When installing a heating system ourselves, among other issues, we need to decide at what distance from the wall to hang the radiator. Although this aspect may not seem important enough to some, in fact, the efficiency of the system largely depends on compliance with the installation parameters.
In our article we will tell you why it is necessary to monitor the distance from the battery to surfaces, and also provide recommendations for installing a radiator on a wall or floor.

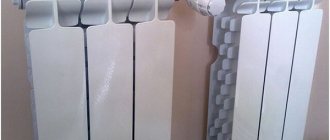
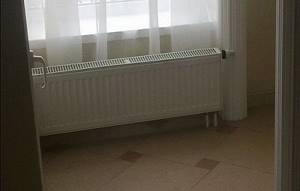
Installing the battery close to each other is not a good idea!
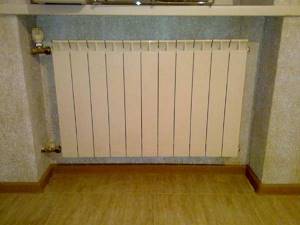
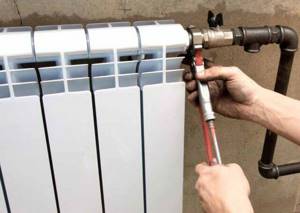
Installation of a heating device
Once we have figured out at what height to hang heating radiators, we can take a closer look at the process of installing them.
During the installation process, do not forget to observe the standardized distances. This is important to take into account at the stage of installing fasteners in the case of using an attachment.
Installation of floor-mounted radiators
Floor heating devices are usually quite heavy and therefore cannot be hung on walls. Most often, such units are made of cast iron, because this material has good heat capacity. The device has removable or stationary legs that are fixed to the floor. When attaching the legs to the floor covering, take into account what material it is made of. You also need to consider the material of the subfloor. For fixing, depending on the material, wood screws, dowel-nails or fasteners with plastic dowels are used.
DIY installation and connection of heating radiators
To prevent such a heating device from accidentally overturning, it is additionally secured with a wall bracket at the required height. To correctly calculate the installation location of the holder, measure the distance from the floor to the place where it is fixed to the heating structure. After this, the installation locations of fasteners are marked on the wall surface, holes are drilled, fasteners are driven in and the holder is secured.
Wall Battery Installation
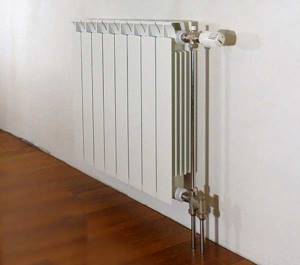
The new heater comes with brackets that secure it to the walls. They are immediately designed for the mass of a radiator made of a certain material. However, if you plan to add additional sections, you will have to purchase additional holders, because the weight of the device will increase. Otherwise, at the most unexpected moment, the unit may collapse and entail pipes, causing depressurization of the system.
Before fixing the radiator to the wall, you need to accurately determine the installation location and maintain all standardized distances from adjacent structures and protruding elements.
To do this, do the following:
- Find the center of the window opening and draw a conventional vertical axis through it. Mark these places on the wall surface under the window to make it easier to align the central axis of the device and the window.
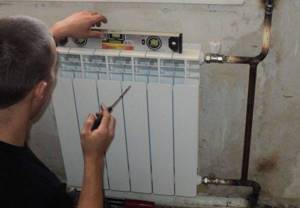
- We measure the distance from the bottom edge of the radiator to the top surface and add 120 mm to this number. We set this size aside from the floor upwards and draw a horizontal line. Moreover, its horizontalness must be checked using a level, since the efficiency of coolant circulation in the battery depends on this.
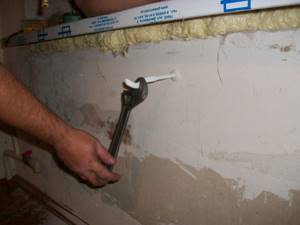
- We measure the distance between the places for fasteners on the battery and divide it by two. We set aside the resulting value in each direction from the vertical axis on the wall. In other words, we put points on a horizontal line at the places where the brackets are installed and drill holes there. For work we use a hammer drill with a pobedit drill. We drive dowels into the holes and secure the holders with self-tapping screws.
Radiators can only be mounted on walls made of durable materials - brick, concrete. In loose porous bases, the brackets cannot be securely fixed. This applies to walls made of aerated concrete or plasterboard. In this case, it is worthwhile to provide in advance for the wall design additional load-bearing profiles to which the holders will be attached.
Installation method
Wall option
When doing installation work yourself, it is much easier to mount the battery on the wall. This task is less labor-intensive compared to floor installation, but all operations must be performed very efficiently.

Photo of the foil thermal insulation layer behind the heating device
The installation process itself includes the following steps:
| Installation of fasteners |
|
| Radiator installation |
|
| Work stage | Operations Performed |
| Site preparation |
|
| Marking | We apply markings to the surface for installing the battery (in principle, this should be taken into account when purchasing a radiator, but duplication here would also be useful): |
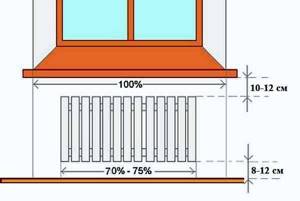
- From the floor to the bottom edge - 80-100 mm.
- From the top edge to the window sill - 80 - 100 mm.
- The width is no more than 80% of the window width.
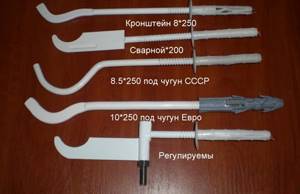
Most commonly used brackets
As you can see, the instructions are not complicated, but you need to control the quality of the work at every stage.
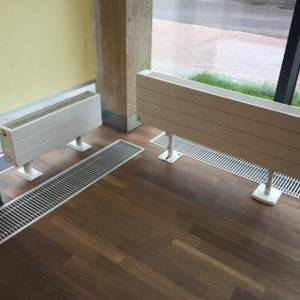
Floor option
Sometimes the battery turns out to be too heavy to hang on the wall - there is a risk that the material simply will not hold up. In this case, installation is carried out using floor brackets. Yes, the price of such products will be slightly higher than that of wall mounts, however, the margin of safety is incomparable.
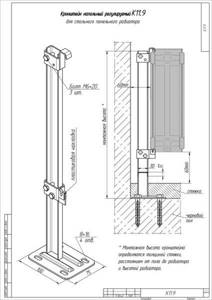
Floor Bracket Drawing with Mounting Diagram
The installation process itself involves the following steps:
- We select a pair of brackets whose load-bearing capacity is sufficient to support the weight of the battery.
- We install racks on the base of the floor, which we fix with anchors. We select the distance from the wall so that the minimum gap between it and the mounted radiator is 60 mm.
Advice! It is better to mount the floor brackets before pouring the screed - this way we can disguise the attachment point.
- We fill the screed, hiding the bases of the brackets and the caps of the mounting anchors.
- We put hooks on the racks, set them to the desired height and secure them with bolts. If the product package includes this, we install metal gaskets that will protect the radiator material at the point of contact with the hook.
- We hang the radiator on the hooks, which we then carefully level.
Despite the great complexity of implementation, this system has obvious advantages: the load from the battery is transferred not to the wall, but to the floor, so the risk of loosening the fasteners will be minimal.
Physics. 6-7 grade. Why are steam heating radiators located below the windows?
For proper air circulation. Warm air rises, and cold air falls down, where it is heated by the heating radiator. For the same reason, pots on the stove are heated from below...
Cold air from the window falls onto the radiator, warms up and rises, making the room warm. If there was no radiator under the window, the cold air would fall to the floor and it would be cold on your feet)
This is convection. A type of heat transfer in which energy is transferred by jets of gas and liquid. Warm, denser layers of liquid or gas are displaced by denser, colder ones. The radiator warms the air below so that it can then rise to the top. If the radiator was placed at the top, then the heavy cold air would not warm up and the room would be cold.
Recommendations for placing radiators
The efficiency of a radiator depends on its location.
Experts pay great attention to the correct location of heating devices. In this case, the room will be heated with the greatest efficiency.
Basic recommendations for choosing a location for installing batteries:
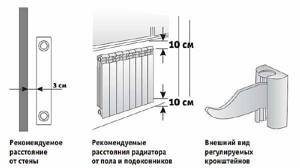
- For high-quality air circulation near the battery, it is necessary to maintain a distance of 3-4 cm between the thermal insulation layer and the heating device. When this gap decreases, air exchange becomes difficult and the efficiency of the system decreases.
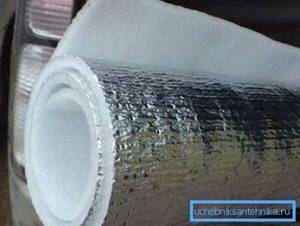
- If it is impossible to create insulation, the inner surface of the wall is covered with a layer of foil. It serves as a heat reflector that directs flows into the room.
- When installing batteries under the window sill, a gap of up to 10 cm must be maintained between the radiator and the floor. The distance from the radiator to the window sill must be at least 8 cm. This is due to the fact that the board is an obstacle when warm air rises upward.
- If the house has large windows, batteries 30 cm high are used. Then condensation will not form on the glass.
- The radiator is installed at an angle of 90°. If there is a deviation from the norm, air will accumulate and corrosion will form.
- The battery should be installed exactly in the middle of the window. Then it will cut off cold air flows and will not allow them to penetrate into the room.
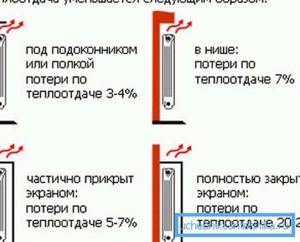
For decorative purposes, radiators can be protected with special screens. They must block the radiator, therefore they reduce the efficiency of the system, since they prevent the flow of thermal energy into the room. For this reason, it is important to pay special attention to the choice of decorative grilles for batteries.
Obstacles to room heating
Effective heat transfer is also affected by barriers that we ourselves create. This includes long curtains (70% of heat loss), protruding window sills (10%) and decorative grilles. Thick floor-length curtains prevent air circulation in the room - you simply heat the window and the flowers on the windowsill. The same effect, but with less consequences, is created by a window sill that completely covers the battery on top. A dense decorative screen (especially with a top panel) and placement of the battery in a niche reduce the efficiency of the radiator by 20%.
The installation of heating devices in private houses is in many cases done by hand, but not all developers know what distance between the wall and the radiator is considered the most optimal
The thermal output of the battery will actually depend on this indicator, so during the work you should pay close attention to this
How to find out the required distance
Many construction works carried out in residential premises are regulated by rules and building codes (SNiPs). There is also a SNiP for the installation of heating batteries.
From it it is possible not only to determine what distance between the radiator and the wall needs to be maintained, but also other parameters for its installation:
- place the device under the windows so that the radiators and the centers of the opening coincide,
- the width of the heating device should not be more than 70% of the width of the window sill niche, if any,
- the distance to the floor should not be more than 12 cm, to the window sill - 5 cm,
- the distance to the wall is within 2-5 cm.
There are a couple of parameters that affect the selection of the optimal gap. Much more often it is affected by the material of the walls of the house and the size of the window sills. In some rooms it is possible to notice an unsightly picture, while the batteries significantly maintain its limits.
Note! A significant reduction in the gap between the system devices and the heating wall is facilitated by additional treatment of the surface of vertical structures with special heat-reflecting materials, the price of which is affordable. These include foil insulation or aluminum foil screens.
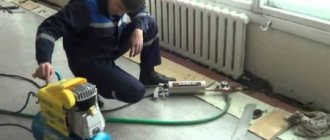
Carrying out installation work
Before carrying out installation work, and when choosing at what distance from the floor and wall the heater will be installed, it is necessary to stick aluminum foil on the wall in the approximate location of the device to increase heat transfer and efficiency (efficiency factor). After which you can mark the fasteners.
You should know that there are several options for connecting radiators to the heating system, some of which you can see from the table diagram.
A medium-sized radiator is hung on 2 brackets
When hanging the radiator, you should check all planes, since the heat transfer of the device depends on maintaining the vertical and horizontal position of the heater.
For medium-sized heaters, install 2 brackets so that they fit between the outer sections; if the radiator is large, then install an additional hook strictly in the middle opening of the radiator. To learn how to hang a radiator, watch this video:
https://youtube.com/watch?v=3BaaUUG4JZE
Bypass will allow you to regulate heat
When connecting radiators, there are also a number of features and requirements that must be observed. One of these requirements includes the rule of installing a jumper (bypass) between pipes in a single-pipe distribution system, which will make it possible to independently regulate the required amount of heat in the room. The main advantage of the bypass is that the base for its installation does not need to be legalized, and the installation process can be done independently.
To summarize the article, it should be said that choosing and installing a heating radiator is not an easy task.
All measures, requirements and recommendations for the installation of heating elements of a heating system specified in the article can serve every owner who is planning to install radiators on their own and organize a heating system in their house or apartment.
When installing or reconstructing a heating system, replacement or installation of batteries is often required. Installation of heating radiators can be done on your own, without resorting to the help of specialists, but only by strictly observing the requirements of SNiP. When performing work, both theoretical knowledge and practical experience will be required, because even the slightest mistake can lead to problems during operation of the heating system.

Radiator battery installation
How to hang a radiator correctly
It is important that heating devices are installed on a flat wall. To make the work easier, you need to find the middle of the opening and draw a horizontal line 10-12 cm below the window sill. This line is needed to align the upper edge of the battery along it.
The brackets are installed taking into account this line, so that after mounting the radiator is positioned horizontally. But this provision is applicable for the circular movement of the coolant using pumping equipment.
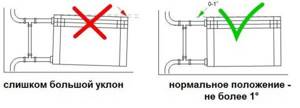
In systems with circulation without the use of additional devices, it is necessary to create a slope of 1-1.5% in the direction of the coolant movement.
Installing a heating radiator
Before starting work, consider some nuances:
Before replacing the battery, the water should be turned off only in the customer’s apartment, and not in the entire house.
Only housing office employees who have the appropriate qualifications for this should shut off the water. Even if you replace the battery yourself, entrust this task to specialists. Otherwise, you risk leaving all residents whose apartments are located along the riser without water supply.
Battery replacement, ideally, should also be carried out by housing office employees or workers specially hired for this. If the customer carried out the removal and installation independently, then all responsibility for the serviceability of the system falls on him.
Installation and replacement of the battery when using the pipe bending method and gas welding, instead of the usual installation system, must also be carried out by workers who have certain qualifications to carry out work at an increased level of safety.
How to install heating radiators correctly according to norms and regulations (SNiP) – Stroim24.info
When installing or reconstructing a heating system, replacement or installation of batteries is often required.
Installation of heating radiators can be done on your own, without resorting to the help of specialists, but only by strictly observing the requirements of SNiP.
When performing work, both theoretical knowledge and practical experience will be required, because even the slightest mistake can lead to problems during operation of the heating system.
Radiator battery installation
Subtleties of attaching to the wall
Each battery manufacturer provides its own instructions, which outline requirements and installation tips. But one requirement is the same: the radiator should be mounted on a pre-leveled and cleaned wall.
Wall mount
Correct fastening of the brackets affects the efficiency of the heating system.
Too much slope or skew in any direction can lead to incomplete heating of the battery, to eliminate which you will have to re-hang the device.
Therefore, when preparing the surface and making markings, the vertical and horizontal positions should be strictly observed. The battery must be hung evenly relative to all planes.
It is allowed to lift it by 1 cm from the side where the air vent is installed, which will cause air to accumulate in this area and make it easier to remove. Sloping in the opposite direction is not allowed.
When installing bimetallic radiators and other types of batteries with low mass, hanging should be done on a pair of hooks located on top. If the length of the device is short, they should be placed between the last two sections. The location of the third bracket must be selected in the middle from the bottom. The hooks can be sealed with mortar after installation.
Hooks for fastening aluminum and bimetallic sections
When placing the brackets yourself, holes are drilled at the designated points and wooden plugs or dowels are installed. The holders are fastened with self-tapping screws with a length of 35 mm and a diameter of at least 6 mm. Such requirements are standard; the norm for a specific battery model is indicated in the technical data sheet.
Panel radiators are installed a little differently. Such devices are supplied with special fastening elements, the number of which depends on the size of the device.
To hang the heating radiator on its rear surface there are special brackets. To install fasteners, you need to know the distance from the center of the battery to the brackets and transfer it as marks on the wall. Next, applying fasteners, holes for dowels are marked. The steps are simple: drilling, installing dowels, securing the brackets with self-tapping screws.
Features of installing radiators in an apartment
The considered rules for self-installation allow you to connect batteries in autonomous and centralized heating systems.
Before replacing or installing batteries, it should be taken into account that the work must be carried out after obtaining permission from the operating or management company - the heating system is considered community property. A significant change in network characteristics leads to system imbalance.
Bypass installation
Installing heating radiators in an apartment has another feature.
Vertical single-pipe distribution requires the installation of a bypass - a special jumper between the supply pipe and the return pipe.
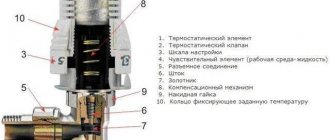
A bypass will also be required when installing a battery with a thermostat.
Conclusion on the topic
The process of installing heating batteries, if you follow the instructions outlined in the article, should not raise any additional questions. With proper preparation, compliance with the sequence of work and a responsible attitude, the system will effectively serve for several decades.
on this topic:
Recommendations for installation and operation of radiators
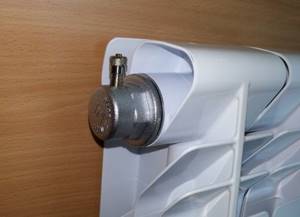
In order for the radiator to warm up well, air is removed from it through the Mayevsky tap.
The efficiency of heating and the service life of the heating system depend on the correct installation of the battery. There are a number of recommendations that you should use during installation:
- It is recommended to lubricate the gaskets with silicone sealant before installation. This is an optional step, but it will help protect the joints.
- Do not open the valves suddenly when filling the heating battery with liquid. Otherwise, water hammer may occur, which will damage the system.
- If thermostatic valves are installed in a single-pipe system, a bypass must be installed. Without it, the entire riser will be regulated, for which the owner may be fined. Ball valves are placed in front of the valves, allowing the supply and return to be shut off.
- If the radiator has more than 12 sections with a one-sided lateral connection, place the flow guide at a length equal to two-thirds of the battery (it is better to do it up to the last section). This will allow the radiator to fully warm up.
- If the radiator fills with water, it is necessary to bleed air from it. If this is not done, the device will not warm up. The air is removed every year at the beginning of the heating season.
After installing the radiator, pipes are connected to it. They are selected in advance by material, cross-section and length.
Types of heating radiators for an apartment or private house
The first thing you should decide on before installing a heating radiator in an apartment is the choice of the type of this device.
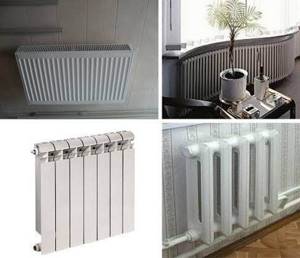
The following types of heating batteries and radiators are widely represented on the modern market:
- cast iron;
- aluminum;
- bimetallic;
- steel;
- copper;
- plastic.
Each of these varieties has its own advantages and disadvantages that you need to know in order to make the right choice. For example, cast iron batteries, which were widely used back in Soviet times, are characterized by a long service life and undemanding quality of coolant - the water in them can even be rusty or contain a large number of impurities. At the same time, due to the low thermal conductivity of cast iron, the fuel costs for heating such devices are quite high. Another disadvantage is the unaesthetic appearance of cast iron batteries, so nowadays they are not used so often.
Aluminum, steel, bimetallic and copper radiators have excellent thermal conductivity and an impressive appearance. At the same time, they also have disadvantages. For example, the disadvantage of aluminum batteries is their high sensitivity to water purity and instability to high coolant pressure. Bimetallic devices are somewhat more durable in this regard. Copper radiators are the most durable and most efficient in terms of heating, but at the same time they are also the most expensive.
As for plastic radiators, this is the most economical option, they are light in weight and easy to install, but they cannot be heated above 80 °C.
Pipeline requirements
The prescribed standards allow the use of various pipes and pipe fittings that are not prohibited in construction. It is recommended to use products from the same manufacturer and try to avoid direct transitions between polymer and steel pipes.
You cannot lay the pipeline in an uninsulated attic or underground space if the temperature in them can drop below -20 degrees. However, it is permitted to install an expansion tank made of non-combustible materials in the attic.
Pipes must be positioned in such a way that they remain accessible for maintenance and repair. Bricking them into floor and wall structures is permitted only in cases where the operational warranty period exceeds 40 years.
When carrying out hidden installation, it is necessary to provide for the presence of hatches at the connection points. It is recommended to leave polymer pipes open in places where they are not exposed to UV radiation, mechanical damage and other influences. It is impossible to lay lines through partition surfaces without installing non-flammable protective sleeves.
Connection diagrams
Before installing a heating radiator yourself, decide on the method of connecting it to the network. The most commonly used schemes are:
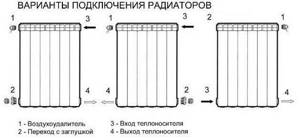
- Lateral (one-sided) installation scheme for heating radiators, in which the pipe supplying hot coolant is connected to the upper pipe of the heating device. The outlet pipe is connected to the bottom one. This ensures high heat transfer. When connecting the other way around, when the supply pipe is connected from below and the outlet pipe from above, the heat transfer is significantly reduced. Such a connection in a one-pipe system requires the installation of a jumper to facilitate the operation of the system.
- The second, diagonal connection of the heating radiator is as follows. The pipe supplying hot coolant is connected to the upper branch pipe of the battery, and the “return” is connected below, on the opposite side of the heating device. This connection is advisable if the battery is long and has a large number of sections. The diagonal design guarantees maximum heat transfer. But if the supply pipe is connected from below and the outlet pipe from above, the heat transfer will decrease by 6-10%.
- The last method - connecting heating radiators from below - is used when the consumer wants to hide heating pipes in the wall, in the floor or near its surface. With it, the forward and return pipes are connected from the bottom of the radiator, but from different sides. This connection scheme (otherwise called “Leningradka”) is characterized by aesthetics, as well as low heat transfer. Heat loss is up to 15%.
You can ask the specialists how much it costs to install a heating radiator, and perhaps agree to their services. Experienced craftsmen will tell you which connection scheme to choose and what auxiliary elements will be needed for installation.
Installation procedure
When installing heating devices with your own hands, you need to do everything correctly, taking into account every little detail.
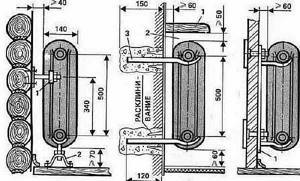
Professionals recommend using at least three reliable mounts when placing radiators, two of which are located at the top and one at the bottom. Sectional batteries of any type are hung on anchors with an upper collector. That is, the upper fastenings withstand the main load, and the lower ones are used for fixation.
When installing heating devices, it is necessary to follow a certain sequence of actions:
- Marking and installing support fasteners in the wall.
- Complete set of radiators with necessary elements:
- in modern systems, the mandatory installation of an air vent is required, regardless of the design option - manual or automatic; it is mounted in the upper manifold, where the supply pipe is connected, having previously been screwed into the adapter;
- unused parts are closed with plugs;
- If the diameters of the collector and pipes do not match, adapters supplied with the product are installed.
- Installation of fittings that block access to the coolant and regulate its supply and other parameters:
- Regardless of the connection scheme, it is necessary to place ball valves at the outlet and inlet of the device, which act as fittings that shut off the water; if it is necessary to repair the radiator during the heating season, they are blocked, the device is removed, and after maintenance is performed, it is installed in place; however, to carry out this operation, it is necessary to have a bypass connecting the forward and return pipe connections;
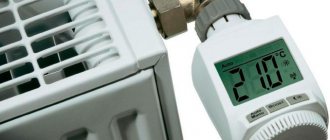
- to maintain a comfortable temperature in the room, thermostats are installed on the battery, which can be manual or automatic; they are not required devices.
- When installing heating devices on brackets, there is no need to remove the film on them, which will protect the elements from dirt until all work is completed. You can remove this thin layer only in those areas where you need to connect something.
- Depending on the type of cylindrical products, the connection to the radiator of the inlet and outlet pipelines can be made by threading, press-fitting, crimping or welding. The connection method will be determined in accordance with the adopted connection diagram.
- After the final installation of the entire system, it is pressure tested under pressure that exceeds the working one to determine the tightness of the structure, the quality of installation and to identify and then eliminate any malfunctions if necessary.
The technology for installing heating radiators is described here in as much detail as possible. To carry out this work yourself, you need to consider some points in more detail.
Distance from the floor to the radiator and battery: SNiP standards from window sills
› Construction › House
05.12.2018
Ensuring a comfortable temperature for people living in a private house or apartment in winter is a priority task for every owner.
When organizing individual heating or heat supply in an apartment building, all elements are important, starting with what should be the distance from the floor to the heating radiator, and ending with the fluid pressure in the system.
Before starting work, you should study the building codes and regulations (SNiP) relating to the organization of heat supply, and also find out at what distance experts recommend hanging the heating device.
Standards
SNiP standards are advisory in nature, but when replacing batteries in an apartment in an apartment building with a central heating system, their implementation is mandatory. This is due to the fact that when designing the house, all the conditions for its further maintenance were taken into account, including, among other things, economical heat supply.
According to established standards, a brick or panel house requires the following:
- The distance from the floor to the battery or radiator should be within 80–140 mm. A smaller installation height will make it impossible to carry out wet cleaning under the device and will provoke the accumulation of dust that is undesirable for human health; a larger one will reduce the useful heating zone.
- The distance between the battery and the window sills should be 100–120 mm. If the distance from the radiator to the window sill is reduced, the conversion of air masses will decrease and the efficiency of the heating battery will decrease.
- Installing heating radiators from the wall more than 30–50 mm is not recommended due to the fact that, as in the previous case, the conversion is reduced and the accumulation of dirt is provoked with minimal possibilities for its elimination.
The radiator must be hung above the floor exactly in the center of the window opening. This will ensure the creation of a heat shield in the area of the glass filling of the window, while maintaining the aesthetic appearance of the room.
Connection diagrams
Several schemes for connecting radiators into a single thermal system have been developed and are used. They are presented in the following types:
- maximum thermal output occurs with a lateral connection, which involves installing the input in the upper sector of the battery, the output is at the bottom on the same side;
- if the heat sink is of significant size, the best option is considered to be a diagonal connection, where water enters through the upper pipe and is discharged through the lower one, on the opposite side;
- When installing hot water supply pipes hidden under the floor surface, a bottom connection scheme is used, popularly called “Leningradka”.
If the heat supply pipes are placed in a rough screed, then significant heat losses should be expected due to contact with the concrete and the ceiling of the lower floor.
Types of heating batteries
The efficiency of heating a room will depend not only on how far from the floor the radiator or radiator is hung, but also on their connection diagram, the material and design of the heating devices themselves. The following models are available on the market today:
- Cast iron batteries. The adult generation probably knows them firsthand. During the Soviet Union, only these models were used in heating systems. Today they have a more presentable appearance. They are characterized by a high level of heat capacity, long-term heat transfer, absence of consequences from water hammer, and they also have an increased service life.
- Steel radiators. They have low heat transfer rates - heating occurs quickly, but they cool down no less quickly. The welded structure is sensitive to hydraulic shock. There is no way to add sections yourself. At the same time, the weight of the product and ease of installation attract many homeowners. Products of the German brand “Kermi” are in particular demand.
- Aluminum radiators. They are characterized by low weight, beautiful shape, and increased thermal output. They are presented on the market in two versions, where in the first the design consists of one monoblock, with a volume that provides different powers, in the second - a stacked sectional one.
- Bimetallic batteries. The innovative design of the placement of heating collectors made it possible to achieve the level of heat transfer of aluminum models, as well as the strength and reliability of their cast iron counterparts.
The radiators purchased must meet GOST standards. They check compliance by reading the documents for the goods in the store. Their absence may serve as a reason for refusing to purchase a product at this outlet.
How do the gaps between the heating radiator and the wall affect
The designated set of rules according to SNiP 2.04.05-91 are not just approved parameters for installing a heating battery. Fixed figures allow you to reduce unexpected heating costs, for example in an apartment building.
The justification for compliance with the standards is that the external walls of residential buildings are in constant contact with the environment.
Depending on the outside air temperature, the building can cool significantly. For example, most high-rise buildings are built of concrete, which due to its physical characteristics does not allow heat to be retained indoors.
Fastening and installation
It follows from this that if the heating battery is attached directly to the inner wall of the supporting structure, then most of the heat will be directed precisely to it, and not to heating the air. By making a small distance from the wall to the heating radiator, a kind of air insulation is created, thereby reducing unnecessary costs. According to this principle, it is necessary to install all devices indoors.
What distance from the wall to the battery or radiator is provided if the window sill protrudes significantly in relation to the wall is indicated in the standards. The distance between the radiator and the window opening should not exceed 3/4, since the heating of the air in the apartment will be significantly reduced.
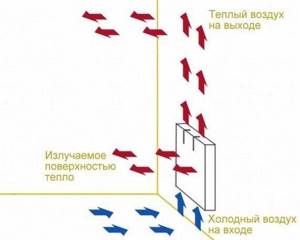
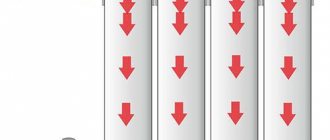
Indoor air movement pattern
What to consider when installing other than distance
Taking into account the indicated norms and rules for installing a heating system, it is necessary to concentrate on such recommendations. In order to avoid unreasonable costs, as well as to ensure that heat is retained in a private house or apartment, you should select heating devices based on the following criteria:
- place of residence, namely the climatic conditions of the region;
- existing heating system wiring;
- method of fastening heating sections;
- temperature indicators in the heating system itself;
- you need to take into account what material the incoming pipes and the pipeline connected to the apartment are made of;
- location of living quarters in the building itself;
- choice of regulatory elements.
Under the window
After analyzing all the options, you can proceed directly to the selection of batteries that will be installed, for example, in a private house, apartment buildings and other premises.
Calculation of the required number of radiator sections
With a ceiling height of 2.6 - 2.7 m, the method of calculating the number of sections based on the quadrature of the room is suitable.
Procedure:
- Find out the total area (from the documents for the apartment, or by multiplying the length and height). Let's assume this is a three-room apartment 56.5 m2.
- This data is multiplied by 100 W. (56 x 100 = 5600 W, or 5.6 kW). We received a total amount of heat sufficient to heat this apartment.
- According to the accompanying documents for the radiator, it is determined how many watts of energy one section can produce. Let's say for the aluminum A500 it is 185 W.
- Next, the total amount of heat must be divided by the energy of one section: 5600: 185 = 30.3. It is always recommended to round up, so to heat a three-room apartment with an area of 56 square meters. m, you will need 31 sections of A500 aluminum radiators.

Radiators after installation Of course, this method of calculation is ideal under ideal conditions.
If the apartment is well ventilated or has regular wooden frames, the heating output may not be enough. It is also better to make additional sections for corner housing and on the first and last floors. If you decide to install a larger number of sections than before, you need to remember that long radiators may not heat up effectively when connected from the side. You can improve performance by installing a water flow extension.
Types of heating radiators
To equip your home, you can choose different models of heating devices - you can have an aluminum radiator, an electric wall heater or a cast iron radiator made of several sections. The question is whether such a battery can effectively heat a room that has large windows.
Building codes regulate at what distance the battery must be placed under the window. But at the same time, these standards do not indicate which batteries should be hung under stained glass windows or under panoramic structures. The fact is that modern technologies offer several options for organizing heating in an apartment. Including in such a non-standard situation as installing a heating radiator under a panoramic window, to the entire height of the room.
Depending on the material of manufacture, the following can be selected for installation in a central or autonomous heating system:
- cast iron sectional batteries;
- aluminum radiators;
- bimetallic radiators;
- steel models;
- radiators made of copper.
In this place you can also place convectors for connecting to the electrical network in a wall position or install them in the floor under a decorative cover.
Heating devices can be:
- in the form of full-size radiators;
- low radiators for panoramic windows;
- floor batteries;
- copper batteries for installation in the baseboard;
- convectors for panoramic windows for placement in the floor.
GOST and SNiP requirements

Correct distance from the floor to the radiator and window sill
Depending on the type of window, the distance from the window sill to the floor may vary. But GOST sets the coefficient at which heat is best retained in the room. It is 0.55 W/°C sq.m. For better effect, use plates with low thermal conductivity. Also, during installation, you need to figure out whether the window sill should cover the battery.
The provisions of SNiP regulate the following values for the distance of the battery to the window sill:
- The window sill must have a slope of at least 1°.
- There must be a layer of thermal insulation between the battery and the wall. It will protect the house from heat loss and extend the life of the heating system.
- The battery should have a protrusion compared to the window sill.
- All window sills must be located at the same level. The distance from the floor to the radiator depends on the shape and size of the device.
- The maximum length of the window sill is 3 meters.
- There must be at least 8 cm of clearance between the battery and the window sill.
The installation standards for heating radiators must be observed to ensure good heat retention in the house. If the distance between the window and the floor is insufficient, a low radiator with an increased number of sections should be installed. Then heat loss will be reduced.
Types of radiators
Cast iron

Installation diagrams The service life of such sections is 25–50 years. The disadvantages of this type are significant weight, so it cannot be installed on walls made of gypsum plasterboard and wood.
Made of aluminum
The appearance of the presented heating batteries is practically no different from cast iron ones, but one of the advantages is the light weight of the section (only 1 kg). Due to their low weight, aluminum radiators can be installed on any smooth surface. As for the disadvantages, this is sensitivity to the mineral composition of running water, as well as to possible pressure surges directly in the pipeline.
In the living room
Bimetallic
This type of battery is a good option for a room heating system. This is due to the fact that such material is not affected by the composition of the water, and it is also resistant to pressure drops in the system. Bimetallic batteries heat up quickly enough and, when installed correctly, perfectly heat the air in the apartment.
Steel
Most of the designated heating radiators have a relief surface, since spot welding is done directly between the channels. Today, many manufacturers make steel batteries with a smooth front panel. The advantage is excellent heat dissipation, as well as ease of connection.
In the apartment
Vacuum
Innovative heating systems represented by vacuum radiators are not entirely in demand, as they have many disadvantages. Among them are the following:
- They heat up quickly enough, but heat the room much longer. This is due to the fact that the lithium-bromine solution located inside the sections boils at a temperature of 35 °C.
- They cool down quickly when compared to a heating radiator made of cast iron.
- Quite fragile, as they are made of one and a half millimeter carbon steel.
- If a section is damaged, the special solution inside may leak.
Installation diagram
Bottom connection
How to properly install a radiator with a wall mounting option
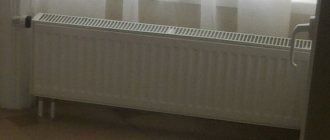
Mounting a battery with wall mounting is easier than with a floor-mounted version. Here it is important to know not only the size of the gap to the wall, but also the height of the heating radiators from the floor.
Installation steps for wall mounting:
- They start by preparing the attachment site. Wall-mounted radiators are usually placed under window sills or attached to walls away from the front door in order to rationally distribute the heat flow. First, the heating circuit pipe is brought to the radiator installation site. The wall behind the radiator is covered with foil insulation. It will reflect heat back into the room.
- It is necessary to make preliminary markings where the radiator will be mounted. The following parameters are maintained: the distance from the floor to the radiator (bottom edge) and from the top edge of the radiator to the window sill is from 8 to 10 cm, but the width of the heating device itself should be 80 percent of the size of the window opening.
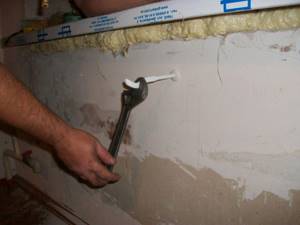
- Then, using dowels, with a depth of at least 6 cm into the wall, fasteners are installed according to the marked marks.
- The radiator is placed on the brackets, fixed and leveled.
- The last point is connecting to the pipes. You can do a test run of the system to check the tightness of all connections.
Advice. Horizontal alignment of the radiator is a very important point during installation. If this is not done, air will accumulate in the radiator. And this will lead not only to a decrease in energy efficiency, but also to corrosion of the device.
When using the wall mounting method under the windows, one more condition is observed: the centers of the radiator and the window opening must coincide. Mounting systems vary in design (for example, the shape of the hangers), but they have the same task: to securely mount the radiator on the wall. Most often, fasteners are included with heating devices, and instructions are attached to them.
The entire installation process is not complicated, you just need to approach each stage responsibly.
Radiator selection
There is a wide range of radiators on the market today, designed for different buyers. The principle “the more expensive the better” does not always work here. You need to make your choice based on the following reasons:
- place of residence;
- heating system wiring;
- on how the heating radiators will need to be installed;
- temperature conditions in the heating system;
- accounting for what material was used in the production of pipes;
- the need for control elements and fittings;
- location of the premises in the building.
Having completed this analysis, you can proceed to choosing a battery.
Today, cast iron radiators can look quite presentable; they can be decorated. Thus, they can easily fit into the overall design of the room.
Cast iron radiators of the modern type are no longer the huge accordions that were in the Soviet apartment, but flat panels with smoothed corners and a presentable appearance. Having good physical heating properties, cast iron retains heat for a long time and gradually releases it into the room. Such radiators have a long service life, 20-50 years. The main disadvantage is their large weight (one section weighs about 8 kg), so it is impossible to install them correctly in rooms where the walls are made of wood or plasterboard. Having a rough surface, they are not very easy to clean.
Aluminum radiators differ little in design from cast iron ones; the only difference is the weight of the sections (1 kg). Also, such devices have good heat transfer properties, a smooth surface, ventilation windows evenly distribute air in the room, and they can be attached to any surface. The main disadvantage is the easy perception of the chemical composition of water and pressure surges in the pipeline.
Bimetallic radiators are a compromise solution between cast iron and aluminum. Externally they are almost no different from aluminum ones, but are not sensitive to the composition of water and pressure surges. They have good heat transfer performance, are easy to install and are inexpensive.
Steel radiators have a panel appearance and a relief surface. They have various connection options and good thermal properties. No major deficiencies were identified.
#5 Choose a manufacturer at random
Apartment owners devote most of their efforts to searching for a high-quality radiator, but do not worry about component manufacturers. You should opt for more expensive parts.
For installation you will need:
- 1-2 taps for connecting to the heating system;
- coupling for connecting two sections of pipeline;
- 2-4 through plugs;
- stub;
- air vent;
- brackets.
When choosing parts, you need to pay attention to the smallest nuances: the number of turns on the thread, the quality of plastic and brass, the presence or absence of a retaining ring. The collapsible connection differs from more expensive manufacturers by a paronite gasket with a large contact area and a thick brass nut.