The key to the pleasure you get in a bathhouse is always thoroughly warming it up to the desired temperature. Otherwise, the procedure itself loses all meaning, wouldn’t you agree? The entire load for this part falls on the oven, which must be properly prepared. You can, of course, save yourself the headache about this and turn to specialists. Or you can put in a minimum of effort, but as a reward you will receive a well-prepared oven and a significant amount of savings. How to make a sauna stove from a pipe with your own hands? In fact, using such material as a source allows you to reduce time costs to a minimum - and not at all to the detriment of the final result. The main thing is the availability of the necessary materials and a drawing, according to which you can successfully implement the plan and avoid mistakes that undermine safety.
Vertical or horizontal format?

One of the key issues that you will have to decide if you intend to make a sauna stove from a pipe. Of course, it directly depends on the size of the steam room.
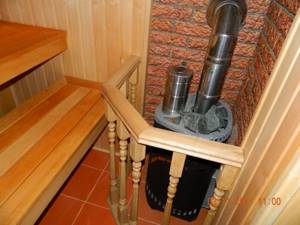
Vertical - ideal for small spaces. The grate bars and the direct firebox are placed in steps, one above the other, which ultimately allows you to save useful space around. The use of this format has recently become noticeably more frequent, especially among professionals. It is better to avoid disputes about which stove is best suited for a bath: make a decision based on your specific situation.
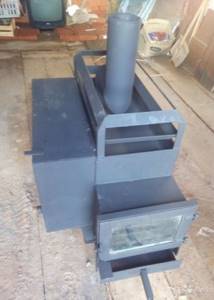
Horizontal is a solution that fits well into the format of spacious bath rooms. At the same time, this is the classic version that is used almost everywhere. Characterized by a slightly enlarged firebox compartment. Often, for practicality, part of it goes into the dressing room, which allows you to speed up the sometimes rather tedious process of kindling.
Agree that it is much more convenient to regulate the temperature from it without wasting time moving from one room to another. In addition, during such “raids” the air actively circulates throughout the bathhouse and prevents its full heating.
What is
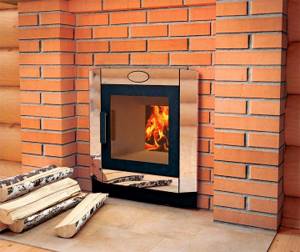
A sauna without a stove is not a sauna! This is not just a heating device, it is the soul of the bathhouse. The speed of heating the house and heater, the microclimate in the steam room and your mood depend on the correctly selected stove.

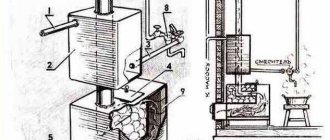
We have all seen – some with our own eyes, some in films – the famous “potbelly stove”. A stove made from a pipe is very similar, but the version for a bathhouse differs in design - such a unit should have a heater and, possibly, a tank for heating water. All other elements are the same as other stoves: body, ash pan, firebox with grates, pipe.
Preparing the foundation
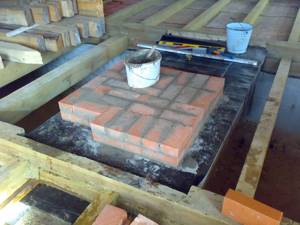
- in the place where you plan to place the stove, make a hole 0.5 meters deep, the length and width can be increased to 0.7 meters;
- approximately 0.3 meters high, fill the prepared hole with very fine crushed stone and carry out thorough compaction;
- prepare a cement composition based on cement-sand in a ratio of 1 to 4, dilute the mixture with water and pour it onto the crushed stone;
- within 24 hours the base will dry and become hard - place several sheets of roofing material on top for reliable protection from moisture;
- prepare a concrete composition of cement, sand, fine gravel and water in a ratio of 1:2:4 and pour it onto the roofing material;
- carefully level the base using a building level;
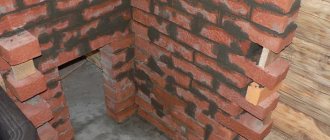
- after drying, make a brick platform approximately 0.7 meters in width and height;
- also arrange a protective brick screen up to 1.2 meters high - in the future the stove will be located in close proximity to it, approximately at a distance of 0.2 meters.
How to build a stove with an open heater in a bathhouse
The design of a stove with an open type of heater is simple to implement. Its dimensions are 102 by 62 cm. This is enough to obtain a functional family steam room with steam and heat in nine square meters of bathhouse.
In this embodiment, lining is not performed, so the stove is built from high-quality M150 brick, achieving very thin seams.
This option is not expensive, but also short-lived - the seams are restored every two years, lubricating them with fresh mortar. The stones are placed on a slab located above the furnace firebox. The stove can be metal or cast iron.
This furnace has two design options:
- with a remote container or located at the top;
- with water heating from a pipe laid through the firebox.
Each construction process begins with preparatory work.
Since a brick stove weighs more than 500 kilograms, and during its operation the bathhouse floor may sag, it is necessary to build a foundation for the device.
Foundation
Step-by-step instructions for constructing a foundation for a furnace:
- Knowing the dimensions of the oven, they draw markings on the ground with a margin of half a brick.
- Dig a pit with a depth of 0.5 to one meter.
- Avoid being too close to the base of the bathhouse itself. If the ground moves, friction will become a destructive force for the stove and the bathhouse itself. A distance of 5 centimeters is allowed. Upon completion of the work, the gaps are sealed with river sand.
- The bottom of the pit is leveled and compacted.
- The choice of binding solution is dictated by the quality of the soil: if it is dry, then prepare a lime-cement mortar (6:1) with a certain amount of river sand. To prepare a lime binder mixture, sand and lime are mixed (2:1). Cement mortar is made by mixing sand and cement (3:1).
- 10 centimeters of sand and crushed stone are placed alternately at the bottom of the pit. Then they are compacted.
- Waterproofing material is placed on top, placing the film higher on the walls.
- Pour the mixture into the pit and leave until completely hardened. This will take about a week.
- After the surface has hardened, a freshly prepared liquid solution is poured onto it, which will spread strictly horizontally.
The stage of laying the furnace begins after 14 days, when the base of the furnace is completely dry. The solution is prepared from lime, clay and sand (1:1:4).
Building a brick oven with your own hands
The fuel part is lined with refractory bricks and equipped with a grate, the rest is made of ordinary red brick.
The masonry of all sauna stoves has the same technology, but in each case the seams are made responsibly. The tightness of the seams is the key to preventing harmful carbon monoxide from entering the room.
Work order:
- Before laying the furnace, a waterproofing sheet made of roofing material is placed on the prepared base in two layers measuring 5 centimeters larger than the dimensions of the foundation.
- To prevent the brick from drawing moisture out of the binder mixture, it is saturated with water before use, immersed in it for 1-3 minutes.
- Prepare a homogeneous and viscous masonry mortar from sand and clay, taken in equal quantities.
- The mortar is placed on the entire plane of the brick in a thin layer to create a sealed, filled joint of no more than 3 mm. Three-millimeter wire guides between the planes will ensure a high-quality seam. After pressing, the wire is removed and excess mixture is removed from both sides.
- When completing each row of the furnace, check the angle values.
- Bandaging (displacement) of bricks in the next new row is required.
Important! You cannot use heat-resistant and ordinary bricks next to each other, since the different heat capacities of these materials threaten the rapid destruction of the furnace.
Recommendations
Important points:
- Constantly monitor dressing rules.
- The thickness of the solution layer is about 10 mm.
- Seal the seams of the oven to ensure tightness.
- Check the horizontal and vertical levels every two rows.
- It is permissible to use a cement mixture when laying the bottom line; the temperature below is not too high, and the cement will strengthen the structure itself and protect the furnace from moisture.
- After laying two lines, install a blower and continue continuous laying.
- After erecting the walls of the blower, install the door and cover it with a grate, which will be the bottom of the firebox.
- Provide an ash pit (mobile or stationary).
- Build a combustion chamber 0.6 meters high. This is enough to create the highest possible temperature at the top of the flame.
- The required furnace firing depth is 80 cm.
- The dimensions of the space for stone backfill for the bathhouse are determined at the rate of 60 kg for each square meter of the steam room.
At the next stage, the fittings are installed: hinges, grilles, doors. When installing the doors, pieces of two-millimeter wire are placed in the seams. Continue laying from the door.
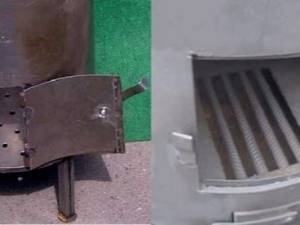
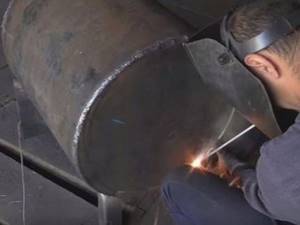
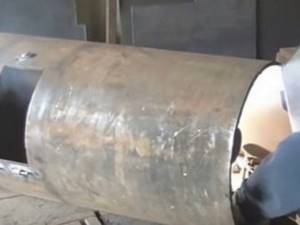
Horizontal oven - step by step
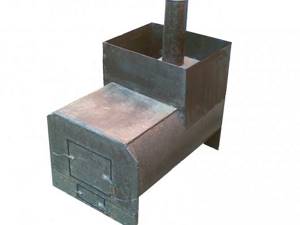
- prepare a working piece of pipe 0.7-0.9 meters long;
- thoroughly clean all edges;
- cut a fragment measuring 0.8 by 0.4 meters from the prepared metal sheet;
- Weld rods horizontally to the opening in the middle, and a grate in the lower part of the pipe;
- make a remote-type firebox from a metal sheet and make cutouts;
- weld this facade to the base pipe;
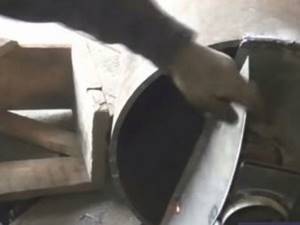
- to decorate the back wall, cut out a circle equal to the diameter of the pipe and weld it to the main structure;
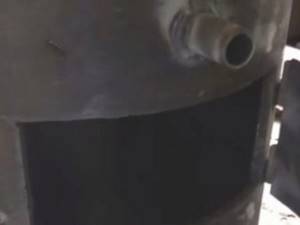
- You can make a hole for the chimney in the upper part - a small size, approximately 0.16x0.16 meters, will be enough;
- weld the main vault and the pipe that will be used as a chimney;
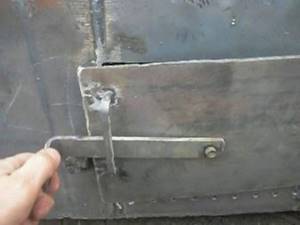
- all that remains is to install the doors for the combustion chamber and the blower;
- finishing comes down to careful sanding of the entire body, and then treating it with durable polymer-based paint.
Here are some drawings and pictures that will help you in making a horizontal type oven.
Making Tips
Before you start assembling a sauna stove with your own hands, take the advice of professionals.
- Try to purchase scraps of spiral pipes; they are more precise, not so elliptical and made from more suitable steel. You can also buy them at the price of scrap metal. You can use seamless pipes, but only for the manufacture of small elements.
- Many people prefer to use rolled stainless steel to assemble the firebox, water tank and chimney. This is a good option, but you must remember that welding work will require the use of stainless steel electrodes or special welding wire.
- During the working process, it is recommended to weld supports to the pipe so that it does not roll and complicate the work.
- When installing a vertical model, it is necessary to leave at least 1/3 of the diameter of the stove opening for smoke to enter the chimney.
- It is recommended to place the external door for stones so that during operation it is directed in the opposite direction from the place where people rest. This will protect bathhouse visitors from being burned by hot steam if moisture gets on the hot stones while maintaining the heat.
Interesting: Interesting projects of brick sauna stoves
- Many craftsmen advise placing the weld under the grate, since the connecting seams are the first to be destroyed under the influence of temperature.
- It is recommended to insulate the outer walls of the chimney with a thick layer of mineral or basalt wool to reduce the likelihood of corrosion inside the structure.
- It is necessary to fill the tank with water in advance of kindling - moisture that gets on the metal surface can cause burns from steam shock.
- For decorative purposes, it is recommended to coat the metal stove with fireproof paint.
- If the stove is covered with paint, then before installation work it is better to heat it in the fresh air. Thus, the excess paint will burn off without causing harm to the human body.
- Cover the stove with a brick screen. This will ensure a more uniform distribution of heated air, and will also protect vacationers from severe burns.
Horizontal oven
When making a horizontal oven with your own hands, the procedure will be as follows:
- Cutting out the firebox using a grinder - part of a pipe of the required format (in strict accordance with the diagram). As a rule, the length of this pipe will be from 0.7 to 0.9 m.
- Manufacturing grate bars from metal frames, as well as reinforcement bars welded parallel to the frame, the distance between which should be about 50 cm.
- The grate bars are strengthened inside the firebox. In the case of using ready-made metal structures, they are folded onto metal corners, previously welded inside.
- A hole is cut from the top, which will subsequently serve as a chimney; its size ranges from 15 to 20 cm. It is best to make a distance of 15 cm from the back wall so that the hot air also takes part in the heat exchange, and is not simply removed as quickly as possible.
Some insist on cutting a hole directly in the very back wall of the pipe, but it is not recommended to do this, since such manipulations subsequently reduce the efficiency of the furnace and increase fuel consumption.
The next step is to cut a sheet of metal of a size corresponding to the back wall and weld it to it. If the diagram indicates the presence of a heater, then the sheet attached to the back wall of the stove must be larger so that its upper part creates a container for stones. A groove is cut out in the front wall, which will later become an ash pan and a firebox.
The facade is attached by welding and finally the doors are hung - they are usually either made independently or purchased from a specialized store.

That's all - the sauna stove is ready. Before use, the metal must be treated from corrosion and possible deposits; after all manipulations, the capabilities of the unit must be tested by conducting the first test fire.
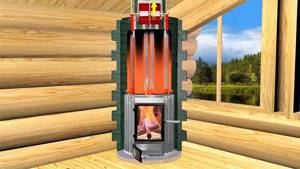
Vertical
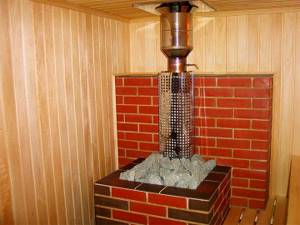
Designing a vertical oven is absolutely identical to creating a horizontal one, with the exception of some points. A distinctive feature is the direct position of the pipe in space, when both ends form not the back and front surfaces, but the upper and lower ones, respectively. In such furnaces, the section for arranging stones is located directly in the combustion chamber, as a result, the manufacture of such a unit will be somewhat more difficult to implement, but the heated air will also be more saturated.
Manufacturing stages.
- First, it is necessary to cut a window in the pipe, which will serve as a ash groove for the supply of oxygen to the burning fuel, and will also collect the fuel decomposition product - ash. Move 40 mm from the bottom edge of the pipe and use a grinder or hacksaw to cut a groove in the shape of a parallelepiped, which will subsequently measure approximately 80 by 240 mm.
- In the same axis, you need to cut out another groove for placing fuel in it - move away from the upper edge of the blower hole from 180 to 200 mm. The cutting procedure must be carried out extremely carefully and as accurately as possible, since these cut segments will subsequently serve as the door of the firebox and ash pan.
- Above the firebox level there is a tray for laying stones. Measure from the front edge of the firebox from 120 to 180 mm, cut a groove in the shape of a circle with a diameter of about 350 mm. Please note that this groove must be offset 90 degrees relative to the circumference of the pipe.
- The next pipe is cut so that its length is equivalent to the outer diameter of the larger pipe. Next, you need to cut off the top part by three quarters to give the material a scoop shape.
- A blank wall is welded to the rear part with a groove, and a plug with a movable door in the shape of a semicircle is attached to the front part, which will subsequently be used as a container for stones and adding liquid to the stones during the steaming process in the bathhouse.
- This section is inserted into the base pipe in such a way that its outer space is from 20 to 30 mm with free space around it. Next, the hole is carefully scalded around the perimeter. If necessary, it is secured from the inside using reinforcing rods.
- A round disk is cut out of a sheet of metal, the diameter of the inner part being equal to the main pipe. A rectangle is cut out in the center of the disk - its size should easily accommodate cast iron grates. If they are not there, reinforcement rods are welded below, which form a grid of grates.
- Using a welding machine, you need to attach a base pipe to the base of the fuel tank 20 cm above the blower.
- Cut out the base for the blower from a sheet of steel. The stove is placed on small legs from below.
- The next step is to make a vat for water, and the chimney pipe should pass right through it. The main pipe is used as the side walls; the bottom is also the upper arch of the firebox.
- The bottom is cut out of a sheet of steel in accordance with the diameter of the inner part of the pipe, then a hole in the form of a circle with a diameter of 30 to 50 mm is cut out on it, which will subsequently become the chimney.
- A part of the chimney pipe is inserted into the same hole so that it extends 100-120 mm beyond the edges.
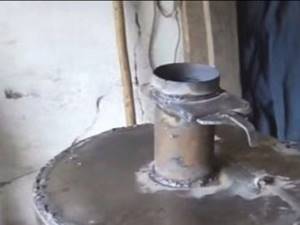
- The bottom of the water tank is inserted into the chimney and welded slightly above the stone container. The smoke pipe should be on the side of the area in the form of a scoop.
- The water tank is brewed around the entire perimeter, a hole is made at the bottom into which the tap is inserted.
- Hinges are welded to install the doors to the body. Check if the tank is leaking by filling it with water. Next you need to carry out the first test fire.
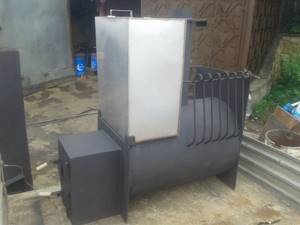
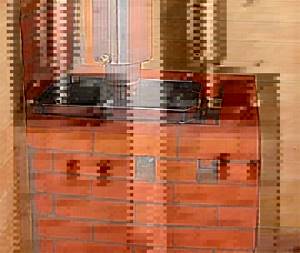
Drawings and photos of a horizontal stove made of pipe 530
Very often, a 530 diameter pipe is used to make a sauna stove. It allows for longer combustion of wood, significantly increases the performance of the stove, and is generally more convenient to work with. Therefore, photos and drawings of a stove for a bathhouse made of pipe 530 in horizontal format will be useful to you if you decide to build this type of building. Below we offer you popular options that have been tested in practice.
Advantages and disadvantages
Among the advantages of a homemade device are the following:
- ease of transportation;
- high temperature resistance;
- when using such a stove, the steam room heats up quickly;
- due to the thin-layer separation of the chambers, the logs burn almost completely;
- long service life;
- ease of manufacture and subsequent installation;
- possibility of using any fuel;
- universal appearance;
- Compared to factory-made stoves, the cost of a home-made unit is much less.

Along with the positive aspects of the horizontal arrangement of the furnace chamber, its negative aspects are also observed:
- rapid cooling, which is why you have to frequently add fuel;
- uneven heating of the room; if the bathhouse is large, then it is worth considering installing several units at once.
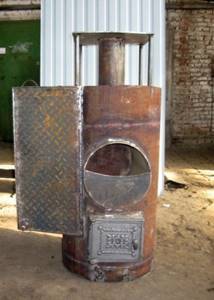
Vertical oven - step by step
- prepare the base - a pipe fragment up to approximately 0.9 meters;
- Weld a circle of metal sheet to the bottom of the pipe - it should be equal to the diameter of the pipe;
- cut a hole for the ash pan, its maximum width is no more than 0.2 meters;
- weld a round plate with a pipe diameter, cut out the middle and weld rods onto the hole - this will be the grate;
- decorate the combustion chamber by cutting out a small rectangle above the grate and seal it with a metal door;
- Again, cut a hole above the firebox, weld rods for the grate and hang the door;
- weld the body with a round piece of metal, do not forget about the holes for the chimney and ash pan;
- The traditional finale is sequential sanding of the entire body and painting.
To help you, there are drawings and photos that will help you make your own stove for a bathhouse from a pipe in full compliance with all safety standards. By the way, don’t forget to do the first warm-up in the fresh air - this way you will avoid fumes from the paint you used getting into your respiratory tract. After all, many polymer compounds are frankly harmful to your health. Remember that an iron stove made of pipe is best lined with brick. This way it will be better to retain heat in the steam room, and the air will be protected from those substances that are released into it when the iron warms up.
Types of structures
They differ in structure and operating principles. Let's look at each type in more detail.
Open
The stones are laid on top of the stove structure and are not covered with anything. Due to this, the steam room warms up faster, reaching temperatures of up to 100 degrees. But the humidity in the room is low, so the heat turns out dry.
The product consists of three parts:
- fireboxes;
- compartments for stones;
- containers with water.
There should be few stones, otherwise the top layer will not warm up well and the steam room will not be warm enough.
To increase the level of humidity and the release of water vapor, the hot stones are simply watered. One or two ladles will be enough - this will give up to 15% humidity.
To increase the level of fire safety and reduce the risk of burns, it is recommended to lay fire-resistant bricks around the walls of the furnace or make a partition made of wood.
To heat a sauna, it is important that as much of the stove area as possible is in contact with the air space. This contributes to faster heating of the air in the steam room
Closed (lined with brick or stone)
If wood fuel is chosen for heating, you will have to prepare large reserves in advance. Such a stove takes a long time to reach the desired temperature, but, having reached the desired level, gives good heat transfer and retains heat for a long time.
Closed structures are great for large baths, where there is not only a steam room, a wash room, a dressing room, but also a relaxation room.
One of the advantages is closed stones. Therefore, there is no risk of getting burned.
In factory economical models, the stove has a double casing with a gap for air exchange between the walls.
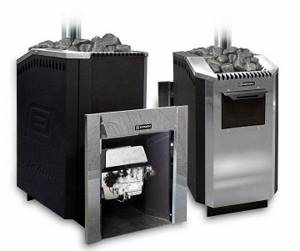
Combined
For most manufacturers, the design consists of a high box with gratings and double valves (performs the function of a firebox). A chimney pipe emerges from the neck of the box. Stones are placed in the neck here.
There are devices available for sale with combined fuel types:
- gas-wood;
- electric wood-burning.
They do not need to be constantly monitored. Simply adjust to the desired temperature.
By design they are divided into 3 types:
- Monoblock. With heat exchanger, combustion chamber. Gas burner of a fixed type, covered with a steel sheet.
- Paired. They have two separate combustion chambers for wood and gas.
- Reconfigurable. Universal device. Can be modified for each fuel.
The first two types do not need to be reconfigured, since you can switch from one type of fuel to another.
Gas is used as main gas or liquefied in cylinders.
The electric-wood-burning design allows you to successfully heat the bathhouse using electricity or wood (optional). Moreover, firewood is considered the main raw material. When they burn out and the temperature drops, the electric heater automatically starts working. There are two heating elements on the sides of the product. Such stoves operate on a 220 W network, with a three-phase voltage of 380 V.
The owners can choose which fuel to heat the bathhouse with. But such designs are many times more expensive than simple wood-burning stoves.
Drawings and photos of a vertical stove made of pipe 530
As with the horizontal format, the 530-diameter labor is ideal for use if you are making the oven yourself rather than enlisting the help of a professional. A stove for a bathhouse made from pipe 530 vertically will help you make drawings with all the necessary markings. Needless to say, this makes your work much easier, because the most difficult thing is to make the necessary markings. Of course, the proposed options are not an axiom. You are also free to make necessary changes to them. With one condition - if you really know what you are doing!
conclusions
The level of tilt of the body does not affect the operation of the stove. Therefore, you can install it arbitrarily. It is possible to treat the chimney with a high-temperature compound. This will help eliminate the metallic smell. After several fires, the pipe burns out and turns red. No further oxidation of the metal occurs.
As you can see, you can build a horizontal stove for a bathhouse yourself, if you get acquainted with the main stages of work and the features of preparation. It is important to choose the right materials and find all the necessary tools. If you have basic welding skills, you can make an effective structure that will last for decades.
Recommended Posts
DIY cellar
Wall mounted metal shelves
How to make a birdhouse with your own hands
How to make a swing nest with your own hands
How to make a cellar lid with your own hands
How to make a fountain in your country house
What about the kitchen?
Generally speaking, a pipe is not suitable as a workpiece for culinary ovens. It is too heavy for portable summer cookers, and it is definitely not suitable for preparing truly oven-baked delicacies, because... not brick or clay. However, making a stove for a cauldron from a pipe makes complete sense: a heavy base will give the entire structure additional stability.
The vertical design is suitable for a large boiler, and the horizontal design is suitable for several smaller ones at once. The latter is useful in livestock farming. For example, to wash the udders of cows and the paws of poultry, hot water is needed in small quantities, but for quite a long time. 2-3 replaceable pots will ensure its continuous flow, incl. and on summer pasture/grazing: a stove made of a pipe of this size can be carried in the trunk.
Preparation
Of course, a home-made stove will not have an elegant appearance or originality, but it performs its function no worse than a factory one and perfectly heats a steam room with an area of up to 20 m2.
First of all, the pipe must provide its basic functions, namely, absorb and release heat evenly and at the same time have thick enough walls so that the stove is not afraid of high temperatures and lasts a long time. When talking about the basic characteristics of pipes, you need to take into account not only the cross-sectional diameter and wall thickness, but also the grade of steel. It is clear that when using scraps, such information is not always available.
Speaking about a standard bath, the following sizes are considered optimal:
- cross-section diameter – 0.5-0.55 m;
- wall thickness – 8-12 mm.
Pay close attention to the quality of the material: only steel pipes are suitable for making a bathhouse stove, and the steel you need is not high-carbon. It is not suitable for profile work because its seams can easily lose shape or even come apart. High-carbon steel can be identified by the sparks that appear when the metal and the sanding ring interact - white sparks will scatter in all directions
Low-carbon steel, in turn, produces yellowish sparks that have a straight trajectory; stainless steel parts are not suitable either. The best option is steel with a carbon content of about 2%. Also, when choosing a metal, it is better to avoid alloy steel - it is also easy to calculate using an emery machine: sparks from interaction with the metal will be orange, red or bright white
High-carbon steel can be identified by the sparks that appear when the metal and the sanding ring interact - white sparks will scatter in all directions. Low-carbon steel, in turn, produces yellowish sparks that have a straight trajectory; stainless steel parts are not suitable either. The best option is steel with a carbon content of about 2%. Also, when choosing a metal, it is better to avoid alloy steel - it is also easy to calculate using an emery machine: sparks from interaction with the metal will be orange, red or bright white.
Cast iron should never be used, as it becomes unusable upon contact with water.
Other advantages of steel pipes:
- resistance to mechanical damage, high heat transfer and low expansion coefficient when heated;
- retaining heat even after complete combustion of wood.
The pipes have their own characteristics according to the specification. Let's look at this information in more detail.
Round pipes are classified by internal diameter size. The second number indicates the wall thickness, the subsequent ones provide information about its type and other characteristics. It is customary to take the millimeter as the unit of measurement. If the pipes are profiled, the first two signs indicate the maximum section size, the third number indicates the wall thickness. The instructions “530 by 10” mean that the diameter of the pipe along the inner wall is 530 mm, the thickness is 10 mm, the outer diameter is 550 mm with an error of +/- 5 mm taking into account the transverse tolerance, which is 10%. Primarily the tolerance consumption applies to ellipticity.
The thickness of the pipe wall will also vary.
Water supply pipes are divided into the following subtypes:
- lightweight;
- ordinary;
- fortified.
One way or another, the most popular pipes have a cross-sectional diameter of 530 mm, their thickness is 6-12 mm, and their nominal value is 6, 8 or 10 mm.
Pipes are one of the most frequently demanded products, so it makes no sense to regulate them too scrupulously. Pipes with standard sizes from 250 to 400 mm have a wide range of options. If possible, for the manufacture of a sauna stove, give preference to scraps of spiral pipes (their designation is GOST 20295 85). Comparing them with straight-seam pipes (GOST 10704–91), they have lower ellipticity, are more accurate and sell them at the same price as scrap metal. Solid pipes without seams are an even better option, but are only suitable for the manufacture of small parts, since their diameter is no more than 250 mm.
When preparing for work, equip yourself a workplace - it can be either a garage or a home workshop.