Finish stage
Finishing work is the creative stage in the construction of the Dutchman.
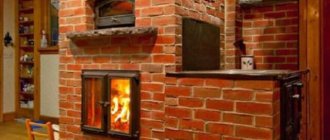
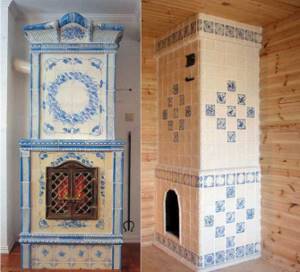
If the stove is laid using new red ceramic bricks, then cladding is not required. For Dutch cladding, clinker or tile tiles and decorative plaster are used. The Dutch woman looks great in the interior. In color it can either merge with the interior or contrast. A stove lined with mosaics or decorative stone looks very good.
In past centuries, the outer parts of the first Dutch ovens were decorated with tiles. The ordinary stove looked like a work of art.
The classic rectangular stove, lined with ceramic bricks, is widely used. Round-shaped Dutch women have a number of disadvantages during operation, so they are less common.
After veneering, take a break for two weeks. The structure must dry. The firebox door is left open during this time.
After the Dutch oven has dried, you can light the stove for the first time. There is no need to rush things. If the first firebox is made with a damp stove, the structure will crack and all the work will be lost.
For the first burning, take a fifth of the full portion of fuel. It is good to use wood chips or shavings for firing in test mode. You need to take the smallest logs.
Open all valves and dampers. In gentle mode, the oven is operated for approximately 7 days. The oven temperature should not exceed 600 degrees.
When burning low-quality, high-ash fuel, a large amount of soot quickly appears in the chimney of a Dutch oven. Therefore, it will have to be cleaned often, but it is better to select good fuel. The most suitable logs for heating a stove are made from wood from not very old oak, alder, linden, and fruit trees.
Stage 2 brick preparation
Arrangement of a brick stove.
At this stage you can proceed to laying the furnace. It should be made only from high-quality bricks. To ensure that the selected material meets the necessary requirements, you need to check it. Take one brick and throw it from a height or a long distance.
Then notice how it splits. If the pieces turn out to be large, then such material can be used, because it is of high quality
If you find small pieces and crumbs on a split brick, then under no circumstances should you make a stove out of it. Otherwise, it will turn out to be short-lived and will soon collapse.

Laying a brick sauna stove.
Now it’s clear to you what kind of brick you need to build the stove from. Therefore, you can proceed directly to construction work. The first thing you need to do is lay out ordinary bricks on the created base and form them into a future structure, only without mortar.
It is necessary that each brick has its own number, so that later during the laying there will be no unnecessary troubles. Accordingly, take a marker and put numbers on the material. Then remove it and soak it in a bucket filled with water for 10-15 minutes
It is important to wait until the brick begins to release air bubbles
Next, take fireclay material. It does not need to be soaked in water. For this brick, light moistening is sufficient. So just wipe it with a wet cloth and then set it aside.
Features of operation
A characteristic feature of Dutch ovens is the increased length of the chimney channels. This is precisely why the stove works so well at heat transfer. But at the same time, with such a flue arrangement, the likelihood of carbon monoxide entering the living space increases.
To prevent this from happening, it is important to observe the correct combustion mode: the heating temperature of the housing should not exceed 60° Celsius
Oven cleaning and repair
In order for the Dutch machine to work without surprises, it is necessary to monitor its technical condition:
- clean the firebox and ash pit from ash every day;
- Perform preventive cleaning of the chimney once a year;
- Once every 4–5 years, inspect the internal and external walls, and if cracks are detected, repair them.
Anyone can build a Dutch oven on their own without outside help. By following the described recommendations and following the ordering diagrams, the heating unit can be easily assembled in 1 week.
Oven space
Before directly installing the structure, it is important to decide on the location of the furnace, since this issue is considered extremely important and relevant. Many people think that the best solution is to place the structure in the middle of the room, and in this case the smoke ducts should be laid along the wall, thus reducing the heads and improving draft. However, with this arrangement, constant air circulation is formed, in which it cools near the outer walls and returns to the stove, forming a stove draft. Cold air above the floor, which moves from the walls to the stove, creates discomfort for people who live or are simply in the room, so good health cannot be achieved in this way.
Therefore, the best solution is to place the Dutch oven near the outer walls, however, even in this case there are certain disadvantages. A problem arises with smoke ducts because condensation appears on the internal walls and draft deteriorates, so the room will become dirty very quickly.
A compromise and the most optimal option is to locate the stove in the middle of the house, and the surfaces that give off heat should go into the living rooms, and the parts that are exposed to a lot of pollution, such as the firebox and stove, should be in the kitchen.
This stove is well suited for a summer residence
Video - Dutch oven
Stages of making a round Dutchman
Foundation
As with any other design, in order for a round Dutch oven to be stable and to function properly, you first need to make a foundation:
- To do this, you need to dig a recess into which the base for the stove will be installed.
- First, take measurements and disassemble the floor covering, deciding in advance on the future location of the system.
- Dig a hole and fill it with cement mortar of the following consistency: 1 bucket of cement, 3 buckets of sand.
- You need to place a reinforcement tie on top of the resulting future foundation so that the foundation better holds the Dutch structure.
- Let the solution dry for 10-15 days before starting work on the construction of the furnace.
Manufacturing of metal casing
Installing a metal casing on a Dutch oven was invented in the Russian Empire by the German designer Utenmark; such systems are often named after him - “Utenmarking”.
Today on the market of heating systems and products for them there is a wide range of ready-made metal casings for Dutch ovens. They are sold in ready-made sizes, so if you decide to use “utenmarking” purchased in a store, you should compare it with the dimensions of the oven in advance. The finished prefabricated metal casings look like this:
Metal casing
If you decided to make a metal casing with your own hands, then the material you can use is a regular galvanized sheet or roofing iron:
It is better to prepare the blanks for installation in advance, having previously made holes for the firebox, valve, vent and door for cleaning
It is important to understand that the masonry is formed by the dimensions of the casing, so take this into account when making it.
Blanks for casing
A sheet of iron is fastened into a round shape using rivets; in extreme cases, the structure can be welded if the thickness of the metal allows this.
Laying and ordering
An important feature in the laying of a Dutch oven is the order of its rows; not every master is ready to undertake the installation of such structures, so the decision to make a round Dutch oven with your own hands is risky. But if you are confident in your skills, then it is important to use a specially invented order of this design
Appearance
In cross-section, a round Dutch oven with a casing looks like this:
Sectional diagram of a round Dutch woman
Features of brick laying
The installation of the casing is carried out simultaneously with the installation of the Dutch. The section of the system, before covering the firebox, is placed in the floor of bricks - that is, the first three rows. Then, using a plumb line and level, the casing is installed - its first, lower ring. The distance between the wall of the case and the masonry is filled with a ready-made semi-liquid clay solution.
Now the firebox is being formed, and it is important to follow the order and bandaging so that the structure has good stability and high efficiency. When the firebox is formed, you can begin laying the subsequent parts of the Dutch system
Front rows
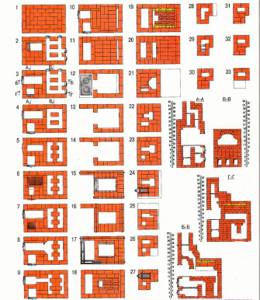
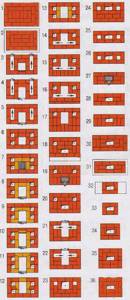
Despite the apparent simplicity of the design, the main thing here is the order of the system; without it, the mason will not be able to install the entire system correctly. The first twelve rows begin like this, the diagram shows the dimensions and entire order of the Dutch woman:
Rows 1-12
From 13 to 29, the row and pipe diagram are shown in the following design order:
Rows 13-29
Rows 30-32
Please note that if one row is folded incorrectly, not to mention more errors, smoke will pour into the house and the system will not be able to function correctly.
First test firing of the furnace
It is important to carry out the first fire in accordance with certain rules:
- Test heating of the heating system must be carried out after the entire structure, including the masonry and facing mortar, has completely dried. Premature testing of the furnace can lead to cracking of the structure, which will deteriorate its technical characteristics and lead to operational problems.
- The first combustion is carried out using 1/5 of the fuel. First you need to lay down wood chips and shavings, and then you can add larger logs. In this case, all valves and dampers must be open.
Expert opinion Pavel Kruglov Stove maker with 25 years of experience
If you have a thermometer installed, then make sure that the temperature in the system does not reach 600 degrees Celsius - you need to carry out the test firebox carefully, constantly inspecting the entire structure for damage to the system.
Preparatory work before assembling the stove
Before installing the stove, the foundation is poured and holes are made in the interfloor and attic floors.
Pouring the foundation
If the installation of the stove is planned during the construction stage of the house, then the foundation is poured at its location. According to the rules, it is not connected to the general foundation of the house, but is laid separately. This prevents unwanted distortions that may occur during shrinkage. The construction of the building is carried out simultaneously with the laying of the stove; when positioning the load-bearing floor beams, the height of the stove body and chimney is taken into account.
For furnace equipment, a foundation is poured that is not connected to the main foundation of the house
If the decision to install a heating unit has arisen in a finished house, carefully weigh and evaluate the work that will have to be done. The most significant ones include preparing the foundation and laying a chimney through the attic or interfloor ceilings. Sometimes it is more expedient to lead the pipe through the wall: the Dutch woman has such an opportunity.
The foundation is prepared in advance. The cement mortar must dry and shrink for at least 30 days. Only after this does the installation of the furnace begin. Otherwise, deformations are possible during operation, which leads to cracking of the thin walls of the stove and a violation of the tightness of the chimney. To avoid such consequences, the foundation is poured in accordance with the rules:
- The foundation is based on dense soil; concrete should not be poured into the soil near groundwater;
- the depth of the pit for filling should not be less than the depth of soil freezing in this region (usually 0.8–0.9 m, with the exception of the Far North);
- the concrete solution is laid on a well-established (within 2 days) sand cushion, which has a depth of 15 to 20 cm and serves as a hydraulic compensator for further operation;
- a reinforcing grid with a metal rod thickness of 5 mm or more is placed inside the concrete;
- the linear dimensions of the foundation should be 15–20 cm larger than the dimensions of the stove base;
- the height of the upper plane does not reach the floor level by 2 brick rows.
Several layers of basalt cardboard are laid between the base of the furnace and the waterproofing, which serves as a heat insulator and prevents the heat of the furnace from escaping into the foundation.
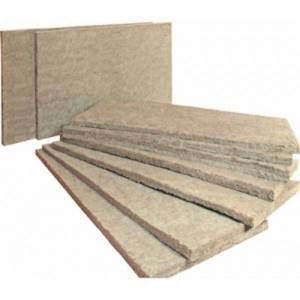
Basalt cardboard is an inexpensive but effective material for thermal insulation
Preparing holes in the floors between floors and the attic
The holes are cut taking into account fireproof cuts and fluffs, which must be built in the chimney in contact with flammable materials. This is especially true in wooden houses. The location of the pipe must be calculated so that it does not intersect with load-bearing beams and other structural elements of the house. The hole in the roof is made last, when the main part of the masonry is completed.
The hole for the chimney is prepared in advance so that plumb lines can be hung
The procedure for venting the chimney outside can be as follows:
- Remove the roof where the pipe exits. If the roof is covered with a continuous layer of material that cannot be separated (for example, corrugated sheeting, slate, etc.), use measurements to determine the location of the exit and the size of the hole, and then cut it out with a grinder or jigsaw.
- Install jumpers to restore the rigidity of the damaged area. Usually these are additional cross rafters made of wooden blocks.
- Lay and secure a heat-insulating layer between the chimney and the roof. Typically, it consists of asbestos sheet or mineral panels.
Make the hole taking into account the fact that at the outlet of the pipe there must be an “otter” laid - a horizontal displacement of the masonry that protects the attic space from water penetration.
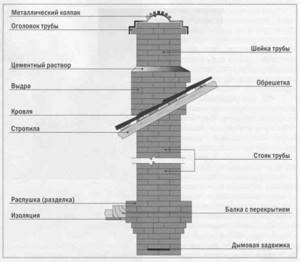
The otter is located directly at the pipe exit from the roof
After this, you can remove the brickwork above the roof.

Fire safety standards for chimneys are important to follow when building a Dutch oven
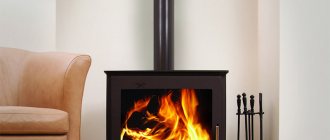
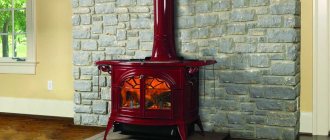
Advantages and disadvantages of a Dutch oven
Like every oven, the Dutch oven has its own advantages and disadvantages.
If we compare the design of a Dutch oven with a stove with the traditional design of a Russian oven, then the advantage will be with the former. It warms up much faster due to the small walls, and its dimensions allow it to be placed even in a small dacha or in a country house.
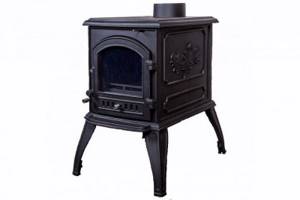
Dutchwoman with a stove
In addition, if it will take you 1200-1300 bricks to build a small Russian stove, then for a Dutch stove of impressive size you will need only 650-700 bricks. This factor alone makes the Dutch oven attractive, especially during times of economic crisis.
Another advantage of the Dutch woman will be especially attractive for dacha owners who visit their country house from time to time. If a Russian stove needs to be heated for several hours before it starts giving off heat, then lighting a Dutch stove will take you no more than half an hour. It can be immediately loaded tightly and given maximum heat.
So, the advantages include:
- Possibility of modifying the stove with various functional additions in the form of a water heating tank, stove bench, oven, fireplace, etc.
- Compact and small in size. If you wish, you can build a good quality stove measuring 50*50 cm.
- Fast heating of the room.
- The efficiency of the furnace does not decrease depending on its height.
- Low construction costs. Only the firebox can be made from expensive refractory bricks, while even used material is suitable for arranging the rest of the structure.
Disadvantages of the Dutch woman:
But it would be unfair not to mention the disadvantages of the Dutch oven.
- Low efficiency compared to a Russian stove. Only 40-45%, subject to proper use.
- The channels are designed in such a way that they can partially draw in cold air from the street.
- Frequent firing of the stove is required - at least twice a day.
- Not the most economical fuel consumption.
- You need to constantly monitor the oven view. If you leave it open, the oven will instantly cool down.
- You should not set the maximum temperature for a Dutch oven. If you overheat it, carbon monoxide will be released, which can penetrate into the room.
Today there are many models of Dutch women:
- with fireplace;
- with oven and heating and hob;
- with water heating tank;
- with a sun lounger.
But basically, this type of design is chosen for its compact size and the ability to place it in a small house. If the room has a large area and many windows, then it is better to give preference to other types of heating structures: a Russian stove, a bell-type stove or a Swedish one.
Cons and pros
The main disadvantages of heating using a Dutch oven:
- require a lot of space indoors;
- the heat transfer rate of air is less than that of water, and therefore more of it is needed;
— there are problems with the distribution of heated air throughout the rooms;
- this is a very expensive pleasure.
It is important to note that heating furnaces are much more difficult to maintain than steam heating, for which you simply need to perform the correct debugging, after which you simply need to monitor the correct functioning of the system. When using the stove, it is necessary to constantly take care of the fuel and maintain the structure, and the room in which it is located must be periodically cleaned, since it quickly becomes dirty. It is important to note that the stove takes up quite a lot of space, so you need to choose a suitable place for it, and you also need to constantly care for it and check that it is functioning correctly, since without this work, a fire or carbon monoxide poisoning may occur. However, despite all the above-mentioned disadvantages of stoves, they have high efficiency, quickly heat rooms, are cheap to install and operate, and are also multifunctional, since with their help you can cook food that has a pleasant and unusual taste and rich aroma.
| Dutch (02) 0.75m by 1m Heating. 3 kW. |
Laying a Dutch oven with your own hands
The Dutch oven is built in rows with your own hands, so we will analyze everything step by step.
1 row. The very beginning needs to be arranged on the top sand cushion, measuring the location of each brick with a measuring tool. We must maintain horizontality. We cover the laid bricks with cement mortar - this is both the beginning of the laying and the final stage associated with the base.
2nd and 3rd row. They are simply laid in layers, naturally, treated with a solution. It is advisable to mark each of them with a number for accuracy. From this moment we begin to deal with plumb lines that will form the horizontal further. Stove makers have a term: “bandaging” is when a fresh row overlaps the joints on the previous one. Dressing needs to be learned at an early stage.
4.5 row. From the fourth row, the construction of the ash pit begins. Assembling from the stand. We lay whole bricks not flat, but on an edge. For your information, the back wall is done dry, because further operation involves adding bricks in this area. Of course, it is not prohibited to install a small door, but this is detrimental to efficiency.
At the same level we install a door that needs to be secured to the base using soft wire. The seal can be easily maintained using an asbestos cord.
6,7,8 rows. Construction of the ash pit continues. We simply cover the top with masonry so that there is space left for the fire grate.
From 9 to 13 rows. This is the gap for the combustion chamber arrangement. Here we install the door using soft wire and asbestos cord as fastening.
14,15 row. We close the firebox next to the brickwork, leaving an opening at the back. Excess smoke should be removed through it.
16, 17 row. Arranging a hole for cleaning, where you will need a small door similar to an ash pan. To save money, you can install bricks without mortar. It will reduce heat loss.
Rows 18–26. More responsible levels, because work is underway with the return channels. Made in the style of a classic coil. There should be no protrusions on the inside of the walls, so it is better to coat the coil with clay.
27 row. The final stage of masonry. All channels are closed. Only the chimney should remain. It is better to move the bricks a few centimeters back.
29, 30 row. A chimney is formed and a valve (view) is installed. The latter will regulate draft and retain heat after complete closure.
For beginners! During each stage, you need to maintain vertical and horizontal.
Chimney for a Dutch oven: we work with our own hands
This is a mandatory element, and the height parameters are always individual. The main thing is to comply with fire regulations.
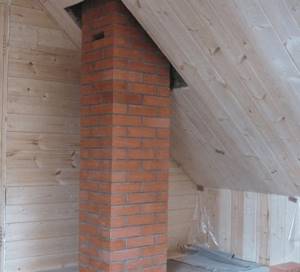
Those spaces where the chimney borders a roof or other structure must be insulated. Gaps may only be closed with non-combustible material.
The difference between the stove itself and the chimney is the composition of the masonry mortar. If we make rows with clay and sand, then we need to add 1/10 of the cement to the chimney. The end is the installation of a metal cap on an already built chimney.
Final finishing
Finishing work is always organized according to your taste. The stove is whitewashed with your own hands and lined with decorative tiles. You can use tiles. But if the process of creating the stove was careful, then the front part of the brick will look excellent.
For safe operation, a sheet of steel is fixed to the floor, which will protect against accidental release of coals, and, therefore, fire.
Having completed everything that was planned, do not rush to start using or drying. It takes at least 15 days to dry
Moreover, it is important to dry the inside naturally, so the door to the firebox is left open
And after 2 weeks they begin full-fledged ignition. Before starting use, it is better to burn a small amount of paper to test traction. If everything is done correctly, the smoke will pass into the chimney without problems.
https://kladempech.ru/pech-gollandka/
https://pechiexpert.ru/pech-gollandka-kak-postroit-svoimi-rukami/
After laying
Drying
Drying a brick heating device is one of the mandatory measures that is carried out before the active operation of the device begins. Dry the oven in two stages:
- in natural conditions. The period for this type of oven drying after completion of masonry work is approximately 6 - 8 days. At this time, all doors and valves must be open to ensure natural circulation of air flow, which, passing through the channels of the device, removes moist vapor through the chimney to the street. This ensures only drying of the surface of the masonry layers;
- forced drying. It is carried out using dry small firewood every day for a week during the warm season. In the autumn-winter season, the time for forced drying should be extended by 1 - 2 weeks.
The end of drying can be signaled by the absence of condensation products on the doors and valves of a closed device.
Finishing and cladding
The finishing of a Dutch oven can be done in different ways: covered with a layer of decorative plaster and whitewashed, faced with tiles, tiles or flat stones.
First test firebox
When all parts of the stove and the chimney are completely dry, you need to test fire the stove.
Basic moments:
- It is better to carry out short-term ignition in the late evening, when the temperature outside is lower than inside the room. The fuel load during the first fire should be minimal. If the ignition was successful, you need to add some damp wood, which smokes more.
- If the chimney is of sufficient height and well insulated, then smoke will not penetrate into the room. If the opposite situation occurs, then you need to check the channels for inaccurate installation and damage.
- The last stage of the first combustion is the maximum heating of the unit for several hours. During this period, check whether cracks have appeared in the seams on the front surface of the device.
Furniture items
A few examples of furnishing a kitchen combined with a living room:
- 1. Sofa. It becomes an object that zones space. The sofa is placed with its back facing the place where food is prepared. In small rooms (less than 20 sq m) a corner is placed, which is placed against a wall installed perpendicular or parallel to the kitchen.
- 2. Set. According to designers, minimalist models without elaborate details look modern. The service, vases or glasses are placed on an open shelf. You can buy a fashionable display case for them. Furniture is placed near the wall. If the space is large (20 sq. m, 25 sq. m or 30 sq. m), then in the central part you can install an island, which also has sections for kitchen appliances.
- 3. Furniture set. The style should be combined with the design of both rooms. In small rooms, a compact table and chairs made of transparent material or painted in light colors look good. You can add a table with a round top to your living room interior. In spacious rooms, the kit is installed near the wall or in the central part. An elongated rectangular dining table would look good here.
Varieties and modifications
There are several common modifications of Dutch ovens:
- Heating (classic) . Optimal for heating small .
- Bell bells . They are distinguished by the most compact dimensions; existing laying schemes allow the construction of miniature Dutch ovens with a triangular cross-section for corner placement.
- Caloriferous . The action is based on the principle of forced air circulation. Optimal for buildings with high ceilings .
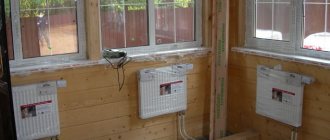
- Heating rooms with water heating boilers . They are used when it is impossible to place the stove in the central part of the house. The installation of a Dutch oven with a built-in heating boiler is carried out in the kitchen or in the hallway , after which the heating circuit is installed.
Important!
The operation of Dutch ovens with built-in boilers for heating large areas requires the use
of coal as fuel.
In addition to using the Dutch oven as a purely heating structure, there are possibilities for additionally equipping the stove with a hob, fireplace or stove bench. To do this, at the preparatory stage, it is important to make the required amendments to the selected installation scheme. It is possible to use ready-made schemes available in the public domain.
Heating Dutch oven
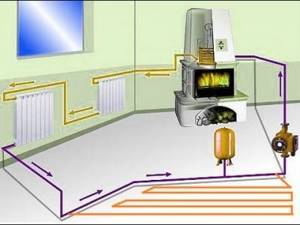
The principle of operation of the classic Dutch oven is to increase the circulation time of smoke inside the housing due to the construction of winding smoke circulation channels. Before exiting into the chimney, the smoke from the burned fuel transfers its own thermal energy to the body. The stove acts as a heat accumulator : heat accumulates in the housing and is systematically used to heat the premises.
Reference.
Classic Dutch ovens
do not require constant heating and warm up quickly after long periods of inactivity.
In addition to the general design features, the differences between Dutch stoves and other types of stoves vary depending on the installation pattern and the presence of additional equipment. The difference lies both in efficiency and in the set of functions.
With water heating boiler
The operating principle of Dutch ovens with a built-in water heating boiler is similar to the classic version.
The presence of a heating circuit increases the efficiency of the furnace by ensuring uniform distribution of thermal energy within the heated premises.
The stove is transformed from a heat source that implements the principle of air heating into the central element of a liquid heating system .
How the Dutchwoman works
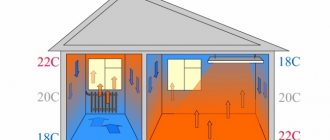
A distinctive feature of the Dutch oven is a six-channel chimney system through which heated gas circulates.
Coming out of the combustion chamber, the smoke rises upward along the upward flow. During his journey, he manages to heat the walls of the furnace. Then it cools down and goes down to the firebox. When heated, it rises through the second channel, etc. The sixth channel already removes smoke outside through the chimney.
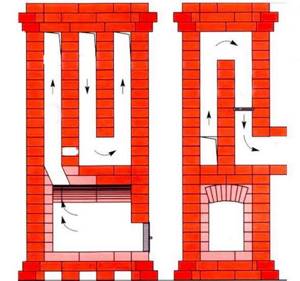
Dutch woman's work system
The six-channel system allows the oven to heat up evenly, without sudden changes, and retain heat for a long time.
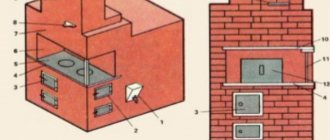
If we talk about the design of the Dutch woman, the main elements here are:
- large firebox;
- chimney;
- 6 smoke channels.
Whatever the dimensions of a Dutch oven, its firebox is always large and has a rectangular shape, while the design of the Dutch oven itself can be semicircular, triangular, etc.
Dutch oven elements
A large firebox significantly increases efficiency and makes it possible to later supplement the design with a water heating system.
The Dutch chimney is connected at the side to the chimney, and their connecting link is a metal pipe.
If the oven needs to be cooled quickly, just open the damper.

Standard furnace diagram
Distinctive characteristics
In today's understanding, the Dutch woman differs significantly from the original model and, first of all, in that it is decorated with tiled, tiled or other materials. The standard version has its own characteristics, which distinguishes the design from its analogues:
- Even a master who is not experienced in the stove business can reproduce the laying of a stove, because this process is carried out according to a simple scheme;
- minor flaws during construction will not affect functionality;
- the classic version of the stove was not used for cooking, so a hob was not installed before;
- lack of grate and blower;
- duct chimney.
Tools and materials used in the construction of a Dutch oven with stove
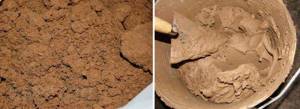
A prerequisite for a good stove is high-quality masonry mortar, which is recommended to be mixed from red clay and brick. The main composition for Dutch masonry is sand, red clay and water.
In this case, the ratio of proportions for each type of clay will be different. The less sand is present in natural clay, the correspondingly less is needed for the solution.
Clay
For oily clay we take the proportion: 1 part clay and 2.5 sand.
For medium clay - 1 part to 1.5 sand.
For skinny ones you will need 1 to 1.
Materials for laying a Dutch oven with a stove:
- Fireclay refractory brick for combustion chamber.
- Red ceramic brick.
- Foundation mortar (cement, sand, gravel and water).
- Mortar for laying bricks.
- Roofing felt for foundation waterproofing.
- Boards for the construction of formwork.
- Grate.
- Blower.
- Metal door.
- Damper.
- Metal rods and wire for reinforcement.
- Metal wire 0.8 mm for dressing.
- Asbestos cord.
- Hob.
Prepare the following tools:
- Trowel for laying bricks.
- Building level, protractor and plumb line.
- Construction stapler.
- Tape measure and marker.
- Rule.
- Grinder for turning bricks.
- Shovel and bayonet shovel.
- Bucket for solution.
- Construction mixer or drill with attachment.
- Rubber hammer for laying bricks.
- Construction hammer for erecting formwork.
Construction instructions
It is advisable to draw up a detailed diagram of the laying of a Dutch oven with a stove before starting work. It will be convenient to navigate during the installation of the entire structure.
First, you need to dig a hole about 50x50 cm at 75-80 cm depth under the stove. At the bottom of the pit we fill a layer of sand 10 cm thick and the same layer of crushed stone. Next, a reinforced mesh is placed over the entire height to the top of the pit. Mix a concrete solution of sand and cement in a ratio of 1:3. Next, we assemble the formwork from plywood or boards and fill everything with mortar, after which we leave the structure to dry for a week.
When the foundation has completely hardened, waterproofing from roofing material laid in two layers is laid on it. Next, take clay (8 liters) pre-soaked for 2 days, 900 g of heat-resistant oven glue and 2 buckets of sand, mix everything thoroughly. Apply the resulting mixture, similar in consistency to thick sour cream, on top of the roofing material.
Flaws
There are also disadvantages to this design:
- The efficiency barely reaches 45%. In this regard, it cannot be compared with a Russian stove.
- If the view is accidentally opened, it quickly loses all the accumulated heat and fills with outside air.
- Fuel sensitive. Requires high-quality materials, otherwise it does not have time to warm up. The optimal operating mode is long smoldering.
Did you know? Since Holland gained independence at the beginning of the 16th century, local authorities began to tax each individual household on the number of chimneys. The enterprising Dutch were not at a loss and began to adapt the design of the golanka chimney to 3, 4 and even 12 chimneys. No other stove can simultaneously remove such an amount of smoke without creating smoke in living spaces.
Tiles, more about ceramics.
Painted pottery dates back to ancient Egypt and is found in almost all traditional cultures of the world.
The first facing tiles began to be produced by ancient Greek craftsmen. Later, the Byzantines contributed to the development of this art, from whom knowledge and skills were passed on to the Arabs.
In the 8th century, the formation of traditional Arabic tile technology ended. By the 14th-15th centuries, Turkish tiles had become widespread. The ornaments depicted using Turkish tiles were not so sharp, but people and animals were not depicted in such ornaments, since this was prohibited by the Koran.
In both cultures, cool, light blue and blue tones predominated. This created an atmosphere of coolness in the hot desert.
An interesting fact is that Europeans during the first Crusades never learned about this ceramic art. This is not surprising, since tiles were used only in the palaces and harems of the nobility, access to which was prohibited to ordinary employees under pain of terrible execution.
It also happened, of course, that individual tiles fell into the hands of the conquerors, but there was no talk of any transfer of technology with the enemies.
Europeans had the opportunity to become acquainted with tiles on the lands of the Iberian Peninsula. The Muslim rulers of these lands were not particularly subservient to the Baghdad caliphs and were more willing to trade with Europe. Moreover, they hired hardworking Christians to make ceramic tiles.
The first masters who not only adopted, but also improved the tile technique were the Portuguese. They began to create massive panels from numerous tiled fragments. The Dutch in the 15th – 16th centuries preferred piece tiles and they were actively brought to their homeland. Later, “kahel” (as the Dutch called tiles) began to be produced in the Netherlands. Although the technique remained the same, the motives and subjects depicted on the tiles were their own.
“Kakhel” was brought to Russia, as already mentioned, by Peter I, but mass production of tiles began only under Catherine II using Arab-Dutch techniques in Gzhel. In the middle of the 19th century, similar production was organized in St. Petersburg, but St. Petersburg products were not so popular. Nowadays, St. Petersburg tiles are desirable exhibits for knowledgeable collectors.
And finally, dessert!
One of the authors of the article, while still a child, saw in one of the Russian villages a solid stone house, famous throughout the area not only for the highest level of improvement at that time, but also for the fact that it was heated by just one five-turn Dutch oven.
Of course, in the kitchen and in the bath there were separate stoves for cooking and bathing procedures, but still the center of the home was the “Dutch stove”, built with one’s own hands. This stove heated 4 rooms at once and was placed diagonally across the entire layout so that each of its walls was in each of the four rooms.
In addition, the furnace was fired in the kitchen, where the wife spent most of her time. Here she could cook, from here she could look after the children and serve food in the living room. Of course, now the role of the stove in modern housing is not as big as it used to be, but, nevertheless, proper planning and skillful hands are the key to successfully building a stove for many years.
Fireplace linings
Bake? Fireplace? Or all together.
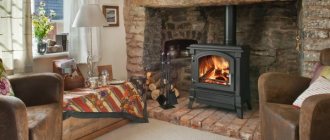
What is the difference between a fireplace built according to English traditions and its Dutch “relative”? First of all, the size of the firebox; in a Dutch fireplace it is much smaller. In addition, the rational Dutch built a superstructure with channels over the firebox, similar to a stove. It became possible to burn such fireplaces with lower quality fuel. This explains the fact that structurally, the stove and fireplace built using Dutch technology are practically no different.
By and large, if you open the doors of any “Dutch”, it immediately turns into a fireplace. The presence or absence of a door has virtually no effect on the properties of the stove. This can be attributed to the undoubted advantages of a Dutch oven as well as a bell-type oven.
Something for dessert
As a child, the author of this article saw a stone rural house in the Russian wilderness, which was famous throughout the entire district not only for the level of improvement unheard of in the Soviet hinterland of those years, but also for the fact that the whole thing was heated with just one large one (“Five-turn!” - the owner proudly reported, with its who created all this splendor with his own hands) with a classic Dutch oven. There was also a stove for cooking in the kitchen, and a stove-stove in the bathhouse.
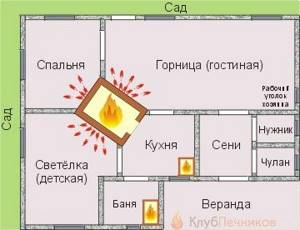
House plan with heating with a large Dutch oven
The house was designed in Russian, from the stove, albeit Dutch, so the layout turned out to be unusual, see fig. But the kids liked it. The village children never suffered from a lack of appetite, and the place where you can always grab something is close by.
And it was convenient for the housewife from the kitchen, on the door of which there was an inscription: “Men - away except to the bathhouse!”, to look after her tomboys and serve dishes both in the upper room and to the same men on the veranda. In general, both in the stove and in any other business, the main thing is your head and hands.