Structural elements of furnaces
Any brick oven, no matter what configuration it is or what masonry scheme it uses, includes several common structural elements that will be present in all models.
Foundation
The base of the entire furnace device on which it rests. Depending on the type and size, a brick oven can weigh two to three tons. Such a large load cannot be distributed on the floors. Neither columnar, nor pile, nor strip foundations imply such a load. The only option when you can do without constructing a special foundation is a slab monolith. In other cases, the foundation for the furnace must be built separately from the existing one. It is not recommended to tie them together, since the difference in load can subsequently lead to deformation.
The stove will be the heaviest item in the house, so the foundation must match
Array
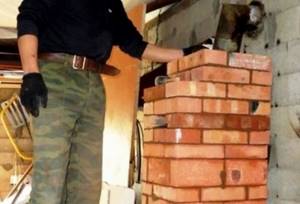
The “body” of the furnace is called an array, which, in turn, is divided into several parts. A base is built on top of the foundation after the waterproofing layer - it separates it from the firebox and consists of several continuous layers of brick. They protect the lower part of the stove from overheating, while warming up the floors. A firebox is built above the base - the part where the process of burning wood or coal will take place.
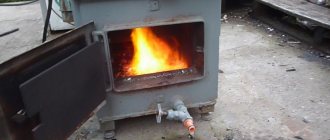
The firebox consists of a combustion chamber and a blower, each of these parts is equipped with a door of the appropriate size. Firewood is loaded through the fire door, and soot, ash and ash are removed through the blower door, and draft is created. The combustion chamber and the ash pit (also called the ash pit) are separated by a grate. This is where the loaded fuel lies. The air passing through the ash pan inflates the flame from below, and the heat and combustion products fly out into the chimney. The grate is made of thick cast iron so that it can withstand long-term exposure to high temperatures.
A good grate is cast iron
Further configuration depends on the type of oven. It can be equipped with a hob, oven, burners, as well as warm niches or a bed (beds). Many of these functions can be combined in one device. The removal of hot gases and heat from the firebox to the chimney is carried out through channels; their schemes are varied.
Video - Detailed laying of a brick stove
If the stove is installed only for cooking, then the channels are laid out so that after heating the hob and oven, the heat freely goes into the chimney. The heating stove does not have devices for cooking food, but is equipped with several smoke circuits. The hot air passing through them heats up the stove itself, which releases heat into the room. The most widespread are combined ovens, where cooking devices are connected to curved channels or a rough oven. Such a stove is located in the middle of the house, so that part of the stove array goes into each room.
Chimneys
After the air and carbon monoxides go around all the bends of the channels, they are discharged into the chimney - a pipe that goes outside. For brick stoves, the pipe is also made of brick, and its outlet is most often carried out through the roof. Nowadays, prefabricated round chimneys with locks have become widespread.
They are made according to the sandwich principle: a layer of dense heat-resistant insulation is laid between the inner and outer pipes of different diameters. Such a pipe is very easy to install and clean: the locking joints are disassembled, the clogged area is cleaned, and then the entire system is reassembled. True, to connect a brick stove with such a chimney you will need an adapter.
When crossing the ceiling, the chimney is lined with mineral wool
List of main advantages
The main advantage of a Dutch country stove is its simplicity of design, so you can build it yourself out of brick. In this regard, the final price of the structure is low. To make such a heating system yourself, it is enough to familiarize yourself with its features and laying methods.
List of other benefits
- High functionality implies the ability to use the structure not only for heating, but also for other activities, for example, cooking.
- The small dimensions allow the structures to fit into almost any building. If necessary, it is quite possible to increase the dimensions of the heating system to 50x50 cm.
- A small-sized brick stove for a summer cottage, made using Dutch technology, heats up quite quickly and cools down very slowly. For temporary residence this is an invaluable advantage.
- Good heat output makes it possible to heat rooms even with a large area. The total square footage of the heated object may well reach 60 square meters. m.
- During operation, there is no need to carry out regular combustion and preheat after inactivity. The structure can be used for its intended purpose immediately.
- The relatively low weight makes it possible to install such systems on many types of floors. The low weight is explained primarily by the low consumption of base material.
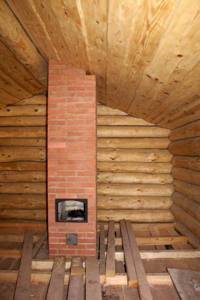
Finished construction in a log building.
Note! When using cheap fuel with increased ash emissions, a lot of soot remains in the chimney, so quite frequent cleaning is required during operation.
Preparatory work
Before you start building a Russian stove, you should make sure that everything you need is available.
Selecting a location
A lot depends on the choice of place to build a furnace. It is necessary to maintain a gap of 30-40 cm to walls made of flammable material or provide them with protective cladding with asbestos. Gaps will also be required for access to the outer walls of the stove for the purpose of inspection and repair.
A heavy unit weighing several tons requires a solid foundation (foundation) protected from ground moisture. A place is provided in advance where the chimney will pass through the ceiling and roof. There should be no ridge or rafters here.
Masonry tools
Basic working tools for a stove maker:
- a narrow trowel (trowel) for laying mortar and cleaning excess from seams;
- a hammer-pick to give a solid brick the required shape;
- building level and plumb line.
To mix the solution you need a shovel and a container.
Stove maker's tool
Now cutting bricks into wedges, removing corners and grinding the cladding is done with a hand-held power tool (grinder) with diamond wheels. This greatly simplifies the work of the master.
Necessary materials
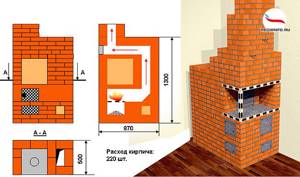
Basic materials for constructing a reliable fireplace: brick and refractory mortar
Their quality is given close attention. You will also need: cast iron for doors, dampers, latches, grates and a hob
Brick selection
The correct selection of bricks for the job is a key factor in the efficiency of thermal output and the long service life of the future fireplace. Therefore, it makes sense to purchase red clay bricks of the M150-M200 brand only of the first grade. Hollow material is unsuitable for stove masonry.
Bricks with obvious signs of defects are also not suitable for such work:
- non-compliance with the standard (230x125x65 mm), to which all standard orders are oriented;
- with traces of burns, warping, shape and surface defects;
- with shells after the release of gases;
- having cracks and burrs from cutting.
Special grades of premium quality bricks, called hearth bricks, are sold individually and are ideal for laying stoves.
Foundation
The base of a heavy furnace is placed on a concrete foundation, which is cast over a compacted crushed stone bed in a hole up to half a meter deep. Horizontal waterproofing from groundwater is made of 2 layers of roofing felt on bitumen mastic.
Masonry mortar
The requirements for a solution suitable for furnace work are seriously different from the usual ones.
The material is required:
- resistance to high temperatures;
- coefficient of thermal expansion as close as possible to that of masonry bricks.
Refractory mixture for laying stoves
Since the quality of the clay plays a leading role here, it is better to buy a ready-made dry mixture at a hardware store.
Checking the quality of clay
The suitability of clay for stove masonry can be checked using a folk method. From the solution, make a spherical lump the size of a child's fist and slowly squeeze it between two planks. If the clay is of high quality, the lump will crack only after being compressed to half its size. Skinny, unusable clay does not deform at all, and material of average condition will burst after being compressed by about a third.
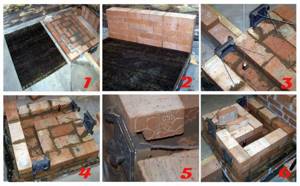
Making a potbelly stove
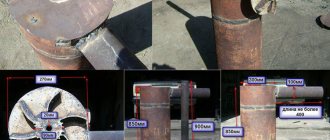
Long-burning potbelly stoves are good because they are made from any available materials - these are various barrels, old capacious cans, pieces of large-diameter pipes or simply sheet metal. We chose sheet steel as the starting material - it is a more convenient material to process. You can adapt a barrel for this, but doing work in its internal volume is not very convenient.
All sizes are presented rather as guidelines, a kind of averaged best option. You, in turn, can deviate from the dimensions of the parts to create a stove that satisfies your specific wishes.
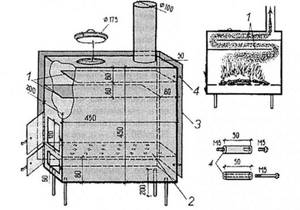
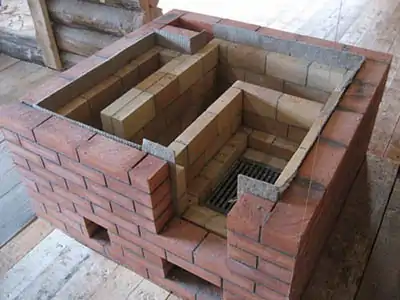
The design of a long-burning furnace is quite clear from the drawing presented above. Here are its main components:
- Combustion chamber - wood burns in it with the formation of pyrolysis gas;
- Afterburner – combustion of pyrolysis products occurs in it;
- Doors of the combustion chamber and ash pan - they are purchased in the store, but you can make them yourself;
- Chimney - in most cases it is a pipe with a diameter of 100-150 mm.
You can deviate from the drawing in one direction or another. But remember that as the size decreases, the burning time decreases and the power of the long-burning stove decreases.
The lower the power, the smaller the heated area. Therefore, it is best to provide a small reserve.
To make a long-burning stove like a potbelly stove, we need sheet steel with a thickness of at least 3 mm - this will ensure a long service life of the heating equipment. If the steel is thin, it will begin to burn through - after a couple of seasons, holes will form in it
Therefore, special attention is paid to the thickness of the steel. The optimal thickness is 3-5 mm
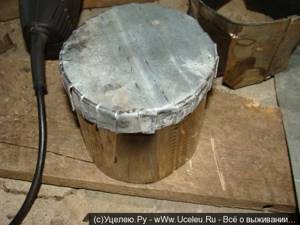
For our example, we will take the classic scheme of a potbelly stove, modify it and get at our disposal an effective wood-burning stove for a home. At the initial stage, we prepare the side sheets - in our drawing they have dimensions of 450x450 mm. Next, we make the lower walls, front and rear walls - their dimensions are 200x450 mm. As a result, we should get a rectangular box. But don’t rush to weld it together - there is a lot of work ahead.
First you need to make a base - this is the bottom wall and two side ones. We weld them together, weld the grate at a height of 80 mm from the bottom. Now we need to prepare the front wall of the long-term heating oven - we weld both doors into it, and then weld it to our structure.
We prepare two metal sheets measuring 200x370 mm. We weld the first of them to the front and side walls at a height of 160 mm from the top. Next, we prepare the back wall - we weld small metal tubes into it, which should fit into the space between the two inner sheets that form the afterburning chamber - secondary air will be supplied through them. Then we weld the back wall and a second metal sheet at a height of 80 from the top (welded to the side and rear walls).
The damper is used to regulate air flow. It is this that improves the efficiency and quality of traction.
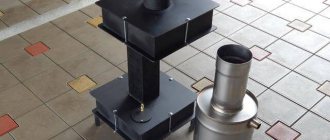
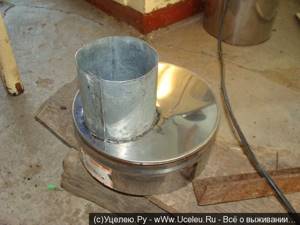
Our DIY long-burning stove is almost ready - all that remains is to figure out the top cover. We make a hole in it with a diameter of 100 mm and weld a piece of pipe for the future chimney. Now it remains to find out whether you need a hob or not - it is also welded into the top cover. At the last stage, we install the lid in place and weld it - the stove is ready, now it can be installed on a non-combustible base, attached to the chimney and started.
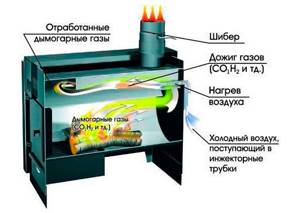
When starting the long-burning stove presented above, let it burn, then cover the ash pit so that the wood barely smolders and the generation of pyrolysis gas begins.
Another interesting long-burning pyrolysis furnace is shown in the following figure. It is made from a barrel or a piece of large diameter pipe and is equipped with a suitable lid. In the lower part, at a distance of 80-100 mm from the bottom, a metal disk with a hole in the middle is welded. A door is welded between the disk and the bottom, on the side wall. The resulting space forms our firebox. We weld a chimney with a diameter of 70-100 mm in the upper part.
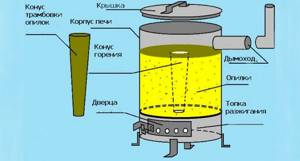
In terms of low cost of use, such a stove is a real gift, since there is no shortage of sawdust in a private home.
The resulting long-burning furnace receives heat by burning pyrolysis gases generated when heating sawdust. The sawdust itself is poured into the main volume, and to prevent it from spilling into the firebox, it is compacted using a wooden cone. When the stove starts, a fire is lit in the firebox, the cone is removed - after a while the unit will begin to produce heat.
Types of brick kilns
Next we will look at all the main models of stoves. At the same time, you will learn that they can be not only cooking, but also heating and cooking. Another variety is a wood-burning brick sauna stove (it can be equipped with a regular or fireplace insert). Let's take a closer look at them.
Dutch oven
It is a crude stove - the simplest and most compact, which is why its efficiency suffers somewhat. Therefore, a large amount of generated heat simply flies into the chimney. Rough stove heating is characterized by its simplicity. For example, a Dutch woman may simply not have a blower - in this way she is somewhat similar to the most ordinary fireplace. But in order to increase efficiency, it is still recommended to make a blower.
But such a brick stove is extremely simple to lay - the stove diagram is distinguished by its simplicity. Thanks to this, she earned her popularity. But it does not have a hob. And this is at the same time a plus, since the unit turns out to be compact. The channels for the passage of smoke rise in it like a snake from the bottom up, located one above the other. The main advantages of this furnace:
- Compactness - if you want to create stove heating for a private house of a small area, with a limited area of rooms, then a rough Dutch oven will be the best option;
- A simple masonry scheme - accessible for a novice stove maker;
- The ability to give any shape - from rectangular to round or any other.
It should also be noted that there is a small load on the foundation - this is due to the low weight of the Dutch wood-burning brick oven. Therefore, there is no need to create a strong foundation.
Wood-burning brick stoves
In some ways they are similar to the rough stones described above, but they differ in their special design - their design contains heaters filled with stones. The firebox in them does not go into the steam room, but into the next room. If necessary, the doors of the fireboxes are made of glass - thanks to this, a fireplace is formed in the dressing room, which serves as an excellent decoration.
Russian stove
When considering the diagrams of brick stoves for the home, you should definitely pay attention to the diagram of a Russian wood-burning stove. Such a stove will be a worthy decoration of your home. It is universal in use - acts as a heater, is used for cooking (right in the firebox), and is used for drying clothes at home.
You can also sleep on it, enjoying the warmth emanating from it.
It is universal in use - it acts as a heater, is used for cooking (right in the firebox), and is used for drying clothes at home. You can also sleep on it, enjoying the warmth emanating from it.
Sleeping on a Russian stove is a special pleasure, almost inaccessible nowadays. But at least once in your life you should give yourself such pleasure and sleep on a Russian stove heated with wood.
Heating and cooking stove
A do-it-yourself brick oven for a home can be made according to a universal scheme - according to the Swedish one. This stove (often called a Swedish stove) runs on wood and is a multi-purpose device. It works as a heating unit, can heat water and bake pies in the oven, and can be used to cook food in traditional dishes - using a simple hob.
Let's look at the features and advantages of such a brick oven:
- Large firebox for storing firewood - ensures long burning;
- The presence of an impressive convector – effective heating of rooms;
- The ability to build in water tanks and ovens expands the functionality of the stove;
- Maximum use of the generated heat - the temperature of the combustion products here is quite low.
It is quite difficult to give a specific typical drawing of a stove, since the masonry schemes are different everywhere. There are also differences in filling - in some places ovens are used, and in others there are built-in tanks for heating water.
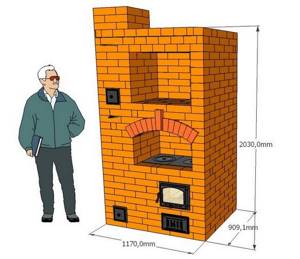
The sizes of Swedish brick wood stoves can vary greatly. Narrow options involve using only the hob. If you need an oven, the oven will increase slightly in size. That is, it can not only be compact, literally a few bricks wide, but also quite large, occupying a decent area.
Some of these universal wood-burning brick stoves require a strong foundation, which imposes restrictions on the possibility of their construction.
How can you paint a stove?
It is clear that a newly minted master will not be able to build a beautiful stove the first time due to lack of experience. But this is a fixable matter, because the outside of a brick wall can be covered with paint. Previously, they were plastered and covered with two layers of chalk or lime whitewash, but now there are simpler and more convenient means. In addition, lime is easily transferred to clothing by accidental touch and constantly needs to be renewed.
If we talk about how to paint a brick stove, here are the following options:
- organosilicon heat-resistant enamel of the KO brand, designed for high temperatures;
- silicate or acrylic paints;
- heat-resistant varnish (for example, PF-238) mixed with dye.
In any case, the coating is applied 2 times, the second layer is applied after the first has dried.
The tools used are a brush and a roller. It is advisable to pre-treat the surface with a special primer intended specifically for such purposes. Date: September 25, 2021
Brick or metal?
If you plan to heat the room only with a stove, then a brick stove is better - it releases heat into the room longer and cools down more slowly. It needs to install a strong foundation that holds the structure.
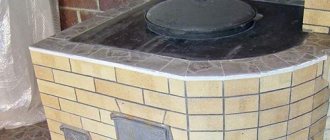
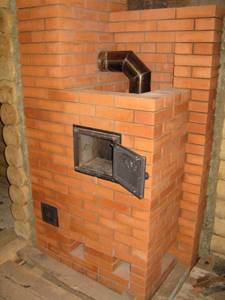
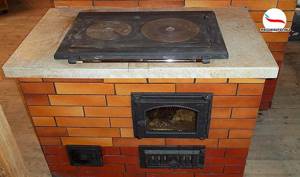
Photo 3. A finished simple stove for heating a summer house. Additionally equipped with a hob.
A metal stove is suitable when the house already has heating or the room is used only from time to time and it needs to be warmed up quickly. The metal stove is lightweight and does not require installation of a foundation.
The choice of one type of stove or another depends on the conditions where it is planned to be used.
DIY FRIEND
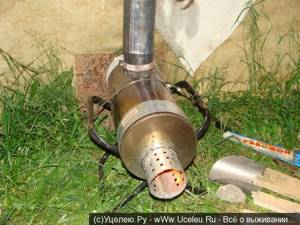
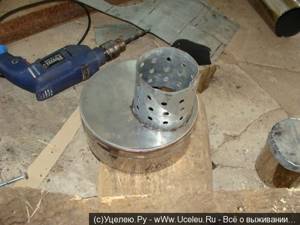
Dear visitors to the “Homemade Friend” website, today we will look at how to make a mini camping stove with your own hands from a tin pipe with a diameter of 200 mm.. On a long hike or on an overnight fishing trip, you will have to be left alone with the wild nature and its unpredictable whims. To comfortably spend the night in a tent, you will definitely need a small and compact stove for heating. In the summer, of course, there is little need for it, but in the autumn or winter, such a stove must be in the equipment of a hunter, fisherman, tourist, SURVIVALIST
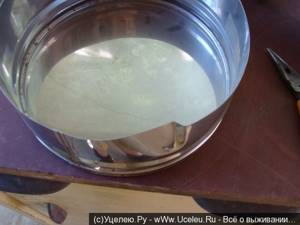
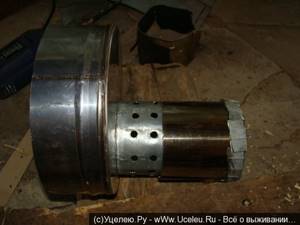
This stove can be easily made with your own hands, for which you will need a tin pipe with a diameter of 200 mm, 2 plugs, an 80-100 mm pipe for the chimney and ash pan. We cut off a piece of pipe 50 cm and make a hole for installing a chimney guide, where the flue is installed and riveted from the inside, the chimney pipe itself is secured with a clamp.
The furnace-blower is made of a sheet of tin rolled into a pipe; holes are drilled in 3 rows along its entire length; they are necessary for the formation of draft and natural air circulation to the combustion center. There is also a special plug-glass with which you can regulate the intensity of combustion, or stop it altogether.
So, let's look at the step-by-step instructions.
Materials
- tin pipe 200 mm length 50 cm
- chimney pipe 80-100 mm
- clamp
- folding fishing chair
- sheet metal 0.5-0.7 mm
Step-by-step instructions for creating a mini camping stove with your own hands.
You will need a 200 mm tin pipe, 2 plugs and clamps for a reliable tie.
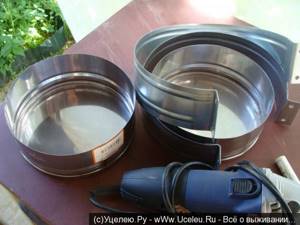
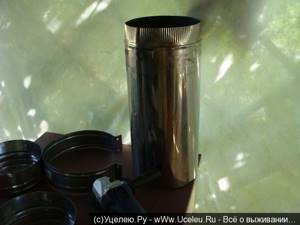
Chimney pipe 80-100 mm.
A piece of pipe 50 cm long will serve as the furnace body.
You can immediately install a plug in the back.
A hole is cut for the chimney flue. It is riveted from the inside.
A strip is cut from sheet metal to make a blower.
Plug - glass.
Holes are drilled in 3 rows; they are needed to create better traction and natural air circulation.
Using a plug, you can regulate the draft and air supply to the combustion source, or completely block the holes to extinguish the fire in the stove.
The stove is installed on an unfolded fishing chair, like this.
The tests are already carried out directly in the tent. Such a stove will heat an army tent designed for a platoon in a short time; the stove consumes quite a bit of fuel in economy mode
You can throw firewood into the stove and install a plug on one hole, thereby maintaining low combustion and maximum heat transfer, which is very important in camping conditions.
We hope this material was useful to you
Thank you for your attention!. Tweet
Tweet
41 shared
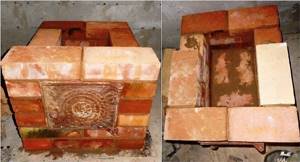
A short guide to making a potbelly stove
Dutch oven diagram.
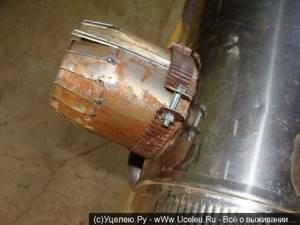
Before starting work, you should prepare the base of the future stove - clean the old can from dirt and rust. The container will be used as an oven upside down. Using a chisel and hammer, you need to cut out rectangular holes for the vent and firebox (Fig. 2). The doors are hung on hinges attached to the body. Another hole - in the form of a circle (for the chimney) - is cut at the bottom of the product, closer to its edge. You can build a chimney with your own hands from an iron sheet or purchase a pipe at a hardware store.
For a potbelly stove you will need a serpentine grate. It is made of steel wire: the wire is bent several times and passed into the container through the neck. The stability of the structure is ensured by special supports made of steel tubes. To reduce heat losses, protect the surface from various damages and enhance fire resistance, the body is lined with fireclay bricks.
Required tools and materials
To build a small stove you need:
- 60 pcs. red stove brick
- 37 pcs. fireclay bricks
- 20 liters of clay solution
- one vent door
- one grate
- one firebox door
- one cast iron plate
- one valve.
The tools you need to prepare are:
- trowel
- pick hammer
- level
- plumb line
- roulette
Rules and nuances of operation
For a stove to be economical, it must be maintained in good condition. A crack only 2 mm wide in the valve area will provide heat loss of 10% due to the uncontrolled flow of air through it.
The stove also needs to be heated correctly. If the blower is very open, 15 to 20% of the heat can fly out into the chimney, and if the combustion door is open while the fuel is burning, then all 40%.
In order for the oven to heat up evenly, the thickness of the logs should be the same - about 8–10 cm.
Firewood is laid in rows or in a cage, so that there is a gap of 10 mm between them. There should be a distance of at least 20 mm from the top of the fuel fill to the top of the firebox; it’s even better if the firebox is 2/3 full.
The bulk of the fuel is ignited with a torch, paper, etc. It is prohibited to use acetone, kerosene or gasoline.
After kindling, you need to close the view so that the heat does not escape through the chimney.
When adjusting the draft during kindling, you need to be guided by the color of the flame. The optimal combustion mode is characterized by a yellow color of fire; if it turns white, the air is supplied in excess and a significant part of the heat is thrown into the chimney; The red color indicates a lack of air - the fuel does not burn completely, and a large amount of harmful substances is released into the atmosphere.
Cleaning (including soot removal)
Cleaning and repairing the stove is usually carried out in the summer, but in winter you will need to clean the chimney 2-3 times. Soot is an excellent heat insulator and if there is a large amount of it, the furnace will become less efficient.
Ash must be removed from the grate before each fire.
The draft in the furnace, and therefore its operating mode, is regulated by a viewer, a valve and a blower door. Therefore, the condition of these devices must be constantly monitored. Any faults or wear should be repaired or replaced immediately.
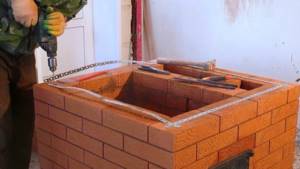
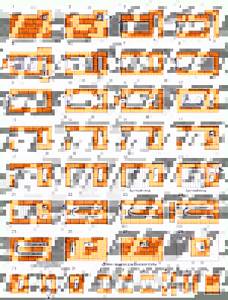
Brickwork algorithm
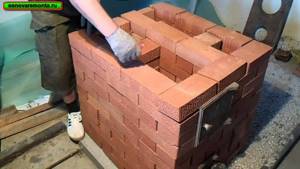
The stove is laid out on a concrete base.
The construction of the stove takes place on a finished base, which protrudes beyond its limits by 10-20 cm. On the side of the firebox, experts recommend leaving 50-70 cm for installing the pre-furnace platform. The construction of the structure is carried out using clay-sand mortar according to the prepared drawings.
Make the first two rows continuous masonry. On the third - start laying out the chamber for the blower by installing the door on the wire. The fourth level involves further laying bricks, strengthening the ash pit and equipping a ledge for the grate. Install the grille itself without mortar on the fifth row, leaving gaps of 5-7 mm.
Having reached the sixth row, install the combustion door in the portal. Secure it with steel wire or slats to the mortar. From levels 7 to 11, continue laying out the firebox.
Metal tape for fixing masonry
After completion of 11 p.m. lay a metal strip or corner to support the hob. Then install the decking for the panel. From rows 12 to 15, begin building walls around the chamber and a chimney coming from the firebox. To construct the fireproof vault, use a sheet of flat slate. At 16 r. cover the cooking vault with solid brickwork and continue to form a smoke outlet. When finished with the work, install the chimney door to clear soot and debris - use a steel plate. Secure the element with mortar. From rows 19 to 22, lay the bricks according to the pattern.
Lay out the niche for the oven from the 23rd row, on the next one - fold the walls and install the cabinet. At the bottom of the chamber, place strips of asbestos cardboard around the perimeter of the niche. Wrap a rope made of the same material around the oven. These works are aimed at strengthening contact with the brick and better heat accumulation. Finish the closet arrangement.
Starting from rows 25 to 27, lay the laying around the oven. At the next level, install a second door for the outdoor smoke duct. At 29, continue the laying and make the first valve, install the second on the 32nd row, which is also the basis for a brick or metal pipe. From 30 to 35 - continue construction of the furnace according to the project.
After completing the work, dry the stove and test fire it. This event is best carried out with a fire service specialist to draw up a report on the safety of the structure.
Characteristics
When purchasing any model, preference is given to it, for some reasons. The buyer selects a product so that it fits the formed requests. Therefore, each model has a number of characteristics that you need to consider when purchasing a stove for your home.
The first characteristic in terms of significance, and also in terms of clarity, is the volume of the chamber. According to volume indicators, it is customary to secretly distinguish between three types of stoves.
- Mini ovens with a volume of up to 15 liters are usually chosen by those consumers who already have a stationary oven.
- The average volume is considered to be in the range from 15 to 25 liters.
- Everything that exceeds the specified limit belongs to professional ovens.
Do not think that choosing the maximum volume will provide a solution to all problems. Firstly, due to its dimensions, the stove may not fit the chosen location. Secondly, larger ovens have more power, which means you will have to pay more each time you fire up the appliance.
The manufacturer, taking into account a number of factors, installs heating elements of a certain power. This happens consciously and expediently, which is why you cannot find electric furnaces with a volume of 9 liters and a power of 2 kW. Most potential buyers believe that the greater the power of the device, the better. This is not always the correct opinion.
The simplest furnace models lack even a basic control interface. As additional functions are added, the capabilities of the device also change. Most housewives choose options that provide for changing operating modes.
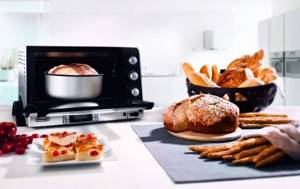
Beautiful pastries
Smoothly adjusting the temperature of the heating element or turning it off and on allows you to efficiently implement even the most capricious recipes. The radiation from the top and bottom panels is ideal for roasting meat or fish. In this process, an important factor is high temperature, but acting evenly. The heat from the top panel alone will replace the grill and cope with flour products. The included bottom panel is suitable for heating ready meals.
Good to know: Stove-fireplace with oven, original design for home and garden
An important characteristic that you need to familiarize yourself with before choosing a mini oven is the package of additional options. It can include any combination of functions for programmed heating of ready-made dishes, defrosting food, boiling milk
The intelligent system itself sets the time and temperature conditions, depending on the mass entered by the user. Once the process is complete, a signal will sound and the oven will turn off automatically. Manual programming includes setting the temperature, time and number of heating elements. A modern mini electric tabletop oven allows you to remember the configured program in case of frequent use.
Another characteristic is the presence of electric burners on the horizontal surface of the body of certain stoves. This addition was invented in order to make the device more versatile. This oven with burners can cook two dishes at the same time. One is cooked in the oven, and the other on the burner.
What difficulties and problems may arise during laying
When constructing stove walls, inexperienced craftsmen do not use a plumb line; as a result, the wall deviates from its vertical position, which creates a threat of destruction.
In case of deviation from the vertical, the masonry is soaked with water and disassembled, then laid out again using a plumb line.
The bottom of the combustion chamber is inclined towards the stove door. The slope (pillow) is filled with clay mortar and crushed stone. If a brick is placed on a cushion that is not dry, it may become deformed.
If this happens, the bottom of the combustion chamber is dismantled, soaking the seams. Then the bricks are taken out, the slope is restored and allowed to dry. After this, the bottom of the firebox is placed again.
Incorrect consistency of the homemade solution leads to the appearance of cracks during operation.
If there are few cracks on the walls, they are covered with new, high-quality mortar. If the cracks are deep and smoke comes through them, the mortar crumbles a lot, then the stove will most likely have to be rebuilt.
The stove of this model uses wood as fuel. If you burn coal in the firebox, a lot of ash will appear, and the firebox will overheat, up to the formation of cracks due to uneven heating of the upper and lower parts of the heating structure. In this case, the cracks are sealed with mortar, and firewood is used instead of coal.
Where is it more efficient and safe to place a small-sized stove?
In order for the heating stove to efficiently release heat, it is placed in the middle of a one-room dwelling or built into interior partitions. Small heating and cooking stoves are placed in the center of the kitchen or against the wall.
The heating structure will be safe if the ceiling is properly cut. A spark arrestor is placed on the chimney.
The combustion chamber is a source of increased danger. The stove is placed so that coals and sparks do not fall on walls, doorways, or furniture. If necessary, walls are protected with non-combustible materials (flat slate, ceramic tiles).
Place for the furnace
Choose the optimal location for the heating stove. For example, a stove installed in the center of the room will distribute heat as efficiently and evenly as possible. However, such placement of the stove is not always convenient.
Stove in the center of the room
If the stove structure is placed against the wall (this option is the most popular and frequently used), cold will flow across the floor of the house.
Select in advance the location of the combustion chamber door. Design the stove so that in the future you do not have to carry fuel throughout the room, spreading dirt around the room.
The heating stove is located against the wall
The best option is to install a firebox in a room that is rarely visited.
Recommendations regarding the foundation are standard - an individual concrete foundation is installed. It cannot be connected to the main foundation.
Calculate the design of the foundation in such a way that it is able to withstand the load not only of the furnace itself, but also of the smoke exhaust structure, which is also strongly recommended to be built of brick.
Design of a Russian stove
Any mistake made during the construction process leads to the fact that the entire structure has to be redone. A diagram of the laying of a Russian stove, which is attached to the drawing and can be very different, can help in this matter.
Based on their size, these heating units are divided into mini, medium and large. They are used for heating and cooking. They definitely have a bed. To build them yourself, you need to study how a Russian stove works.
If you look at the diagram of a traditional design, you can see that it consists of:
- ovens used for drying firewood are not always made;
- a cold stove for storing kitchen utensils, it may also not be there;
- pole - a niche located in front of the crucible. A hob is placed in it. If the stove is located in a different place, food is kept in the pole to keep it warm;
- hearth - the bottom of the crucible. It is built with a slight slope towards the entrance to the chamber to make it easier to move the dishes in it.
- a furnace or cooking chamber used for heat-resistant cookware and fuel. The chamber arch is similarly made with a slight slope towards the entrance. Due to this design feature, hot air collects under the ceiling, due to which the stove bench and side walls warm up;
- cheeks – the front wall of the furnace;
- oven mouths - holes between the cheeks;
- cross-pipe - a niche above which the smoke exhaust pipe begins;
- views - a window with a door that serves to block the chimney. Using it you can get to the damper that regulates traction;
- a bench located behind the chimney above the crucible. When the oven is running, it warms up.
In the diagram of the laying of a Russian stove with a stove, you can see different departments. Their presence allows you not to heat the entire room in the summer, but to use exclusively the hob. As a result, a pleasant microclimate is maintained in the house and fuel consumption is reduced. In winter frosts, all departments are heated in the stove, and then not only the oven, water and stove are heated, but also the house itself.
Before you build a Russian stove with your own hands, they carry out a number of preparatory activities, which begin with choosing its location.
Making a small stove for a summer house with your own hands
In this example, we will consider in detail the preparatory and main work on the construction of a compact heating mini-stove at the dacha. Important points of work are:
- selection of a finished project;
- choosing a place in a country house to build a stove;
- purchasing materials;
- purchase of metal parts and accessories;
- preparation of oven tools , purchase or rental of power tools (grinders, vibrating drills);
- construction ;
- construction of a stove.
A mini oven in the country will solve the problem of cooking and heating the house in the off-season. A small stove should not consume a large amount of wood for heating, yet have high efficiency and withstand seasonal temperature changes. There are several types of structures for these purposes.
Why is a mini-oven attractive?
A mini brick stove for a summer residence is quite attractive in many respects:
- It occupies a small area, which is equal to 0.40 meters square. Despite its very small size, it can give off heat for a long time and can serve as an alternative to a metal stove-stove.
- Due to its small size, there is no need to build a solid foundation for it. It can be laid out directly on the floor.
- If the floor is wooden, then it is advisable to place a sheet of metal with asbestos on the bottom of the stove to protect the floor from fire. Compared to a potbelly stove, it is more functional, as it has a hob on which you can cook food.
- It can be made entirely with your own hands. This will make its price insignificant.
To provide this functionality, the oven design includes:
- Cast iron stove for cooking.
- Chimneys. allowing to increase the efficiency of the furnace.
- Smoke tooth. Its use allows you to turn a mini-oven into a fireplace.
A mini brick stove is laid out within one working day, of course, if you have work experience.
After laying out the stove, you can try it in operation by partially lighting it, using wood chips or paper for this.
Attention: It is prohibited to light a stove using large logs, as under the influence of high temperatures, cracks may appear in the stove structure. After test lighting, without allowing the stove to warm up, it is allowed to dry naturally
This may take up to 2 weeks
After test firing, without allowing the stove to warm up, it is allowed to dry naturally. This may take up to 2 weeks.
Masonry mortar
If you are making mini brick sauna stoves, then you need to make a solution taking into account high humidity.
- To lay out a mini-oven, you can use various types of mortars, such as cement-sand, cement-screening or clay-sand. Cement-screening mortar can be used to fill the base under the furnace, if necessary. Cement-sand mortar is prepared for laying out the first two rows of the furnace, and clay-sand mortar is used to lay out the entire masonry, starting from the third row.
- Clay-sand solution requires much more time to prepare. To obtain a high-quality solution, the clay is soaked in the evening to soften all the smallest particles of clay. Moreover, it is necessary to select the desired fat content of the clay, or rather the solution, by adding sand or fattier clay to it. This process is very labor-intensive, but it is necessary so that the mini-stove ends up being strong enough.
- You can check how ready the solution is for use using a trowel: if it does not stick to the trowel and does not leave its marks on it, then it can be used. At the same time, its thickness should correspond to the thickness of mashed potatoes.
Step-by-step masonry diagram.
Advantages and disadvantages
Advantages of mini-ovens:
- small dimensions allow installation in small rooms, taking into account the recommended distances from the walls without loss of total area;
- quality and compliance with fire safety standards make them safe for installation in wooden garden houses;
- in winter, the stoves can be easily dismantled and stored in the pantry to prevent theft;
- the quality of the materials allows the devices to easily withstand long-term interruptions in operation and being in a damp and unheated room;
- stoves – small fireplaces cost significantly less than large models. Therefore, you can buy them and enjoy the sight of a burning fire;
- simplicity of design and a small amount of materials allow you to make such devices yourself;
- With a little imagination, you can make such a little thing into an interior decoration item for your home.
The only disadvantage that can be highlighted is that little firewood can be placed in a small firebox, therefore the burning time of the firebox is reduced. This can be inconvenient, especially if you need to add fuel at night. Otherwise, the advantages of small structures are undeniable.
Swedish cooking oven
A small combined structure, equipped with a hood, is intended not only for heating, but also for cooking.
Strict adherence to the order, the use of a plumb line and a building level will ensure the construction of a geometrically correct, functioning structure. Excessively thick mortar joints or the presence of voids in them are not allowed. It is recommended to monitor the cross-sectional parameters of the smoke channels to avoid their narrowing.
Upon completion of work, the finished oven is cleaned of dust and excess solution and left to dry for several days. High-quality materials, compliance with work technology and fire safety measures will ensure a long period of its impeccable service.
All lovers of country holidays dream of a stove in their cozy cottages. As you know, a brick stove is the oldest universal design for heating rooms. Its effectiveness and high performance have been proven for centuries.
It is not at all necessary to build a serious bulky structure. Sometimes a small-sized stove is enough, which you can build with your own hands. Models may differ in shape, size, type or design of the chimney, but in general, their construction will not take you much time and will not require serious stove-maker skills.
How to build the simplest brick oven?
First you need to decide what you want to get from your future stove. If you only need to heat the rooms, and use bottled gas or electricity to cook food, then choose an option without a stove and oven. Anyone who loves soft healing warmth chooses the option with a bed.
For regular cooking of large quantities of food and pet food, a simple oven with a hob will be just right.
We will look at three examples of stoves with step-by-step guidance on how to lay them:
- Simple direct flow;
- With hob;
- Heating.
Let’s say right away that you cannot expect high heat transfer from a simple design devoid of gas circulation. For this reason, such stoves are installed in garages and other small rooms with an area of no more than 16 m2.
We will consider this option so that beginners get their first simple lesson in practical masonry.
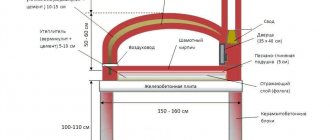
Such a stove does not require a strong foundation. Having poured large crushed stone in a layer of 15-20 cm, filled it with cement mortar and leveled the surface, after a couple of days you can begin laying.
Stove dimensions in plan: width 2 bricks (51 cm), depth 2.5 bricks (64 cm). Since there is no blower chamber in it, holes for air intake are drilled directly in the combustion door.
The procedures for this design are simple. The main condition during work is to ensure that the seams are bandaged so that the top brick covers the seam between the two lower ones.
On the eighth row, the firebox is narrowed, using halves and “three-quarters” - ¾ of a whole brick. The exit from the firebox is thus obtained with a cross-section of 1 brick (125x250 mm).
The next row (ninth) is laid out in the same way as the seventh, using a whole brick.
After this, the brick tier is placed on the edge flush with the inner edge of the bottom row. The new tier is laid flat, using two whole bricks and four “three-quarter” bricks. In this way, the smoke channel is again narrowed in order to trap gases and increase heat transfer.
On the next tier, the stones are placed on edge. A brick is placed in the middle of the smoke channel. In this way, the oven is raised another five rows (one tier on an edge and a brick in the middle, the other tier flat).
The remaining four tiers are laid flat. With the last two rows of masonry, the smoke channel is narrowed to a size of 12x12 cm (half a brick). At this level, a smoke damper is placed in the furnace. A steel pipe is inserted into it from above.
Construction of a country stove made of bricks
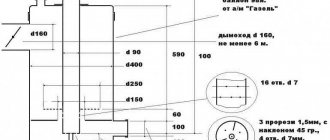
Order drawings for masonry with explanations.
We will need clay-sand mortar, building brick (double sand-lime brick M 150 will not work, we need clay), trowel, bucket, mixing trough, plumb line, level, asbestos cord, fireclay brick, doors, valves and other oven fittings, galvanized steel wire, hammer with pick, grinder with disc for concrete.
The oven will take up 0.4 m², and its weight will be insignificant, so you can do without a foundation. If your floor is weak, then it is better to make a screed under the masonry.
So, laying a small country stove step by step:
- On the place chosen for the stove we place roofing felt or glassine measuring 530x780 mm for waterproofing;
- Pour sand one centimeter thick on top and level it;
- According to scheme No. 1 (the figure at the beginning of the paragraph), we lay out the first row of bricks without fastening them together, and level it using a level;
Lay out the first row.
- Apply a thin layer of clay mortar. We take the blower door, wrap it with a double layer of asbestos cord and secure it with twisted wire.
- Lay out the second row of bricks.
Second row with door.
- We take fireclay bricks and lay out the third row. After its formation, we install the grate. We maintain gaps for thermal expansion of materials of up to 1 cm.
We lay out a row of fireclay bricks with space for the grate.
- Using a brick placed on an edge, we lay out the fourth row. Inside the chimney duct we make supports for the internal partition. We place the “kick-out bricks” of the rear wall without clay with a slight protrusion outward.
- We install the combustion door, pre-wrapped with asbestos. We fasten it with twisted wire and temporarily fix it with two bricks: we put one on the back of the butt, the other on it and the door on top.
We install the combustion door.
- We lay out the fifth row flat along the contour of the fourth, and the sixth on the edge. We wipe down the chimney walls with a wet rag.
We secure the door with wire.
- We lay the seventh row flat from three-fours (we cut off 3/4 of the whole brick with a grinder) to connect with the eighth row. The back wall is on the edge again.
We cut the bricks with a grinder.
- In the eighth row, we close the firebox door with two bricks above it. We install a beveled brick above the firebox to center the flame under the burner.
Cover the combustion door.
- We place the ninth row offset back (slightly) to keep the door open. Before laying, we lay out wet asbestos cord to seal the joints of the brick and the hob.
- In the tenth row we begin the formation of a chimney, which will gradually expand backwards. We will make an attached pipe, so as not to displace the center of gravity of the structure, or a mounted one made of light iron.
We begin to form the pipe.
- In the eleventh row we lay a valve, seal it with an asbestos cord coated with clay.
There will be a valve here.
- Next comes a quadruple chimney, which is connected to a light metal pipe.
We continue the chimney to the joining point.
- Now we take out the knockout bricks and clean the lower part of the chimney from debris.
We bring the chimney under the pipe.
- We close the gap between the first row of bricks and the floor with a metal L-shaped sleeve and nail the baseboard.
- We whitewash the stove or cover it with stove varnish, seal all the joints between the metal and the brick. Metal parts can be painted with black fireproof paint.
We whiten and decorate the stove.
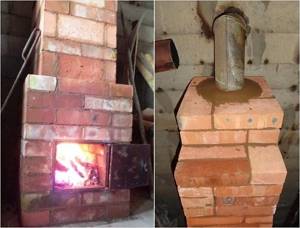
- We make a test fire with paper and small branches, then give it 2 weeks to dry.
As you can see, all the manipulations are not so difficult to do on your own. Material and labor costs are relatively small, and the construction does not take up much space.
At the same time, we received a heating and cooking device that will perfectly heat a small country house, give your cooking a unique taste and aroma of smoke, and create a pleasant atmosphere and comfort.
Advice! If there is an opportunity to invite a person more or less experienced in the stove business, at least as a consultant, be sure to take advantage of it, since building stoves from a book is quite difficult, it’s better to see it once.
What to consider when choosing a stove
technical and functional
The most important parameters that should be followed when choosing a long-burning stove are the maximum possible area and heating time. With various configurations, the equipment can heat from 80 to 250 m2. The smoldering time of one batch of fuel material divides gas-generating furnaces into three categories, namely:
- units with minimal heating time - up to 3-4 hours;
- units with an average heating time of about 6-8 hours;
- units with a maximum heating time of more than 10 hours.
Project preparation
To understand how to make a mini-oven at home, you need to study the recommendations of specialists. The main requirement for installed heating is the ability of the product to give off heat within several hours after heating. The final choice of project is influenced by three parameters:
- Cost of building materials.
- Climatic conditions.
- The area of the house and the number of heated rooms.
Much depends on the taste of the property owner. A correctly built heating stove can efficiently heat the entire house and complement the previously created interior.
Step-by-step construction of the furnace
Selection and production
- The Russian oven is ideal for preparing all dishes; food simmers in it and acquires an absolutely original taste, which is not achieved with quick cooking. It has a high efficiency in heat transfer; you can not only cook on it, but also dry things, sleep and use it for stove heating (but only 1-2 rooms, if they are adjacent). Previously, people even washed in such ovens. The downside of such a unit, of course, is its size and complexity of masonry. Only connoisseurs have such stoves.
- Brick - when laying it with your own hands, you should not get carried away with fireclay, it perfectly accumulates heat, which is more suitable for heating, and for cooking you will need to spend a lot of fuel, the heat from which will dissipate into the room, which will be completely inappropriate in the summer. The only exception will be a two-bell oven.
- Swedish - such a stove is suitable for both cooking and heating; it is easy to make with your own hands.
Order:
- solid ceramic bricks (M150, about 600 pcs.);
- clay dry oven mixture (approximately 200 kg);
- steel corner 40x40 – 1.7 m;
- steel strip 50x5 – 0.65 m;
- iron sheet (in front of the firebox) – 1 pc.;
- flat slate sheet (10 mm) for the cooking chamber – 1 pc.;
- oven appliances (grids, doors, valves).
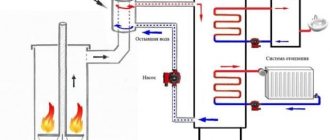
Particular attention should be paid to the traditional oven; it plays a very important role. The chamber serves as a barrier to gases from the firebox, which burn near the surface, heating the hob. And if you make the oven wall double, it can be used as a heat exchanger.
The stove can be heated with either wood or coal. If the duct part opens into another room, it will serve as additional heating in winter and heat removal in summer. The heat-storing functions should be performed by the design material, this will be more convenient.
Foundation:
It must be solid, with a cement screed flush with the floor, lined with asbestos sheets with allowances on the sides. Asbestos should also be laid on the floor, then iron, felt soaked in a clay solution, and only then should the laying begin.
All these measures will help to avoid heat loss, since the balance in the Swedish oven must be strictly observed. It is better to additionally use video instructions when performing work.
- A fireplace stove - the principle of its installation is quite simple and can be done with your own hands. You will only need to slightly modernize the finished metal structure. But a modern oven is not suitable for cooking. Therefore, it is worth separating the hob and fireplace, and it will turn out modest and beautiful - one burner and a small hearth. Not economical, but suitable if you visit the dacha on weekends.
- Cooker - suitable for a dacha or for a summer kitchen; it is also not difficult to install with your own hands. Similar to Swedish, but without channels.
Advantages:
- Saves bricks (approximately 300 pcs.), can be built in a residential area.
- You can even bake bread in the oven.
- Instead of a tank, you can put an expander in the attic and a register; there will be enough warm water for a shower.
- The roasting pan is sturdy and can withstand intense fire.
Recommendations for using the heating unit
It is better to build a compact model in small-sized country houses. This is an excellent heating device that can be used in small production areas without central heating. For proper operation, it is necessary to remove ash in a timely manner and remove accumulated soot.
More interesting and educational information is presented in the video:
Average score of ratings is more than 0
Share link
Comments There are no comments yet, but you could be the first...