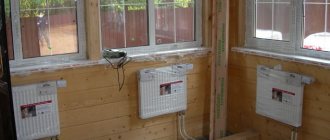
Who said that a potbelly stove for a summer residence is out of date? Yes, there was a time when potbelly stoves were installed only in garages. But life changes. Unpretentious wood-burning stoves are experiencing a rebirth and becoming fashionable design elements.
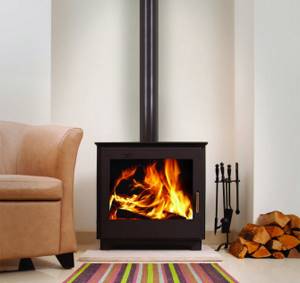
A stove in a country house is always cozy. I think each of us enjoys sitting in the evenings with a glass of wine, looking at a cozy live fire. Previously, this option was only available in fireplaces. However, massive and complex fireplaces are too expensive for modern homes. So, there is now a new trend among current property owners: installing potbelly stoves for their dachas, summer houses and even in apartment interiors.
19 design ideas and installation options for country stoves - potbelly stoves
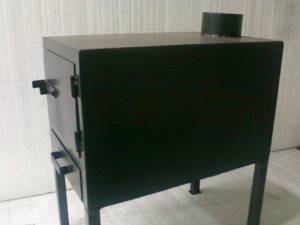
- Stove on a metal pedestal
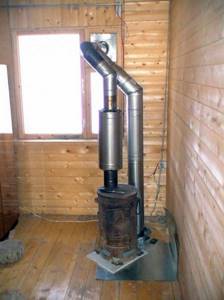
- Stove with a straight pipe, against the wall
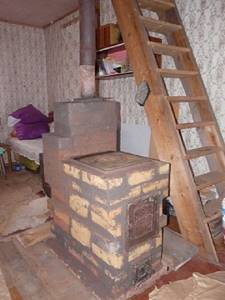
- Cast iron stove-stove near the column
- Installing the stove in a niche
- The stove as a “screen”
- Potbelly stove inserted into a former fireplace
- Stylish stove in a modern interior
- Stove near a steel wall
- Furnace with secret pipe
- Futuristic hanging stove stove
- Stove corner
- Cast iron stove as a kitchenette
- Stove-fireplace in the center of the room
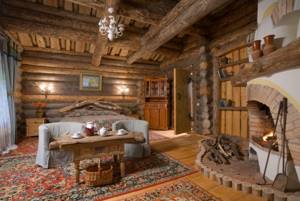
- Potbelly stove “like in an old castle”
- Wall oven
- Corner stove
- Oven as a kitchen module
- Potbelly stove in casing
- Stove as a piece of furniture
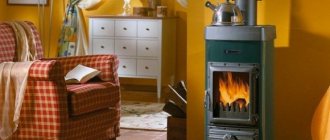
The stove as a “screen”
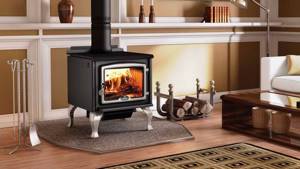
Iron potbelly stove in the interior: not only for heating, but also for beauty
For many, the aesthetic component is important, so people are happy to buy stoves with a large transparent door made of heat-resistant glass. It turns out to be a mini-fireplace. Beauty + heating. What else do you need for a cozy house?
Fire safety requirements
It is this selection criterion that is fundamental. Older designs of potbelly stoves are metal stoves made from cast iron segments or metal sheets. Such units were not famous for their wide variety of forms. These were mostly cubic or cylindrical structures. The inside is a firebox where wood or coal was burned.
The fuel burned in the firebox and heated the device to very high temperatures. In essence, the oven was one hot element, from which any thing that fell on its surface could catch fire. According to statistics, fires from operation occurred more often than from all other heating devices in general.
If we talk about modern models, we should divide them into two categories:
- Factory ones.
- Homemade.
In factory conditions, where each technological stage is quality controlled, it is possible to produce potbelly stoves that meet all fire safety standards and requirements. With homemade analogues, things are worse. Nobody controls this production. Each master himself comes up with devices and devices that will supposedly protect consumers’ property from fire. That is, there is no guarantee.
Therefore, when the question arises of which option to prefer, everyone decides for themselves. It is important to prioritize here:
- The first is the high safety of operating a potbelly stove in apartment conditions.
- The second is the price equivalent. Of course, the homemade option is cheaper. But is it worth the risk of purchasing a low-quality device at a low price? After all, it can cost a hundred times more if a fire occurs.
Furnace finishing options
Do not underestimate the decor - it determines how well the stove will look in the interior and the indicator of its thermal efficiency.
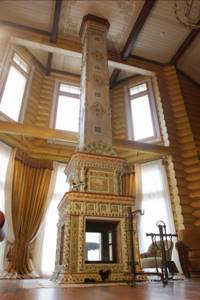
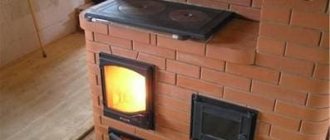
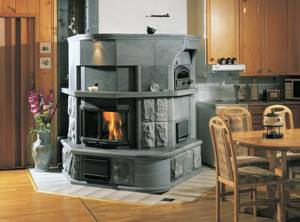
Large tiled stove in a wooden residence
The following options are used for finishing:
- Traditional solutions include cladding with clay mortar. Such a mud stove will fit perfectly into the decor of a rustic kitchen or into a Provence-style interior.
- The tile finish consists of elements that are similar to ceramic tiles, and inside they have a fastening in the form of a protrusion, which is called a rumpa. This option is an excellent solution for a luxurious interior.
- Tiles are considered an economical option. In this case, products created by pressing with double firing are used. This type of product is called majolica.
- Terracotta tiles imitate stone designs. Similar products come in square and rectangular shapes.
- The design of the stove is done using clinker tiles. This cladding is durable and reliable.
- The most budget-friendly options include decorating with plaster and paint.
- The most labor-intensive option is the use of natural stone.
The combined finish looks good. On the kitchen side, the surface can be tiled, and on the living room side, with stone.
Stove-fireplace, lined with gray tiles, in the kitchen of a country house
Cladding is a troublesome and costly task. In some cases, it is easier to hide flaws or add an accent with simple decor. You can arrange cast iron pots or ceramic dishes, hang embroidered towels or hang bunches of herbs.
Painted fireplace stove in the bedroom of a wooden country house
Next to the stove you can place a stand for firewood, a woodpile, a grip and other accessories.
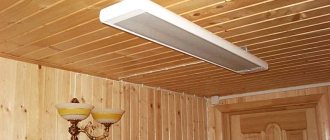
Finnish wood stove in the living room
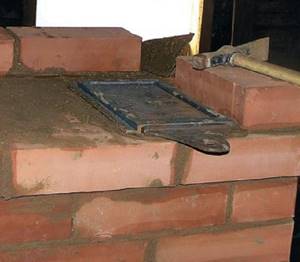
Start of installation: screen, wall protection
The wall near which the stove will be placed is made of wood, with foam inside and plasterboard outside. Therefore, in order to protect the wall from the high temperatures of the heated device and single-layer pipe, it was decided to construct additional insulation for the wall. As a result, profiles for plasterboard 75 mm wide were installed, fire protection was laid inside - “Paroc” with a 40 mm foil gasket and an air gap between the insulation and the wall. Each seam was taped with aluminum tape and a glass-magnesium sheet 8 mm thick was sewn on top.
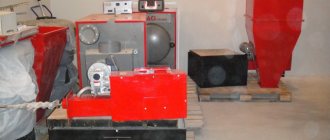
The process of making a potbelly stove
Nowadays, most residents of large cities have already forgotten what potbelly stoves are and have not even thought about installing such a stove in their apartment. In fact, a potbelly stove for an apartment will help you survive severe frosts if problems arise with central heating. Only an electric generator can replace such a device, but installing it individually and using it is quite expensive. You can install the stove in question yourself, the main thing is to figure out how to install a potbelly stove in an apartment.
Assembly steps
- The first step is to prepare all the parts for subsequent assembly. The main element is the oven itself. You can take the body of the old model made of cast iron. It will heat up quickly and give off heat well.
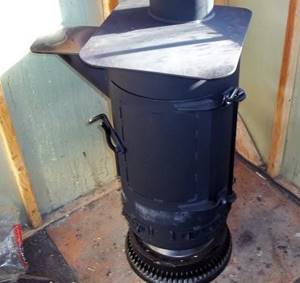
The main element of a potbelly stove is its body
Advice! When making a potbelly stove fueled by sawdust, you can choose a metal pipe of the required diameter as a chamber.
- Next, you should prepare the pipes for building the chimney. The first pipe will be connected to the stove itself - its walls should be quite dense. The rest are recommended to be made from galvanized sheet; it is often used when constructing drains after rain.
Pipes for building a chimney and chimney construction
- The stove is placed on an iron sheet and on bricks to form an insulation for the potbelly stove on a wooden floor and prevent fire.
- Construction of a chimney. To do this, the glass is removed from the window in the window and an iron plate with a hole for the pipe is installed instead.
- A pipe with thick walls extends from the potbelly stove itself to extend its service life. Thin iron will quickly burn out. The two pipes are then connected together
- To fasten a thick pipe to the stove, you can prepare a clamp from a fire extinguisher in advance, cut it and compress it to the required diameter. The remaining cracks are covered with clay.
- On the street, the chimney should be directed upward, not to the side.
Note! Thanks to the stove, the temperature in the room rises quite quickly. But for kindling, it is better to use coal rather than firewood; it will help save on fuel and prolong the operation of the device.
Fuel economy
Do-it-yourself stove
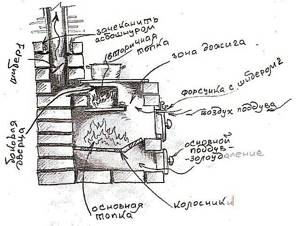
This is the last criterion for potbelly stoves, which are used in modern apartments. Long-burning designs have already been mentioned above. They are the most popular option today when it comes to installing a potbelly stove in an apartment.
What is the design feature of this model? The thing is that the firebox of the device is divided into two parts - lower and upper. The separation boundary can be horizontal or angled. It all depends on what conditions for combustion of flue gases we are trying to achieve. When the boundary is placed at an angle, the combustion efficiency is slightly higher due to the higher gas concentration inside the narrowed part of the chamber.
In the lower firebox, wood or coal is usually smoldering. Oxygen-enriched flue gases burn at the top. Channels are specially installed to allow oxygen to enter the chamber. At the same time, there is one very important criterion that ensures complete combustion of fuel in the first chamber. The fuel must be placed correctly, that is, with a minimum number of gaps between its parts.
For example, if it is firewood, then it should be laid out horizontally in a row or in the form of a cage. The distance from the walls of the potbelly stove should be minimal. If the stove has a cylindrical shape, then in addition to horizontally laid logs, it is necessary to lay firewood in the vertical direction. They must be placed in the gaps between the walls of the unit and the corners of the stacked pyramid of firewood. In this state, a minimal amount of fresh air penetrates the firewood, but it is quite enough for the fuel to smolder.
The combustion gases flow through the outlet channels under the influence of physical laws upward into the second combustion chamber, where they burn, releasing additional heat.
Attention! One load of solid fuel is enough for a whole day. In potbelly stoves of traditional design, the fuel supply is enough for only a couple of hours.
Do-it-yourself brick stove: installation instructions
A do-it-yourself brick potbelly stove, made for heating in a country house or garage, is the best option for such premises.
Do-it-yourself brick stove
Usually, in such conditions, small metal stoves are used, as they are compact and convenient. However, they have one significant drawback - they heat up very quickly, but also cool down quickly. Therefore, it is constantly necessary to maintain a fire in them throughout the day, which means that a large supply of fuel must be prepared.
Craftsmen have figured out how to get out of this situation and retain heat for a longer period - the stove will remain hot much longer if it is made of brick or lined with brick.
There are different options for potbelly stoves, which are made using brick:
- a stove made entirely of brick;
- a combined potbelly stove, when its lower section is brick, and a gas cylinder or metal pipe is fitted for the upper section;
— a cast-iron stove-stove, which is lined with brickwork on the outside;
- a brick stove covered with metal sheets on top.
To choose the appropriate option for use in a country house, outbuilding or garage, you need to know how much work needs to be done in making each of them, and what tools will be needed for this.
Tools for building a potbelly stove speech
To make brickwork for a potbelly stove, you will need the following tools:
- Spatulas of different widths.
- Trowel and trowel.
- Rubber, regular hammer and hammer with a pick.
- Grinding machine with wheels for stone and metal.
- Plumb and building level.
- Joining.
- Container for solution.
- Electric drill and mixer attachment for mixing the solution.
- In addition to the above, to make the metal part of a potbelly stove, you need to prepare other tools - a metal welding machine and consumables for it, all the necessary equipment for a welder - metal brushes, a cleaver hammer, etc. It’s good if the farm has equipment for cutting metal - this will simplify the task of working with workpieces.
To make each of the stove options, you will need your own list of materials, depending on the shape of the potbelly stove, its design and its size.
Brick stove
A brick potbelly stove does not belong to the work of the highest category of complexity.
Any potbelly stove should be small in size - this is its main advantage over massive buildings, for which there may not always be a place in small rooms. A potbelly stove made of brick is an ordinary stove, only it has a very compact size. Like any heating structure, a brick potbelly stove can have different designs and serve only to heat the room or also include a cooking function. The latter will not be superfluous both for a country house and for a garage.
A bold sketch by the master - in principle, everything is clear in the diagram
Making such a stove is worth considering as the best option.
Materials for work
To build a brick potbelly stove, you will need the following materials:
- Red and fireclay bricks.
- Grate (ready-made cast iron or homemade steel rod).
- Valve.
- Fuel and vent doors.
- Single burner hob.
- Pipe for chimney.
- Waterproofing material – roofing felt.
- Asbestos material - it is most convenient to use asbestos cord
- Steel wire.
- Steel plate, 4 ÷ 5 mm thick, to separate the afterburning zone, if provided.
- Heat-resistant building mixture for masonry mortar or clay, cement and sand.
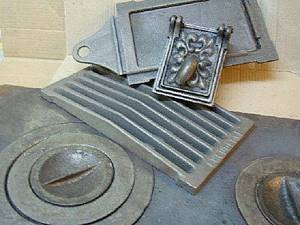
Cast iron parts can be purchased at a special store.
When all the materials have been prepared, you can begin to work. It begins, naturally, with preparing the foundation.
Prices for refractory bricks
Fire brick
What should I use to lay the furnace?
Any stove must be installed on a rigid, reliable base.
If in the room where the potbelly stove will be built, there is a good concrete screed on the floor, then it may well serve as a foundation for such a stove, since the structure, in principle, is small and relatively not heavy. If the flooring is wooden, but made of thick boards, then it can also sometimes support the weight of the stove, but it is better, of course, to play it safe and go the other way - as indicated below.
- It is not recommended to lay floors made from thin boards. In this case, you will have to build a reliable foundation before building the stove. It should be 10 ÷ 12 cm wider in each direction than the base of the stove.
- In order to pour the foundation, you will have to dismantle the section of the floor in the place where the potbelly stove will be installed.
- A pit is dug in the subfloor soil, 300 ÷ 350 mm deep, into which a layer of sand is poured and compacted - its thickness should be 50 ÷ 70 mm.
- Crushed stone of the middle fraction is poured on top of the sand cushion, which is also compacted.
- A reinforcing mesh is laid on the crushed stone, and then a formwork is made from boards for pouring concrete into it. It is best to build it so that it rises 70 ÷ 100 mm above the wooden floor.
- The next step is to pour a rough concrete mixture consisting of cement, crushed stone and sand into the formwork. After the concrete has been poured, it is necessary to free it from internal air bubbles - this is done by “bayoneting” using an ordinary shovel, which pierces the solution in several places.
- The surface of the foundation is leveled and left to dry. This process lasts from two weeks to one month, depending on the thickness of the poured structure. To ensure uniform ripening and to avoid drying out and cracking, the surface must be moistened with water every day during the first week, starting from the second day.
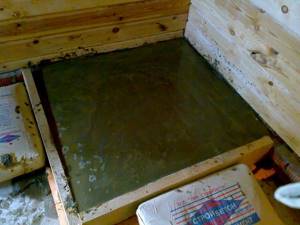
Poured foundation for a small stove
- After the foundation has dried, before laying out the first row, a sheet of waterproofing material - roofing material - is laid on its surface with mastic.
If the floor seems reliable, and the decision is made to build a stove without laying a foundation, then the foundation for the masonry needs to be prepared early.
- In this case, an asbestos sheet is laid on the boards, on top of which a plastic film is laid.
- A layer of sand 8 ÷ 10 mm thick is poured onto the film, on which the first row of the oven will be laid out.
Prices for fireproof mortar for stoves and fireplaces
Fireproof mortar for stoves and fireplaces
Furnace laying
- When laying out the first row, the mortar is applied only to the ends of the bricks - the brick is not bonded to the sand sprinkled underneath. However, to begin with, it is better to lay out the entire first row dry in order to determine its placement and level it. Only after this, mortar is applied to the ends and the bricks are fastened together.
The order and general diagram of a compact brick potbelly stove
- On the second row, the installation of the blower door begins. It is installed on a layer of thick clay mortar and secured to a wire, which is screwed to the ears using special holes. It is recommended that before installing the door, wrap it with asbestos rope or a strip cut from a single sheet. A blower chamber is formed behind the door.

Installing the blower door
- On the third row, the blower chamber is covered with a grate.
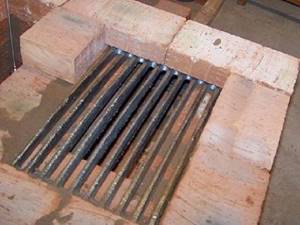
The grate is in place
- On the fourth row, the combustion chamber and smoke exhaust channels begin to form. The bricks are installed at the end. Stands are installed inside the channels on which the next rows will be laid, since there must be a hole for the smoke to escape. The back wall is laid without mortar.
- Having laid out the fourth row, the combustion chamber door is installed above it. installation is carried out according to the blower type, and the door is also temporarily secured using wire, which is fixed with bricks installed on the sides.
- The fifth row is laid out according to the diagram. All bricks are laid flat, except for those that form smoke exhaust channels with the inner walls.
- On the sixth row, the brick is installed on its end, and this row is the last when the brick is placed in this way. The back wall is laid with bricks installed at the end in two rows.
- The seventh row is placed according to the diagram.
- On the eighth row, the fire door is covered with a masonry of two bricks on top. In this row, a hewn brick is installed on the back wall, which will guide the flame towards the burner.
- On the ninth row, asbestos strips are placed in the place where the hob will be laid, which will ensure a tight seal between the bricks and the metal part. The masonry proceeds according to the diagram.
- On the tenth row, the hob is laid and the formation of the chimney begins.
- On the eleventh row, a valve is installed on the smoke exhaust duct. It is laid on asbestos strips and coated with clay mortar.
Installation of a valve on the chimney channel
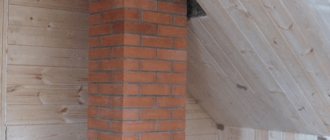
- Next, there is a laying of a chimney in two or three rows, into which a metal pipe is then attached, which is subsequently routed through the wall or attic floor and the roof. We must not forget about its heat-resistant insulation when passing through flammable wall or ceiling materials. The pipe is insulated with mineral wool, the thickness of which should be at least 170 ÷ 200 mm.
- The folded stove is left to dry; it is not recommended to heat it immediately. To speed up the drying process, it is recommended to temporarily install a regular 100 ÷ 150 W electric light bulb in the firebox and leave it on.
- When drops of condensation stop settling on the cast-iron closed doors, or such evaporation is reduced to a minimum, you can begin to gradually heat the oven, which will help it dry completely. The firebox must be dried with the doors and valve open.
- You should not rush into finishing a brick potbelly stove - you need to let it work for at least a season, as cracks may appear on the seams, which will need to be repaired before finishing.
- The surfaces of the stove are finished with clay mortar. It is applied with a spatula and leveled well. Instead, you can use heat-resistant compounds for stoves and fireplaces.
- Next, the surface can be whitewashed or covered with decorative tiles.
It is very important to properly design the base of the stove so that the sand poured under it remains in place. Therefore, it is recommended to lay tiles on the floor around the potbelly stove or fasten a metal sheet extending onto the masonry of the stove. Another way to cover the sand under the stove is to install a plinth around this structure, preferably ceramic.
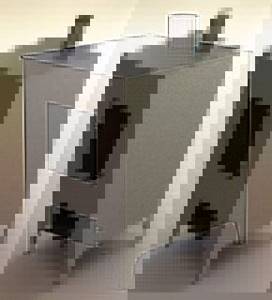
Brick stove covered with metal
This version of the potbelly stove is made of two main materials - metal and fireclay brick, which can withstand temperatures reaching 950 ÷ 1000 degrees. This stove is very durable and economical to operate, thanks to its well-thought-out design.
An effective solution for heat preservation: metal on the outside, brick on the inside
Materials for production
To make it you will need to purchase the following materials:
- Steel sheet, at least 3 ÷ 4 mm thick.
- Steel angle approximately 40×40×3 in size.
- Fireclay brick.
- Grate.
- Chimney pipe.
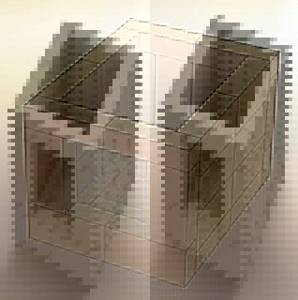
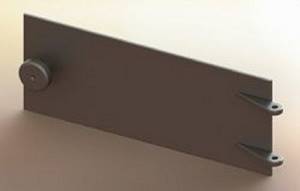
Preparing metal parts
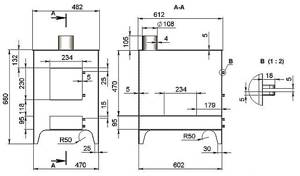
Drawing of the metal component of a complex stove
Based on the drawing, all the details of the future stove are drawn on metal sheets, and then they are cut out using a grinder, gas or plasma cutting machine, or welding machine. To transfer the drawing to metal, use a ruler, square, compass and tailor's chalk.
On the sheets you need to place two side walls, a bottom plane, an upper hob, as well as the front and back walls.
The combustion and vent holes are marked and cut out on the front panel. You can also immediately cut out the shape of the legs on all walls.
A round hole is cut in the top panel for installing a chimney pipe.
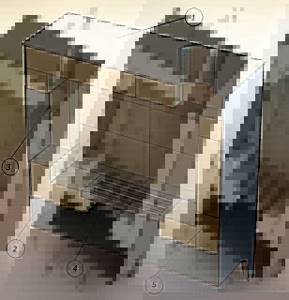
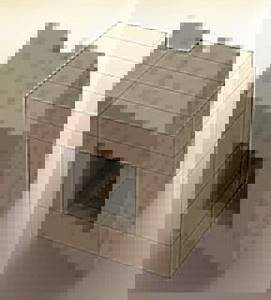
A cross-section of the stove - this makes it easier to correctly understand its structure
In this schematic section, the parts that make up the potbelly stove are indicated in the following order:
1. — Metal body.
2. — Blower door.
3. — Firebox door.
4. — Grate.
5. — Fireclay masonry.
Installation of a potbelly stove
Installation is carried out alternately - either welding or masonry work.
The manufacture of a metal body is carried out as follows:
- From the inside, one of the side walls is welded with a continuous seam from the front and back.
- Next, a mark is made of the place where the bottom of the structure will be welded, and then welding is carried out, also with a continuous seam.
- When the three panels are welded, it is necessary to arrange supporting elements for laying bricks. They are made from a metal corner, which is welded to the walls along the entire internal perimeter of the body, at the level of the upper edge of the blower hole. Two metal strips are welded to the corners installed on the rear and front walls at a distance from each other that is equal to the width of the grate.
- The next step is to transfer the welded structure to the prepared foundation, since later, with bricks laid inside, it will be much more difficult or even impossible to move it.
- Having moved the body to its “standard” place, you can begin laying fireclay bricks.
For masonry you will need a brick of the following sizes:
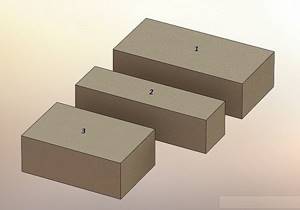
Bricks for the internal masonry of a potbelly stove
1. - Solid brick, measuring 230 × 113 × 65 mm - 36 pieces.
2. - Half a brick, divided lengthwise, measuring 260 × 62 × 65 mm - 4 pieces.
3. - Half a brick, divided across, measuring 172 × 113 × 65 mm - 2 pieces.
- On the bricks intended for laying the grate, you need to make grooves along the edges, and recess them deep into the masonry so that the grate is installed tightly and flush with the surface of the combustion chamber. Unfortunately, this point is not clearly indicated in the figures.
- Next, the first row of masonry is made on stands arranged from a corner; it should seem to hang over the blower chamber.
Start of interior masonry
- The following actions are carried out along the back and side walls, and a hole for the firebox is left on the front panel. The brick is installed on its end and flat - its correct installation is very clearly visible in the figure.
Laying out the side walls of a potbelly stove
- Before further masonry is carried out, a grate is installed in the square opening left in the middle.
An opening is formed under the combustion door
- Next, laying out the brick walls to the top is completed. To keep the brick firmly above the opening for the firebox, it is covered with a metal strip.
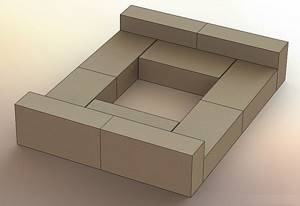
- Then, it is necessary to cover the upper part of the structure. This is done using ten bricks, from two of which ¼ of each is cut off. The cut bricks are laid at the back of the structure - they form a hole into which the chimney pipe will be mounted. To stiffen the floor under the ceiling bricks, a metal strip is also laid in the middle of it.
Completion of masonry - complete covering of the combustion chamber with bricks
- The laying should be done without mortar, but it can also be used. For this, a heat-resistant mixture is used, specially designed for laying fireplaces and stoves.
- After the masonry is completed, the second side wall and the roof of the stove are welded into which the pipe is mounted. A pipe leading to the street will be welded onto it. External welds must be made as carefully as possible.
Fire door
The next step is to make the firebox door according to the diagram below.
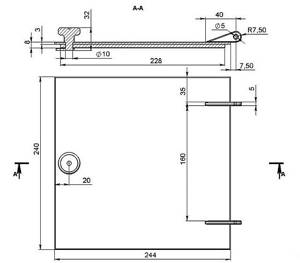
Drawing for making a firebox door
- Ears with a hole are cut out of steel sheets and welded in the designated places of the cut door. These devices will play the role of canopies.
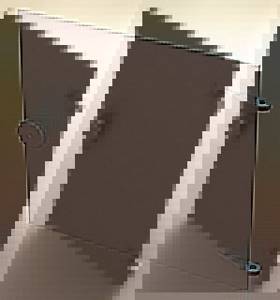
Combustion chamber door
- On the opposite side of the ears, a handle is installed in the drilled hole, to which a tongue is welded on the inside of the door. When you turn the handle, it will also turn and will not allow the door to open spontaneously.

The simplest lock for closing the door
- Elements with holes, which can also be called eyes, are welded on the wall. The door eyelet will be inserted between them. The holes are aligned, and a fastening pin is installed in them, which will hold the door, but will not interfere with its opening and closing.

Door suspension on the stove body
- The blower door is manufactured and installed in the same way. For door panels, you can use pieces of metal previously cut from the front panel, pre-processing their edges to make them look more aesthetically pleasing.
The ash pan door differs, in principle, only in linear dimensions
- After the potbelly stove is ready, it is worth cleaning the external welding seams and then painting it with heat-resistant paint.
This potbelly stove design has a number of undeniable advantages over other types of these compact small stoves:
- It does not require a large amount of fuel to heat the room, as it retains heat for a long time.
- A layer of heat-resistant fireclay bricks protects the metal from burning through.
- The compactness of this stove allows it to be installed even in a small room.
- For this design, you can use metal of different thicknesses.
- The body does not require finishing with expensive materials - it is enough to apply heat-resistant paint to the metal, and the stove will look quite aesthetically pleasing.
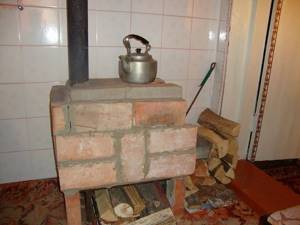
Cast iron stove lined with brick
To increase heat transfer and increase fuel economy, conventional cast iron stoves are often lined with brick. This process is especially relevant for a metal sauna stove, because when it gets hot, there is a risk of getting a very serious burn.

Another option is a metal stove lined with brick.
Potbelly stoves installed in other residential premises are also covered with brick, since well-made masonry looks very respectable and aesthetically pleasing.
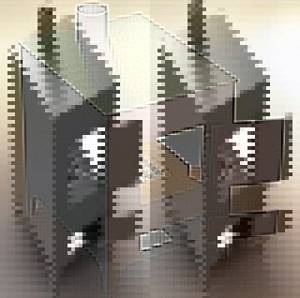
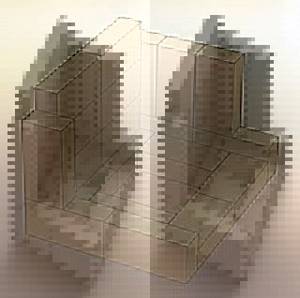
The diagram clearly shows the air circulation around a cast iron stove lined with brickwork. A powerful convection flow of hot air contributes to very rapid heating of the entire volume of the room.
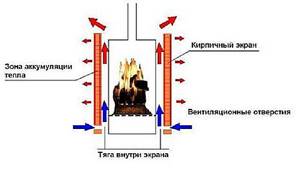
Scheme of created convection flows
Since the lining of an already installed furnace is being done, it means that the foundation will no longer have to be poured, and this greatly simplifies the work. There will also be no problems with masonry mortar, since specialized stores sell dry mixtures for making heat-resistant mortars, with which bricks are fixed. All that remains is to prepare the area around the building and begin work.
Laying bricks around a metal body
- When laying the main first row, it is necessary to adjust one brick to another in level, since it will determine the evenness of the entire masonry. It is best to carry out this process dry first, and, if necessary, adjust the row to an ideal horizontal level using shims. As the latter, you can use old ceramic tiles or other hard, non-flammable and non-moisture-absorbing material.
- Having verified the dry masonry of the first row, you can prepare the mortar and lay bricks on it, placing leveling elements.
- The first row is placed close to the metal surface. The bricks should not lie along the side wall of the furnace, but perpendicular to it. Thus, an even, rigid base is created for further masonry - a kind of foundation.
- Next, markings are carried out along the laid first row, since the remaining rows are not laid out close to the metal surface of the oven, but at a distance of 50 to 100 mm. If this rule is not followed, the brick will not warm up well or the effect of long-term heat preservation will not be achieved, for which, first of all, this technological measure is carried out.
The optimal gap between the two surfaces is 50 ÷ 70 mm. By arranging it, you can be guaranteed to achieve your goal.
Marking is carried out using a meter ruler and chalk. It is recommended to measure the required distances and draw the place where the second row will be laid out.
- You can set the direction of the wall while maintaining the required gap by laying prepared pieces of brick with the required gap width on the first row, close to the cast-iron body.
These “calibrating” pieces of brick are laid on the mortar, and the facing wall begins to be erected next to them.
- The brick in the wall can be installed either on the end or in the usual way, flat, at the discretion of the master. However, you need to take into account that when laying bricks flat, you will need twice as much of it.
- Having completed the laying of two rows, on the third it is necessary to leave several holes between the bricks to ensure air circulation in the gap between the metal and brick surfaces.
- When making masonry, it is necessary to control the vertical of the wall and the horizontal of the rows, constantly checking these parameters using a plumb line and a building level.
- If you need to get a beautiful, neat masonry, the seams between the rows are made using jointing, but this must be done immediately before the masonry mortar has set. It is also important to maintain the same distance between rows and bricks in a row so that the seams are even. Sometimes marking strips that have the necessary parameters are used for this purpose.
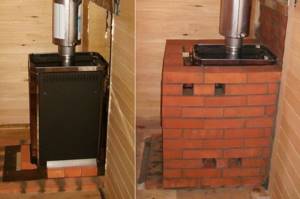
The stove before and after covering it with bricks
When there are two rows left before the end of the masonry, in the penultimate one it is also necessary to leave gaps between the bricks in several places - through them heat will flow into the room during the process of convection air circulation.
It is much easier to build a brick stove than to build one of the models of massive stoves. If you have at hand a diagram of the design of a compact potbelly stove, the necessary material and the necessary tools, you can get down to business without hesitation.
Video: DIY compact brick stove
+
The volume and complexity of work when covering a ready-made and installed metal potbelly stove also seems quite accessible even for a beginner. The main thing is to take your time and not be lazy to check the laid wall and rows for level, since if one of the rows goes to the side, further laying will also not be level, and most of the work will have to be redone.