What it is?
The ash pan is the same as the ash pan. An ash pan has long been included in the design of any stove. This is a chamber under the firebox grate, which is equipped with a metal tray.
When any material is burned in a furnace, ash and ash remain. For such waste, a special place is needed, and that is exactly what the ash pit is.
It's hard to imagine a stove without a blower. Then the entire structure ceases to function normally, and may even make no sense. After all, the ash pan is an important component, without which all excess waste would come out.
Dust from the firebox is transferred to the ash pan using a grate. The air thus gets to the fire and allows the fuel to burn as efficiently as possible. After which the air passes further and is removed into the chimney.
Device and elements
A classic ash pan consists of the following components:
- door,
- lattice,
- under,
- ramp,
- bunker
The door is an element that may sometimes be missing. Usually it is opened slightly when the stove is heated, and a stronger fire is obtained. To relieve the pressure a little, close the door back.
Blower location
If there is no door, then increase the traction by pulling out the drawer. And so that ash and ashes do not fall out, the underside is made inclined.
Blower size
To build a stove vent with your own hands, you need to know its usual dimensions. Although there are no standards at all in size, there is one simple rule: the ash pan must be identical in size to the grate.
If the blower is smaller, then the soot will settle on the grate and will not allow air to pass to the flame.
If the ashlar does not have a door, then it is worth installing a drawer or tray. Here the dimensions are more clear. The width of the tray is the same as the distance from edge to edge of the blower. The length should be longer than the firebox.
You need to determine in advance which type of oven is right for you. When you know what exactly you want to cost, then you will find the right sizes for your type of stove. In a matter where there is no exact ideal, there may be room for your imagination.
Traditional scheme for supplying air to the firebox
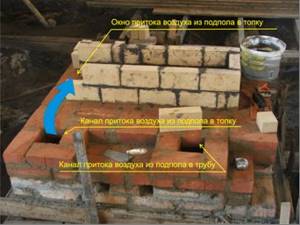
By traditional air supply we mean the most common method of supplying air through the lower part of the furnace - the blower. This is not only the most common way of organizing the breathing of a furnace, but also not the most rational. The fact is that by opening the summer valve, when the most powerful draft is formed in the furnace, heat from the room in which the furnace is being heated literally escapes into the chimney. Naturally, colder air from outside begins to enter the room. As a result, the room quickly loses temperature and cools down.
It’s another matter when the furnace is equipped with an air duct system, for example, taking oxygen from the basement or directly from the street. In this case, the temperature in the room does not drop during kindling, but the draft does not decrease in any way.
This innovative scheme allows you to heat a room more efficiently, significantly reducing heat loss by reducing the circulation of atmospheric air inside it, but if the stove is not designed to burn light gases, it will still not be possible to achieve maximum savings.
How to make an ash pan with your own hands?
In fact, constructing an ash pan is quite simple. It is enough to carefully study the structure of the furnace. You must follow these rules:
- Complete the drawing. A rough sketch will help in design.
- Prepare all the necessary materials, count how many there should be.
- Prepare your tools for work.
Guided by these superficial rules, you will be closer to the result. Now closer to the point:
Materials and tools
The design of each furnace can be individual. But the standard set of tools for work looks exactly like this:
- construction trowel,
- mallet,
- building level,
- plumb line,
- brick hammer,
- construction tape.
Experts say that the ideal material for the ash pan is steel (0.8 mm) . If there is no door, then the ash pit can be made of fire-resistant brick, like the rest of the stove structure.
Do not forget about the quality of the material for the stove. Naturally, joy will come from a product that will last you as long as possible. Price plays a very important role, but remember that cheap materials will have to be changed frequently and, in addition, will waste your time.
You will need some special materials for making. Definitely worth adding to the list:
- metal corner,
- chamber door,
- ash door,
- valves,
- refractory brick,
- fireproof mastic.
Then your shopping list will grow, depending on your desires and the complexity of your stove design.
It is worth buying the necessary materials in specialized stores (construction stores, more likely). The consultants there will tell you, if anything happens, which products are best suited for the job. You can also find materials for building a stove on the Internet and choose the most suitable ones.
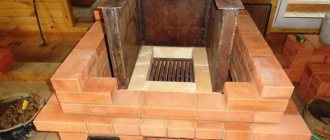
Manufacturing instructions
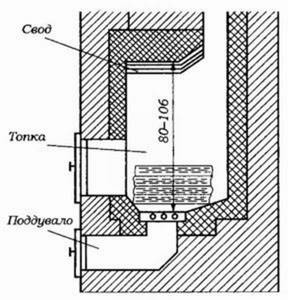
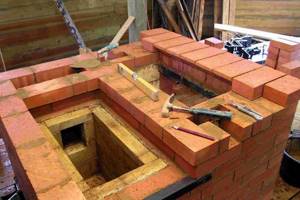
The diagram shows the location of the blower in a brick oven
First, you need to lay out several rows of the oven without mortar to know whether everything will turn out exactly as required. Next, it is worth laying the lower rows so that the laying of the second completely covers the joints of the first. Next comes the blower and cleaning channels.
In the next two rows you should leave room for the blower and ducts and attach a door to each opening. To install them you will need to drill holes in the frames in all corners.
Next, you need to insert a soft steel wire into the holes that have formed and bring the end of each wire out. To strengthen the frame, wrap it with asbestos cord. Already during installation, it is worth placing each end of the wire in the solution.
Then you can safely lay out the top rows of the stove.
Advantages of the Russian stove
If a Russian stove is laid correctly, it has many advantages:
- Saving space and simultaneous heating of several rooms in a building with the correct location of the structure.
- Safety and reliability.
- Long cooling time, due to which heat is retained well.
- Long service life, approximately 30 years.
- Heating a large area.
- Health benefits due to good warming.
- Possibility of drying things, herbs, mushrooms.
There are some disadvantages of the Russian stove. These include the high cost of fuel. In addition, the structure absorbs a considerable amount of firewood. Only the upper part of the structure warms up. In addition, a Russian stove in a modern home may not be suitable for every interior.
How to clean a stove vent?
The presence of a door in the ash pit plays a positive role in regulating the pressure of the fire. But with cleaning we get the opposite result. The box is more convenient for cleaning. You can simply pull it out and shake it in the right place.
If there is no drawer, then you will have to clean the oven manually. First, you should wait until the oven has completely cooled down. Next, using a brush, dustpan and bucket, you need to clean out all excess from the installation. There is nothing difficult about purchasing such cleaning products.
There are also special vacuum cleaners for fireplaces that can also be used in the stove. With their help, cleaning will not be difficult for you.
Often, due to a clogged oven, various types of problems occur. Example: The stove often leaks smoke. People who are not very familiar with the structure of the furnace and do not know how to operate it complain about caustic soot in the house or garage. The solution to the problem is incredibly simple: you need to regularly clean the ash pan, using the right tool.
Perhaps these are the main points you need to know to design your own ash pit. Making a furnace ashtray is quite simple. Having information about the dimensions, necessary elements, components and materials, you can easily make this device at home.
Remember, before you make a stove with your own hands, make sure that it will be safe for you and others. A proper chimney and a well-made ash pan are the foundations of a good stove. Therefore, it is worth consulting with professionals, seeing what store-bought versions of stoves look like, and reading about the different types.
Having figured out what an ash pan is, what size it is and what it consists of, what materials are needed for it, what the construction instructions look like, what tool to use and how to clean it later, you can be calm about the correct construction of such a device.
Building a stove is a very labor-intensive process, so be patient and get to work!
Furnace appliances
Furnace appliances - doors, water tanks, grates, dampers, views and valves - are made mainly of heat-resistant cast iron. Cast iron appliances are stronger, more durable, do not burn out or rust. The same stove appliances come in different shapes and sizes, so their exact copy is not given here - the pictures simply show which stove appliance is installed in a certain place in the stove.
When purchasing a valve, pay attention to the engine. If the engine moves very freely along the frame (there is a high gap in it), then with strong traction it will begin to rattle. If there is a special hole on the “underside” of the valve, then this valve is good, and the hole, which should be at the bottom when installed, serves to allow soot to spill out, which accumulates behind the engine in the frame.
So that the stove gives heat, don’t forget about the vent
Making a stove with your own hands or with the help of a specialist is not so difficult, knowing the device and some design features. Today we will not talk about all the components of the stove, but we will talk about the vent for the stove. Everyone understands that any fuel (coal, peat, firewood) has some kind of residue when burned. A portion of combustion products is removed as smoke, soot and soot through the chimney, and some, such as ash and ash, remain in the combustion chamber.
So, the blower is the main air chamber of a rectangular oven. Air passes through its door, which cools the grates and supplies the firebox with oxygen. In addition, it serves as a place where ash and other fuel waste are collected. They can be removed through the door, so it is worth considering its comfortable dimensions.
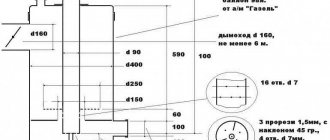
The standard dimensions inside the chamber for a brick kiln are 25 × 38 cm. Other dimensions are possible. But in any case, the blower door should be smaller than the chamber itself. It is laid on the second row of the stove masonry.
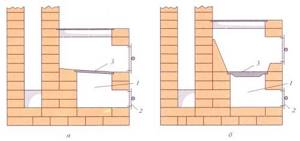
The firebox must, due to its purpose, withstand high temperatures. This design promotes precise, uniform air distribution and absorption. The ash pan is equipped with two openings: the front one is a ash pit with a blower door and the top one is covered with a grate.
The ash pit or ash chamber is located immediately under the firebox grate. As I already said, it is necessary to collect ash and regulate the flow of air into the firebox. Such a chamber is often equipped with a blower. Its height is about 14 cm. It is worth remembering that after each firebox you need to clean the chamber from combustion products.
The ash pan is usually equipped with a metal tray. Ash from the firebox ends up in the ash pit through the grates. The air enters the fire through the grate and this ensures efficient combustion of the fuel.
The blower can be made with or without doors. To increase the air flow, just open the door slightly. And, conversely, to reduce the intensity of the fire, cover it. If your structure is so complicated that doors were not provided, no problem. In this case, you can increase the traction by pulling out the drawer. To prevent ash and ash from spilling out, the blower should be made inclined.
As for the size of the ash pan. As I already said, there are no identical stoves and fireplaces, so there simply cannot be uniform blower sizes. The main thing to take into account is that the ash pan must match the size of the grate. If you do less, most of the ash will remain on the grate, and this will prevent air from reaching the fire.
If the vent is not originally equipped with doors, install a drawer or tray. To calculate the size of this device, you need to know that the width of the tray should be equal to the distance from the wall to the wall of the blower, and the length should exceed the dimensions of the firebox. Why? Yes, because to increase traction you will need to pull out this drawer or tray, otherwise the ash will spill out and accumulate at the back wall.
As for the material for the ash pan. We remember that it needs to withstand high temperatures. The best option is steel with a thickness of 0.8 mm. For blowers with doors, the presence of a drawer is not necessary. The ash pit is made from the same brick as the stove. It would be better if it was fireproof.
It is clear that the vent needs to be cleaned periodically. A tray or box is made for these purposes - this will simplify the cleaning process. You just have to remove and pour out the ash that has accumulated during the combustion process. Even if this device is not provided, the cleaning process will not take much time. But follow safety precautions. Wait until the ash cools down and then start cleaning. It's a little more time-consuming, but not super difficult. Prepare a brush, dustpan and bucket. By the way, there is a special vacuum cleaner for fireplaces. It will ideally help cope with dust, ash and ash.
This concerns the designs of the furnace. But there are different opinions and approaches to the issue of the need for blowers in fireplaces. Today you can choose designs to suit every taste. It is possible to choose with or without a blower.
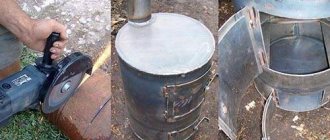
In small stoves and fireplaces, instead of a blower door, it is sometimes advisable to use an ash box in the form of a scoop. You can prepare it yourself. The body is cut out from a sheet of steel 0.6-1 mm thick. The sides and edges are folded along the marked lines. Holes should be drilled for the rivets. The body is riveted, then the front wall is mounted to it using rivets. Its top is turned away in the fold directions, creating a comfortable handle of sufficient width.
A sign that the furnace element has been completed correctly is that our completed ash box will fit into the ash pit so that its front wall tightly covers the ash hole.
In any case, to achieve high efficiency of the furnace, the required amount of air must enter the firebox. Its lack will lead to incomplete combustion of fuel and loss of heat. In addition, it leads to the deposition of a considerable amount of soot in the furnace channels. Even a small amount of deposited soot can affect the thermal conductivity of the furnace walls. Under no circumstances should the stove be lit with the ash pan closed in smoldering combustion mode.
If there is insufficient air flow, the flame will have a dark red hue. This is also evidenced by the presence of dark smoke from the chimney. The humming noise in the firebox and the bright white color of the fire indicate excess air. This is also not good, because excess air simply passes through the oven, cooling it. In this case, it is worth closing the blower door and the valve.
At the best combustion mode, the color of the flame should be light yellow and the smoke from the stove should be colorless.
These are the main points you need to know about the furnace vent. With this I say goodbye to you. Until next time.
Russian stove: types, characteristics
Each Russian stove has the same main elements in its design:
- Foundation or guardianship. This is the part that is the base of the entire furnace, weighing not a single ton.
- Array. Part of the structure, including the ash pan, smoke ducts, combustion and cooking chambers.
- Chimney. A smoke exhaust pipe that rises above the stove.
The stove design also includes:
- Cooking furnace (furnace, firebox). Located under the bed. The air entering for fuel combustion appears through the throat, and the heated air moves to the overpipe, then enters the chimney.
- Cheeks. This is the firebox wall located at the front.
- Mouth. The distance that serves to communicate the firebox with the chimney. The mouth of the Russian stove also communicates with the rooms that are heated.
- Arch. It is located at the very top of the stove. It gets very hot during heating.
- Under. Bottom of the hob. Its installation is carried out on the vault filling.
- Podpechek. Located under the basement. Used for drying and storing firewood.
- Hob. It is made of cast iron, less often of steel. It is located on the baking tray.
- Trough. Covers the bakers. It contains material to preserve heat (sand, stones).
- Six. The place in front of the entrance to the cooking chamber.
- Bed or tent. It is located either in front of the chimney or on the side on either side.
- Hilo. Smoke exhaust hole located in front of the mouth. It looks like a funnel through which smoke escapes.
Interesting fact! In the old days, the stove predicted the weather. An increase in draft indicated the imminent approach of cold weather, while a decrease indicated rain.
A Russian stove in the house can be made for different purposes, different dimensions, and design. Structures can be classified by size:
- Volumetric (150x230 cm or more);
- Medium (150x175 cm);
- Mini Russian stove (less than 150x175 cm).
Improved structures for modern interiors are also divided into types:
- With a fireplace. A Russian stove with a fireplace is designed in such a way that its firebox is in one room and the fireplace is in another. The advantage is the presence of one chimney and foundation.
- With a bed. A standard option, where a trestle bed can be used as a bed in modern stoves, as a place to sleep and relax.
- With a stove. A slab is built into the structure mass. There is a flood in the Russian stove and stove.
- Housekeeper. The Russian stove housekeeper is used for cooking.

It is very important to know how to properly heat a Russian stove to avoid fire or carbon monoxide poisoning. Experienced stove makers or those who have been using such a fireplace for many years will tell you how to light a Russian stove. It should be noted that the temperature in a Russian oven reaches an average of 300 degrees.
Interesting fact! One of the most sought-after professions in the world is a stove maker.
Ash pan (ash pan) for the stove
Any fuel, be it coal, peat or firewood, does not burn without a residue. Some of the combustion products in the form of smoke, soot and soot are discharged through the chimney. The rest remains in the combustion chamber. This is ash and ashes.
Photo: Ash pit (ash pit)
Purpose of the blower
For a stove to produce good heat, excellent draft is necessary. Clogging the firebox with ash prevents this; air does not flow to the fire. Especially a lot of ash is formed when burning firewood from soft wood.
Therefore, the design of the furnace always included a ash pit , in other words, an ash pit . This is a small chamber with doors under the firebox grate. The ash pan is often equipped with a metal tray.
Ash from the firebox falls through the grate into the ash pit. Air flows through the grate to the fire, thereby ensuring efficient combustion of fuel. And then it comes out with smoke through the chimney.
Blower door
Most often, the ash pan is made with doors, although they may not exist. To increase air flow, you need to open the door slightly. You can reduce the intensity of the fire by closing the door.
If there are no doors, you can increase traction by pulling out the drawer. In ash pits without doors, in order to prevent ash and ash out, the floor should be inclined.
Photo: Ash pit design
Ash pit design
Furnace ash pan (a) and retractable ash pan hopper (b): 1 – under; 2 – grid; 3 – door; 4 – ramp; 5 – bunker
Blower (ash pit) size
Just as there are no absolutely identical stoves or fireplaces, there cannot be a generally accepted single size of the blower. The basic rule is that the ash pan must be the same size as the grate. With a smaller size, most of the ash will remain on the grate and will not allow air to reach the fire.
If the ash pan for the stove does not have doors, then it is necessary to install a drawer or tray. The size of such a device is determined as follows. The width of the tray should correspond to the distance from the wall to the wall of the blower. Length – exceed the firebox, because for good traction you will have to extend the device. And in this case, the ash will wake up, accumulating at the back wall.
Most manufacturers of metal fireboxes have taken into account the presence of blowers in their products.
Photo: Material for the ash pan
Material for ash pan
The close location of the ash pan to the fire dictates the requirements for the material for its manufacture. Metal devices withstand high heat well. The best option is steel with a thickness of 0.8 mm.
For ash pans with doors, the presence of a drawer is not necessary. The ash pit is made of the same brick as the stove itself. Fireproof is preferable.
Firebox
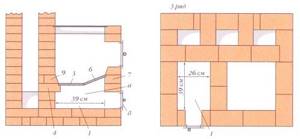
Not only fuel burns in the firebox, but also chemicals released during fuel combustion - gases, resins - are burned with it. And the water contained in the fuel is converted into dry steam, which determines whether there will be soot streaks on the stove. To prevent gases and tars from turning into damp soot that settles in the flue ducts, and to keep the steam dry, there must be enough free space above the fuel in the firebox in which lighter fuel particles burn. Therefore, in heating stoves in which the firebox is arranged at the entire height of the stove, there is almost no soot.
The width of the firebox sometimes reaches 38 cm. In indoor stoves, the best firebox is 26 cm wide (according to the size of the door). Practice shows that if you make a firebox 26 cm wide and 31 cm long with steep side walls, and bevel up to 2 cm at the front and rear walls, then the coal (anthracite) in such a firebox burns completely. Coal does not bake well, so a firebox with a more expanded shape for coal is worse - in such a firebox, little air flows to the walls. A funnel-shaped firebox with a large bevel is good for firewood and brushwood: as the fuel burns, it settles down toward the grate. In a firebox with a stove, there should be a space above the fuel formed by two rows of masonry (at least).
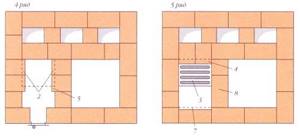
Installation of a grate for fuel: a - wood; b - coal; 1 — blower chamber; 2 — blower door; 3 - grate
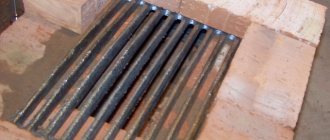
The grate separates the firebox and the blower chamber. For wood fuel, the grate is installed to the rear wall of the stove, slightly raised. Practice shows that it is not necessary to lift the hearth under the firewood, since the rise is formed over time from growing ash. Under the coal, the grate is placed exactly horizontally one or two rows below the fire door. It is good to assemble it from piece cast iron grates covering the entire width of the firebox - up to 26 cm. The solid grate is fragile and therefore soon fails. Individual grates are stronger; they are specially produced for heating with coal. Any fuel burns on such grates. For brown (Moscow region) coal, the grate is installed two rows below the combustion door, so there will be at least three rows of masonry above the blower window.
For peat and dung (this is homemade fuel in the form of bricks, which are made from manure and dried on the street), the grate should have slots (holes) no more than 1 cm. In this case, the bottom of the firebox is made of two grates. First you need to try to install the grates dry. If the grates are smaller in size than the blower chamber 1, then 2 overlaps are made above it, on which the lower grate 3 is placed. Sometimes, due to the small size of the blower chamber, the grates have to be installed across it. In this case, if the grates are narrow, you need to make overlaps over the back wall of the blower 4 The dimensions of the overlaps depend on the size of the grate. To the bottom grate, on the remaining free protrusion 5 of the inlet, a second grate 6 is installed obliquely, which is placed at the top in a hewn groove in the brick 7. After installing both grates, the laying of the side walls 8 is continued vertically in relation to the lower rows of the blower. For more complete combustion of fuel, one row 9 is cut off above the lower grate (around it).
Installation of a grate under peat fuel: a - ash chamber; b - blower door
Installation of a grate under peat fuel: a - ash chamber; b - blower door
I have always placed the grates on top of the slurry and pressed them against it in the middle of the grate. I covered the cracks near the grate with the same solution on which the stove was placed. The grates never deformed or bent from the heat, just like the fire doors without asbestos, but only sometimes burned out due to the poor quality of cast iron. And they cannot be deformed, because during the oven drying, when the solution dries, it releases steam. This steam rejuvenates the solution: it becomes soft again, as when laying. The heat causes the grates to expand, and the soft solution allows them to do this. After heating the furnace, the solution near the grate dries and contracts along the expanded position of the grate. When the grates cool, a cobweb-like gap will form around them. During the next heating, it will gradually be fixed by itself with dust from the ash.
The proposed backfills around the grates are ineffective and are more needed to simplify their replacement with new ones. Ash is better than any backfill: it compacts so much that you need a scraper to remove it, so you don’t need to complicate your work. The grates are installed shallowly at the top of the hearth so that they can be easily removed whenever they are replaced with new ones. Grate grates from individual grates can be partially replaced or the hearth can be replaced completely.
Grate made from whole bricks
Often the firebox is made without a blower, by inserting a firebox door with holes if there are no cast iron grates. The ash spills out through the grate, and the wood burns better. The lattice can be made from metal rods, placing them in the masonry. You can also make it from whole bricks. The brick is placed on its edge and a recess is cut out on both sides - a gap that widens downward so that the ash does not linger.
These articles may also be of interest to you:
- Laying a stove under peat
- Laying a calorific furnace
- Laying a triangular stove
- Furnace door installation
Materials for the Swedish stove
When creating this design, two types of bricks are used: red and fireclay (fireproof) - sometimes raw brick is used instead. Before laying, the material is soaked in water for 24 hours. The foundation of the unit is laid on cement mortar, and the structure itself is laid on clay. The durability of the “Swedish” depends on the quality of the clay solution - the higher it is, the longer the stove will last.
Whatever the arrangement of the Swedish stove, the design necessarily contains metal parts - dampers, doors, latches. Most often they are made using the cast iron method. For floors, metal corners, reinforcing mesh, tires and sheets of metal are used. Various finishing materials are often used, but the “Swedish” is usually simply painted with lime. But there are also structures decorated with decorative stone, tiles and other things.
To set up the oven you will need:
- solution container;
- metal sieve with cells of 1-2 millimeters;
- hammer;
- bayonet shovel;
- Master OK;
- plumb line;
- level.
Stove for Russian bath
Stoves for Russian wood-burning baths have features associated with their use. In the first Russian designs there was no chimney, so the bathhouse was called “black”. The oven was laid out in the form of a well with a steel tray on which stones were placed, and a container with water on top. Boiling water fell on the stones heated from the fire, creating steam that filled the room. Over time, the structure was improved, a chimney appeared, and the bathhouse began to be called “in white.” The most common dimensions for a bathhouse are 180x213x142 cm. In addition to its intended purpose, a stove for a Russian bathhouse, called a “teplushka”, is capable of heating water and operating as a stove in the summer.
Interesting fact! The stove began to be heated on Pokrov, and the end of the heating season ended on Annunciation.