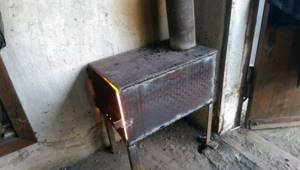
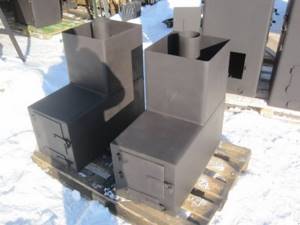
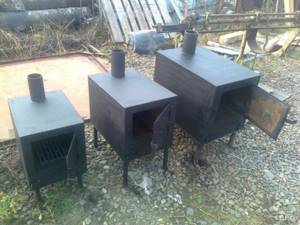
Features of the structure of the potbelly stove
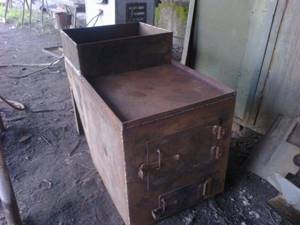
Any model of potbelly stove, assembled with your own hands, regardless of the model and material used, is a structure with the following components:
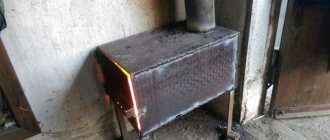
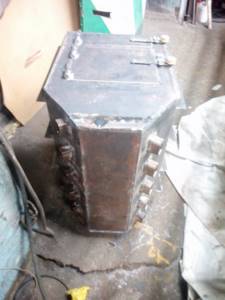
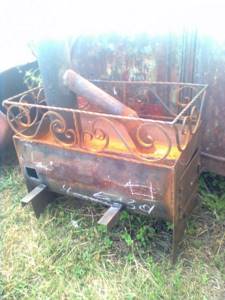
- One-piece body, which is located on supporting legs.
- Screen.
- The ash pit door, through which burnt ash is cleaned and the remains of unburned firewood, coal, and sawdust are removed.
- An important element of a potbelly stove is the chimney stove. The traction force in the furnace depends on its design and quality of execution.
- The firebox door is installed separately.
For ovens where food is supposed to be heated, retaining grates are prepared. There are also steam generator structures, which must have separate chambers for steam accumulation. Different types of devices may exhibit different variations and may require additional parts to operate.
Why is a chimney calculation required?
It is the chimney that ensures the safety of residents. An improperly designed chimney is unable to completely remove toxic combustion products (carbon dioxide and carbon monoxide, sulfur oxides), smoke and soot. There can even be a fire if hot smoke enters the room. Particularly dangerous is the overturning of the draft - turning the movement of smoke in the opposite direction.
Therefore, when installing a chimney, it is necessary to correctly calculate its parameters - they ensure the creation of ideal draft and complete removal of harmful substances.
Requirements for creating a potbelly stove
Having a stove-stove undoubtedly allows you to significantly save on heating and financial costs. However, during the construction process it must be remembered that the design must meet a number of criteria:
- Correct assembly of all components. The slightest defects in the device will lead to malfunctions of the furnace. For example, poor-quality draft will inevitably lead to smoke in the room.
- Sufficient heating of the room. To comply with this parameter, craftsmen must prepare in advance a design and drawing of the future furnace, and calculate the estimated power of the structure.
- The relative isolation of the potbelly stove. There should be no flammable objects, flammable liquids or gas around the homemade stove. It is better to install the device itself on a fireproof platform, for example, made of concrete.

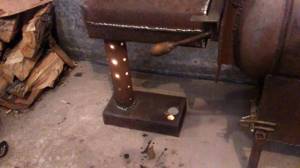
The structure itself must be as stable as possible, for which special attention is paid to the installation of the support legs. The most effective homemade potbelly stove fully meets all the requirements.
Important structural components
To make a durable potbelly stove for the garage, it is recommended to use detailed diagrams; photos will not help here. The drawing will help you independently create a practical and very effective version of the stove, which will be an ideal solution for heating a garage or other room.
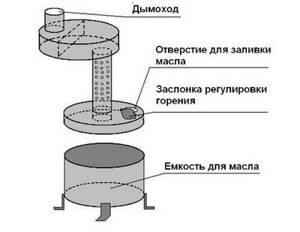
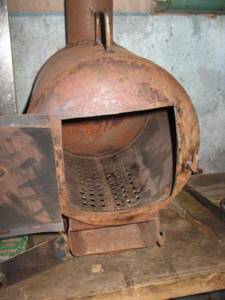
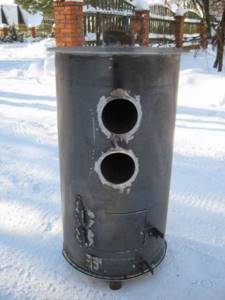
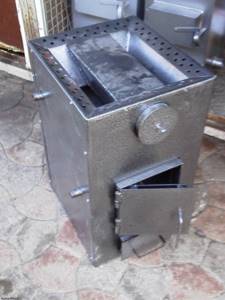
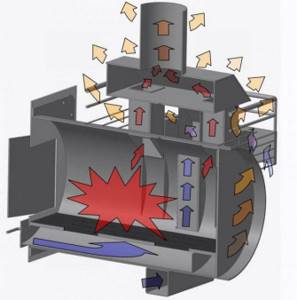
Manufacturing of the combustion chamber It is worth noting that the larger the firebox in terms of its area, the better it will be, since the stove, which runs on oil, wood, and exhaust, transfers the function of efficient heat transfer. In addition, it is important to have a decent area of the bottom of the chamber, then it will be possible to lay firewood or other coolant well. It is for this reason that the shape of the stove should be cylindrical and laid on its side. All rectangular ovens must also be oriented strictly horizontally. A vertical arrangement is only possible if the oven is large in size.
Making an ash pan This structural element is not always made, since ash can be removed directly from the fuel chamber. To ensure air supply, you just have to drill small holes in the door. If you plan to make a stove for a garage with an ash pan, then it may look like a box. This design makes it possible not to take up the space of the combustion chamber. In this case, the metal can be used quite thin, since there is no danger of burning. There is no need to weld it either, just screw everything in place.
Grate If such an element is used, it effectively separates the chamber and the ash pan located in the housing. It is quite possible to use factory grates made of cast iron. The distance rule must be observed. The interval between the gratings should be 10 mm. For fastening, it is quite possible to use a special corner, which with its outer edge is turned into the fuel chamber.
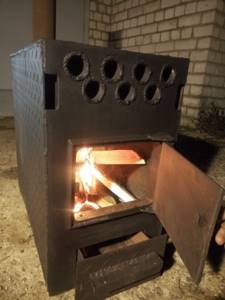
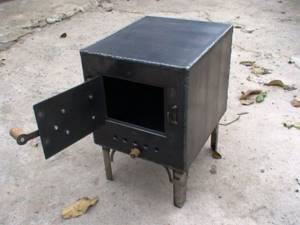
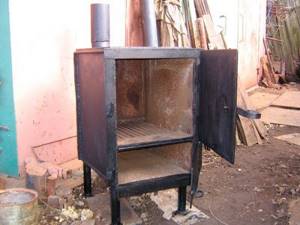
Openings and doors Similar elements, as a rule, are made of metal, which usually remains after the work on cutting out the necessary parts is carried out. The doors are connected to the body by welding and steel canopies.
It is mandatory to install a durable locking device - a bolt or bolt.
Openings deserve special attention, since here it is necessary to use standard dimensions that are shown in the drawings:
- For a firebox 250 by 250 mm.
- For the blower - height 100 mm and width 250 mm.
- Awnings are usually placed along one vertical line, with the distance between numerous openings being approximately 10 cm.
To prevent coals from falling out through the openings and doors, it is better to make the firebox opening about a couple of centimeters above the level of the grate. Gas and smoke removal
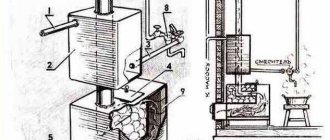
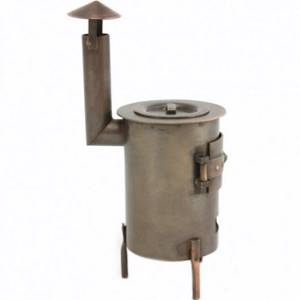
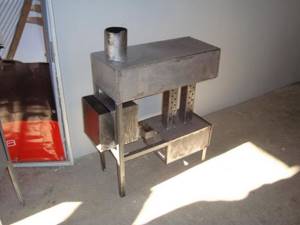
Pipes for this furnace should have a diameter of 100 to 150 mm.
This element is directly involved in the process of heat transfer, therefore it is made of high-quality steel and is also not insulated. A part such as a pipe is usually located on the side, as well as at the very top of the furnace, with the first option being the most preferable.
Pipes in a room are usually not led along the shortest lines, but strictly to one of the most remote points and in simultaneous inclined and horizontal sections. This design significantly increases the amount of heat received.
The pipes with which the furnace is equipped, as the drawings show, must be equipped with valves - moving along a guide or rotating.
The need for such elements is based on the fact that it is possible to regulate the process of smoke removal as efficiently as possible and shut off the chimney for the time when the firebox is not being fired.
A valve on the pipes must be installed without fail, especially if various measures are taken to increase the overall heat capacity of the furnace.
Parts to significantly increase combustion and heat capacity
Pipes in the manufacture of a furnace operating on waste oil are not the only necessary element. It is important to ensure an optimal long-term combustion process. For a furnace that runs on waste oil, a special suspended load is ideal. As the fuel burns, it will press the load against the grate by its gravity. A metal pancake with a hole can be used as such a load.
Stone can be used as elements that provide heat capacity.
Here you can note the following execution options:
- If the furnace runs on waste oil, a lining with special refractory plates is optimal. It is ideal because the metal body wears out much less, and the volume of the firebox is preserved;
- Another method is based on covering all the walls with bricks. As a result, you can get a furnace that runs on waste oil;
- There are drawings of oil-fired stoves that have an open box in their upper part. A stone or brick is laid in it.
- Very often, a potbelly stove that runs on oil is designed in such a way that there will be a mesh on both sides to firmly fix the stones.
Types of fuel used in potbelly stoves
The amount of heat generated, the area to be heated, and the possibility of smoke in the room depend on the type of fuel used. The following types of fuel are recognized as the most famous:
- Firewood. The wood-burning potbelly stove is recognized as the most efficient stove model.
- Coal is a more expensive fuel. The advantages of use include prolonged combustion and a greater amount of heat generated. Practical application is limited by the relatively high cost.
- Peat and sawdust are widely used for heating small spaces. However, for such fuel special storage conditions must be observed so that the briquettes do not get wet. If moisture gets in, the material will not burn or will provide too little heat.
It is absolutely prohibited to use liquid flammable mixtures (gasoline, oils) as the main source of heating, which can cause a fire.
In addition, during the combustion process, saturated vapors and caustic resins are formed, which cause irritation to the eyes and respiratory tract of humans.
Advantages and disadvantages of a potbelly stove
A potbelly stove is a fairly common type of heating equipment. It is valued for a number of positive aspects:
- Versatility . The ability to use almost any type of solid raw material for heating: firewood, sawdust, coal, wood chips, briquettes, pellets, peat. Sometimes some models use used engine oil as fuel.
- Simplicity of design and ease of installation . This allows you to make a stove with your own hands. Moreover, any available material is suitable for this.
- Small size and weight allow this structure to be placed in a small room, in limited space.
- Perhaps the most important point is the absence of such requirements as the construction of a foundation, site arrangement, or installation of a chimney pipe.
With all the positive properties, a potbelly stove, like any equipment, has some disadvantages:
- Protection is required from combustion elements falling out of the firebox, for example, embers, sparks.
- Compliance with safety rules when working with the stove. There is a risk of burns from the strongly and quickly heating walls of the structure.
- Significant fuel consumption during operation. The best option is to use a potbelly stove for heating for a short time.
Ideas for creating a potbelly stove
Craftsmen and home craftsmen learned to build stoves for heating auxiliary rooms from various available materials. What can you make a potbelly stove from:
- Metal can.
- Brickwork.
- You can make a potbelly stove for your garage from a used iron barrel.
Note!
Chipboard: what is it? Types, application features, photos, sizes, thickness, explanation, manufacturers
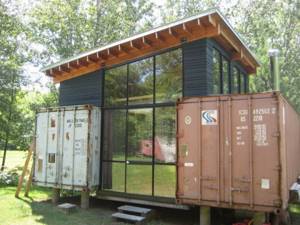
DIY houses made from shipping containers step by step: instructions, diagrams, pros and cons, photos, design
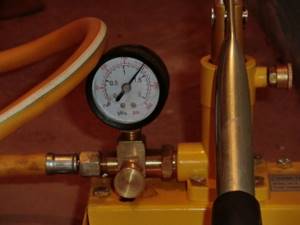
Working pressure in the heating system in a private house: what it should be, how to create it, instructions for adjusting it yourself
The most commonly used in self-construction is sheet iron, which has a convenient shape for the final assembly of the structure.
What metal to use
Before the manufacture of the furnace, it is imperative to inspect the metal for defects - corrosion, cracks, bulges. If they exist, they must be processed by grinding, welding, and stamping.
The reliability and strength of the stove is given by the material from which it is assembled. Suitable metals for the thematic problem include:
- Ordinary steel;
- Heat-resistant steel;
- Cast iron.
If the stove is made from a ready-made container, then sometimes a can or fire extinguisher acts as the latter. The most durable material is steel. But this indicator (strength) also depends on thickness. If it is 10-18 mm, then the stove will last a long time.
In addition to the classic options, you can also make a metal grill oven with your own hands; this is an excellent alternative to a brick grill. Here you can limit yourself to a thickness of 3-6 mm, so that the structure is light in weight for easy carrying.
If you have a large amount of cast iron, you will have to make a heavy stove with walls 6-25 mm thick. Despite their enormous weight, the corresponding structures heat up quickly and retain heat for a long time. In other words, cast iron stoves have good efficiency.
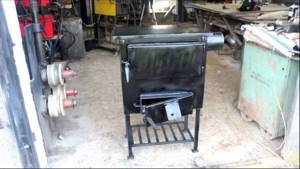
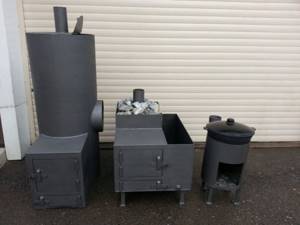
Making a potbelly stove step by step from sheet iron
The most practical way to make stoves is to assemble a structure from sheet iron.
The material is quite durable, easy to process, and if properly treated with an anti-corrosion compound, it can perform its functions for a long time.
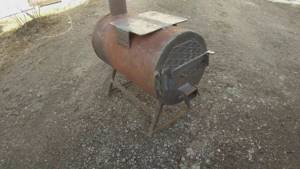
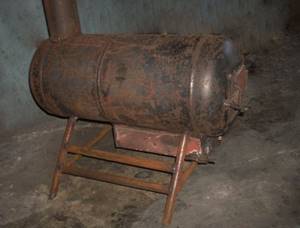
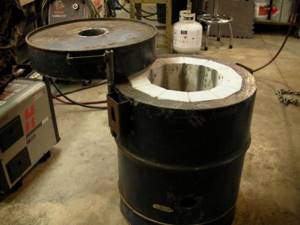
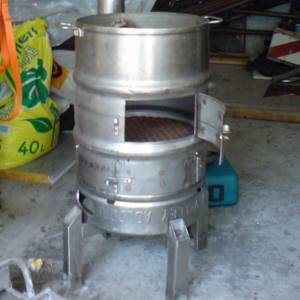
Barrel stove
It will correct the situation, and on this potbelly stove you can even cook borscht and fry cutlets. Not only an old barrel will do, but it’s better if it’s a discarded 50-liter gas cylinder.
Its walls are thicker, they will heat up a little longer, but they will also retain heat more. This is an ideal sauna stove. And if you cover it with sea or river pebbles or other strong stones, it will be easy to raise steam in the room.
It will stand vertically. There will also be enough space for the blower, and you can put a lot of firewood in the firebox above it. You can make the exhaust pipe not straight, but with elbows for greater release of thermal energy in the steam room.
If a potbelly stove is needed for a country house, then weld a metal platform on top, and you will cook food and tea on it.
Preparing tools for work
Assembling the furnace involves working with a welding machine, which means that it is necessary to prepare in advance a workplace of sufficient size without flammable objects. It will also be useful for the master:
- Welding machine.
- Grinder for cutting metal.
- Roulette and building level.
- Pipe for organizing a chimney.
- Accessories for firebox covers and ash pan.
- Grate for ovens.
To fasten the parts together, steel corners are required.
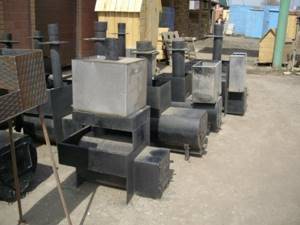
Photos of do-it-yourself metal stoves
Read here - Do-it-yourself kitchen renovation: cost, description of restoration and interior renovation options (120 photos and videos)
Step-by-step assembly of a potbelly stove
Work on assembling the structure is carried out strictly in accordance with a pre-prepared plan. Instructions on how to make your own potbelly stove:
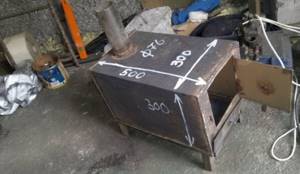
- Five parts are cut out of sheet iron: the bottom, three walls and the roof. The supporting legs are prepared separately.
- Weld the walls to the bottom, periodically monitoring the progress of work using a building level.
- Further actions are related to the division of the internal space into the chambers of the ash pit, firebox and vestibule of the chimney. Separation is carried out using a grid.
- To fix the grille, retaining sides (metal corners) are first welded to the inner walls of the housing.
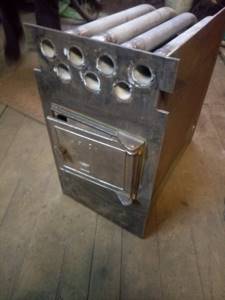
On the front wall it is necessary to cut out the holes for the ash pan and firebox, and weld the rotary fittings on which the doors are mounted. The structure is assembled by welding the supports and the chimney pipe.
Basic models of homemade potbelly stoves
According to its principles, a potbelly stove is practically no different from models of a special solid fuel device. This is a certain type of very simple stove in the fireplace category. There are also special models that are equipped with hobs and special bath devices.
Material used to make the stove Often, a potbelly stove is made of high-quality steel, but in some cases cast iron can be used. For different types of metal, elements made of natural stone are often used. If cast iron is used, then you should count on low heat capacity parameters; it is very difficult to find and it is not easy to cook. Many people prefer steel for this very reason; it is much easier to work with. Moreover, the thicker the material, the longer it will last. If you plan to make a device for rare use, for example, for emergencies with a heating system, then make it from simple iron with a thickness of 1 mm. In the process of making a stove, all factory fittings may well be used. This applies to elements such as grates, the necessary doors, burners and valves. Many craftsmen make them with their own hands using steel.
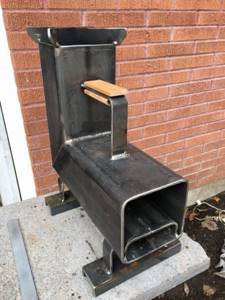
Shape and material for the body If you want to make a potbelly stove using drawings or photos, you must use the method of cutting a metal sheet.
- In addition, the following elements are used:
- Molding profiles;
- Square shaped pipe;
- Special corners;
- Fittings;
- Rod.
All this is required to make the furnace body rectangular in shape. Due to the presence of special planes, the case will have ideal ergonomic properties. In other words, the potbelly stove will be as stable as possible, it will be easy to process and cover. The stove can be easily and simply docked with a wide variety of structures, objects and parts.
Various metal cabinets and boxes can be used as a base. Often these are cylindrical elements, for example, large-diameter pipes, cans, gas cylinders.
In the process of making a stove with your own hands, you will definitely need to use welding. If the metal is not very thick, the oven can be made using bolts, screws and a drill. Regardless of the chosen model, it is important to use drawings as the basis for production, because Despite its relative simplicity, certain instructions for implementing the heating device must be followed.
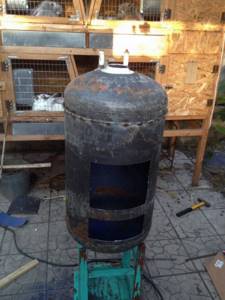
Making a potbelly stove from a can
An old metal can or barrel can be an excellent option for building a potbelly stove.
This is facilitated by the optimal shape (there is no need to boil sheet iron) and sufficient volume. The main task of the master is to form the openings of the ash pit and firebox, as well as the high-quality organization of the exhaust system.
Note!
How to seal a stove so it doesn’t crack from the heat, what solution: review of the most effective methods + instructions
- Why the bottom of the battery is cold and the top is hot - let's look at the reasons. Review of recommendations on what to do and how to fix it
How to insulate a dog house for the winter with your own hands and inexpensively - step-by-step instructions with photos and descriptions of all stages
Making a furnace
When the decision to make a metal stove yourself has been made, then you can choose a metal pipe. Serving as a “donor” for the future product, its diameter should be 50-80 cm. The length of the pipe should be about 1.5 m (margin is welcome). Wall thickness – 8-16 mm. A chimney pipe with a diameter of 135-180 mm is also useful.
Do-it-yourself drawings of metal stoves can delve deeper into the theory. The manufacturing technology itself is a completely different matter.
First of all, the pipe is cut into two parts - one should have a length of 0.9 m, the second 0.6 m. The first is used for the manufacture of a furnace, the second for the manufacture of a water tank.
Then you need to make cutouts in the pipe - future passages to the blower and firebox. The cut pieces of metal are left for making doors.
The next step is the installation of grates made from reinforcement. The fastening of the grate must correspond to the volume and principle of fuel loading. To fix the grate, ears are welded to it.
Next, a hole is made in the upper plane of the stove into which the chimney pipe is inserted.
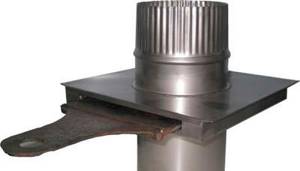
To provide the stove with good draft, you need to use a 4-5 meter chimney. The latter is inconvenient to install and maintain, so it is better to focus on collapsible types.
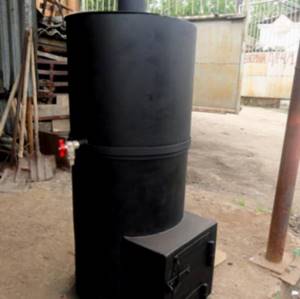
When making a sauna stove, you will have to be guided by the following list of works:
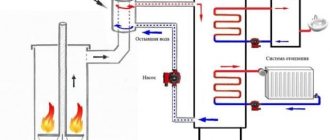
- First, a heater is installed below the stove firebox;
- Then you need to install a tank next to the firebox. The installation is carried out in such a way that part of the tank is on supports, the second is on the firebox;
- A tap should be connected to the tank;
- The next stage is welding the legs to the bottom of the structure;
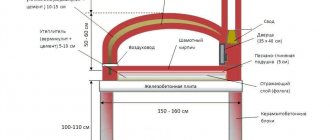
- A screen must be made of refractory bricks around the entire perimeter of the furnace.
If the chimney passes through the attic, then the first one should have no dampers. You can place a light stove in a metal sauna with your own hands on a metal sheet.
Heavy analogues already require the preparation of an additional brick or concrete base 20 cm high.