Advantages of installations
Energy-saving installations for water heating are just beginning to gain popularity among Russians; they have appeared on the heating equipment market too recently. Of interest are high technical characteristics, environmental safety, autonomy, reliability, efficiency, and compactness.
- The efficiency of the EOU is 98% when two devices operate simultaneously in the heating system;
- the heating level is controlled by special temperature sensors;
- compact size and neat appearance;
- instant heating of the liquid in the chamber;
- there is no need to coordinate installation and subsequent operation with Gostekhnadzor authorities;
- significantly save owners money during the heating season;
- The guaranteed service life is 10 years, the operating period declared by the manufacturers is 30 years.
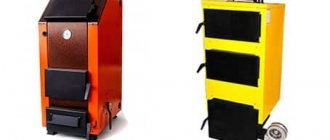
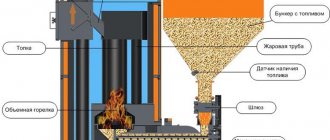
Pellet boiler type
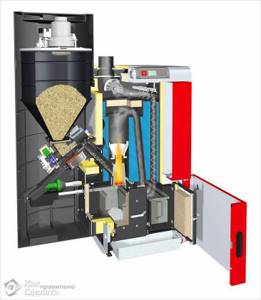
Operating principle of a pellet boiler
This type of boiler installation is more automated and less demanding to maintain during operation. Pellets are granulated wood made from sawdust and shavings. Since this material is free-flowing, they are fed into the combustion chamber automatically using a screw or hopper.
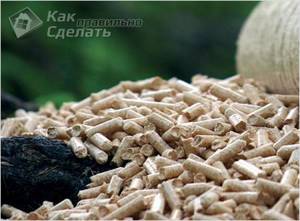
Pellets
You may have difficulty making such a boiler due to the lack of certain electrical equipment: an electric motor to operate the auger, or a hopper damper.
The operation of a pellet boiler is carried out in such a way that there is no need for kindling or adding fuel. This is influenced by the dimensions of the bunker. Thanks to the operating principle of the boiler installation, it is possible to control the amount of heat generated by the amount of pellets supplied to the firebox.
These two types of boilers are optimal for DIY production. Which one to choose is up to you. This is determined by many factors, the main of which is the need for heat and the availability of a certain type of fuel that you will use.
In any case, it is necessary to strictly follow the technology and observe safety rules.
See how you can make a long-burning boiler yourself:
https://youtube.com/watch?v=lS9RHrPXRFc
This video demonstrates a shaft-type solid fuel boiler with a heat accumulator:
Necessary materials
To make an ion boiler we will definitely need:
- firmness and determination;
- welding, ability to use it;
- iron tee;
- a steel pipe that has the dimensions we need;
- coupling;
- terminal and electrode insulators;
- set of electrodes;
- terminals for grounding and zero.
You may also be interested in an article on how to make a steam generator yourself, read about it here
How to calculate power
The feasibility of installing a heating boiler of one type or another is determined by its operating conditions and the area of the room. Based on these data, the minimum power and operating cost for the heating season or the whole year are calculated.
Power formula: W=We*S (kW);
- W is the optimal power of the heating installation;
- We is the specific power per unit area, depends on the region (southern regions are about 0.05–0.07, northern and central – up to 0.2);
- S – total area (m2);
Additional correction factors can be introduced for different types of buildings and roofs:
- roof without thermal insulation – 0.25;
- no external wall insulation – 0.35;
- drafts or powerful ventilation – 0.15.
These and other amendments are contained in reference literature, as well as relevant GOSTs.
It is important! Having received the required boiler power value, compare it with the maximum possible load on the electrical network in the house. Garage and garden cooperatives have weak networks and are not able to power powerful heating devices.
Device and technical characteristics
This method of instantly heating the coolant is not some kind of modern development; it has existed for several decades, so today models are produced by several companies. The designs are basically similar and differ only in minor details.
This is usually a vertically mounted cylinder, with a wide lower part where the electrical switching unit is located. The design contains two pipes for supply and return coolant.
Electrodes are installed inside the device. When working in a 220 V line, there is one electrode in the center, and in a 360 V line, there are three insulated electrodes made of specialized alloys, secured with protected polyamide nuts.
In addition, the design contains:
- control unit;
- control unit controller;
- low quality voltage protection;
- power and ground terminals;
- rubber gaskets for insulation
- insulating.
Average characteristics of a domestic ion boiler:
- diameter of the electrode boiler – up to 300-350 mm;
- length – approximately 600 mm;
- weight of one installation is from 10 to 12 kg;
- thermal power from 2.0 to 55.0 kW.
An indispensable component of an ion boiler unit is a special coolant, which must necessarily meet the conditions specified in the technical instructions of the manufacturer.
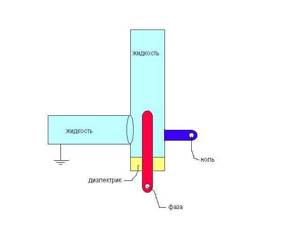
Design features
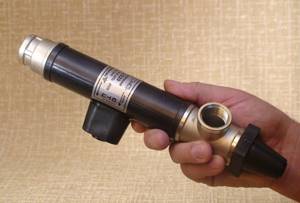
From a structural point of view, such a boiler is a small all-metal pipe coated with polyamide (it acts as an insulator). The coolant input and output, as well as power terminals, are connected to the housing. A set of insulated electrodes is inserted into the pipe on one side, while the other is hermetically sealed.
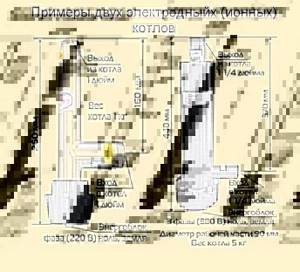
Electrode boiler
Let's consider the technical parameters of factory models.
- Length – up to 60 cm, diameter – no more than 32 cm.
- The power can vary between 2 and 50 kW, in other words, the boilers are capable of heating a room of up to 1500 m².
- They can also be single- and three-phase. In the first case, we mean low-power appliances used in private homes, in the second - high-performance boilers intended for industrial facilities.
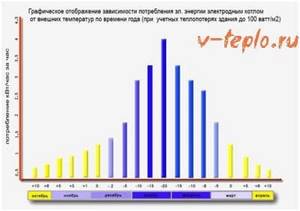
- The optimal value of energy consumption is achieved at a working fluid temperature of 75ᵒC. If the indicator is higher, then energy consumption increases, and if it is lower, then it, accordingly, decreases (at sub-zero temperatures, the thermal conductivity of the liquid worsens).
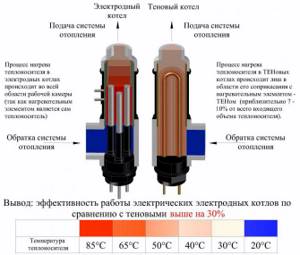
The operating principle of an electrode boiler. Comparison of electrode and heat boilers
Based on the method of coolant supply, ion devices can be of two types:
- open systems are characterized by the fact that the heated liquid moves naturally, transfers heat and is sent back to the heat generator;
- closed ones have a special pump and expansion tank - they are necessary for the initial stage of warming up the working fluid.

Boiler piping
Video - How the boiler works
The best manufacturers
Due to their advantages, ion boilers remain very popular sources of heat supply on the Russian market.
They are produced by a number of domestic factories, and there are also models from Western manufacturers.
General overview of the most popular brands:
- "Galan", a boiler unit from a Moscow company. The company produces several basic models on a 220 V network: "Ochag", "Turbo" and "Geyser", and on a 380 V network - "Vulcan". For the devices you will need to buy a main control unit "Navigator", a circuit breaker "ABB", a thermostat "BeeRT", which controls the performance of the circulation electric pump.
- Electrode ion boilers Beryl, a Russian manufacturer, are available in 2 standard sizes for a 220/380 V network and, accordingly, with a power of 9/33 kW. It has a top-mounted power supply unit, which simplifies installation and maintenance. It is necessary to additionally purchase a “Euro” CSU unit, which allows for stepwise control of the coolant heating power every 200 W.
- Electrode boilers of the EOU brand of a domestic manufacturer, with a power range from 2 to 120 kW, in a 220/380 V network.
- "Forsazh" of the Ukrainian manufacturer are equipped with a special protective casing that increases safe operation and has a designer appearance. It is presented in 5 modifications for a 220 V network, with a power from 3.0 to 20 kW, which are equipped with an ECRT control unit.
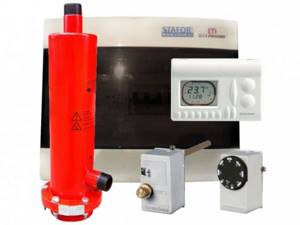
- STAFOR, a Latvian manufacturer, complies with EU requirements. The design has a number of innovative solutions, including the use of a “Faraday cage” with distribution of safety and working zero. Together with it, it is possible to buy a branded coolant and a specialized additive STATERM POWER, which allows timely adjustments to the chemical composition of the electrolyte to regulate the efficiency of the boiler.
The best Russian electrode heating boilers
The big advantage of domestic equipment is that it is perfectly adapted to real-life operating conditions - with voltage fluctuations, unstable current, etc. At the same time, in terms of price, maintenance costs, unpretentiousness and reliability, it will give a head start to most competitors.
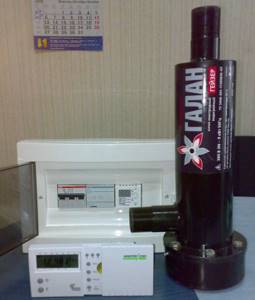
"Galan" Vulcan 36
was one of the first to begin developing such a family of heating devices, using developments in the military space industry and patented engineering solutions. For a quarter of a century, even the first line of devices has not failed and continues to function.
"Galan" Vulcan 36
Model power 36 kW, suitable only for three-phase network. The maximum current for three phases is 27.3 A. The control is mechanical; the boiler is installed only on the floor.
This model “Vulcan” 36 has many advantages, let’s highlight the main ones:
- ease of maintenance and operation.
- safety and reliability - if an electric short circuit occurs, the current supply wires overheat, the set temperature is exceeded, or a coolant leak occurs, the boiler turns off.
- the coolant volume is 600 liters, the volume of the heated room is 1700 cubic meters.
- affordable cost - the average price is 11,000 rubles.
Operating instructions "Galan" Vulcan 36
"Galan" Geyser 15
A safe and productive single-circuit electrode boiler, which is often preferred by owners of country property. Equipment power 15 kW, suitable only for three-phase network. The maximum current for three phases is 22.7 A. The control is mechanical; the boiler is installed only on the floor. As an additional option, it is possible to connect external control.
"Galan" Geyser 15
It is bought due to the following advantages:
- Simplicity and ease of use - even a beginner can understand the device.
- light weight of the structure and compact dimensions - only 5.3 kg.
- large heating area - up to 180 sq.m.
- electronic automatic control - the presence of a control unit that allows you to create an interval for heating the coolant.
- ability to connect to a room temperature indicator.
- The average price of the device will be 7800-8000 rubles.
Operating instructions "Galan" Geyser 15
RusNIT 208M
, Ryazan. Can be used as the main or backup heat source in a house or domestic premises with an area of up to 80 sq.m. Power 8000 W.
RusNIT 208M
Specifications:
- three-stage power adjustment - 30%, 60% or 100%;
- the heat exchanger and heating element are made of stainless steel;
- antifreeze or distilled water can be used as a coolant in the system;
- the presence of a thermal switch that prevents heating of the coolant above 90°C;
- can be connected to a circulation pump;
- Manufacturer's warranty – 2 years.
Among the disadvantages, we note the manual selection of power, difficulties during connection, requiring certain skills.
The cost of the unit is from 15,000 rubles.
Operating instructions RusNIT 208M
Review of popular models and prices
Models of ion boilers differ in size, appearance, technical characteristics and cost.
Galan
The manufacturer of electronic boilers, JSC Galan, is based in Russia. The company has been producing heating equipment since 1992. The most famous models are “Geyser”, “Galan Hearth”, “Vulcan”.
Using electric boilers from this company, you can heat any premises, regardless of size: apartment, garage, cottage, cottage, office, warehouse, store, production workshop. The power of the units starts from 3 kW.
The equipment set additionally includes: German high-quality automation, a remote temperature control unit, which can be programmed for a week in advance. The products are supplied with CDs on which you can find the necessary diagrams, drawings and operating tips.
Boilers from this company can operate around the clock in automatic mode. For wall-mounted models, a special antifreeze is used, the freezing point of which is -40 degrees Celsius.
Cost - from 4100 rubles.
EOU
These are ion heating devices from Ukrainian. They are an alternative to traditional devices. Water is used as a coolant, which makes the installation economical, safe, reliable and durable compared to conventional boilers.
Thanks to their compact size, the models can be easily installed in any home. Durable and resistant to external influences materials are used to manufacture the electric heating device. EOUs are autonomous, fireproof and silent devices that are suitable for various premises. The built-in AEZ controller allows you to start the installation without preparing the coolant. Warranty period - 6 years.
Cost - from 5400 rubles.
BERIL
The units have been manufactured since 1998. The equipment is popular in Russia, European countries, and Korea. With the help of heating boilers "Beryl" you can heat: country houses, garages, cottages. The products have a distinctive feature - electrodes, the construction of which uses composite materials. This allows you to reduce energy consumption.
Other features of Beryl boilers:
- The power unit is located on top. This makes connecting equipment even easier.
- For preventive maintenance, replacement or repair of the electrode unit, there is no need to disconnect the boiler from the system.
- The presence of foreign inclusions in the coolant cannot affect the quality of the installation.
- Insulating and sealing materials have increased heat resistance - up to +250 degrees Celsius.
- Operational life is at least 10 years.
Cost - from 4450 rubles.
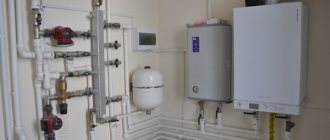
Connection diagram to the heating network
For normal operation, you will need to install a circulation pump, an expansion tank, a special filter and an automation unit. Most often, 3 standard schemes for connecting an electric boiler to a heating circuit are used.
Standard or sequential
The most common concept is in which the coolant is supplied from top to bottom using a pump. Allows you to connect a large number of heating radiators.
The boiler connection diagram is the most common
Parallel circuit
Well suited for small rooms with 1–2 battery sections. Liquid circulation in such a circuit is possible by gravity due to convection. A second boiler or central heating can also be connected.
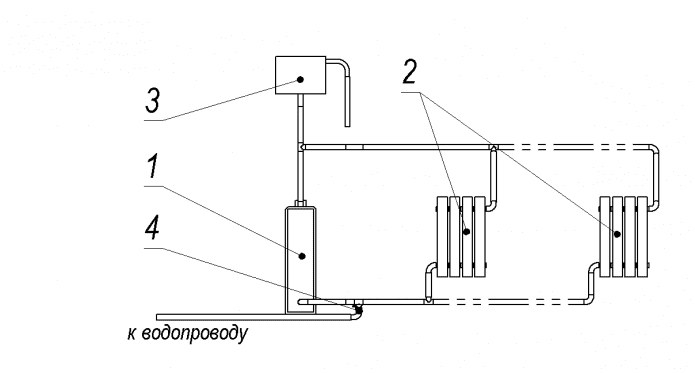
1 – boiler, 2 – heating system radiators, 3 – expansion tank; 4 – valve for filling/feeding the system from the water supply
Connecting a heated floor
In houses with central or gas heating, low-power electrode boilers are used to heat the floor. This floor retains heat longer and makes the indoor microclimate softer than when using infrared heaters.
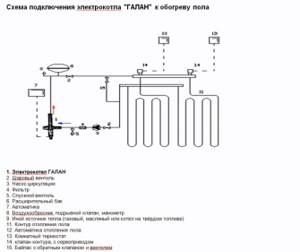
You can connect the heated floor to the boiler yourself
Heating water in a hot water supply system involves the use of special 2-circuit boilers, which can also be connected to a general heating system.
Before starting work, the drawing must indicate the number of circuits, locations of heating radiators and the total number of pipes, installation locations of pumps and filters. Provide taps for draining water and filling fluid into the circuit.
Structural components of an electric heat generator

An electric boiler assembled by yourself, most often, is a container like a metal pipe. The main element of such a heat generator is the heating element. The use of additional equipment - sensors and regulators - facilitates the operation of a home-made unit and increases its level of safety.
The simplest option is to install the heating element directly into the heating system. The main requirements in this case are that the pipe in which the heating element is mounted is removable and must have a larger diameter than the other pipes. The ability to remove the pipe is useful if it is necessary to replace the heating element.
Attention! Only a stand-alone unit can ensure efficient operation of the system. An electric boiler designed to heat a small house with two or three rooms can be made from a piece of steel pipe 500 mm long and 219 mm in diameter
The pipe is welded on both sides with steel caps. The top cover must have a hole designed to connect the heating system pipe, through which the hot coolant will flow to the radiators. For cooled water coming from the return pipe, an opening is provided at the bottom side of the device
An electric boiler, designed to heat a small house with two or three rooms, can be made from a piece of steel pipe 500 mm long and 219 mm in diameter. The pipe is welded on both sides with steel caps. The top cover must have a hole designed to connect the heating system pipe, through which the hot coolant will flow to the radiators. For cooled water coming from the return pipe, an opening is provided at the bottom side of the device.
The heating element itself in a homemade heat generator is mounted either on the bottom cover or on the bottom side. In the latter case, the heater should be installed on the opposite side of the pipe that serves to supply cooled water.
Drawings for assembling a boiler with your own hands are selected depending on the preferred design; it must be equipped with the following elements:
- expansion tank;
- circulation pump;
- safety valve;
- filters.
When deciding how to make an electric boiler with your own hands, you should pay special attention to installing automation, which will help solve issues of saving energy and increasing the safety of electrical equipment. tell me about a homemade electric boiler
tell me about a homemade electric boiler
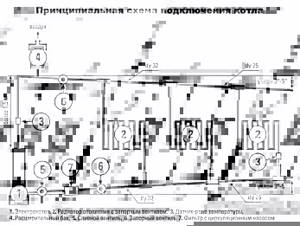
In addition to the solid fuel boiler (Dakon), I want to install a homemade 9 kW electric one. It will be made from a two-hundredth pipe. I want to embed it sequentially after the solid fuel boiler, as shown in the figure. Make the water supply to the electric boiler and the outlet on the same axis to reduce the resistance to water flow, place the heaters vertically. I plan to buy automation from a factory electric boiler. The following questions arise:
1. Is one safety group enough for a solid fuel boiler and an electric boiler with this connection,
2. if yes, then where is it better to weld the safety group in position 1 or 2 (in the picture)?
3. Is the location chosen correctly for the water temperature sensor (it is planned that the electric boiler will automatically turn on when the temperature of the water leaving the boiler drops to 50-60-70 degrees)?
4. At what distance from the automation can the water and air temperature sensor in the room be placed (as I understand, the increase in wire resistance increases with their length, and affects the accuracy of the sensors, but I don’t know how critical)?
Maybe someone else will have some thoughts?
idris
An efficient heating system involves the use of a modern heating boiler. This unit can operate on electricity, gas, or solid fuel. Today there is a wide range of products presented. But, despite this, anyone who has the necessary materials and a diagram can make a homemade electric boiler without any problems.
Manufacturing technology. Instructions
After becoming familiar with the structure of the boiler, you can try to make a similar device at home. This process is not as difficult as it may seem, but it requires utmost care and attention. Otherwise, the finished product may be unsafe.
Stage 1. Preparing everything you need
To work you will need the following equipment:
- welding machine;
- electrodes;
- iron tee;
- electrode insulation (polyamide);
- neutral wire;
- coupling;
- ground terminals;
- steel pipe of appropriate dimensions;
- insulation for terminals.
Note! At the preparatory stage, you should study the operating diagram of such equipment.
Stage 2. Assembling the ion boiler
Assembling the boiler
First, let's clarify a few important aspects. So, the ion boiler needs grounding, as mentioned above, and the neutral cable must be supplied exclusively to the outer pipe. It is also worth remembering that the phase should only be supplied to the electrodes.
Combination device
The need for maximum reliability led to the invention of combined Archives flame control sensors and relays, for example. The main difference from a conventional device is that the device uses two fundamentally different registration methods - ionization and optical.
As for the operation of the optical part, in this case it selects and amplifies an alternating signal that characterizes the ongoing combustion process. While the burner is burning and pulsating, the data is recorded by a built-in photosensor. The detected signal is transmitted to the microcontroller. The second sensor is of the ionization type, which can receive a signal only if there is an electrical conductivity zone between the electrodes. This zone can only exist in the presence of a flame.
Thus, it turns out that the device operates in two different ways to control the flame.
Comparison of EOU and gas boilers
For many years, natural gas occupied the first position among energy sources. It was used both for domestic purposes and on an industrial scale. The disadvantages of gas boilers became apparent after the advent of electric EOSs designed for autonomous operation. Gas equipment is inferior in several ways:
- efficiency value is lower;
- boiler operation is accompanied by emissions of harmful substances;
- high fire danger;
- dependence on the gas main.
Installation of EOU
To install an energy-saving water heating device, fittings and connecting elements are used, which are traditionally used during plumbing work (pipes, hoses, couplings, adapters, etc.). Installation of an energy-saving electrical installation in a heating system is no different from installation of other types of boilers:
- output temperature is about 95 °C;
- operating voltage range 220–380 V;
- single-phase installation length 300 mm, diameter 43 mm, weight 2 kg;
- inlet connection size G1″, outlet G1¼″;
- three-phase installation length 400 mm, diameter 106 mm, weight 7 kg;
- inlet connection size G1¼″, outlet G1¼″.
Possible installation options
The input of the unit is connected to the return line, while the output is mounted to the flow line of the heating system. If one or more boilers are already operating in the system, the installation of an energy-saving option is carried out in parallel with the existing devices. There are several options for installing the system:
- two-wire circuit with top wiring (natural water circulation);
- single-wire circuit with bottom wiring (forced water circulation);
- parallel circuit, when the EOU is connected to a heating system installed previously;
- parallel circuit, when two or more EOUs are connected to the system.
Mandatory requirements
When installing an energy-saving water heating boiler, it is necessary to provide for the installation of an electricity meter, in relation to a current strength of 1A. The cross-section of the electrical cable must be the same as indicated in the instructions. Mandatory requirements also include the installation of a grounding loop.
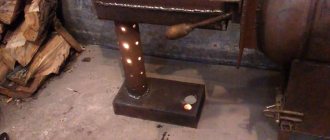
Do-it-yourself heating element electric boiler for home heating
You can make a heating element electric boiler for heating with your own hands from a tank of any shape. In such a unit, water is heated by heating elements. They will need to be purchased in the quantity that is needed specifically in your situation. We have already told you how to calculate the power of an electric boiler. Usually two or three heating elements are installed. The cost of one heating element is 10 dollars. They are already equipped with a thermal head with an external thread, with which they will be screwed into the tank body.
Diagram of a heating element electric boiler made by yourself.
Let's look at how to make a homemade electric heating boiler using heating elements from a pipe. To do this you will need:
- steel pipe with a diameter of 150 mm;
- two round plates with a diameter of 150 mm;
- three pipes with a diameter no less than the cross-section of the circuit pipes (from 25 mm);
- heating elements;
- nuts;
- automatic air vent;
- ball valve
To make an electric heating boiler for your home with your own hands, you need to choose the right dimensions. The length of the pipe, which will be the body of our heater, must exceed the length of the heating elements by a good margin. The ends are welded on both sides with plugs. Two pipes are welded into the side part for supply and return coolant. Now you need to decide how the heating elements will be located after connecting the electric boiler. Naturally, they will be in a vertical position; the only question is which side they will be screwed in from. There are two options:
- below;
- above.
If the heating elements are screwed in from below, then during operation, in order to replace the burnt-out heating element, you will have to drain water from the boiler, and then, accordingly, pour liquid into the heating system. But this arrangement guarantees that the heating elements will be completely immersed in the coolant. Such homemade electric boilers for heating a private home are more reliable. As you know, if part of the heating element is not in water, the tungsten spiral will burn out.
Due to the formed air pockets, the heating elements will overheat and burn out. Therefore, to vent air outside in the upper part, you additionally need to install an automatic air vent. In this case, the air problem will be solved.
Choose for yourself how it is more convenient for you to make electric heating boilers with your own hands, both options are correct. In order for the heating elements to be screwed into the body, you need to cut holes of the required diameter and weld nuts on them. The internal thread of the nuts must match the external thread of the heating elements. Additionally, a pipe is welded into the lower end to drain the coolant. After this, threads are cut on all three pipes (supply, return, drain). A ball valve is screwed onto the drain pipe.
That's all, the manufacture of a homemade boiler is finished. All that remains is to install it on the heating circuit and connect it to the network. Before heating with an electric boiler, you need to consider what voltage is in the network of your home (220 or 380 volts). The connection diagram of the heating elements depends on this. You also need to resolve the issue with the boiler control unit. The minimum that is required is thermostats that will measure the temperature of the coolant. Based on the thermostat data, the control unit will turn the boiler on or off. If desired, you can add certain options, depending on the situation. How to make a heating element electric heating boiler with your own hands, video:
Savings from using EOU
Energy-saving heating systems comply with all environmental and fire safety standards, operate silently, without emitting substances harmful to human health.
The use of EOU allows you to optimize the consumption of electrical energy, and where rationalism operates, the family budget is saved. Thermostats installed in each room allow you to regulate the temperature within the range from 5 to 30 °C. When the temperature drops by just 1-2 degrees, electricity costs are reduced by 5-6%. A more flexible approach to temperature control throughout the entire house will achieve 35-50% savings.
If desired, you can program any temperature schedule for a heating system with an EOC, according to which the automation will turn off one or a group of rooms.
Advantages and disadvantages
As can be seen from the above, electrode boilers have the following advantages:
- Simple construction diagram.
- Small sizes.
- Easy to install.
- Fire safety.
- Quiet operation.
- Low cost of components.
- Low consumption of materials for self-production.
- Possibility of connection to single- and three-phase power supply.
As for the minuses, ion boilers do not please with the following features:
- To turn on the device, you need to apply a large electric current . To do this, use a magnetic starter or similar devices.
- It is necessary to use coolant with the correct salt concentration . If it is too low, the current will be insufficient and the heating will be weak.
- If you create an electric heating boiler with your own hands, you need to spend a lot of time determining the correct salt concentration.
- It is not possible to use other coolants besides water . Moreover, the water itself must be in proper condition. Thus, it is advisable to use a technical fluid without any metal impurities, which tap water is rich in.
- High consumption of electrical energy .
Description of work
The task of all heating systems is to heat the coolant at minimal cost and maintain its temperature for a long time. An electrode boiler, also called an ion boiler, copes well with this. But it has not received proper distribution in everyday life.
The electrode boiler circuit resembles an electrolysis device. The steel body is one electrode. And inside it there is a second one - a metal rod. A positive charge appears on it when an electric current is applied, and a negative charge on the body. The ions begin to move towards the body. But for this you need a good conductor as a coolant. Salt water fulfills this role perfectly. It does not have time to conduct all the current and heats up. Heating depends on the concentration of salts in the liquid and the current strength.
How to make an electric diode boiler with your own hands, watch in this video:
Advantages of an ion boiler:
- high efficiency - efficiency 98%;
- compactness - the length of the device does not exceed 50 cm, and installation is carried out in the heating main;
- reliability - in the absence of coolant in the system, overheating will not occur;
- Low voltage in the electrical network will only slow down the heating.
The small size allows the device to be installed in limited space. Reliability is achieved due to the impossibility of heating the liquid if it is not in the system. The electrical circuit will open - this is safe.
Electrodiode boiler - a compact and safe device
Negative sides:
- you need a high quality coolant with a certain resistance value;
- the device must be grounded;
- significant electricity consumption;
- mandatory installation of instruments to monitor the operation of the system;
- Not all types of radiators are compatible with the system.
Gluttony and the requirement to install control devices are the main disadvantages. They form half the cost of the system. It is also difficult to select a coolant that will give the required level of resistance. Otherwise, the operation of the ion boiler will not be effective.
Tips from the professionals
Anyone can install the device, but it is important to do the job well. In this case, a number of rules must be observed. This will avoid problems with the device.
The electrodiode boiler must be installed only in a vertical position
Useful information:
- The electrode boiler is installed only in a vertical position. Operational safety is ensured by separate mounting of the device to the wall, regardless of the rest of the system.
- For grounding, use a copper wire with a diameter of 0.4 mm. Resistance should not exceed 4 ohms.
- The zero terminal is placed at the bottom of the boiler. This makes it easier to attach the ground wire.
- When installing an ion boiler into a previously used heating main, it should be cleaned. To do this, use special products for electrode heating systems.
These techniques were developed by specialists over many years of practice. It is undesirable to repeat mistakes and then redo the system. The owners, taking into account the advice, will not spend additional time optimizing the operation of the device.
Putting the heater into operating mode
The last stage is connecting the power and grounding wires, filling the system with water and setting up the electrode boiler. It will need to be brought to operating power by adjusting the coolant composition. Tap water is usually used, but it contains a number of harmful inclusions that form scale on the surfaces of the electrodes. The ideal option is to fill the system with distilled water at the very beginning; if it is not available, use rain or tap water.
To set up, you need to have the following devices and materials:
- current clamps or ammeter;
- soda;
- syringe;
- container for stirring.
Since electrode boilers made by hand according to the given drawing will have an approximate power of 4 kW, then according to calculations the current in the circuit should be 4000 W / 220 V = 18 A. The ammeter is connected to the power wires, after which the device is connected to the network for heating water in the system. At this time, a soda solution is made in the container, the approximate proportion is 1/10. It is better to add it to the system through an open expansion tank or other place with a syringe.
After switching on, the first ammeter readings will be less than 18 A. In small portions, slowly, a soda solution is added to the coolant for electrode boilers. In this case, the system must be completely warmed up. If distilled water was poured in, the process will take a long time, you need to be patient. Topping up should be stopped when the device shows 16-17 A, otherwise the concentration may be exceeded. This can lead to boiling and the release of steam or rupture of plastic pipes.
Operating principle and installation diagram
Before studying the drawings and starting to assemble the device, you need to familiarize yourself with its operating principle. It is based on accelerating the movement of ions in a coolant (salted water) under the influence of electric current. The use of physics allows you to save up to 40% of electricity, which significantly reduces the cost of heating your home.
We recommend using an extremely simple design when constructing a heating installation. The coolant enters a container with an electrode installed in it. It is better to use a metal rod of a certain diameter as an electrode attached to one of the sides of the container. The phase wire is connected to the electrode, and the neutral wire is connected to the outer surface of the housing. Connecting a boiler made independently to an electrical network with a voltage of 220 V and a frequency of 50 Hz leads to a chaotic movement of liquid molecules between the cathode and anodes, which in turn leads to heating of the water. Adding salt to water reduces the resistance of the conductor, which reduces the magnitude of the voltage surge when the installation is turned on. For the same reason, we recommend using an autonomous power supply if you make an electrode heating boiler with your own hands.
Consequences of electrolysis, direct action of current
During the operation of the hydrolysis solution, water breaks down into hydrogen and oxygen, leading to the formation of air pockets. Does not allow fluid to circulate normally within the system.
Some users have found traces of corrosion on aluminum radiators - a consequence of electrochemical exposure.
If you install cast iron radiators in the heating system, the quality of the coolant will change for the worse. Distilled water washes out impurities from the pores of cast iron. An electrode boiler requires the installation of bimetallic structures.
The liquid in the system is under constant influence of current; grounding is required. The process is complex and not possible on all types of heating systems.
You can install a clamp on a steel pipe if the system consists of cast iron radiators and plastic pipes - a process that is practically impossible to solve.
A little history
Electrode heating boilers were proposed for use in domestic conditions back in the 80s of the last century. The idea belonged to Dmitry Kunkov, and the invention received a patent. Until this point, such equipment was used in the military industry and installed on submarines and naval ships. The Russian company GALAN was able to improve the invention by developing a unique and fundamentally new electrode-type water heating boiler, which was introduced to the market in 1992.
Just two years later, a serial model appeared, the operation of which in the heating system confirmed the fact of a significant reduction in energy consumption used for heating premises in comparison with previously produced heat generators. Today, Galan heating devices are widely used in villages remote from communications and hard-to-reach places, in warehouses and railway stations, in areas of natural disasters and urban cottages.
Myths about outstanding efficiency
Promotional materials claim that electrode-based boiler equipment extracts thermal energy from the void. Indicators - 120-150% of the applied electrical power. But they completely ignore the laws of physics and heat engineering.
Myth - the conversion of electrical energy by an electrode boiler is many times greater. We focused on the promotion of thermal equipment that was powered by a heat pump with a positive COP coefficient.
You should not believe the statement that electrical energy is 100% converted into heat. Losses are inevitable.