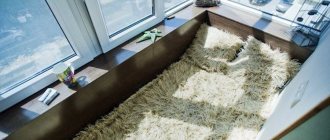
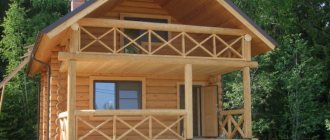
The layout of most apartments in panel houses includes loggias, which are most often used as a place for storing old things and drying clothes. However, by insulating a balcony in a panel house with your own hands from the outside and inside, you can significantly expand the possible area of its use. Many, having insulated the loggia, expand the living space of the apartment, turning it into a separate room or increasing the area of the adjacent room.
Loggia
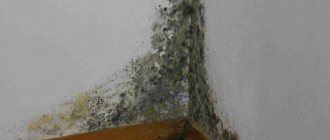
Why is it cold in a panel house?
During the cold season, standard heating in panel houses may not be enough.
Even installing plastic windows instead of old ones, or replacing the radiator will not solve the problem. The largest amount of heat, in this case, escapes through the thin walls and open space of the balcony. To make living in an apartment more comfortable in winter, you can insulate the walls, but this is quite difficult. The best option would be to insulate a balcony in a panel house. First of all, the balcony needs to be glazed; it will be difficult to do this on your own; the smartest thing to do is contact a special company, of which there are many now. You will also have to seek help if the balcony is on a high floor, for external finishing and strengthening of the slab. But the internal insulation of the balcony after glazing can be done without outside help. In this article we will look at various methods of insulating a balcony and finishing methods.
Additional thermal insulation will help retain heat in the apartment, avoid drafts, and increase the overall temperature in the house without even replacing the batteries. Your stay will immediately become more comfortable. Insulation is a fairly feasible task for any person, even those without experience in repairing and furnishing an apartment. You just need to decide on the price and quality of the material and study the instructions. And every thrifty owner most often has the necessary tool for this.
Balcony glazing KOPE-M-Parus
In 2003, the KOPE project received a new, modernized version; changes also affected the balconies. Now this architectural form is made in the form of a bay window balcony with floor-to-ceiling glazing. The problem with balcony glazing is the connection of the frames at an angle; the height of the frames reaches 2900 mm. But there is a competent solution to the problem.
H-shaped connecting reinforced profiles are installed between the frames, allowing the structures to be firmly secured to each other along the entire length from floor to ceiling. The best option for glazing a KOPE-M-PARUS balcony are plastic profiles, the frames of which are connected to each other with reinforcing connectors.
Where to start and which method to choose?
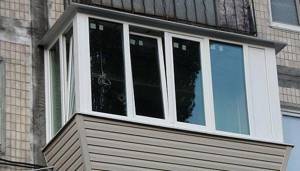
First of all, it is necessary to glaze the loggia. It comes in two types - cold and warm. Cold, as the name suggests, only protects from rain and wind, but it won’t get any warmer on the balcony itself. It is better to glaze the balcony with metal-plastic windows, then you will be able to install heating there and use the additional space to your advantage, as a room for relaxation or storage. But after glazing, in order to prevent the structure from cooling, it is necessary to insulate the slabs themselves, because concrete has low thermal insulation properties.
There are many different materials for insulation. The most popular are polystyrene foam and mineral wool. You can additionally put expanded clay on the floor. To make staying on a new, warm balcony more enjoyable, you also need to complete the interior decoration. It will not only please the eye, but will also additionally protect the insulation from physical impact or moisture penetration inside.
Types of balconies
Balconies are as varied in appearance, internal layout, functionality, and insulation as the houses to which they belong. The glazed balcony also has its own varieties.
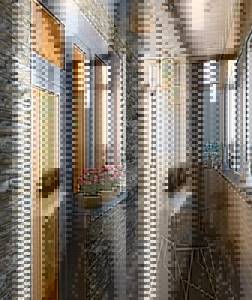
An elegant glass balcony along its entire perimeter and height is called a French balcony. Such balconies are installed in private buildings or special buildings. As a rule, they are not insulated; they serve as an excellent decoration for the home.
Panoramic glazed balconies can be classified as semi-warm, because the large area of the glazed surface is not able to retain heat. Such balconies, like stained glass ones, serve more the aesthetics and design of the house. A warm balcony maintains room temperature, and often such balconies are connected to the room or kitchen of the apartment.
A cold balcony usually looks like a warm one in appearance, but there is no heat inside, and therefore its arrangement can be much cheaper than other options. There are also balconies of the “bay window” type, but they often serve a decorative role and can increase the illumination of the room to which they are attached.
Thermal insulators used to insulate loggias
Currently, construction stores offer a wide range of insulating materials, from which it is not difficult to choose the one that is right for you. You should focus on the climate and the proposed insulation scheme.
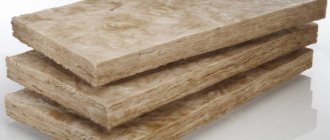
Mineral wool
The most tested and traditional material. It is constantly being modernized, has many shapes, which makes it very convenient for insulation, and today it is one of the most popular and effective.
Popular insulation - mineral wool

Depending on the source material, there are the following types of mineral wool: glass, stone and slag. It is available in various types and forms, in rolls and mats with a thickness of 20 to 200 mm. It is very plastic, convenient and easy to cut with a regular construction knife.
Expert opinion
Konstantin Alexandrovich
It has excellent heat and sound insulation properties and resistance to high temperatures.
The most important thing when working with this material is to protect yourself from separated microparticles. Glass wool is especially dangerous, since its invisible particles cause severe irritation and itching on the skin and mucous membranes. Be sure to protect your skin, eyes and respiratory tract before starting work. Of all the varieties, it is better to choose basalt wool - it is less harmful.
Foamed polystyrene (foam)
Polystyrene foam is easy to install on flat surfaces, is relatively cheap, has good thermal insulation properties, and is therefore often used to insulate balconies.
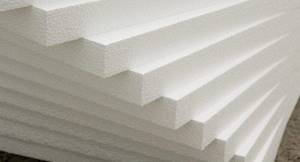
Its cellular structure retains heat well and does not allow sound to pass through, since the partitions between the cells dampen heat transfer and sound vibrations.
Available in a variety of options, varying in thickness - from 20 to 200 mm and density - from 15 to 50 kg/cub.m. The density of the foam should be selected based on need. If it is covered on top with additional plywood or other strong material, then you can take a lower density, since the higher the density of the foam, the worse it retains heat.
High-density polystyrene is stronger and easier to install and secure. It will help smooth out the unevenness of the walls, and not just insulate them. But the best option for leveling is extruded polystyrene foam.
Extruded polystyrene foam
Extruded or extruded polystyrene foam and polystyrene foam, although they consist of the same substance, differ in the technology for creating granules. At elevated temperatures, the granules are mixed and squeezed out of the extruder, due to this a uniform, closed-porous structure is formed, which has a high density.
Strengthening the balcony slab in Khrushchev

A combined method of attaching a balcony slab to the facade of a building.
The photo shows an option for repairing a balcony slab in a Khrushchev-era building. According to the project, the platform is attached to the brick building using the clamping method. Beams loaded with solid brick are used as pressing supports. To restore the integrity of the balcony slab and increase the load-carrying capacity, a combined method of fixing the platform and railings to the walls of the house was used. That is, a technique typical for beam and suspended systems was used.
Due to the unsatisfactory condition of the structural elements of the balcony and the height of their placement, the work was carried out from scaffolding. Since the design has standard dimensions, the parts used were manufactured in advance.
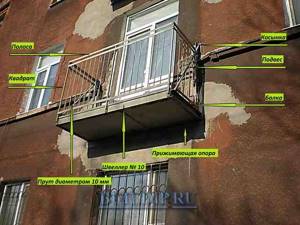
Photo of a reinforced balcony slab in Khrushchev and elements of the balcony.
Strengthening the balcony slab is carried out using the following technology:
- The unreliable railing is being dismantled.
- The reinforced concrete slab is cleaned from destruction and corrosive wear.
- In the end part, where the platform is attached to the wall, niches are cut out for installing channel-type beams.
- Channel No. 10 is inserted onto the protruding longitudinal part of the slab, beams are inserted into the niches, and all the elements of the resulting reinforcing belt are welded together.
- A fence made of a round metal rod with a diameter of 10 mm and a square profile measuring 20 X 20 mm, a strip of 30 X 3 mm and a corner of 30 X 30 mm is attached to the channels.
- Metal gussets are attached to the brick wall with 12 x 200 mm anchors and welded to the lower outer corners of the railings and channels.
- The scarves are connected to hangers made of rods with a cross-section of 30 mm.
- A metal sheet 3 mm thick is attached to the reinforcing belt from the bottom of the slab.
- The floor covering is restored using a screed. In cases of severe wear of the site reinforcement, additional laying of reinforcing rods is carried out, followed by pouring concrete.
- All metal parts of the new product are cleaned of rust, degreased, primed and covered with an anti-corrosion coating.
Many houses have an unheated room such as a balcony or loggia. How to insulate it and make it suitable for normal use in winter will help.
Residents of Khrushchevkas are familiar with the situation of disorder on the scanty balconies that these legendary buildings of the USSR are equipped with. In order to somehow organize it.
The article talks about the technology of covering the ceiling on a balcony with plastic panels, including preparatory work and installation of the ceiling.
We will show you how to arrange cabinets under the parapet on a balcony with a carry-out, mark and attach frame profiles under the sheathing, and sheathe the balcony parapet.
Let's look at an example of how to make a wooden floor on a balcony without extra money, and correctly determine the location of the load-bearing elements.
The balcony slab is the basis of your balcony. The performance properties of the balcony structure depend on its strength characteristics and dimensions. Read a review of balcony glazing technologies with aluminum profiles.
Specifications
Types of balcony slabs, their main parameters and dimensions are regulated by GOST 25697-83.
Balcony slabs are divided into the following types:
- PB – flat solid beams;
- PBK – flat solid cantilever;
- PBR – ribbed cantilever.
Balcony slabs are manufactured in lengths from 1200 mm to 7200 mm, widths from 1200 mm to 1800 mm. Standard dimensions of balcony slabs: length – 3275 mm, width 800 mm.
The thickness of the balcony slab in brick and panel houses or in Khrushchev varies in the range from 150 mm to 220 mm, depending on the type of slab, its size and weight.
A series of balcony slabs consists of several groups of numbers and letters; the series is deciphered as follows: the main group of letters and numbers is the type of slab, the length and width of the slab in decimeters. Additional groups of numbers and letters may indicate the following information: if the balcony slab is equipped with an emergency exit, then indicate which side of the slab it is located on, left or right; class of prestressed reinforcement, type of concrete, if it is light; for heavy concrete indicates the type of finishing of the upper front surface.
- Balcony slabs PB are reinforced concrete hollow-core floor slabs. Dimensions of balcony slab PB 1: product length 3440 mm, product width 1400, product thickness 160 mm.
- In the monolithic version, the balcony slab can be integral with the floor slab.
- The cantilever balcony slab is fastened by pinching it into the wall on one side or two opposite sides. Suitable for buildings with heavy walls, such as brick with reinforced concrete floors.
Preparing the premises for insulation work
Before choosing insulation, you need to decide on the thermal insulation technology, but first of all you need to prepare the balcony for repair, since the preparation is the same in any case, no matter what method you choose.
Do not ignore preliminary procedures and do not skimp on them so that the insulation is of high quality and does not have to be redone in a few years. Proper preparation is necessary to prevent moisture from getting under the insulation, causing it to begin to deteriorate, lose the qualities for which you chose it, and become ineffective.
The algorithm for preparing surfaces for insulation is as follows:
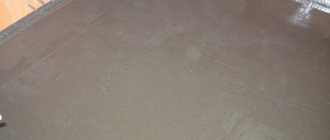
- First, thoroughly clean the walls, ceiling and floor of old paint, various concrete irregularities, bumps, etc. Crushed, breaking concrete must be eliminated to a smooth surface.
- Then the floor is carefully cleaned until it is absolutely clean. Large debris can be collected by hand, but dust must be sucked up with a vacuum cleaner to detect various cracks in walls and slabs.
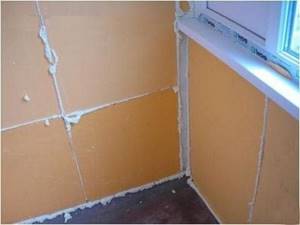
Now you can start sealing holes, crevices and holes
- Cracks visible to the eye are expanded, cleaned, if necessary, moistened with water and filled with cement mortar or sealant.
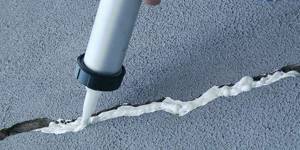
- The gaps between the plates also need to be enlarged, moistened with water and filled with foam.
- In addition to the damage listed above, cracks, dents, and small potholes may form in the concrete. They will not interfere with fixing the base evenly, but when the temperature changes, condensation may accumulate in them. Therefore, they need to be leveled; this can be done using cement mortar with the addition of PVA glue.
After all the covered defects have dried, you need to cut off the excess foam and remove the remaining sealant. Afterwards, it is necessary to prime all surfaces to protect against mold and strengthen the surface.
Preparatory stage
Before starting work, preparations should be made. It consists not only in selecting tools and purchasing materials, but also in preparing the loggia itself for insulation. The following recommendations must be followed:
- First of all, glazing is installed, and only then insulation is carried out;
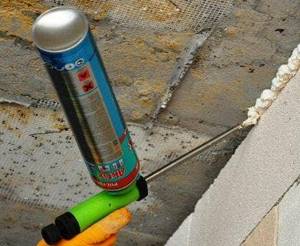
- seal all the cracks leading to the street, otherwise the insulation procedure will lose all meaning;
- cut off the protruding excess polyurethane foam flush;
- seal the windows with plastic film so as not to stain them;
- lay all the necessary communications: these include electricity and installation of freon and drainage pipes for the air conditioner.
Often in new panel houses you can find cracks in the loggia, plugged with anything. They should be cleaned and filled with polyurethane foam.
It is also important to remove uneven areas on the walls and ceilings, and carefully remove any resulting construction debris.
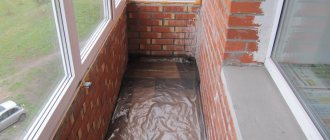
Surface waterproofing
At the next stage, you need to protect the floor and lower part of the walls from water. The walls must be waterproofed to the height of the final floor installation.
There are several main methods of waterproofing:
- Covering the floor with roll materials that do not allow moisture to pass through, for example roofing felt, which is hot glued onto bitumen mastic. Currently, there are roofing felt with a prepared glued mastic layer, which is heated with a burner.
- Penetrating waterproofing is a special composition for impregnating concrete. If you are going to lay tiles on the floor, then this method is not suitable. The effect of such protection against moisture is based on the fact that it penetrates the cellular structure of concrete and forms crystals that fill the pores of the material from the inside. The crystals become part of the concrete, compacting its structure and preventing water penetration. Since the composition is very toxic, it must be applied extremely carefully, protecting exposed skin, otherwise you may get burned.
- For tiles, it is recommended to use liquid rubber - a two-component mastic that is cold applied and quickly hardens. It is applied with a roller or wide brush. As liquid rubber hardens, it forms a kind of thin, moisture-proof film on the floor and walls.
- Waterproof plaster mixture, which is applied with a wide brush, or, if necessary, with a spatula of a suitable size.
- An inexpensive method is thick oil paint, which is easy to apply and hides minor flaws, but is quickly absorbed by concrete, which increases its consumption
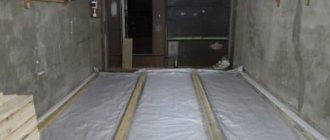
- A time-tested method is to cover the floor with thick plastic film, making sure that it completely covers the height of the future floor and fits correctly in the corners. The film should form something like a bowl that will protect the insulation. Secure it with construction tape or liquid nails.
You can choose any method based on your preferences and budget. All of them perform their main function - they do not allow water to penetrate into the room, and therefore reduce the likelihood of black mold, which is very difficult to fight.
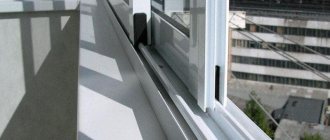
Features of glazing design in Khrushchev
At this stage, the accuracy of measurements and calculations is very important. All elements of the future structure must precisely take their places and withstand the load intended for them.
At the same time, the glazing along with additional elements should not be too heavy so as not to exceed the strength of the balcony.
Calculating the weight of frames, double-glazed windows, support frames, and assessing the load-bearing capacity of basic balcony structures require special knowledge and high qualifications. Trying to do this work yourself can lead to irreparable consequences.
Professionalism in this matter is a prerequisite for safety, not just quality.
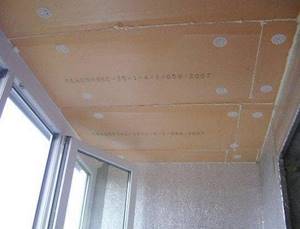
Ceiling insulation
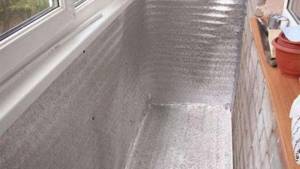
The ceiling can be insulated in various ways, it depends on the choice of insulation. But the best option for a substrate under the sheathing and a layer of the main thermal insulation material is to fix a thin layer of foil polyethylene foam on the entire surface of the ceiling.

Foil backing for sheathing
It is mounted on construction tape with two adhesive sides or on universal Moment adhesive, which is evenly distributed over the ceiling in small dots and the insulation is pressed against it. It is best to use sheets for this purpose that need to be bent onto the walls by approximately 150-200 mm for additional waterproofing of the joints. Check that the insulation is securely fastened, as the sheathing will be installed on it.
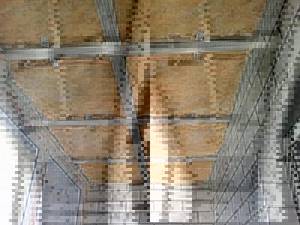
The sheathing can be made either from a galvanized metal profile for plasterboard, or from a wooden beam - both are suitable for laying mineral wool or polystyrene foam.
The distance between the fastenings of the sheathing elements depends on the width of the insulation; it is desirable that it be close together, without gaps. Since mineral wool is elastic, this interval can be reduced by 30-50 mm for a good tight installation.
Laying insulation in sheathing cells
At the next stage we lay the insulation. The mineral wool will become tight between the beams, especially if you followed the advice and shortened the interval, but polystyrene foam is a hard material, so small gaps may remain. To prevent the penetration of cold, they need to be filled with polyurethane foam, the protruding parts of which will need to be cut off after drying.
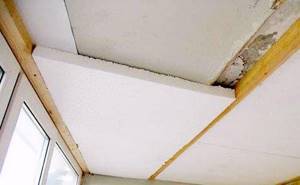
Ceiling insulation with foam plastic
Along the sheathing guides, the material is covered with clapboard or plasterboard sheets.
Since foam boards are durable, they can be attached directly to a concrete ceiling.
Installation of slabs directly on the ceiling
Installation is carried out using special plastic mushrooms. For them, holes are drilled in the concrete directly through the insulation, into which the fungus is inserted, and then a plastic nail is carefully driven in.
Glazing at Windows of the 21st Century Corporation
The 21st Century Windows Corporation has many years of positive experience in glazing houses of almost all series, including P-44, P-44T, P-3, P-3m, P-46 and many others.
You can be sure that:
- all work will be done professionally
- After installation you will not have any problems with operation
It is worth considering that even in standard houses the size and configuration of balconies may differ from those shown on our website. Therefore, it would be more correct to use the services of a professional measurer, who, moreover, will calculate the exact cost of your order.
You can call a surveyor and order standard glazing by contacting our company by phone-1 or visiting our nearest office in Moscow.
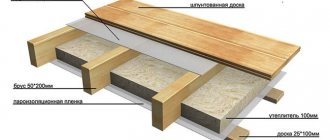
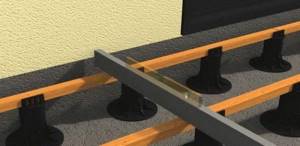
Insulating the loggia floor
To insulate the floor, you can also choose various options: dry screed, lifting with joists, or simply covering the concrete floor with extruded polystyrene foam. The latter action is not effective in maintaining the temperature on the balcony as in the rooms, it will simply make the floor not too cold.
Expert opinion
Konstantin Alexandrovich
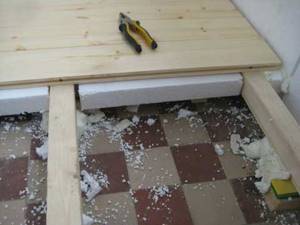
The most highly effective and most frequently used method is insulation using logs.
The joists can be laid directly on the concrete floor or adjusted in height using various devices - metal holders, studs, adjustable or homemade stands.
Metal holders raise the guides, and this is a good way to attach joists if they are high enough to install insulation. For a standard loggia (size 3*1.2 m), three rows of logs will be enough.
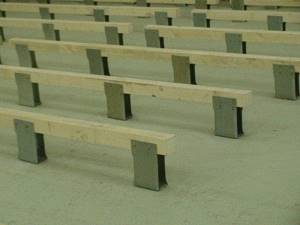
The holders are attached to concrete and insulation is put on each. Mineral wool is most often used in combination with such fastenings. A square is cut from it, in which two holes are made, through which the insulation is put on the rack.
Having secured the logs in the holders and checked the horizontality, we lay the main insulation over the entire floor area. To achieve a better effect, place another layer of mineral wool, almost to the level of the joists.
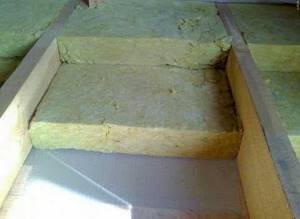
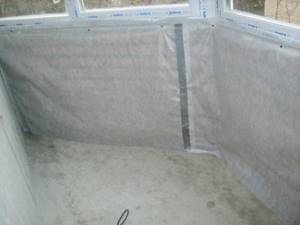
Using staples, secure the vapor barrier film on top of the insulation to the joists.
The logs are covered with 10 mm thick plywood on top, and all cracks and crevices are filled with polyurethane foam. After drying, the excess foam is cut off, and a decorative coating is laid on top of the plywood.
- If the floor on the balcony is not too level, and you don’t want to bother with a leveling screed, then metal or plastic height-adjustable stands would be a good option. With their help, it will not be difficult to lay out the logs strictly horizontally. The logs are placed and secured onto the stands, and only then are they lowered to the floor and leveled. The rest of the installation, including laying insulation and decorative coating, is carried out in the same way as with metal holders.
- You can also set up the logs using paving sheathing prepared on your own, installed on stands made of the same wooden blocks to the required level. If the field is not very level, you will have to tinker with such a design to align it horizontally. Such a sheathing must certainly be attached to the walls of the loggia.
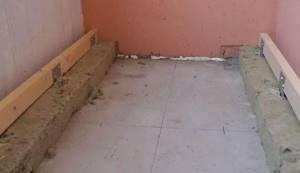
- If you do not plan to use the balcony as a living space, but simply want to raise the temperature there so as not to let cold air into the apartment, then raising the floor to the threshold level is not required. It will be enough to lay the insulation to the height of the logs, fixed to thin polyethylene foam laid on concrete.
Under these conditions, the joists are drilled through and secured using anchors. The space along the walls and between the joists is filled with insulation and covered with a vapor barrier and plywood.
Do-it-yourself insulation of a balcony from the inside
Insulation of a balcony from the inside is carried out using a fairly simple technology, which, by the way, does not require any special knowledge or skills. Accordingly, these works can be carried out independently. This action, regardless of the method of insulation, usually occurs during the reconstruction of the balcony (the original design of the balcony does not provide for insulation).
There are a number of effective options for insulating a balcony, and each of them has its own good sides, and even if it is superior to others in some respects, it may be inferior in others. The most common of them are:
- basalt (mineral) wool,
- slab or spray polyurethane foam,
- polystyrene foam (expanded polystyrene),
- penofol,
- penoplex.
Most often, polystyrene foam is chosen as insulation for balconies, since, along with its availability, it has excellent insulating qualities and is easy both to process and to install.
Advantages of the material
The choice of polystyrene foam as insulation is determined by the mass of its advantages. Among them, first of all it should be noted:
However, it is a fire hazard and can release toxic substances when burned. Therefore, during production, fire retardants are added to the foam. Such a modified material is called self-extinguishing polystyrene foam.
What materials are needed for balcony insulation work?
To insulate your balcony you need to stock up on:
- sheets of foam plastic;
- antiseptic boards or a special dry mixture for screeding on the floor;
- foiled polyethylene film as a vapor barrier;
- polyurethane foam without toluene, which can destroy the foam;
- fastening materials such as self-tapping screws, dowels and others.
Foam sheets are usually square in shape with a side of 1 m, thickness - 20 -50 mm. The compression density varies between 15-25 kg/cm2 and the higher this indicator, the more densely the granules will be arranged in the sheet, that is, when cutting insulation sheets there will be less debris (scattering granules).
However, the density of the sheet only increases the cost, but does not in any way affect the thermal insulation properties. Therefore, the optimal density of foam plastic for putty is 25 mm, and for drywall and other materials – 15 is enough.
How to lay polystyrene foam on a wall
You can begin laying the foam after installing the fastenings for the profiles. It is put on a U-shaped mount, punching through the sheet. The sheets can thus be held vertically or hung (on the ceiling). After which the profiles are attached on top of the insulation. But this installation method requires additional space, which is already lacking on small balconies.
In this case, you can resort to another method - laying it between guide profiles for the finishing material. The pieces are cut so as to achieve a tight fit both to each other and to the profiles.
A paint knife is used to cut the foam, and a marker is used to make marks.
If the insulation is to be laid under putty, it will need to be attached directly to the wall. There should be no paint, lime, falling plaster, or nailed or screwed objects on it.
During installation, two methods are used at once. First, special glue is applied to the foam sheet at five points, laid on the cleaned wall and pressed on top, also in five places, with foam fungi and special self-tapping screws (dowels) with disc-shaped heads. After which, their caps and seams are covered with glue.
Having completed the laying of the sheets, the joints between them are sealed with polyurethane foam, after which, after allowing to dry, they also apply adhesive tape. Insulation of joints is a very important point; any defect can lead not only to heat loss, but also to the development of dampness and mold.
The next step is to place foil polyethylene film over the foam, fixing it to the insulation using polyurethane glue or double-sided tape. The joints of the film are sealed by gluing them on the outside with special metal tape. The ceiling is also insulated in the same way.
How to lay foam on the floor
Floor insulation is carried out in two ways.
- When making lathing for a wooden floor, polystyrene foam is placed in its gaps. The foam joints are carefully sealed and the installation of the floor covering begins.
- Insulation is attached to the cleaned floor surface and filled with a screed from a pre-prepared solution of a special dry mixture.
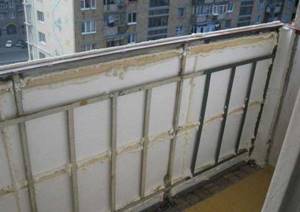
Insulation of loggia walls
Insulation of walls is done in the same way as on the floor or ceiling of the loggia. Here, too, you can choose a method to suit your taste - use wooden or metal sheathing or rigid insulation, which is attached to the walls with special glue or polyurethane foam.
- Installation of penoplex will be easy if you prepare the panels of the required size in advance. All vertical surfaces are faced in the same way - we apply glue to the back of the insulation and press it firmly to the wall. For additional fastening, you can fix the panels using plastic mushrooms.
But still, a more popular option, which is suitable for any thermal insulation material, is a method using lathing walls with wooden beams or metal profiles.
Before installing the sheathing, to increase efficiency, it is recommended to make a polyethylene foam backing with a foil surface.
- Such a substrate will create a “thermos” effect and will reliably retain heat on the loggia. Next, the sheathing is fixed on top. The guides should be placed at a distance equal to the width or length of the insulation mats.
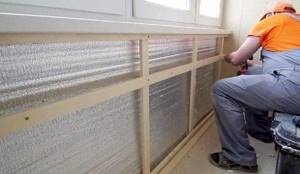
Installation of sheathing
The selected heat insulator is laid - polystyrene foam or mineral wool; it is covered on top with a vapor barrier film, secured with staples on bars or, when using metal guides, with liquid nails along the upper and lower edges.
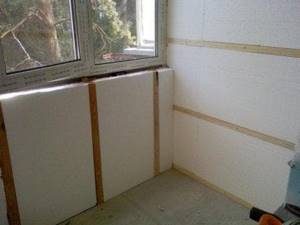
Foam insulation
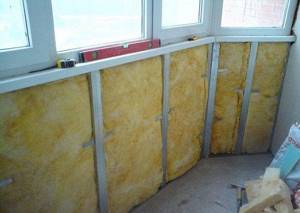
Insulation with mineral wool
And finally, the final stage is covering with decorative material, such as clapboard, or plasterboard for painting or plaster.
Insulation with polyurethane foam
The most modern method of insulation is spraying polyurethane foam. In most cases, it is practiced for insulating the inside of roofs and outside walls in private houses and cottages, but since this method is characterized by speed and ease of installation, it is increasingly used on balconies and loggias in city apartments.
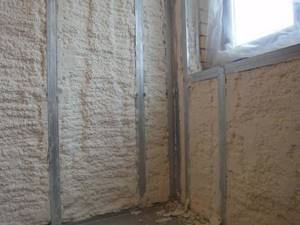
The only thing is that this method cannot be carried out independently; spraying is carried out only by professional specialized companies using special equipment.
Before entrusting your loggia to professionals, it is necessary to make additional preparations in the room, that is, make lathing, as described in the article above. The lathing will serve as a frame for the heat insulator and fastening on top of the decorative trim.
The great advantage of this method is that when sprayed, polyurethane foam expands and fills the entire space without leaving any gaps. It can be used not only on walls, but also on floors and ceilings. The surface becomes completely windproof, that is, it retains heat perfectly. Plus, you are spared the need to carry out additional inspection and fill cracks and cracks with polyurethane foam; you can immediately begin finishing.
Finishing features
In most cases, balconies are lined from the inside with clapboard or profile, but plasterboard is also used, followed by wallpapering. PVC panels are also used for cladding. As for the exterior finishing, it is better to entrust it to professionals, especially if your apartment is located higher than on the ground floor.
Interior decoration of balcony walls with clapboard
Balcony finishing with plastic panels
The process of finishing a balcony with plasterboard
You can also install an outlet on the balcony to which an electric heater will be connected. The described room is small, so heating will take a minimum of time. We also note that the double-glazed window weighs quite a lot, so the remaining materials (including the insulator itself) must be of minimal weight. By the way, this is another reason why it is better to give preference to EPS or foam boards.
The photo shows a socket and a connected heater
Video - Instructions for insulating a balcony
Now you know about the strengths and weaknesses of materials suitable for insulating a balcony, as well as the technologies for laying polystyrene foam and expanded clay. Therefore, it's time to get to work! Moreover, there is nothing complicated here if you are armed with step-by-step instructions and all the necessary materials. If you do everything correctly, you will turn the balcony into a full-fledged living room with all the ensuing advantages.
Loggia design solutions
Let's see how we can use the additional space resulting from insulating the loggia. In practice, you have one more room at your complete disposal, and only you can decide what it will be like.
For our part, we can offer several ideas on how to use the new opportunities.
The warmest transformation - the loggia turns into a cozy little corner for relaxation. Here you can enjoy the silence with a good book or crafts. If necessary, there is enough space to install a TV or a small table for a laptop.
If a large family lives in an apartment, it is sometimes difficult to find a comfortable, quiet place for your favorite activity. Despite the small space, your new insulated loggia will allow you to place even two separate corners for activities dear to your heart. For example, a cozy deep chair can be placed in one corner, and a small table for a laptop in the second.
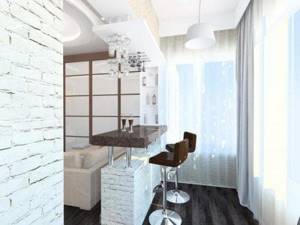
A very stylish modern option, suitable if the exit to the balcony is from the kitchen. You can even transform the loggia into a kind of dining room.
Ideal for parties, especially in the case of high floors and an attractive view from the window, a window sill can easily replace a bar counter.
Using small details, such as lit candles, you can create the atmosphere for a romantic dinner. Fresh fragrant air and watching the sunset on warm summer days, and in winter - cozy blankets, candles and mulled wine.
If you install glass sliding doors instead of standard ones, you can delimit the space if necessary.
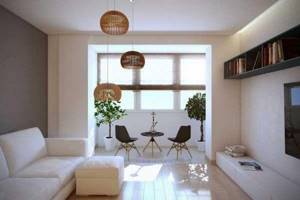
A bold design solution suggests expanding the living room space onto the loggia. The wall that previously separated the rooms has been turned into a comfortable table.
In this case, the area of the former loggia can be used as a study or hobby room.
By combining two spaces, the living room provides access to a large window, which increases illumination; you will feel this well in winter, when there is always not enough light.
It is not difficult to come up with the use of additional warm space, everything is limited only by your flight of imagination. A winter garden, a workshop, an office, even a sports corner - everything is doable.
Therefore, if your apartment has a loggia, and you still haven’t thought about insulating it, get down to business immediately.
Differences between a loggia and a balcony
The loggia slab is a continuation of the floor of the room, and three sides are closed with solid walls
The loggia has a slab as a base, which is a continuation of the floor of the room, and three walls, which are a continuation of the walls of the house. The upper load-bearing slab serves as the roof of the loggia, the parapet is made of a concrete slab.
The loggia has three sides covered with capital slabs, and only the front part is open. It can withstand significant weight loads. If central heating is installed on the loggia (for this you need to obtain permission from the local authorities), it will be considered a living area.
The balcony is mounted on consoles and has only one common wall with the building
When constructing a loggia, hollow floor slabs measuring 1200x5800 mm are used. The slab length of 5.8 m is enough to build loggias for two apartments - each 2900 mm long.
The balcony protrudes beyond the load-bearing wall of the building, is most often mounted on consoles, has one common wall with the building, and three sides are open. Even if there is no parapet on it, but there is a platform in the form of a protruding slab, such a structure is also considered a balcony.
Central heating is not allowed on the balcony; it cannot withstand significant weight loads. There have been cases when slabs subjected to significant loads in 9-story buildings broke.
Related article: Miter box for skirting boards: how to use correctly
For the construction of balconies, a slab of 800 x 3275 mm is used.