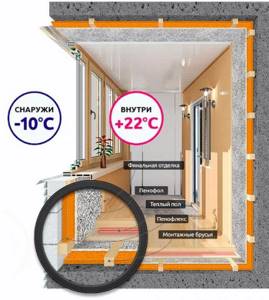
The balcony is the most vulnerable room in an apartment, which often suffers from severe frost and wind. And if earlier it often served as a kind of storage room, storing all the necessary (and often even unnecessary) things, now many people turn the loggia into a full-fledged room.
The only difficulty that residents face is that in winter it is almost impossible to be on the balcony - frost and strong wind create a beautiful picture outside the window, but a cold atmosphere on the loggia. However, today this problem can be prevented. A huge amount of thermal insulation materials make it easy and quick to insulate a balcony with your own hands.
Types of materials for insulation
Today, there are a huge number of options for how to insulate a balcony from the inside. The choice of one option or another may depend on many factors:
- The amount you are willing to spend on insulation.
- Climate.
- Type of construction.
- Your personal preferences.
- Resistance of the material to frost, wind, moisture.
One way or another, before you start insulating the loggia, it is important to study in detail all the popular materials. This is the only way you can choose the option that suits you perfectly. We invite you to familiarize yourself with the most common insulation materials.
Expanded clay
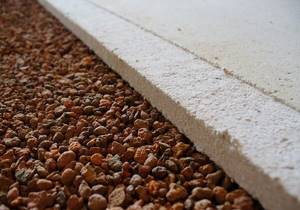
It is made of clay, therefore it is considered an environmentally friendly and safe material. Expanded clay is small and light porous granules. Such weight and structure of the material can be achieved thanks to a special clay firing technology. The raw materials are first heated to approximately 1000 degrees, as a result of which voids are formed inside, providing heat and sound insulation. Expanded clay is used to insulate walls, floors, ceilings or even the foundation of a country house.
Advantages:
- affordable price;
- long service life;
- compliance with all fire safety standards;
- resistance to mold and mildew;
- the ability to take the required form;
- light weight.
Flaws:
- increased degree of moisture permeability;
- rather complicated installation of the material;
- Expanded clay is used primarily for floor insulation and is not suitable for other surfaces.
Mineral wool
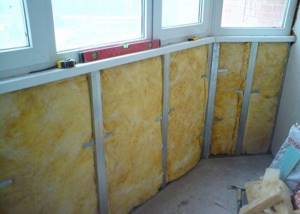
The most common insulation for walls and floors. Outwardly, it resembles a thick canvas, which consists of many molecules chaotically intertwined. The raw materials for mineral wool are glass, rocks or slag. In order for the fibers to be reliably connected to each other, they are impregnated with special mixtures based on oils and alcohol. Mineral wool itself is divided into several other types:
- glass wool (consists of glass, stove and limestone);
- stone wool (made from basalt rocks);
- slag wool (made from blast furnace slag).
Advantages:
- low level of thermal conductivity;
- compliance with all fire safety standards;
- is not affected (deformed) by sudden temperature changes, heating and cooling;
- resistance to chemical and mechanical damage;
- vapor permeability;
- easy to install.
Flaws:
- moisture permeability (which can be reduced using special water-repellent agents);
- heavy weight.
Styrofoam
Perhaps the lightest thermal insulation material. It is a foamed mass that is more than 90% filled with air. It is thanks to this technology that it is possible to achieve good results and efficiently insulate the balcony. The popularity of polystyrene foam as insulation is also due to the large selection of materials. It is divided into the following categories:
- sheet;
- foam in balls;
- extruded polystyrene foam (which we will talk about a little later);
- liquid foam;
- foam formwork.
Advantages:
- low cost compared to other insulation materials;
- light weight of the material;
- good thermal insulation properties, allowing the use of a thinner layer of insulation;
- versatility (suitable for insulating floors, ceilings and walls);
- long service life (up to 30 years);
- resistance to the appearance of harmful microorganisms;
- easy to install.
Flaws:
- release of toxic substances during combustion;
- poor vapor barrier;
- release of harmful substances even at high temperatures (applies to cheaper options);
- absorbs moisture;
- not resistant to sunlight;
- unstable to mechanical and chemical damage.
Extruded polystyrene foam
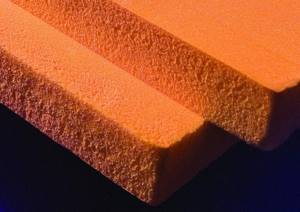
Today, many people prefer to insulate their balcony with polystyrene foam. This material is a subtype of polystyrene foam and is also characterized by its low weight and good thermal insulation properties. Comparing polystyrene foam and expanded polystyrene, it can be noted that the materials have both common features and some differences. For example, the texture of the latter is not granular, but more even.
Advantages:
- low degree of vapor permeability;
- material strength;
- lack of water absorption, which allows the use of polystyrene foam without preliminary waterproofing;
- low degree of thermal conductivity;
- compliance with all fire safety requirements (non-flammability);
- resistance to high and low temperatures;
- environmental friendliness;
- ease of installation;
- resistance to mechanical damage.
Flaws:
- poor vapor barrier;
- high cost of material;
- instability to sunlight (corrected by special treatment of the material);
- additional costs for arranging the frame or purchasing glue.
Polyurethane foam
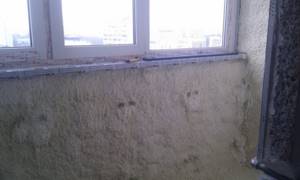
The basis for polyurethane foam is a subtype of plastic that has a foamed structure. Like some previous insulation materials, this material consists of 90% of a gaseous substance with which all its cells are filled. The use of various technologies has helped to create several types of polyurethane:
- Elastic (in other words, foam rubber), which fills sofas and armchairs, and is also used to make washcloths, shoe linings, etc.
- Hard – actively used for heat and sound insulation of a house.
Advantages:
- mounted on any material (concrete, metal, glass, wood, brick, etc.);
- light weight that does not weigh down the surface;
- can significantly strengthen the surface;
- resistance to sudden temperature changes, extreme heat and frost;
- compliance with all fire safety requirements;
- Thanks to the one-piece design, no seams or joints appear on the surface.
Flaws:
- not resistant to sunlight;
- Although the material does not burn, it begins to smolder strongly in an open fire. Therefore, you should not install polyurethane foam in rooms with a high risk of overheating or fire.
Penofol
It is one of the most innovative insulation materials for balconies. This material consists of several layers:
- Self-extinguishing polyethylene foam.
- Aluminum foil.
Unlike previous insulation materials, penofol is not able to absorb heat. Thanks to the foil, it works on a different principle, namely, it reflects thermal radiation. The material, in turn, is divided into several types:
- Type “A” - the foil is located on one side of the insulation.
- Type “B” – with foil on both sides.
- Type “C” – with a special self-adhesive insert.
Advantages:
- versatility. The material is used to insulate the walls of the floor and ceiling of the balcony. In addition, it is great for both interior and exterior decoration;
- low level of vapor permeability;
- provides high-quality sound insulation;
- light weight and thin structure;
- ease of installation;
- environmental friendliness;
- compliance with all fire safety standards.
Flaws:
- due to its high softness, penofol is not used when insulating walls under plaster;
- some types of penofol require fastening with special glue;
- will not be able to protect against severe frosts and is installed mainly as additional insulation.
Why choose penoplex?
Penoplex is one of the new generation building materials. Insulating walls and ceilings with penoplex from the inside has advantages over other materials (for example, polystyrene foam) due to its high vapor barrier properties. Also, penoplex is superior to foam plastic in terms of:
- thermal conductivity
- moisture resistance
- compressive strength
Due to its properties to withstand maximum loads, penoplex is excellent for insulating floor coverings. In addition, unlike polystyrene foam, penoplex is thinner - this allows you to save space indoors. In terms of price, penoplex is also superior to polystyrene foam, however, the high price of the insulator is fully justified by its unique characteristics.
What is penoplex?
Penoplex has many advantages and is one of the most popular materials for insulation.
This modern insulation consists of extruded foam material filled with gas. It is produced by extrusion from polystyrene foam. The characteristics of penoplex include:
- environmental friendliness
- chemical inertness
- easy to cut with a knife
- doesn't crumble
- moisture resistance
- resistance to deformation
- noise absorption
- small thickness
- light weight
As can be seen from the list of advantages of the material, insulating a loggia with penoplex does not require the installation of a vapor barrier. The material has excellent moisture resistance properties and can be used in any room. Disadvantages of the material:
- highly flammable
- toxic when burned
To avoid negative effects in the event of a possible fire, you should buy products with the addition of special fire retardant additives that increase fire resistance. Also, you should not cover open areas of the room with this material, but only lay it between non-combustible building materials as a layer.
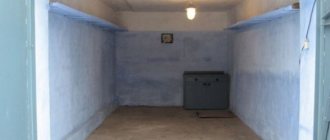
Preparing for insulation of the balcony
In any repair or construction process, everything begins with the preparation of surfaces and territory. Therefore, before you insulate the balcony with your own hands, you will have to get rid of all the rubbish that is there. By the way, things that you plan to leave later also need to be moved to another room.
After the balcony is completely cleared of unnecessary things, you need to completely inspect the room. Firstly, it is important to understand which parts of the loggia require more thorough insulation. In addition, you need to pay attention to cracks and chips that allow cold air to pass through.
Important! Some balconies have a rather small area. And the thermal insulation material takes up space in the room. In this case, it is better to immediately determine the so-called “cold” and “warm” zones of the loggia and insulate only those that are more susceptible to frost and wind.
The balcony parapet especially needs insulation.
Right now it is desirable to get rid of significant defects on the surfaces. Large cracks can be sealed with putty or foam.
At the same stage, you should decide on the type of insulation for the balcony and stock up on all the necessary tools. We'll talk about thermal insulation materials a little later. Now let's look at what tools you will need to insulate your balcony.
Tools for insulating a balcony:
Insulating a balcony with your own hands is a fairly simple and straightforward process. The main thing is to understand the sequence of work and stock up on the necessary tools. These include the following basic materials:
- Insulation in the required quantity (calculation takes place in accordance with the number of layers and the area of the balcony).
- Cladding material for exterior finishing.
- Polyurethane foam.
- Waterproofing materials.
- Adhesive mixtures.
- Wooden or metal beams (for the frame).
- Dowels, screws, nails of different sizes.
- Metallized tape for sealing seams.
In some specific cases you may also need:
- drill;
- perforator;
- knife;
- scissors;
- hammer;
- building level;
- rollers;
- spatulas, etc.
Here everything will depend on the finishing of the loggia.
Additional article: the better way to insulate a balcony.
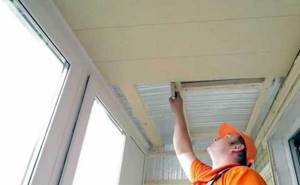
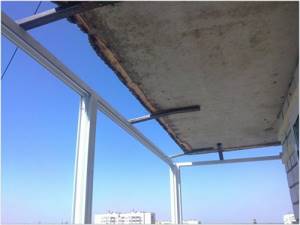
Ceiling insulation
If you are planning to insulate a balcony with your own hands, then it is best to start from the ceiling and move further from top to bottom. Of course, if the ceiling of your loggia is the floor of your neighbors, then the process of protecting the room from frost and wind is much simpler. However, if the roof is independent, then a little effort should be made to insulate it.
To best protect your balcony from cold and wind, we recommend performing the work in the following sequence:
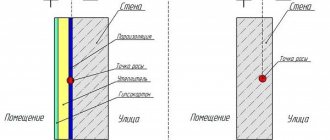
- Spraying or special film for sound insulation.
- Waterproofing the ceiling on the balcony. In this case, the most popular materials are polyvinyl chloride or polyester.
- A special membrane that protects from wind. It freely allows steam to pass through, which is released from the insulation, but helps to completely isolate the ceiling from wind and drops that can enter the room along with it.
- Anti-condensation material that protects the insulation from the formation of water droplets.
- Frame (metal or wood of your choice). The sheathing is an optional element. The insulation can be installed using special glue. The main thing is to make sure that the mixture does not contain toluene. For greater reliability when fastening sheets, use dowels.
- Insulation for balcony ceiling. We recommend that you use polystyrene foam, polystyrene foam or mineral wool. They provide good protection from the cold and are easy to install, which is especially important when insulating a balcony ceiling.
- Vapor barrier for insulation. It does not allow water vapor to pass inside, which significantly increases the thermal insulation properties of the material.
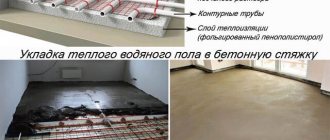
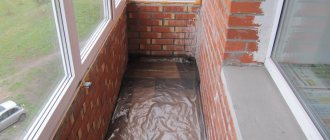
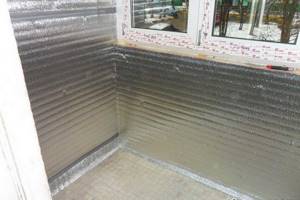
Floor insulation
The initial stage of insulating the balcony floor is installing waterproofing on the surface. Polyethylene or penofol will do this role perfectly. Be sure to hide all seams between sheets with tape. This way you can be sure that the balcony is protected as much as possible from dampness.
Tip: If you use one-sided penofol (type “A”), install it with the reflective layer facing down.
Another popular option for waterproofing balcony floors is bitumen mastic. However, do not forget that such material dries for about 24 hours.
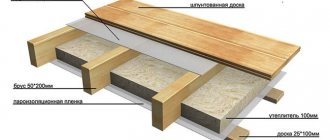
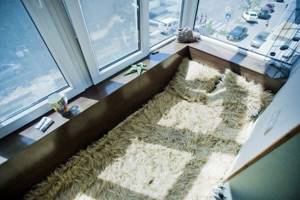
After waterproofing, you should install a frame or, in other words, logs. For this, wood or metal is used. The main thing is to choose the highest quality material that can last for many years.
Tip: If you are installing wooden beams, make sure that the moisture content does not exceed 12%. Also for that. To prevent the appearance of fungus, we recommend that you treat the beams with an antiseptic or a special primer.
The beams are laid at a distance equal to the width of one sheet of insulation. As for the height of the beams, it is usually 10-15 cm. To prevent gaps that appear between the logs and the balcony wall, ordinary polyurethane foam is used.
After installing the logs, you can proceed directly to installing the insulation. Make sure that there are no even the smallest gaps between the sheets (or slabs) and the frame. Otherwise, your work will not bring the desired result. In some cases, the insulation is laid in several layers (for greater protection). Then it is important that the seams between the plates are not in the same place. That is, the material needs to be laid with a slight offset.

Recommendations
- When installing insulation, do not forget about the parapet. It must be well protected from the penetration of atmospheric moisture, cold and wind. To do this, carefully mask any cracks and small crevices on it with mounting foam.
- When installing slabs, do not allow gaps to form. Tape the joints between the sheets with tape.
- Penoplex has the highest moisture resistance. However, if desired, you can install an additional layer of waterproofing directly on the sheets. Some masters strongly recommend doing this.
- To more securely fix the slabs to the walls and ceiling, glue and dowels are used. First, the plates are glued to the surface, and then fixed using dowels with a nozzle. Also, double fixation of sheets will give a better insulating effect.
Independent insulation of a room using penoplex does not require special construction skills. The main thing is not to rush and not leave gaps between the plates, otherwise all the work will lose its meaning.
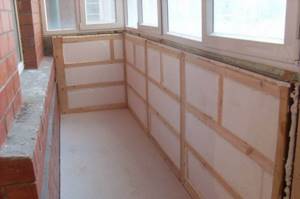
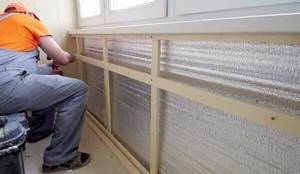
Wall insulation
In the process of insulating the floor on the balcony, it will not be superfluous to immediately take care of the walls. So, for example, when creating a waterproofing layer, cover the entire perimeter of the room with it. This will make your future work much easier.
Next, as in previous processes, everything is quite simple:
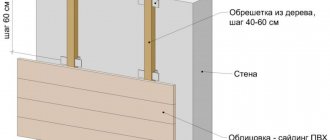
- Create a sheathing from wooden beams. The distance between them and the width of each beam should correspond to the dimensions of the insulation.
- Install thermal insulation material. For walls, traditional options are most often chosen - mineral wool (or glass wool), polystyrene foam, polyurethane foam, penofol (or isolon). For greater reliability, we recommend combining several thermal insulation materials (for example, polystyrene foam and mineral wool).
- If there are cracks and large seams, polyurethane foam is used. With its help you can reliably protect your balcony from cold and wind.
- Don't forget to install a vapor barrier layer on the insulation.
Important! Most often, the wall that connects the balcony and the room (living room, kitchen, etc.) is insulated with one layer. At the same time, at least two layers of insulation should be installed on external walls, or a denser thermal insulator should be used.
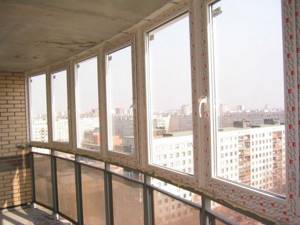
Insulation of windows on the balcony
If you want to insulate your balcony from the inside as efficiently as possible, you should never forget about the windows. After all, even the highest quality thermal insulation materials for walls, ceilings and floors will not bring any benefit if the wind breaks through the cracks in the window opening.
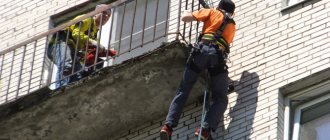
If your balcony has not been glazed all this time, you should pay special attention to the wall that protects it from the street. The parapet (that’s what this wall is called) must be strong enough to support the frames and double-glazed windows. In some cases, it is better to further strengthen this part of the loggia. There are two options for strengthening the parapet:
- Brick. The simplest method, which, however, is not particularly reliable or durable.
- Reinforced with steel rods. Use thick iron bars and cement. This method is a little more complicated than the previous one, but several times more reliable.
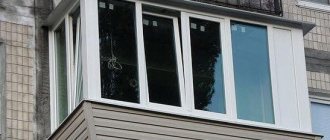
Before glazing the balcony, you must select the material from which the window frames will be made. Of course, the most popular today are PVC structures. However, some modern manufacturers produce wooden or aluminum frames, which are in no way inferior to plastic ones (except that they are more expensive).
Classic wooden frames are practically not airtight. Therefore, it will be impossible to insulate the balcony with their help. Therefore, it is better to use them in areas with a warmer climate.
As for aluminum structures, they are able to retain heat much better than wood. In addition, they are also resistant to rust and corrosive processes. However, the most optimal option (if price-quality ratio is considered as a criterion) are plastic windows. They are not afraid of high humidity and temperature changes. In addition, such structures have good thermal conductivity. Therefore, if you want to insulate your balcony, choose PVC windows. The most common types of structures today are:
- casement windows;
- double sash windows;
- extended profiles.
Advice: If you do not have the time or financial opportunity to update the balcony glazing, you can try to insulate the opening using special materials (spray foam, foam rubber, etc.).
Features of the work
Insulating and finishing a balcony is a rather complex process. Problems arise due to the lack of walls connected to the warm room. If you want to get high-quality thermal insulation for your balcony, you need to start with its glazing. It is recommended to use three-chamber double-glazed windows. Wooden windows retain heat less well, especially if the frames are old. Using them will waste your energy and money. After the glazing is completed, you can move on to insulating the remaining parts of the structure: the floor, walls, parapet.
Installation of a loggia glazing structure
Additional insulation methods
If you live in an area with a cold climate, insulation alone on the balcony may not be enough. After all, even the highest quality heat insulators are sometimes unable to protect against severe frosts. Therefore, on cold winter days, you can organize additional insulation of the balcony.
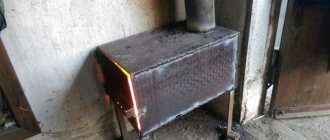
For example, install an ordinary electric heater. For greater effect, it should be placed near the wall connecting the balcony and the apartment itself.
Important! Never place the heater near windows. The condensation that will be released during the process can greatly damage the glass unit.
If you do not want to install additional heating devices, and installing central heating on the balcony is strictly prohibited, you can install a “warm floor” system on the loggia. It will last for decades, creating a comfortable temperature even in the cold season. In addition, today many such systems are equipped with a special thermostat that helps you choose the most optimal mode.
Another option for additional insulation is air conditioning. In addition to the fact that it will heat the loggia in winter, it will also be able to cool the air on summer days. However, using an air conditioner has one rather important disadvantage - it will not be able to properly warm the floor on the balcony. Therefore, the warm floor still wins.
Tip: Installation of heated floors is another expense item. You should not rely only on your own strength, since installing the system is a rather complicated process. It is better to entrust the work to professionals.
When protecting the room from cold air and strong wind, do not forget that it is also important to organize good ventilation on the balcony. With hermetically sealed cracks this will be a little more difficult. Therefore, we recommend that you periodically ventilate the loggia for a more comfortable stay on it.
If you live in a cold climate, pay attention to the “breezer” type ventilation system, which supplies purified air from the street, preheating it to the temperature you need.

Breezer ventilation system operation process
Common mistakes when insulating
When organizing balcony insulation yourself, you may not take into account many important nuances. As a rule, people make fairly predictable and common mistakes, including:
- Excessive haste. Many people understand by the phrase “loggia insulation” something like a radiator that is installed on the balcony, double-glazed windows and sealing the cracks with foam or putty. If you think that everything is so simple, do not be surprised that the heat will continue to leave your house through the balcony. After all, for better protection of the loggia from the cold, special insulation is needed for the walls, ceiling and floor.
- Saving on materials. Of course, in some cases it may be justified (for example, promotions in a store). However, purchasing a obviously cheap product from an unknown manufacturer is a rather large risk that may not pay off. Think about it, is it important for you that the insulation serves for a long time and with high quality? If so, be prepared to spend a little more for quality materials from trusted brands.
- Lack of a plan for insulating the premises. In any process that concerns renovation, chaos is the worst enemy. Carefully plan all your actions to insulate the loggia and try to adhere to the planned order. In short, the sequence should be like this:
- preparing the room (clearing space, removing trash, etc.);
- ceiling repair (if necessary);
- cleaning surfaces (walls and floors) from previous coatings, dust and dirt;
- restoration of walls and floors (if necessary);
- applying an antiseptic that prevents mold;
- balcony glazing;
- balcony waterproofing;
- sealing all seams and cracks;
- electrical wiring;
- installation of insulation (from top to bottom - from the ceiling to the walls and only then to the floor);
- finishing of the loggia;
- installation of furniture and lighting.
Tip: It is recommended to start insulating walls from the coldest wall on the balcony.
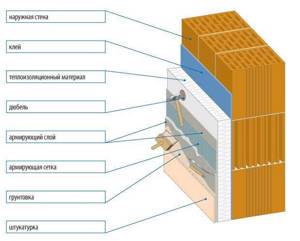
Sequence of materials when insulating a balcony
Finishing
For finishing side walls and fencing, the optimal choice of material is MDF wall panels. They are attached directly to the sheathing. Polystyrene foam will add rigidity to the structure, preventing the panel from denting even under serious load.
The fastening method is self-tapping screws, which are used to attach the crest of each panel to the sheathing. Then they are hidden by the groove of the next plank. The first and last panels in each row are screwed through; then the heads of the screws are hidden with a decorative corner placed on glue.
For the ceiling it is better to use lighter polyvinyl chloride panels. Fastening - the same screws or stapler; To finish the corners adjacent to the walls, you can use both the starting profile and foam ceiling plinths mounted on liquid nails.
Plywood or OSB with a thickness of 15 millimeters or more is laid on the floor over the sheathing and foam plastic. The material is attached to the sheathing with self-tapping screws in increments of 30 cm.
Advice: it is better to pre-oil the plywood twice. This will protect you from swelling and deformation if, for some reason, a large amount of water gets on the floor.
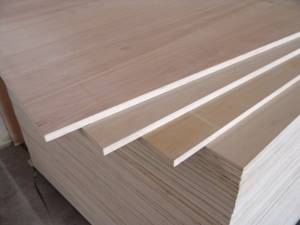
An alternative is to buy moisture-resistant plywood.
The finishing of the floor is completely up to your taste. A budget solution is inexpensive household linoleum, installed along the edges with glue or liquid nails; You can also lay a laminate on top of a thin polyethylene foam backing. The last thing to attach to the wall sheathing is the baseboard.