Heating using radiators does not always work with maximum heat output. Also, it does not always allow achieving comfortable temperatures over the entire area of the heated room. Therefore, owners of private housing often prefer, instead of installing radiators, to make a water-heated floor from pipes in the screed through which the coolant circulates. When installed correctly, such a floor heating system is 1.5–2 times more efficient than the classic radiator version.
Advantages and disadvantages of water floors
The use of water heated floors (HF) is possible as both an additional and the main source of heating rooms in cottages and apartments. Moreover, most often they are laid in the second version. Compared to batteries, underfloor heating is more efficient in operation, but also more expensive to implement.
Among the advantages of heated water floor heating systems are:
- optimal heat distribution throughout the room for a person;
- lack of dust circulation due to air convection;
- high efficiency - the coolant has to be heated to only 40–50 0C;
- aesthetics - all communications and elements of the energy system are covered in a layer of screed;
- complete electrical safety;
- absence of electromagnetic fields and problems with air drying;
- service life up to 50 years;
- smooth heating of the floor, eliminating the shock effect on the laminate and other coverings when they are suddenly heated.
If we compare the heating option under consideration with radiator heating, the floor system turns out to be at least 20–30% more economical. And in some cases this difference reaches 50–60%. For batteries, water has to be heated to a temperature of 70–90 0C at the inlet of the radiator. And for TP it is heated to maximum, in severe frost outside the window, only to 50–55 0C.
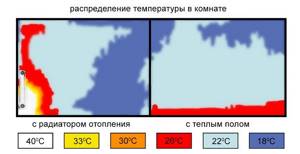
Heat distribution when heating with a radiator and underfloor heating system
The disadvantages of a water floor are as follows:
- possible water leaks;
- impossibility of installation in narrow corridors;
- relative high cost;
- large time costs for the device;
- high loads on the floor due to the large volume of concrete;
- raising the floor due to an additional screed 60–150 mm thick;
- low maintainability;
- high inertia.
To install a pipe heated floor with your own hands and lay the finishing coating on top, it takes up to a month. It is installed in a concrete screed, which needs about three weeks to harden and harden.
The initial costs for installing a water transformer substation are 1.5–3 times higher than its radiator counterpart. However, due to its efficiency, such a warm floor pays for itself in 3–5 years.
Its main problem is its high inertness to heating. Due to the thick layer of concrete, the underfloor heating system takes a long time to warm up (radiators provide heat to the room much faster). Often, due to this delay, it simply does not keep up with fluctuations in temperature outside.
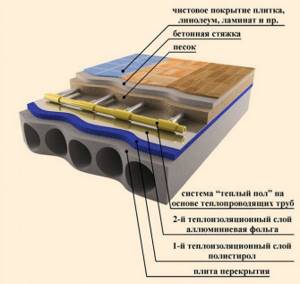
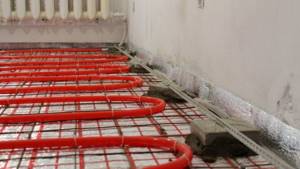
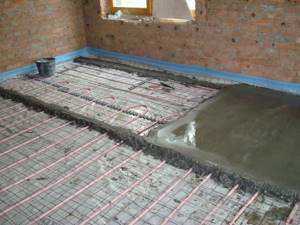
Water floor installation
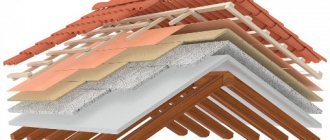
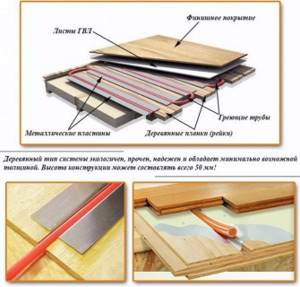
The water heated floor consists of:
- copper or metal-plastic pipes;
- concrete screed with reinforcing mesh and damper tape;
- waterproofing;
- insulation (usually extruded polystyrene foam);
- a heat-reflecting screen made of aluminum foil;
- collector and mixing unit.
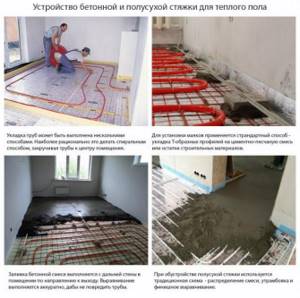
In most cases, TP pipes are placed in a poured layer of concrete. This is a classic version of such a heating system. However, dry screed in the form of plywood and gypsum fiber board flooring is also applicable here. But for self-installation, preference is usually given to wet technology with pouring sand-cement mortar.
The concrete layer takes longer to warm up, but then retains the heat longer, gradually releasing it to the room. In this case, you can either mix the concrete yourself on site from cement and sand, or take a ready-made mixture for floor screed from one manufacturer or another. The main thing is not to use plaster-based solutions when pouring water TP. They are incompatible with such a heating system.
Heated floor installation
Commissioning
Full maturation of the cement screed occurs after a month, which is when balancing needs to be done using collector flow meters.
Using balancing valves, the coolant flow is regulated; it should become the same in all circuits. If you have no experience with self-balancing, it is better to invite a specialist.
After manipulating with cold water, if the system is working correctly, you can conduct tests with heated coolant. At this point, the installation of the heated floor is considered complete.
Premises requirements
Before installing a heated floor made from water pipes, it is necessary to find out whether the interfloor ceiling will withstand the additional load. With the correct installation according to SNiPs, the concrete screed above the laid pipeline with coolant should rise by 45–50 mm. It is not possible to make it thinner due to the low strength of the resulting layer, and it is not recommended to make it thicker because the energy consumption for heating the concrete increases.
Each square meter of DSP screed with grade M300 and a height of 10 mm is approximately 22 kg. Plus, the weight of the fittings and insulation, as well as the flooring, is added here.
As a result, the total load on the floor from the “warm floor” in a room of 15–20 square meters often exceeds a couple of tons. If the slab between floors is not able to withstand such additional mass, then the heating system in question cannot be built.
The installation room must be closed. It may not be heated, but sudden changes in air temperature must be excluded.
Hardening concrete and temperature fluctuations are incompatible things. Also, to dry it, you cannot resort to prematurely turning on the water floor for “heating,” which will lead to the appearance of local areas with overheating in the concrete layer. In these cases, the screed will inevitably crack and lose its strength.
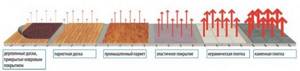
Thermal conductivity of different materials
Variety of heating systems
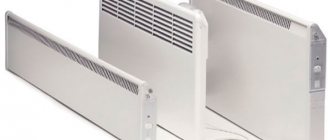
The heating system is responsible for creating a warm, favorable microclimate in the house. In a private home, this could be radiators or heated floors. The disadvantage of the battery is its small surface area of the device. Due to the increase in temperature, the speed of air movement increases. In addition, dust often accumulates in batteries.
But a warm floor has a large heat transfer area, which allows you to heat large volumes of air faster. The most common type of heated floor is considered to be a water floor, which is powered by a gas boiler : it heats the water, it goes through pipes and becomes a source of heat for the floor.
The entire variety of types of heated floors is divided according to the following criteria:
- according to the operating principle: infrared or convective;
- by type of boiler: it can operate on solid or diesel fuel, gas or electricity;
- by coolant: they are air, water, electricity.
Choosing the required heating system is a complex and responsible matter that should be entrusted to professionals. They can take into account all the advantages and disadvantages of heating types and the conditions of a particular home. The heating system is selected at the design stage . After all, one of the factors influencing the choice is the material from which the building is constructed. This is also important to consider.
How to choose floor pipes?
When laying a water heated floor, it is permissible to use pipes:
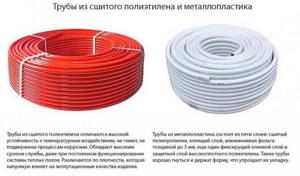
- Copper.
- Metal-plastic.
The first ones have simply ideal characteristics for the systems under consideration. However, they are expensive and difficult to install yourself. The slightest mistake when soldering them will then lead to a rupture of the copper pipeline and leakage of water into the concrete.
Most often, when installing a water transformer pipe, metal-plastic made of cross-linked polyethylene PEX-AL-PEX with a cross-section of 16 or 20 mm is used. This option is cheaper than copper and is optimal for heated floors.
Popular floor pipe options
In this case, PVC or polypropylene pipes cannot be used. In an underfloor heating system they should be installed without soldering or fittings at corners. But it is impossible to mount polyvinyl chloride and polypropylene products this way; they break when bent. As a result, there is only one optimal choice - cross-linked polyethylene. Pipes made from it can easily cope with both the temperature of hot water in the heating substation and its pressure.
Selection of components
For the circuit, special pipes for heated floors made of cross-linked high-density polyethylene are used. They do not form creases, they have a high thermal conductivity coefficient and a maximum operating temperature of up to 95 degrees. Metal-plastic pipes are not used in the circuits.
Many manufacturers offer foil-coated insulation, but you should not overpay for this option, since in an opaque environment, the reflectivity of the metallized layer is zero.
When using expanded polystyrene, special fasteners (disc-shaped dowels) are needed so that after pouring the insulation does not float to the top.
To tightly attach the pipe to the insulation, you can use clamps on the insulation; if laying goes along the fittings, you can use reusable plastic clamps.

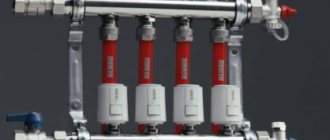
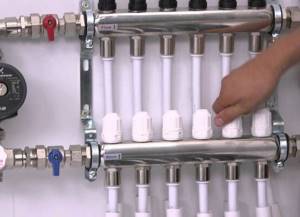
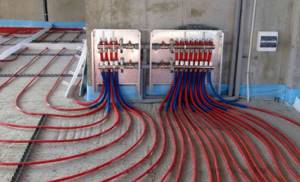
One of the most important elements of the system is the distribution manifold, which is selected based on the layout of the circuits, has pressure and heating sensors and is mounted in a special niche.
Design principles
When calculating a water heated floor, you must consider:
- only the active area of the system, under which the heated pipes are located, and not the entire square footage of the room;
- step and method of laying a water pipeline in concrete;
- screed thickness - the minimum above the pipes should be 45 mm;
- requirements for the temperature difference in the supply and return – the optimal values are considered to be 5–10 0C;
- water must move in the system at a speed of 0.15–1 m/s - a pump should be selected that meets these requirements;
- the length of pipes in a separate TP circuit and the entire heating system.
Every 10 mm of screed is approximately 5–8% of heat loss due to heating of concrete. It is worth pouring it in a layer of more than 5–6 cm above the pipes only as a last resort, when increased strength of the rough base is required.
After installation, switching on and warming up of the TP, the floor temperature in living rooms should be around 21–25 0C. For corridors at the entrance to the house it is recommended to raise it to 30 0С, and for swimming pools and bathrooms 31–33 0С will be optimal.
Ways to adjust contours
Pipes in the underfloor heating circuit are laid:
- snake (loops);
- spiral (snail);
- double spiral;
- in a combined way.
The easiest option to implement is option one. However, when laying pipes in a “snake” pattern, the water temperature at the beginning of the circuit and at the end will differ by 5–10 0C. And this is a fairly noticeable difference that can be felt with bare feet. Therefore, in most cases, it is recommended to choose a “spiral” or combine methods to ensure approximately equal temperature conditions throughout the floor.
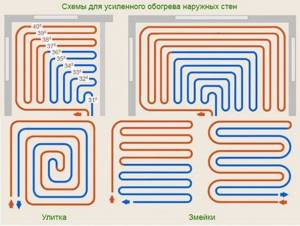
Laying methods
Insulation
It is best to place extruded polystyrene foam (EPS) under pipes as a thermal insulation material. This is a moisture-resistant and durable insulation material that is easy to install and easily tolerates contact with alkaline cement mortar.
The thickness of the EPS slabs is selected as follows:
- 30 mm – if there is a heated room on the floor below;
- 50 mm – for the first floors;
- 100 mm or more - if the floors are laid on the ground.
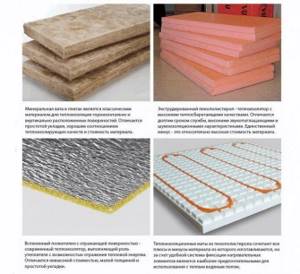
Floor insulation
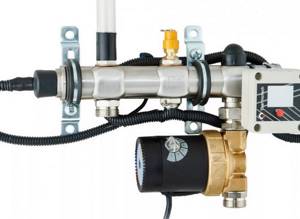
Collector-mixing unit
One of the main elements of a water floor is a mixing unit with a manifold, shut-off valves, air vent, thermometer, thermostat and bypass. A circulation pump is placed directly in its composition or in front of it. If you plan to adjust the TP manually, then connecting the circuits to the collector can be done through simple valves. Otherwise, you will have to install thermostats and electric valves on each outlet.
The collector-mixing unit allows you to accurately regulate the water temperature in each circuit and, thanks to the bypass, protects the boiler from overheating. It is installed in a special cabinet or niche in a room with heated floors. Moreover, if this unit is configured incorrectly, you may end up with a hot frying pan under your feet, but there will not be enough heat in the room. The efficiency of the entire underfloor heating system depends on it.

Collector unit
Boiler installation
For a “warm floor” system, a boiler is selected depending on the coolant. If the house has gas, then it is advisable to choose a gas boiler. It is installed indoors. Coolant costs will be minimal. Equipment with outlets for hot water supply and for a floor water main is required.
If a solid or liquid fuel stove is installed in the house, then a separate boiler room is installed for heating equipment. The disadvantage is that you have to constantly monitor fuel consumption.
The water in the heat exchanger heats up to a high temperature; you will need to additionally install radiators and towel dryers; you can take separate circuits to a bathhouse or garage. These measures are necessary to maintain a certain pressure and temperature of water in the floor line.
Floor installation
Any person who knows how to handle wrenches, a drill, a hammer and a hacksaw can independently install a water heated floor. The most difficult moment of installation is the calculations of the system and the choice of configuration for laying water pipes. And the installation work itself should not cause problems.
Installation of insulation
EPS boards are laid end-to-end without gaps in the seams. Under no circumstances should concrete pass between them when pouring. If this happens, acoustic and temperature bridges will form. To level the slabs horizontally, you can use fine sand, which is sprinkled from below.
You should not spread foil or foil film over the insulation under a warm water floor. Thin aluminum will be instantly eaten by concrete, since the cement mortar is highly alkaline. The layer with foil is relevant only when laying a water-based heating system using dry technology with gypsum fiber and wood boards laid on top.
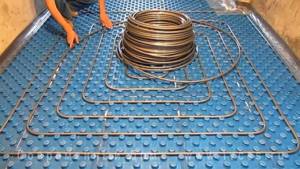
To simplify installation, instead of ordinary EPS, you can take special polystyrene foam boards for “pipe heated floors”. They have pimply protrusions on top with a pitch of 50 mm, between which pipes are laid and firmly fixed in place.
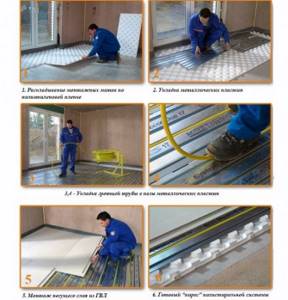
Laying the floor on a polystyrene foam base
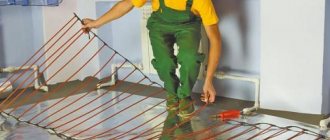
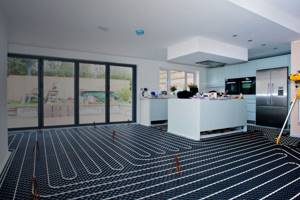
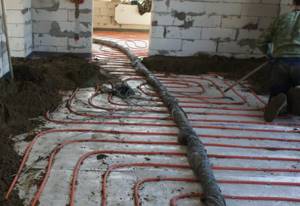
Pipe installation
The pipe circuit is formed at the rate of one per 15–30 m2 of room. It is allowed to lay it on a maximum of 40 m2. If the room is large in area, then you will have to make several separate circuits in it. Moreover, in each of them the pipeline with the coolant should not exceed 100 m in length.
It is impossible to connect metal-plastic pipe products using fittings or soldering in a warm water floor. In the screed, each circuit must consist of a continuous pipe, the two ends of which are connected to the manifold.
The pipeline is fixed to the insulation using the existing protrusions or by attaching it to the reinforcing mesh in increments of 0.5–1 m. In the second case, fastening wire or clamps are used. The pipe should be at least 30 cm from the internal partition, and 50 cm from the external wall.
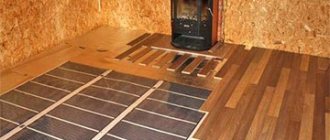
Laying floors on a wooden base
Installation of reinforcing mesh
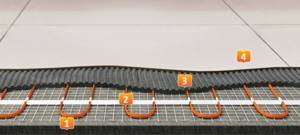
When installing a heated floor, a reinforcing mesh made of a metal rod with a cross section of 3–6 mm is usually used. It not only increases the strength of the screed, but also simplifies the layout of pipes. Each square cell is from 100 to 300 mm. After laying it out on the base, you get an even grid, the distance on which can be easily determined without a tape measure.
The reinforcing mesh for the screed should be laid on top of the pipes so that the reinforcement is inside the concrete. If you put it directly on the insulation under the pipeline, then such reinforcement will be of zero use.
Screed for heated floors
System test
After installing the pipes, water heated floors must be washed and checked for leaks. This is done using a pressure testing pump and before pouring the concrete solution. Moreover, here it is allowed to use water without heating to operating temperatures. The main thing is to identify places where coolant may be leaking. If everything is fine, then all that remains is to lay the damper tape along the walls and you can pour the screed.
We do it step by step with our own hands
The installation of a heated floor begins with planning: drawing up a project and an estimate. Independent calculations of the amount of materials will be approximate, so it is worth buying them with a small margin. The project begins by drawing up a diagram of the location of the heating elements. To do this, it is convenient to use graph paper, on which the outline of the room is drawn to scale.
Between the heating elements, gaps of 10-20 cm are made. A larger distance is permissible provided that the house is well insulated. If heat loss is large, the gaps should be minimal. It is possible to lay out the heaters with variable pitches: maintain 10 cm near cold walls, 20 cm near warm walls.
Selection of heaters
Manufacturers of heating equipment offer 2 groups of floor heaters: water and electric. Their applicability is considered individually. Water circuits are organized using metal-plastic pipes up to 100 m long. To ensure operation, pumps, three-way mixers, and programmers are installed in them. If the area of the room exceeds 15 m², several contours are made.
Electric heaters are easier to install; they allow you to install the entire system cheaply and quickly. Heating cables or mats are available for installation. They are small in size, so the apartment owner can do without pouring a finishing screed. This is especially true for wood floors when heaters are installed directly under the floor covering.
Thermal insulation
Heat retaining material is an essential component of such a heating system. It serves to prevent heat loss through the ceilings. Foamed polystyrene with a density of 25-35 kg/m³ is used as the main thermal insulation. A material with lower performance will not be able to withstand the weight of the screed. The thickness of polystyrene slabs must be at least 5 cm. If they are laid on the ground or in an unheated room below, it is advisable to increase this parameter to 10 cm. To reduce heat loss, a reflective screen is laid on top of the main insulation. This can be penofol or simple food foil. However, the metallized coating must be protected from the aggressive effects of concrete mortar by covering it with plastic film.
Installation of heating elements
Heaters are placed on top of the thermal insulation. The layout of pipes, heating cables or mats is carried out in accordance with the drawn up diagram. The heating elements are fixed using special plastic fasteners. In addition, you can use profiled polystyrene. The material has grooves or projections that allow pipes or cables to be neatly laid out and secured.
Pouring a heated floor
After installing and testing the heaters, they begin pouring the finishing screed. If a water system is used, a pressure of 0.3 MPa is maintained until the concrete is completely dry. Sand is not used to prepare the solution - it has low thermal conductivity, which reduces the heating efficiency. The concrete mixture is prepared from several components:
- cement grade not lower than 400;
- granite crushed stone (grain size from 5 to 20 mm);
- small granite screenings (up to 5 mm in size);
- water;
- plasticizer.
The solution is evenly distributed over the floor, forming a layer 5-10 cm thick. If the size of the room is more than 30 m² or it is too elongated, expansion joints are made at intervals of 10 m. Concrete hardens within 12 hours, and will gain maximum strength only after a month. At this time, you cannot turn on the heating so that the screed does not burst. After holding, the heating is activated gradually, increasing the temperature by 5°C every 24 hours.
Flooring
The final coating can be safely laid on the concrete surface. Ceramic tiles are placed on a special adhesive designed for heated floors.
Special attention is paid to expansion joints: if the tile gets on it, only one edge is glued, the second is fixed with silicone. This solution will help level out the deformations that occur during thermal expansion.
Knowing all the nuances of pouring a heated floor, you can successfully carry out the repair yourself. The property owner will only pay for consumables, the price of which is not too high, and will be able to save on the services of professional installers.