Standing barefoot on a heated bathroom floor after a shower is a pleasure, especially if the house is poorly heated in winter. You can design and install a heated floor yourself, but this requires a little knowledge and skills. Before work, you need to decide on the type of flooring, draw a conclusion which is better, and only then purchase the necessary materials and tools.
Choosing the type of floor for the bathroom
Warm floors can be divided into several types, selected by the user according to the criteria: specific installation and operation. Each of the installed types of heated floors with your own hands performs its own functions, but still there is a difference and here you need to carefully calculate the costs of maintaining the floor during operation, as well as take into account all the nuances when installing it. If you don’t have great skills in construction and don’t have time to renovate a bathtub, it’s better to make an electric floor.
High-quality laid heating base
A water floor will take a little longer, but it will also not require much expense. And the youngest type of floor heating for the bathroom is considered infrared, but its use is not as popular in comparison with electric or water.
Experts will help you choose the type, calculate the required amount of the required material, and tell you which floor covering is suitable for each type.
Electric
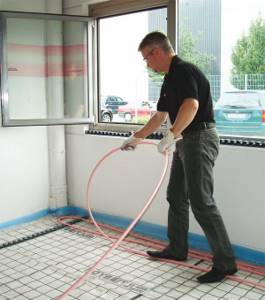
An electric heated floor in a bathroom consists of a set of electric mats made of a special film and a cable responsible for heating. Cables are made single-core and double-core. The cost of two-wire ones is higher due to the high level of safety. Together with the mats, the kit includes a thermostat for determining and adjusting the required temperature, as well as wires for connecting the system to the electrical network. It is advisable to purchase insulation film separately, and if not included, buy tape and corrugated pipes.
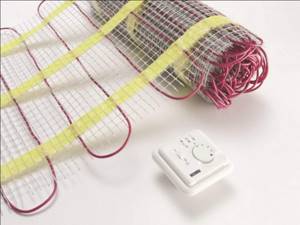
Electric heated floor
The following steps are carried out step by step:
- Before installing an electric floor with your own hands, you must prepare the surface and remove the old coating. After which the base should be perfectly flat and free of dirt and dust, bumps and potholes. The last defect is sealed with concrete mortar and leveled with tools, and the tubercles are removed with special sandpaper.
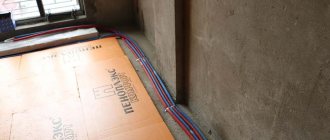
- After preparing the area for applying the mats, the area for installing the thermostat is determined. And it is already possible to carry out electrical wiring to connect to the underfloor heating network.
- The first layer of insulating film is applied to the leveled, cleaned floor, with the shiny side facing the ceiling . The joints are secured with tape. Thermal insulation boards should not reach the walls.
- Electrical mats are produced mainly in rolls and sometimes with a ready-made mesh for installation and tape for fastening; if this is not available, you will have to buy the mesh and lay out the cable at a certain distance.
- The bathroom is very small, so the mat will definitely have to be turned at an angle; to do this, simply cut the mesh and install the cable in the desired position.
- The sensor, which is usually included in the complex, is located in a well-accessible place so as not to expose the floor to destruction during breakdown or maintenance.
- The thermostat on the wall is installed in accordance with the rules of operation and safety with electrical wiring. Almost like a socket with a sensor is hidden in the wall under a box.
- After installation, the functionality of the system and power supply is checked. You can check the current supply with a tester.
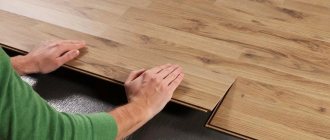
- If the system works, a floor screed of a certain thickness is made, into which tiles or other flooring material are placed.
Installing underfloor heating in the bathroom
Since we already know the characteristics of an electric floor heating system and which floors are best suited, we can imagine how to do it. Everything may seem complicated at the beginning, but if we adhere to the relevant rules and recommendations of the system component manufacturer, the entire procedure should be surprisingly simple.
Floor preparation
It should be remembered that when installing underfloor heating, the substrate should not contain any removable surfaces. It must also be prepared properly, mainly by cleaning and light hydration.
After which it is necessary to apply a primer (or a special contact layer that will improve adhesion). After this we can move on to applying the primer. In the pan we must make the correct slope (about 1%), thanks to which the water will flow into the wastewater grid.
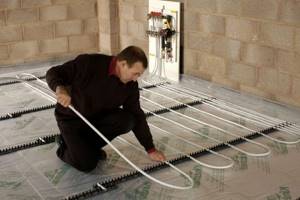
Installation of heating cables
In the next step we can start laying the heating installation and lowering it using a screed. We must remember to maintain the correct height. It must be at least 35 millimeters. Only then will all kinds of elements be introduced in the correct order.
Installation of waterproofing
Waterproofing the floor plays a very important role, as it protects the screed and heating elements from exposure to water. Two layers of waterproofing will need to be applied, preferably using a steel trowel, although a brush is also acceptable.
The first layer should drown the so-called sealing accessories - they will ensure proper tightness of the waterproofing, which will certainly affect the efficiency of its operation.
Tape gluing and collar insertion
They are built in where the floor meets the walls and along the extension. These are sealing tapes that are highly flexible. We embed them using a waterproofing mass. Then we must assemble the sealing corners.
The flanges are shaped like special rings that will protect the installation pipes. The said clamps are pulled onto the tubes and then pressed against the waterproofing mass. All the above steps must be performed quickly on the newly placed mass.
Installation of heating mat and primer
Finally, we can move on to assembling the most important element - the heating mat. Before doing this, however, check the condition of the mat. First, look for any kinks that need to be ironed out. It should be remembered that the mat cannot be disassembled where fixed elements will be installed, such as a shower, bathtub, washing machine or shelves.
Once it is properly prepared, we can immerse it in deformable adhesive, which must be applied to the floor immediately before assembly. Spread the mat evenly without stretching it.
When it comes to priming, we are talking about floor surfaces that have not been waterproofed. The soil layer will protect them from external factors.
Gluing tiles
Methods for gluing tiles vary depending on the products chosen. In the case of gres or terracotta, the most commonly used mortar is flexible. Thanks to this, the tiles will be reliably protected from damage as a result of rapid temperature changes.
The solution should be applied with the smooth side of the float, and then profiled with the other side, equipped with teeth. If we purchased a low-quality adhesive, we must also apply a little of it to the tiles. Then all we have to do is attach these elements to the floor.
Some developers also use self-draining adhesive, which is very popular when assembling ceramic tiles. It is characterized by favorable binding and protective parameters and is designed specifically for large tiles. We place it on the floor with a spatula with semicircular teeth.
Securing surfaces
When the tile gluing stage is completed, you need to wait until the glue dries. This period is different for each type of product, so it is best to follow the manufacturer's instructions.
After the appropriate time has passed, we can begin cementation. It is best to use cement mortar, which has properties beneficial for underfloor heating systems. Mix the compound with water (in the proportions specified by the manufacturer) and then distribute it in the gaps between the plates using a rubber float.
All excess mortar should be collected promptly - if we allow it to dry, it may not be possible to remove it. After all work is completed, be sure to thoroughly clean the tiles.
The quality of the solution is of great importance, primarily because of its aesthetics. Cheap products quickly get dirty and may even crumble. Fortunately, there are many compounds on the market that should meet our requirements. It is worth deciding first of all on products that are antibacterial and resistant to moisture. Regardless of the type of solution, be sure to clean it regularly.
Sealant treatment
This is the last step in the underfloor heating installation process. You need to choose silicone that will withstand various conditions in the bathroom (large accumulation of steam and moisture), as well as resistance to the development of various microorganisms.
The silicone should be distributed evenly in the joints, without leaving empty spaces. Immediately after applying the silicone, we need to properly shape and level it with a spatula.

Did you find this article helpful? Please share it on social networks: Don't forget to bookmark the Nedvio website. We talk about construction, renovation, and country real estate in an interesting, useful and understandable way.
Advantages
Do-it-yourself water or electric flooring in the bathroom has many advantages:
- Any of the systems is hidden from view, while heating radiators even take up space in an already small space;
- Every bath or shower will be more enjoyable if the bathroom has a comfortable temperature not only of the air, but also of the floor covering.
- Warm floors connected to individual heating are installed both in apartments and private houses, this significantly saves the family budget, and this system pays for itself quite quickly, especially if it is installed by yourself.
The warm floor makes walking on it a pleasant experience
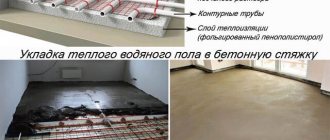
Water heated floor
To form a VTP, two methods are used:
- “Wet” method, which involves installing a classic dry or semi-dry screed. Suitable for all types of buildings: concrete, brick houses, log houses, frames. The main thing is that the power “skeleton” of the structure is strong enough.
- “Dry” method, requiring the use of special mounting sheets or an entire system of lags. This is a lightweight installation option used for houses with weak supporting structures, on unstable foundations, as well as in rooms with low ceilings (up to 2.5 m).
The installation of an HTP in a bathroom using the wet method is carried out in 7 stages:
Project
Regardless of where exactly the sanitary room is located, whether there are windows or not, one should calculate such a parameter as heat loss through the building envelope (including walls, ceiling, window blocks). This is necessary in order to determine the required system power during peak loads with a margin of up to 10%. The recommended level is up to 0.1 kW per square meter of floor space.
Professionals, as a rule, have at hand special tables with a whole system of adjustment coefficients. If you plan to install it yourself, we recommend using highly specialized online programs located on the websites of well-known manufacturers (Uponor, Rehau, etc.).
Next steps:
- a plan for laying pipelines is drawn up with an interval between turns of 10-30 cm. For a small bathroom, combined wiring diagrams are not required - a simple “snake” (for rooms with one or two external walls) or a “snail” (for uniform heating of the entire room) is enough. ;
- the location of the manifold cabinet and the channels for supplying electricity and water are noted;
- the total thickness of the “pie” is calculated, taking into account that the height of the doorway after laying the finishing coating should be equal to the optimal 205 cm;
- the final mass of the entire structure is calculated, which will make it possible to determine whether such a load on the load-bearing supports is permissible or not.
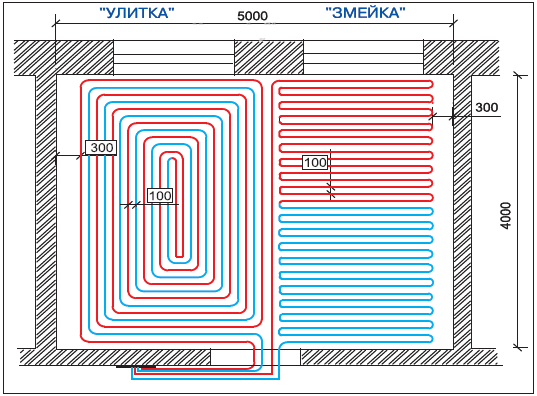
Pipeline laying diagrams for high-pressure transport stations.
Since the total length of the contour in the bathroom almost never exceeds 20 m, there is no need to install expansion joints.
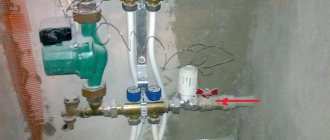
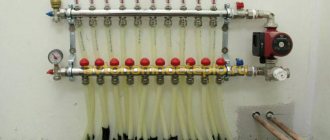
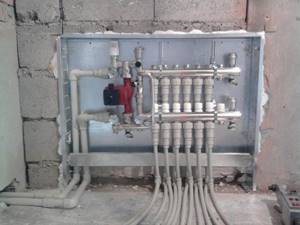
Collector
This element can be installed both in a sanitary room and in any other adjacent room. In the first case, it is recommended to fix the block on one of the walls, closer to the riser. You need to take care in advance:
- arranging a niche for the box;
- piping;
- by cutting channels for electrical cables, the task of which is to power automatic control systems.
To decorate or disguise a cabinet, you can use false panels or plasterboard covered with tiles on the front side.
Preparing the base
The floor under the HTP must comply with the requirements of SP 29.13330.2011 (SNiP 2.03.13-88). In particular:
- Integrity, monolithicity. All defects must be eliminated and the surface treated with a primer with a strengthening effect. For example, widen the cracks and fill them with repair compounds, fill the holes with putty, and trim off the bumps.
- Stiffness and strength corresponding to 15 MPa and above.
- Residual moisture for a concrete base is no more than 5%, and anhydrite – up to 1.5%. The indicator for a subfloor made of wood or wood-composite boards is 12%.
- Cleanliness, which implies the complete absence of dust, sand, dirt, bitumen, oil stains, traces of soot, soot, etc.
- Evenness with an acceptable limit of no more than 2 mm for every 2 meters of surface. All irregularities must be eliminated.
In addition, it is recommended to stick or staple a damper tape 5–15 mm high (depending on the thickness of the floor pie) around the perimeter of the sanitary room and waterproof it. The latter can be polyethylene film, polymer mastic, rigid coating compositions, or rolled materials. Particular attention is paid to corners, as well as places adjacent to pipelines.
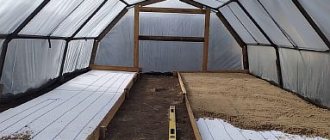
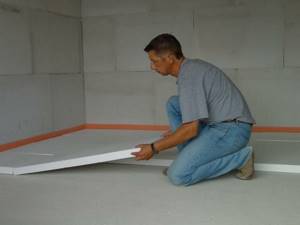
The next step is laying thermal insulation material for the floor and fixing it to the base. This stage is mandatory, because otherwise part of the thermal energy will go down, and not, as expected, up. You can use extruded polystyrene foam boards, polystyrene foam with a density of 35 kg/m², basalt or fiberglass wool. The optimal insulation thickness is up to 5 cm.
On top of the prepared base it is necessary to lay a reinforcing mesh made of metal or glass-composite rods 4-6 mm thick. It will serve as a frame for securing the pipe contours. Some craftsmen recommend fixing it to the base for reliability.
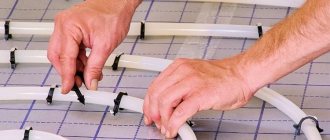
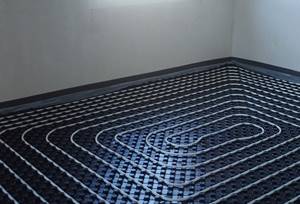
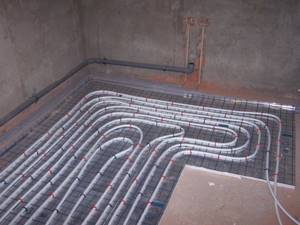
Installation of heating circuits
The layout of pipelines for the VTP system is carried out in accordance with a pre-developed diagram. The turns are secured using plastic clamps, PVC holders, metal wire, etc.
Alternatively you can use:
- anchor brackets - convenient when working on insulation materials;
- metal tape with fixing “antennae” - useful for fastening on rigid bases;
- special forms made of polystyrene foam with protrusions;
- fixing tracks, which are a kind of strips or comb made of aluminum, galvanized steel or plastic. There is a recess in the center into which the pipes are tightly laid and securely fixed.
We remind you that during work you need to ensure that the channels are even and free of creases, dents and other defects. If, due to the characteristics of the sanitary premises, it is impossible to maintain the minimum permissible interval between turns, some of them must be thermally insulated using corrugated pipes.
Connection and testing
First of all, it is necessary to mount the pumping and mixing unit in a pre-installed cabinet. If the control unit is located directly in the bathroom, then its installation is carried out before the heating circuits are laid out.
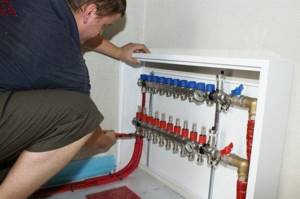
Now you can connect the pipelines to the corresponding outputs of the block. SP 41-102-98 recommends that at the same stage, immediately perform pressure testing of the system under pressure exceeding the nominal operating pressure by 1.5 times, but not less than 0.6 MPa. During hydraulic tests the following is carried out:
- Checking the pressure gauge.
- Balancing the collector in accordance with the tuning tables.
- Examination of pipelines along the entire length, which will allow early identification of depressurization points, leaks, creases, areas of overheating and other defects.
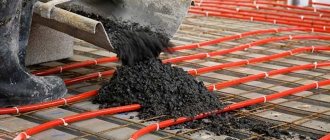
Screed
If there are no malfunctions or have been eliminated, then you can begin preparing and pouring the solution. Manufacturers of components for HTP recommend a minimum thickness of 3–4 cm above the surface of the heating circuits, and a maximum thickness of up to 9 cm.

To create a screed you can use:
- industrial cement-sand or concrete compositions with grade strength not lower than M-150;
- self-leveling self-leveling mixtures with o on the packaging;
- homemade solutions of a grade not lower than M-300. They do not have the necessary elasticity, so plasticizing additives must be added to the composition.
The finished screed mixture is laid on pipes with water at room temperature under a pressure of 0.2–0.3 MPa (2-3 atmospheres), and carefully leveled. To ensure uniform maturation of the cement mortar, the surface can be covered with a film. Technological break – 14–28 days. It is not recommended to drain the liquid from the system for another 1-3 days.
Flaws
Like any installed system in the house, it has its drawbacks:
- The cost of the system for the buyer will not be a small amount. But it will be justified after the first uses, because you simply won’t want to leave a comfortably furnished bathtub.
- Not all floor coverings that you would like to use in your bathroom can be used as flooring. The most practical would be ceramic tiles and self-leveling flooring. It is rational to install a wooden floor only if there is good ventilation in the bathroom, otherwise such flooring will soon have to be replaced.
- Electric floor heating requires electricity. Therefore, before installing any type of heated floor, you need to calculate all the pros and cons and choose which one is better, otherwise the floor simply will not be useful, because it will be very expensive to use.
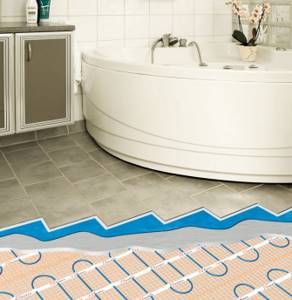
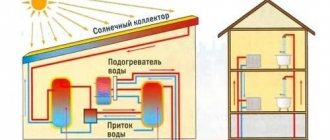
This is what a heated floor looks like in cross section
Installation of heated floors, electric or water, which is better, has to be chosen only by the owner of the house or apartment. The cost of any system will not be cheap, but it will require significantly less costs when installing the floor yourself. If the electric one can be turned on even in the summer, then water floor heating will only work with the start of the individual heating system. The system sensor shows the temperature no higher than 40 degrees, but the heating can be changed using a thermostat.
Specifics of film flooring under tiles
The main requirement is the installation of a rigid base between the heating film and the tile. And the peculiarity is that pouring screed onto a film floor reduces its effectiveness by more than 50%.
This is due to the principle of heat transfer from the film. If in a heating cable heat transfer is carried out by direct contact, then in an infrared film, 90% of the thermal energy is transferred by radiation. This means there should be a small gap between the film and the rigid base.
In this case, infrared radiation will heat the overlying layers of materials with greater efficiency. But the material of such a base must also have a sufficiently high thermal conductivity and at the same time be a dielectric.
For comparison, take the following sheet materials:
- Plywood – 0.15 W/m*K;
- GCR – 0.22 W/m*K;
- GVL – 0.3 W/m*K;
- Glass-magnesite sheet – 0.21 W/m*K;
When compared, it is clear that gypsum fiber sheets will conduct heat better than other materials. But you can only use waterproof GVL.