Kinds
The standard device has the form of a metal plate, which is placed in a plastic or glass case. The surface of this plate accumulates solar energy, retains heat and transfers it for various household needs: heating, water heating, etc. Integrated collectors come in several types.
Cumulative
Storage collectors are also called thermosiphon collectors. This DIY solar collector without a pump is the most profitable. Its capabilities allow you not only to heat water, but also to maintain the temperature at the required level for some time.
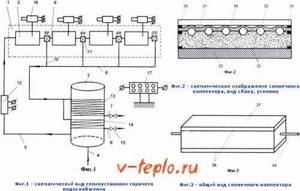
This solar heating collector consists of several tanks filled with water, which are located in a thermal insulation box. The tanks are covered with a glass lid, through which the sun's rays shine through and heat the water. This option is the most economical, easy to operate and maintain, but its effectiveness in winter is practically zero.
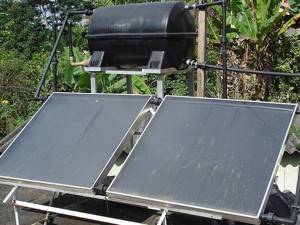
Flat
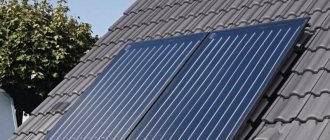
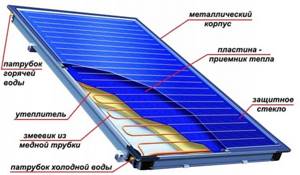
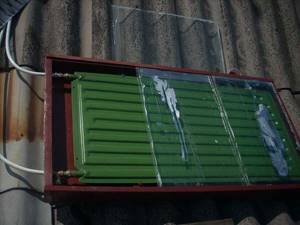
It is a large metal plate - an absorber, which is located inside an aluminum case with a glass lid. A do-it-yourself flat-plate solar collector will be more efficient if you use a glass cover. Absorbs solar energy through hail-resistant glass, which transmits light well and practically does not reflect it.
There is thermal insulation inside the box, which can significantly reduce heat loss. The wafer itself has low efficiency, so it is coated with an amorphous semiconductor, which significantly increases the thermal energy accumulation rate.
When making a solar collector for a swimming pool with your own hands, preference is often given to a flat integrated device. However, it copes just as well with other tasks, such as heating water for household needs and heating a room. Flat is the most widely used option. It is preferable to make an absorber for a solar collector from copper with your own hands.
Liquid
From the name it is clear that the main coolant in them is liquid. A do-it-yourself water solar collector is made according to the following scheme. Through a metal plate that absorbs solar energy, heat is transferred through pipes attached to it into a tank with water or antifreeze liquid or directly to the consumer.
Two pipes approach the plate. Through one of them, cold water is supplied from the tank, and through the second, already heated liquid enters the tank. Pipes must have inlet and outlet openings. This heating circuit is called closed.
When heated water is directly supplied to meet the needs of the user, such a system is called open-loop.
Non-glazed ones are more often used to heat water in a swimming pool, so assembling such thermal solar collectors with your own hands does not require the purchase of expensive materials - rubber and plastic will do. Glazed ones have higher efficiency, so they are able to heat the house and provide the consumer with hot water.
Air
Air devices are more economical than the above-mentioned analogs that use water as a coolant.
The air does not freeze, does not leak, and does not boil like water. If a leak occurs in such a system, it does not cause as many problems, but it is quite difficult to determine where it occurred. Self-production does not cost the consumer much. The sun receiving panel, which is covered with glass, heats the air that is between it and the heat-insulating plate. Roughly speaking, this is a flat-plate collector with space for air inside. Cold air enters inside and, under the influence of solar energy, warm air is supplied to the consumer.
A fan, which is attached to the duct or directly to the plate, improves circulation and improves air exchange in the device. The fan requires the use of electricity to operate, which is not very economical.
Such options are durable and reliable and are easier to maintain than devices that use liquid as a coolant. To maintain the desired air temperature in the cellar or to heat a greenhouse with a solar collector, just this option is suitable.
Preparing to assemble the absorber
So, when assembling your device, you are better off using cellular transparent polycarbonate. The use of this type of polycarbonate will allow you to achieve maximum heating efficiency from the created device. It is also worth choosing this polycarbonate because it is very durable. This is important, given possible weather disasters, such as large hail, hurricane air flow that tears branches from trees - these accidents must be taken into account, as they can damage a weak coating. The honeycomb structure of the coating will help you create an airy greenhouse effect, resulting in an enhanced heating moment for the water in the tubes. Simply put, by using this material and in addition to it a selective coating, you will significantly increase the effectiveness of the product.
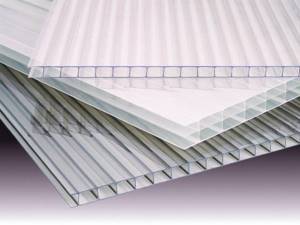
Cellular polycarbonate
For the absorbent panel, you will need a sheet of metal about 0.8 millimeters thick (however, copper material is better). In principle, a steel sheet will do. The outer surface will need to be coated with a so-called selective coating (painted with matte black paint, the paint must be resistant to high temperatures). If you do not follow these recommendations (black coating is also included), the device will not function in the correct mode.
In addition to the listed components, purchase the mineral wool necessary for thermal insulation; it will create a kind of air trap, minimizing heat exchange with the surrounding space, transferring all the heat to the coil, and then through a hose to the heating system of the house.
Absorber installation
You can also assemble the body of the device yourself; for this you need to use aluminum materials or use less durable but easier to process wooden material. When working with wood, you will spend significantly less time creating a heater, and working with plywood is even easier. But still, it is better to use an aluminum frame; its durability, in comparison with wood, cannot be compared.
How it works
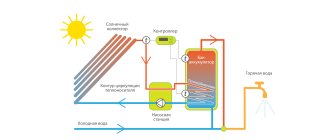
The collector collects energy using a light accumulator or, in other words, a solar receiving panel, which transmits light to an accumulating metal plate, where solar energy is converted into thermal energy.
The plate transfers heat to the coolant, which can be either liquid or air. Water is sent through pipes to the consumer. With the help of such a collector you can heat your home, heat water for various household purposes or a swimming pool. Air collectors are used mainly for heating a room or preheating the air inside it. The savings when using such devices are obvious. Firstly, there is no need to use any fuel, and secondly, electricity consumption is reduced.
In order to get the maximum effect from using the collector and heat water for free for seven months of the year, it must have a large surface area and additional heat exchange devices.
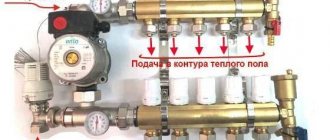
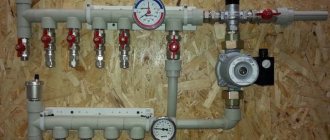
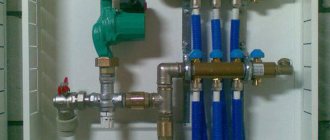
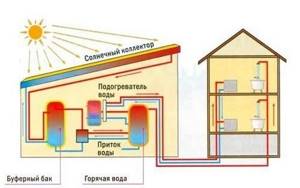
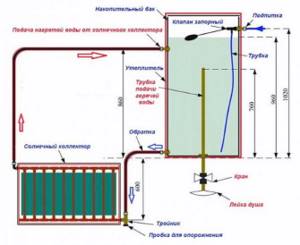
How to connect a solar collector to a tank (shower) by gravity
The weak point for summer solar collectors remains the need to use a pump. This dramatically increases the cost of the design or makes it completely unacceptable.
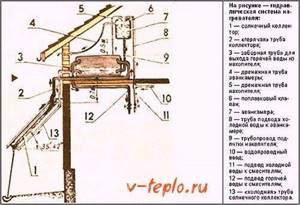
But you can make a heating tank connected to the solar collector so that the liquid moves by gravity. The principle of gravity flow is preserved - the heater is located lower than the storage tank (radiator).
According to this scheme, when using pipes from ¾ inches, water should move by gravity. The heated water from this tank can be drained into the pool.
Collector Stanilova
Engineer Stanislav Stanilov presented the world with the most versatile solar collector design. The main idea of using the device he developed is to obtain thermal energy by creating a greenhouse effect inside the collector.
Collector design
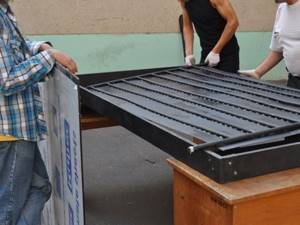
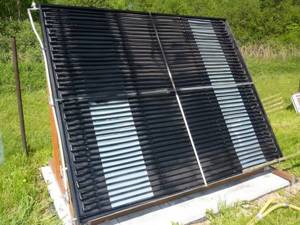
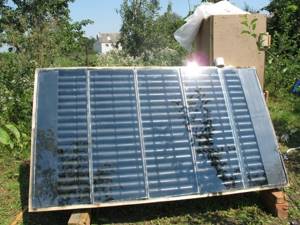
The design of this collector is very simple. Essentially, this is a solar collector made of steel pipes welded into a radiator, which is placed in a wooden container protected by thermal insulation. Mineral wool, polystyrene foam, and polystyrene can be used as thermal insulation materials.
A galvanized metal sheet is placed at the bottom of the box, on which the radiator is mounted. Both the sheet and the radiator are painted black, and the box itself is covered with white paint. Of course, the container is covered with a glass lid, which is well sealed.
Materials and parts for manufacturing
To build such a homemade solar collector for heating a house you will need:
- glass that will serve as a lid. Its size will depend on the dimensions of the box. For good efficiency, it is better to select glass measuring 1700 mm by 700 mm;
- glass frame - you can weld it yourself from corners or put together from wooden planks;
- board for the box. Here you can use any boards, even from dismantling old furniture or plank floors;
- rental corner;
- coupling;
- pipes for radiator assembly;
- clamps for attaching the radiator;
- galvanized iron sheet;
- radiator inlet and outlet pipes;
- tank with a volume of 200−300 liters;
- aqua chamber;
- thermal insulation (sheets of polystyrene foam, expanded polystyrene, mineral wool, ecowool).

Stages of work
Stages of making a Stanilov collector with your own hands:
- A container is made from boards, the bottom of which is reinforced with beams.
- A heat insulator is placed at the bottom. The base must be especially carefully insulated to avoid heat leakage from the heat exchanger.
- Afterwards, a galvanized plate is placed at the bottom of the box and a radiator is installed, which is welded from pipes, and secured with steel clamps.
- The radiator and the sheet underneath are painted black, and the box is painted white or silver.
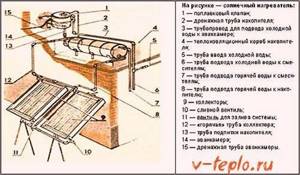
- The water tank should be installed under the collector in a warm room. Between the water tank and the collector you need to install thermal insulation to keep the pipes warm. The tank can be placed in a large barrel into which expanded clay, sand, sawdust, etc. can be poured. and thus insulate.
- An aqua chamber must be installed above the tank to create pressure in the network.
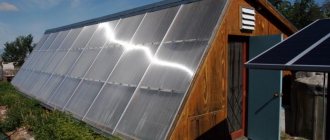
- Do-it-yourself solar collector installation should be done on the south side of the roof.
- After all the elements of the system are ready and installed, you need to connect them into a network with half-inch pipes, which must be well insulated in order to reduce heat loss.
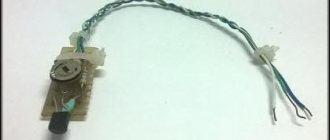
- It would be a good idea to build a controller for the solar collector with your own hands, since factory devices do not last long.
Determining the size of the collector
Now let's summarize, we list all the materials necessary for assembling an effective homemade collector:
- Copper tubes measuring 18 millimeters - from which you will form a coil (the same tubes are used when assembling heating systems);
- matte black paint, resistant to high temperatures (with its help you will apply a selective coating);
- mineral wool (thermal insulation);
- metal sheet (copper, iron, steel), sheet thickness 0.8 millimeters in thickness;
- corner transitions 18 x 18 millimeters;
- plumbing transitions 18 mm x ¾ (needed to connect to the water supply system);
- cellular polycarbonate (front covering of the collector);
- a sheet of aluminum and aluminum corners to create the body of the product, if these are not available, wooden planks and a sheet of plywood for the rear wall of the heater;
- all the tools necessary for soldering work.
Dual manifold
It is important to determine in advance the dimensions of your collector based on its dimensions; calculate in advance the required number of tubes, transitions and other materials (in other words, the overall performance of the mounted device). Calculate the amount of water that will be required to ensure heat exchange in the entire system. To do this, decide in advance for what purposes the collector will be used - either it is just washing dishes, or for a shower, or to ensure that all household needs of hot water supply are covered in your home. To heat water for washing dishes or taking a shower, it will be enough to assemble a collector measuring 200 x 100 centimeters; the distance between the tubes in the coil should be from 8 to 10 centimeters.
Size calculation
Calculation of dimensions in order to make a solar collector for heating with your own hands is, first of all, aimed at determining the load of the heating system, the coverage of which is assumed by this device. It goes without saying that this implies the use of several energy sources in combination, and not just solar energy. In this matter, it is important to arrange the system in such a way that it interacts with others - then this will give the maximum effect.
To determine the collector area, you need to know for what purposes it will be used: heating, water heating, or both. By analyzing water meter data, heating needs and insolation data of the area in which installation is planned, the collector area can be calculated. In addition, it is necessary to take into account the hot water needs of all consumers that are planned to be connected to the network: washing machine, dishwasher, etc.
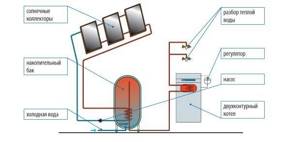
How to connect the collector to the hot water supply
The best monetary benefit comes from the manufacture and operation of a collector made of aluminum or copper tubes on metal under glass, connecting it to the hot water supply system.
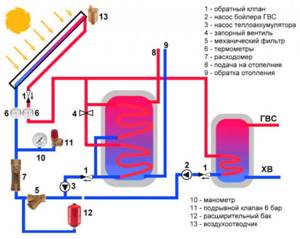
Since the collector and spiral in the boiler are a small-sized heated system, it must be equipped with an expansion tank and a safety valve. Circulation is carried out using a low-power pump. A good collector will provide the house with hot water even in the off-season...
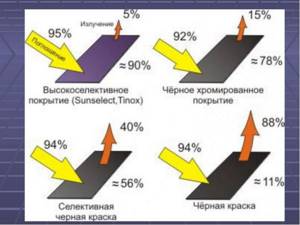
Selective coating
Selective coating performs perhaps the most basic function in the operation of a collector. A coated plate or radiator attracts many times more solar energy, converting it into heat. You can purchase a special chemical as a selective coating, or you can simply paint the heat storage tank black.
To make a selective coating for solar collectors with your own hands, you can use:
- special finished chemical;
- oxides of various metals;
- thin thermal insulation material;
- black chrome;
- selective paint for the collector;
- black paint or film.
Structural drawings
Let's get started
Before building a solar collector, it is necessary to make the appropriate calculations and determine how much energy it should produce. But you shouldn’t expect high efficiency from a homemade installation. Having determined that there will be enough of it, you can begin.
The work can be divided into several main stages:
- Make a box
- Make a radiator or heat exchanger
- Make a front camera and storage device
- Assemble the collector
To make a box for a solar collector with your own hands, you should prepare an edged board 25-35 mm thick and 100-130 mm wide. Its bottom should be made of textolite, equipped with ribs. It should also be well insulated using polystyrene foam (but preference is given to mineral wool), covered with a galvanized sheet.
4 more effective ways to alternatively heat your home
Which you can learn about in our next article.
Having prepared the box, it’s time to make the heat exchanger. You should follow the instructions:
- It is necessary to prepare 15 thin-walled metal tubes 160 cm long and two inch pipes 70 cm long
- In both thickened tubes, holes are drilled with the diameter of the smaller tubes into which they will be installed. In this case, you need to ensure that they are coaxial on one side, the maximum step between them is 4.5 cm
- The next stage is that all the tubes need to be assembled into a single structure and welded securely
- The heat exchanger is mounted on a galvanized sheet (previously attached to the box) and fixed with steel clamps (metal clamps can be made)
- It is recommended to paint the bottom of the box in a dark color (for example, black) - it will better absorb solar heat, but to reduce heat loss, the external elements are painted white
- To complete the installation of the collector, it is necessary to install a cover glass near the walls, while not forgetting about reliable sealing of the joints
- A distance of 10-12 mm is left between the tubes and the glass
All that remains is to build a storage tank for the solar collector. Its role can be played by a sealed container, the volume of which varies about 150-400 l
. If you cannot find one such barrel, you can weld several small ones together.
Like the collector, the storage tank is thoroughly insulated from heat loss. All that remains is to make a fore-chamber - a small vessel with a volume of 35-40 liters. It must be equipped with a water-falling device (a swivel valve).
The most responsible and important stage remains - to assemble the collector together. You can do it this way:
- First you need to install the front camera and storage. It is necessary to ensure that the liquid level in the latter is 0.8 m lower than in the front chamber. Since a lot of water can accumulate in such devices, it is necessary to think about how they will be reliably shut off
- The collector is placed on the roof of the house. Based on practice, it is recommended to do this on the south side, tilting the installation at an angle of 35-40 degrees to the horizontal
- But you need to take into account that the distance between the storage tank and the heat exchanger should not exceed 0.5-0.7 m, otherwise the losses will be too significant
- At the end, the following sequence should be obtained: the front camera must be located above the drive, the latter - above the collector
The most important stage is coming - it is necessary to connect all the components together and connect the water supply network to the finished system. To do this, you will need to visit a plumbing store and purchase the necessary fittings, adapters, sockets and other shut-off valves. It is recommended to connect high-pressure sections with a pipe with a diameter of 0.5 inches, low-pressure sections with a diameter of 1 inch.
Commissioning is carried out as follows:
- The unit is filled with water through the bottom drainage hole
- The anterior chamber is connected and the fluid levels are adjusted
- It is necessary to walk along the system and check that there are no leaks
- Everything is ready for everyday use
Collectors from scrap materials
Assembling a solar collector for heating a house with your own hands is both cheaper and more interesting, because it can be made from various available materials.
From metal pipes
This assembly option is similar to the Stanilov manifold. When assembling a solar collector from copper pipes with your own hands, a radiator is welded from the pipes and placed in a wooden box lined with thermal insulation from the inside.
Copper pipes will be the most effective; aluminum pipes can also be used, but they are difficult to weld, but steel pipes are the most successful option.
Such a homemade collector should not be too large so that it is easy to assemble and install. The diameter of the pipes on solar collectors for radiator welding should be smaller than that of the pipes for coolant input and output.
From plastic and metal-plastic pipes
How to make a solar collector with your own hands, having plastic pipes in your home arsenal? They are less effective as a heat storage device, but are several times cheaper than copper and do not corrode like steel.
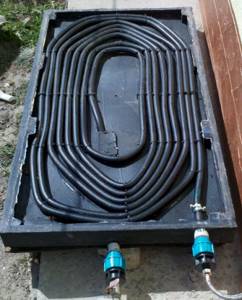
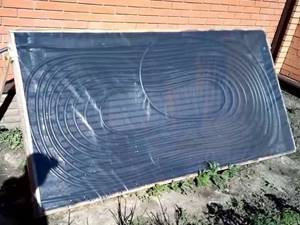
The pipes are laid out in a box in a spiral and secured with clamps. They can be coated with black or selective paint for greater effectiveness.
You can experiment with pipe laying. Since pipes bend poorly, they can be laid not only in a spiral, but also in a zigzag. Among the advantages, plastic pipes can be easily and quickly soldered.
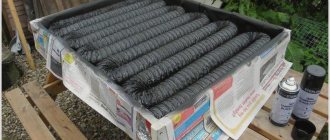
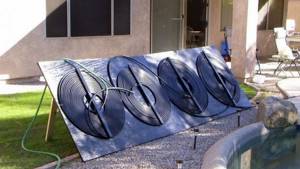
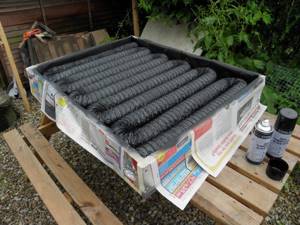
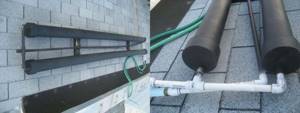
From the hose
To make a solar collector for a shower with your own hands, you will need a rubber hose. The water in it heats up very quickly, so it can also be used as a heat exchanger. This is the most economical option when making a collector yourself. A hose or polyethylene pipe is placed in a box and secured with clamps.
Since the hose is twisted in a spiral, natural circulation of water will not occur in it. To use a water storage tank in this system, it must be equipped with a circulation pump. If this is a summer cottage and little hot water is consumed, then the amount that flows into the pipe may be sufficient.
From cans
The coolant of a solar collector made from aluminum cans is air. The cans are connected to each other to form a pipe. To make a solar collector from beer cans, you need to cut off the bottom and top of each can, dock them together and glue them with sealant. The finished pipes are placed in a wooden box and covered with glass.
Basically, an air solar collector made from beer cans is used to eliminate dampness in the basement or to heat a greenhouse. Not only beer cans, but also plastic bottles can be used as a heat storage device.
From the refrigerator
You can make your own solar water heating panels from an unusable refrigerator or the radiator of an old car. The condenser removed from the refrigerator must be rinsed thoroughly. Hot water obtained in this way is best used only for technical purposes.
Foil and a rubber mat are spread on the bottom of the box, then the capacitor is placed on them and secured. To do this, you can use belts, clamps, or the fastening with which it was attached in the refrigerator. To create pressure in the system, it would not hurt to install a pump or aqua chamber above the tank.
What materials will you need to make a homemade absorber?
It seems to the average person that making a solar-powered absorber for heating your home yourself, by hand-making every part that makes up the device, is an incredibly difficult task. However, in order to make such an absorber, which will act as a device for heating water in a home heating system, you do not need to purchase or search for any exotic materials. You don't have to go to a lot of stores looking for the right hose, looking for vacuum tubes. Don’t worry - these are all speculations of lazy people and people who are afraid to get down to business. The main thing is to take a balanced approach to solving the problem, plan everything correctly, draw a diagram and select the necessary materials.
Flat radiator collector
A homemade flat air absorber coated with a selective coating can be made from conventional materials and HDPE components. Polycarbonate vacuum pipes and other parts can be purchased at low prices at any hardware store or supermarket. The assembly diagram is quite simple; for training purposes, you can watch a video on the World Wide Web (there are more than enough such videos there). In fact, you can find a lot of specialized literature on this issue on the global network. If you decide to do your intended work at a high quality level, reading a certain amount of literature will not be superfluous.
The main difficulty in the assembly process is how exactly to make the coil (this is a tube in a tortuous shape through which liquid circulates, storing energy). There are several options based on which an assembly diagram will be drawn up. The easiest option is to assemble an absorber based on a ready-made coil (you can try to look for something suitable for these purposes, it is important that it is vacuum). Alternatively, a circulation system located on the back wall of the refrigerator may be suitable. The second option is to select the necessary vacuum tubes, two or three hoses, a couple of plastic bottles of water (the coolant is collected from them). To be more confident, watch the instructional video again. It is better to use copper tubes for heating water. Next, you will need to start soldering the coil itself.
Coil made of plastic pipe
The second very significant element that is included in the absorber is the top side made of transparent polycarbonate. In industrial production conditions, a polycarbonate coating is not used; the front covering is cast from a tempered glass alloy. However, in our case, we are considering a homemade air collector, the thermal design and required efficiency of which allows the use of polycarbonate, since we will assemble the device from inexpensive inexpensive materials. It is worth noting that there are assembly schemes where materials are used ranging from beer cans to the use of plastic bottles.
Polycarbonate manifold
Recommendations for installing solar systems
The more light that hits the solar collector, the more efficient it is. Therefore, it must be installed in places where there is no shadow from surrounding objects (buildings, trees and other obstacles to sunlight) for as long as possible.
The orientation of the collector receiving plane depends on the geographic latitude. In the northern hemisphere, where Russia is located, the sun shines from the south most of the time. Therefore, the collector light receiver should be directed strictly in the south direction. Due to objective technical reasons, deviations to the southwest or southeast are possible.
The solar installation angle must be set correctly. It depends on the geographic location of the area, since the deviation of the sun’s position from the zenith changes with latitude. The angle of inclination should be selected at which the minimum amount of light will be reflected from the protective glass of the collector.
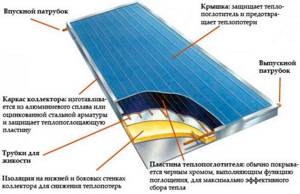
Design options
There are two main types of structures:
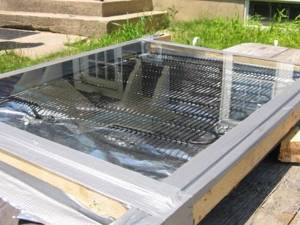
- flat solar collector;
- a more complex device using a thermal barrier in the form of a vacuum, which for this reason is called vacuum.
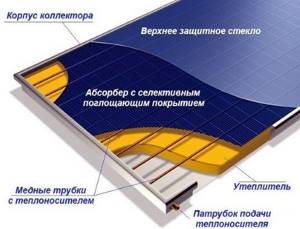
An example of a flat collector design is shown in the image:
Mineral wool is usually used as insulation. In winter conditions, when the temperature gradient of the outside air and the internal space of the collector reaches a significant value, such thermal insulation does not save from large unproductive heat losses.
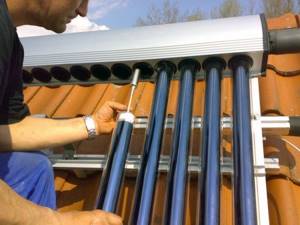
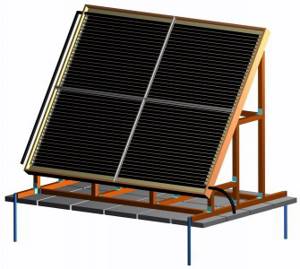
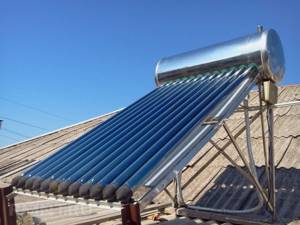
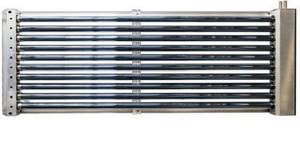
In order for the solar collector to work efficiently and in any conditions, a vacuum solar collector is used. A structural element that distinguishes it from other types of heat generators is glass tubes with a vacuum space recreated inside them. The tubes are combined into a single structure using special connecting devices and form a vacuum solar collector, a version of which is shown in the image:
The operating principle of a collector with heat pipes using heat pipe technology:
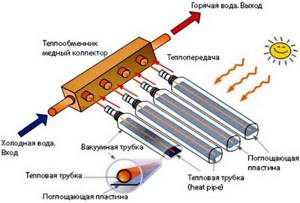
In heat pipe technology, the tube is filled with an easily evaporating substance, which, under closed pipe conditions, evaporates and rises when the lower part is heated. At the top there is a heat exchanger in which the substance of the tube condenses, giving off heat, for example, if you decide to install a solar water heater, then all the heat will be transferred to the water.
An alternative to heat pipe technology based on the type of heat transfer in vacuum tubes, a direct-flow U-shaped heat channel is widely used. A curved copper tube is mounted in a housing with a vacuum space, the ends of which have separate connections to the heat exchanger systems responsible for cold and hot flows.
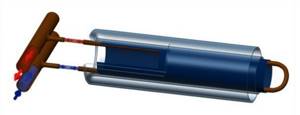
Such a tube has high performance in heat transfer, but this design will not allow replacing one faulty tube. You will have to change the entire unit along with the receiving heat exchanger.