Solar air collector from ceiling lamp housing
I think many people have come across these terrible ceiling lamps (metal boxes) that were used in enterprises. Even now they can be found in some industrial premises. But on the other hand, enterprises are modernizing, making repairs, and tens, or even hundreds of these lamps are thrown into scrap metal, which in turn, under the slogan “ useful on the farm, ” were taken away by workers.
Perhaps you have a similar lamp lying around in your household that never found its use. But there is a use for such a lamp, and it can serve to heat your home, utility room or greenhouse .
Airborne solar collector - self-installation
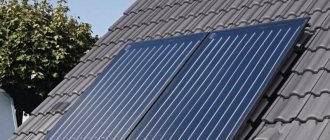
Today, among residents of private houses there is an urgent question about a functional and economical heating system. Nowadays, there is no need to purchase expensive fuel and worry about transportation. Owners are invited to take advantage of unlimited natural resources. An air solar collector is a device that converts the sun's energy into heat and supplies it to the house. It is not necessary to buy ready-made devices, like Solar Fox. You can make a heater yourself.
Modern devices are used as additional heating equipment, which converts sunlight into fuel for the room. But it guarantees the owners high-quality water heating and heating only for residents of the southern territories, where it is warm most of the year. And this is only if the collectors are quite large and placed in unshaded yards. Regardless of the type, the units operate on the same general principle.
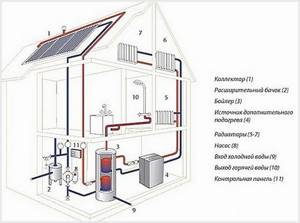
Each solar system is a system of circuits with alternate locations of devices that generate heat and transfer it to the room. The leading working parts are considered to be solar panels based on photocells.
Solar collectors only help in generating additional heat. It is unsafe to completely switch home heating to this type due to the impossibility of predicting the exact forecast and the number of days with cloudless weather.
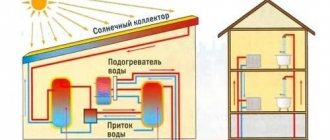
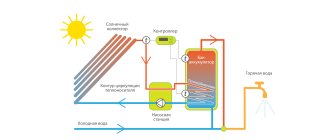
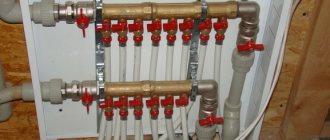
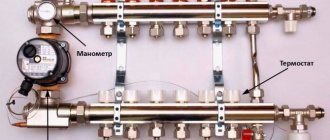
Collectors are presented as a system of pipes, connected alternately with the output and inlet lines or having the shape of a snake. Water flows through the connections (if the device is powered by water), mixed with antifreeze. Circulation is ensured by the physical characteristics of the liquid: evaporation processes, pressure changes, and others.
Solar energy is collected and processed using absorbers. This is either a solid iron plate with a matte outer surface, or a system of several plates that are connected to pipes.
To construct the upper part of the body and the lid, consumables with the ability to receive rays are used. Professionals call plexiglass, similar polymers, and heat-resistant glass quite popular materials.
To eliminate energy loss from the rear of the device, a layer of thermal insulation is placed in it.
It is worth noting that polymers are not resistant to ultraviolet radiation. As for plastic, it can be deformed due to elevated temperatures, and this often leads to depressurization of the device. As a result, the introduction of similar consumables for the equipment of the collector body should be excluded.
Owners can use water as a coolant only in systems specialized for supplying additional heat in autumn and spring. If the owner intends to use the system throughout the year, then in the very first autumn the required amount of antifreeze should be added to the water.
In some solar systems, energy is generated using air. Channels to ensure its circulation can be made from simple corrugated sheeting.
If the solar collector is planned to heat a small building that is independent of the centralized heating system of a residential building, then the most primitive structure should be built with one circuit and a heating device at the beginning of the line. The circuit is so simple that it does not need to be provided with pumps. But it can be used to its maximum only in the summer.
When connecting the collector to a double-circuit design, everything is much more difficult, but the number of days suitable for use is significantly increased. The device starts working immediately from one circuit. The main load falls on the leading line, which runs on electricity or fuel.
To assemble a solar collector, the owner can take an already drawn up diagram.
Regardless of energy producers and the number of clear days, any solar device is in great demand among owners of private houses and cottages. They are very popular among people who care about nature and try to surround themselves with environmentally friendly items, free of pollution and harmful emissions.
There are quite a few factors by which certain equipment is systematized. However, for devices that are subject to self-assembly and are used for heating premises, division by type will be more optimal. Thus, systems are divided into water and air. Most often, owners make a choice in favor of the former.
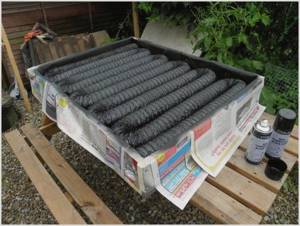
A simple steam manifold can be constructed from corrugated material. You will also need a foil insulator and a plywood panel for the box. First you need to process the corrugation, laying it in the right order. The device is painted with dark paint. Next comes the installation of inlets for air supply and circulation.
A classification is often used based on the maximum temperature to which the pipes reach.
Low temperatures. Their highest temperature is 50 degrees. Used to heat water in garden tanks, bathrooms from June to August and for comfort on cold evenings.
Average temperatures. Their heating peak is 80 degrees. They heat rooms and other buildings well. A suitable option for a private home and cottage.
High temperatures. The highest value that the device reaches is 300 degrees. It is advisable to use such a collector only for industry: factory premises, workshops, etc.
Designing a device yourself is an interesting procedure that brings a lot of benefits. It allows you to correctly use solar energy and solve a large number of significant economic issues.
The absorbing panel is made of cellular polycarbonate, painted in a dark color. The upper and lower edges of the panel, i.e., the open ends of the polycarbonate sheet channels, are inserted into pipes cut along the length.
Step-by-step instructions for the main stages of work:
- installation of an absorbent panel;
- connecting the battery to the rear wall;
- thermal insulation for the battery;
- device assembly;
- metal profile insert;
- drilling holes for connecting to pipes;
- welding of all components;
- installation of a stand for the finished device.
Professionals have always considered wood to be the simplest and most inexpensive material for making a solar collector. In construction stores, special departments offer various beams, boards, slabs, panels and other products. As for metal, it costs much more, but it is distinguished by high strength.
For each consumable, the seller must have a quality certificate, which contains a separate paragraph dedicated to the requirements for buildings and structures on the street. Products typically come with a 30-year warranty. In order for materials to last this time, you need to look at the characteristics and, if possible, purchase protective equipment.
If the owner plans to make a wooden case, then it should be treated with special impregnations and antiseptics. They will help protect the wood from insects, mold and accidental sparks.
The main principle that must be followed when drawing up the project and the practical part is the availability of materials in relation to the cost and financial capabilities of the owners. That is, are they freely available or can the collector be assembled from improvised means.
There are many that are optimal for assembly, for example, PVC or PP pipe with corner fittings. There are models made from empty beer cans. To prevent heat loss, insulation is laid on the bottom of the box. As a rule, these are foam boards or mineral wool. Today, the construction industry produces quite a large number of insulating materials for every taste.
To insulate the box, the use of foil is allowed. It guarantees both heat retention and reflection of rays from the plane.
If foam plastic or polystyrene foam board is used for insulation, then pipes and lines must be provided with grooves. The absorber is placed on top of the protection and securely attached to the bottom of the housing using a method depending on the consumable.
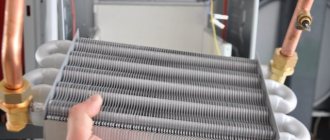
The heat receiver is an absorbent component of the structure. This is a whole system of pipes where the coolant is heated, and elements made from mostly copper sheets. The best material for creating a heat sink is copper pipes. Self-taught craftsmen came up with another alternative - a spiral heat exchanger made of polypropylene hose.
Another interesting solution is a solar system absorber made of a flexible polymer pipe. To connect all the parts together, you need to use fittings of the required sizes.
For the solar collector in the house and garage, you can find many useful parts from old household appliances. This list includes a heat exchanger from an unnecessary refrigerator, water pipes with a polyethylene base, and old batteries. A necessary aspect for performance is thermal conductivity.
For assembling a collector with your own hands, copper is considered the best option. It has a thermal conductivity of 394 W/m?. For aluminum, this parameter can vary - 202-236 W/m?.
Copper pipes have long established themselves as the best material for a heat sink. But this does not mean that others are behind them in all respects.
Under equal criteria, the performance of a copper heat exchanger will be 20 percent greater than that of metal-plastic. But the second material is much more profitable.
Any pipe, regardless of the consumable, must be sealed. They are laid in a parallel direction, or the owners can use the coil principle. By the way, this is the most reliable method because it reduces the risk of holes and guarantees more uniform air movement.
The top of the box in which the heat exchanger is located is closed with glass. Instead, you can use modern materials, such as acrylic polymers or solid polycarbonate. It is better to choose a corrugated or matte plate. Some owners cover the space with several layers of plastic film.
After construction, the structure should be carefully checked for the presence of all parts. If everything is in place, you can proceed directly to installation.
First, the owner should install a front camera. It is located at the highest point - attic, overpass, roof. Something to keep in mind here is the weight depending on the type of heater. If a water collector is planned, then its mass will be much greater than that of an air one. But just in case, it’s better to check everything again just in case.
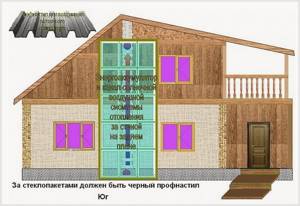
After this, the box is mounted. The most reliable and optimal location for it is the south side. And the angle of inclination should be a maximum of 45 degrees.
Then all laid pipes are combined into one system. Each of them is supplied with diameters. The smallest measures half an inch, and is used for the pressure part of the system.
To prevent energy from being lost during air movement, it is necessary to insulate each pipe. To do this, you can use polystyrene foam, basalt wool or foil. This also applies to the front camera.
A common and easily accessible option for thermal insulation of a storage tank is to build it around a plywood or plank box. The gaps are filled with insulation - slag, a mixture of dry grass with clay, sawdust.
After installing all components and insulating part of the systems, it is necessary to connect fans and thermostats. Gradually the collector will fill with air and heat up. It is definitely worth checking the operation of the valves, which will prevent air circulation during non-working hours.
An increase in temperature also occurs in cloudy weather. The heated coolant begins to rise to the top of the storage tank. Air circulation is carried out until the heat of the coolant entering the radiator is equal to the temperature at the outlet of the device.
What you will need
To make a simple solar collector from corrugated sheets with your own hands, you need to prepare the following materials:
- plywood sheets for the box. One will be used to make the back wall, the others for the top, bottom and sides. Recommended thickness is 7-8 and 10-12 mm. It is better to choose moisture-resistant material;
- corrugated sheet. The best option is aluminum, but other metals are also suitable. Since the corrugated sheet will be laid inside the box, its width and length should be 10-15 mm less than that of the plywood sheet;
- wooden beams: 40x40 mm;
- glass wool;
- mosquito net. A small rectangular piece is needed to protect the air intake hole from insects;
- heat-resistant black paint;
- fan;
- wooden boards;
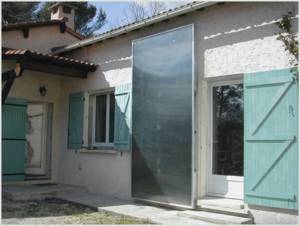
- glass Better - right in the frame. The best option: 3 old high windows, the width of which is 2 times less than the height. The size is calculated based on the fact that the glass should completely cover the box from the outside.
One of the advantages of a homemade manifold: the materials are easily replaceable. For example, instead of plywood, you can use OSB board. You should focus on the raw materials that you can find in the garage.
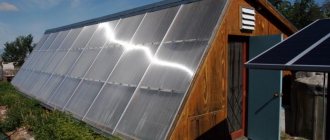
How to assemble and manufacture an air solar collector with your own hands
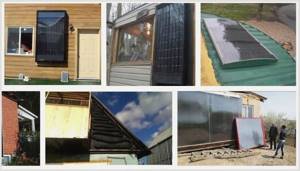
Using inexpensive scrap materials and simple equipment, you can assemble an effective airborne solar collector for heating your home .
The device works on a simple principle: the black surface absorbs solar heat and releases it to the air. While the sun shines on the collector, the absorber heats the cold home air pumped by the fans. Already heated air returns to the room - thanks to such ventilation, the temperature in the room gradually increases.
An airborne solar collector is usually installed on the roof or on the southern wall of a house, having previously made four holes with a diameter of about 10 cm, explains Yuri Dudikevich, candidate of technical sciences, author of numerous publications on energy saving and the book “Energy-Saving Cottages”.
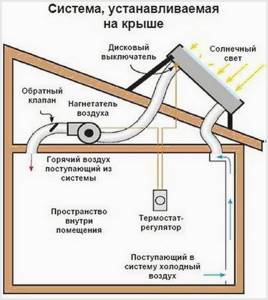
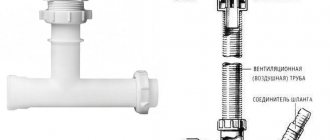
“Through the lower openings in the wall, cool home air will be supplied to the collector, heated and returned back into the room through the upper openings,” explains the specialist. “Check valves are installed at the collector outlet, which block air movement when the fans are turned off.”
According to expert calculations, an air solar collector allows you to obtain 1.5 kWh of thermal energy per square meter of area. “For example, 10 collectors, each two meters in area, can produce 30 kWh on a sunny day,” explains the Ukrainian engineer. — In December, when the air temperature outside reached -6 ° C, the total output thermal energy of the collector during a sunny day (7:00) was 6 kWh, and the efficiency was at least 50%, and in October the efficiency of the device increased to 75%."
It is better to direct the warm air from the solar heater under the floor, the expert advises. “This can be done using flat rectangular air ducts 30 centimeters wide and 5 centimeters high,” explains Yuri Dudikevich. “You can make them yourself from galvanized sheet metal, and they also have a larger surface area than round pipes and therefore transfer heat better.”
In this case, it is necessary to wrap the channels and the floor in thermal insulation, the specialist notes, adding that natural insulation made from lime and flax or hemp fires have excellent properties.
The air solar collector can be used not only for heating a house, but also for heating greenhouses, drying unheated rooms, drying fruits and vegetables, as well as wood in spring, summer and autumn.
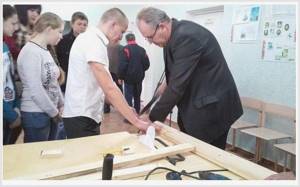
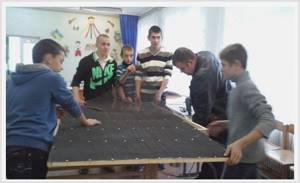
According to the expert, an air collector is the cheapest means of heating a house. “For a water solar system you have to pay at least 4 thousand euros, and an air-based analogue, which is not inferior in efficiency, can be made with your own hands for 100 euros,” notes Yuri Dudikevich. “Thanks to available materials, such devices can be assembled even during labor lessons at school.”
To make an airborne solar collector, you need basic knowledge, as well as materials and tools that can be bought at your local store or found on your own farm.
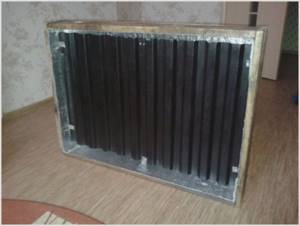
To make a solar air heater that can work in winter, you will need a wooden frame with a plywood bottom, insulating and reflective film, metal sheet, blackened mesh and a sheet of transparent polycarbonate. In addition, two fans and two check valves are needed, which are installed at the outlet of the manifold.
A plywood bottom measuring 1500x1500 mm needs to be cut into two parts: 1050x1500 mm and 450x1050 mm (connected by a strip with a cross-section of 20x40 mm) and cut four holes for the movement of ventilated air (you can use a format-cutting machine).
In the bottom, covered with an insulating film with heat-reflecting properties, it is necessary to drill two holes with a diameter of 10 cm from the bottom to take in cold home air and two holes from the top to remove hot air from the collector. “We will install fans in the lower holes, with the help of which cold air will be drawn into the collector, and later we will install check valves on the upper ones, which will block the movement of air when the fans are turned off,” explains Yuri Dudikevich.

Insulating the plywood bottom of the frame with insulating and reflective film helps reduce heat loss from the collector. The aluminized film reflects the heat rays that come from the heated absorber.
The main element of the collector is the absorber - a metal sheet painted black.
A metal mesh is nailed to the inside of the absorber, which changes the structure of the air flow created by the fans, and this entire structure is mounted to the collector frame.
“Cold home air drawn into the collector moves along the grid, warms up and becomes temperature uniform,” explains Yuri Dudikevich.
Next, we connect power to the fans and mount them in the holes that will be located below.
“Two Domovent VKO-100 fans create an air flow at a speed of 200 m3/h,” explains the expert. “The power of one fan is 14 W with daytime solar input to the collector of 3 kWh or more.”
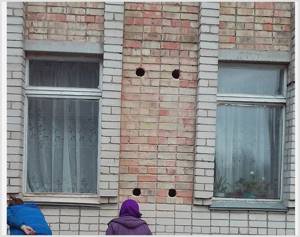
To install the air collector, you need to drill four holes with a diameter of 10 cm in the wall.

And finally, to reduce heat loss, we cover the absorber with a sheet of transparent polycarbonate, which has a protective film against harmful ultraviolet radiation.
Video: how to assemble an air manifold with your own hands from beer cans
Did you like the article? Share it and you will be happy!
Advantages and disadvantages
Air solar systems, like all human creations, have their strengths and weaknesses. The advantages include:
- efficiency in air drying;
- low cost;
- simple design.
But there are also disadvantages:
- Air collectors cannot be used to heat water;
- they are quite large (due to their low heat capacity);
- they have modest efficiency.
Note! To increase the efficiency of solar air systems, they are installed in the walls (southern, as we remember) during the construction of the building.
You can make such a device yourself, since its design, as already noted, is quite simple. This will require cheap and accessible materials (some even manage to use tin cans).
But remember: such collectors are quite large, so it is likely that you will have to build a structure that covers the entire wall.