Types of fireplace grills
In addition to the purely practical properties that a barbecue oven will have, you need to remember about its aesthetic characteristics.
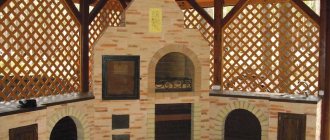
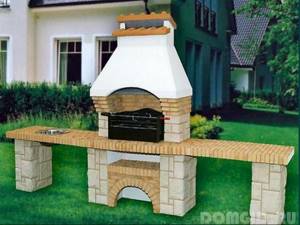
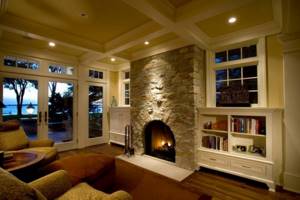
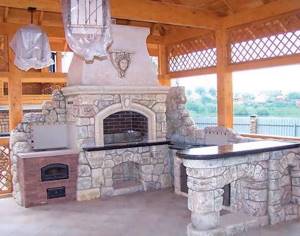
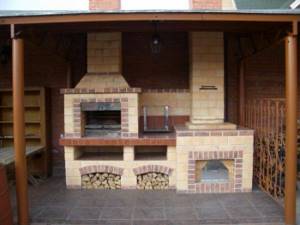
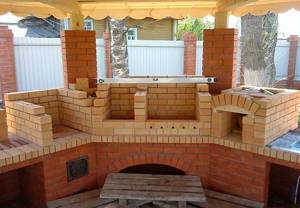
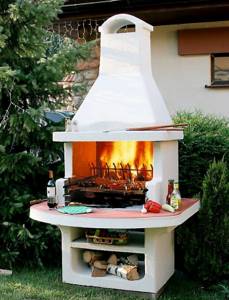
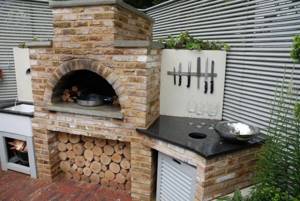
Beautiful barbecues are a real decoration of even the most sophisticated landscapes. Brick structures look especially impressive. They look great on any site, are multifunctional, strong and durable. Since fireplaces are designed to heat rooms, this factor must be taken as a basis. There is no point in heating the street, wasting firewood to no avail. It is better to adapt the grill to the gazebo, even if it is open. Some of the heat will still remain under its roof. Also a good solution is to build a brick barbecue in close proximity to the terrace.
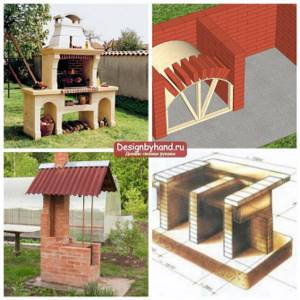
At the place of installation, fireplace barbecues can be as follows:
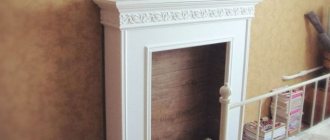
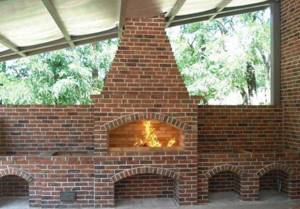
- Free-standing without canopy or chimney. Externally, they are practically no different from the simplest barbecues. The only difference is the presence of an open hearth.
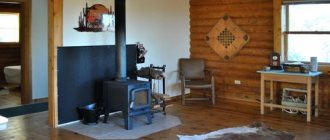
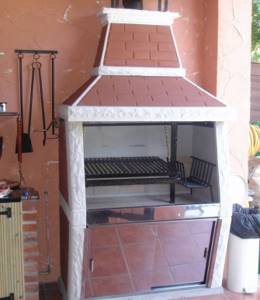
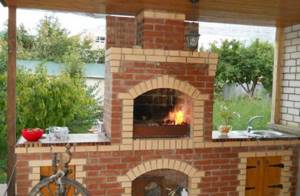
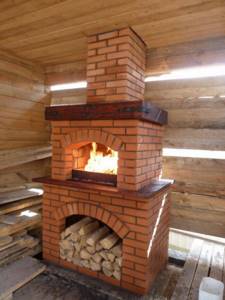
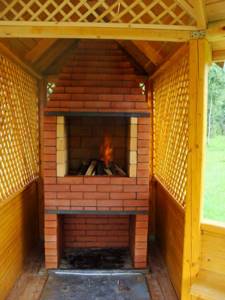
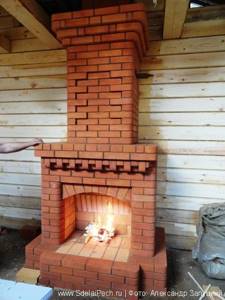
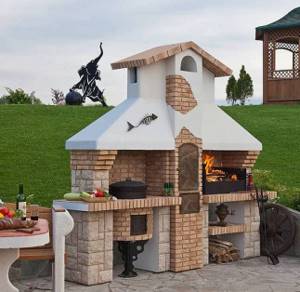
- Freestanding with chimney and roof. Such buildings look very impressive. When designed appropriately, they look like a stove from a fairy tale.
- Combined with one of the buildings on the site. Attach a barbecue to a house, gazebo, veranda or bathhouse. Less often, outdoor fireplaces and barbecues are built next to garages or sheds.
They make barbecues with a hearth made of steel, brick or stone. Metal structures are decorated with artistic forging. Stone and brick themselves look quite beautiful; they are rarely finished.
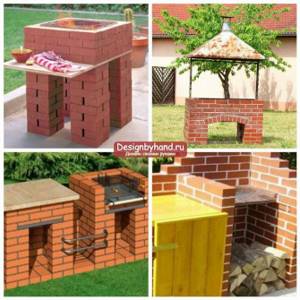
An outdoor stove can have a wide variety of shapes. Depending on the size and layout of the site, stoves of the following configuration are built:
- semicircular;
- triangular;
- square;
- trapezoidal;
- with broken lines.
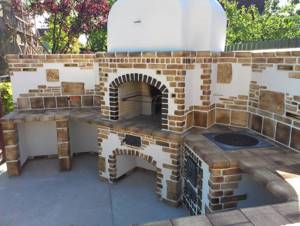
In small buildings it is better to install a corner grill. In addition to saving usable space, such a structure looks compact and neat. Tables and shelves can be made folding, using them only during cooking and feasting near the barbecue.
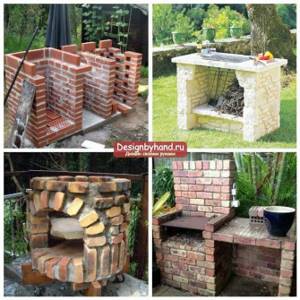
Any combined grill is done in stages. Let us dwell on the sequence of construction of this structure.
Fire is the most beautiful and dangerous element; since ancient times it has evoked special feelings in people - it brings a feeling of security, warms and creates comfort, helps to prepare food, and ultimately, it is simply pleasing to the eye. But when arranging your home or site with structures where open fire will be used, you should remember that fire has enormous destructive power and must be handled with care. Most often, stoves or fireplaces are built in private country houses, but if there is no space for it in a small building, they resort to installing an outdoor fireplace.
Content:
- Types of outdoor fireplaces video video
- How to choose the best location for an outdoor fireplace
- We comply with fire safety rules
- Design Features
- What construction tools will you need?
- We stock construction materials
- We are drawing up a project
- Procedure for performing construction work video video
- Finishing work
- Arrangement of the area near the fireplace
Types of outdoor fireplaces
An outdoor fireplace is an excellent opportunity to create an original recreation area on your site. Depending on the availability of free space on the territory and the general design style of the site, the role that will be assigned to the structure, different types of fireplaces can be used.
If the fireplace will be used exclusively for decorating the area and creating a special cozy atmosphere, then it is best to use the classic indoor fireplace option. It will have a similar architectural solution, the only thing that needs to be taken into account is that the outdoor wood-burning fireplace will be affected by precipitation. Materials for making the hearth should be chosen that are fire-resistant; brickwork is usually used as the base; sometimes they resort to using frame structures - gabions.
An outdoor fireplace can be built into a retaining wall, or it can also be located separately from any structures. An excellent backdrop for such a fireplace will be shrubs or decorative trees located behind it. Projects for outdoor fireplaces must necessarily include a high-quality chimney exhaust. You can build such a fireplace with your own hands, but you can resort to buying a ready-made hearth.
An open design fireplace, which is a rounded sheet of metal, will look no less attractive. Outdoor outdoor fireplaces are usually equipped with a barbecue and grill grate.
The location of the open fireplace can be different - it can be buried in the ground, or raised above it. To decorate the fireplace, you can use a backfill of gravel, sand or stones.
Mobile fireplaces have an interesting and neat appearance; they are practical, have a compact shape, design style and height. Such models are attractive because they can easily change location; they may include built-in shelves. Purchased or made with your own hands, such a hearth will be an excellent solution for a small summer cottage; any utility room can be used for storage.
Outdoor grill fireplaces are of particular utilitarian importance; they allow you to prepare original vegetable and meat dishes. Craftsmen build an additional element into the overall design of such a fireplace - a barbecue. You will need to build a canopy for such a fireplace; it is better to place it on an area with a hard surface.
How to choose the best location for an outdoor fireplace
In order for the use of an outdoor fireplace to bring only positive emotions and be comfortable, you will need to correctly determine the location for its construction. Often the optimal location for the fireplace is near a gazebo or patio area - the heat from the fire will warm the people who are there. Considering the most frequent direction of winds, you should position the fireplace so that the smoke from it is not blown by the wind to neighboring areas - this will help to avoid incidents with neighbors. An open veranda, terrace, or winter garden may be a suitable place. The place heated by the fireplace can be used for comfortable relaxation.
We comply with fire safety rules
Although there are no strict regulations on where exactly an open fire should be located, it is still not recommended to neglect fire safety rules. Fireplaces should not be located near buildings made of fire hazardous materials or trees. Also, you should not choose a place near neighboring buildings or a fence - the wind may accidentally carry sparks towards flammable structures.
Features of the design of an outdoor fireplace
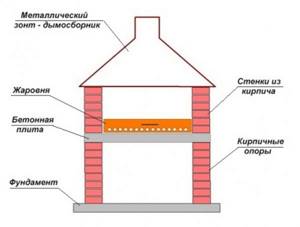
The design of an outdoor garden fireplace is very similar to that typical for an indoor fireplace and includes the following elements:
- a foundation that ensures the strength of the structure, its subsidence as a result of soil moisture, preservation of the geometry of the frame and prevents the appearance of cracks;
- a firebox designed for burning wood;
- body with decorative trim;
- chimney
Often, drawings of outdoor fireplaces are made with the addition of optional, but useful fragments, such as seating areas. It is also a good idea to place a firewood rack near the fireplace; it will help make the operation process more convenient and make the object being constructed more attractive.
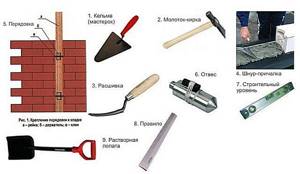
What construction tools will you need?
The set of tools for building a fireplace is not much different from the traditional one that will be required when building a house:
- different types of shovels: for digging a trench under the foundation and for mixing the solution,
- level, with its help it will be possible to maintain the geometry of the structure parameters, eliminate distortions and uneven surfaces,
- trowel for applying the solution,
- tape measure for taking measurements,
- sieve for sifting sand.
We stock construction materials
The main one will be brick; the frame of the structure and the chimney will be built from it. For work, you will need different types of bricks: fireclay - fireproof, for the construction of the firebox and chimney, for the body - baked clay. In order for the hearth to serve for a long time, it is better to buy high-quality bricks of the first or second grade. If you can’t get fireclay bricks, you will need a steel sheet with a thickness of at least 1.5 mm.
You will also need boards for formwork and scaffolding; you can opt for low-quality material. High quality clay that does not contain impurities should be used as a masonry mortar. It is clay that has a coefficient of thermal expansion similar to brick; this will prevent the appearance of cracks in the masonry when heated to high temperatures.
For finishing work and laying the foundation, you can use cement, preferably grade 500. To save mortar when laying the foundation, you can use natural stones.
We are drawing up a project

Before you create an outdoor fireplace with your own hands, you will need to draw up a project. If you have sufficient preparation, you can develop it yourself. To construct the firebox and chimney, you can use durable and inexpensive materials, and for finishing you can use a wide variety of materials at your discretion: gypsum, facing tiles, artificial or natural stone, or combine these materials. A self-invented option will allow you to give your suburban area a unique, attractive design.
The procedure for performing construction work
Building a fireplace with your own hands will require following the order of work. Let's take a closer look at each of the stages. First, we mark the place and dig a pit. Its depth can be from 15 to 30 cm, depending on the characteristics of the soil in the area. To do this, remove the layer of soil and install the formwork. Next, small stones are placed within the marked base and filled with prepared concrete mortar. Depending on what brand of cement is used, the concrete hardening period can range from 24 to 48 hours.
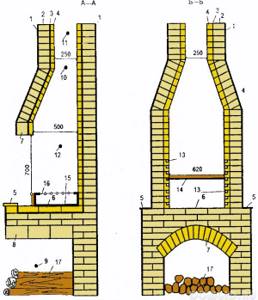
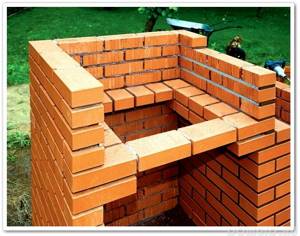
After making sure that the concrete foundation has hardened, you can begin to lay brickwork. In this case, it is imperative to ensure that each row of pores is laid horizontally and level. Fireclay bricks should be used to lay the space inside the firebox. Compliance with the rules of masonry and high-quality mortar will ensure the reliability of the structure.
Clay mortar is traditionally used for laying ceramic bricks; its structure is homogeneous in composition with brick. The proportions of the components included in the solution depend on whether it will be used for masonry or finishing work. Not one but two components can be used as a binding material: clay and cement. This option will provide greater strength to the masonry. During production, an excess of the binder component should not be allowed in the mixture - if an excess of filler imparts rigidity to the mixture during hardening, then an increased clay content reduces the strength properties. But it is not recommended to completely replace it in the solution with lime or cement.
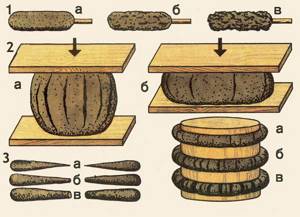
143. Determining the plasticity (fat content) of a solution with a paddle; a - low plasticity (lean solution); b - medium plasticity (normal), c - high plasticity (bold);
144. Determination of the plasticity of a clay solution using the “ball” method: a - a ball made from a solution of low plasticity (compression of 1/5-1/4 of the diameter). b - ball made of highly plastic solution (compression of 1/2 diameter);
145. Determination of the plasticity of a clay solution using the “flagella” method (on the left - by stretching, on the right - by bending around a rolling pin)
The prepared solution should be viscous and plastic, but should not crumble or be liquid. The thickness of the seams for stove masonry should not exceed 3-4 mm. The proportions of the components depend on the quality of the clay: if it is oily, then take 2 parts of sand for 1 part of the clay; if it is skinny, the amount of sand is reduced. If the sand is fine and the clay is of high quality, the proportion may change 1:1.
Additives to the solution can be made at will; these can be salt - up to 150 g per 10 kg of clay and grade 400 cement - up to 1 kg. To lay 100 bricks you will need to prepare a solution from 2 buckets of clay and 2 buckets of sand. The amount of water can be a quarter of the volume of clay. When the optimal consistency is reached, the stirred mixture will slowly slide off the shovel.
To lay the chimney, it is recommended to use a solution based on lime paste: take 3 parts sand for 1 part lime paste. To make your own lime paste, you will need to mix 1 part quicklime and 3 parts water. The work should be done very carefully - contact with quicklime can lead to burns to the skin and mucous membranes of the respiratory tract. You can buy ready-made lime dough in specialized construction stores. To increase the strength of the lime mortar, they resort to adding cement to it: add 8 parts sand and 1 part cement to 2 parts lime paste. This solution is highly moisture resistant.
To construct the foundation of the fireplace, concrete and heat-resistant concrete mixtures are used. For their preparation, in addition to crushed stone, cement and sand, fireclay sand is also used, which gives the mixture heat-resistant characteristics.
When building an outdoor barbecue or regular fireplace, you should use a beautiful masonry technique - after all, the fireplace will serve not only for utilitarian purposes - it will serve as a decoration for the site. After completing the masonry, all air bubbles should be removed from the mortar; for this purpose, jointing is done. The firebox is left to dry for 48 hours.
Next, the finished chimney pipe is installed or the chimney is laid out of brick in accordance with the project. It is necessary to comply with the requirements of building regulations - only this can guarantee high-quality smoke extraction from the firebox. A shelf must be installed to reduce the backdraft force.
The next step is to fix the fireplace slab, which is the open part of the firebox. The stove must be installed in accordance with all the rules, because... it is a very important fragment of the fireplace. Experts recommend applying the solution to the surface on which the slab will be installed in strips, the distance between them should be 2 cm, the thickness of the mortar strips should also be 2 cm. The slab should be laid level, and when laying, use a mallet with a rubberized striker. The slab should lay flat, without protruding above the level of the firebox.
To give the fireplace an attractive look, an arched design is often included in the design. It complicates the construction process somewhat. Construct arches using templates.
First, knock down a wooden panel of the appropriate size. A semicircle is cut out in it, and a plastic, tin or metal strip is attached to the end. The template is raised, wedges are placed under it, and an arch is erected. Particular attention is paid to tightly fixing the last brick - it is used as a wedge. Upon completion of the construction of the arch, the wedges are removed and the template is dismantled. A correctly folded structure will not collapse.
Finishing work
Having chosen the finishing style and prepared the facing material, you can begin to improve our building. If stone is chosen as the facing material, then a distance of 5 mm should be left between the fragments. The stone should not be fixed at the joints of surfaces with an angle of 90°: the first fireplace stone is attached to the corner, the second is attached with a protrusion of 3 cm, so that their edges meet. It will take no less than 24 hours for the solution to harden after cladding. After constructing the fireplace, you cannot immediately start using it - it must stand for several days and dry well. It is recommended to choose dolomite or basalt as the cladding material. It is undesirable to use rubble granite on surfaces where temperatures can reach over +80 degrees.
Arranging the area near the fireplace
To make the area near the fireplace comfortable for use and attractive in appearance, you will need to work on its design. For example, if an outdoor barbecue fireplace is equipped with firewood, then the areas above them can be tiled. They can be used as working cutting tables, or decorated with vases and beautiful crafts.
The cap of the structure is often given a cone shape; it looks quite attractive. It will also be useful, after several weeks of completion of construction, to coat the surface of the barbecue with a special varnish. The area around the fireplace is laid out with paving slabs.
An outdoor fireplace built according to an original design will decorate a suburban area for many years and fulfill its utilitarian functions.
Author: Sergey and Svetlana Khudentsov
10
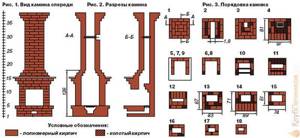
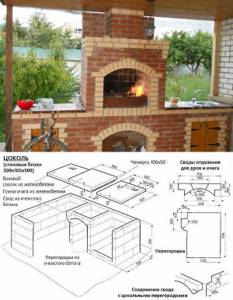
Brick barbecue projects: drawings, photos
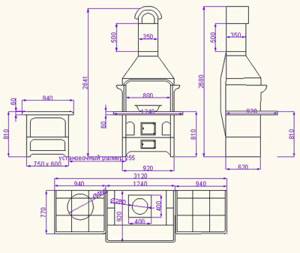
Features: the length of the firebox should not exceed 1 m - this is enough for 8-10 skewers at a time. The width should be consistent with the length of a standard skewer - 47-62 cm. The height of the frying area is ideally just above the waist of the person who will cook.
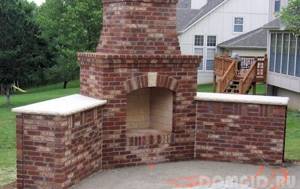
Since a stationary barbecue often becomes the central decorative element of a site, this should be taken into account when designing and choosing a location. Its reverse side looks like a solid brick wall, so it is advisable to position the structure so that it is not visible from the reverse side. Or provide for its decoration taking into account fire safety.
Installation of beautiful decorative fireplaces for the home
Before you start building your brainchild, we recommend that you familiarize yourself with its structure.
So, the fireplace consists of:
- A firebox made of fireclay. This is where a miracle happens—fuel combustion.
- The portal is located outside the firebox and creates a decorative load.
- The grate, which is located under the firebox and helps the combustion process occur, supplies air from below to support the fire.
- An ash pan is a metal compartment that serves as a collection point for ash.
- The area in front of the firebox prevents sparks from the fire from falling onto the floor in front of the fireplace, and also serves as a decorative element.
- Hailo is the first source of smoke in front of the chimney.
- Gate valve for regulating air supply.
How to make a barbecue out of brick with your own hands at the dacha - step by step instructions
A lot depends on the model you choose to build a barbecue with your own hands, and not just the quantity and quality of bricks you will need. Some people think that since they are involved in such an interesting construction project, they need to choose tips on how to make a barbecue out of brick with your own hands in the country, step-by-step instructions
, which concern large, multifunctional ovens.
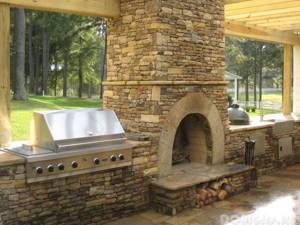
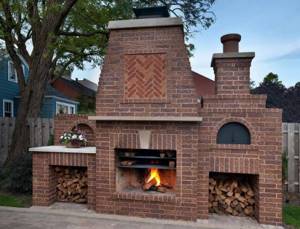
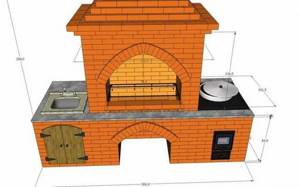
This includes a fireplace for baking dishes in heat-resistant dishes, a tandoor for preparing delicious oriental dishes, a built-in barbecue grill and, last but not least, a large grill that can accommodate a dozen skewers.
Moreover, all such splendor takes up not only a lot of space, requiring a canopy or a full-fledged gazebo with a barbecue, but also requires a significant, strong foundation, the construction of which is as important a point of work as laying out bricks.
That is why always evaluate your daily or weekly needs before choosing a model and tips on how to make a brick grill with your own hands. Step-by-step instructions with photos
in this case, it can stretch either over several pages, or it will literally take several photos if you settle on the simplest, but quite functional model.
The barbecue structure itself, if you still want to make it look like a stove and not a metal model, is similar to all similar structures, such as a do-it-yourself fireplace.
There is a ash pit that provides draft and oxygen flow for the combustion of coals, there is a place for burnt ash, the so-called ash pan, there is a chamber for direct combustion of firewood and the formation of coals, as well as a hole for a pipe, brick or metal of your choice.
All components are made of brick, only its quality depends on your budget. A compromise and the most popular solution is to build the “hottest” part of the structure - the combustion chamber - from refractory fireclay bricks, and lay out the rest with red brick, which is approximately 3-4 times cheaper than fireclay bricks.
How to make a simple brick grill with your own hands step by step instructions
To figure out how to make a simple brick grill with your own hands, step-by-step instructions
We will definitely find it useful, as well as photo or video lessons from those who have already walked a similar path.
There are several stages, all of them are quite important, because without proper planning and a masonry scheme, you will have many questions during the work process, and if you do not build the foundation correctly, it will not be strong or level enough, then all the work will go down the drain in a few years and the building will have to be redone.
A simple barbecue in its structure is quite similar to a barbecue for a summer house. After all, the most important thing for him is the hearth, inside which the firewood will burn, turn into coals and give off its high-quality heat to the skewers with food, which are located above. All this does not require complex diagrams at all, so for how to make a barbecue out of brick with your own hands, quick step-by-step instructions
will not take very much time.
For a simple model we choose a strip foundation, this way you can save a large amount of mortar and reinforcing elements. Trenches are dug in the shape of the future masonry, formwork is laid out with old boards or pieces of slate, into which metal mesh or rods for reinforcement are laid and the whole thing is filled with mortar. The screed takes from several days to a week to dry according to the technology, depending on the composition of the dry mixture; it is better to withstand this period so that the screed does not crack. When the site is ready, we begin laying out the bricks, guided by the order scheme that you came up with initially, or that you saw on the Internet. It should indicate both the location of the bricks and their type, so as not to get confused. At the end of each row, while the solution has not yet set, we use a level to check the evenness of the masonry; this is a mandatory procedure.
If the design provides recesses, a place for laying out a barbecue grill, ventilation holes or a small auxiliary tabletop, then all this is done immediately, without waiting until the last row is laid. At the end, you need to decide whether to leave the grill in the same form as you put it together or decorate it like a country architectural object.
The decoration can be decorative plaster (of course, you should choose a special composition for working with high temperatures), facing bricks, tiles imitating natural stone, and even natural stone itself.
Types of outdoor fireplace
Such structures can be divided into several types. To build an outdoor fireplace with your own hands, use the same materials as to build a home fireplace. Only in the open air it is easier to carry out work and the possibilities are wider. So:
- Barbecue oven. This oven allows you to cook many dishes, it is popular (see Do-it-yourself barbecue oven - methods and options). There are two ways to cook food on a barbecue: sear the food from the side and from the bottom. Therefore, there are several ways to manufacture such structures. The best ones are those that use both methods. They allow you to adjust the degree of frying and cooking speed. Such a furnace can be made in a stationary or portable version. If you are a big travel lover, then you are better off doing the second option.
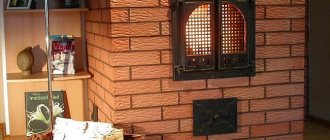
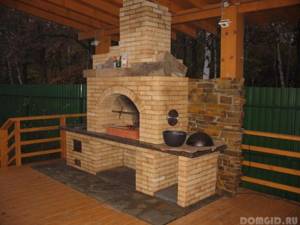
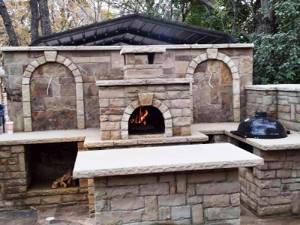
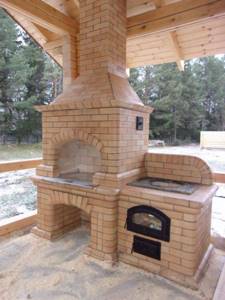
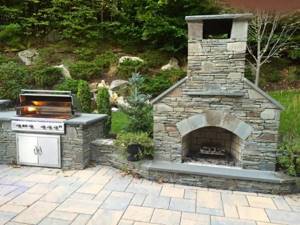
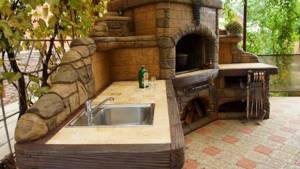
An example of an outdoor stone fireplace
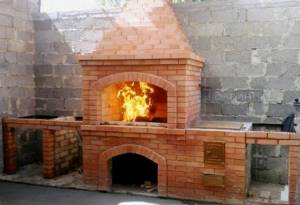
- You can make an outdoor fireplace with your own hands in the form of a brick barbecue. This will turn out to be a stationary oven in which you can perfectly cook shish kebab. You can also stew and fry food here.
- You can make an outdoor fireplace with a smokehouse with your own hands. Special ventilation holes are used here to distribute heat evenly.
Outdoor fireplaces and barbecues are widely used today; there are many modifications of them. They will always allow you to cook healthy and tasty food outdoors.
What materials are used?
Outdoor fireplaces, which are equipped with a barbecue or barbecue, can be made from the following materials:
To build a furnace you will need the following materials:
- brick;
- stone;
- metal;
- concrete blocks.
There is also a scheme for constructing stoves from clay, cinder block and some other materials, but in any case a certain level of resistance to high temperatures should be ensured (for example, using heat-resistant finishing elements).
Unlike heating devices that are located inside the house, the requirements for outdoor installations are increased. They must be built from high-quality materials that can withstand the negative effects of the environment.
Selection of materials
An outdoor fireplace can be brick, metal or even stone . Which material to choose? It all depends on the preferences of the owner, the availability of materials and the purpose of the structure itself. The construction of barbecues made of stone is quite common, since such a structure will be the most durable, reliable and durable. However, it is quite difficult for a novice builder to build one; in addition, the stone structure is quite massive and heavy, so it will require pouring a strong and durable foundation.
Brick is a more popular material for the construction of outdoor stoves; a brick structure can be erected much faster than a stone one. However, when choosing a brick, it is important to focus on its quality. The choice of low-quality materials can significantly reduce the service life of the structure, and the decorative functions of the structure will suffer.
The least bulky and complex is a metal fireplace. Such a structure is much faster to construct and is very easy to build with your own hands.
Spit and other devices
In order to provide maximum functionality to your brick barbecue, it should be equipped with as many accessories as possible. A banal device for preparing barbecue is not worth starting a grandiose project on the scale of a country house.
In the process of laying a fireplace for picnics, it would be nice to also provide a spit on which you can cook a whole small lamb. A device on which you can hang a cauldron would also be useful. In other words, a barbecue oven should become your summer kitchen, only much more functional.
In the process of laying the side walls of the portal, somewhere at the level of the fourth or fifth brick, you need to make recesses in the bricks on both sides opposite each other.
To ensure that they do not move relative to each other, a pipe is threaded into the recesses, which must remain there until all work is completed. Today, many people have beautiful stoves in their dachas, but not many people have one in which you can take and roast a wild boar on a spit.
Design and installation of a portable outdoor fireplace
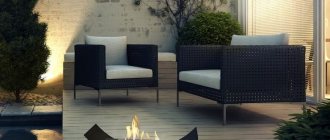
And finally, a modern, practical version of an outdoor fireplace can be called a portable version, namely the European “Fire pits”. The design of a portable fireplace is a container on stable, low legs. The portable fireplace is covered with a lid - a mesh that does not allow ash and sparks to fly away.
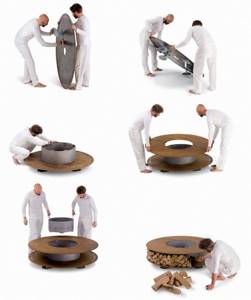
To install a portable fireplace, it does not require the creation of additional platforms or a powerful foundation, much less the construction and installation of a smoke collector. You can install a portable fireplace on any flat area.
If desired, a portable fireplace can be turned into a barbecue or grill. Installation of a garden barbecue fireplace is carried out independently from elements and blanks that fit perfectly into grooves with each other. This is exactly what is shown in the proposed video.
Recommendations from experts
The following tips will help improve the quality of the design and the aesthetics of its appearance:
- round the sides of the stove - this will make it look more attractive;
- lay the ash pit made of bricks, with the edges cut at an angle (45°) - the ash will crumble freely during operation;
- to shrink the bricks, use a rubber hammer - this is effective and does not damage the material;
- install doors so that you can open them with your left hand (for left-handed people with your right hand);
- When installing stove fittings, use a level;
- For a firebox made of fireclay bricks, lay them on edge - the space will be used efficiently and food will cook faster;
- Fireclay bricks and ceramics should not come into contact - be sure to lay basalt cardboard between them.
To set up a barbecue with a brick stove, you will have to spend a lot of time and effort, but the result will pay for it all many times over. A well-organized design will last a long time, and it can be used to prepare a variety of dishes.
Self-construction of a mini-fireplace for a summer residence
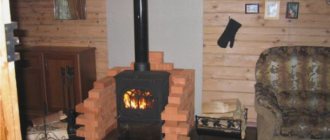
The construction of this heating device for a country house is distinguished by its simplicity. The only difficult process is covering the firebox. When laying a fireplace tooth, some irregularities are allowed, since it is lined with a sheet of metal, accordingly, all inaccuracies will be hidden.
A wood-burning mini-fireplace is suitable for use in the autumn-winter season, but coping with a frosty winter will be problematic for it. But in warmer periods, this device will heat a room with an area of 16 to 20 m². One of the obvious advantages of a mini-fireplace is its low cost: purchasing all the necessary elements will cost about 5-8 thousand rubles.
One of the most suitable materials for constructing a fireplace is high-quality red brick. Work begins with laying ten rows of the back wall. In the next two levels it is necessary to make an overlap the size of 1/4 brick. When laying the side walls, you need to provide a turn at an angle of 25 degrees, while leaving vertical channels. In the third row you need to make holes to provide passage for cold air. This contributes to additional heating of the room.
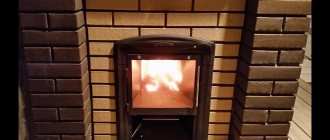
On the back wall of the firebox in rows 11-12, protrusions are provided to form a smoke tooth. Four metal pins are also mounted here, which will hold the inclined stainless steel screen. The back wall can be made of treated brick.
The dimensions of the fireplace at the base, excluding the chimney, are 1020x510 mm, height – 1120 mm. The cleaning door is installed on the back wall, which allows you to clean the fireplace tooth from ash and soot.
The design of this mini-fireplace for a summer house is slightly different from the original, which was proposed in the original source. In our case, the arch that covers the fuel chamber is made of 9 bricks, and not 7, as was originally specified. In the presented project, the gaps between the bricks of the arch have been reduced. The central brick has non-standard dimensions and is quite narrow.
We lay the walls
Laying a stove with a barbecue or barbecue with your own hands must comply with certain rules:
- the firebox must be laid from heat-resistant materials that can operate normally at elevated temperatures;
- the construction of the device body can be carried out using ordinary materials;
- under the stove body you need to build a strong and level base from several rows of bricks. The evenness of the podium should be checked using a building level;
- the walls must be laid with ligation of the seams;
Arranging a classic outdoor fireplace
- during the construction of the walls, it is necessary to install grates that will supply the outdoor fireplace with the necessary amount of air;
- fasten the stove door to the masonry using welded embedded parts;
- starting from the sixth row of masonry, build a base for the combustion chamber. Lay the brick crosswise so that a small part of it protrudes. This is useful for attaching barbecue nets or if using a grill;
- The wall thickness depends on the dimensions of the stove and ranges from 120 mm to 250 mm.
Construction of a brick fireplace
To build an outdoor fireplace with a barbecue or barbecue with your own hands, you need the following materials and equipment:
Stove maker's tool kit
- concrete mixer;
- shovel;
- bucket for solution;
- building level;
- cement;
- trowel;
- roofing felt;
- sand;
- crushed stone;
- heat-resistant and ordinary bricks;
- metal gratings;
- any finishing material for lining the furnace body.
The walls of the furnaces must be laid using cement-sand mortar. The optimal proportion in this case is 1:3, where one part is cement, three parts are sand.
To build a combustion chamber with your own hands, use a special heat-resistant mixture, which is sold at any hardware store. You can also prepare this composition yourself. To do this, you will need to mix cement, sand, table salt and a special plasticizer. The solution according to this recipe will have no less strength. It will be able to withstand high temperatures when burning wood.
Table of approximate compositions of cement-lime mortars
To lay a chimney with your own hands, it is best to use a sand-lime mortar. To do this, prepare lime dough and mix it with sand filler in a ratio of 1:3.
Construction design
The basis for the success of any event is competent planning, the correct choice of building materials and strict adherence to technology and safety measures during work. Initially, you need to decide on the place where the stove will be installed. After this, you should draw up diagrams and drawings of each element of the barbecue.
The paper displays information regarding the following structures:
- foundation;
- the order of each fragment;
- fireplace;
- frying oven;
- chimney;
- roof.
If it is planned to create a universal frying complex, then an oven, a smokehouse and a hob with a hole for a cauldron are additionally developed. A washstand, sink and cutting tables are provided.
Based on the data obtained, construction materials are calculated. They are purchased with a small margin of 10-15% to cover errors in calculations, defects and damage during transportation.
Order and layout of masonry
https://youtube.com/watch?v=oylkEIHYiII
Having removed the formwork and waited until the concrete has hardened, the most important stage begins - laying bricks. Markings are applied to the slab, indicating the dimensions of the future structure. You need to apply the level again and make sure that the surface is horizontal. If significant errors are found, they are eliminated.
Rows from the first to the fourth must be laid with a spoon dressing. In front of the fifth row, a 40x40 mm corner is placed on the front side - it will act as a kind of support. To create bases for the pallet and shelf, the sides of the fifth row are placed with a tying bandage.
The spoon dressing should be followed when laying rows six to eight. Row number nine is made in the same way as row five to form supports for the table top and grille.
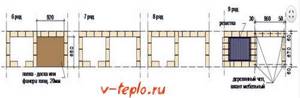
At this point, the construction of the table can be considered complete. Next, the barbecue oven with your own hands will be built only from the roaster side. Bricks are laid again using a spoon bandage from the tenth to the fourteenth rows. In front of the fifteenth row, a metal corner is again placed on the front side, acting as a support for the stove vault. The fifteenth row is laid.
1f8683af01cdd717f398a2a01b5a2186.jpe

5b6027f1fd565a39b7d9f054b8937253.jpe d4c248074f8a46e4f1b275d8d06f7af7.jpe
Then you need to arrange a gradually tapering vault. It can be done by alternating the splint and spoon ligaments, gradually moving them to the center. In the sixteenth row, stitching is done on the front side, spoon stitching is done on the sides. In the seventeenth row, on the contrary, in the eighteenth row we change again. The resulting protrusions can be arranged according to their purpose.
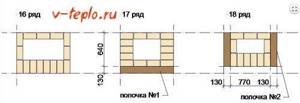
From the nineteenth to the twenty-first rows are laid with spoon masonry.
The twenty-second poison begins the pipe. In the twenty-third row, the necessary narrowing is made and work continues in the same sequence to the desired height. The higher it is, the better the traction will be.
In the penultimate row, windows are made to remove smoke. The last row will be laid completely.
The work can be considered completed. While the solution dries, all that remains is to think about the exterior finishing and reliable protection from the vagaries of nature.
We recommend reading the instructions for making a false fireplace with your own hands
Finishing work
It is necessary to install shelves, a finishing countertop, a frying grid and a tray for coals. The latter is made from a sheet of steel with folded edges. The minimum side height is about 5 cm.
You can take the grate from your old oven or buy a new chrome model. The main thing is that it fits in size. Tabletops and shelves are made of moisture-resistant material.
The top of the pipe should be covered with a stainless steel roof. This will protect the smoke windows from rain. The monolithic slab is covered with tiles or porcelain stoneware to prevent moisture from penetrating inside.
You can build a full-fledged gazebo around the barbecue stove, the canopy of which will cover the structure
It is very important that flammable objects and materials are located away from brick walls, which become very hot.
By welding the smoking chamber, the functionality of the stove will expand.
Video instruction
Conclusion
Building a barbecue oven with your own hands is not difficult if you plan each stage competently and slowly and prepare well for the work. The most important stage is masonry. The longevity of the service of the entire structure will depend on the quality of its implementation.
f865172a8d51505597d87f00badffcfb.jpe
Detailed instructions and order
It is easier to build a fireplace with your own hands if you have a detailed description and photo of each installation stage. There are several stages that are followed during construction. Carrying out the work step by step, you can build a country stove-fireplace with your own hands.
Create a drawing
Regardless of the shape and configuration of the structure, the first thing they do is create a sketch and drawing of the future fireplace. Adhering to the scale on a piece of paper, draw the design, indicating all the elements of the device
It is important at this stage to choose the cladding. For example, if you plan to embroider the outer part, you will need red ceramic brick
And if the cladding will be done with tiles, then choose a more economical option.
What are frame houses and what are they made of?
Preparatory work
When installing a fireplace in a living room, cover all furniture and the floor with plastic wrap in advance. If the premises are not residential, then this is not done, but after construction work, they simply wash and clean everything thoroughly.
The next step is the construction of a foundation, on which the reliability of the structure depends. The foundation is made separate for the fireplace, rather than shared with the house. If the construction is being done in a residential building, then carefully remove the floor in the place where they plan to build a fireplace. It is made 6 cm larger than the structure itself.
They dig a hole 60 cm deep, fill it with 15 cm of crushed stone, fill it and form a base. The foundation is given 7 days to dry. Before building a fireplace, the bricks are first laid out dry without using mortar.
Note! During the process of laying bricks “dry”, each stone is numbered. This will allow you to build the fireplace faster.
Laying out the fireplace
As soon as the foundation has dried, lay out roofing material in two layers. For the first row of masonry, cement is added to the mortar in a ratio of 20% of the total volume of the mortar. The first brick row is laid edgewise. The equality of the diagonals is determined using a tape measure.
Continuous rows are built using a trowel. The chimney and firebox are built manually. The solution is applied to the middle of the brick. If there is excess solution, remove it with a damp cloth immediately before it dries.
After the foundation, a firebox is made. A grate is laid on the bottom, then rows of firebox are erected and the door of the fuel chamber is secured. To securely fix it, the door is placed on a metal mustache and laid between the rows. The blower is built on the fifth row.
The next step is the arch. Regardless of the design of the fireplace, steel corners are used when constructing the arch. Bricks are attached to them, and when facing they are hidden. When building an arch, the bricks are placed in a wedge.
Construction of a chimney
Whether smoke enters the room or not depends on a well-built chimney. If the smoke exhaust duct is round, then the draft is better, but if it is square, it is worse. The walls are made smooth so that soot does not form and smoke easily passes through the pipe. The chimney itself is made vertical, less often at an angle. In this case, the angle of inclination is no more than 30 °C. The size of the pipe depends on the size of the structure and the outlet channel. The minimum cross-section is 14x27 cm. A cap is installed at the top of the chimney, which protects it from precipitation and other parts.
Cladding works
If you build a regular or mini-fireplace with your own hands, then finish it with cladding. Decorate the outer part of the structure in several ways:
- Plaster. First, tighten the mesh and install U-shaped brackets. Drying oil is applied to protect against corrosion. The first layer of 5 mm plaster is applied to the warm wall. The second layer is applied after the first has dried. The thickness of the layer is made thicker than the previous one. The third layer is made with a thickness of up to 15 mm.
- Coloring. Use a chalk or glue solution.
- Drywall. It gives the fireplace a rectangular shape. First, a metal frame is made, and drywall is sewn onto it.
- Decoration.
Note! When painting the outer part of the fireplace white, it is recommended to add blue to the paint. Then the paint will be more snow-white.
With the help of cladding, flaws that arose during the masonry process are hidden. If the work is done well, you don’t have to do any cladding.
Construction work
Since the masonry of the structure is done with wet bricks, it must be dried before lighting the fireplace. They do this for 6-7 days. Open the combustion door and ash chamber. Then the fireplace is lit to dry, but the temperature is not raised to maximum. During the second week, the structure is heated every day, without raising the temperature to the maximum.
c4d4067ce0701a4076ea6b6cb6ff2af6.jpe
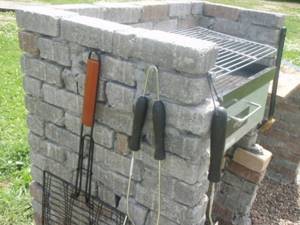
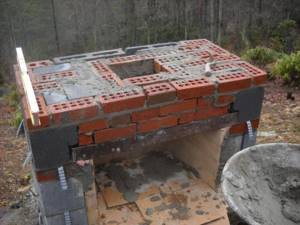
Block barbecues
Popular barbecue model made of blocks and bricks
Portable block grill
We removed two blocks and now it’s no longer a grill, but a barbecue
The main feature of this project is that you can always disassemble it, put it in the back of a car and transport it wherever you need it. Since there is no mortar, glue, nails or anything like it in its design, the block grill can be easily moved with minimal effort. You can install it anywhere and forget about it, as the design is weather-resistant and requires no maintenance at all. How to build a grill, I think, instructions are not needed.
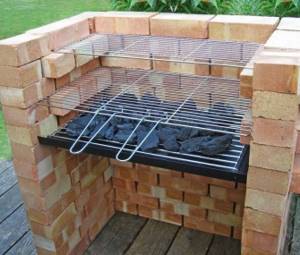
If we're talking about blocks, check out a few more options. Here is a collapsible barbecue grill made from blocks with a shelf. It can be assembled like a construction set, anywhere, and after a picnic, it can also be disassembled and stored in a shed until the next event. But it is advisable that you have a permanent area lined with tiles or stones; usually there are always crowds around the grill, everyone wants to see how meat is fried, proven by practice. Therefore, it is not a bad idea to provide a paved path, it can be made of the same material as the site, then you have a chance to preserve the lawn.
And here is another barbecue made of blocks, complete with a bench made of the same material. If you put cushions on the bench and hang a couple of lanterns, you’ll get a very cozy place. And, most importantly, you can make all this beauty yourself. Everyone loves barbecue, and if you decorate everything with imagination, it will delight your family and guests, but in fact, you don’t need to do almost anything, just drag the blocks around for an hour :)
Here's a step-by-step tutorial on how to make a BBQ grill out of blocks. This is a stationary structure with finishing and an upper frame. However, for such designs there is no need for instructions; you can put together any combinations yourself. Photo source www.woohome.com/diy-2/cool-diy-backyard-brick-barbecue-ideas
Grill smokehouse made of blocks
Or this kind of grill and smokehouse, on which you can cook a lot of things at once. This project is labor intensive, but simple and can be completed in just one day. The job doesn't require a lot of skill—it's not like you'll be stirring anything or inserting rebar supports—but you do need to be precise when laying the foundation.
All materials are available, although sheet metal will likely be the most expensive component, so take the time to shop around.
The main thing is to make a plan.
First, sit down and decide what size grill you want. The author decided that he needed a 1.5 x 2.5 m barbecue, which, of course, commands respect. After this, you need to decide at what height the work surface will be, so to speak. In this case it is 60 cm.
Next, you need to think about where you are going to place the holes to place the charcoal. For a grill this large you will need holes at both ends. This is needed for two purposes. First, heat is needed at each end to distribute it evenly across the entire surface. Secondly, having two holes on opposite ends will help with temperature as you can now control the air flow.
Regarding materials. The quantity will naturally depend on the size. In addition to the blocks and metal grating, you'll need a metal roof—corrugated metal roofing is used to cover the pit during cooking. This material can be purchased at most hardware stores, but you won't cook on a galvanized surface as it releases toxins. However, it works great as a coating without any danger of contamination.
Yes, there are also metal corners, they are needed to support the block and as supports for the grille.
Step-by-step photos of production:
Photo source caughtsmokinbbq.blogspot.co.uk/2011/10/how-to-build-bbq-pit.html
Features and advantages of corner fireplaces
Placing a fireplace in the corner of a room dates back to those times when it served more of an applied role than a decorative one. Since it was necessary to heat several rooms using a heating device, the location at the intersection of the walls was the most advantageous both from the point of view of heating engineering and from a purely practical side. A corner fireplace could be installed in a small room, where a full-fledged heating unit simply could not fit.
A corner fireplace creates an atmosphere of comfort, warmth and well-being in the house
In addition, homeowners were attracted by the price of building a heating device, which was significantly lower than when installing a classic fireplace configuration. This is due to the fact that the corner design requires the construction of only one facade, while wall-mounted models also require side walls. Of course, in the first case, much less material will be needed, and construction time is reduced by almost half. Although in our time the fireplace has lost its exclusive purpose, the trend towards optimizing space and costs during its construction has remained.
All corner fireplaces can be divided into two groups:
- symmetrical designs;
- asymmetrical fireplaces.
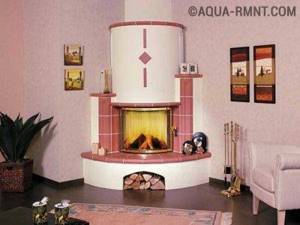
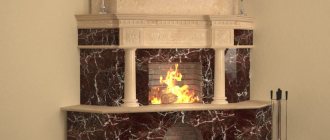
Symmetrical fireplace with a semicircular portal
In the case of a symmetrical installation, the bisector of the angle runs exactly in the center of the portal of the heating device and visually divides its firebox into two equal parts. In this case, the front panel can be laid out either in a straight line or in the form of an arc or broken line.
The combustion chamber of an asymmetrical fireplace is shifted to the side and often ends up opposite one of the walls. The heating device itself resembles a wall-mounted stove with an open or closed firebox, and its portal is complemented by a side wall. It is often replaced with a metal or stone column, resulting in a unique design.
Corner fireplaces have virtually no disadvantages, while their features predetermine a number of design and operational advantages.
- Versatility. Heating devices of this type can heat rooms with an area of more than 100 square meters. m, therefore suitable for small country houses and large country cottages.
- Space saving. Installing a wood-burning heat generator in a corner of the room will significantly save space. Symmetrical models with a concave-type portal allow you to optimize space as much as possible.
- High thermal power. The heat from the fireplace spreads not only by convection, but also by radiation. This allows you to raise the room temperature from 0°C to +20°C in just 1–2 hours.
- Installing a heating device in a corner allows you to heat three rooms in the house at once.
- Possibility of constructing a firebox of any configuration.
As you can see, this design has many advantages. As for the negative aspects, corner models in this regard are no different from wall models. An open fuel chamber does not allow for complete smoke circulation, since the draft is only sufficient to remove combustion products through a direct channel. Due to the fact that most of the heat goes outside along with the smoke, the efficiency of corner fireplaces rarely reaches 20%. There can be no talk of heat accumulation either - when wood burns out, the walls of the stove quickly cool down.
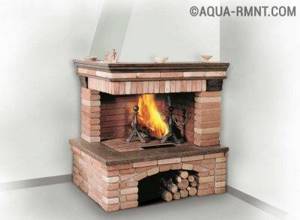
An asymmetrical corner fireplace looks stylish and elegant
The fireplace is simply irreplaceable on rainy autumn days - its ability to pass a large amount of air through itself will help maintain the humidity of the room within optimal limits.
Do-it-yourself stove installation
Before starting work, the installation location, the layout of the brick stove, and the availability of all building materials are clarified.
The foundation is planned first; how deep and wide it will be depends on your plans. It also depends on the plans whether a concrete platform will be built near the stove, what additional functions the outdoor stove will perform, and what material will be used.
For masonry you will need the following: sand, cement, crushed stone, rubble, reinforcement, refractory bricks, facing tiles and a trowel.
Roofing felt is spread on top of the concrete foundation in two layers; it will serve as a barrier to moisture. You need to lay them in a checkerboard pattern, the standard laying is half a brick.
Add clay as a binding solution, so it will be resistant to high temperatures, and if you use only cement and sand, the structure will crack.
Check each row with a horizontal level. In order to fasten the walls together, reinforcement or a metal corner is taken.

122054a47c82abd08dd6051beb95a47b.jpe
After the installation is completed according to your drawings, you need to treat the seams - cement mortar is made and rubbed into the seam. Afterwards, when the solution has not yet dried, you need to remove the excess and embroider with the means at hand.
You can use a pipe as a chimney or lay a brick chimney, gradually reducing the width of the pipe from the stove.
A stove in the yard, just like a home stove, requires care; you need to constantly keep it clean, since with each subsequent cooking, cleaning will become more and more difficult, and the appearance will be spoiled.
Any owner will want to be proud of his construction in a private house or country house. Because it will always be in sight and constantly in use. Having spent a small amount of money on building materials, you will forget about the unstable collapsible grill and enjoy your vacation.
Making an outdoor fireplace
Today we decided to tell you how to build a wood-burning outdoor fireplace-barbecue with barbecue. The manufacturing cost is not that high, and if you do the work yourself, this will further reduce the cost of the entire structure.
Choosing a place
This is a fairly powerful stove that will require certain conditions for installation. We must also take care of fire safety and convenience. So:
- Do not install the stove near wooden buildings or in bushes. The place should be open and well ventilated.
Attention! When choosing a place, take into account your neighbors; smoke from cooking can directly enter the door of a neighbor’s house. And then the holiday can end in tears. Take care of your nerves and your neighbors!
- Do not install a wood-burning outdoor fireplace in a low area. If it rains, you may end up in a puddle. Give preference to elevation.
Tools and materials
To build a stove, you need to prepare material and tools. The set will not be so large and, perhaps, any owner will have one. We will need to purchase:
- Brick. Determine the quantity according to your size. Just keep in mind that the firebox will need to be lined with fireproof material.
- Cement.
- Clay.
- Fireclay powder.
- Spacious capacity.
- Kelma.
- A shovel.
- Construction level.
- Construction square.
Making the foundation
Outdoor fireplaces and stoves, like most stationary brick structures, begin to be built from the foundation. This is the basis of the structure. It should not sag in bad weather and should reliably support the weight of the entire structure. So:
- First, let's draw a diagram of what we want to get in the end. After the location is chosen, we stretch the nylon thread along the foundation placement points. We dig a hole at least 70 cm deep.
Making a trench for a strip foundation
Attention! You should immediately take into account the width of the masonry. The hole should be 10 cm wider from the wall. Don't forget about this.
- As a rule, in the manufacture of such a structure, a conventional strip foundation is used. After preparing the trench, fill the hole with crushed stone. You can use all unnecessary stones from the site in your work.
- After this, we need to spill the crushed stone with a solution. To do this, we take a larger container and pour sand and cement into it. For cement grade 300 we use a ratio of 1:3. Start adding water to the dry mixture and mix. To do this, it is better to use a drill with an attachment. With this simple device you can quickly and efficiently prepare a solution for pouring the foundation. Bring the mixture to the state of liquid sour cream. The presence of clots and stones is not allowed.
- After preparing the solution, we pour the foundation and compact the crushed stone. We give the structure time to harden properly.
Attention! If you decide to make a large and very heavy stove, then you will need to reinforce the foundation. To do this, reinforcement should be placed in it at the filling stage. It needs to be spot welded in the form of a lattice. This will provide the necessary rigidity to the foundation.
Laying an outdoor fireplace
The design of an outdoor fireplace is not fundamentally different in all modifications. There can be only one installation instruction; adhere to the basic rules and requirements in construction. There are different modifications of this design, but the principle remains the same:
- Making a solution. Pour sand and cement into the container, as described earlier. However, the following is worth saying and should be taken into account. When in contact with fire the temperature is high, it is best to add clay and fireclay powder to this solution. Fireclay should be added to at least 10% of the total volume of the mixture. It will give the required heat resistance. If you only use a mixture of sand and cement, then it will simply crack after a couple of warm-ups. It is best to take cast iron containers for making the combustion chamber and line them with bricks.
- In areas of high temperature, it is best to use refractory bricks for masonry.
- Let's start laying. First we make a solid plane of brick. It should be perfectly smooth.
- First, we cover the foundation with roofing felt. It will provide the necessary waterproofing of the building.
- We lay the first row with a whole brick. Here you need to strictly monitor the level of the masonry, which must be perfectly parallel to the ground. To do this, use a level. It is best to use a long one so that it reaches from one wall to the other. Then you will get the desired alignment of the structure.
Attention! Throughout the entire masonry, you need to ensure that the corners are made correctly. Use a level and square. Before starting masonry, you should lay out all the elements to dry and check the correct installation. You should never lay a brick directly on top of the mortar.
- The following rows should be placed with dressing. That is, each subsequent row should overlap the seam of the previous one. You can start laying the second row from half.
- When installing the stove, you should install grate bars every couple of rows. To do this, air will flow through them into the combustion chamber and ash will fall out. To do this, we place the grate bars on a brick and outline them with a pencil. After this, we take a grinder with a circle on the stone and make a reduction in the masonry. It should be the depth of the grate and a couple of cm wider. After this, you should lay the grate and make sure that it does not rest against the brick.
- When installing the doors, you need to weld strips of metal to their frame for fastening. These will be mortgages, with the help of which the fastening to the masonry will be carried out.
- The door frame is treated with asbestos cord before installation. This will ensure the desired tightness and will not allow smoke to penetrate. We make mortgages like this: we weld two tires on each side and after that, during laying, we put them in the seam between the bricks. Then they will be securely fastened;
- Approximately from the sixth row, you should begin to form a support base. This can be done by laying bricks crosswise. Then half a brick will protrude beyond the masonry. You can put a frying rack here. For it, also prepare a place according to the dimensions.
One of the options for making a support base
Making a chimney
Like any stove, an outdoor fireplace needs smoke removal. Therefore, you should install the chimney correctly to make your stay nearby comfortable. Moreover, the smoke will be emitted much higher from the ground level, and therefore the possibility of installation site increases significantly. For such structures, it is best to use modular chimneys. It will provide the necessary removal of exhaust gases and is easy to install. Such designs are available for free sale. They have the necessary insulation, and their fastening is quite simple, which is provided by clamps. This work can be performed by a person for the first time. When installing it, the following principles should be followed:
- The installation of the chimney should always begin from the unit itself.
- When fitting the elements, they must be fastened tightly enough. No gaps allowed.
- The depth of fastening of the elements must be at least half the cross-section of the pipe.
- The connections must be freely accessible, which will ensure timely cleaning of the elements.
- Joints are not allowed in walls and partitions. Please take this into account when installing in outdoor kitchens.
- The chimney is mounted on external walls with a distance of at least 2 meters.
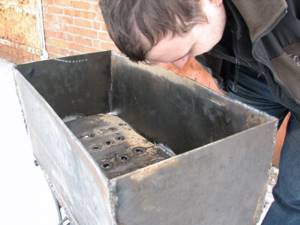
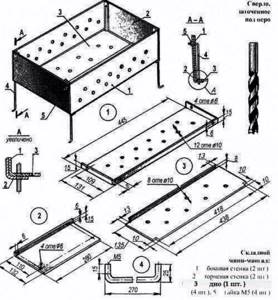
Instructions for making a portable barbecue
The model of a collapsible barbecue consists of four legs, walls with holes and a bottom. You need to think over and draw your option in advance.
The list of required tools includes:
- grinder,
- welding machine,
- drill and drill bits,
- mounting hardware.
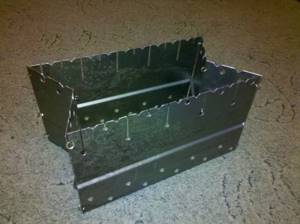
Step-by-step instruction.
- On a sheet of metal it is necessary to measure and draw the bottom and walls.
- The metal “pattern” is cut out using a grinder, the edges are folded and connected with a weld.
- Drill holes for air.
- You can make slits on the walls for fixing skewers.
- The easiest way to make support legs is from a metal corner, welding (or screwing) them to the base of the box.
Walling
If you lack experience, it is recommended to use the developed diagrams for the construction of a barbecue. They do not carry any secrets, just to get a strong firebox with the ability to install a grate and a brazier, you need to properly tie the bricks. After laying 2-3 layers, you will have to take a short break, otherwise the weight of the entire fireplace will fall on the bottom layer of the mortar that has not yet hardened.
The process of laying an outdoor fireplace
So, after the foundation has completely hardened, you can begin laying the barbecue.
- The structure is made of half a brick, as it is not subject to heavy loads. Complex fireplaces are already being built in brick. Strength will be created by the staggered laying method. It involves shifting all the bricks by half a brick cyclically.
- When forming one row, before moving on to the next, do not forget to insert fastening elements for shelves and grids. For this purpose, metal products or bricks are used, laid perpendicular to the row and forming protrusions inside the firebox. If this nuance is overlooked, you will have to dismantle the entire grill.
- The fryer is mounted on the completed fasteners. It must have holes through which the air necessary for combustion will flow.
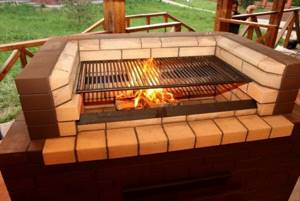
Steak grill
The considered variant of the firebox structure is the simplest and can be complicated by closed structures. But you should not start your first independent work with complex options, because the complication leaves a certain imprint on almost all parameters: the formation of a row, jumpers, the number of rows, etc.
Features of the construction of small country fireplaces
When choosing the optimal size of the structure, it is necessary to take into account the area of the room, the wishes of the owner himself and, of course, be guided by the general fire safety requirements. There is an established standard to ensure correct use and maximum operating efficiency.
Let us dwell in more detail on each of the elements of the device and their technical characteristics.
Firebox
The standard size of the opening in the firebox of a mini-brick fireplace is 50x40 cm. Of course, you can choose the parameters as you wish, but you still shouldn’t go beyond the designated limits.
Firebox
The depth of the firebox should reach 30 cm or more, which is necessary for the safe operation of the chamber. Some experienced craftsmen in this case use a little trick: they make a protrusion in the firebox of the upper beam bridge by about 5-6 cm in relation to the vertical axis. In this case, the depth of the combustion chamber will be less than 30 cm.
Walls and heat transfer
The small fireplace has two heater channels located on the side walls. They provide increased heat transfer. When wood burns in a fireplace, cold air from the room enters the channels of the 2-3rd level, heats up there and returns to the room through the holes in the 13-14th row.
Choosing a place for a stove with a brick grill

When deciding on an outdoor grill, you need to take into account many details. One of them is the right choice of location.
One of the important points is the direction of the smoke. If it constantly ends up in the neighboring area, then it will definitely not be to everyone’s liking. To check, you need to light a fire and trace the direction of the smoke.
For a brick kiln to be safe, you need to build it taking into account:
- distance from trees and other plantings;
- distance from buildings - smoke should not reach them;
- remoteness of other flammable objects;
- protection from wind and rain - a canopy can be provided;
- artificial lighting or the possibility of providing it so that you don’t have to cook in the dark.
You might think about installing a brick oven near the gazebo or building such a structure in the future. In warm weather, you can gather in it - the owner does not need to stray far from the food being prepared, and the fresh air will only whet your appetite.
Important points when installing a fireplace outdoors
To ensure that your outdoor fireplace is safe for you and your neighbors, consider the following points for its installation:
- It is not recommended to install it near bushes, trees or wooden structures. This can be fraught with negative consequences.
Fireplace in the courtyard on the site
- It is best to choose an open space for installation that will be well ventilated.
- You shouldn't put a fireplace in a low area, because if it rains and you have to cook, you might just end up in a puddle.
Projects of brick barbecues with a stove
The brick barbecue project with a slab is another important stage and the next step after finding the right place. First you need to think about the configuration and dimensions of the future stove. It’s better to start with a sketch to visualize everything clearly.
You can draw up a project yourself, find a ready-made version on the Internet, or contact specialists. The drawing is important for clarity and determining the sequence of work and calculation of materials.
Brazier oven with closed stove
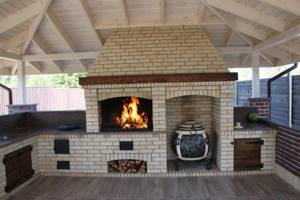
A grill with a closed hob is equipped with walls on the sides and back. The stove will only be open from the front. At the same time, such a grill can be equipped with an oven.
The closed-type cooking stove is attractive because it makes the food special. Cooking is reminiscent of a Russian oven.
Brazier oven with open stove
A brazier with an open stove is attractive because less material is required to construct the structure. Another advantage is more space. There is nothing above the stove, so you can use containers of any height.
Finishing and additional work
To decorate a stone fireplace, it is customary to use sandstone or shell rock. These stones are able to serve and maintain their appearance due to their low thermal conductivity and the ability to withstand even significant temperatures. Those who prefer to build a fireplace in a Scandinavian style are recommended to use rougher and more austere stones: sandstone, dolomite, limestone and others. you can use small pebbles or medium to large boulders. To better equip a fireplace in the garden, it is still worth building a roof and walls around it to protect the structure from wind and precipitation.
If you refuse to create additional buildings, then a special protective cover should be a completely reliable protection against various weather conditions for the fireplace. Which is most often made of metal. As it was many years ago, wood is considered the best fuel for fireplaces. However, recently, prices for them have become very high, thereby making the tree almost inaccessible. In this regard, the use of other, alternative types of fuel has actively begun. Among which are:
- wood pellets;
- peat;
- coal briquettes;
- coal.
To ensure normal combustion of all types of fuel, special grates must be provided in the structure of fireplaces, through which a good supply of oxygen inside the firebox will be ensured. Then combustion will occur stably and evenly.