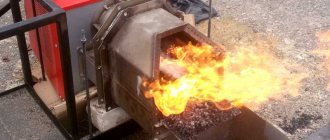
What is a Babbington burner?
The design of a Babbington liquid fuel burner is simple enough that you can make it yourself in a home workshop. The exhaust burner has the following main components and parts:
- waste container;
- fuel line;
- fuel pump; included in a fuel line break;
- hemisphere with a small diameter hole;
- an air nozzle opening into this hole;
- tray for draining fuel.
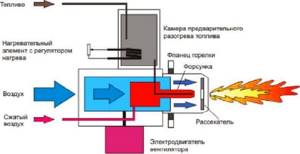
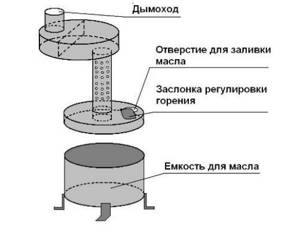
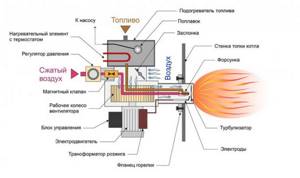
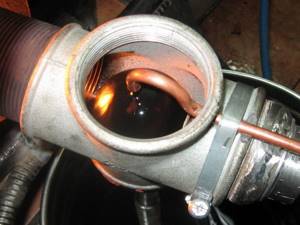
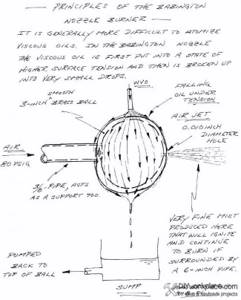
Burner design diagram
The fuel line ends at a certain height above the hemisphere, the waste flows down it and evaporates, the vapors are drawn into the air stream, forming a fuel mixture. The fuel that has not had time to evaporate falls into the pan, and from it through the pipe system back into the fuel container.
Despite the apparent simplicity of the device, for its effective and, most importantly, safe operation, it is necessary to accurately manufacture the main parts and correctly position them relative to each other. Therefore, it is better to download ready-made drawings of the Babington burner and follow the dimensions indicated in them.
How is oil supplied to the burner?
Oil supply in Babington burner.
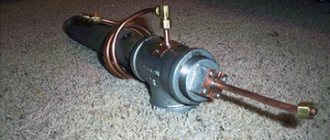
(Click to enlarge) A homemade oil nozzle is made using a lathe. The base requires a rod with a smooth shank.
It is required to secure the hose to the oil supply. When a flexible oil supply is provided, we cut a thread in this place.
More than half the length of the rod will be occupied by metric threads. The pipe has a diameter of 16 mm. A hole is drilled along the entire length of the nozzle, which will come into contact with the transverse part, which is installed below and has a diameter of 3 mm. This part is ordered from professionals, or if you have the skill to work with a lathe, it is done with your own hands.
The principle of operation of the nozzle is that the viscous waste flows out of the hole that was made in the transverse part and is captured by the air charge. The fuel disperses into small drops, making their ignition much easier.
Principle of operation
In most known oil burners, the oil-air mixture is supplied through a nozzle under pressure. In contrast, in the Babington system, oil is supplied by a low-pressure pump and flows freely over a surface shaped like a sphere or close to it. The fuel forms a thin film and evaporates, carried away by a stream of air supplied under pressure into a small (up to 0.3 millimeter) hole in the center of the sphere. Oil vapor and air mix, forming a torch of the fuel mixture. This torch is ignited and heats what needs to be heated - the walls of the furnace or the liquid heat exchanger of the boiler.
Some of the oil does not have time to evaporate and burn and flows below the hole, ending up in the fuel collection pan. The waste then flows from the sump into the fuel tank and is reused.
To increase the fluidity and volatility of the mining, it is heated. The heated waste is sprayed into droplets of a smaller volume, which also improves the quality of the fuel mixture and the overall efficiency of the device.
How to make a working burner
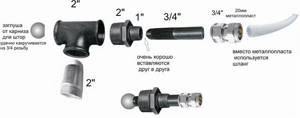
To make a waste oil burner with your own hands, you will need:
- crosspiece for water pipes with internal thread, 2 inches in diameter;
- a piece of two-inch pipe with a cut external thread, 15-20 cm long;
- copper tube with a diameter of 10 millimeters for supplying fuel;
- metal tube for air supply;
- compressor 2-4 bar;
- oil pump;
- fittings for connecting the fuel line;
- valve for the fuel line to regulate fuel flow;
- hemisphere - a brass furniture handle or spherical nut.
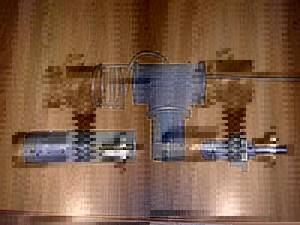
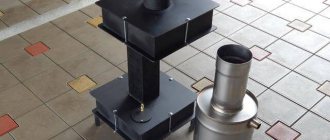
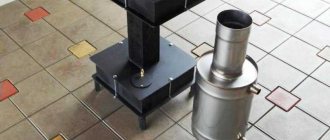
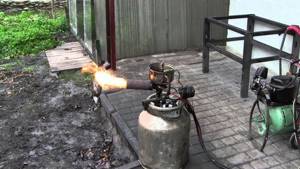
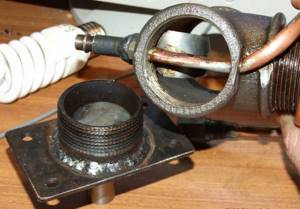
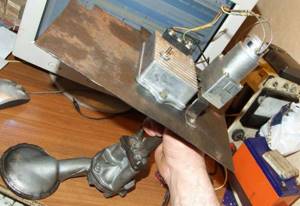
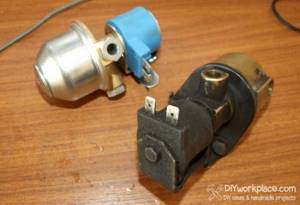
Parts for assembling the burner during testing
The pump will fit from any car or motorcycle; its drive shaft will need to be connected to an electric motor. It is best to take the compressor from the refrigerator - they are adapted for long-term operation.
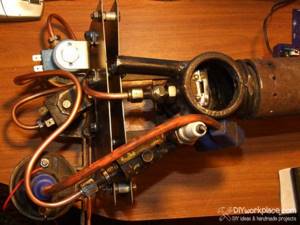
The tube is screwed into one of the holes of the crosspiece, and a plug with a hemisphere attached to it is screwed into the opposite hole so that it is in the center of the crosspiece. At the rear, an air supply tube is connected to the hemisphere through a plug.
A fuel line is attached to the upper hole of the cross, from which waste will drip onto the hemisphere. The lower hole leads into a tray to collect unburned oil. All the main components of a waste oil burner, assembled with your own hands:
- cross assembly;
- compressor;
- fuel tank;
- pump;
- power supply and control unit;
fixed on a frame welded from angle steel.
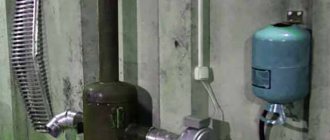
Do-it-yourself burner
Do it yourself
The process of making a Babington burner is not very complicated and, if you have all the necessary materials and tools, it will only take a few days, depending on the skills of the person.
To manufacture this unit you will need the following materials:
- steel tube DN10,
- metal tee with a diameter of 50 millimeters with internal thread;
- a metal sphere (or hemisphere) with a diameter of less than 50 millimeters;
- copper tube DN10 at least one meter long;
- metal elbow DN10 with external thread;
- a bend with a diameter of 50 millimeters with an external thread, a length of at least 10 centimeters;
You will also need a minimum set of tools:
- angle grinder (grinder) or hacksaw for metal;
- perforator;
- special chuck for thin drills;
- drill;
- drill with a diameter of 0.1–0.3 millimeters;
- soldering iron;
Preparatory stage
Before starting assembly, you need to make a hole in the sphere (hemisphere). This is one of the most difficult and critical stages, since the hole must be made exactly in the middle. Otherwise, the burner torch will be directed to the side, which in turn can negatively affect the quality of the product and its efficiency.
In addition, drilling holes of this diameter is a difficult task, since thin drills can break. Therefore, this process must be carried out carefully and slowly.
Step-by-step instruction
Babington burner
Once the sphere or hemisphere is ready, you can begin assembly. It is very simple and consists of several simple manipulations:
- The metal squeegee will act as a nozzle. It is cut to the required length and screwed into the tee. After this, a hole is drilled in the side of the burner, large enough so that the jet can be ignited through it.
- On top of the tee, closer to the nozzle, a hole is made for a copper tube through which fuel will be supplied to the device.
- to the copper tube to connect the fuel line.
- A copper tube makes several turns (2-3 will be enough) around the nozzle. They must be done at some distance from the drive. This will allow the oil to be heated to the desired temperature before it hits the sphere.
- In the sphere, at the opposite end of the small hole, another hole is drilled along the outer diameter of the steel tube. The tube is hermetically inserted into the sphere. This is necessary so that the air exits only through a small hole, and pressure is created inside it. If a hemisphere is used instead of a sphere, then the tube is soldered at the small hole and sealed.
- From the opposite end from the nozzle, a metal tube with a sphere is inserted into the tee. She is fixed in it.
- Thus, the burner is ready for use. All that remains is to connect a compressor to the tube with the sphere, which will pump air into it and a fuel line to the copper tube.
- If desired , this system can be improved by connecting a pump to supply oil. You can also install a control unit with control sensors. This will make this system automatic and more secure.
https://www.youtube.com/watch?v=y-fOHSJONHc
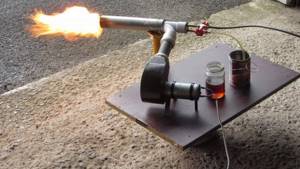
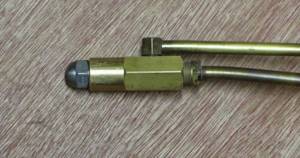
Making a burner nozzle during testing
The nozzle is the most important design element of a do-it-yourself burner for testing. The precision of its manufacture determines the fuel efficiency and safety of the system. The larger the nozzle hole, the more powerful the burner will be.
In addition, it is very important that the air intake channel is even and smooth - then the shape of the torch will be optimal. The best option would be to use a ready-made jet with a hole of the required diameter, for example, from a gas stove or carburetor.
But you can also drill a hole on a drilling machine. The use of a hand drill is not recommended due to the difficulty of ensuring hole alignment.

A hemisphere can be made from a furniture handle of a suitable diameter or from a hemispherical nut. The nozzle must be mounted flush with the surface of the hemisphere. In the most extreme case, they simply use a strip of metal bent on the rule with a jet welded to it.
The power of the resulting burner can be estimated in advance with a known error. A burner with one 0.3 mm hole can produce approximately 16 kW of thermal power. If more power is required, then it is better not to increase the diameter of the hole, but to make several of them, at a distance of at least 8 mm from each other. Practice has shown that from an opening larger than 0.3 mm, the air flow becomes turbulent, captures waste vapors worse, and the thermal efficiency of the device decreases.
Read also: What is the temperature of a hair dryer?
Furnace add-ons
When making a drip-type furnace with your own hands, you must remember that it can be supplemented with some elements. This will allow the structure to be used for heating several rooms at once. The stove will have this functionality if it is connected to the heating system. Initially, you need to install a tank for heating water, which must be connected to the system, only after that the return line is connected. Thus, the installation will not only be able to heat rooms, but will also allow heating water and cooking food. A design of this type has many advantages, one of which is its small dimensions, which allow the stove to be dismantled in a short time and then installed in another place. You will definitely need to equip homemade drip-type furnaces with your own hands with a chimney, the height of which should not be less than 4 m. Make sure that the chimney is devoid of horizontal sections. In order to be able to clean the pipe, which will have to be done once a week, you need to equip the element with a system that will allow dismantling.
Read also: Channel 10p dimensions GOST 8240 89
The history of the appearance of waste engine oil burners
Exhaust burners became widespread in our country in the second half of the 20th century. The population was looking for an inexpensive way to heat their premises.
The use of mining, which cost practically nothing, was very profitable compared to the purchase of coal, firewood and even peat, not to mention heating with gas or electricity. More or less economical and safe devices came out of the hands of home craftsmen.
The principle of their operation was reminiscent of the well-known kerosene gas, which ran on kerosene. The kerosene was evaporated, and its vapors were burned in a separate pyrolysis chamber.
The main problem with such devices was strong soot and a strong unpleasant odor due to incomplete combustion of fuel. To avoid this, the fuel was first decomposed into fractions at high temperatures, and then these fractions were burned separately.
In 1969, English inventor Robert Babbington received a patent for his stove, originally intending it to run on diesel fuel. After the patent expired, the design became available for repetition by both industrial enterprises and home craftsmen. A homemade waste oil burner of the Babbington design is much more economical and safer than other burner designs.
Design Features

Do-it-yourself drip-type furnaces are made on the basis of two combustion chambers, which involves combustion of fuel twice during the operation of the structure. In the first chamber of an installation of this type, the combustion process of waste oil takes place, which is accompanied by the release of a significant volume of flammable vapors. As soon as these vapors arise, they enter the second compartment, in which mixing of oxygen and combustible gases occurs. The resulting mixture begins to burn in the second chamber, which is accompanied by exposure to significant temperatures and the release of a large amount of heat.
When making a drip-type furnace with your own hands, you need to choose the right place for its installation. Due to the fact that the operation of the structure is accompanied by combustion of fuel at fairly high temperatures, it is necessary to take care of safety rules that do not involve installing the structure in a place that is ventilated.
Advantages and disadvantages of a liquid fuel burner
The Babbington design burner has a number of advantages:
- Simplicity of design, no moving parts.
- Availability for making at home.
- Availability of well-calculated and accurate drawings on the Internet.
- Exceptional cheapness of fuel. Enterprises that own a large fleet of automobile and tractor equipment will be able to significantly save on heating and at the same time on the disposal of used oil.
- High energy efficiency. Other burners during processing consume significantly more fuel per kilowatt of thermal energy.
- Small dimensions allow the burner to be built into existing heating systems without significant modifications.
- High degree of fire safety.
In addition to these advantages, the burner also has a number of disadvantages.
- Sensitivity of the fuel path to contamination. The work will definitely have to be filtered.
- Requires power to operate the fuel pump and air compressor.
- Unpleasant odor during work. It is better not to use the burner in premises where people or farm animals are permanently occupied, or it will be necessary to ensure reliable removal of combustion products.
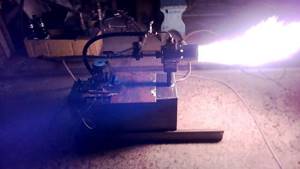
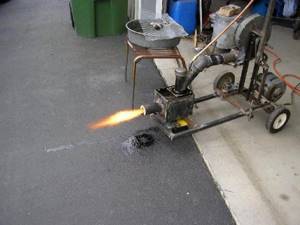
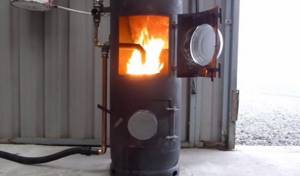
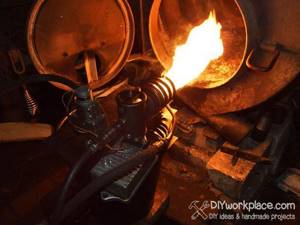
Burner being used at home
Overall, the advantages far outweigh the disadvantages, and the Babbington burner is becoming increasingly popular.
If you find an error, please select a piece of text and press Ctrl+Enter.
In this article we will look at how to make an exhaust burner for boilers with your own hands from scrap materials. Every motorist often has a question about where to dispose of used oil. After all, you can’t pour it on the ground - it harms the soil, but you can make a burner that will be fueled with waste. After all, this material is an excellent fuel; the main thing is to provide all the conditions for its high-quality combustion.
Structural diagram of a potbelly stove using waste oil
At the moment, we can distinguish 2 types of homemade furnaces for burning waste, which are actively used by most garage owners:
- a simple potbelly stove with a secondary afterburning chamber;
- oven - dripper.
Note. There are also homemade universal stoves that can alternately operate on wood and waste oil. But they have a number of significant shortcomings and shortcomings, which is why we cannot recommend making them at home.
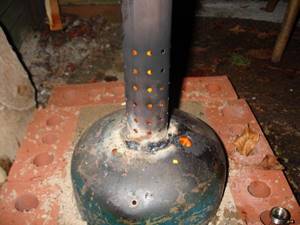
The simple potbelly stove using waste oil, shown in the photo, has the most common design and is found in almost every garage. The reason for this popularity is the ease of manufacture and operation of the heater. It works simply: the fuel in the lower tank, after ignition and heating, releases oil vapors that burn in the primary chamber. Combustion air enters through a damper installed on the exhaust fill hole.
Through holes in the afterburner pipe, secondary air is supplied to the furnace, due to which the released pyrolysis gases are burned in the upper chamber. There, heat exchange occurs between the metal walls of the chamber and combustion products, after which the latter leave the potbelly stove through the chimney. The design diagram of the furnace is shown in the figure:
Although such heaters are very simple, they have several unpleasant disadvantages:
- practice shows that on cold days such a stove is not enough to heat the entire garage. Only the corner where it is installed and the space around the chimney pipe are heated;
- the unit is fire hazardous, as many motorists have become convinced of. As soon as there is a bit of water in the process (which often happens), the furnace begins to shoot splashes of burning oil;
- During ignition and the first minutes of combustion, the potbelly stove emits acrid smoke into the room.
For those who are not deterred by such little things, we will tell you how to weld this stove for heating a garage. You will need sheet metal 4 and 6 mm thick, as well as a pipe with a diameter of 100 mm and a wall thickness of 4-5 mm. Holes are drilled in the pipe, and blanks are cut out of metal, as shown in the assembly drawing of the potbelly stove:
Assembly is carried out by electric welding. Considering the fluidity of oil, close attention should be paid to the quality of the welds, and at the end they should be checked for permeability, having first removed the slag. How to make a simple miracle - an oven - is shown in the video:
Combustion conditions
In order for a homemade burner to work during mining, several requirements must be met. In particular, oil will burn best when heated and atomized. It is not difficult to fulfill these conditions; the article provides several options for burners that have a powerful flame of fire, and most importantly, a large amount of thermal energy is released.
It should be noted that it is allowed to fulfill at least one condition - to provide heating or atomization. True, the efficiency will be somewhat less.
Homemade burners: requirements
Homemade devices can be used for any purpose. Very often they are installed in liquid fuel stoves or universal boilers. During manufacturing, it is important to make a nozzle capable of producing a powerful flame. Requirements for the burner that must be met first:
- Low electrical energy consumption.
- Easy to install and easy to use.
- The burner must have high operating efficiency.
- The homemade product should work well even when using low-quality and contaminated fuel.
Burner features
In order to burn the oil effectively, it will need to be heated first and then sprayed. For this purpose, an electric heating element is installed. But the energy consumption will be quite large. And the main thing for you in manufacturing is to achieve minimal losses when using the device. The burner must be a source of very cheap heat, which cannot be realized when using heating elements.
If you can’t warm up the oil first, you need to try to atomize it. The simplest burners made according to the Babington scheme can be successfully used in boilers. The design is extremely simple - fuel flows over a spherical surface. A thin hole is made in the latter; compressed air is supplied through it. It turns out that the oil is blown away from the sphere, small drops are formed, which can be ignited.
Burner operation
The article shows a simplified diagram of the burner, which allows you to understand the principle of its operation. After spraying, the mixture is ignited, and the flame is used for some purpose. You can install this burner in a boiler running on any type of fuel. In principle, no one is stopping you from making a boiler yourself. Please note that there is practically no evaporation during operation - all processes take place at low temperatures, the main role is played by compressed air.
Read also: Hidden fastenings for wooden structures
To make combustion more efficient, you can make a heating system, just use a low-power heating element in it. In this case, efficiency will increase, heat transfer will improve, and the flame will have a beautiful and even flame.
Materials required for making a homemade injection gas burner:
- *roofing gas burner;
- two pieces of black pipe 40x3mm (length: 40mm, 50mm);
- one piece of black pipe 25x3 (length: 155mm).
* - a lot of people bother and make a burner from a bunch of plumbing fittings and welding tips, faucets. For what? All this is sold in the store in the form of a roofing burner (take a medium nozzle size for normal performance). And all we have to do is remake the nozzle!
By the way, speaking of the nozzle. If you are wondering now, why redo something when there are ready-made burners. This is exactly what I will be redoing. So the answer is simple. And I demonstrated it clearly in the video. With a short nozzle, the burner will not burn in a closed space! The injection process of air leakage will not work and the flame will go out.
Advantages of the Babington burner
This design has quite a lot of advantages. The most important thing is that there is no need to pre-clean used oil. After all, you understand that the waste may contain a very large amount of impurities. This is actually why the oil has such a specific black color. You also cannot ignore the second advantage - ease of manufacture. And if you know how to work with tools, you can easily make an effective and simple heat source using cheap fuel.
Waste oil evaporative burners require an additional heat source. Therefore, it is necessary to install heating elements that consume a large amount of electricity. Or you can complicate the design so that the oil is heated and flammable fractions are formed. As for the Babington scheme, it is very simple - you can still do without evaporation, but you just have to use a compressor. This is a design option with lightweight fuel atomization.
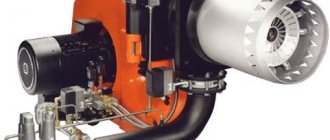
Conversion of industrial burners
It is worth noting that making a waste oil burner from scratch is much easier than remaking industrial designs. After all, you will still need to invest. For example, when converting a diesel fuel burner you will have to spend quite a lot of money. As a result, the design turns out to be very complex and the oil needs to be heated. It is much cheaper to buy a ready-made oil burner or make one yourself.
Some people try to make a burner from a blowtorch. But this is not a very good option, since its operating principle is very different from what is needed. In a blowtorch, the nozzle warms up, and the oil is forced out of the nozzle due to pressure. Gasoline is a purified fuel, which cannot be said about used oil. It contains metal impurities, combustion products of diesel fuel or gasoline, as well as other types of contaminants. As a result, the nozzle becomes clogged very quickly. You can, of course, modernize it, but the game is not worth the candle - it is too expensive and labor-intensive. Therefore, it is recommended to give preference to the Babington burner.
Operating rules
In order for the burner to be safe to operate, it is necessary that all parts associated with the supply of air and waste oil are sealed. In addition, it is necessary to protect the mining storage from accidental exposure to fire. To do this, you need to make a metal screen. It can also be made from other non-combustible materials.
For safety, it is also important that the torch burns strictly straight (this depends on the accuracy of the center of the drilled small hole). Equally important is the correct adjustment of the oil supply to the burner. It can be carried out due to the longitudinal displacement of the tube with a sphere (hemisphere) inside the tee.
If you comply with all fire safety standards and correctly adjust the fuel supply, then your homemade Babington burner will be reliable, burn cleanly, will not smoke and will last for many years.
What you need for self-assembly
Now let’s come closer to how to make a burner with your own hands during testing. The advantage is obvious - you will receive a high-quality device that will work perfectly and can compete with any industrial design. And most importantly, its cost is very low. You will need a compressor capable of providing a pressure of at least 2 atm.
The ideal option is from an old refrigerator. You also need to have the following materials:
- Fuel tank with a heating element installed in it. The heater will not work constantly; it helps partially warm up the oil.
- The second tank is designed to collect oil not sent to the injector.
- Copper tube to supply air to the burner sphere.
- Pipe for draining waste.
- Pump for pumping excess into the main tank.
- Metal pipe with a diameter of 2 inches for the nozzle.
- Tee for two-inch pipe.
- Materials for spherical nozzle.
When you have prepared all the materials, you can begin manufacturing a burner for solid fuel boilers.
Nozzle
First you need to make a spherical nozzle; fuel will flow through it in the future. Make a hole in the sphere; the diameter should be approximately 0.25 mm. Please note that the power of a homemade burner depends on the diameter. The smaller the diameter, the lower the power and vice versa. All difficulties await you in the manufacture of the nozzle. The channel for air passage must be made perfectly smooth. It is necessary that the air hits forward and not against the walls of the nozzle. The best option is to make a hole on a special machine.
But if luck smiles on you and you find a jet with the desired diameter, then do not miss the opportunity and place it in the center of the spherical element. If you can’t find a hemisphere, you can use a small piece of sheet metal with a jet attached inside. As a result, you will receive an oil spray nozzle. Heated fuel will flow into it, and atomization occurs due to the incoming air. When installing such a device in a universal boiler, you get an effective and cheap heat source.
Ensuring normal operation

For the installation to work properly, it is necessary to ensure the supply of oxygen to both combustion compartments. An excessive amount of air should not flow into the first compartment, and in order to regulate its supply, a damper should be installed. The second chamber must receive sufficient oxygen. To do this, many holes must be drilled in the pipe that connects the two compartments, the diameter of each of which should be approximately 10 mm.
Burner assembly
Now let's talk about how to make a working burner and start it up. In fact, after the injector has been manufactured, we can safely say that the main part has been manufactured and only assembly is expected. Now you need to combine everything in the body. And as it you can use a tee and a metal pipe screwed to it. Its length should be approximately 20-40 cm. The nozzle should be welded or screwed to the tube that supplies air. The second end of the tube is connected to the compressor.
The sprayer is placed inside the tee and secured with fittings. You need to make a hole in the tee itself; a tube for supplying used oil is placed in it. It is necessary that it ends above the sprayer. The lower element of the tee is used as the outlet tube. An adapter for a thin tube is screwed in here, through which the excess will flow into the drain tank. To organize the supply and removal of oil, you need to use flexible thin copper tubes.
Read also: How to charge a maintenance-free car battery video
Security measures
A stove for a working garage is a simple and inexpensive solution for heating a technical room. And if the garage is a workshop where people often come for oil changes, then there will be no problems with fuel - there will always be plenty of it. When using the oven, you should be careful:
- Do not light faulty stoves;
- Do not use gasoline, alcohol or other aggressively burning liquids for ignition.;
- Do not overheat ovens;
- Do not leave equipment unattended;
- Do not touch hot elements;
- Keep a fire extinguisher nearby;
- Homemade stoves during testing must be tested in outdoor conditions.
By following these rules, you will ensure complete safety of the premises and protect yourself from injuries and burns.
Drip-type furnaces are often made by craftsmen and home craftsmen with their own hands. These installations act as an excellent way of autonomous heating. If you want to use equipment that is one of the cheapest to operate, then you should make just such a stove. Used oil, which can be motor or transmission oil, can be used as fuel.
Any craftsman can make such a design, which is due to the simplicity of the work, during which there is no need to use a special set of tools and materials.
Completion of production
The burner will have a powerful flame, but for smooth operation it is important that all designs of external elements are thought out correctly. In the considered option, the waste flows down the sprayer in the shape of a sphere, but most of it returns back to the tank, a small amount ends up in the nozzle. To increase efficiency, it is recommended to install at least a weak heating element in the main tank. If you do not want to manually pour oil from one tank to another, you need to install a small pump. It is installed between the tanks and allows oil to be pumped from one to another, thereby ensuring circulation.
To increase the service life of the unit, it is recommended to treat the connections with high-temperature sealants. It is recommended to install a thermostat on the heating element (if one is not provided). It is enough to warm the oil to a temperature of 70 degrees, there is no point in doing more. The end result should be three nodes consuming power. These include:
- Compressor.
- Oil pump.
- A heating element.
Unfortunately, it is not possible to make a completely energy-independent design, since it is not recommended to exclude a heating element or an oil pump. As for the compressor, without it the burner will not work at all. But you still save a lot on fuel - used oil costs a penny.
For those who run their own auto repair shop or simply have large reserves of used oil, creating a burner will be an indispensable thing. The burner described below can run on waste oil, and the oil can be mixed with water or even sawdust. This will allow you to easily heat a garage or other room with waste oil.
The operating principle of the device is very simple. The oil flows over the spherical surface, forming a thin film on it. This surface has a hole through which flammable gas or ordinary air is supplied under pressure. In this case, the air flow will atomize the oil, and it will ignite in the oven. To atomize oil more efficiently during the cold season, a simple heating system is provided.
Materials and tools for homemade work: – sheet iron; - bucket; – automobile oil pump; – electric motor for the oil pump (with speed controller); – bolt M10; – light and heat sensors; – copper tube; – air solenoid valve.
Tools:
drill, soldering iron, hacksaw, grinder, keys, pliers, welding machine.
Let's start assembling the burner:
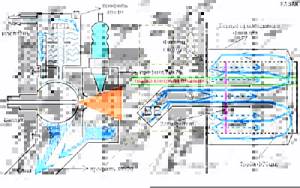
Step one. Schematic diagram of the device
This device is also called a Babington burner. Below you can see the original diagram.
During operation, oil flows through the outer part of the nozzle, and therefore its cleanliness does not affect the operation of the device. The homemade product consumes very little air, only a few liters per hour. To create air flow, compressors from refrigerators or aquariums are suitable.
The system has an oil pump, it is designed to ensure that the oil flowing down the sphere is supplied back up to the container.
Step two. Burner type
The burner was made in the form of an attachment that fits onto a bucket of oil. The oil pump, as well as the engine and speed controller were bolted to a sheet of metal. As a result, the design came out as in the photo.
Here is another diagram of how the burner should work
Step four. Assembling the mechanical part of the device
The copper tube must be rolled into a spiral; its diameter should be slightly larger than the outlet diameter of the tee. To successfully bend the tube into a spiral, it must be filled with sand.
The system will work as follows. When starting, the controller will generate a spark and simultaneously open the gas valve. Once the gas ignites, the thermocouple detects the presence of fire and then the electronics begin supplying oil and air. Next, using an optical sensor, the flickering of the burner flame is monitored. As soon as the flame begins to flicker steadily, the electronics will shut off the gas supply.
The system will also have a temperature sensor. When the burner reaches the maximum permissible temperature, it will turn off, cool down, and then turn on again.
If desired, the homemade product can be equipped with two nozzles; as a result, the burner will be able to operate in three modes. For example, you can turn on a small nozzle, a large one, or two at the same time. To do this, two air valves will be needed.
The author decided to make the starting burner himself, focusing on the principle of the Chinese burner.
As a result, the Babington Burner is capable of operating at a propane pressure of 0.2-1 kg/cm. A tube with a spark plug from the car was welded to the burner so that the burner could be attached to it for starting. A tube was also installed to attach the flame sensor.
According to the author, the burner starts easily, one spark is enough. At the same time, it burns quite evenly and the flame cannot be blown off. To ensure that the Babington burner could operate in cold winters, the propane pressure was set to low. In winter it can be about 0.5-1 kg/cm.
The author used a thermocouple from an old boiler.
Manufacturing stages
Buying a ready-made potbelly stove that runs on oil waste will cost at least 5,500 rubles. If you want to save money, you can study the principle of operation of the device, diagrams and instructions on how to make a waste stove from a potbelly stove - this will allow you to make a homemade heating structure in just a day.
Materials
To make an oil stove you will need:
- Steel sheets. It is better to make the body from a material with a thickness of at least 4-5 mm. The top cover is exposed to the greatest heat, so its thickness should be 7 mm or more. It is better to use steel corners (2-4 pcs.) as fasteners.
- The potbelly stove is not placed on the floor, so as not to create a flammable situation. It can be installed on a fireproof sheet or on legs made from angles (4 pcs.).
- You will also need steel strips and pipes (recommended diameter 10 cm) - they are needed to connect the tanks, create an “air corridor” and install the chimney pipe.
- If you want to give your potbelly stove a neat appearance, then it can be treated with any heat-resistant paint.
- A homemade potbelly stove for testing can be made from an empty gas cylinder (it is optimal to take a fifty-liter tank).
- You will also need a pair of steel pipes with a diameter of 10 centimeters and a wall thickness of 4 millimeters. One pipe will remove gases, the second will serve as a heat exchanger.
Tools
A regular or drip potbelly stove during mining is made using the following tools:
- Locksmith's hammer.
- Bulgarian.
- Welding equipment.
- Metal ruler.