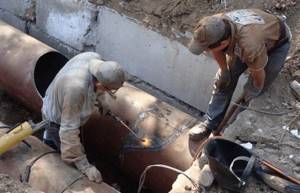
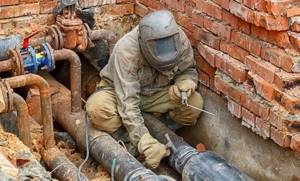
Pressure testing is not just a hydraulic test of the system. This is a whole series of activities aimed at preparing the system for the heating season. This includes repairing emergency areas, replacing (repairing) valves, checking pressure gauges, cleaning filters and much more.
In this article I will describe the main points that representatives of regulatory authorities pay attention to. What is described below is not the ultimate truth; each inspector has his own cockroaches in his head. But the necessary minimum of work must be done in any case.
So, let's go...
Limitation of responsibility
First, let's figure out what we will be crimping. There are several options for connecting a building to the heating network. The first, most common option is when inlet valves are installed next to the wall at the entrance from the city. With this option, the boundary of division of responsibility is considered to be the flange of the inlet valve, and the owner of the building is responsible for everything beyond (including the inlet valve). Accordingly, the heating unit and heating system of the building are pressurized.
The second option is when the heating unit is located inside the building, and an internal heating main runs through the building from the input valves to it. With this connection option, you need to clarify where the demarcation line lies. The “Heat Supply Agreement”, which is concluded between the owner and the heat supply company, will help us with this. This agreement has an annex, which indicates where the demarcation line lies.
If the delimitation boundary is considered to be inlet valves, we press three elements of the system: the internal heating main, the heating unit and the heating system. If the boundary of division of responsibility passes through the valves at the heating unit, naturally, we pressurize only the elevator (heating) unit and the heating system.
Rules and procedure for performing work
The success of the washing process depends on an individual approach to the work. Each system operates under its own unique conditions. Here are a number of signs of a clogged system:
- Deterioration of heat transfer from radiators;
- Increased hot water heating time;
- Underheating of hot water to the required temperature;
- Increased costs for gas and electricity.
Scheduled flushing of the heating boiler, water heater and heat exchangers prevents the appearance of extensive areas of corrosion and large blockages. This preventive measure allows you to care for the equipment without disassembling it. Critical contamination can be eliminated by disassembling the equipment to clean its individual parts.
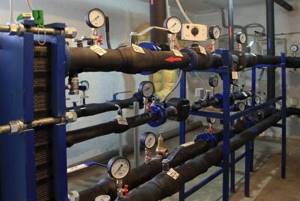
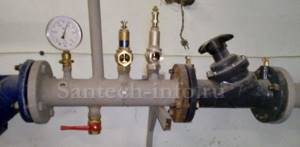
Pressure gauges
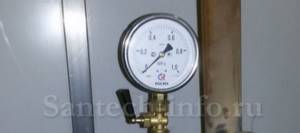
Perhaps the first thing an inspector turns his attention to when accepting pressure testing is the pressure gauges.
Checking the pressure gauge
Pressure gauges must be verified every year. Verification is a test of a measuring device for accuracy of readings. If the pressure gauge readings exceed the permissible error, it must be sent for calibration or replaced. Calibration, in essence, is the adjustment of a pressure gauge aimed at reducing the error in measurement accuracy.
After verification, a stamp of the Metrological Service is applied to the pressure gauge body.
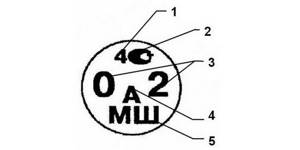
1. Month of the year (1, 2, 3, etc.), quarter (I, II, III, IV). 2. Gosstandart sign. 3. Last numbers of the year (here 2002). 4. Individual sign of the verifier. 5. Code of the Metrological Service.
New pressure gauges are subject to verification only after 18 months, that is, a year after commissioning. But when checking, you must provide passports for these devices (they are included in the kit).
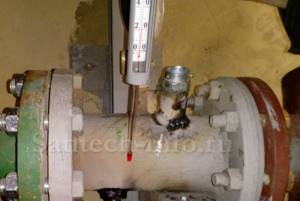
Pressure gauge connection
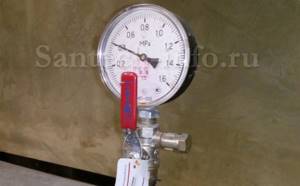
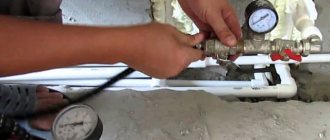
The pressure gauge must only be connected through a three-way valve or a ball valve with a pressure release valve. Conventional ball valves do not work.
Three-way valves often leak. Tip: to avoid leaks, rotate the valve stem several times around its axis before installation. This way you will evenly lubricate the stem and the inner surface of the tap with the grease that was applied during assembly.
Where should pressure gauges be located?
Regarding the installation location of pressure gauges, there is a whole bunch of standards (DBN V.2.5-39 - Heating networks, SNiP 2.04.01 - Internal water supply and sewerage of buildings, SNiP 2.04.05 Heating, ventilation and air conditioning, SNiP II-35 Boiler installations). In simple words, I will say this: pressure gauges should be placed before and after any equipment that can affect pressure changes: on all outgoing and passing pipelines, before and after shut-off valves, before and after control equipment, before and after mud traps (to monitor its condition) and etc.
Another nuance that an inspector can pay attention to is the rating of the pressure gauge. Heating points should have pressure gauges with a rating of up to 1.6 MPa (16 bar).
What does the order say?
Preparation of thermal facilities for operation during the autumn-winter period (AWP) should begin with the execution of the appropriate order.
First of all, it defines the person responsible for the operation of thermal power plants and his deputy. For organizations involved in generating heat and supplying it to consumers, the responsible person must have a higher heat and power education. Responsible persons are also required to undergo an annual knowledge test with an exam at Rostechnadzor.
The order for preparing thermal equipment for work in the open-air zone should reflect the following main points:
- Creation of a commission to prepare the heating sector for work in the open industrial zone, accepting the readiness of the heating sector, fixed on the balance sheet of the organization.
- Determination of responsible persons and end dates for each item of the order.
- Development and approval of an autumn-winter action plan (AAP) to prepare the enterprise’s heating equipment for operation in the autumn-winter period.
- Procedure for monitoring and reporting on preparations for the heating season.
- The procedure for commissioning and testing of the heating system.
- The procedure for obtaining a certificate and passport confirming readiness for the occupational health program.
The development of a health maintenance plan should be carried out taking into account the identified failures in the thermal-hydraulic operating modes of heating equipment in the last winter period.
The corresponding orders and instructions of the heads of district administrations, as well as the heads of private management organizations, including HOAs and housing cooperatives, independently managing residential buildings must be published annually before April 30.
Thus, meetings to prepare for the 2020 heating season were held in May 2021, at which plans were approved to prepare heat and power equipment for work in the winter zone.
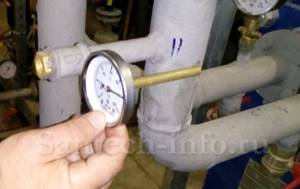
Thermometers
The thermometer sleeve (pocket) should extend 2/3 into the pipeline, so that the immersed part is in the center of the flow.
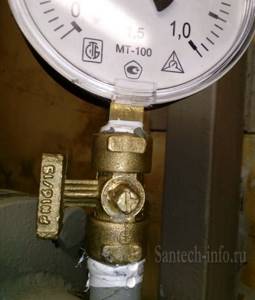
This shows an incorrect pressure gauge connection.
To ensure good thermal contact, the thermometer sleeve must be filled with mineral oil (GOST 8.586.5-2005 clause 6.3.9.).
Formation of an act based on the autumn inspection
Following the implementation of repair and restoration work and maintenance of heating networks, the established preparation commission is obliged to conduct an autumn inspection of the measures taken, the reliability and readiness of the facilities for the heating period, before the fifteenth of September. After completing this procedure, those responsible for the implementation of the measures must adjust the repair plans, taking into account all detected problems at heat supply facilities. Such deficiencies must be eliminated without fail by September fifteenth. Then you can begin the procedure for drawing up the necessary acts and obtaining a confirming passport.
Connection to existing heating networks occurs before the first of September, and after the fifteenth of September, before the start of the heating season, tests are carried out, which consist of launching heating supply units. According to information from the relevant Ministry of the Russian Federation, after an inspection of about 950 electric power industry entities in 2021, 83 percent received passports confirming their readiness for the heating period. Activities continue at other sites.
Elevator
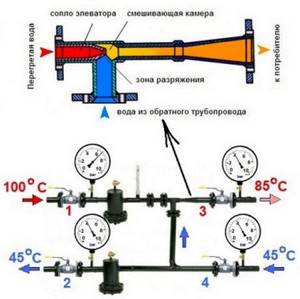
The principle of operation of the elevator unit.
The main requirement for the elevator unit is flushing the cone (nozzle). The diameter of the hole in the cone is 5-7 mm (calculated individually for each building); if the cone is clogged, the required amount of heat will not flow to the building.
The elevator must be sealed. To wash the nozzle, the seal must be removed, but to avoid unnecessary questions, this must first be agreed upon with the inspector who will accept the pressure test from you. After washing, the elevator is sealed again.
Often inspectors require that a tag hang on the elevator with the diameter of the hole in the cone indicated on it.
Why you need to prepare for the heating season
Reliable performance of housing and communal services facilities, timely and complete preparation for the new heating season is carried out to ensure a stable energy supply to consumers at subzero outside temperatures. Providing the required technological modes for heating buildings is a priority issue for public utilities in the regions of the Russian Federation.
If everything is ready, no problem
Preparing housing and communal services facilities for winter protection is carried out to reduce the impact of temperature and other atmospheric factors on the structural stability of utility facilities, prevent emergency wear and tear and prevent malfunctions of equipment in life support systems.
The preparation of housing and communal services facilities for the heating season must guarantee:
- regulatory technological operation of housing and communal services facilities;
- implementation of the generally established sanitary and hygienic regime for permissible temperatures and humidity in the premises;
- extreme reliability and high efficiency of operation of thermal facilities;
- rational consumption of materials and fuel.
Insulation and warning colored rings on pipelines
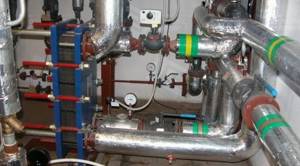
All pipelines in the ITP (CTP) must be painted and insulated. The insulation should not hang in rags, everything should be neat. Metering units and elevators are also isolated.
Markers on the pipeline should indicate the direction of movement of the coolant. To identify the contents of the pipes, warning colored rings are applied to them. For heating, rings of green (primary color) and yellow are used on the supply, green and brown on the return. The same marking is used for DHW. Drainage and cold water supply are indicated by green rings.
Monitoring your home's preparation for winter
The readiness of heat supply organizations and consumers for the heating season is checked by local governments. They form a commission, which includes representatives of local governments, heat supply organizations, housing commissions and the Federal Service for Environmental, Technological and Nuclear Supervision.
The commission checks documents on compliance with the requirements for preparing an apartment building for winter, and, if necessary, inspects the facility. Within a day after the inspection, she fills out a report with the results and conclusion. According to Rules No. 103, the commission concludes:
- the house is ready for the heating season;
- the house is ready for the heating season if the problems are corrected in due time;
- the house is not ready for the heating season.
Don't miss: Fan for a solid fuel boiler: types, selection, manufacturing
If the house is not ready for winter, the commission draws up a list of comments with deadlines for elimination. If you are ready, local authorities within 15 days issue a certificate of readiness for the heating period. Houses that are not prepared will be issued a passport after correcting the comments and re-checking.
Samples of the inspection report and readiness certificate are presented in the appendices to Rules No. 103.
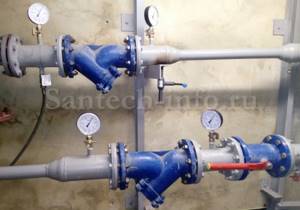
Shut-off valves
Shut-off valves must perform their main function - block the flow of coolant. If there are valves on the heating unit that do not “hold”, they need to be replaced. Different sections of the system are pressurized under different pressures, and if there is a non-working valve in the circuit, it will definitely manifest itself.
Marking of fittings
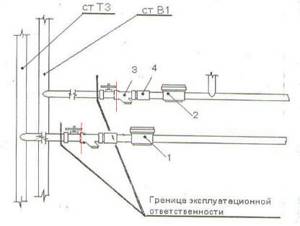
Ideally, everything should look like this: at the heating point there should be a diagram showing numbered and marked inlet and outlet pipelines, shut-off and control valves, drainage and drainage devices. The diagram must correspond to the current state of the system, that is, if changes have been made to the system, they must be displayed on the diagram.
All of the above devices must have tags with symbols corresponding to the symbols in the diagram (1,2 - shut-off valves on the supply and discharge pipelines, t1 and t2 - thermometers, P1 and P2 - pressure gauges, etc.).
In practice, at small heating points, inspectors do not always focus on this. The main thing is to make it clear what goes where, for example: “supply to the left wing”, “return from the right wing”, “supply to ventilation”, etc. But if everything goes according to Feng Shui, this is an additional plus.
Inspection of wedge valves
Old-style wedge valves require additional attention during operation.
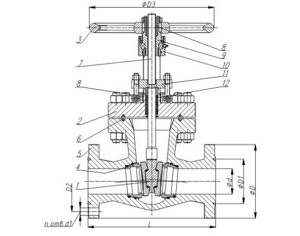
Wedge valve design: 1 - wedge, 2 - cover, 3 - flywheel, 4 - seat, 5 - body, 6 - o-ring, 7 - spindle, 8 - threaded bushing, 9 - bushing, 10 - stand, 11 - gland flange , 12 — stuffing box made of thermally expanded graphite.
In such valves, it is mandatory to pack the stuffing box every year. And during the year, if a leak occurs from the seal, it is necessary to tighten the flange. If this is not done, the valve will become unusable.
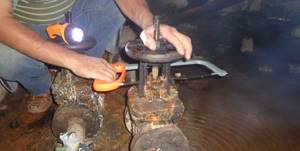
To replace the stuffing box, you need to unscrew the nuts on the union bolts, lift the flange, remove the old stuffing box and install a new one. The seal is wound in rings around the spindle and pressed against the flange.
When tightening the flange, you need to be careful: if you overdo it, the cast iron flange may burst, and replacing it is very problematic; in practice, it is easier to change the valve completely.
There should be no signs of rust on the valve. The body should be painted black, the flywheel red, and the retractable spindle should be lubricated with grease.
Start preparing your home for the heating season
Heat supply organizations and management companies begin preparations for the heating season immediately after its completion. They wash and pressurize the nets. Conducting tests. Check and, if necessary, change shut-off valves, pressure gauges, pipes and metering devices.
The networks need to be washed and pressure tested to clean them of salts and rust. Without this, a lot of resources are spent on heating, but there is little benefit. Hydraulic tests test networks for strength and detect leaks. The management company and owners eliminate them in the summer.
A complete list of requirements is contained in the Order on preparation for the heating season of the Ministry of Energy of the Russian Federation No. 103 dated March 12, 2013. It specifies the requirements for heat supply organizations and consumers.
Drainage
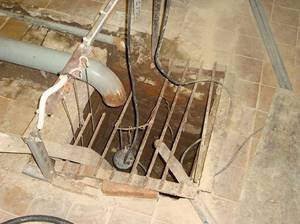
Heating points are equipped with a ladder for gravity drainage of water, and if this is not possible, with a drainage pit with a pump (SP 124.13330.2012 Heating networks. Updated version of SNiP 41-02-2003 clause 14.20). The pit is closed with a removable grate. The latest innovation is that the edge of the pit should be painted with yellow and black stripes.
If the TP has a safety valve, then it must be equipped with a drainage pipeline so that in the event of operation no one (or nothing) is harmed.
The procedure for preparing for the heating season for heat supply organizations
According to the rules for preparing for the heating season, heat supply organizations:
- enter into an agreement on the management of the heat supply system;
- draw up a schedule of thermal loads;
- check the reliability and quality of heating networks, namely:
- establish a water chemistry regime;
- check the service life of equipment;
- calculate the time to eliminate possible accidents;
- check automatic regulators;
- carry out hydraulic and thermal tests;
- repair heating networks.
- conclude contracts for uninterrupted fuel supplies;
- recruit staff and provide them with tools, clothing and instructions;
- organize commercial metering of thermal energy.
Preparation plan for the heating season
In order to carry out a comprehensive check before the start of the heating season and not forget anything, you need to draw up a step-by-step plan. Institutions that service central networks have certain regulations, supported by SNIPs. Preparation work is accompanied by multiple acts and permits. Fortunately, owners of private houses and apartments with autonomous heating do not have to go through such a complicated procedure.
Don't miss: Do-it-yourself heat exchangers - how to make plate, water, pipe-in-pipe, air, drawings
Simply check the following aspects:
- heat loss of the room;
- presence/absence of dirt in the circuit;
- whether there is faulty equipment or leaks;
- checking the system for air pockets;
- Is the chimney clean?
You can use this heating season preparation plan as a sample. Unfortunately, many users do not prepare for winter at all. We recommend carrying out this operation every autumn or at least once every two years, but not less often. Not only heating efficiency, but also your safety depends on this.
We minimize heat loss before the heating season
You can check your house for heat loss using a thermal imager - this is a device that shows an image in the infrared spectrum. Ideally, the check should be done in winter, and heat loss should be eliminated before the heating season begins.
Photo of a house in the infrared spectrum.
Ideally, on the screen of a thermal imager, the house should be blue - this means that it is cold outside, and therefore heat does not leave the room. All places where heat escapes will be marked in red or yellow. The brighter and more saturated the color, the higher the heat loss. The main places for heat leakage are windows and doors. Therefore, replacing or at least sealing windows and doors is done first.
After all the cracks have been eliminated, the windows have been replaced and the doors have been insulated, you can proceed to the thermal insulation of the enclosing structures:
- walls;
- floor;
- ceiling;
- foundation.
According to reviews, domestic insulation Izover is no worse than its foreign analogues.
When the heating season ends, the insulation continues to work. Only now it does not let heat from the street into the room, so in the summer it is cooler in such a house. Energy efficient homes are very popular today.