A gas water heater is an excellent way to heat water, which can successfully replace a central heating system.
A 3-volt power supply can be made either independently or purchased ready-made
distilled hot water. This device allows a huge number of people not only to use warm water at any convenient time, but also to regulate its temperature. However, servicing a geyser is expensive, primarily due to the need to buy expensive batteries. How to upgrade a speaker to a power supply in order to save money - read on.
The advantage of a power supply as an analogue of batteries
Installing a geyser is an excellent prospect for switching to the method of individual water heating. In addition, this allows you to significantly save on utility bills. Installing a gas flow-through heater makes you independent from the boiler house and water utility and allows you to get hot water at any time. Thus, regular shutdowns of hot water due to summer maintenance work will no longer be a problem.

Batteries for a 1.5 V instantaneous gas water heater Source sat-oskol.ru
Features of batteries for the speaker and nuances of choice
Modern speaker models rely on electricity to operate. The power supply, thanks to the spark produced, ignites the flame necessary to heat the water, and also guarantees the functioning of the display, which displays the current temperature and other information.
It is noteworthy that ignition in the very first gas water heaters was carried out manually using a rather dangerous method - using matches. Subsequent modifications of water heaters were equipped with a more ergonomic piezoelectric element , batteries or a hydrogenerator . There are also models of speakers with mains .
Nowadays, speakers with battery-powered ignition are in greatest demand. Analogue models with a hydrogenerator that replaces batteries are in much less demand. We have given the rating of the best geysers popular among buyers in this article.
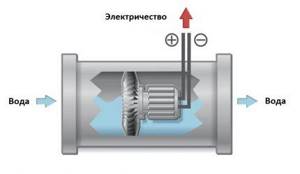
Significant disadvantages of columns with a hydrogen generator:
- the cost of such equipment exceeds the price of battery-powered speakers;
- the generator mechanism and blades are extremely sensitive and often suffer from poor water quality, and therefore require regular cleaning;
- The pressure in the water supply may not be sufficient to generate a strong spark.
Ignition of a battery-powered gas water heater is quite simple. So, in a column with an igniter, the process works like this: a small amount of gas is supplied to the igniter, and then, using an electrical pulse generated by batteries, it is ignited. The ionization sensor detects the presence of a flame and only after that gas is supplied to the main burner, where smooth ignition is carried out from the igniter.
In a direct-ignition column, gas is immediately supplied to the burner, which is ignited by an electrical impulse generated by the batteries.
The need to replace the batteries in a geyser may be indicated by a popular “symptom” of incorrect operation of the equipment: the water heater starts idle several times in a row, making sounds characteristic of ignition. Some models are equipped with an indicator that indicates battery wear.
What batteries are used in the speakers?
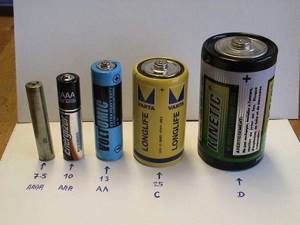
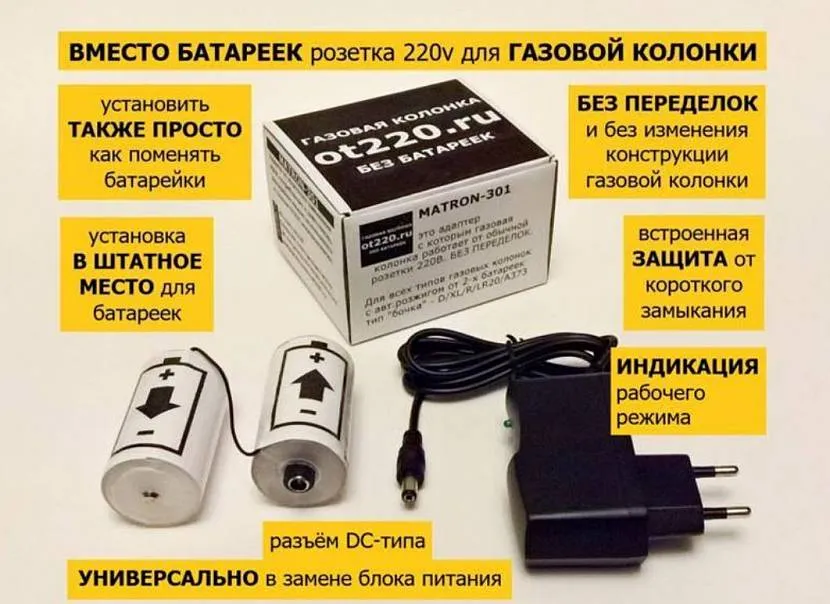
For full operation, the gas water heater requires power sources with a total voltage of 3 volts. Therefore, batteries for water heaters stand out from the more familiar finger and mini-finger modifications. These are thicker “barrels” of class D , producing a voltage of 1.5 V each.
In fact, there are two types of batteries on the market: D-LR20 and D-R20 . They differ from each other in price and “filling”: inside the battery there may be salt or alkali.
D-R20 salt batteries are confidently losing ground, which is more of a plus than a minus. Cheaper power supplies are notorious for extremely fast discharge rates. Therefore, even the low attractive price does not make the purchase of the D-R20 worthwhile.
Alkaline alkaline batteries D-LR20 are more expensive, but do not require as frequent replacement, working properly for up to six months. A salt power source will last a couple of weeks at best.
To save as much money as possible on routine battery replacements, you should purchase rechargeable batteries. Used batteries and accumulators should not be disposed of with household waste, as power sources require special disposal.
Nickel-metal hydride battery versions – NiMH D/HR20 – are best suited for geysers. However, before installation, you should make sure that the voltage in each battery is 1.5 V.
If operating standards are observed, such batteries will last 5-6 years, gradually losing their capacity. But it is worth remembering that you will have to buy a battery charger separately.
Subtleties of choosing power supplies
The safest option to avoid making a mistake in choosing a product is to go to a store with old batteries and buy batteries with similar parameters.

Additionally, you should pay attention to the following nuances:
- compliance with the expiration date;
- packaging integrity;
- absence of abrasions and mechanical damage on the case;
- correct shape of the power source.
The abundance of counterfeits on the market and storage of products in inappropriate conditions without maintaining the correct temperature conditions significantly affect the service life of batteries and accumulators.
Power supplies purchased at the nearest crossing are unlikely to be certified and reliable products. Therefore, purchase batteries from official offline and online stores. After all, the use of any damaged battery is fraught with fires and damage to equipment.
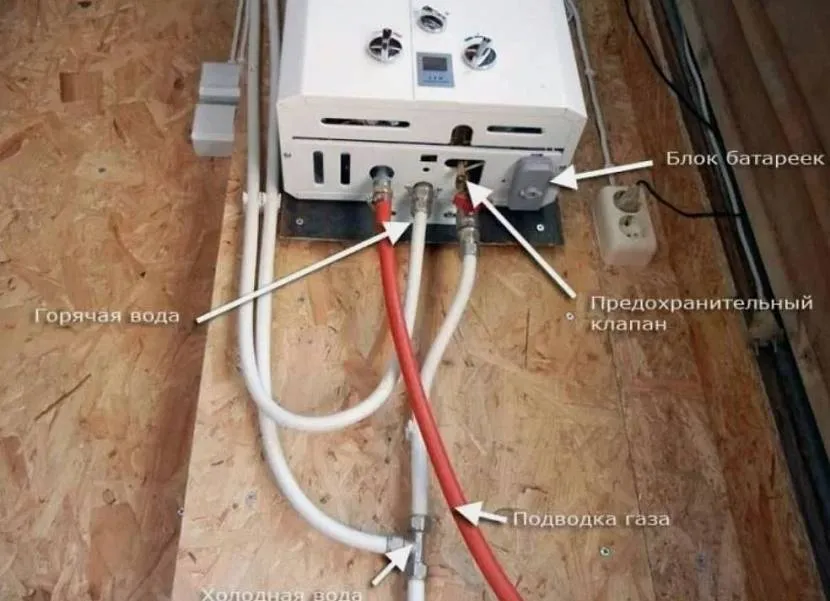
Connecting the power supply
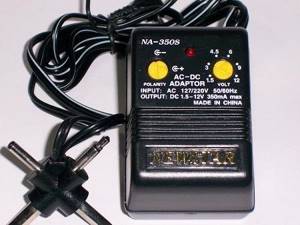
There are 2 options: purchasing a ready-made power supply for geysers in a store or self-assembling from a charger with similar characteristics.
Connecting the magazine unit
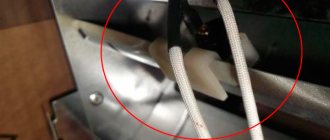
The advantage of this method is that you do not need to cut off the end with the plug and solder special connectors instead. The pulse unit is designed specifically for these purposes and has everything necessary for quick connection. The wiring already has pole markings. For example, in the Robiton IR3-1000S model, the striped wire is connected to the positive output
Healthy! The cost of a 3V power supply for a geyser varies from 250 to 350 rubles.

Factory power supply for instantaneous gas water heaters Source remotvet.ru
How to replace the battery
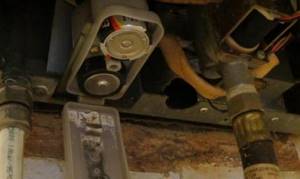
In a geyser, the source of electricity is located in a special compartment located in an easily accessible place. Taking into account the design and functional features of the water heater, this is its lower part.
To gain access to the batteries, you must remove the cover, which is held in place by a latch.
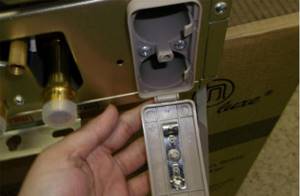
To replace old batteries, you need to open the battery pack at the bottom of the gas water heater and replace the elements with new ones.
The compartment contains 2 batteries held in place by latches. Having remembered the polarity of each, we press on the latch, and the battery slides out under its own weight.
The other power source is removed in the same way. New ones are inserted and fixed, observing polarity. The lid closes. The gas water heater is ready for use.
In some models, a successful replacement is completed with a light or sound signal.
The speaker housing or opening cover may indicate the correct polarity of the connection. Insert new elements in the same way as the previous ones were placed
Choosing the right adapter
The manufacturing process is simple, the only thing you should pay close attention to is the parameters of the power supply. The main characteristics of the adapter that interest us are indicated under the inscription “Output”. Naturally, they can have different meanings in different devices. In this situation, they must meet the following indicators:
- Input power – 220V.
- Output power – 3V.
- Power 500 mA.
Healthy! The output voltage of most mobile phone chargers is 5V. To lower it to the desired value, use the adjustable stabilizer LM 2596.
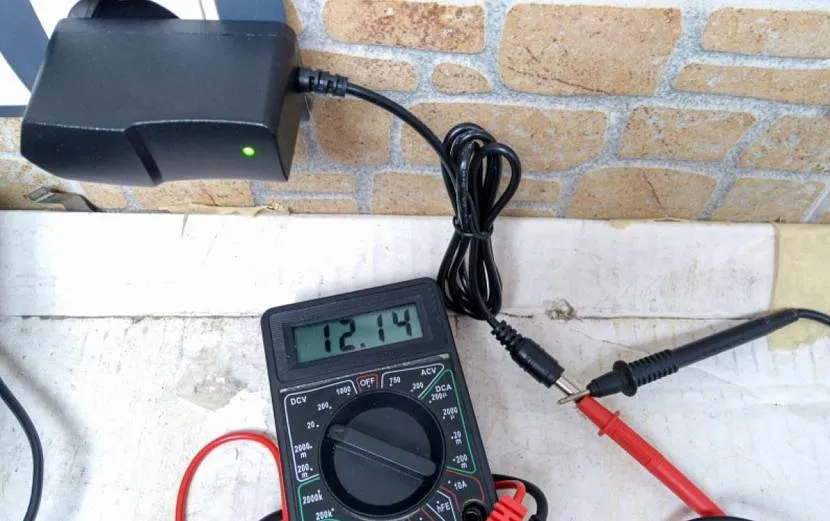
Determining the voltage of the power supply Source img.mysku-st.ru
Another situation concerns the moment of determining polarity. Finding the “plus” and “minus” on the outgoing wires of the charger is not difficult. To do this, you need to connect the device to a 220V network, and alternately check the contacts (internal and external) with an indicator. The one that, when touched, will cause the instrument’s light to light up and be “positive.”
Choosing the right power supply
Situations when purchasing a new unit is required may be different. The old adapter is out of order, the purchased gadget is not equipped with a charger, there is no desire to purchase batteries when it is possible to connect the device to the network, and so on.
This is easiest for those who have a non-working adapter. We simply pay attention to the existing inscriptions on the block and select an identical one.
What to see:
- Output voltage is measured in volts (V);
- Output current - unit of ampere (A) or milliamp (mA);
- Plug polarity;
- Plug size and type.
The main parameters will be those designated “Output” - this means output. Adapters for different devices are, therefore, also different.
It is necessary that the number of volts coincide and fully correspond to the declared one.
The next thing of interest is polarity. Polarity determines the location of "Minus" and "Plus". Both can be located either outside or inside the plug.
And finally, the current strength should be no less than that indicated on the old unit, but a little more is allowed.
Once the basic parameters have been determined, you need to select the appropriate size plug. At the moment there are many of them. And even from the same manufacturer, different types of connectors can be used for different devices. A simple solution is to take the non-working adapter with you and compare.
There are devices on sale that require alternating current to operate. On blocks for such devices, instead of polarity, the “∼” icon will be displayed.
How to determine the parameters yourself
There are quite common cases when the inscription about the adapter parameters is erased or missing. You can determine them yourself in 2 ways:
- Carefully inspect the electrical appliance for which it was intended. In most cases, the marking is applied to the back wall of the case or written into the instructions in the column with the main characteristics (voltage, current).
- The second method involves individual determination of each of the indicators of interest. This is done as follows:
- Input power supply is standard for all 220V. Sometimes this paragraph may indicate, for example, 190-240V. This means that the device is capable of functioning during voltage surges within this range.
- The output voltage is calculated by multiplying the number of power elements by their equivalent voltage (you can find this indicator on their body).
- There is no need to determine the current strength. For battery-powered devices, 0.5-1 Ampere will be sufficient, which can be used as the desired value.
- The polarity is checked by the tester. We talked about how to do this a little earlier. It should be taken into account that in most cases a classic circuit is used, where the “negative” wire powers the outer side of the plug, and the “positive” wire goes to the internal contact.

Connection completed Source stroydesign24.ru
Healthy! In order to maintain the ability to use the geyser during a power outage, you need to solder the cut wires from the batteries to their original place. In this case, you will be able to get hot water at any time. In normal mode, you will use power from the outlet, and when the lights go out, switch to batteries.
Home amplifier from car
To use a car amplifier at home, we need a power supply and speakers (subwoofer optional).
I’ll warn you right away that the current consumption of some car amplifiers approaches the 40A ! This is a very high current. Therefore, not everyone will be able to find a suitable power supply for 12V and a current of 30 - 40 A :)
But to power the car amplifier, a computer power supply in AT and ATX format will do. Some models of computer power supplies can supply significant current via the +12V bus. Judging by the characteristics of the cheapest models that are now sold in stores, this is 12A. Top-end, expensive models give out 50 - 70A !
Such a block produces a current of 14A at the +12V output.
How to determine? We look at the characteristics of the power supply, the line “power along the 12V line”. We see, for example, 200 W. Divide 200 W by 12, we get the maximum current on the 12V bus ~ 16 amperes. If the power supply is on hand, then look at the sticker on the case. All the block parameters are usually indicated there, including the maximum current for each bus.
All PC power supplies have yellow wires going to MOLEX and SATA connectors - this is +12V, and black wires are negative (common, GND ). I have already talked in more detail about using power supplies from a PC.
If you find a power supply with a lower current, for example, like I did with 12V ( 10A ), then you shouldn’t be upset. The amplifier simply will not be able to work to its full potential and will play quieter. Now about the connection.
There are 2 terminals on the body of the car amplifier for connecting power. The negative power supply is connected to the GND terminal, and the +12V terminal is connected to the positive power supply. As a result, the amplifier is in sleep mode ( Stand by ). To switch the amplifier from standby mode to operating mode, you need to apply +12V to the REM ( Remote - “control”). We throw a jumper from the +12V terminal to the REM . Then turn on the power supply.
As you know, car radios have a special output (usually blue). Most modern radios have it, and it is used to turn on active antennas, extend antennas and turn on external amplifiers and subwoofers. If you turn on the car radio, a voltage of +12V appears at this output. The load current of this output is small, about 100 - 120 mA.
By the way, when installing an amplifier in a car, it happens that the control (blue) wire is already connected, for example, to the same active antenna. What should I do? Then you can supply +12V voltage to the REM through a latching button, and place the button itself on the car panel. The same technique can be implemented at home. Just put a regular toggle switch or rocker switch in the gap in the +12V — — -> REM . These are sold at any auto supply store.
Attention! Since the current consumption of a car amplifier can reach 40 amperes or more, it should be connected to the power supply using copper wires with a cross-section of 6 - 10 mm2. If possible, make the connecting wires shorter. This is ideal. In practice, if you do not “drive” the amplifier to maximum mode, ordinary wires with a cross-section of 1.5 - 2.5 mm2 will do.
An ordinary MP3 player can be used as a sound source. You will also need a 3.5 mm adapter. Jake on "tulips".
When setting up the amplifier, do not forget that on its panel there is an input signal level control - “LEVEL”. This is nothing more than a volume control , like those found on analogue tape recorders or cassette players.
At a level of 0.2V, the maximum signal level is received at the input - the amplifier will operate louder. If you turn the variable resistor knob to 8V , then the minimum signal from the player will be received at the input. Naturally, the signal level can also be set using the volume control of the MP3 player itself.
On many amplifiers, the input level control only has a pointer in the form of a stylized arrow or pointer.
Depending on the configuration of the car amplifier, it can be used in different ways. The simplest example.
Most amplifiers have filter mode switches (crossovers). For example, on the CALCELL I found an X-OVER SELECTOR (other models may have a BASS/FLAT/TREBLE and similar ones). When selecting a mode, the corresponding filter is activated - LP (40Hz - 160Hz), HP (40Hz - 600Hz). OFF mode turns off all filters (aka FLAT ).
In FLAT , no signal correction occurs. Roughly speaking, what goes into the filter is what comes out.
If you select the LP mode, the input filters cut off all frequencies above 40 - 160 Hz and leave only low audio frequencies. This mode is suitable for working with a subwoofer.
The filter works on two of the 4 amplifier channels at once, for example, on the front speakers ( FRONT ). Two other amplifiers also have such switches - rear ( REAR ). The division of amplifiers into FRONT and REAR is conditional. If we examine the circuitry of the device in detail, it turns out that all four amplifiers in its composition are identical, like Siamese twins. But that's not the point.
All car amplifiers can operate in Bridge mode . This is when two amplifiers drive one speaker or speaker. In this case, the powers add up. Thus, if you have a 4-channel amplifier, you can mount a stereo system with a 2+1 (sub) subwoofer.
It is enough to connect 2 channels of the amplifier to the bridge and connect it to the woofer, it will act as a subwoofer. In this case, use the mode switch to select the LP mode and set the desired cutoff frequency for the subwoofer. As a result, we will get a full-fledged subwoofer. The remaining 2 channels can be used to enhance the right and left front channels. For them we set the mode to OFF .
Have you ever wondered why speaker systems always use one, but powerful subwoofer? The fact is that at low frequencies the human ear does not perceive the stereo effect well. That is, the ear doesn’t care where the roar comes from. But in order for the ear to normally perceive low-frequency sounds together with others (mid and high frequencies), the sound power must be 2 times greater than the right ( R ) and left ( L ) channels separately. That is why the subwoofer needs to be turned on in bridge mode. I think this is clear.
This small manual did not cover the topic of acoustics. In any case, when connecting speakers and speakers to a car amplifier, you must remember that their resistance must be at least 2 - 4 ohms. If you want to know how to properly connect multiple speakers, then take a look at this page. I also advise you to familiarize yourself with the speaker structure and its main parameters.
Before connecting anything, be sure to read the instructions for your amplifier!
Home » Workshop » Current page
also be interested to know:
- Slot drive DVD player. Device and disassembly.
- We repair the Samsung MAX-VS720 music center.
- DIY DVR repair.
A gas water heater is an excellent way to heat water, which can successfully replace a central heating system.
You can make a 3-volt power supply either yourself or buy ready-made hot water. This device allows a huge number of people not only to use warm water at any convenient time, but also to regulate its temperature. However, servicing a geyser is expensive, primarily due to the need to buy expensive batteries. How to upgrade a speaker to a power supply in order to save money - read on.
Do I need a stabilizer?
After the parameters of the power supply have been determined, the availability of its stabilized and unstabilized voltage should be considered. The solution to this issue is relevant due to the fact that the network supplying a gas instantaneous water heater must have a stable voltage, without jumps in one direction or another.
Power supply with stabilizer Source oboiman.ru
Important! If there is no suitable power supply and you have to buy one, you can provide for this nuance already at the stage of selecting an adapter. There are models that stabilize the voltage or supply it as received.
The operation of the geyser involves receiving electrical power from batteries. The latter, in turn, (provided they are well charged) are a source of high-quality current and do not require additional stabilizing devices. Manipulations to change the element that powers the heater and does not have a stabilization unit; the piezoelectric element may not operate stably.
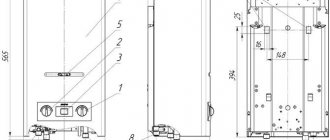
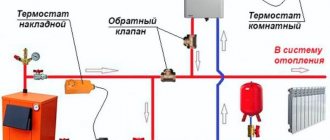
Structural elements of a gas flow-through heater Source turbo-yandex-ru.
What to do if there is nowhere to see the parameters
This problem can occur with devices that are not equipped with an adapter for connecting to the network, or if the unit has been lost.
In this case, the device itself will come to the rescue. On the case, usually in the area of the connection socket or in the instructions, there is information with the main indicators : voltage, current and the location of “Plus” and “Minus”.
If this information is not available, then:
- In order to find out the voltage, you need to count the number of batteries and multiply by the voltage of 1 battery (indicated on the batteries);
- The current strength is easily measured. For devices that run on batteries, this is not necessary, 1 Ampere is enough;
- The polarity is called. But 90% of all gadgets use a scheme - “Minus” on the outside of the plug, and “Plus” on the inside.
Roof wind deflector: design and principle of operation
Although today the weather vane is most often used as an element of decor in country houses, it is too early to write it off from the pages of history. Even in our digital age, mechanical windsocks regularly perform their service at small weather stations, in ports and at airfields. Depending on the purpose, several types of weather vanes can be distinguished:
- meteorological wind direction indicators, which are made of forged metal and are characterized by high mobility, which, in turn, has a positive effect on the accuracy of the readings;
- instruments combined with a device for determining wind speed, which are called Wilde weather vanes after the name of the creator;
- chimney - with a body that additionally plays the role of a chimney cap;
- decorative - serve mainly for decoration, so their flag and indicator are made in the form of figures of birds, animals, fairy-tale characters, etc.
No matter how simple the design of the weather vane may seem, a reliable and durable wind direction can only be obtained if it contains the following parts and components:
- The vertical axis on which the flag and counterweight are mounted. The axis can rotate freely 360° thanks to a sliding or rolling unit.
- A housing that is attached to the chimney or mounted on the roof. Being the base of the structure, the housing serves as a holder for the moving axis.
- Bearing. This unit is fixed in the housing and ensures ease of rotation of the windsock axis. The design may use one or more ball bearings, as well as sliding units consisting of low-friction bushings.
- Protective cap. It is installed on a vertical axis and prevents precipitation from penetrating into the windsock housing.
- Reference angles or bearings. They are two rods crossed at an angle of 90° with printed letters indicating the cardinal directions (North-South and East-West pairs). The rhumbs are rigidly fixed to the body and during installation of the weather vane they are oriented along the compass.
- Arrow (pointer) - attached to the axis at an angle of 90° and serves as an indicator of the wind direction.
- The flag is a blade mounted on one side of the boom. In fact, the entire decorative potential of the weather vane lies in the large surface area of this element.
- Counterweight. It is attached to the other end of the pointer and serves as a balancing device that balances the boom.
The design of the weather vane is so simple that it can be easily recreated at home.
Just one glance at the weather vane diagram is enough to understand how it works. Due to the high windage of the flag, the pointer rotates even from a small movement of air masses. The blade will rotate until it is parallel to the wind - in this position the resistance area will be minimal. In this case, the arrow will be directed in the direction from which the wind is blowing, and the flag will accurately indicate the place where the air masses are moving.
Safety sensors and their meaning
A geyser can be dangerous, because it is connected simultaneously to water and gas mains, each of which individually can pose a threat.
If there are problems with the gas or water supply, safety sensors turn off the operation of the column, and special valves will shut off the water or gas supply.
Typically, geysers can withstand voltages of up to 10-12 bar, which is 20-50 times higher than normal pressure in pipes. Such sharp jumps are possible with so-called hydraulic shocks.
But if the pressure is lower than 0.1-0.2 bar, then the column will not be able to work. You need to carefully study the instructions and specifications before purchasing to understand whether the dispenser is optimized for low water pressure in pipes in the CIS countries and whether it will work properly. And vice versa - will it withstand sudden changes in pressure, which, alas, is also not uncommon in our conditions.
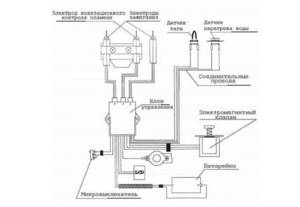
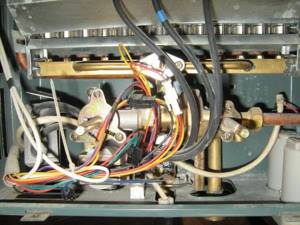
Ignition circuit for a burner powered by an electric spark. Locations of the main safety sensors for a household geyser
In general, a modern geyser contains many safety sensors. All of them, in case of breakdown, can be replaced.
More details about the purpose and location of the sensors are in the table below.
| Sensor name | Location and purpose of the sensor |
| Chimney draft sensor | Located in the upper part of the device, connecting the column with the chimney. Turns off the column when there is no draft in the chimney |
| Gas valve | Located in the gas supply pipe. Turns off the column when gas pressure drops |
| Ionization sensor | Located in the device camera. Turns off the device if the flame goes out while the gas is on. |
| Flame sensor | Located in the device camera. Shuts off the gas if the flame does not appear after ignition |
| Relief valve | Located on the water supply pipe. Turns off the water when the pressure in the pipeline is high |
| Flow sensor | Will turn off the column if water stops flowing from the tap or if the water supply is turned off |
| temperature sensor | Located on the heat exchanger pipes. It will block the burner operation if the water is significantly overheated to avoid damage and burns (mainly triggered at +85ºС and above) |
| Low pressure sensor | Will not allow the column to turn on when the water pressure in the pipes is low. |
Instructions for replacing old batteries
The batteries are located in an easily accessible place, often at the bottom of the case, and can be easily removed.
Pull-out boxes are opened by pressing on their wall.
In compartments that are closed with latches, batteries are often installed vertically. The batteries are held in place with a special latch, so they do not fall out of the box when opening the box.
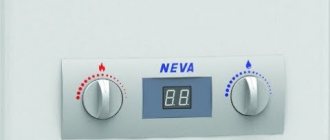
Depending on the design features of the speaker, the batteries can be positioned vertically or horizontally, for example, in the “Neva” speaker model.
Replacing worn-out batteries in a gas water heater takes place in several successive stages:
- It is necessary to turn off the gas and water supply to the column.
- Carefully open the battery compartment by pressing on its side or bending the locking latches.
- Remove old batteries.
- Install new batteries, observing polarity.
- Return the box to its place (or close the lid). Correct installation is characterized by a characteristic click.
- Resume water and gas supply.
In order to significantly save money on replacing batteries and not spend money on buying expensive batteries, you can upgrade the gas water heater yourself. After installing the adapter for a household gas water heater, instead of batteries, the ignition will carry current from the network.
But this procedure has two disadvantages:
- in case of power failures, there will be no hot water;
- such “tuning” may deprive the right to free warranty service of the water heater.
If the owner does not have experience in connecting the power supply for a household gas water heater or other equipment, it is better to entrust this procedure to a professional.
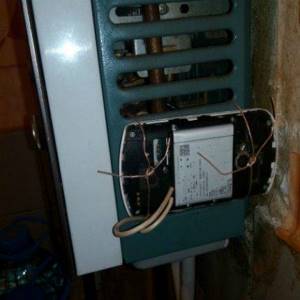
When performing work, do not forget about aesthetics. Some homemade designs still look a little clumsy
To remake the column yourself, you will need an adapter that matches the parameters of the water heater. Since the batteries produce a total voltage of 3 V, you need a unit with a similar output voltage. The operating voltage in the network is 220 V, the adapter must have a similar input.
To reconnect, you need to complete a number of steps:
- Gain access to the speaker power box and disconnect the wiring from it. For your own convenience, the connectors can be photographed or marked in any way, indicating their polarity.
- Cut off the plug from the purchased power supply, separate its wires and carefully solder them to the purchased connectors, observing the polarity. To determine the polarity, you can use a multimeter: positive readings of the device in voltage measurement mode indicate that the polarity of the wires matches.
- Connect the prepared wires to the column.
- Plug in the adapter and perform a test run of the instantaneous water heater.
If the connection is made correctly, the geyser will work properly, maintaining the required water temperature. After a test run, you can hide the wires in the housing.
https://youtube.com/watch?v=eV3wAYNB25E
To avoid malfunctions due to current fluctuations in the network, it is appropriate to add a stabilizer to the design. The device will protect the column from voltage surges.
Is it possible to turn on the speaker without batteries?
I would like to answer this sensitive question in the negative, but, alas, in some models it is quite possible to carry out ignition yourself. The method is banal and incredibly dangerous.
So, if the model of the installed water heater does not have a special protection system, then you can unscrew the hot water mixer and bring a fireplace match to the burner in the column. The flame from the match will ignite the gas, the column will begin its work.
It is worth remembering that such treatment of the speaker can result in an explosion. Jokes with blue fuel often lead to death. Therefore, it is much safer to go to the nearest trusted store to buy batteries.
How to make a gas water heater ignition block with your own hands
Buying a ready-made block is not the most expensive investment, but it pays off over time. However, if you want to spend a minimum of money on such a modification, you can make a power supply yourself.
This process, although it seems complicated, does not take that much time. And the money spent on purchasing materials for such a product will pay off within a year.
To make a power supply for a speaker with your own hands, you need to know how to solder. If this is your first soldering experience, we advise you to first practice on some product that is not so expensive, like a gas water heater. Once you are sure that you have acquired the soldering skill, you can get to work.
First of all, you will need to purchase a power supply with suitable parameters. The best option is considered to be an electrical unit with characteristics of 220V/3V/500MA. Next, you need two female-male connectors. You can purchase all the necessary materials at an electronics store. In addition to materials, you will need some tools, namely a soldering iron and soldering materials, a construction knife, and electrical tape.
Rules for turning on gas water heaters
It is important to take precautions when using the speaker.
Ignition of the wick or main burner is carried out in strict accordance with the manufacturer's instructions. Modern columns have several levels of protection and operate mainly in automatic mode, without requiring special precautions. Ignition and switching on occurs when the hot water tap is opened. Problems and difficulties arise when using old speakers that need to be set on fire with matches or models with a built-in piezoelectric element.
How to turn on an old speaker with matches
There are two main types of water heaters, differing in the ignition device. All models, without exception, are equipped with an ignition wick that burns constantly. The first residents of “Stalinka” and “Khrushchev” buildings had to use a column with levers. Later, water heaters with a built-in piezoelectric igniter appeared.
You should use an old-style geyser with caution. Failure to comply with the rules described in the operating instructions can cause an explosion, gas leakage and equipment failure
When turning on a instantaneous gas water heater, observe the following rules:
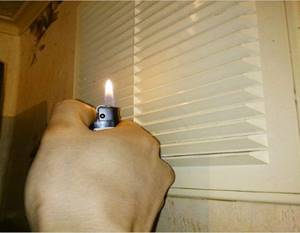
- Checking the presence of draft - before turning on, you should make sure that carbon dioxide can freely leave the room. Air circulation is checked using a strip of paper or a lit match. An inspection hole is provided in the column body. A sheet of paper brought to it should adhere to the body of the water heater. The flame should be pulled into the hole.
- The column lever (replaced by a handle in later models) is moved to the left position until it stops.
- Press the solenoid valve button. At this moment, the wick is simultaneously ignited with matches. After 15-20 seconds. the valve is released. The pilot light should continue to burn. It happens that the wick turns on only the second time. The cause of this malfunction is a malfunction of the solenoid valve.
- Turn on the water in the bathroom or kitchen sink.
- Quickly move the right lever to the left position. The main burner should light up. The lever regulates the temperature of hot water.
Lighting an old gas water heater is not that difficult. Switching off is carried out in the reverse order. First, the main burner is turned off, after which the water is turned off.
For convenience, when lighting an old gas water heater, it is better to use long fireplace matches.
How to light a column with a piezo element
Classic speakers with control via levers have been replaced by models with mechanical switches in the form of knobs. The housing provided a piezo ignition of the wick, allowing the gas water heater to be ignited without matches. The ignition procedure is as follows:
- The electric valve is clamped - usually 15-20 seconds are enough for enough gas to accumulate on the wick for ignition.
- You will need to press the piezoelectric element 2-3 times. When the module is correctly positioned and in working order, it is enough to “click” the piezoelectric element once to ignite the wick.
Further steps are the same as in the case of a column lit by matches. If the piezoelectric element malfunctions, ignition is carried out using matches.
How to light a column with electric ignition
Those who have used automatic gas instantaneous and storage water heaters know that the user does not need to carry out complex manipulations, as is the case with old-style models. Modern gas water heating equipment is equipped with an automatic system that gives a signal to turn on when the hot water tap is opened.
The spark appears due to the activation of automatic ignition, powered by batteries or mains electricity. If the water heater is in good working order, a few seconds are enough for the burner to start and hot water to be supplied to the consumer.
How long do batteries last and reasons for frequent changes?
The service life of a chemical power source depends on the frequency of switching on the column and the correct adjustment of the equipment. If the standard conditions are met, the shelf life of the batteries reaches 6-8 months. Premature failure of elements is associated with problems with the operation of the electronic unit that generates the spark.
An additional reason for premature discharge of the power source is the low quality of the device (typical for batteries produced by small or little-known Chinese manufacturers).
Signs of a decrease in voltage at the contacts of the current source:
- drop in spark power; when the tap is opened, the burner does not ignite;
- Reducing the brightness or turning off the information display.
An increase in humidity in the room in which the heating device is located negatively affects the battery life. If the distribution valves are clogged or the sensors are broken, a second spark is generated, which leads to the discharge of the power source. The ingress of water vapor onto the contact pads leads to the formation of conductive paths, causing a short circuit and accelerated degradation of the battery.
Burner, combustion chamber, chimney
Heating of water in a gas water heater occurs due to the heat released during gas combustion. The combustion itself occurs in the burner, and it is “packed” into the combustion chamber. Unburnt gases that remain in the chamber are discharged through the chimney. Let's take a closer look at all these devices.
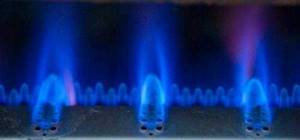
Burner - main unit
Burner
The heat source in the gas water heater is a gas burner. There are three types: single-stage, two-stage, modulated. The first two types are almost never seen lately - they do not allow maintaining a given temperature, so there is no point in considering them - all columns have a modulating burner.
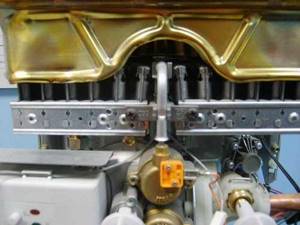
This is what a gas burner for a water heater looks like when installed
Modulating burners can be controlled manually - with a special handle mounted on the body - or through a microprocessor that maintains a given water temperature. Burners are made mainly of galvanized steel, since this material is optimal for performing the assigned tasks. It is inexpensive, durable, has a high melting point, and can withstand frequent heating.
Types of combustion chamber and chimney
Combustion chambers in geysers are of two types - open and closed. Their name reflects the essence:
- closed (turbocharged, fan) is a metal box into which a burner is inserted with a socket at the top for installing a chimney;
- open (atmospheric) - this is actually the entire body of the column, since there is no isolated space, just a burner is installed in a certain place, on top there is a lid with a socket to which the chimney is connected.
Different types of combustion chambers require different chimneys. In an open chamber, air is taken from the room, therefore an effective ventilation system, normal air flow and an atmospheric chimney exiting into the ventilation duct are necessary. The closed chamber is equipped with a coaxial chimney (two pipes of different diameters inserted into one another), which is led through the wall to the street. In this case, combustion products are removed forcibly, using a fan, through the inner pipe, and oxygen flows directly to the burner through the outer pipe.
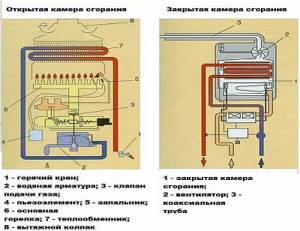
Open and closed combustion chambers at gas water heaters require the installation of a different type of chimney
A gas water heater with a closed combustion chamber operates more stably under normal conditions, but it has disadvantages. In winter, the chimney can become overgrown with frost, causing the heater to go out (it is extinguished by an automatic system that controls the removal of combustion products). The second point is that with a strong side wind, the air flow can blow out the flame. The gas supply is turned off by the same automatic system, but the situation is unpleasant. The third circumstance is that not all city authorities allow holes in the walls of houses and the insertion of pipes.
So in this case, it is difficult to say exactly which geyser is better - it depends on many factors.