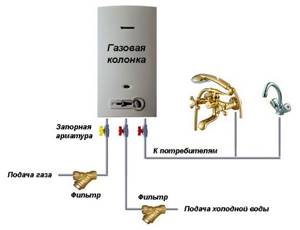
If you decide to install a gas water heater where there has never been one, you need to connect a gas pipe to the installation site of the water heater. To do this, you need to contact the gas service of your area or a company that has a license for this type of activity. You should not try to do this yourself, in this case you risk your life and the property of other people in the apartment building. All work related to gas supply, such as supplying a pipe, installing shut-off valves and tees on it, is carried out by organizations that have the appropriate license.
Installation of a geyser is carried out only after receiving an agreed project. Some of the work can be done independently, but all requirements must be strictly followed. If you do not do this, the gas utility will not put your water heater into operation.
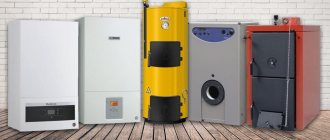
Types of heaters and boilers for apartments (including Khrushchev)
If we talk about gas heaters, they can be flow-through or storage. But in Russia, gas boilers are not widely used, because they are less convenient, cost more and take up a lot of space. They should only be installed if the gas supply is too weak. Mostly they install instantaneous gas heaters. You can find out how many sockets you need in the kitchen here.
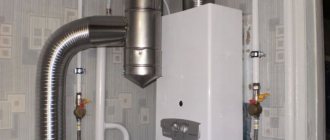
Modern models may have a closed or open combustion chamber. Open ones are a little safer and require less paperwork during installation. They are needed if there is no chimney in the house. The latter are suitable if the old heater is being replaced with a new one, the chimney and gas supply have already been made and tested.
Suppliers offer 3 types of power. 17-20 kW is needed for a one-room apartment with 1 inhabitant. If a person takes a shower, there is no longer enough power to wash dishes. Devices with a power of 20-26 kW are indispensable for apartments. They provide 15 liters of water per minute at a temperature of 40 degrees. The power of an average heater is enough for a family of 4 people and an apartment with 1 shower and 2 sinks. A power of 26-28 kW is suitable for two-level apartments or houses. You can find out what kitchen hoods there are by following this link.
Typical mistakes when replacing a column
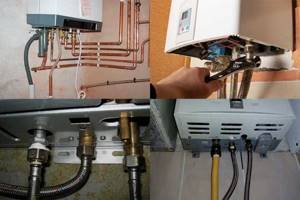
Often, when installing a water heater in a new location, the lateral distances of 150 mm from the wall or other surfaces and objects are not observed.
Too close a distance to the gas tap will make it difficult to maintain and will cause failure during commissioning
Excessive heating accelerates the wear of the heat exchanger, promotes the formation of scale, leaks, and reduces the service life of the gas appliance. We recommend that you read the heat exchanger repair instructions.
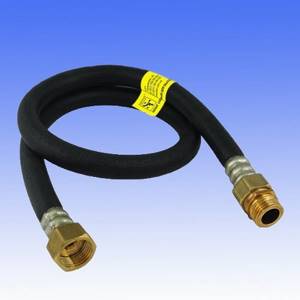
Many errors are associated with the use of unauthorized gas supply hoses or their incorrect connection. The desire to save on the price of such an important element can lead to unpleasant consequences.
It is known that exposure to gas greatly accelerates the drying of rubber. If it is not intended for gas line use or is of poor quality, the hose will quickly crack, causing unacceptable gas leakage.
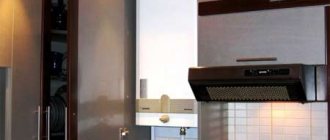
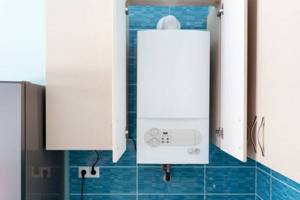
Sometimes, in an effort to give the most aesthetic appearance to the kitchen interior, the column is placed in wall cabinets. This arrangement, in addition to overheating the column itself, can lead to more serious consequences.
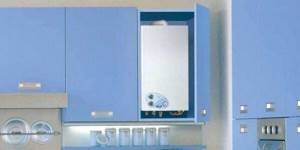
Installing a gas water heater in a lockable cabinet disrupts the normal operating temperature of the device. Impedes the flow of outside air. Insufficient ventilation increases the risk of carbon monoxide poisoning
To improve air circulation, the partitions at the bottom and top of the column should be removed. If the required gap of 3 cm is not observed and the side surfaces are protected with fireproof materials, heating the cabinet walls can lead to their charring and fire.
We recommend that you familiarize yourself with the best ideas for disguising a speaker in the kitchen that do not violate safety requirements.
How to install a geyser
Self-installation is prohibited by Russian law, but since representatives of the gas service often remain elusive, we recommend installing the device yourself. Specialists should only be invited to connect the hose to the gas pipe and check all connections for leaks.
What you need to have with you
First of all, prepare all the necessary materials and tools. You will need:
- new gas water heater;
- PVC pipes for water supply and metal-plastic for gas;
- fitting;
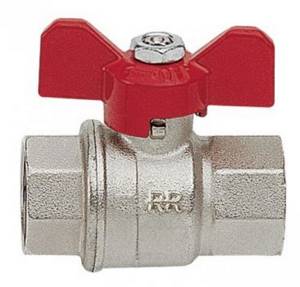
- taps - gas and water (it is better to use ball taps);
- salt and magnetic filters;
- corrugated or galvanized pipe (if included with the column);
- Mayevsky crane;
- a ring to make an entrance to the chimney;
- gas hose (its length depends on the distance between the pipe and the column);
- water hoses (also select the length depending on the distance);
- dowels and screws;
- gas key;
- pipe cutter;
- set of wrenches;
- drill;
- level;
- sealant, FUM tape and tow;
- soldering station for pipes.
In the case of a private house, you may also need a metal (asbestos) pipe to remove smoke. Its diameter should not be less than 120 mm, and its height should be two or more meters.
We remove the old
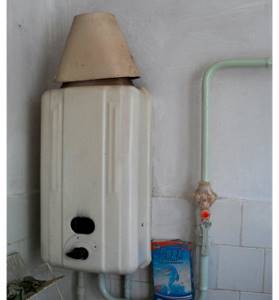
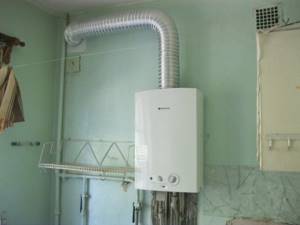
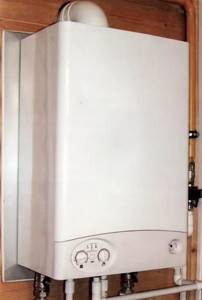
This is an old gas water heater and is not safe to use. It is best to replace it with a modern analogue.
If you already had a water heater, then the first thing you need to do is dismantle it. For this:
- Close all gas valves.
- Using a gas wrench, unscrew the fixing nut on the hose.
- Then remove the hose from the column. If the hose is new and undamaged, it can be used further. Otherwise, buy a new one.
- Now you can proceed to disconnecting the device from the water supply. Turn off the water (if there is a tap near the water pump, then just turn it off, otherwise you will have to block access to water for the entire apartment).
- Remove the connecting pipe located at the outlet of the column and pull it out of the chimney.
- Dismantle the water heater by removing it from its mountings.
Direct installation
Installation of a gas water heater occurs in several stages. After choosing a location, you need to prepare all communications: water supply, chimney and gas pipeline. All this should be in close proximity to the future column, so that after installing the latter, all you have to do is connect the hoses to the pipes.

To connect gas to a gas water heater, be sure to call specialists from a special service.
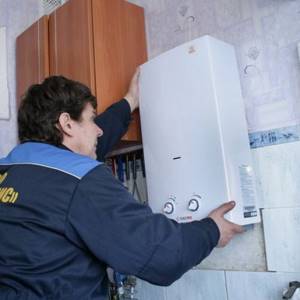
- So, the first thing you need to do is mark the location for the water heater. I hang it on a special bar that is included with the device. That's why you will need a drill, dowels and screws. It is better to mark using a level.
- We drill holes, drive in dowels, attach the plank and screw it to the wall with self-tapping screws.
- The next thing you need to do is connect the water heater to the chimney. This is done using corrugation or a metal pipe. Installing the latter is easy. The pipe needs to be put on the pipe (and the sleeve must also be tightened with a clamp) of the column. The other end is inserted into the chimney and covered with cement (asbestos can also be used). But do not forget that the horizontal section of the pipe cannot exceed 6 m and you cannot make more than 3 corrugation bends.
- Now you can proceed to connecting the column to the water supply. As mentioned earlier, it is better to do the installation of pipes and branches in advance. At the same time, cutting into the nearest line is not always a good option (if the pressure in it is weak, cut directly into the main pipe going to the apartment). Be sure to install a tap on the new branch going to the water heater so that you can repair the water heater or replace it without turning off the water in the entire apartment or house. To install the pipeline, you will need metal-plastic pipes and a soldering iron, as well as a tap and couplings.
- After finishing work with the hot and cold line pipelines, all you have to do is connect the hoses to the corresponding outlet and inlet of the dispenser and to the pipes.
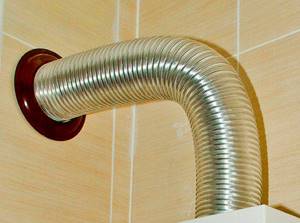
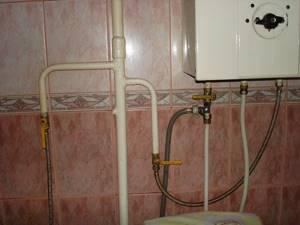
This is what a chimney made of corrugation looks like. The ring has a purely aesthetic value.
Your work is now complete. Connection to the gas pipe is carried out by specialists from the relevant service. A ball valve is also placed at the entrance to the column, all connections are sealed and then checked for leaks.
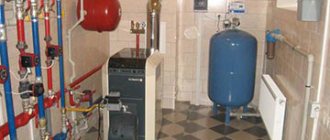
Climate
How much does it cost to install a geyser? Dismantling and replacing a geyser by the hands of specialists will cost an average of 3,000 to 4,500 rubles. This is in Moscow, in the regions it will be cheaper. The amount is not astronomical, but, nevertheless, it is still a pity to give it for work that you can easily do yourself. And everything would be fine, but in this matter there are a great many nuances, ignoring which can greatly hit the user’s pocket.
What are these nuances? What kind of rules and regulations generally govern these types of work? And you simply must know the basic provisions, because this is not a plumbing system with which you can experiment. Gas is gas, negligence and carelessness in dealing with it ends very badly. In this article we will look at the procedure for replacing and installing a gas water heater. Let's look at step by step how and what you can do yourself, and what is best left to a gas industry representative.
Content
- Standards and requirements governing the installation of a geyser
- Removing the old column
- Installation and commissioning of a gas water heater
- Tools and materials
- Installation and testing of a new unit
Standards and requirements governing the installation of a geyser
Note! Let’s immediately make a reservation that all types of work related to gas supply, i.e. supplying a gas pipe, installing tees, shut-off valves on the gas pipe, etc. carried out only by organizations that have the appropriate special license. Ignoring this provision will, at best, lead to a hefty fine and a severe headache.
All work on installing a geyser can be divided into two categories:
- installation from scratch, i.e. it wasn’t there, but you decided to put it in;
- replacing the old column with a new one.
In the first case, a design and supply of a gas pipe to the location of the future water heater is required. All this work is the responsibility of the gas industry in your area or a company that has a license for the corresponding type of activity. It is impossible to do without this. In this case, do not try to do anything yourself. This is not smart, because... You yourself risk your life and property, and when installing a gas water heater in an apartment, you endanger other people. And it’s not easy to play such games with the state, it’s not the right weight category. Therefore, entrust this work to people authorized by law for this type of activity.
If the project is ready, everything is agreed, then by completing part of the work properly you can save a significant amount. Any work that you decide to carry out yourself must be carried out strictly in accordance with the requirements of the approved project; if this is not done, the gas industry will not accept this gas water heater for operation.
Note. All work on the installation of gas units begins only when you receive a project with all the necessary permits and approvals.
All standards for installing a geyser are regulated by the following acts:
— SP 42-101-2003 “General provisions for the design and construction of gas distribution systems made of metal and polyethylene pipes”
— SNiP 42-01-2002 GAS DISTRIBUTION SYSTEMS
In order to bore the reader with many clever words, we present the basic standards for installing a gas water heater, which apply to the intended installation location:
- The room in which the column is installed must have a volume of at least 7.5 m3.
- The room must have ventilation (vent, window, etc.).
- The ceiling height in such a room must be at least 2 m.
- The room must have a chimney with a diameter of at least 120 mm (at the same time, “smotherers” in apartments do not qualify as such).
- The pressure in the water supply must be at least 0.1 atmosphere.
- It is prohibited to install geysers in bathrooms.
- The column is installed on a wall made of non-combustible materials; installation above a gas stove and at a distance closer than 10 cm to it is prohibited.
At the same time, those speakers that are installed in bathrooms, in accordance with the technical standards in force at the time of installation, are allowed to be used in the future. That is, the law does not clearly prohibit its further exploitation. This means that replacement with a new one does not prohibit. And does not require transfer at the user's expense.
If all these requirements for installing a geyser are feasible, then you can order a project. The exact installation location and other details will be displayed in the project.
Removing the old column
Since the basic requirements and standards have been reviewed in general terms, if everything complies, you can begin replacing the gas water heater. And we should start with dismantling. You can do this yourself and save from 300 to 800 rubles.
We start by shutting off gas access to the column by closing the tap at the end of the gas pipe. Using an adjustable wrench or an open-end wrench of the appropriate size, unscrew the fixing nut of the hose (rarely, but there is a method of supplying gas using a metal pipe). It is quite difficult to damage the gas pipe when unscrewing the hose, but with the “ancient” connection method, i.e. a piece of metal pipe, quite realistic. Especially if the joint has been painted over for years. In this case, do not use excessive force; to remove paint, use a modern solvent specifically for this work. When unscrewing, hold the gas pipe with a second adjustable wrench, this way there is less chance of damage.
After disconnecting from the gas pipe, it is necessary to remove the hose (pipe) from the point of entry into the column. If the hose has recently been changed and its condition is satisfactory, then it can be reused when connecting a new column. If you have any doubts about the reliability of the hose, purchase a new one. When purchasing, take a certified and tested hose; after all, this is gas and buying a cheap hose from an unknown manufacturer is not appropriate here.
The next dismantling step is to turn off the water supply system. If there are taps to turn off the column, turn them off. If this is not possible, shut off the supply to the apartment. In the case of the latter option, before installing a new column, purchase two taps for the inlet and outlet of water from the column and install them on the pipes in the place where the connection will be made. This will make it easier to maintain in the future.
After disconnecting the column from the water supply, remove the connecting pipe from the outlet of the column and remove it from the chimney. The speaker is disabled and can now be removed from the wall mount. The installation site is free, you can begin installing the new unit.
Installation and commissioning of a gas water heater
During the initial installation, it is better to entrust the connection and verification, with the registration certificate of the gas water heater, to gas specialists. If you change the old column, you can do all the work yourself. But there are two nuances, if you doubt your ability to correctly install a gas water heater - trust the specialists, your wallet will be somewhat thinner - but the nervous system will remain unaffected and, ultimately, the benefit will be yours.
If you decide to do everything yourself, you will succeed, the main thing is to do everything slowly and progressively. But even in this case, you cannot do without a representative of the gas industry; he must register the dispenser. The best option, perhaps, is the situation when you do all the connection work yourself, with the exception of gas-related work. In this case, you will save a significant amount and there should be no problems with the gas service, because connection to the gas main will be carried out by their representative. We will consider this option.
Start-up and commissioning
After the installation of new equipment has been carried out, it is necessary to begin supplying gas and put the column into operation. This item of work can only be performed by a gas worker who has a specific permit for this. To do this, you will need to fill out and leave a special application and wait for the specialist. If you know exactly the model of the future column, then specialists can lay the pipe directly to it. Just remember that the column is initially installed, after which the gas pipe is installed. In another case, you should stop half a meter from the installation site and use a hose. This method will help services significantly reduce work.
An important issue is connecting water to the column, because without it it is simply impossible to fully use the equipment. To begin with, you should run cold water, after which you should make a distribution for hot water, which will flow throughout the house and through the column. If there is a filter, it will definitely make the task easier. If it is not there, then it is worth installing a special purifier for 90–100 microns - this is a filter for the so-called coarse water purification. But you can also install a fine filter, but it will be 10–20 microns. Installation of filters is necessary to ensure that the column operates without interruptions and does not clog the pipes.
There are the following methods for connecting pipes to a gas water heater:
- you can make a pipe connection over a short distance and use a special hose made of copper or brass;
- connect directly using metal-plastic or steel material, depending on what material the wiring was made from.
The procedure itself goes as follows:
- you should take a tee, a pipe and a so-called pipe cutter, but it will only be suitable for metal-plastic pipes;
- in places that seem most necessary, you need to make pipe cuts;
- using a fitting, you need to screw the tee to the pipe through which cold water flows;
- the remaining section of pipe must be connected to the column;
- if you have steel pipes, you will need a welding machine and, of course, the ability to use it;
- you should use a tee clamp, the principle is the same as in the first case: you need to make a hole, apply a tee there and connect it to the gas water heater;
- a soldering iron will be required if there are polypropylene pipes;
- DHW pipes will be required, but if they are not there, then you need to run one pipe from the water heater to each faucet in the house.
When everything is already installed and looks pretty decent, you can safely start launching the gas water heater. First, you should check the connection for leaks - are there any cracks anywhere, is there water leaking, is there a smell of gas. This is quite easy to check: you need to take soapy water and wet the joints, and then let the gas flow through the pipe. If there is no smell, this means that everything is sealed. The first launch should be performed in the presence of a specialist and strictly follow the instructions contained in the box.
The first step is to decide on the gas supply pressure, which is regulated by a bolt, and the air supply, which is regulated using a damper. It will be impossible to perform this procedure in the absence of a pressure gauge; it will show the pressure when the column is turned on to maximum and minimum. What the maximum pressure should be can be found in the manufacturer's instructions. The optimal solution would be to set the burner gas to a normal level, at which the flame will be constantly blue. By the way, this also needs to be monitored repeatedly, because there should be no yellow glow in the combustion.
As for the cost of not only the equipment itself, but also the installation, the choice here will depend directly on the owner. If you purchase a product on the market, then most often the installation comes with a separate receipt, in contrast to a specialized store, where you can see the full cost of the product and installation in one receipt, or, more often than not, such stores offer to carry out the work for free. You can also use the services of a service center. Then a contract is concluded for the entire period of services, which will be a guarantee of quality.
In the next video you will find instructions on how to connect a gas water heater.
Installation norms and rules
Technically, installing a speaker with your own hands is not difficult. However, not everyone is able to act in strict accordance with safety regulations. The installation of the equipment can be carried out by a person with the appropriate skills, but only a specialist from a company with a license can connect it to the main line.
Before you begin, you need to collect the necessary documents and obtain permits. What design scheme should I choose to legitimize my work? This depends on a number of reasons:
- This is your first time installing equipment that will replace the central water supply (provided that gas is supplied to the premises).
- You want to replace an old or broken unit.
- You comply with the requirements of the services to move the device from the bathroom, toilet or other place not intended for these purposes to another room.
It is important to take the choice of technology seriously. Not only the design and power of the product matters, but also the type of combustion chamber. If your house has a chimney (not to be confused with ventilation), then you can buy open-type models. They are presented in a wide range. But if there is no chimney, then a closed model is suitable: combustion products are forced out through a channel in the wall.
We repeat: be careful. The wrong choice will lead to the need to replace equipment and unnecessary expenses.
Now about the documents. To install a speaker in the kitchen, you need to obtain permission and register it. But first you need to collect a package of documents. At the same time, you need to know that in a number of situations installing a column is impossible.
The location of the water heater is not provided
Surprisingly, in apartments where a stove is allowed, the placement of a flow-through heater may be prohibited. This is possible in houses with large number of storeys (more than 11 floors), as well as when remodeling premises. We are talking about options when the apartment is remodeled as a “studio” or the kitchen is combined with a living room - this is unacceptable for installing a main building. This also applies to apartments without a kitchen or to premises with a shared kitchen (communal housing).
Gas equipment is prohibited from being placed in residential premises.
If you have a studio apartment, this option is also prohibited. In this case, the kitchen is combined with another room, that is, with a living space. Shared kitchens, such as in dormitories, also fall into the off-limits category. Before deciding to purchase a speaker, carefully study the documents for the apartment. They contain the necessary data about the parameters of the room.
If everything is ok, then prepare:
- Application to the gas service.
- Document confirming ownership.
- Project of gas and water mains, chimney channel.
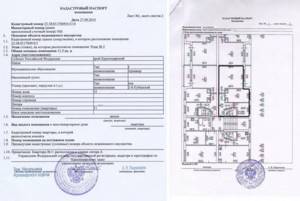
- Apartment plan from the BTI authorities.
In addition you will need:
- A report on the technical condition of the chimney obtained from the fire inspection.

- Documents for the purchased speaker model.
- Permission to renovate the premises.
- Application for reconstruction.
After the documents have been collected and permission to register has been received, specialists will come to you and carry out the connection in accordance with the requirements of the law.
How to change equipment
Everything is a little simpler here. Since the documentation was collected during the initial installation, all you have to do is contact the Housing Office and take copies of the diagrams, piping plan, and chimney. Then write two statements:
- About replacing the old model with a new one - in the same place.
- On permission to carry out work on water and gas mains.
If you want to install equipment in a new location, you will need to obtain a renovation project. This is due to the fact that the supply line will undergo changes. In fact, you need to build the same package as in the case of the initial installation.
SNiP 42-01-2002 - standards for the design and construction of gas distribution systems. They indicate the equipment requirements.
Components of the smoke exhaust system ↑
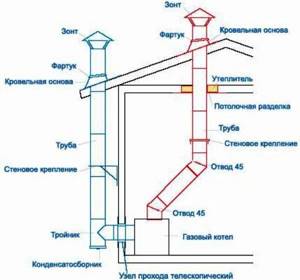
Components of a chimney
- An umbrella (protective cone) is the upper element of the chimney.
- The chimney is the next part of the structure after the protective cone. There is a version with or without a thermal insulation layer.
- Pass-through pipe - necessary to isolate the previous element from the wall of the house.
- Brackets - necessary to secure the chimney.
- Clamps - connect pipe joints.
- Tee - necessary for the transition from the gas water heater to the chimney.
- Inspection window - allows you to monitor the condition of the chimney pipe.
- A collector of condensate that accumulates as a result of the operation of the chimney.
The process of connecting the column to the water supply
When the main part of the work has already been done and the device is attached to the wall, you can begin the process of connecting to the water supply. In this case, you must follow the following rules :
- Connect the pipes to the water supply and the column using fittings, but do not confuse the inlet and outlet.
- When connecting to the heater, use American ones.
- The pipes should be securely fastened to the wall so that they do not put any weight on the equipment.
- If there is no mud trap in the apartment, it must be installed on the inlet line.
- On each of their inlets you need to install a tap, which can be hidden in a special cabinet so as not to spoil the interior.
Connection diagram of communications to the water heater
After completing the entire series of works, it is necessary to invite specialists who will directly deal with the supply of equipment to the gas main.
Tip: Do not connect a gas water heater if it does not have a heat exchanger!
To learn how to install a gas heater, watch the video:
Electric water heating storage device
In a storage water heater (boiler), water is heated to 35-38ºС and then its temperature is maintained at this level automatically. When you open the tap, warm water flows out of the container, and instead the next portion of cold water enters the tank. The duration of water heating in these water heaters depends on two parameters. This is the volume of the tank and the power of the heating element. To keep energy losses to a minimum, water tanks are made heat-insulating (in the form of a thermos), which does not allow the heat of the water to be transferred to heat the room where the water heater is installed.

Typical storage electric water heater device
Such a device can be connected to a regular outlet, since it does not require high power to gradually heat the water. For example, 150-liter water heaters of this type consume no more than 2 kilowatts. It is this circumstance that makes these devices popular, since they can be installed in almost any room. In addition, the high demand for them is due to another advantage of storage water heaters: water can be consumed from two water intake points simultaneously - both in the kitchen and in the bathroom.
On the other hand, boilers also have some disadvantages. These are large in size and require periodic maintenance: cleaning the heating elements from scale, replacing the magnesium anode. It is no secret that any heating element becomes covered with scale during operation, which reduces its heat transfer, and, consequently, the energy consumption for heating water increases. To protect the heating element from scale, a magnesium anode in the form of a rod is built near it. Dissolving during operation, it reduces the formation of scale. As it wears out, and this depends on the intensity of use and the level of water hardness, the anode is changed. The volume of heated water depends on the capacity of the tank, so when choosing a storage water heater, you need to focus on the capacity you need.
A tank that is too large will consume more electricity, and it will take up extra space. Therefore, you should think carefully to choose a device with the optimal capacity for you, without spending extra money and not taking up extra space. If the water heater is needed only to supply warm water in case of periodic outages, a volume of 10-15 liters will be sufficient. Only for taking a shower will a device with a tank capacity of 50 liters be sufficient. For a hot bath you will need a tank with a capacity of up to 150 liters. In a country house where there is no centralized hot water supply, the required volume is 200 liters or more.
Most manufacturers produce horizontal and vertical models; recently, modern universal designs have been created (installed as needed - either horizontally or vertically).
Choosing a place for the column
It is important to remember the requirements that the location of the column must meet. Devices can be of different power and for different purposes. Choose a place that is optimal for supplying hot water - near the bathroom, kitchen or in the pantry, where children and unauthorized persons will not have access.
It must be taken into account that the installation of such a device in an apartment must be agreed upon with representatives of housing and communal services, the gas service in a particular area, and the management company related to the house and apartment. Applications for installation should be sent only to organizations that have a license for this type of work.
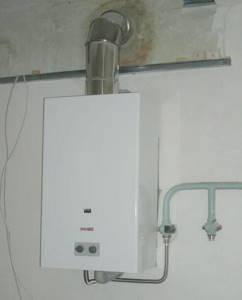
The column must fit into the interior in accordance with all technical standards and conditions. It is also necessary to install a hood for combustion products. It can be installed; this option will be especially easy if there is a chimney.
They make a hole in the ceiling and insert an asbestos pipe, which you can make yourself. Its length must be at least 1.5 meters. Only after this requirement is met is the installation of the column under the pipe done. It is also necessary to place the device at a height inaccessible to children, but within an accessible zone, since the operation of the automatic column must sometimes be adjusted manually to achieve a certain temperature.
Brief instructions for installing a geyser
This information should not be considered as a guide to action. Replacing a water dispenser with your own hands, as well as working with any gas appliances, is prohibited not only by law, but also by common sense: such “amateur activity” in an apartment building can lead to disastrous consequences.
For work use:
- certified geyser;
- PVC water pipe;
- American type fittings;
- pipe cutters;
- soldering iron;
- metal-plastic pipe for gas supply;
- fittings for metal-plastic;
- gas taps;
- salt and magnetic filter;
- Mayevsky crane;
- regular water tap;
- proportional wrenches;
- drill;
- as well as dowels and screws.
Progress of work and basic requirements for them:
The choice of installation location for the dispenser should be based on the possibility of arranging the hood in accordance with all rules and regulations, the convenience of the dispenser location, as well as the possibility of supplying communications.
The volume of the room in which the column will be installed must be 8 m³ or more.
Speakers are installed only on fireproof walls. In another case, the fire-resistant surface is lined with a galvanized sheet from 0.8 to 1 mm thick, having previously secured a sheet of basalt heat-insulating cardboard from 3 to 5 mm thick to the wall.
IMPORTANT! Installing speakers on wooden walls is prohibited!
The column is hung on the wall, taking into account that the installation height can be arbitrary, but do not contradict the rules for installing the air vent. There should be at least 15 cm from the side panel of the speaker to the wall, and a space of at least 60 cm should be left in front of the front panel of the speaker.
At the installation location of the column, mark the fastening points, then drill them with a drill. The column is secured with self-tapping screws.
The standards for installing the connection between the column and the water supply system provide for the use of metal pipes or flexible hoses with an internal diameter of at least 13 mm. In this case, the length of the hose or pipe must be no more than 2.5 m (similar parameters must be observed when arranging a connection to the gas supply system).
Installation of a gas connection to a column must be carried out only with a shut-off valve installed.
Before installing the chimney, check the draft. Under normal conditions, it should be approximately 1.96-29.40 Pa (depending on the type of room).
The gas exhaust pipe must have at least 110 mm in diameter, while its length cannot exceed 2 m, but cannot be less than 300 mm. The slope of the gas exhaust pipe must be at least 2° upward.
IMPORTANT! It is also prohibited to independently carry out the first release of water through the column. All work related to testing the system, installing a new column or dismantling an old one must be carried out only by qualified representatives of GORGAZ. The speaker installation diagram must be included with the product.
The manufacturer's advice on installing this device is also given there.
The speaker installation diagram must be included with the product. The manufacturer's advice on installing this device is also given there.
Only kitchens and non-residential premises intended to accommodate these heating devices are suitable for installing speakers.
However, the installation rules prohibit installing a column in the bathroom, because... this room does not meet the basic requirements (see SNiP 2.04.08-87 GAS SUPPLY).
In previous regulations, the installation of speakers in bathrooms was allowed. But after the change in legislation, we can only talk about moving the speaker from the bathroom to the kitchen or any other non-residential premises, if it is necessary to replace the device with a new one.
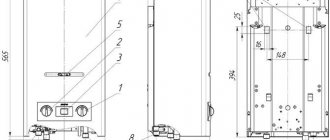
Figure 4 — Gas water heater installation diagram
The requirements for installing speakers also make it possible to consider each individual case: for example, in a private house that does not belong to typical buildings, it may be possible to install a speaker in a wide corridor or a room without windows, but having access, however, to a spacious room with a window.
Figure 5 — Checking draft before installing a gas water heater
Choosing a location for installation
By default, the geyser is installed in the kitchen. In all house projects where the speaker was initially supposed to be installed in the kitchen, a chimney with a diameter of at least 120 mm or its equivalent, required by the rules, was provided, as well as a ventilation system for constant air access. When replacing an old speaker with a new one, it is better to leave everything in the same place.
However, new models of gas instantaneous water heaters can not only cope with high humidity in the bathroom and do without a classic chimney.
To install them, you only need to lay a coaxial pipe outside, through which fresh air will flow into the closed combustion chamber and combustion products will be discharged.
Water connection
Now a pipe with cold water is connected to the column, and hot water is distributed throughout the house. It is better to connect to the water heater using an American connection with a movable union nut.
For cold and hot water lines, be sure to install shut-off valves - ball valves.
If there is no cleaning filter at the main inlet to the apartment or house, then a coarse filter of 80-100 microns is installed in front of the column. It is also advisable to install a fine filter of 10-20 microns.
The cleaner the water, the longer the heat exchanger will work without blockages and scale.
Pipes are supplied in one of the following options:
- Supplying pipes to a distance of less than 30 cm to the column and connecting using a flexible hose or copper/brass tube;
- Direct connection of metal-plastic, polypropylene or steel pipes, depending on the material used for the main wiring.
To tap into a cold water pipe, you will need a tee. The simplest option is to insert into plastic using clamp fittings. All you need is an adjustable wrench, a pipe cutter and a flaring tool. The fittings you will need are a tee, an American fitting and a shut-off valve.
Water connection diagram
Having previously cut the pipe in the right place so that the supply to the column is as smooth as possible and without additional elbows, American fittings are inserted into the cut and a tee is screwed to them. Next, a section of pipe is connected to the column.
For steel pipes, you will need a welding machine and welding skills. Instead, a special tee clamp is used. It is fixed to the pipe and then a hole is drilled through the outlet in the cold water pipe. Next, a section of pipe is connected to the column.
For polypropylene pipes you cannot do without a soldering iron. It is easy to rent, but the amount of work will be less than with steel pipes.
Next, the DHW pipes are laid out, if they do not already exist. A pipe with a shut-off valve is led from the column, and then to each mixer in the house.
If you are only replacing the column, then it is still advisable to re-lay the pipes to avoid the accumulation of adapters and elbows in front of the gas column. This will protect the equipment from unnecessary turbulent flows in the pipes, which can affect the operation of the hydrothermal control unit.
Requirements for installation work.
For installation you will need:
1. ball valve: gas and two for water supply.
2. connectors with an American cap washer.
The cross-section for the reinforcement should be ½ inch.
Fasteners are included in the kit for the column.
Attention! Cold water supply must have a filter to protect against impurities in the water.
1.make markings for the device, placing it against the wall. Measure the distance to the mounting holes. Drill them. The model of the device dictates the mounting method: using brackets or hooks.
2.hang the device, connect the outlet to the chimney. A round pipe is inserted into a square shaft using an adapter. The connection is sealed using an asbestos cord.
3.American ones are mounted to the fittings, then the taps are connected. It is important not to confuse the water pipe with the gas pipe.
4.connect the water supply with hot and cold water, open the common tap, checking for leaks. If the connection is good, connect the gas pipe, and before screwing, treat the gasket with grease.
5.check for gas leaks, open the gas tap, lubricate with soap foam. If there is a leak, bubbles will form.
Next, the installation must be accepted by the gas engineer, and the water heating can be checked. When replacing a column, dismantle it, and then do everything in order.
Attention! When connecting to water supply and gas, you can use flexible hoses no more than two and a half meters long. But the number of areas for connection will increase.
Installing a chimneyless type dispenser with automatic ignition has a different method of installing the flue: through the wall to the street horizontally. A double-walled coaxial pipe is installed with a slope towards the street so that condensate flows through it. The device requires grounding and connection to electricity, so a separate outlet is installed nearby, which is powered through an 8-amp machine.
Operating rules
In order for the new column to serve for a long time and not require repairs, you need to:
- Carry out regular maintenance, cleaning the device from carbon deposits, dust and scale. The recommended frequency is once a year, but if it gets dirty, unscheduled cleaning can be done.
- Avoid excessive heating of the water in the column, as this accelerates the process of scale formation on the walls of the heat exchanger.
- If necessary, install a filter and pump in front of the column.
You can see an example of installing a gas water heater in the following video of the “Yury Trifonov” channel.
The best posts
- How to make a plasterboard box in the bathroom - step-by-step instructions
- Drywall figures or how to make the interior stylish and fashionable
- DIY decorative corner fireplace made of plasterboard
- Wiring under drywall: lay it out correctly
- Painting drywall - step-by-step instructions
- How to join drywall in corners and the process of building a decorative niche
- Socket boxes for drywall: correct selection and installation
- How to seal a doorway with plasterboard - installation diagram
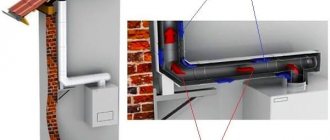
Connecting the column to the chimney
It is better to connect the water heater to the chimney using a steel pipe. It is also possible to use a corrugated aluminum hose, but if its length is more than one and a half meters, measures must be taken to prevent sagging. The diameter of the connecting section, as well as the chimney itself, must be no less than the diameter of the outlet pipe of the column.
How to install a gas water heater with your own hands
The installation itself is not difficult. The pipe is simply put on the pipe, and the sleeve is secured with a steel clamp. The other end is inserted into the chimney opening and sealed with cement or asbestos. It would seem that it would be logical to attach the sleeve to a special socket, but this is prohibited by the rules: each previous link of the connection must be inserted into the next one, and not vice versa.
How to install a gas water heater with your own hands
This is not the only rule. They represent the main difficulty at this stage of work. The total length of the horizontal section of the connecting chimney cannot exceed 6 m (in houses under construction - 3 m), and no more than three bends are allowed along its entire length. In addition, for many models of gas water heaters, the vertical part of the pipe coming from the nozzle must be at least 0.5 m.
We have already discussed the need for sufficient space above the column. Let's calculate: 1 m from the column to the floor, plus the height of the device itself (on average 0.5 m), plus 0.5 m of the vertical pipe - this is already 2 meters. According to the rules, the distance between the wooden ceiling (wall) and the pipe must be at least 25 cm, and if the ceiling is non-combustible - 5 cm. In this situation, low ceilings made of flammable materials can become a problem.
In this case, you will either have to choose a water heater that can work with a shorter vertical section of the connecting chimney, or cover the ceiling above the pipe with sheet steel or asbestos. The second option is not very aesthetic, but it allows you to reduce the permissible distance between the ceiling and the pipe to 10 cm.
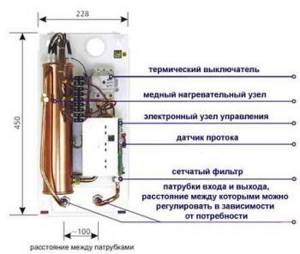
Electric instantaneous water heater
Instantaneous water heaters operate on the following principle: passing through the heating element, water immediately flows out of the tap hot (up to 60ºC). Such devices are compact, easy to install and reinstall if necessary to a new location. Their big disadvantage is their high power - from 3 to 24 kW. For this reason, they can only be used in places where the electrical network is designed for such high power. In houses with conventional electrical wiring, where there are gas stoves, the maximum permissible load on the electrical network is 3 kW.
Therefore, when choosing such a device, you will have to change not only the wiring, but also the meter, the input machine, and install an additional machine directly for the water heater. All these costs can exceed the cost of the water heater itself. In houses equipped with electric stoves, the maximum load on the network is 8 kW. In this case, an instantaneous water heater can be connected to the wiring for the stove, but these devices can only be used one at a time. The main advantage of instantaneous water heaters is that they are capable of producing hot water in unlimited quantities, but the disadvantage is the impossibility of simultaneously providing several points with hot water.
Checking the system operation
After installing a gas heating device with your own hands, it is important to check the quality and safety of its operation. To do this, open the gas supply valve - it goes into the column. Then make a solution of soapy water - it will help check the joints of pipes and faucet fastenings. If bubbles appear in these places, then there are some holes that need to be covered and eliminated without fail.
Then they check the operation of the water supply - open the Mayevsky tap and, at the same time, open the hot water. You must wait until the air comes out of the filters, then close the filter. After this, if there are no shortcomings, you can use the speaker in your house or apartment with complete peace of mind.
Advantages and disadvantages of electric boilers
Electric boilers are still more versatile. Their advantages include:
- The heater is able to work in homes where there is no gas supply system.
- There is no need to purchase expensive metal pipes and install a ventilation system.
- Safe to use.
- The device can be installed independently
, while a gas device can only be installed by specialists. - The pressure of hot water does not depend on the number of taps open in the house.
The disadvantages of these devices are due to their design:
- an electric water heater is less economical in terms of energy consumption;
- large dimensions
; - shorter service life compared to gas heaters.
Of course, both the water heater and the electric water heater have their advantages and disadvantages. Therefore, it is quite difficult to unequivocally answer the question of what to choose, a boiler or a gas water heater. When choosing, you should first of all take into account the availability of gas in the house and the economic factor.
However, any device can completely eliminate such a problem as the lack of hot water in the house.
Unstable hot water supply is a common problem. However, you can successfully protect yourself from the inconvenience that this unpleasant phenomenon causes by installing a gas or electric water heater. The variety of types and models of such equipment on the market allows you to choose the best option for a particular home. But which is better: a boiler or a geyser - an objective answer can be obtained by comparing the features of these types of water heaters.
Modern geysers are very different from the unaesthetic bulky appliances of yesteryear. Now these are devices with an attractive design and compact size that easily fit into any interior. There are two types of geysers, differing in the type of ignition:
- automatic water dispensers - their operation begins from the moment the water tap is opened;
- semi-automatic - to start such equipment, you need to light the wick manually.
Features of self-installation
In the case of a simple replacement of the unit, its installation can be carried out without the involvement of specialists, since the communication connections are already available and all that remains is to change the equipment.
When carrying out installation operations, the following points must be taken into account:
- First, you should mark the mounting points for the speaker on the wall, for which you first need to remove its mounting dimensions;
- the hanging location should be chosen in such a way that the distance to the nearest outlet is at least 0.5 meters (with a room height of up to 2.75 meters);
- with a higher room height, this distance may be slightly less (up to 0.25 meters).
For safety reasons, the height of the gas water heater on the wall should not allow small children to reach the control panel
It is very important to accurately measure the distance between the mounting holes, which allows you to hang the speaker on hooks or special brackets without any difficulty. Taking into account all the above factors, installing a speaker comes down to simply hanging it at the desired height
Advantages and disadvantages of storage water heaters
Using a boiler can be a solution to the acute problem of lack of hot water in buildings without a gas pipeline. These could be non-gas-free areas of the private sector or suburban real estate where there is running water and access to electricity. Other obvious advantages of this electrical equipment:
- There is no need to collect any documents, because installing an electric boiler does not require special permits;
- You can even install it yourself, having the necessary knowledge and experience;
- Plastic pipes are sufficient for installation of the device;
- no strict installation requirements, because the device operates without open flame;
- the force of water pressure does not affect its temperature, as happens in some models of geysers;
- the equipment has the correct shape and modern design, which allows you to optimize space;
- The stores offer a variety of boiler models, equipped with convenient options, the size and color scheme of which can be selected to suit any type of interior.