How does a turbocharged column differ from a regular one?
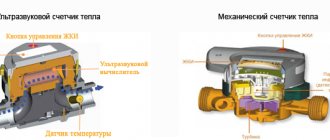
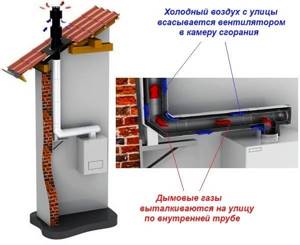
An important difference between the new type of geyser is the closed combustion chamber, into which street air is forced by a fan or drawn in by a smoke exhauster.
Hence the names of the household appliance - turbocharged, supercharged, chimneyless. In atmospheric flow-through heaters, air flows to the burner directly from the room naturally, through an open lower opening.
A double-wall pipe can also be installed vertically, the operating principle remains unchanged
A gas water heater equipped with a closed chamber has other features:
- the air for gas combustion is sucked in by a fan from the street through a double-walled (or double-circuit) coaxial chimney, through which combustion products come out;
- the design of the instantaneous water heater provides for the use of multi-stage and modulating burners capable of changing the power and intensity of heating;
- there is no constantly burning igniter, piezo ignition button or batteries;
- turbo - the heater operates in automatic mode from ignition to shutdown;
- air and fuel consumption is controlled by an electronic unit (controller), choosing their optimal ratio and suitable heating mode;
- turbocharged geysers are powered from the electrical network.
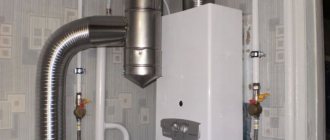
An example of installing a water heater with all communications embedded in the wall, pipes and electrical wires are not visible
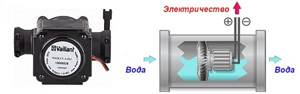
The principle of operation of a hydrogenerator located at the cold water inlet to the turbo column. Thanks to the listed features of such units, they implement many functions that increase comfort and safety during operation. They will be discussed further below.
Geyser does not light up
- A water heater failure can occur for many reasons. We list the most likely of them:
- The simplest reason for this problem is the lack of normal draft in the chimney. If the chimney is clogged and there is no “draft” in it, then the column may not ignite.
- To check the malfunction, you can bring a piece of newspaper, a napkin or a lit match to the chimney. If they flutter, then the thrust is fine. Otherwise, you will need to clean the chimney.
- If the device (only in units with automatic ignition from batteries or the electrical network) does not ignite, then the battery is discharged or the wires or igniter unit are faulty. Eliminated by inserting batteries or checking the electric ignition system.
Failure of the igniter system to operate may occur due to poor water pressure. Open any cold water tap and check the pressure; if it is weak, you can call the housing office and find out what the problem is.
If the column does not light up when water is supplied or turns on only when the pressure is very high, then the problem is most likely in the membrane, which, due to wear, reacts poorly to the water passing through it. In this case, it must be replaced.
How to light an old gas water heater: 3 practical tips
Which column is considered old? Taking into account the improving models that appear on store shelves almost every day, last year’s modification is already ancient. That is why in this article we will look at the features of igniting a column with an ignition wick - these burned in the middle of the last century, and in some modern houses (the function is provided in newer “old” modifications of the columns). Let us remind you that the wick is ignited by the flame of a match or the sparks of a piezo lighter.
Security level of old speakers
Until recently, gas water heaters were used to equip the kitchens of high-rise buildings and entire neighborhoods. Today, in the face of increased requirements for the safety and reliability of units, users are concerned about the safety of their “out of fashion” speakers
On the one hand, they, of course, do not have super fancy functions, such as, for example, a gas catcher, auto shut-off, automatic ignition, or protection from everything. At the same time, rumors about the unsafety of the devices appear every now and then in the media and online platforms. We decided to figure out how much they have a right to exist.
Our verdict is this: if possible, buy a modern water heater and live in peace, but in the absence of what you want, the geyser will normally “work out” your requirements.
How to solder a geyser heat exchanger
Preparation for soldering
First of all, you need to remove the casing from the column. This must be done carefully, first disconnecting the wires from the display. In some models of water heaters, for example Neva 4510, the gas and pressure regulators must be removed before doing this.
Next, turn on the water and locate the leak. Often it is located on the bend of the heat exchanger pipes near the sheathing. If it is easily accessible, it will be possible to seal the fistula without removing the column.
If there is no direct access, and the fistula is located from inside the radiator, you will need to disassemble the column and remove the heat exchanger.
Modern dispensers have a special plug for draining water, after opening which the liquid is poured into a substitute container. Remaining moisture is blown out with a compressor or vacuum cleaner.
This is important because during soldering the liquid will boil and evaporate, creating pressure and blowing the solder through the fistula. The last stage of preparation is cleaning and degreasing the leak area. This is done using fine-grained sandpaper.
You need to clean it carefully so as not to make a through hole, since the pipes in the heat exchanger can be very thin. After this, the cleaned tube is wiped with any solvent or white spirit to remove any remaining dirt and grease.
This is done using fine-grained sandpaper. You need to clean it carefully so as not to make a through hole, since the pipes in the heat exchanger can be very thin. After this, the cleaned tube is wiped with any solvent or white spirit to remove any remaining dirt and grease.
The last stage of preparation is cleaning and degreasing the leak area. This is done using fine-grained sandpaper. You need to clean it carefully so as not to make a through hole, since the pipes in the heat exchanger can be very thin. After this, the cleaned tube is wiped with any solvent or white spirit to remove any remaining dirt and grease.
Soldering methods
There are three ways to solder the geyser heat exchanger:
Powerful soldering iron
To solder the fistula site with your own hands, you will need a soldering iron with a power of about 110 W, flux and solder.
The first stage of soldering is applying flux. This is a substance that cleans the surface of the material from oxides and allows the solder to spread more evenly. Flux paste containing copper is best. If it is not available, you can use regular rosin or an aspirin tablet.
Burner with gas cylinder
You will need a burner, a small gas cylinder, flux, and solder. The burner is connected to the cylinder and ignited. You need to choose a not very strong flame so as not to damage the column radiator.
First, the leak site warms up well. This is done to ensure that any remaining moisture in the pipes evaporates. After this, the pipe is heated and solder is supplied to it.
After soldering, it is imperative to remove any remaining flux, because it contains acid and can subsequently corrode the walls of the heat exchanger pipes.
Cold welding
It is important to choose a cold weld that will not melt from hot water. All actions must be carried out wearing protective gloves. A small amount of cold welding comes out of the package
You need to knead it in your hands for about three minutes. As soon as the material begins to harden, you need to apply it to the site of the fistula and hold it tightly until it hardens completely.
A small amount of cold welding comes out of the package. You need to knead it in your hands for about three minutes. As soon as the material begins to harden, you need to apply it to the site of the fistula and hold it tightly until it hardens completely.
If there are several fistulas nearby on the heat exchanger tube or there is a large hole in the tube, you need to solder a copper patch. You can also make soldering from a piece of copper pipe.
How to check for leaks
After soldering the geysers, you need to check the tightness of all pipes. To do this, they are carefully examined to see even the smallest fistulas - their presence is indicated by small green spots. To avoid re-disassembling the column in the near future, these defects are also cleaned and soldered.
After this, you need to connect water to the gas water heater with a soldered heat exchanger and open the tap.
At the very end, the boiler with a gas water heater is turned on to check its performance when in contact with hot water. In this case, the soldered areas can be wiped with a dry cloth to detect the slightest signs of moisture.
Repair of an old Soviet gas water heater
Lyudmila Slyusareva Domysheva. Heating works fine.
In many cities, in new buildings, residents of apartment buildings are often forced to solve the problem of having hot water in their apartments on their own. This is also very important for owners of country private houses, because the availability of hot water is one of the important components of comfortable living in the house.
We turn on the tap with cold water, does it start to boil when the burner is not lit? Maybe I didn't explain it correctly?
Please tell me what's the matter?
There is an opinion among manufacturers that only old Soviet speakers can lead to an explosion. If you regularly check the gas duct, calling a specialist for a preventive inspection of the device, you should not be afraid of an explosion.
Let's dispel another fear. People installing speakers in their home are afraid of gas leaks. Modern appliances have a pilot burner. It prevents gas from entering the room, since it begins to flow through the pipe only after a spark or fire appears.
Execution of work
After the fire is turned off, the tube shuts off the gas with a valve. If for unknown reasons the gas goes out, the valve also works. Designers and manufacturers always think about people's safety when developing new speaker models. The popular opinion that the presence of a speaker in any kitchen, and especially in a small one, spoils the appearance of the room, can easily be refuted.
Modern speaker models differ from Soviet-era models. They look like a small cabinet; the color can be chosen individually. Let's consider the algorithm for installing a column so that it does not spoil the appearance of your kitchen. If you already have furniture and just need to install the speaker, proceed as follows: To create a cozy atmosphere in a small kitchen, use the services of an experienced designer.
He will advise you on how to arrange the furniture and all the necessary appliances. There are several interior options for kitchens with gas water heaters. The most common option would be a complex and expensive solution to the problem of a small kitchen, connecting it with a living room or another room. The space will become larger, and there will be more options for the location of electrical appliances and furniture. Unfortunately, this is not always possible by law. Let's consider options that do not require moving walls.
They are performed by choosing furniture, determining a less noticeable place for the speaker and decorating the device itself. We considered this option very similarly above.
It remains to give advice: replace the old column with a new one if the previous one is too outdated. Corner kitchens are easy to use. Everything is at hand. And the gas water heater can be hidden in the corner of the room. The remaining cabinets will hang on the sides.
Old gas water heater. How to use?
This will make the additional cabinet less noticeable. This is a very practical option. No cost required. The column is located above the stove, and on the sides are the cabinets of your set. You can decorate the column with painting or other decorative elements as desired. By the way, this option is the most convenient due to the short length of the tubes from the stove to the column.
They are easy to hide under a structure made of finishing materials. There are many styles of room decoration.
How to hide a gas water heater and water heater
In the summer, the whole country has a new topic of conversation: where, for how long and how unsuccessfully the hot water was turned off in such heat. Only the lucky ones who have a kitchen with a gas water heater or a bathroom with a boiler do not carry on a conversation.
But they have another problem: camouflage. After all, boilers with columns do not particularly decorate either the kitchen or the bathroom. New questions arise: how to place a gas water heater in a small kitchen, whether it can be hidden legally. What about in the bathroom? And if not gas?

Placing a gas water heater in the kitchen: is it possible or not?
So, you have a gasified house, but there is no central water supply with hot water. It would seem that in this situation it would be logical to install a gas water heater: gas is consumed more economically than electricity and costs less. Let's say right away that this is an incorrect assumption - it is wiser to install an electric water heater (more on them later).
The paradox is that installing a gas water heater will not be allowed in every gasified house. They will definitely refuse if the house is higher than 11 floors or the apartment has undergone redevelopment, as a result of which the kitchen has been attached to the living room. Why?

By law, a kitchen with a gas heater cannot be part of a living space (kitchen-living room). Nevertheless, we come across a lot of similar projects where everything is different. The rule seems far-fetched and outdated to many.
No one sleeps in my living room (nobody gets gassed in their sleep); For sleeping I have a separate bedroom with a tightly closing door.
The main requirement for a room with a heater is natural exhaust and a room area of at least 6.5 - 8 sq.m, depending on the burner. It seems that a larger area (in the case of a combined kitchen-living room) is only better?
From a safety point of view, why is it dangerous to dismantle the wall between the gasified kitchen and the living room (as in the photo above), but is it permissible to simply remove the door from its hinges in the kitchen (formally this is not a violation)
How to disguise a gas water heater in the kitchen?
When thinking about how to hide a gas water heater in the kitchen, owners most often come to an aesthetic solution: build the heater into the top line of the unit. The problem is that it is impossible to cover the column with a continuous façade. In addition, the box should not have a lower or upper part: it is believed that this is the only way to ensure a full flow of air. This limitation is circumvented in different ways - for example, by installing a perforated facade with holes for ventilation. Someone even builds a speaker into a closet, but each time they remove the façade before the inspector arrives.
The question arises: is it worth looking for solutions on how to hide a speaker in the kitchen if you have to bypass so many restrictions?
Instantaneous gas water heater [ edit | edit code ]
History [edit | edit code]
The first instantaneous gas water heaters appeared in Germany in 1895. Their inventor was Hugo Junkers, who patented the heater - the prototype of the modern gas water heater. In 1895, Junkers opened the company Junkers & Co in Dessau, producing the world's first gas water heaters.
In Russia, the most common wall-mounted gas water heaters are geysers. They appeared during the gasification of cities with the beginning of mass housing construction, in which a bathtub became an obligatory element of a city apartment, and were installed when it was impossible to connect the house to a centralized hot water supply. Mass production of geysers in the USSR began in 1956. The KGI-56 and the VPG series became common models of columns. The KGI-56 column was produced in Moscow and was equipped with two control levers on the front panel [1]. Columns of the VPG series were produced in Leningrad [2]. To control the column, there was a rotary knob on the front panel. Since the 1980s, dispensers began to be equipped with solenoid valves that prevent gas leakage when the igniter goes out.
Most often, geysers are found in Khrushchev and early Brezhnevka buildings, mostly five-story buildings. Columns can often be found in Stalinist buildings, where they were installed instead of solid fuel boilers (“titans”). In total, about 8 million instantaneous gas water heaters are installed in Russia [3]. In Moscow, there are few such houses; some have been demolished, while others have been transferred to hot water supply.
Recently, geysers have been installed in houses with central hot water supply, since hot water is often turned off or it is of poor quality, and the price of hot water is much higher than that of cold water.
Device [edit | edit code]
The instantaneous gas water heater is designed for instant heating of water. Water heaters of this type do not have a tank, and the water is heated using a direct-flow system. The water heater contains a plate heat exchanger through which a water tube passes. The heat exchanger is most often made of copper. Gas burners are located under the heat exchanger. When the water heater is operating, the heat of the combustion gas heats the heat exchanger plates, and from them the water tube. Above the heat exchanger there is an exhaust gas collector that collects combustion products and directs them into the chimney.
In outdated and modern budget models, the burner is ignited from a constantly burning gas wick, ignited by a match or a piezoelectric element. More advanced models use automatic electric ignition. The electronics can be powered from batteries, an electrical network, or from a built-in mini-turbogenerator driven by water flowing through the water heater. The water temperature in simple models is controlled using a water reducer (“frog”). The size of the flame is adjusted depending on the amount of water flowing through the column. Complex models use automatic electronic control of water temperature.
Checking the correct assembly
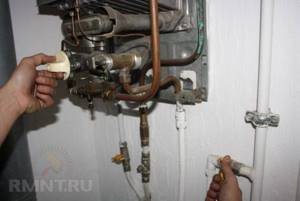
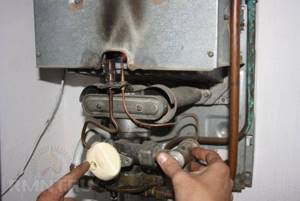
Place the faucet handle in the closed position. We open the gas supply. Press the automatic button. We bring the match to the igniter. The igniter must not light up!

Turn the tap handle to the igniter position. Press the automatic button. We bring a match. The igniter should light up (this may take up to a minute, since air may have entered the system during disassembly and reassembly). Release the automatic button. The pilot light should be lit; when the hot water tap is opened, the main burner should not flare up!

Turn the tap to full open mode. Open the hot water tap. The main burner should light up.
Place the faucet handle in the closed position. The igniter should go out completely.
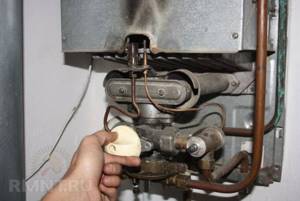
After making sure that the gas tap is working correctly, we light the column and check the tightness of all gas connections with a soap solution. If the column is not ignited, the tightness can only be checked up to the automatic button.

Wick
The wick has two main functions - automatic ignition of the column when water is supplied, and constant heating of the thermoelement of the safety valve. If the wick goes out or if its flame is weak and unstable, then the thermoelement cools down or does not warm up enough, and the valve turns off the column. It is the weak flame of the wick that is the most common reason for the spontaneous shutdown of the gas water heater.
!
Most often this happens while the speaker is running (for example, when you are in the bathroom and taking a shower :)). There are several reasons. Firstly, the fitting may become clogged
- this is the simplest thing.
Secondly, it often happens that the removal of gas pressure
from the wick to the main burner, during operation of the column, makes the wick flame much smaller. The thermoelement, which is heated by this particular wick, gradually cools down and the column goes out. This is more difficult to deal with. As a result of a series of long experiments, I came to the following modifications:
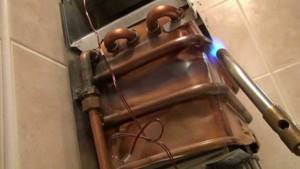
- I changed the design of the wick guide casing and lengthened it (see picture).
- I was forced to increase the diameter of the fitting hole. Unfortunately, this increases gas consumption in idle mode, but I couldn’t find any other solution. The fitting can be drilled out, and when overhauled, it can be compressed with pliers. It's worth stocking up on a few just in case.
- I put a tungsten spring on the thermoelement, which lengthened it and increased heating, reducing the dependence on the shape and direction of the wick flame.
By the way, even when the fitting is cleaned (by blowing, preferably with preliminary soaking in kerosene/gasoline/acetone), after screwing in, specks often get into it and the wick flame begins to play again (sometimes more, sometimes less). Sometimes it is enough to blow into the place where it is attached again, sometimes to lightly tap it. If it doesn’t help, unscrew it again and blow it out (including the screw-in area).
Checking the correct assembly
Place the faucet handle in the closed position. We open the gas supply. Press the automatic button. We bring the match to the igniter. The igniter must not light up!
Turn the tap handle to the igniter position. Press the automatic button. We bring a match. The igniter should light up (this may take up to a minute, since air may have entered the system during disassembly and reassembly). Release the automatic button. The pilot light should be lit; when the hot water tap is opened, the main burner should not flare up!
Turn the tap to full open mode. Open the hot water tap. The main burner should light up.
Place the faucet handle in the closed position. The igniter should go out completely.
After making sure that the gas tap is working correctly, we light the column and check the tightness of all gas connections with a soap solution. If the column is not ignited, the tightness can only be checked up to the automatic button.
Recommendations for choosing a new speaker
The main parameters when choosing a geyser are power and performance
They should be given priority attention if you do not plan to redo the project when installing the column in its original place. The power of the new device should not exceed that specified in the project
For a family of 1 - 2 people, a dispenser capacity of 10 liters per minute is usually sufficient, which corresponds to a power of 17 - 18 kW. If replacing the device is associated with the desire to use two points of water consumption at the same time, for example, a sink and a shower, then the productivity of the gas heater should be at least 13 l/min.
For three points, including filling the bathtub, you need to focus on 15 l/min. Provided there is sufficient pressure in the water supply.
When choosing a new water heater, it is important to decide whether the previous power of the water heater is enough for the needs of the family or whether you will need to purchase a more efficient device, which will entail the need to order a new project
Many models of geysers have a flame modulation function. Its purpose is to maintain a constant temperature (with an accuracy of 1 - 3 degrees) at the outlet of the device, regardless of water consumption. Choosing such a model will allow you not to worry about adjusting the temperature when several family members turn on hot water at the same time.
Before installing the column, you need to check the condition of the chimney, pipelines, taps, and determine which elements will require updating.
Where to dispose of a water heater
Recycling company
In many cities there are special organizations that accept household appliances, including speakers, for disposal and recycling. Our employees will come and remove the unnecessary water heater, saving you from unnecessary hassle.
Promotions in stores
Some stores specializing in the sale of household appliances and gas water heaters are holding promotions to accept old models. When you hand over an unnecessary water heater, you get a good discount on the purchase of a new one and do not worry about where to put the unnecessary device. And store employees transfer all collected equipment to recycling plants.
Scrap metal collection point
The geyser mainly consists of stainless steel, copper and other metals. If your device cannot be repaired, you can take it to a scrap metal collection point and receive a cash reward.
You can take any unnecessary scrap to the collection point
In order to find a collection point, you can use the search engine on our website. On the main page, in the top menu bar, find Collection Points, and then Scrap Metal. On the page that opens, indicate your city. In the list that appears, you will find all the recycling collection points in your city, you will be able to familiarize yourself with prices, addresses and telephone numbers, and based on this, choose the collection that suits you best.
How to make money at gas water heaters
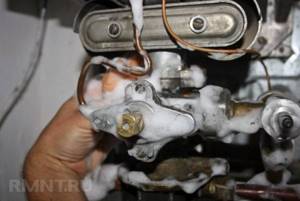
The water heater is leaking
If you see similar stains on your column, then be sure that it is leaking and needs repair.
This malfunction can occur mainly in geysers that have been operating for a long time. The two main reasons for the leak are:
The radiator is leaking.
Tubes (bends) or gaskets in connections are cracked. Replacing the radiator or taps is quite expensive. Therefore, there is a reason to repair the geyser on your own. For repairs you need:
- screwdrivers (cross and regular);
- open-end wrenches (set);
- solder with rosin;
- vacuum cleaner;
- solvent;
- "skin".
Sealing holes
Due to harsh operating conditions, the radiator or taps may burn out and holes may appear on them. If you have determined where the leak is, you can repair the small hole with a regular soldering iron.
Preparing a gas water heater for repair
- Drain all liquid from the system - open only the hot water tap, unscrew the nut on the cold water inlet pipe, and most of the water will flow out;
- Remove the radiator completely;
- Inspect the entire tube. - if you see “green”, clean and inspect these places for cracks.
Soldering a heat exchanger does not always give good results; a lot depends on your skill. If the soldering is bad, the heat exchanger will quickly leak again.
When you have found leaks, you need to do the following:
- clean the holes found with sandpaper and immediately wipe with a cloth with solvent (this will remove any remaining grease, carbon deposits and dirt);
- using rosin with solder, tin this place with a 100-watt hoop (if you don’t have rosin, use aspirin);
- Fill the crack or hole with solder, and after it cools, add more tin (the layer should be 1-2 mm).
Attention! In some cases, with holes of about 5 cm, craftsmen apply a “temporary” overlay made of a copper or aluminum plate, securing it with thick wire or metal tape
But as a rule, such a “temporary” solution remains for a long time. We recommend replacing the radiator completely and forgetting about its leaks
Faulty gaskets and tubes
Replacing flexible hoses of this type does not require special skills; anyone can do it with a wrench.
Very often, leaks form at the points where the taps are connected to the heater externally or to the internal components of the column. All connections are made “American” with gaskets inside.
Due to constant heating/cooling, rubberized liners either melt or lose their properties and harden. Cracks appear in them, through which water flows. If you notice a gas column leak in such connections, replace the gaskets. Using a wrench (usually 24), unscrew the nut and replace it.
It also happens that the flanges on the tubes crack over time - in this case, you need to replace the entire tubes.
Water node and central valve
A malfunction of the water unit can cause:
- Unexpected shutdown of the column
during operation (the second most important reason, after problems with the wick) - Popping noises when the speaker is turned on
and even micro-explosions - Weak hot water pressure
- The column does not turn on
- while gas flows and the wick burns (the most dangerous case)
The main reason is jamming of the valve pusher rod and deformation of the diaphragm.
The problem can be fixed only by replacing the rod, membrane, etc. - everything that is included in the standard repair kit (tel. below). In addition, there are still problems that I was able to overcome only by improving the design.
In general, everything here is most interesting.