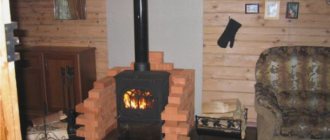
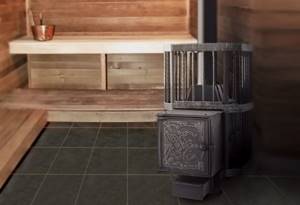
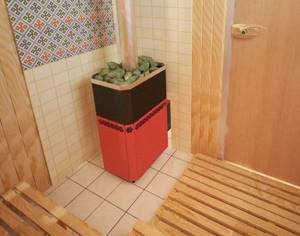
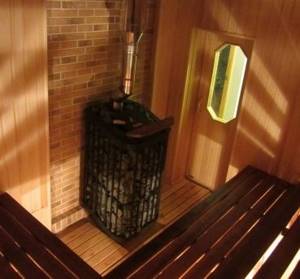
Installing a stove in a bathhouse on a wooden floor is an important and responsible step. It is best to select a stove and how to install it before the foundation of the bathhouse is laid. After all, it is in this case that it will be possible to design rooms of optimal dimensions, provide a place for storing firewood if the stove is solid fuel, or take care in advance to comply with the PUE if the unit is electric. Gas heaters are installed only by qualified craftsmen, and permission to install certified equipment is issued by Rostechnadzor. It is prohibited to independently manufacture and connect to the gas pipeline in “makeshift conditions”. But, if the bathhouse has already been built, and even the finishing work has been completed, it is possible to install a stove on a wooden floor, provided that a number of important nuances are observed.
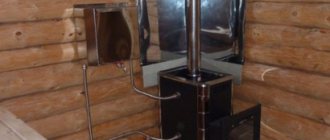
Installing a sauna stove on a wooden floor
Load on wooden floor
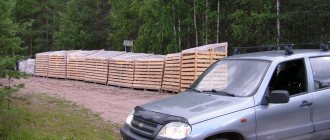
The maximum load on a wooden floor depends on the cross-section of the beams and their pitch. The larger the cross-section and the smaller the pitch, respectively, the greater the load the floor will withstand without any deformation. If under the wooden flooring instead of beams there are inch boards placed on the edge, and their pitch is about 60 cm or more, then in the steam room you will have to be content with a miniature electric heater weighing 10-12 kg. Therefore, the first step before installing a stove is its correct selection, taking into account the permissible load on the floor.
Movavi Video Suite Overview

Dear TopReview , as you know, special editing programs are used to edit videos. We have already written that if you are a beginner, you should not immediately try to master powerful professional tools. It's better to start with something simpler, like the Movavi video editor. However, working with video can begin even before the editing stage.
For example, you want to record a video instruction from the screen or a greeting card on a web camera, and only then edit and convert it into the desired format. For all these tasks, the company has a comprehensive solution - the video creation program Movavi Video Suite . To get started, download the program from the official website (www.movavi.ru/suite/), install and run.
In the window that opens, go to the video tab. It looks like this:
The program has 4 main tools for working with video:
- Screen video recording;
- Capture from cameras;
- Video editing;
- Video conversion.
Screen video recording
The tool allows you to capture part of the screen (or the entire screen) and record a video. With it, you can create instructions, record training videos on, and save recordings of live broadcasts. The operating principle is simple:
- Set up capture frames;
- Set the settings (effects, webcam, system sound, microphone);
- Press “Rec” to record and “Stop” to stop it.
You can immediately trim the finished video to remove the unnecessary beginning and end, or open it in an editor for full editing. The advantage is ease of use and the ability to immediately edit the recorded file.
Capture from cameras (Record video from a web camera)
The “Record Video from Cameras” tool is most often used to record video from a web camera. You can use it to create greeting cards, video tutorials, or simply record a video message for your family and friends.
In the program, you select the recording device, resolution, frame rate and audio capture device. The recorded video can be opened using the video editor program included in Movavi Video Suite and edited.
Video editor
We have already talked about the Movavi video editor in detail in one of the previous articles (you can read it here https://www.topobzor.com/movavi-redaktor-video/.html), so now we will only go over the main points.
The first is the interface. All program tools have a clear name and purpose and are also translated into Russian. This means that you do not need to study instructions on the Internet for a long time before getting started.
The second is convenience. Many things here are performed on an intuitive level: you need to add a fragment to the video - drag it to the track, add effects, transitions, text, etc. - drag it to the track, configure a specific fragment - double-click on it and then configure it in a special window.
In addition to the basic functions such as trimming, merging, adding music, and so on, there are more interesting tools. Among them: background replacement, zoom and panorama, stabilization, selection and censorship. With their help, novice users can not only improve their videos, but also lay some foundation for further work with professional programs. The program is great for creating simple videos and films.
Types and weight of sauna stoves
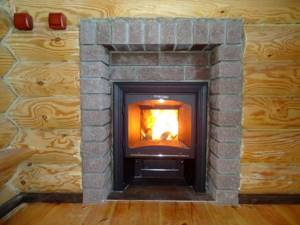
Brick
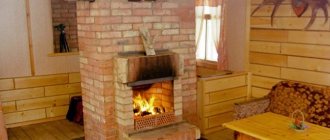
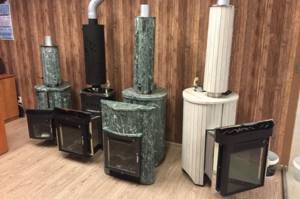
The largest and most massive stoves are brick . Their weight can reach several hundred kilograms. They are distinguished by excellent heat capacity and durability; it is possible to install a large tank for heating water and install a beautiful fireplace in the dressing room. For decorative purposes, such stoves are finished with natural stone: coils, marble, granite, soapstone, flagstone, heat-resistant tiles, etc. However, even without special finishing, neatly embroidered brickwork looks presentable.
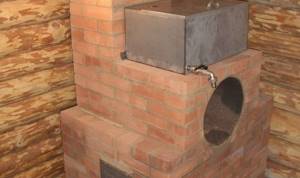
Brick heater
A separate monolithic reinforced foundation is built for brick stoves, not connected to the base of the bathhouse. It is not always advisable to build a brick stove in a ready-made bathhouse; you will have to dismantle the floor, ceiling and roof, as well as, possibly, the partition between the steam room and the room next to it, which is associated with significant financial costs. The optimal alternative to a classic brick stove is a thick-walled metal stove with cladding.
One of the foundation options for a brick kiln is columnar
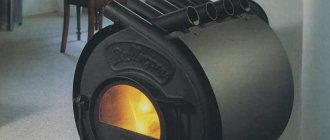
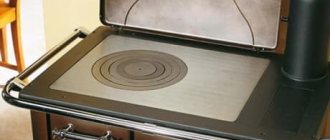
Cast iron
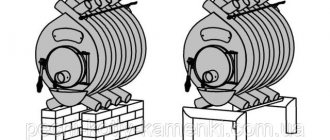
A cast-iron sauna stove itself weighs a lot, and if you add a water tank, a heat exchanger, a lot of stones, cladding, the total load can become critical for the wooden floor. Therefore, we recommend that you plan in advance to purchase a cast iron unit, if necessary, strengthening the floors under the stove installation site.
Cast iron sauna stove "Sibir-24"
On a note! The entire heating unit or just the firebox can be made of cast iron. Some stove models have a steel heater. Fully cast iron products weigh more than steel and composite ones.
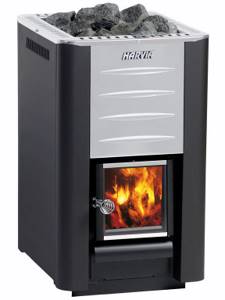
Steel solid fuel
Steel solid fuel sauna stoves cannot boast of such wall thickness as their cast iron counterparts. If we compare cast iron and steel stoves, the latter cool faster and are prone to burning out, the radiation from them is not so soft, but such units are cheaper, weigh less, and the range of models is very wide.
Steel solid fuel sauna stoves with lining
Steel solid fuel sauna stoves
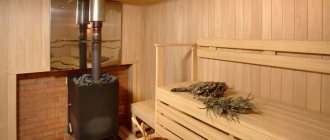
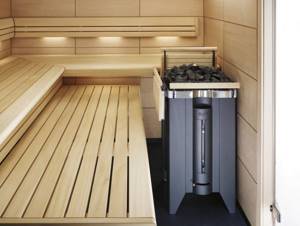
Electrical
The most compact ovens are electric . They operate on 220 and 380 V, saving owners from the need to prepare and store firewood, clean the chimney and other “dirty work”. High-quality electric heaters are compact, do not fail when exposed to moisture, and are equipped with an overheating protection system, a steam generator and temperature sensors. The stoves are selected according to the size of the steam room (the larger the volume of the room, the more powerful the unit should be purchased). On average, the equipment weighs 10-28 kg; from 20 to 75 kg of stones can fit inside, depending on the design and dimensions of the furnace.
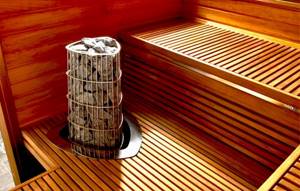
Electric sauna stove
Electric sauna stove
Concrete foundation
- The sand is coarse-grained without inclusions. The ideal option would be to use mountain sand, but sea and river sand are also suitable. We have already discussed methods for cleaning sand from impurities on the pages of our Internet resource.
- Formwork material.
- Crushed stone.
- Ruberoid or dense polyethylene.
Tools:
- Solution trough
- Shovels: bayonet, shovel
- Building level
- Hammer, nails, hacksaw for formwork construction
- Construction stapler
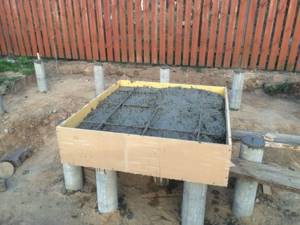
You can begin to build the foundation for the furnace. Many may wonder whether it is necessary to go deep into the ground when laying a foundation for a stove with their own hands. Our answer is definitely. Sometimes there is an option in which the foundation is arranged with a shallow depth. Only the top plant layer is removed and after installing the formwork the foundation is poured.
Digging a pit
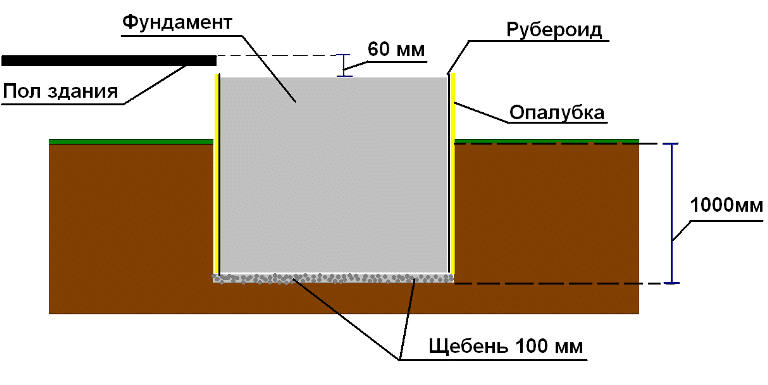
For dry, sandy soils, 500–600 mm is sufficient. But on heaving soils this depth should not be less than 1000 mm. We repeat - this is the correct foundation design.
Proper laying of the foundation
According to the markings, we dig a pit. The size of the pit must allow the installation of formwork. But if the soil on your site is dense enough and the edges do not crumble, you can do without it. In any case, it all depends on the specific location and soil. When the formwork is installed, a 100 mm thick layer of crushed stone is poured onto the bottom of the pit. Crushed stone must be leveled. After this, it is necessary to compact the crushed stone using a manual tamper.
To waterproof the foundation, a layer of roofing material is attached to the inside of the formwork using a construction stapler. You can start filling
It is important to know that the upper level of the foundation should be 60 - 70 mm lower than the main floor of the building. Prepare the solution according to the following proportions:
- Cement 1 part
- Sand 3 parts
- Crushed stone 5 parts
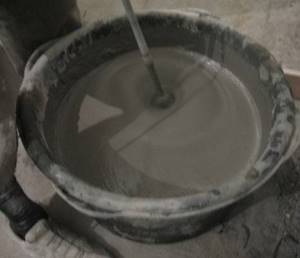
Solution
- First, a dry mixture of cement, sand and crushed stone is prepared. You can use the mortar for laying the stove.
- After shoveling and obtaining a homogeneous mass, water is gradually added until a solution with the consistency of thick sour cream is formed. The solution can be poured.
Using a rubble concrete foundation allows you to significantly save on mortar. Let's consider a variant of such a foundation.
Rubble concrete foundation
The preparation of the pit is carried out in exactly the same way as in the first case. After the crushed stone is filled and compacted, the first layer of rubble stone is laid on the bottom. Solution for rubble concrete mixture:
- Cement 1 part
- Sand 3 parts
- All filling is done in this way.
- It is not allowed to pour several layers of rubble stone at the same time. In this case, voids are formed inside the foundation, reducing the characteristics of the foundation.
The foundation is poured. It is necessary to carefully level its surface and check it using a building level.
- The foundation will dry out for ten days. In the first week, you need to spray its surface with water.
- If you do not have the opportunity to be on the site all the time, proceed as follows: cover the foundation with plastic wrap after pouring and leave it in this position for a week.
- After seven days, the film must be removed and the foundation left for another 5 to 6 days.
TOP 3 popular models of wood-burning cast iron sauna stoves
| Photo | Name | Rating | Price | |
| #1 |
| Hephaestus PB-04 MS | ⭐ 98 / 100 | More details |
| #2 |
| Vesuvius Legend Forging 16 (271) | ⭐ 97 / 100 | More details |
| #3 |
| NMK Sibir-18 | ⭐ 96 / 100 | More details |
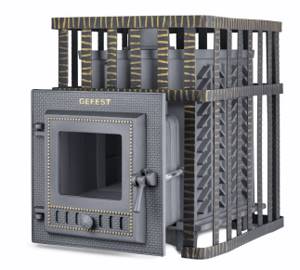
Hephaestus PB-04 MS
A modern stove made of alloy cast iron (a firebox made of cast iron with the addition of chrome), which harmoniously fits into the interior of a Russian steam bath. Decorated with forging elements. Through the door with heat-resistant glass, the live flame is clearly visible. Stainless steel ash box.
“Hephaestus PB-04 MS”
High efficiency (up to 87%), energy efficiency (active afterburning of pyrolysis gases), quick heating of a steam room with a volume of up to 15 m³. The firebox is remote. The thickness of the elements is up to 40 mm.
The stove weighs 130 kg. The heater can hold up to 180 kg of stones. Product dimensions 39.4 x 56 x 64.5 cm.
Hephaestus PB-04 MS
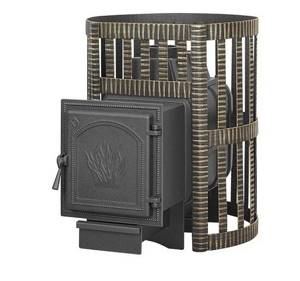
Vesuvius Legend Forging 16 (271)
A sauna stove made of a special cast iron alloy “Vesuvius Legend” is suitable for steam rooms with a volume of 8 to 18 m³. Wall thickness 12 mm. It has a combustion tunnel with a length of 250 mm (filling firewood is implied from the adjacent room). The door is cast iron, without glass. Convection-ventilated steel casing. Furnace efficiency up to 80%. It warms up the steam room quickly and gently, the steam from the stove is finely dispersed, light and pleasant.
“Vesuvius Legend Forging 16 (271)”
Product dimensions 70x56x69 cm. The weight of the unit itself is 98 kg and the stones additionally up to 120-160 kg.
Vesuvius Legend Forging 16 (271)
NMK Sibir-18
The Siberia cast iron sauna stove (grade SCh-15) with a panoramic door is designed for steam rooms with a volume of 12 - 18 m³. It features a spacious firebox, is visually aesthetic and ergonomic. Wall thickness 10 mm. Flame stopper made of steel, thickness 6 mm.
“NMK Sibir-18”
Suitable for use in commercial baths and saunas. Loading firewood from an adjacent room.
The dimensions of the stove are 72 x 72 x 43 cm. The weight of the stove is 104 kg, stones - up to 80 kg.
NMK Sibir-18
* Heat exchanger tanks for water are purchased and installed separately. The volume of tanks varies, from 6 to 85 liters or more. When calculating the load on the floor, it is worth taking into account the weight of the metal (10-15 kg on average, indicated in the product passport) and the water being poured.
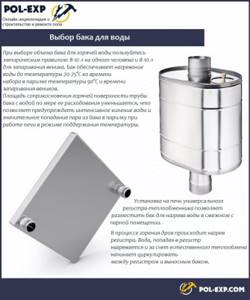
Selecting a water tank
How to cover the walls and ceiling when installing an iron stove
Stone panel
How to protect wooden walls from a stove in a house is determined by the style of the room, purpose and budget. Finishing does not exclude the construction of a protective screen. But if the stove is located far enough - 100 cm, it is allowed not to install thermal insulation, but to select a finishing material.
- The most obvious solution is to treat this part of the wall with fire retardants. This does not provide a 100% guarantee, but it reduces the potential for fire.
- A panel made of natural or artificial stone looks beautiful.
- In a room in a loft, techno or rustic style, facing with brick - textured or facing - is quite suitable.
- A sheet of plasterboard provides sufficient protection.
It is prohibited to use flammable coatings for finishing, such as oil impregnation, varnishes, or oil wax.
TOP 3 popular models of wood-burning steel stoves
| Photo | Name | Rating | Price | |
| #1 | Harvia M3 SL | ⭐ 97 / 100 | More details | |
| #2 |
| Teplodar Rus 18 L | ⭐ 96 / 100 | More details |
| #3 |
| Varvara Terma-kamenka | ⭐ 95 / 100 | More details |
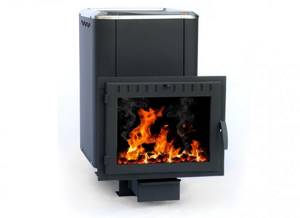
Varvara Terma-kamenka
Finnish steel wood-burning stove with a closed heater and a panoramic combustion door. Suitable for Russian baths, as well as saunas. You will have to add firewood from the dressing room, a unit with an external firebox. Water tank included.
“Varvara Terma Kamenka”
The heated volume of the steam room is from 6 to 13 m³. The dimensions of the device are 39 x 71 x 65 cm. The stove itself weighs only 50 kg, plus stones - up to 30 kg.
Varvara Terma-kamenka
Teplodar Rus 18 L
Another stove that is heated from the adjacent room. Among the advantages are an effective heat exchange scheme and ergonomic design. Open type heater, remote firebox.
“Teplodar Rus 18 L”
A distinctive feature is that the stove can be converted from wood to gas (the burner is purchased separately and installed without welding).
Suitable for a spacious steam room with a volume of up to 18 m³. The stove itself weighs 41 kg, and up to 90 kg of stones can be placed in the mesh. Unit dimensions 81 x 79 x 33.5 cm.
Teplodar Rus 18 L
Harvia M3 SL
One of the heaviest steel stoves. Outside there is a mesh casing for laying stones, and there is also a closed heater. The firebox is remote, the door is panoramic with the “clean glass” system. There are also modifications of the oven with a blank door (without glass).
Harvia M3 SL
A powerful stove for a spacious steam room with a volume of up to 24 m³. The unit itself weighs as much as 170 kg, stones up to 250 kg.
Harvia M3 SL
Installation of a metal stove with a remote firebox in a log house
Let's consider the option of installing a fireproof anti-shrink wall made of LV mineralite. A special fastening method will allow installation in the log house before it shrinks, and the floating design of the fastening elements will prevent the rigid wall from deforming.
Minerit LV
Minerite
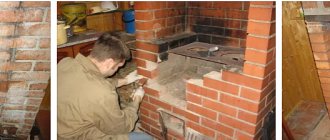
Step 1. Prepare the opening in the wall. We cut it out with a chainsaw according to the markings.
Hole in the wall
Step 2. Cover the inner surface of the opening with mineralite. We saw the mineralite sheet into three pieces. We cut out two vertical pieces based on the height of the opening minus 10 cm. We cut out the horizontal part with a length equal to the width of the opening minus 2 cm. The width of the mineralite section should be equal to the thickness of the timber or log from which the wall of the bathhouse was built.
Step 3. We nail foil to the inside perimeter, and then mineralite. First, we fix the vertical sections with nails, then the horizontal ones.
Step 4. It is necessary to make an opening in the mineralite sheets, which will protect the wall from the heat of the stove. The remote furnace firebox will pass through this opening. We take measurements of the remote firebox, then make markings with a pencil and cut the sheet so that there is 3 cm on each side between the remote channel and the sheet.
Installation of foil and mineralite. Finishing of the opening can be done both before and after installation of the main slabs of refractory material
You can do it differently - first we fix the sheet on the wall, and then we cut the opening for the remote firebox.
Mounting mineralite to the wall
The sheet is fixed, you can cut out the opening
Step 5. Drill oval holes in the sheet for self-tapping screws. When shrinkage occurs, the screws will move downward inside these holes, while the sheet will remain motionless. We fix the foil insulation on the wall (with a stapler), and then use self-tapping screws and a washer to fix the mineralite sheet (we mount the sheet on the steam room side).
Step 6. We attach the second layer of mineralite with an air gap of 3 cm. To do this, you need to purchase a mounting kit with ceramic or steel bushings.
Mounting kit
Once again, you need to drill oval holes, but be sure to make sure that the fasteners of the first and second sheets do not end up at the same point.
The photo shows a diagram of the installation of a protective screen made of mineralite. Double-layer sheathing. If the stove has an external firebox, make an opening according to the instructions
When joining two sheets at 90 degrees, we make cuts at the ends at 45 degrees for a more aesthetic appearance.
After installing the sheets, we install the stove on the base. We adjust the legs, making sure that the external channel is located exactly in the center of the opening cut in the mineralite. We take foil-coated basalt wool and place it tightly between the walls of the outlet channel and the mineralite. In this case, the foil should “look” towards the steel walls of the channel.
Adviсe
Craftsmen use different methods of installing stoves and protecting walls. So, for example, in a log bath it will be more convenient to install mineralite on a wooden sheathing. Antisepticize the 50x50 mm bars, drill holes for self-tapping screws and fix the sheathing posts exactly vertically. The mineralite will already be fixed to this sheathing with self-tapping screws.
Lathing
If you plan to cover the wall from the inside (from the steam room side) with mineralite for further finishing, for example, with a coil, and finish the portal with brick from the outside, then it is worth carrying out the work in the following sequence:
- From the side of the steam room, fix a sheet of mineralite;
- cut a hole for the outlet channel;
- secure the horizontal guides from the plasterboard profile. Fasten the strips with self-tapping screws at the top of the opening, along the bottom and exactly above the opening for the fuel channel;
- install the vertical posts of the sheathing from the profile, fix them with self-tapping screws through the shelves;
- take basalt wool and lay it between the sheathing posts;
- sew up the opening with mineralite (from the dressing room side);
- install the stove in its place;
- Now, on the side of the dressing room, fill the opening with brick (don’t forget to put insulation in the cracks), and on the side of the steam room, apply decorative finishing with stone.
Lathing and insulation
View from the steam room and dressing room
Fixed furnace portal
Walls and chimney after finishing with a coil
The process of finishing the oven itself
The work on installing the furnace does not end there. Be sure to install a water tank and a heat exchanger, if they are provided for in the design, install the chimney in accordance with fire safety rules, prepare and lay the stones in the mesh.
Calculation of the load on a wooden floor
Will the wooden floor withstand a brand new stove complete with stones, tanks, cladding, etc.? And given that the floor will be used in conditions of temperature changes and high humidity, it is worth taking this issue seriously.
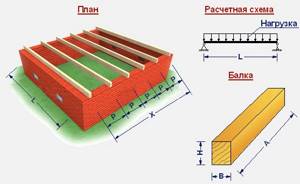
Calculation scheme
Payment procedure:
- measuring the distance between load-bearing walls;
- load calculation;
- calculation of the optimal section and pitch of beams.
If the span length (distance between load-bearing walls) is less than 5 meters, the use of beams made of solid coniferous or hardwood is allowed. If the span is more than 5 meters, it is desirable that glued beams be used (they can withstand increased loads).
Beams are used of square, rectangular, and also I-beams (a profile combining elements made of solid wood and plywood or OSB). For a rectangular section, the optimal ratio is 1 to 1.4 (for example, 100 x 140, 200 x 280 mm). The rigidity of the beams is taken to be no more than 1 to 350 (the ratio of the deflection to the length of the beam). Recommended thickness of flooring boards is 50 mm.
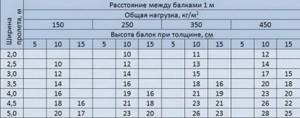
Table for determining the minimum permissible cross-section at a step of 1 m
Accurate data on the relationship between beam pitch and section can be obtained using a calculator.
Calculation of a wooden subfloor
The recommended cross-section of beams, provided that the stove, together with the cladding, stones and other structural elements, weighs less than four hundred kilograms.
| Span length | Section of beams (step 60 cm) |
| 2 meters | 75×100 mm |
| 3 meters | 75×200 mm |
| 4 meters | 100×200 mm |
| 5 meters | 150×225 mm |
| 6 meters | 175×250 mm |
If the calculated load corresponds to the actual cross-section of the beams, you can proceed to installing the furnace. If the load is critical, it is advisable to either strengthen the beams or choose a different stove for the sauna (with less weight).
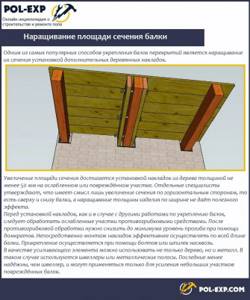
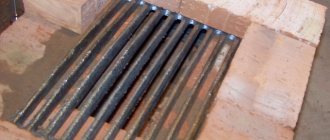
Increasing the cross-sectional area of a beam
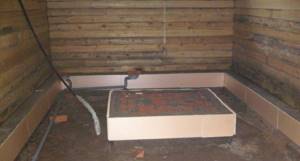
Concrete foundation
To build a foundation for the furnace you will need:
Cement.
- The sand is coarse-grained without inclusions. The ideal option would be to use mountain sand, but sea and river sand are also suitable. We have already discussed methods for cleaning sand from impurities on the pages of our Internet resource.
- Formwork material.
- Crushed stone.
- Ruberoid or dense polyethylene.
Tools:
- Solution trough
- Shovels: bayonet, shovel
- Building level
- Hammer, nails, hacksaw for formwork construction
- Construction stapler
Do I need to go deeper?
You can begin to build the foundation for the furnace. Many may wonder whether it is necessary to go deep into the ground when laying a foundation for a stove with their own hands. Our answer is definitely. Sometimes there is an option in which the foundation is arranged with a shallow depth. Only the top plant layer is removed and after installing the formwork the foundation is poured. This is completely the wrong way. A foundation slab constructed in this way will constantly experience loads, especially in winter. The motivation for economical consumption of building materials when constructing such a foundation is not justified. Deepening must be carried out to a depth below the freezing level in your region. You can use a shallow foundation for a bathhouse under a stove, but with the obligatory installation of piles under the main foundation slab.
3298747c3106dbca1d54e8cc0871aa17.jpe
Pit construction - main parameters
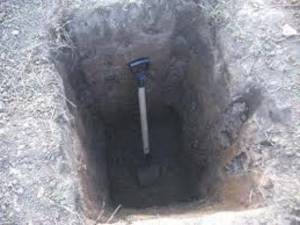
Digging a pit
For dry, sandy soils, 500–600 mm is sufficient. But on heaving soils this depth should not be less than 1000 mm. We repeat - this is the correct foundation design.
Proper laying of the foundation
According to the markings, we dig a pit. The size of the pit must allow the installation of formwork. But if the soil on your site is dense enough and the edges do not crumble, you can do without it. In any case, it all depends on the specific location and soil. When the formwork is installed, a 100 mm thick layer of crushed stone is poured onto the bottom of the pit. Crushed stone must be leveled. After this, it is necessary to compact the crushed stone using a manual tamper.
Waterproofing and filling
To waterproof the foundation, a layer of roofing material is attached to the inside of the formwork using a construction stapler. You can start filling
It is important to know that the upper level of the foundation should be 60 - 70 mm lower than the main floor of the building. Prepare the solution according to the following proportions:
- Cement 1 part
- Sand 3 parts
- Crushed stone 5 parts
Solution
- First, a dry mixture of cement, sand and crushed stone is prepared. You can use the mortar for laying the stove.
- After shoveling and obtaining a homogeneous mass, water is gradually added until a solution with the consistency of thick sour cream is formed. The solution can be poured.
Rules for installing electric furnaces
Electric stoves in a bathhouse must be powered by 220 V. In private construction, electric stoves powered by a 220 V network are used to equip saunas and baths. When installing them, the following rules should be observed:
- Select the type and cross-section of the cable according to the power of the stove. For modifications to 3; 4.5 and 6 kW a 1.5 mm2 conductor is suitable.
- Lay the floor under the electric heater with ceramic tiles.
- Leave a gap of at least 7 cm from the stove fence to shelves and flammable objects.
- Place washed stones only on top of the heating element.
- If you have a stove, use lamps designed for a temperature limit of up to 140 degrees.
- The ventilation hole should be located behind the heater at a height of 5-10 cm from the floor.
- Apply water as carefully as possible; do not water the stones with sea water.
Do not use abrasive products to maintain the electric heater.
Advice from professionals
If the stove is mounted in a wall, it is sealed with brick.
Steel and especially cast iron stoves can have a very beautiful design. Such products should not be covered with bricks or protected with a screen. You need to worry about their successful placement in advance.
- A structure for heating several rooms can be placed directly in a wall or partition. This installation is more complicated and requires bricking.
- When installing the stove and chimney, carefully ensure that all structural components are freely accessible. There should be no difficulty in cleaning and inspecting the elements.
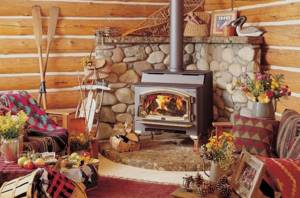
Heating a wooden building with a metal stove is a completely rational solution for a country house or cottage. The structures are light, compact, and very effective, but during installation a number of rules must be followed.
Additional fire barriers
To protect wooden partitions, ceilings, and wood trim in the steam room, a “cut” is made from fireproof products. They lay high-quality brickwork, and the system is not tied to the furnace masonry. Cutting is carried out in the following areas:
- the chimney located horizontally passes through the ceiling. The brickwork is tied to the laying of the stone chimney;
- next to the brick stove, which will occupy space in the interior wall, fire gaps should be filled. The cutting is carried out vertically along the entire height of the heating unit and its chimney;
All gaps around the stove in the interior wall must be filled Source bg.decoratex.biz
- the heat generator is located in the bathhouse, and its door opens into the adjacent room; protective building materials are also installed around the firebox channel.
Ceramic products, metal, asbestos-cement and concrete panels are used to lay the smoke channel. They use a passage tube or install a box and fill it with non-flammable material - basalt wool. In the lower zone, the iron pipe passage unit is hemmed with stainless steel.