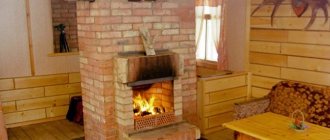
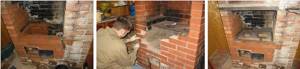
A little history
Previously, firewood was burned on a blind hearth - combustion air was supplied through a slightly open fire door. This method has a fire hazard - coals may fall out of the firebox. It is also difficult to accurately select the optimal combustion mode - the regulator is very rough. The ash that covered the coals over time also did not contribute to the normal combustion of fuel - it is an excellent heat insulator (in the combustion chamber of a Russian stove, this is exactly how coals were stored in the ash for the next kindling). Therefore, they began to install a grate - a grate on the hearth through which oxygen enters the combustion zone. The ash is also removed through the grate - nothing interferes with the combustion processes.
The absence of a grate or its damage is not critical - the stove operates without it. True, the efficiency is somewhat lower. And the zone of intense heating of the masonry moves below the hearth - now the base of the ash chamber is also heated. And here you need to be careful if the stove is installed on a wooden base.
Ways to solve the problem
If the grate is damaged, there are two options: fill the ash chamber with a brick or install a new grate.
The option of filling is acceptable only if the integrity is damaged or there are cracks and it is impossible to eliminate them at the base of the ash pit. At the same time, it would be good to replace the firebox door from a blank door to a door with a grille to regulate the flow of secondary air. But this option will definitely create a lot of unnecessary trouble and reduce the efficiency of the furnace. Therefore, we change the grate.
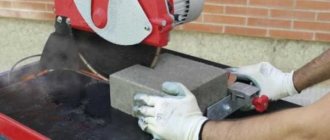
The grate is usually made of cast iron. Cast iron is very different from brick in terms of CTE - coefficient of thermal expansion. This indicator for iron is much higher than for ceramics. Therefore, the grate is always placed freely with a gap of 5-10 mm around the entire perimeter. Some manuals recommend filling the gaps between the masonry and the grate with sand. But this is very stupid advice. Unnecessary and even harmful. Firstly, the sand from the heat of the coals (and it can reach 1100 degrees Celsius) simply sinteres - vitrifies, tightly welding the grate to the masonry and depriving it of the necessary freedom. Secondly, after the first fire, this gap is filled with ash - a non-flammable and non-caking material. So why make unnecessary movements?
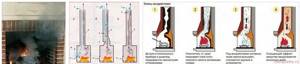
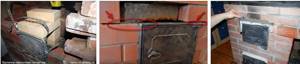
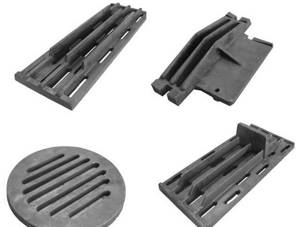
It is important to place the grate correctly - an inverted grate quickly becomes clogged with ash and stops working. Therefore, we remember that the grate slits expand downward, not upward. Sometimes the grate has a thickening in the middle - this is to equalize thermal stress, and not to roll the coals to the edges, as some people think.
The figure shows the correct (bottom) and incorrect (top) position of the grate
Usually the grate is placed in a brick trough or in grooves selected in the brick. If the integrity of these grooves is damaged and it is impossible to restore them, you will have to come up with some kind of supports. Sometimes they try to get out of the situation by driving nails, metal plates, etc. into the seams of the masonry. All this is in vain - the metal is quickly tempered and ceases to hold the grate, and more massive pieces of iron are unacceptable - they will tear the masonry.
Repair of brick kilns
A good stove maker works on his mistakes when he goes to repair stoves for his customer. The best teachers in our lives are the mistakes we make. Many wrong steps can be avoided if you watch and learn from the mistakes of others.
Good examples of poorly built stoves
Do-it-yourself repair of brick stoves
It is impossible to build a stove that does not require maintenance and periodic repairs. Sometimes the situation with the stove is simply outrageous, for example, they plan to build the combustion chamber for light firewood, but during operation they prefer to heat it with coal. Sometimes a Russian stove is split open in an attempt to quickly warm up a room frozen in the cold, loading the combustion chamber with fuel, like a fireplace. In any case, repairing a Russian stove is much more difficult than building it, so craftsmen always advise rebuilding the brick body; for them it’s easier than bothering with finding and solving the problem.
- How adobe ovens were made in Rus'
Lack of draft in the furnace
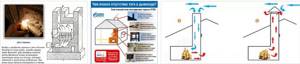
It is believed that the first and main condition for the successful operation of a Russian stove is the presence of stable draft. If you build a chimney with transfer channels in the over-pipe according to all the rules of stove science, then there will always be draft above the mouth of the stove, even if the firebox has not been used for a long time.
There may be several reasons why there is no normal removal of combustion products:
- Soot overgrowing of transition channels and the coldest part of the chimney;
- Use of substandard or unsuitable fuel;
- The appearance of hidden or obvious cracks in the masonry of the upper crowns, through which air leaks from the room into the chimney tract.

All about chimneys and proper installation
Most often, owners blame the craftsmen who were entrusted with building the stove. Even if you build a stove according to the most complex design, with a large number of chimney channels, their presence has virtually no effect on the operation of the firebox, but cracks in the walls of the chimney, lack of insulation, or incorrect pipe outlet on the roof can cause reverse draft.
First of all, you need to make sure that there are no cracks on the stove body; most often, the outer surface of the walls is whitened with lime, and most of the defects are clearly visible as black smudges.
- What causes chimneys to become clogged with soot?
The problem of a “lazy” chimney can be solved in several ways, for example, you can properly insulate the pipe and clean it more or less regularly. For low, large-section chimneys, it is imperative to build a soot or chimney tooth, which collects most of the dirt and debris that gets into the chimney.
How to correctly calculate a chimney for a stove
The next step is to clean the firebox and planter. Before building a furnace, you need to consider how to clean the channels, especially turns and dead ends, where most of the debris and soot are deposited. Over the summer, a large amount of cobwebs can accumulate in the pipe, leaves and small twigs get in, through which it is very difficult for air to get through.
The most desperate owners, instead of building an inspection window with a valve, prefer to clean the pipe with a torch and even by pouring and burning a small amount of gasoline or natural gas. A strong shock wave in the chimney, even if you build a rotary elbow, knocks all the dirt and soot back into the firebox of a Russian stove, so the method does not always give the expected result.
You can try to restore traction by burning a small amount of charcoal briquette on the cooking surface. After about half an hour or an hour, the chimney will warm up and the stove will operate in the required mode.
For Russian country stoves, experts recommend not experimenting, but building a stove with a fireplace. Even in severe frost, a fireplace will help warm the room and at the same time warm the chimney to create draft.
Cleaning a Russian stove

It is clear that the operation of the stove is greatly influenced by the quality of the firewood or briquettes used. If you burn with birch wood, which produces heat and a minimum of soot, then you have to clean the stove no more than once a year. To make work easier, windows or doors need to be built on the over-pipe and fireboxes, through which you can remove the remaining mineral ash from the grates, sweep out sand and crumbled clay.
Some experts recommend building an exhaust fan on the chimney, which can be used to simplify ignition of the stove; electric supercharging also helps when cleaning the channels of a Russian stove - fine dust and dirt are mostly blown out through the chimney.
Strengthening the frame of a Russian stove
One of the most difficult problems encountered during operation is the subsidence of the walls of a Russian stove on a weak foundation. There are two ways to strengthen a stone box:
- Dismantle part of the masonry, lay reinforcement and a corner under the bottom of the furnace combustion chamber, build an internal frame that tightens the walls;
- Construct an external tension band from steel strips and reinforcement.
The second option is quite possible to implement with your own hands, since you do not need to break the brickwork and seal the cracks with repair mortar. In both cases, steel strips are connected into a bandage using threaded rods, nuts and spring washers welded to them.
Strengthening and replacing the combustion door in a brick kiln
Problems with the firebox door usually arise when you try to build a firebox that is too hot. Due to air leaks through the gap, the hot metal intensively burns and corrodes, even despite the heat-resistant paint. Over time, the wire and door frame fade, and the design needs to be changed.
To replace the frame, cut the frame into two parts with a grinder, cut the wire from the inside and pull out all the parts from the opening. To prevent flames from hitting the door, you need to build a barrier in front of the opening, for example, lay a whole fireclay brick on its edge. To install a new door, the frame is pulled onto a piece of stainless steel wire and the cracks are filled with asbestos cord and then fresh repair mortar.
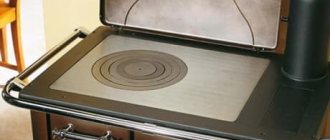
Replacing a hob in a brick oven
Many customers, before building a Russian stove with a hob, spend a long time and carefully selecting a cast-iron stove on which to cook “quick” dishes. On the market you can buy a standard slab made of Chinese cast iron or domestic pigment material. But this is not the same. Modern slabs are too thin and easily burst from impact. Often, a Chinese cooker bursts even from a falling brick; before the stove has been built, it needs to be repaired.
It is possible, as the experts advise, to build the cooking surface of the stove from cast iron grates, but in this case the efficiency of the firebox drops by 10-15%.
Before building a Russian stove, it is best to find an old hob from the 50s of the last century with a set of rings. The quality of cast iron is very high, so the slab is not cut or polished; you need to build the size of the mouth and hearth of the furnace to match the dimensions of the cast iron.
Replacing the stove in the stove is simple - cut the old cast iron with a grinder, split it and knock it out of the niche. Next, the support groove is cut to the dimensions of the new plate and the part is placed in place. The ends and seams are rubbed with fireclay clay.
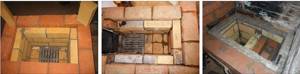
Replacing the grate in the oven
To properly replace the grates, you first need to remove the old parts and understand the reasons why the thick cast iron grates burned out or cracked. The main reason for the failure of the grate is considered to be non-compliance with construction technology or the use of coal mixed with crushed stone or rock.
If built according to all the canons, the grate bars in the furnace can last 30-40 years. To install a cast iron grate in fireclay or brick masonry, a support niche is cut to the size of the grate, plus a 3-4 mm thermal gap. If you build the firebox differently, the grate may split the brick or, more often than not, crack. If you use dirty coal as fuel, individual pebbles will get stuck between the bars of the grate and, when heated, can break off the part.
As a rule, the dimensions of the grate and firebox door of a Russian stove are selected in such a way that the cast-iron grate, turned diagonally, passes freely through the frame opening. In this case, the damaged element is simply replaced with a new one. If the firebox niche had to be built larger than the size of the opening, then the grate is assembled from two halves connected by wire.
Sealing cracks and cracks in the oven
The formation of cracks in brickwork is considered to be the most common defect. Even if you try to build a kiln with a weekly exposure for every 3-4 laid rows, there will still be no guarantee that the masonry mortar will not crumble and the brick will not crack. The nature of the behavior of the material can only be known by a stove maker who has had the opportunity to build several dozen stoves from the same clay and brick.
A crumbled seam can be repaired with thin clay, crushed and soaked in water. The damaged area in the furnace masonry is cleaned of clay residues and sprayed with water. The clay, crushed into a long cord, is placed at the joint and pressed tightly into the free space with a wooden stick.
If the depth of the defect is more than 5 cm, then the seam is treated with a mixture of lean clay, sand and horse manure. The bricks are laid in two stages, with intermediate cold drying for 10 hours. Cracks in the bricks are sealed with a purchased mixture, most often with masonry mortar for fireplaces, otherwise, fireclay mortar.
Replacing the bricks of a Russian stove
Large thermal stresses in the walls of a Russian stove often lead to deformation and even destruction of individual masonry elements. Bricks with a crack are rubbed down with clay and lime; material with a collapsed front or bond surface must be replaced.
Why wet bricks with water when laying a stove?
To do this, use a thin chisel to knock out the mortar from the seams and remove the bricks. The replacement uses the same material as the entire oven. As a rule, in order to build a stove, bricks are purchased with a 5-7% reserve of the estimated quantity. The brick is cut with a wedge and hammered into the mortar with a wooden mallet.
There is only one reason for the destruction of bricks - poor quality of the material. Previously, in order to build a Russian stove, heavy red bricks with a mark were purchased. And a Russian stove could stand for a hundred years without any fireclay. Today, building a box from branded brick is not a guarantee; the material may crack even during the first firing of the furnace.
Replacement and repair of tiles
The situation is considered normal when the cladding lasts for 20-30 years without repair or replacement. Individual cracks are rubbed with lime or sealed with liquid glass. If the material is installed on the walls using an adhesive solution, the tiles are soaked with water and carefully removed. Replacement is carried out in the same way as in the case of brick.
If the customer tried to build a furnace lining on steel wire, then he had to remove a whole row, from corner to corner. To build the lining, it is necessary to restore the wire fasteners on the walls of the furnace and stretch the wire along the entire row. Next, sequentially tying each tile onto a metal mustache, the row with the damaged area is restored. It will take at least four hours of labor to build one row of cladding.
Replacing the pre-furnace sheet
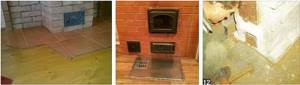
A simple device in the form of a thin metal or cast iron sheet is used to block hot pieces of ash and coals that have fallen from the furnace firebox. It is possible to build a classic Russian stove without protection, since the space at the exit from the firebox is reliably blocked by the mouth and hearth. If the stove does not have a hob, then the outlet can be covered with a sheet of roofing steel. This makes it easier to remove ash when cleaning the furnace.
More complex stoves, “Teplushka” and “Economy”, must be built with pre-furnace sheets, since the additional combustion chamber is separated from the room by only a thin door. They simply change the sheet, turn out the old fasteners, fill the screw holes with mineral glue and attach a new piece of iron over the holes.
Repair of a firebox in a brick kiln

The crucible, or combustion chamber of the stove, has always been and remains the most intense and loaded element of the Russian stove. It cannot be built in any other way; due to constant heating and cooling processes, the walls of a Russian red brick stove lose their masonry mortar, may crack or even lose individual blocks.
In the classic Russian stove, fireclay was not used; it was enough to build a chamber from hardened bricks with a high content of “scorched” or aluminous clay. The huge size allowed the stove maker to climb inside and determine the place that had to be repaired or rebuilt. If it came to the walls of the furnace, then it was possible to get by with replacing the brick; the vault had to be dismantled and rebuilt.
In modern Russian stoves, repairs can only be made by professional stove makers, and even then, most of them prefer to move the stove and rebuild the firebox.
Repair of hearth and ceilings in a Russian oven
Under or the bottom of the combustion chamber, especially the area adjacent to the back wall of the furnace, heated up the most. A slanted hearth platform for burning wood had to be built next to a relatively cold ledge for a cast iron pot or a pot of food. If you try to heat the stove with coal, especially in winter or after a long period of inactivity, a crack appears in the bottom. Many stove makers try to build a hearth in two parts, and fill the joint between the hot and cold parts with mineral backfill crumbs.
To repair a furnace with a monolithic hearth, you have to dismantle the masonry from the back side and completely rebuild the base of the chamber.
In approximately the same way, roof repairs are carried out. Most often, under load, the surface of the roof is forced into the chamber, in this case it is necessary to remove the plaster, brick and level the screed made of sand and clay. Damage to the roof can be effectively prevented by building a bench with a wooden panel made from oak boards.
Repair of the chimney of a Russian stove
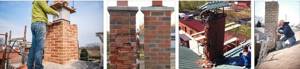
A drop in draft and smoke in the room are the first signs pointing to the fact that things are not as good as we would like with the chimney of a Russian stove. Simply put, the chimney began to crumble. Depending on the extent of the damage, the masonry can be repaired, or the chimney will have to be rebuilt. If the owners had the wisdom to build a channel from high-quality bricks, then it makes sense to fight for its health and normal operation.
The first step is to find the location of the damage. Often, in order to simplify the process of lighting a cold Russian stove, owners try to build a pipe with a larger cross-section, with a brick wall thickness of up to 120 mm. It turns out to be an incredibly heavy structure, which is not entirely correct. Similar errors appear if, for example, a master who builds fireplaces tries to build a Russian stove. This is where a chimney is required, like a blast furnace; when the fireplace is running, most of the heat flies into the chimney. For a Russian stove, it is best to build a chimney made of stainless steel, with a cross-section of 180 mm, carefully insulated with basalt wool and lined with M250 red brick.
The desire to build a chimney for a Russian stove, “like in a book,” leads to the fact that the section of the brick pipe from the stove body to the first cutting simply crumbles and cracks, the brick crumbles and falls out. In this case, the pipe is covered with a steel bandage and hung on supports. The section of masonry located below with damaged bricks is dismantled and cleaned, then the entire row of the pipe contour needs to be built or rebuilt.
What causes condensation in the pipe?
Sometimes, due to freezing condensation or atmospheric moisture, the brick at the top of the chimney crumbles. It is better to disassemble the damaged section of the Russian stove pipe and completely rebuild it. If the owners did not have enough money to build a protective casing made of metal, then after the repair they need to install a protective canopy and treat the brick walls with a solution of liquid glass.
Replacing the lining in a Russian furnace
Modern Russian stoves are difficult to build without using fireclay lining of the combustion chamber. Firstly, the dimensions have changed: instead of a huge brick colossus weighing more than a ton, customers prefer to build a Russian stove in a smaller version. The amount of fuel burned remains the same, and the size of the firebox is almost four times smaller. It is believed that an almost eternal firebox can be built from fireclay or dinas. This is not entirely true. Parts of the lining that come into contact with the flow of cold air burst and crumble.
If the crack is small, then you can replace one brick from the row. In the event of complete destruction or the appearance of a long chain crack, the lining of the Russian stove must be dismantled and a new masonry rebuilt. Most often, for this you have to disassemble part of the front wall, the mouth and the over-pipe of the Russian stove. To make it easier to lay bricks in the firebox, before installation you need to build the lining dry, without mortar, in an open area, adjust it to size, and only after that send it to the furnace of a Russian stove.
How to light a stove correctly
Stacked and solid options
In different furnaces, the fireboxes may differ not only in size, but also in shape. In this regard, grate manufacturers produce a wide range of products, so you can choose grate bars for even non-standard shaped fireboxes.
By structure they are distinguished:
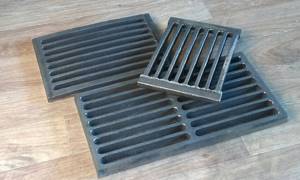
- Solid cast grate bars . In this case, a product is produced that cannot be disassembled into parts. They are produced in several standard sizes, so when selecting a product you need to rely on the total area of the fuel chamber of the furnace.
- Prefabricated gratings are assembled from several parts. From these components you can assemble a grate for a furnace of the desired shape and size.
What types of grate designs are there?
If we talk about products made of heat-resistant steel, then there are pipe and chain varieties of grates.
As for cast iron grates, there are several types:
- Tiled . Such rectangular grates are widely used in solid fuel stoves and boilers, fireplaces. We can say that these are universal products. You just need to choose the right grate size.
- Baskets . This type of grate was used in open hearths where food was prepared. Currently, they are practically never found.
- Beam . Externally, such grates resemble beams for construction. They are single or double stacked parts from which you can build a grill of any size.
- Movable gratings . The peculiarity of this design is that the grille links can be moved in a horizontal plane, changing the clearance between them. As a rule, such grates are used for long-burning furnaces.
How to install a grate in a furnace yourself
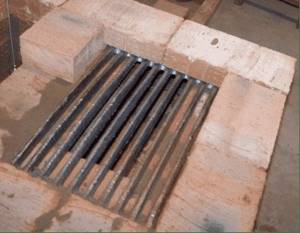
When laying a new structure, installing a grate in a furnace does not present any great difficulties.
According to the sequential masonry scheme, the vent and the base of the firebox are laid out. A cutout is made in the foundation bricks for the grate. Then the process is simple - laying out the base, installing the grille, fixing it with cardboard. It's a different matter when repairs need to be made. Especially when the masonry itself is new and it is not possible to disassemble the entire oven, but you just need to replace the grate. In this case, first of all, you need to carefully study the structure of the furnace. It often happens that the grate bars on one side have a thermal gap, and on the other side the structure is securely fastened with a brick or even two. In this case, you will have to remove the hob and disassemble the stove masonry.
For replacement, it is recommended to select an analogue that matches all sizes of the grille to be replaced. If it is not possible to find a similar one, you can if the nature of the damage allows you to simply saw the structure with a grinder and combine the resulting parts, adding the missing elements along the edges.
Well, if you can’t find an element suitable in size, you’ll have to make a grate for the stove with your own hands.
What to make grates from
To make the grate in the furnace, fire-resistant steel and cast iron are used. Since the grate is constantly exposed to combustion, cast iron is considered the best option for its manufacture.
Even the strongest steel will become damaged over time due to exposure to constant fire. And the combustion temperature of coal is considered to be one of the highest among all types of fuel. It is for this reason that cast iron is chosen for the manufacture of the grate. When exposed to high temperatures, steel material has the ability to oxidize, and in the future it rusts and breaks down.
Do-it-yourself grate: materials, design, stages of work
As already mentioned, it is easier and easier to make a grate for a stove with your own hands from steel.
There are several options here. The only difference is the purpose for which the lattice needs to be made. For small stoves, which are mainly used for periodic heating of premises, for example, for a potbelly stove, you can use construction fittings with a diameter of 10-12 mm. But for capital heating or heating-cooking stoves, it is better to pay attention to two options - from structural reinforcement or from corners. The advantage of steel reinforcement lies in the availability of this material and the possibility of using previously used sections. In addition, steel reinforcement is more suitable for grates; it does not burn out so quickly, and it is not greatly deformed under the influence of temperature. On the other hand, to assemble this element it is necessary to use reinforcement with a large diameter - 16,18 or even 20 mm. This makes it possible to extend the life of the grille.
The use of steel angles makes it possible to quickly replace a worn-out element; they are not as expensive as other types of rolled products, and by their design they are able to withstand a greater number of heating and cooling cycles than a profile pipe or rod.
The manufacturing technology is quite simple. To assemble a structure from steel reinforcement, it is recommended to first make simple calculations. First you need to calculate the geometric dimensions of the lattice. Here the length, width and height of the product are taken into account. In this case, the height plays no less a role than the length and width; a discrepancy between the height and the cast iron parameter will not allow the grate to be correctly installed in place. A height that is too small will interfere with proper loading of fuel, and a height that is too high will raise the grate above the surface of the bricks, and thus create a space in which ash and unburned fuel will accumulate.
The next step is to calculate the area of the grating. Next, the number of rods is calculated. First, 40% of the area is calculated, approximately how much is occupied by the spaces between the rods. And then the number of rods is calculated. When calculating, it is recommended to round the resulting values; it is not necessary to strictly adhere to the figure of 40%; nothing bad will happen if the gaps are 35 or 45% of the grating area.
The stage of practical work begins with the preparation of material for work - first, the rods are cut; accuracy and precision are required here. After this, a template for assembly is made, markings are made on a section of the board, and nails are simply hammered in to secure the sections of reinforcement. After checking the correctness of the layout, electric welding connects all the elements into one structure. First, tack is done at several points, and then all seams are finally welded around the entire circumference.
Upon completion, the resulting structure is checked in all planes; this is done on a flat surface using a bench angle - all angles must be correct, the lattice itself must be in the same plane. No bends or deformations.
Step-by-step instructions for making a grate
Before you make grate bars with your own hands, you need to clarify the initial data. The firebox opening subframe is made from a 50×50 mm corner with an internal perimeter of 265×335 mm. Therefore, the grate frame should be made with dimensions of 260x330 mm along the outer perimeter. Having prepared tools and materials, the following work is carried out:
- Using a corner machine, a corner 1180 mm long is cut.
- The side of the corner 40x40 mm is successively marked with a pencil into segments: 260, 330, 260 and 330 mm.
- Perpendicular lines are drawn in marking areas. From the top point, lay 20 mm in both directions. The sides of the equilateral triangle will be the cut lines.
- Using a corner machine, triangular fragments of the corner are cut out.
- Alternately clamping the steel workpiece in a vice, bend it into a frame with a hammer.
- The sides of the folds are connected by welding. The right angles of the frame are checked with a square.
- The remaining section of the corner is divided by a corner machine into 5 sections, each 322 mm long.
- The corners are welded into the frame with the feathers facing outward with 10 mm gaps between them.
- A grinder is used to remove all burrs and metal deposits after welding.
- A piece of strip is welded to one of the sides of the frame, having previously made a hole ø 6 mm in it with a drill. This is done so that when cleaning the grate it can be easily removed from the subframe.
- The finished grate is lowered into the subframe.
It is necessary to comply with safety regulations during work on assembling the grate. The master must have special clothing and shoes, especially for welding work.
The proposed manufacturing method is not suitable for everyone. You must have skills in handling welding equipment and power tools. As a last resort, a grate of this design can be ordered at any mechanic shop. It won't cost much, and the order will be completed quickly.
You can go another way. Instead of corners, cast iron grates 330 mm long are placed in the frame. To do this, appropriate grooves are made under the beam elements in the vertical corner of the frame. Despite the fact that the grate may initially seem difficult to implement, making it with your own hands is not difficult.
What is needed for production?
It is possible to make a grate with your own hands. What to make a grate for the oven from? It is better to use heat-resistant steel as a material, because it is impossible to work with cast iron at home. To make the grille, you can use any materials that have heat-resistant characteristics. This could be fittings, corners, steel pipes or strips of metal.
To make grate bars you will need:
- the metal from which the grille will be made,
- steel rods for creating partitions;
- ruler, tool for making marks;
- grinder for cutting material;
- welding.
From reinforcement
It is not difficult to make a grate from reinforcement yourself. It is enough to select the desired length of the product and cut the reinforcement with a grinder. It is necessary to determine the number of strips and take into account clearances for ventilation.
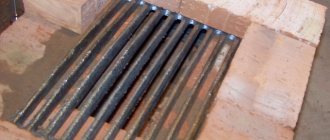
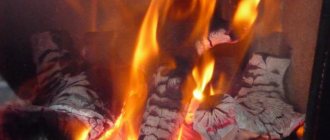
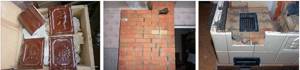
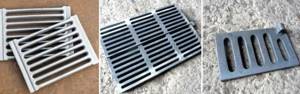
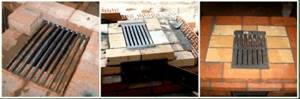
When the required amount of material has been prepared, you can begin welding the grate using rods. Do-it-yourself grate bars for the stove made from reinforcement can be seen in the photo below:
conclusions
So, before installing grates in the oven, you should choose them correctly. Cast iron products are considered the best option - they are equally suitable for both brick and steel stoves.
During the selection process, pay attention to the size of the gaps between the bars and the area of the grill, as well as the type of fuel. Monolithic models are a little easier to install, but stacked models can be selected individually according to the size of the firebox.
Do not forget about the compensation gaps around the perimeter of the grille and do not completely bury it.
Provided that all details are observed, the installed grate will not need to be replaced for a long time.
It is quite possible to make a grate with your own hands in a home workshop. What is a stove grate, how best to make and install it - we will try to talk about all this in the article below.
The grate for the stove is part of the support platform in the form of a grate for laying solid fuel in the combustion chamber of the stove. The lattice can be either solid or in the form of bars laid in a row with spaces between them. The size of the grate depends on the size of the stove firebox. The material from which grates for furnaces are made in the factory is cast iron and steel. Homemade structures are assembled from steel elements.
Price policy
A quality product cannot have a low price. High-quality cast iron parts that will last for many years are expensive. And vice versa, light and cheap ones, made from a mixture of unknown materials, will quickly become unusable.
Approximate prices for furnace grates:
| Size | Price |
| 800x200 mm | 1200-1600 rub. |
| 915x250 mm | 1100-3000 rub. |
| 260x540 mm | 400-500 rub. |
It is better to buy these products in specialized stores. They provide a wide selection of models with different materials and price categories. Consultants will help you make the right choice based on your preferences, the nature of the fuel, and the frequency of operation of the heating device.
Criteria for selecting grates for a furnace
The choice of grate is determined by several factors, which include the following:
- Type of heating device (structure).
- The type of fuel used - the grate model will depend on this point. If you plan to heat the stove with coal, then you should purchase more massive grates that can withstand considerable mechanical load and extremely high temperatures. Lighter weight products are suitable for wood fireplaces and stoves.
- The grate must correspond in size to the seat in the combustion chamber. More precisely, the dimensions of the grate are usually immediately included in the design of the furnace, based on the sizes of these products offered for sale.
- The distances between parallel grate bars for wood-burning stoves must total at least 40% of the grate area. This factor will help to avoid difficulties when cleaning the product from ash. In addition, gaps less than recommended will create obstacles to the free circulation of air flow. And this, in turn, will lead to a decrease in the productivity of the heating device, as well as to a decrease in the level of safety of its operation. Insufficient air exchange creates difficulties both for complete combustion of fuel and for normal traction. And the delay of combustion products is unacceptable, as this is fraught with very serious consequences.
If the gaps of the grate are larger than necessary, then not only ash, but also unburned fuel particles will fall into the ash pan. The consequence is a completely unnecessary waste of fuel, since unburned particles of firewood or coal that have fallen into the ash pan will no longer produce the expected heat transfer. And in this case, everything is not very good with security.
Let's sum it up
- The best material for grates is cast iron. It is reliable and durable, it can be installed in brick and even steel ovens.
- When choosing a grate, you need to take into account the weight of the fuel and the area of the gaps. Monolithic models are easier to install, while modular models are well suited for assembling gratings of non-standard sizes.
- When installing, be sure to leave gaps for metal expansion and do not fill the grooves with cement.
If you take into account all these nuances, the new grate will last for decades, and you will not need to think about replacing it.
Dimensions of grate for the furnace
The dimensions of cast iron grates for a furnace depend on the type of fuel. Their possible sizes are presented in the table.
| Firewood | Coal |
| 330*252 mm | 350*205 mm |
| 300*252 mm | 300*205 mm |
| 250*252 mm | |
| 250*180 mm | |
| 140*180 mm | |
| 120*140 mm |
If it is necessary to install beam gratings, you need to remember that the length is 250, 330 and 470 mm.
Tile grate
One of the most common types of grate is the tiled grate. The main feature of this design is the observance of strictly fixed dimensions. This grille is designed for an installation site of a certain size.
A mandatory condition must be met - the presence of a gap between the outer perimeter of the grate and the walls of the firebox of at least 5 mm. If this size is not maintained, the cast iron grate may expand greatly when heated and damage the firebox.
Specifications
A structure of any size can be assembled from beam grates.
Depending on the type of fuel used and the design of the boiler, the grate bars are made of monolithic parts or hollow pipes. The latest models are air-cooled, which reduces the likelihood of metal melting. The shape and size correspond to the firebox of the appliance and the door configuration through which they must pass during installation.
The following types of grates can be installed in ovens:
- Tiled. They are a rectangular product with parallel crossbars. They are universal, as they have different intervals for all types of fuel.
- Baskets. Products with a volumetric configuration that is effective but difficult to maintain.
- Beam. They are set parts from which grates of any size and configuration can be assembled. They are used in self-manufacturing of boilers for assembling non-standard grates.
The correct choice of grate is as important as the chimney, damper and vent. Every detail is important in making a boiler.
Main functions of grate bars
The grate bars are installed in the firebox; as combustion proceeds, the waste is poured into the ash pan.
Any boiler is a structure where each part performs a specific task, ensuring the uninterrupted operation of the entire device.
The grate bars in the furnace perform the following functions:
- Placement of fuel - coal, firewood, briquettes, and other flammable items. Air enters through the blower, ensuring the presence of oxygen necessary for the thermal reaction.
- Removing ash and ash. As the loaded material burns out, it turns into a powder and spills down through the grates. The fuel settles on the surface of the metal, and the flow of oxygen to it improves. This frees up space for loading the next portion of fuel.
The efficiency of the boiler depends on the design of the grates; the correct choice of metal for its manufacture ensures the longevity of the device.
Recommendations for choosing cast iron grates for the stove
A correctly selected grate increases the efficiency of the furnace and reduces fuel consumption. Which option is best depends on:
- type of oven;
- firebox dimensions;
- fuel used.
Type of oven
Each type of grate is better suited to a certain type of heating device. for conventional stoves and fireplaces. in solid fuel boilers. Although flat ones are also used, especially in small models.
For long-burning devices, choose a movable option for better regulation of air flow. And when using open stoves, it makes sense to choose a basket model.
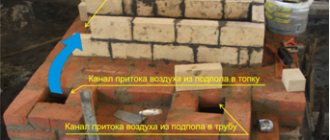
Blower
The vent is the first air chamber in the furnace, which usually has a door. The blower chamber is laid out according to the dimensions of the grate. It can be wider than the grate and overlapped by overlap of rows of side walls up to the grate. Through the ash chamber, air enters the firebox through the grate; in addition, it serves to collect ash and other fuel waste.
Blower: 1 - blower chamber; 2 - blower door
The blower door can be of any size, but no larger than the blower door. Through this door it is convenient to remove ash from the wide ash chamber, and as for air, there is enough of it with a door even half as small as shown. Practice has shown that the best place for the blower door is on the second row of the stove masonry. The door is installed in the blower window, which is connected to the blower chamber. When the door is open, air rushes through the window into the ash chamber. The more the door is open, the more air will enter the ash pan and the better the fuel will burn. Air, especially coming from below, is needed to maintain fuel combustion. Hence the name - blower.
Sometimes the door is used to regulate the draft in the oven: the less the door is open, the less draft. It is not necessary to install a blower door, but it is advisable, because without it a draft can occur in devices that do not close tightly, such as valves. And then the heat will go out into the chimney, and the stove will release less heat into the room.
If there is no door, the draft is adjusted using a valve. The more the valve is open, the stronger the draft, and with it more air will enter the stove and the draft will be stronger, which means the fuel will burn better. If there is no door in the ash window, but there is a view, then the fuel will constantly burn with the same intensity, but with this intensity a lot of heat will go into the pipe, which the brick could absorb. The viewer cannot regulate either thrust or fuel combustion.
Let's say that the door is a few millimeters smaller than shown in the figure. In any case, the seams should be no more than 3-5 mm. To do this, the laying must be carried out from the door to the corner of the stove. The last seam turns out thicker than expected, and such a seam cannot be made. To maintain the thickness of the seams, you need to break off a quarter from a whole brick in the corner of the wall where the door is located. You will get a three-quarter and a quarter. Next, you need to break off a larger quarter, taking into account the thickness of the seam. It will seem to lengthen the whole brick. Instead of a whole brick, you need to put the first three-quarter and the second quarter - it will take the place of the thick seam. The masonry of the top row above this quarter will be made of a whole brick - it will block this quarter. If a thick seam is obtained near the door, then you need to do the same in this place.
If, because of the door, the firebox turns out to be several millimeters narrower and the flues are wider, then this will not affect the operation of the stove. In some areas of the country, stoves are installed without a blower at all. In these furnaces, the combustion doors have windows-openings for air intake instead of a blower. In such fireboxes, only wood and peat fuel burns, but the firewood is buried in ash and forms a lot of firebrands. When they burn out, the heat goes into the chimney, so the firebrands have to be pulled out of the firebox and placed in a bucket of water. Such ovens are made due to the lack of grates. If they exist, then they are installed above the blower chamber.
Initial information
Self-made structures made of steel, when compared with their brick counterparts, are distinguished by the speed of construction and increased heat transfer. To carry out the work, it is enough to find a pipe whose diameter will be approximately 50 centimeters. Such products are especially relevant for small objects.
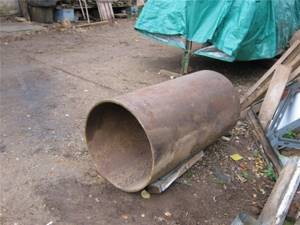
Approximately the following pipe needs to be prepared.
- The heating structure must be located in a place where reliable fire protection is provided for materials that are easily ignited.
- The area occupied by this facility should not exceed 0.15 percent of the usable square footage of the heated room, since it is not very comfortable to carry out water procedures in a cramped environment.
- The side surfaces of the structure must be covered with heat-insulating materials so that the risk of burns is minimized.
- When installing, you should take care of the correct location of the stove, because the heat emanating from it should spread in different directions, thereby ensuring high-quality heating.
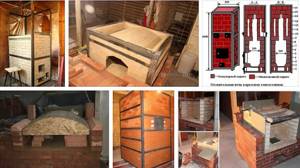
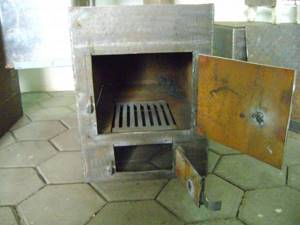
Basic elements
When making an iron stove for a bathhouse with your own hands, every novice craftsman must familiarize himself with the main components that make up the structure.
Any of the fragments listed below performs some function, so it is important to study all the details in full.
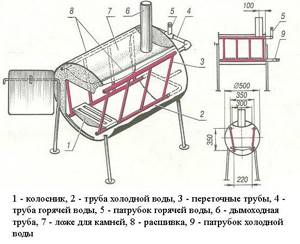
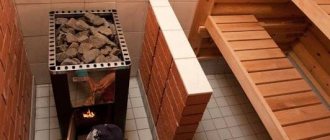
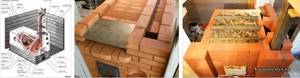
The structure of a sauna stove with water supply.
- The firebox is the main chamber where organic fuel is usually burned to heat the walls and then the surrounding air.
- The ash pit is located below the previous chamber, ensuring the collection of ash, which is formed as a result of the combustion of organic substances.
- The stone container allows you to lay cobblestones of jadeite, gabbro-diabase, crimson quartzite or other high-temperature resistant analogues.
- The pipe is a hollow product that is necessary to remove combustion products from the main chamber.
- The grate is an element inside the firebox that makes it possible to hold a layer of solid substance intended to produce thermal energy.
- Blower and firebox doors allow you to control the flame by covering it, which leads to a decrease or increase in oxygen inside.
- A pipe valve is usually made in the form of a control element that moves perpendicular to the working medium.
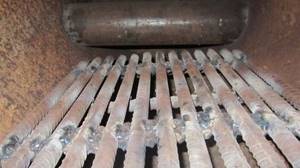
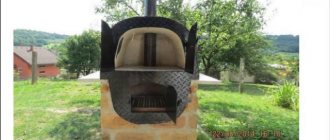
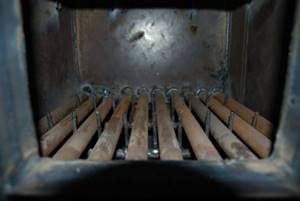
Shown is a homemade grate made from rebar.