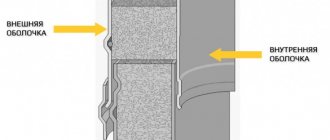
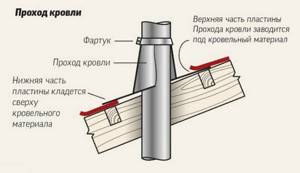
The principle of waterproofing
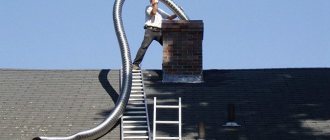
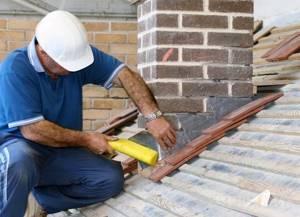
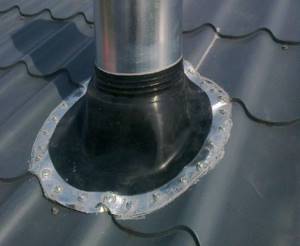
Where the pipe passes through the roof, there are bound to be gaps, and their usual waterproofing with mastics and sealants is not a sufficient measure for reliable protection against leaks. Therefore, when laying the roofing, it is necessary to perform a number of measures:
- The pipe should be positioned as close as possible to the ridge of the roof, this will help avoid the accumulation of snow at the point where it exits;
- A moisture removal system, a protective membrane and so-called “aprons” and “ties” are installed under the roofing. Their shape depends on the shape of the pipe;
- The pipe exit points must be waterproofed with a special sealant that is resistant to temperature changes;
- An additional decorative apron is laid on the roof covering. Its purpose is to drain rainwater from the pipe.
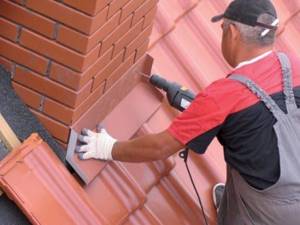
Chimneys, as you know, have different shapes, so the design of waterproofing elements for them is somewhat different.
Pipe connection at the ridge
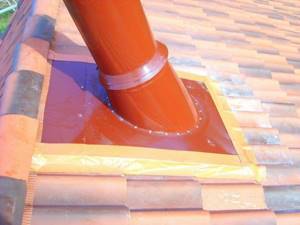
The easiest way to seal the joint between a pipe and a corrugated roof is if it is routed through a ridge. This increases the reliability of the connection. In such structures, the formation of snow pockets is impossible. The risk of leaks arises precisely when they are present. Such options also have one significant drawback - to pass the pipe through the top of the roof, the ridge element must be divided.
The upper junction area must be sealed using the standard method - using the upper elements of the apron, sealed on top with sealant. The silicone composition is not afraid of high temperatures.
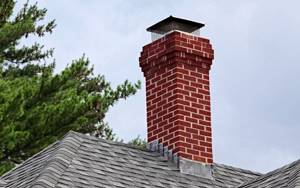
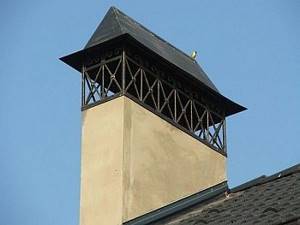
Waterproofing of a rectangular chimney
Such pipes are most often made of brick. An asbestos-cement or metal pipe can run inside the brick box, or a chimney can be made using brickwork. Brick has good thermal insulation characteristics, so, as a rule, there is no sudden temperature change in such a pipe.
To waterproof a pipe you will need:
- Diffusion membrane;
- Waterproofing mastic;
- Sheet metal or prefabricated metal aprons and ties to fit the pipe;
- Heat resistant sealant.
Waterproofing technology:
- It is necessary to begin waterproofing immediately after laying the waterproofing under the roofing. The edges of the diffusion film are folded onto the pipe with an overlap and glued using polymer-bitumen mastic.
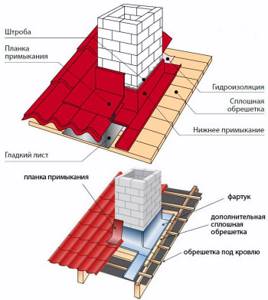
Features of installing a brick chimney
It is recommended to use clay bricks for the chimney and lay out each wall at least 12 cm wide. Brick laying for low-power stoves is done in four rows, for medium-power stoves - in five rows and for high-power stoves - in six rows. However, any brick is destroyed under the influence of soot, soot and condensation; to avoid this, the brick box should be strengthened by adding a metal pipe. The space that is formed between the pipe and the brick walls must be filled with non-combustible insulating material, thus providing additional insulation of the chimney.
Brick chimney for home
Stages of chimney construction:
- They begin to install a brick chimney with their own hands from the neck. This is the part of the chimney that immediately follows the stove top pipe. In this place it is necessary to make a smoke valve, or, as it is also called, a view, which blocks the pipe after fuel processing.
- Next, the outer diameter of the masonry expands, the so-called fluffing is performed, while the internal smoke channel does not change in size.
Brick laying must be done in such a way that the internal size of the smoke channel is the same in any place.
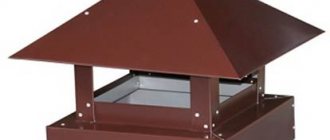
After the chimney passes through the ceiling, a pipe riser is laid, which has the same dimensions as the neck. The next time the outer size of the masonry increases during the passage of the chimney through the roof rafters. This extension is called otter. It is necessary to install each otter wall at least 0.1 m wide to successfully prevent moisture from entering the attic space through existing gaps between the chimney and the roof. After cutting the otter, the outer diameter is narrowed again - the pipe neck is laid. After the neck of the chimney, the masonry expands again - this is the head of the pipe. A special metal cap is installed on the head - an umbrella, which protects the chimney from rain and other precipitation. In addition to its main function, the umbrella also restrains strong gusts of wind that can disrupt the draft in the smoke channel and serves as a decoration for the chimney and the entire building, giving it a finished look. Insulation of the visible part of the chimney can be done using a duct.
Sometimes, with a lack of experience, the chimney is laid out the same size from the neck to the head, and then the wall is expanded from the outside, adding fluff and concrete otter. Laying a brick chimney is not an easy task and requires certain skills. However, you can do it yourself if you study the diagrams and drawings in detail.
We build a brick chimney according to the diagram shown in the figure:
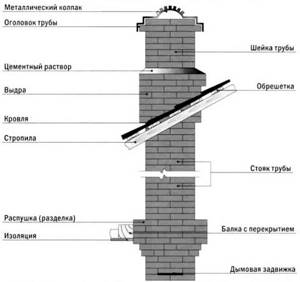
Brick chimney diagram
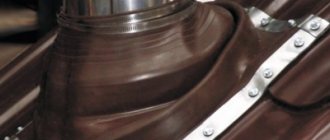
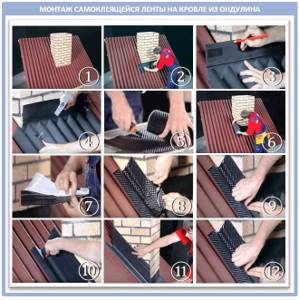
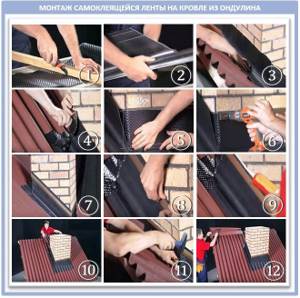
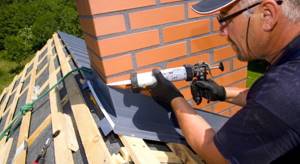
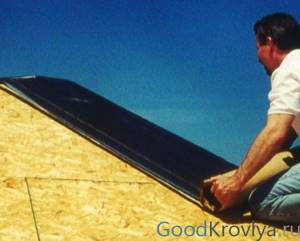
Wakaflex material laying technology
Vakaflex is a self-adhesive plastic waterproofing tape. Vakaflex has internal reinforcement with aluminum, thanks to which it can take the shape of the roofing profile while simultaneously adhering to the pipe. Installation of Wakaflex is simple and can be done by one person.
- The tape begins to be glued along the lower edge of the pipe. Cut it along the length of the wall with a margin of three to five cm on each side. Bend it in half lengthwise, remove the protective layer from the upper half and glue the tape to the pipe, rolling it with a hard roller. Then remove the bottom protective film and glue it to the roofing, carefully rolling it with a roller until a complete fit is ensured. The corners of the tape are carefully trimmed, folded onto the side walls of the pipe and glued.
A Waka strip is attached to the pipe over the waterproofing tape, preventing water from flowing along the plane of the pipe.
Waterproofing self-adhesive tapes: a flexible approach
One of the most popular and proven methods for arranging the connection between the roof and the chimney pipe is the use of special waterproofing tape.
For example, it is difficult to come up with something better for a roof made of piece materials, for which a galvanized steel apron is not suitable. It is easy to work with such tapes, the main thing is to adhere to the temperature regime – from +5 to +40°C.
In this article we will look at the highest quality and most popular tapes. In general, there are many options, because each manufacturer of roofing material tries to produce its own roofing element, which will be most suitable for a specific brand.
For example, if you need to go around a round chimney, an Ecobit type tape will help you. It is good because it has a self-expanding base and can be sealed without problems.
Its lower part must be placed under the tiles, and the upper part must be placed on the roofing. Next, press both layers and glue them to the walls of the chimney and to the tiles. Next, cover the edges of the top tape with metal profiles.
This is what these waterproofing tapes look like:
In total, today tapes are produced on two bases. Thus, butyl rubber has the highest waterproofing qualities, and aluminum allows you to hermetically fit even the most complex shapes.
Easy-Form: the strength of aluminum
Easy-Form is an aluminum tape with a butyl layer on the surface. The elongation of such a tape is 70%, and at the same time there is a rigid lining made of polyester material.
It is self-adhesive and is great for waterproofing a chimney. Does not rot, is resistant to frost and temperature changes, does not lose its properties within the temperature range from -20° to +80°C.
This tape completely replaces the use of lead sheets, and is cheaper and much easier to install. It comes with a 10-year warranty. And the work is quite simple, although the instructions look voluminous:
- Step 1. Even at the stage of construction of the sheathing, include additional elements made of timber with a section of 40x40 or 50x30 mm. Secure them along the chimney walls.
- Step 2. Cover the front of the pipe with a covering apron. Usually this is recommended by the manufacturer himself, from a specific material for each type of roof.
- Step 3. Install the apron in its place - along the lower edge of the pipe.
- Step 4. Make markings on the apron and make cuts along it. Make sure that the top of the apron is exactly the width of the pipe, and that the wavy part has one wave on each side.
- Step 5. Make markings with a pencil and cut off excess material along the lower crest of the wave with a sharp knife.
- Step 6. Press the finished apron onto the pipe and fix it to the surface with proprietary roofing nails, directly into the sheathing beam. Drive nails into the top of each wave, strictly vertically, except for the waves that extend on the sides beyond the dimensions of the pipe.
- Step 7. Now attach the cut piece to the installation site and give it the shape of a corner relief.
- Step 8. From the back of the tape, remove the protective film that covers the adhesive layer. Apply the tape to the pipe so that it covers the top and bottom of the apron by 70-80 mm. To ensure that the tape fits tightly to the roof, trim its corner.
- Step 9. Press the tape onto the entire surface with a little force. Do this on one bottom corner of the pipe, and then on the second.
- Step 10. Attach the side apron to the pipe, press it and mark the cut line. You will need to cut along the vertical boundaries of the pipe with a sharp knife. Do not press the knife itself too hard, so that it enters the apron only 2/3 of the thickness of the material. Then bend it and carefully break it off.
- Step 11. Nail the prepared side parts of the apron to the roof, three nails in each part: one in the center and one more at the bottom and top.
- Step 12. Cut a piece from the self-adhesive tape that will be 200 mm longer than the width of the pipe. This length is suitable for sealing the back of the chimney pipe.
- Step 13. Now glue the tape to the front side of the pipe. Now the length of the tape should exceed the width of the pipe by 200-300 mm. The tape itself will bend over the sides of the pipe and go under the side parts of the apron.
- Step 14. Press the top edge of the tape with the metal fixing bar and secure it to the dowels. Bend the edges of the apron away from the surface of the pipe.
- Step 15: Seal the corner between the pipe wall and the folded edge with a layer of polyurethane sealant.
- Step 16. Lay an additional piece of ondulin on the back side, from the ridge to the pipe.
Here's what it all looks like in practice. Part 1:
Part 2:
In the case of a metal roof, the whole process is as follows:
Wakaflex and Grind Line: modern waterproofing
Vakaflex is a reinforced polyisobutylene mastic, which is supplied in the form of a roll 5 meters long and 28 cm wide. On its reverse side there are strips of synthetic rubber, which are glued to the base using a stitching roller.
Let's look at the Wakaflex tape installation technology step by step:
- Step 1. Trim the waterproofing film so that there is an overlap of at least 10 cm on the pipe.
- Step 2: Make a drainage groove using waterproofing material directly above the pipe opening.
- Step 3. Trim the tiles around the pipe and lay them with a gap of 2-3 cm.
- Step 4. Now cut the Wakaflex to a length that is equal to the width of the pipe + 5 cm for each side of the pipe.
- Step 5. Bend the strip using a corner so that the resulting corner width is 15-16 cm.
- Step 6. Next, apply the wide part of the strip to the pipe, remove the protective film and press the Wakaflex to the base.
- Step 7. Stretch the tape over the surface with your hands and roll it using a roller.
- Step 8. Cut the upper part of the Wakaflex at an angle of 45°, but do not cut 1 cm to the line of the pipe and the slope. Glue with a roller.
If you did everything correctly, the side roll should start from the bottom of the glued strip and end 15 cm above the top of the pipe.
The following instructions are:
- Step 1. Remove the protective film and glue the top of the Wakaflex onto the pipe.
- Step 2. Step back 2-3 cm from the level of the pipe and cut the tape parallel to the pipe, but do not bring the cutting line to this same 2 cm point.
- Step 3: Now cut the side of the tape so that it is parallel to the water drain from the roof.
- Step 4. Using scissors, round the corners of the Wakaflex strips so that the junction has a beautiful appearance and is not torn off by the wind.
- Step 5. Next, glue the lower part of the roll to the tile and roll it with a roller.
- Step 6. Cut the top part of the roll and do not bring the cutting line to 1 cm. Glue the cut parts onto the pipe and tiles, then roll them.
- Step 7. Glue the left and right corners of the pipe with the remnants of the strip. This will protect them from sliding ice and snow. As a result, the overlap on the side of the chimney pipe should be about 2 cm.
The tape should be placed under the shingles above the row of shingles. At the same time, to protect the roof from melt water, make the top roll of tape double. To do this, cut two strips, remove the protective film and stick to the bottom strip with a 5 cm overlap and roll with a roller.
But it also happens that the tiles are not located in the best way, and the width of the double strip will not be enough. In this case, it will not be possible to install the upper waterproofing of the pipe under the roof. Then a flooring of boards is installed behind the pipe. By the way, a good alternative to Wakaflex is the tape from Grind Line:
Here's how to work with it:
- Step 1. Place the double roll with a slight slope into the groove and glue the tape to the pipe.
- Step 2: Remove the protective film and press the wood decking tape against the waves of the shingles.
- Step 3. Roll with a roller all places except the lower section - the one that is adjacent to the pipe and is not yet covered with tiles.
- Step 4. Now make a cut parallel to the pipe line to the bottom, and retreat 2-3 cm. Do not bring the cutting line to the slope line of 1 cm.
- Step 5. Cut off the excess part of the roll with scissors, round the corners.
- Step 6. To avoid leaks due to a large snow bag above the pipe, bend the top edge of the Wakaflex to a width of 2-3 cm.
- Step 7. Now lay the shingles so that they partially cover the tape above the pipe.
As soon as the junction assembly is ready, you can proceed to the installation of the ridge elements.
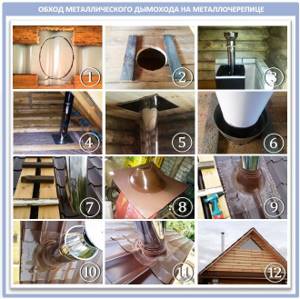
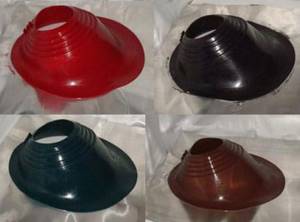
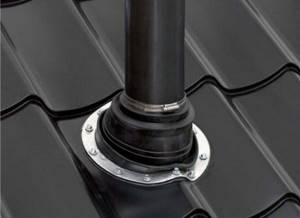
Waterproofing of a round chimney
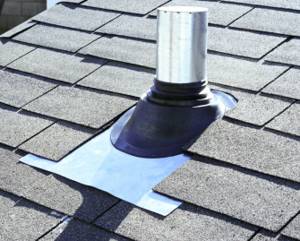
Recently, round sandwich pipes are increasingly being installed to remove flue gases. They are easy to install and cheaper, besides, they are fireproof and do not create unnecessary load on the foundation of the furnace. Waterproofing such pipes is quite simple. This requires special pipe penetrations. They are an aluminum or steel frame made of thin sheet metal with a flexible apron made of polymer material. Penetrations are produced in a variety of colors, allowing you to match them to the color of the roof.
Technology for waterproofing a round pipe
- Before laying the roof covering, try on the penetration and, if necessary, make additional sheathing next to the pipe to which the penetration will be attached.
- The roof covering is laid. In this case, it is more convenient to cut the sheets so that the joint fits exactly along the pipe.
- Cut a hole of the required diameter in the penetration, put the penetration on the pipe, lay it on the roofing covering and give the base the shape of the covering profile.
- The joints are coated with heat-resistant pipe sealant.
- Secure the base of the penetration to the roof using self-tapping screws.
- Self-tapping screws are attached to a pre-arranged sheathing in increments of 7-10 cm.
Properly performed waterproofing not only reliably protects the roof from leaks, but also extends the service life of roofing materials, sheathing and the chimney itself.
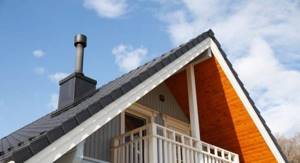
For comfortable year-round living, a country house must have a heating system. Regardless of its type, whether it is gas or wood, combustion products are removed through a chimney pipe, which is discharged outside through the roof of the house. The main purpose of the roof trim around the chimney is to protect the roof from leaks and overheating. Read on in our article to learn how to carry out the entire complex of work correctly and avoid making serious mistakes.
Laying tile sheets
correct laying of sheets
Before laying the material, logs are assembled, which are necessary to lift the sheets onto the roof. Metal tiles are allowed to be laid on both sides of the first sheet. If the next sheet is placed on the left side, then the last wave is covered on top. When this is done on the right side, the subsequent material is overlapped under the previous sheet. Regardless of whether a hip roof is created from metal tiles or it will have a different shape, it is customary to align the sheets of material horizontally along the eaves. There are several ways to install this roofing material. The operating procedure is as follows:
- the first sheet is placed on the slope and the material is leveled along the cornice and end;
- this sheet is attached to the ridge with one self-tapping screw - it is screwed into the center of the strip of material;
- the next sheet is laid next to an overlap of 15 centimeters, it is aligned with the cornice and connected with a self-tapping screw to the first;
- Similarly, several sheets are mounted and fastened together;
- the block formed from fastened sheets is once again aligned along the eaves and attached to the sheathing, except for the last of them, which is used to create the next blocks of metal tiles.
The technology for creating a roof covering looks like this:
- the first sheet is placed on the slope and aligned along the cornice and end;
- the second sheet is placed above the first and secured with one screw at the ridge - the screw is placed in the center;
- both of these sheets are connected to each other using screws;
- the third sheet is placed next to the first, and the fourth is placed above the third;
- the prepared block, consisting of four sheets, is leveled and mounted to the sheathing.
To implement it:
- on a triangular slope, find the center and draw a line along it;
- a similar line is marked on the first sheet in the center;
- the first sheet is placed on the slope, aligning the axes, and secured with one screw at the ridge;
- further installation is carried out on the right and left sides of the first sheet;
- On a triangular slope, when installing metal tiles, the sheets will have to be cut, which will require a special tool called a “devil” - a standard tool for a tin roofer. You can make it yourself from 10-centimeter boards. They are assembled into a rectangle, the elements of which are held in place using hinged fasteners. This tool will help you mark sheets of material directly on the roof (see also the article: “Installing a metal tile roof - features and rules”).
Installation and operation of a metal tile roof, detailed in the video:
Sealing a pipe on the roof
Sealing of the chimney on the roof is carried out taking into account the shape of the pipe and the relief of the roof covering:
- For rectangular and square designs, a metal apron is suitable;
- For round outlets, elastic rubber or polymer penetrations are often used;
- Sandwich-type pipes are equipped with a metal cone fixed at an angle to a steel apron;
- Slate or metal tiles are equipped with lead abutment strips or the Master Flash system.
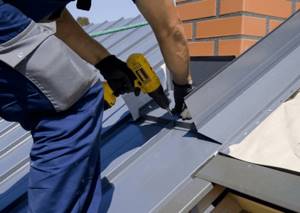
Installing a pipe on a metal roof
Places where pipes pass through the roof
There is a pattern - the lower the pipe is placed along the roof slope, the more effort will be required to waterproof the joint between the chimney and the roof.
Roofs made from corrugated sheets are equipped with pipes in the following areas:
- Near the skate. According to SNiP 41-01-2003, the installation of the device near the ridge will reduce the likelihood of the formation of snow pockets and the appearance of condensation.
- Insulation of the chimney on the slope. The passage of the chimney is at a distance of 500-700 mm. from the roof ridge reduces the risk of leakage and preserves the rafter structure. Elastic penetrations or additional apron elements will help protect the joint.
Why finish the pipe?
There are at least 3 reasons why it is necessary to finish chimneys on the roof:
- High temperatures, on the one hand, and cold air on the other, lead to condensation settling on the inner surface of the pipe. But this is not just water; condensation is an aggressive acid cocktail that gradually corrodes the pipe. External insulation shifts the dew point inside the insulation and eliminates the appearance of condensation;
Clinker brick does not require additional finishing.
- 222222If a solid clinker brick or a stainless steel pipe was used to construct the chimney, then these materials are not afraid of weather troubles. While ordinary brick without external protection will begin to crumble in a couple of years, steel will rust, and concrete will crack;
- In addition to the strength of the chimney, there is also such an important point as protecting the roof itself from rain. If the sealing of the sector connecting the pipe with the roof was performed poorly, then within a year the insulation will become unusable, and the wooden rafter system will begin to deteriorate.
You should not wait until the chimney is completely destroyed.
Chimney passage through a metal roof
Waterproofing a chimney on a metal tile roof requires the preparation of the following tools and materials:
- construction pencil or marker;
- drill and set of drills;
- grinder with 2 mm disc;
- silicone sealant;
- riveter;
- aluminum tapes and clamps;
- metal corners;
- roofing screws;
- long ruler or tape measure;
- pliers and hammer.

Tools and materials necessary for work
Bypassing a chimney on a metal tile roof involves the creation of two protective layers, which are done as follows:
- An internal apron covering the roof and chimney is assembled on the sheathing.
- Prepare the external decorative strips covering the roofing material and the lower apron.
The arrangement of the internal apron begins with the bottom wall of the riser.
- Each element covers the slope by 200 mm and rises vertically along the ventilation structure to a height of 150 mm.
- The side strips go under the ridge of the metal tile, cover the lower element of the apron along the entire length, and extend beyond the pipe by 20 cm.
- All parts are firmly connected with self-tapping screws.
- Measure 15 cm on the pipe, use a grinder to make a groove 15 mm deep.
- Next, fill the ditch with silicone sealant, after which the lower junction bar is fixed.
When pouring silicone, you don’t need to spare it, it should fill all the voids between the pipe and the apron
All that remains is to lay the roofing material and attach the top strips to the chimney with self-tapping screws, and fill the sealing line with waterproofing mastic.
To ensure that the screws do not stand out against the background of the roof, the color of their heads should be matched to the tone of the roofing
Cutting for round pipes: metal penetration
A ready-made apron-cap, represented by a metal sheet with a hole, covered with an inclined truncated cone, will help seal a round chimney.
- The sheet is attached to the sheathing, the pipe is passed through a cap, the upper part of which is pressed to the chimney with a steel clamp with a heat-resistant gasket.
- In order to direct the flow of water downward, a bead is made along the edge of the sheet using pliers and a hammer.
Sealing the joint using a ready-made apron-cap made of stainless metal
Sealing the junction of the roof and pipe with the Master Flash system
Master Flash - these are elastic penetrations made in the form of a stepped pyramid with an aluminum or lead soft base. The design can withstand an operating temperature range of 50°C (+ 130°C), and is easily adjusted to the steepness of the roof.
Installation of the elastic assembly of the passage through the roof is carried out in the following order:
- Select a seal ring with a gap 20% less than the diameter of the ventilation system.
- The seal is pulled over the pipe, having previously been moistened with a soap solution.
- The cap is secured with sealant and screws equipped with neoprene or rubber gaskets. Pitch - 35 mm.
The Master Flash chimney seal is convenient and easy to install
Aluminum and lead tapes
An alternative to ready-made penetrations is to waterproof the chimney with self-adhesive aluminum/lead tape based on bitumen or modified polymers. It allows you to seal the joints between the pipe and the roof.
Waterproofing a pipe using self-adhesive tape is done in several stages:
- Clean the area where the tape will be applied, then press the film firmly.
- Cover the vertical part of the chimney with sections, simultaneously covering the horizontal roof covering.
- Clamp the tape with a metal strip and secure with heat-resistant dowels.
Pipe sealing tape is a great way to save time and money.
Standards and possible finishing options
The chimney system, as well as the entire stove system, is an important fire-hazardous facility; accordingly, all aspects of its arrangement are strictly regulated.
Rules and regulations
All important points regarding the arrangement of heating, ventilation and air conditioning systems are described in detail in SNiP 41-01-2003. The work is quite voluminous, so I will recount only those standards that apply to chimneys:
- The ignition temperature of the thermal insulation and finishing materials of the pipe should be 20 ºС higher than the maximum temperature of the chimney outside, but ideally it is advisable to line the chimney with non-combustible materials;
- Sheathing the pipe with metal is allowed, but the metal must have an anti-corrosion coating;
- The brick pipe must have walls with a thickness of 120 mm;
- Concrete chimneys are rarely installed in private houses, but if you decide to install such a pipe, the concrete must be reinforced, heat-resistant and have a wall thickness of 60 mm or more;
- The minimum gap between the chimney and the wooden roof sheathing is 130 mm;
- For ceramic chimneys that are not protected by thermal insulation, the gap between the pipe and the wooden roof structures is from 250 mm;
How to finish a chimney pipe
The above-mentioned clinker brick is a good thing, but expensive. Therefore, many people lay out the pipe from ordinary brick, and line it with clinker tiles on top.
The material can withstand any vagaries of weather, plus such tiles can be used to cover not only chimneys, but also the stoves themselves inside the house.
The option is not as durable as clinker tiles, but if you attach a reinforcing mesh made of fiberglass or galvanized metal to the surface of the pipe, the plaster will stick well.
But keep in mind that not everyone is capable of high-quality plastering of the surface with their own hands while standing on the slope of the roof.
To line the chimney, you can use any type of siding, except plastic.
Both metal and cement siding are equally suitable for lining chimneys. Moreover, this material is mounted on the sheathing, which means it is possible to lay insulation under it.
Finishing chimneys with corrugated sheeting is now one of the most common. This option harmonizes especially well with metal tiles.
But if you choose the color, then steel chimneys on roofs made of slate, ondulin or ceramic tiles will also fit into the overall design.
Since the material is produced with the addition of bitumen, finishing a real chimney with it is strictly prohibited.
In this case, we can only talk about installing a decorative cocoon made of fire-resistant plywood around the pipe, onto which the bitumen shingles are placed. But this option is only suitable for sandwich pipes equipped with a cap with a spark arrestor.
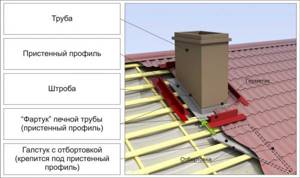
Sealing rectangular and square pipes
To ensure the reliability of the roof in the areas of valleys and junctions, a tie made of metal parts (junction strips), which are inserted 150-200 mm under the covering, will help.
Before applying corrugated sheeting, it is necessary to seal the passage of the riser with a membrane.
- A cross-shaped cut is made in the material and glued to the walls of the chimney at a height of more than 5 cm.
- Self-adhesive “Vakaflex” tape is attached under the upper junction bar: from below, from the side, then from above.
- Sometimes a chimney is installed in a finished roof, cutting a hole in the corrugated sheeting with a margin of 1.5-2 cm. To do this, the metal sheet at the junction of the rectangular pipe is bent, a waterproofing membrane is glued and a lower and then an upper sheathing is installed, tightly pressed against the roofing pie and the chimney.
Sealing with a metal pipe - how to secure it correctly
In addition to elastic penetrations, you can use metal passage pipes, which also help solve the problem of how to attach a chimney to the roof. They can be purchased at construction stores. This element is used to arrange the passage of a chimney through a flat roof. Most often, the pipes are made of alloy steel; they are selected in accordance with the angle of the roof.
Installation of a metal passage pipe is carried out as follows:
- Mark a mark on the roof surface with a marker and cut out a hole of the required size for the chimney to exit onto the roof. For cutting, you can use a grinder or special scissors, retreating 1-2 cm inside the circle.
- Clear the passage for the chimney by removing waterproofing material and insulation. If necessary, cut down elements of the rafter system.
- A fire-resistant material with a hole for the pipe and a size that exceeds the diameter of the chimney by 15-20 cm is fixed on the roof from the attic side.
- Insert the pipe into the hole and connect it to the laid chimney; the joint is tightened with a clamp.
- The pipe is placed on the chimney and fixed to the roof surface using sealant or self-tapping screws.
- The pipe is extended with new segments until the required height is reached.
Chimney fire protection
Today, ready-made “sandwich” panels made of steel or ceramics are available for sale. Their installation proceeds as follows:
- To install a modular system, an asbestos gasket is installed between the stove and the chimney.
- Then a layer of solution is applied on which the module is placed. Level, and secure subsequent blocks with a layer of mortar.
- The places where the smoke device passes through the roof are well insulated. Fire-resistant insulation of the roof will be provided by a galvanized steel box, secured with staples to the rafters and cross beams at the point where the pipe passes.
Pipe waterproofing
Quick and reliable protection of the chimney from leakage is carried out by applying roll materials.
Main stages of installation work:
- The pipe is coated with a primer and covered with a superdiffusion membrane. Instead of a primer, it is possible to use polymer-bitumen mastic. The membrane is glued to the roof, the edges are placed on the pipe.
- The top and bottom ties are made from metal. The bars are stuffed onto the sheathing and the corners are secured.
- The rolled material is laid overlapping, allowing for proper water drainage on a soft or metal roof. The length of the bottom sheet reaches the roof overhang.
- The joints are insulated with bitumen mastic. The corners are secured to the sheathing with dowels. The cracks are treated with heat-resistant sealant.
- The roofing decking is laid, a PVC apron is placed on top using Onduflesh tape, and the sealing is completed.

Device for connecting the roof to the pipe
Fixing a roof leak near a pipe
There is a leaking pipe on the roof of the house - bitumen tape, a polymer cap or a tin apron will solve the problem.
Insulation with bitumen tape takes place in 5 steps:
- Use a metal brush to clean the roof around the chimney along the outer lower part.
- Remove dust and dirt with a damp cloth.
- At the junction of the pipe and the roofing pie, pieces of bitumen tape are glued.
- The sections are heated with a gas burner and pressed as tightly as possible to the roof and smoke outlet.
- Wooden blocks or boards are fixed on top. The service life of the tape is 2-3 years.
Do-it-yourself chimney sealing using bitumen tape
Polymer cuffs reliably protect the joint between the roof and the oval pipe and do not cause any particular difficulties during installation:
- In the upper section of the cuff, a cutout is made with a diameter less than the thickness of the chimney.
- Place it on the outer part of the riser and lower it to the roof level.
- In places where the roof comes into contact with the cuff, a protective layer of sealant is used.

Polymer pipe cuffs are an excellent and inexpensive way to protect your roof from leaks.
Creation of metal bends
To protect against water, a tin apron with parameters similar to the dimensions of the pipe is put on the chimney pipe. The upper part of the covering is fixed to the vertical structure, compressed with clamps and sealed. The lower part of the apron is installed on the roof over the roof sheathing and secured with self-tapping screws.
Special “layouts” will also help prevent water from penetrating into the ceiling - wide metal strips with a side edge that seals the gap between the top layer of the roofing pie and the pipe. Layouts are placed between the ridge and the passage of the pipe, covered on all sides.
Sealing a pipe using metal “layouts”
Cost of material and work
The cost of services for installation and repair of roof penetrations, depending on the volume or complexity of the work, is 450-850 rubles/m2.
| Name of material | Price |
| Self-adhesive strip with aluminum foil 12.5 m long, 8 cm wide | 2500-3000 rub. |
| Bitumen mastic | 50 rub./kg |
| Cement mastic | 40 rub./kg |
| Apron | 100 rub./m linear |
| Elastic penetration Master Flash for sealing pipes | 1500 rub. |
| Flange | 500-800 rub. |
Roofing a chimney is an important stage of construction, requiring the correct selection of materials and adherence to the sequence of operations.
When creating waterproofing for the junction of the roof and the chimney system, you should ensure maximum safety and comfort, without fires or leaks.
A chimney is an element with an increased fire hazard , so it is important to responsibly approach the processes of bringing it onto the roof made of corrugated sheets and isolating it from the contents of the roofing pie.
It is also important to protect the pipe from moisture penetration , which can significantly reduce the life of the roof.
In this article we will take a detailed look at how to wrap a pipe on the roof with corrugated sheeting and look at waterproofing issues.
Three options for independently arranging a chimney outside
There are 3 options where a person without special training can do everything with his own hands. The first option concerns brick pipes, which do not need lining, but you need to seal the joint with the roof. After this comes the frame version and the option with ready-made factory solutions.
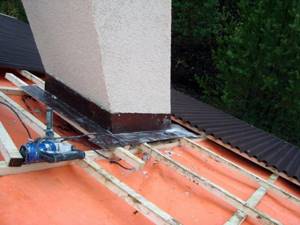
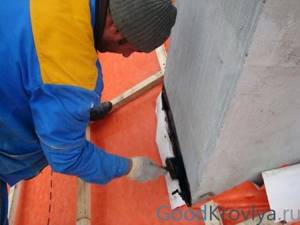
Option number 1: we arrange a brick pipe
Waterproofing the pipe on the roof should be carried out before laying the roofing material. If the roof is already in place, you will have to partially dismantle it. The entire perimeter of 50–70 cm around is removed, plus you need to remove the lower part of the roof from the pipe to the edge of the slope.
Scheme of sealing the perimeter of a brick pipe on a pitched roof.
The materials we need are a wall metal profile. You can bend it from galvanized steel with your own hands or buy it ready-made. The profile consists of 4 parts, which are superimposed on each other during installation.
It is definitely better to buy an external apron for the pipe, and it is advisable to buy it together with the roofing material, it is easier to choose the color.
The so-called tie is a sheet of roofing iron with sides curved on the sides. It is laid from the bottom of the pipe to the edge of the slope and placed under the lower section of the wall profile.
In order to hermetically connect a brick pipe with a wall profile, we need to cut a groove about 20–30 mm deep on the pipe with a grinder. The curved edge of the profile is inserted into this groove.
Under the wall profile, a groove is cut around the entire perimeter of the pipe.
Next, we insert the curved edge of the profile into the groove and fill the groove with sealant. Then we fix all 4 parts of the profile and the tie, fastened from below with self-tapping screws and press washers. Roofing material is laid on top of this entire structure.
Scheme of arrangement of the upper apron for the chimney.
The upper apron is attached to the pipe with self-tapping screws along the entire perimeter. It must extend onto the pipe by at least 100 mm. The lower part of the apron is often made of soft bituminous materials. It is pressed around the corrugated roof and glued to this roof with mastic or special glue.
The apron must be glued to the roof.
The scheme works something like this: the main amount of moisture is removed from the pipe by the upper apron, but if this barrier does not cope with its task and moisture gets under the roof, then it will be collected by the wall profile and the water will flow down the tie from the roof.
Scheme of double waterproofing of the roof in the sector adjacent to the chimney.
Option No. 2: frame installation
This method is well suited for insulating and lining the chimney with corrugated sheets, siding and other similar materials. To begin with, the base is sheathed with a metal profile; later we will attach corrugated sheeting to it. It is better to make the frame from a wall profile under plasterboard; it is wider than the ceiling.
The metal profile frame is more durable.
It is not difficult to work with a metal profile, but if you are not confident in your abilities, you can build a frame from wooden blocks. True, the wooden frame will need to be well impregnated with fire retardants, antiseptics and a water-repellent composition. Between the frame slats, slabs of dense mineral wool are laid to insulate the pipe.
Chimneys are insulated only with slabs of dense mineral wool.
Corrugated sheeting or any other sheet material is screwed to the frame slats using self-tapping screws and press washers. The whole structure is crowned with an umbrella for protection from the rain.
Sectional diagram of an insulated and lining pipe.
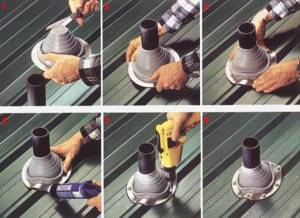
Option No. 3: ready-made solutions
There are no problems at all with round pipes now. Special flexible aprons are produced for them. Based on experience, such an apron can be installed in a couple of hours maximum. Photo instructions for installing such an apron are given below.
Step-by-step instructions for installing a flexible connection unit for a round pipe.
- Select the pipe diameter you need and cut a hole in the soft polymer cone;
- Pull the cone onto the pipe, the connection should be tight;
- Crimp the lower ring of soft metal to the shape of the roof;
- Thickly lubricate the perimeter under the ring with sealant;
- Screw the ring to the roofing material using self-tapping screws and press washers.
It is better to entrust complex types of finishing to professionals.
Varieties
The elements differ from each other according to the material of manufacture:
- Brick chimneys. This is a classic option, which is distinguished by its reliability and undemanding finishing . Red brick is used for the production of products. To lay bricks, you must use a special fire-resistant mortar. Lime mortar works well.
- Steel chimneys. This is a budget option, characterized by ease of installation, light weight and a large selection of section sizes. But steel pipes burn out quickly, and their safe service life is relatively short.
- Sandwiches. These chimneys consist of several metal pipes of different sizes placed inside each other. Between them there are layers of thermal insulation. Sandwiches retain the advantages of simple steel chimneys without their disadvantages. The main disadvantages of such structures are the high price and the possibility of depressurization during sudden temperature changes , which can render the pipe completely unusable.
- Modular chimneys. Like sandwiches, these chimneys are multi-layered. They consist of layers of metal and fireclay (fireclay). Between them there is a layer of basalt insulation. The pipe body is made of lightweight concrete . If there is a layer of clay inside, then the chimneys are called fireclay; if there is a metal pipe inside, then the design is called modular.
How to protect a chimney from moisture
Practice shows that most often water leaks on the roof near the pipe are associated with poor-quality sealing of the roof section. If the cutting is under the roof, it will leak from below, if on top, it will leak from above. To prevent this, the chimney on the roof is waterproofed by installing insulating aprons.
The work is carried out in several stages:
- First of all, a drainage gutter is placed in the waterproofing layer above the chimney, designed to remove moisture from the chimney.
- Then an internal apron is installed, ensuring complete sealing of the junction of the roofing covering and the chimney.
- Next, the so-called “tie” is laid. This is an element cut from waterproofing material, placed under the lower edge of the inner apron. The structure must reach the very edge of the roof. If the roof is covered with slate or metal tiles, the edge of the tie is brought out between the lower sheets of covering onto the roof surface. Along the edges of the structure, be sure to make a side with the help of pliers, which will prevent water from spreading over the roof, but will direct it down the slope.
- A roof covering is laid around the pipe.
- An external decorative apron is mounted on top of the roof. It is installed in the same way as the internal one. The only difference is that the top edge is fixed directly to the pipe wall.
Sealing the chimney with roofing felt and installing an “apron” Insulating aprons are made independently, but if desired, you can purchase industrially manufactured units designed specifically for these purposes. They are used for wiring circular chimneys through the roof and are called roof passages. The nodes are an element consisting of a flat sheet of steel in the form of a base, to which an apron made in the form of a cap is attached. A chimney runs inside it.
Roofing penetrations are available in different colors to make it easier to choose the right option
To ensure stove draft, it is necessary to install ventilation outlets on the roof. They form air flows, protect ventilation from precipitation and create draft in heating devices. The outlets must be fixed strictly vertically and be equal in height to the chimney; only in this case the air flows generated in them will be strong enough to ensure optimal combustion of fuel in the heating device.
Waterproofing a pipe is a responsible undertaking. Not only the integrity of the roofing pie, but also the safety of using heating devices depends on the correctness of its implementation. Of course, you can do all the work yourself, but you need to calculate your strength and be sure that everything will be installed absolutely correctly. If you still have doubts about your competence, it is better to entrust the installation of waterproofing to specialists and receive a unit mounted in accordance with all the rules in a short time.
Selecting a location
The most optimal place for the pipe outlet is the space near the ridge of the roof, located at a distance of 50-80 from its highest point . This is due to a number of considerations:
- The closer the pipe is to the eave of the roof, the greater the snow load placed on it , and the amount of flowing water also increases.
- The higher the pipe is, the less of it will be located in the cold air zone. This will reduce the amount of condensation formed and slow down the accumulation of soot and dust.
It is possible to install the pipe directly along the top line of the ridge. This will eliminate the possibility of creating snow pockets and minimize condensation and leaks. But such a design violates the integrity of the ridge girder .
Choosing a place for a pipe
Installation of pipes in areas close to the edge of the slopes is not excluded. But then large costs will be required to seal it.
Important points
The waterproofing of chimneys, if it is damaged, can be restored in several ways: the choice of the most suitable one depends on several factors:
- A pipe installed on a slate roof must be freed from the cement apron, and then the slate sheets adjacent to the pipe must be removed. After checking the condition of the pipe for mechanical damage, an apron should be made from sheet metal. The joints are treated with oven clay with the addition of Portland cement or fire-resistant mastic. Now you can lay slate sheets on the apron, and then coat them with cement mortar.
- Fused insulation can be used to insulate leaky areas, but damaged slate sheets should also be replaced.
- If the pipe is made of brick and the first two above points are completed, it is enough to coat it with clay-cement mortar.
- For a metal roof, you need an apron made of the same material: it can be made using special scissors. The outlets of round pipes can be sealed using special corrugated rubber elements.
- If the distance between the pipe and the ridge is large, special bitumen tapes with metal inserts are used.
The exit points of round pipes are sealed using rubber corrugated inserts
How to remove a pipe through a roof made of corrugated sheets
In the corrugated sheet that will surround the chimney, contours are outlined with length and width parameters corresponding to the dimensions of the chimney. Then, using a grinder, you need to cut a hole with a slight indentation from the contours.
- also made in the elements of the roofing pie ; when calculating their width, you need to take into account not only the pipe’s own dimensions, but also the dimensions of the protective box that will separate the chimney from the contents of the pie. The sheathing at the junction must be continuous.
- How to make a pipe passage through a corrugated roof? The pipe must be tightly surrounded by outer and inner aprons . The inner apron is located under the corrugated sheets (with the exception of the part that fits the pipe wall), it is attached to the sheathing. A stainless steel groove extends from it, which should go around the chimney on all sides and goes directly to the ends of the slopes to the eaves strip. Precipitation and condensation will flow down it.
- If the pipe is made of brick, then the edges of the apron adjacent to it must be bent at the ends and inserted into the grooves. Grooves are small holes in the bricks (but not in the seams between them), which are made using a grinder.
There should be a layer of waterproofing under the bottom apron. Waterproofing a pipe on a corrugated roof is carried out in the following order:
- The outer apron is installed on a sheet of corrugated sheeting and is also attached to the sheathing. For the most part, it performs a decorative function, making the joint between the chimney and the roof smoother, but this element also provides additional protection.
- You can make aprons yourself from a solid zinc sheet, or you can purchase a set of ready-made flashing strips. The first option is more complicated, since it requires cutting and bending the edges of the hole in the sheet yourself. But the second option involves additional spending of money.
Sectional installation diagram
Parts of the apron adjacent to the chimney must be sealed with sealant.
It is more difficult to cut holes in corrugated sheeting and in the roofing pie for pipes with a round cross-section than for rectangular chimneys, but their insulation can be done using simple methods. For this purpose, Master-Flash attachments are used . These are rubber or silicone products in the shape of a stepped pyramid with a circular cross-section. They fit the chimney tightly and are securely attached to the corrugated sheet.
The base of the nozzle is made of aluminum. The reverse side of the product has a corrugated surface, which increases its tightness.
Installation of a round pipe
So, how to sheathe a pipe on the roof with corrugated sheeting if it is round? Before installing the nozzle, it is necessary to cut off such a number of pyramid rings that will ensure the hole diameter is 20% smaller than the diameter of the pipe . The Master Flush is then pulled down the pipe from top to bottom. The base is glued to the corrugated sheet using silicone and attached to it with screws. The area where the rings of the product meet the pipe is sealed with silicone.
You can also seal round pipes using self-adhesive lead tapes.
Features of sealing the passage unit
The photo shows the waterproofing of the passage using rolled materials
In order for the operation of heating equipment in a country house or cottage to be stable and efficient, the area between the roofing system and the chimney must be completely sealed. The roof penetration is responsible for this parameter of this section. (See also the article Features of finishing the roof eaves of a house.)
The design of the passage unit is determined by fire safety rules. For example, if the excessive temperature of exhaust furnace gases is transferred to the roofing system, there is a high probability of fire.
Important: The risk is especially high for roofing systems with a large number of wooden elements that have not undergone timely treatment with fire retardants.
To prevent fire and damage to the roof, the chimney pipe is finished as follows:
- We maintain a gap between flammable areas of the roof and the chimney, the width of which is regulated by building regulations.
- At the junction area, the chimney is treated with materials with a low degree of thermal conductivity, such as asbestos.
- The section where the chimney pipe passes through the roofing pie is made using a box made of galvanized steel or corrugated sheeting.
- We fill the gap between the chimney and the steel box with non-flammable heat-insulating materials, for example, basalt wool plates.
This method of arranging a roof passage can be used with equal success both on the slope and on the ridge. Both methods have characteristic features that will need to be taken into account in a timely manner.
For example, installing a smoke exhaust along a ridge requires changes to the design of the rafter system. Installing a chimney on a slope causes the formation of an additional pocket for snow accumulation, which can lead to leaks. However, this problem can be solved by using modern insulating materials. (See also the article How to install trim panels for the facade of a house.)
Old and modern chimney sealing technologies
If relatively recently the sealing of the joint between the chimney and the roof was carried out using improvised means, now such work is carried out using specialized materials and standardized components.
The choice of industrially manufactured products for sealing passages on the construction market is wide. Consequently, everyone will be able to choose the option that is most suitable for arranging a particular chimney system.
Traditional finishing methods
Collar (clad) made of soft metal
As already mentioned, the finishing of the pipe on the second floor, in the attic and at the place of passage through the roofing pie was carried out using improvised means, and therefore it was not possible to count on optimal results of the work done.
The finishing of the chimney pipe on the roof was a metal structure, the so-called “collar” or “cladding”.
The “collar” is made as follows:
- Rectangular strips up to 40 cm wide are cut from sheet steel 0.2-0.5 mm thick;
- the prepared strips are bent to the shape of the junction of the chimney pipe and the roof;
- finishing parameters are applied based on the size of the chimney, the angle of inclination of the slope, and the type of finishing used;
- the elements of the “collar” made of galvanized sheet are connected into one piece with an overlay and carefully soldered;
- if the collar elements are cut from steel sheet, they are installed with a double standing seam;
- a lying seam connection is used for finishing a chimney on a roof made of corrugated slabs or tiles;
- on a pitched roof with a slope angle of more than 30°, directly behind the chimney, a “bumper” is mounted in the form of a beam or metal threshold, which will direct the flow of rainwater around the pipe.
Modern finishing methods
The photo shows the installation of a prefabricated apron
In order for the finishing price to be relatively low and the quality of the work done to be satisfactory, the chimney is sealed with a protective apron.
The apron is made in two ways:
- using flexible aluminum or lead tape;
- using galvanized metal coated with protective polymer compounds.
Finishing scheme using soft metal tape and sealant
An apron made of aluminum tape is mounted in two layers, which wrap around the pipe around the entire perimeter. The tape is inserted halfway into the gap between the pipe and the roofing, while the other half of the tape is folded over and laid on top of the roofing material.
Next, the junction of the apron to the roofing materials is carefully glued using bitumen mastic or alternative means. The apron at the junction with the chimney is covered with metal profiles.
The final stage is waterproofing the assembled structure using a special waterproofing film. (See also the article How to do waterproofing and finishing work.)
In the photo - an apron made of sheet steel
I installed the sheet steel apron as follows:
- The roofing deck is insulated with roofing felt and overlaps the adjacent walls of the chimney;
- Pre-prepared apron elements are mounted on top of the roofing felt;
- The gaps between the apron and the surface of the chimney are filled with roofing silicone or other polymer sealants.
Important: Statistics show that the most reliable and durable solution is not one of the above methods, but a combination of them. That is, it is advisable to complete the finishing using flexible tape, and in addition to this, install a steel apron.
Repairing leaks
The main cause of leakage at the joints of the pipe and roof is a violation of the tightness of the apron structures. To solve this problem, it is necessary to build an additional external apron from bitumen tape.
Before installing it, the roof should be cleaned of dust with a wire brush.
The tape is laid in several layers along the bottom of the pipe and along the adjacent corrugated sheet (or along the apron) . Then it must be heated with a burner and pressed down with a wooden plank.
This type of gasket can last for several years.
Serious leaks can only be repaired by replacing the flashing.
Moisture can also get under the roof due to excessive condensate production by the pipe. To reduce its amount, you can build an umbrella on the chimney. Umbrellas are made from metals such as copper, galvanized steel and stainless steel. The cap not only reduces the volume of condensation, but also extinguishes sparks coming out of the chimney, increasing the fire safety of the structure.
If the chimney is located close to the edges of the slopes, then leaks may occur due to the accumulation of large amounts of snow masses. To eliminate this problem, the apron is supplemented with a triangular convex structure (with mandatory sealing), which will separate the snow and simplify its removal.
Materials used
Even if the pipe is placed as tightly as possible on the roof, minor gaps will still remain. When it rains, moisture will constantly enter the attic through them, which over time will lead to damage to the roofing structures. This is why roof pipe sealing is so important.
The easiest way to solve the problem of how to seal the gap between the pipe and the roof is to install an apron on top. You can do it yourself, in which case you will need to provide strips for connection to the pipe in advance. There is an easier way - to buy a ready-made stainless steel roof passage. Often, round passages are made for the chimney, and they are made of stainless steel. The passage is placed on the pipe, and the joint is fixed with a steel clamp.
The process of how to seal a roof around a round pipe will differ slightly depending on the type of roofing, that is, in addition to the basic recommendations, there are also algorithms that will vary somewhat.
Sometimes the question arises of how to seal the gap between the pipe and the slate.
The technology provides the following sequence:
- First, a round hole is cut in the steel sheet that will be needed to finish the ridge.
- Next, a ring of sheet asbestos cement is placed on the pipe.
- For absolute sealing, so that in the future there will be no problems with the leaking pipe on the roof, the joint between the pipe and the roof is sealed with an asbestos cement solution (proportion 1:2).
- In addition, the same solution is used to fill the gap between the chimney pipe and the slate sheet. To do this, you can temporarily make a limiter out of cardboard.
On a tile roof, it is best to seal the cracks with a solution of sand and cement, which will best protect the inside of the building from moisture and precipitation.
To achieve the best moisture insulation, you will need:
- Install a galvanized collar on the roof, thus creating a place for pouring the solution.
- Pour a solution of cement and sand, making sure that it clearly fills the entire space between the roof and the chimney.
- In addition, you will need to make a surface and place it at an angle so that excess liquid flows down it.
You can perform isolation in this way:
- First, cutting is done from the Wakaflex tape.
- At the next stage, this cutting needs to be pressed with a pipe case.
- At the end, all remaining gaps between the parts being connected are sealed with bitumen mastic.
As a rule, when installing a chimney through a corrugated roof, a ready-made Master Flash pipe cutting is used. Another advantage is that this set is very convenient to use; it can be used for roofing made of almost any material.
In essence, Master Flash is an apron cap made of silicone or rubber, placed on an aluminum base.
As for operating temperatures, for the silicone version of products it is significantly wider - in the range from -50 to 130 ℃.
The process of sealing cracks on a profile roof includes the following manipulations:
- A gap is cut in the cap, the diameter of which is slightly smaller than the cross-section of the chimney.
- The Master Flush is put on the chimney.
- A gasket is placed at the base of the chimney.
- The joints between the material are sealed with silicone sealant.
- The base of the chimney is fixed to the profile roof using screws.
Thus, the fact how well a corrugated roof will be sealed at the exit point of the chimney depends largely on the choice of material and the quality of the work performed. However, we are confident that by following our instructions exactly and working responsibly, you will be able to protect your home from any surprises associated with roof leaks.
It is a roll or shortened fibers. Positive qualities of vata:
- 5
- 4
- 3
- 2
- 1
(0 votes, average: 0 out of 5)
Chimney finishing, choice of materials
Negative factors affecting the chimney include
:
- atmospheric influences (wind, precipitation, ultraviolet radiation);
- difference in ambient temperatures;
- high temperature operating loads.
Due to the difference between the temperature of the working pipe and the air temperature in the chimney, condensation forms, which provokes destruction of the pipe during the combustion of heating oil
. To avoid the formation of condensation and protect the pipe from external influences, it is necessary to provide reliable insulation of the chimney through lining.
Various materials are used to cover the protruding part of the pipe. When choosing, you should consider
:
- resistance to external factors, wear resistance;
- appearance and color scheme (matching the roofing or wall decoration of the building).
Finishing a chimney on the roof is most often done using
:
- clinker bricks or tiles;
- plasters;
- cement fiber boards;
- roofing material (corrugated sheeting, slate).
Characteristics of finishing materials
Clinker bricks or tiles are a practical option for finishing a chimney pipe, since dirt is not noticeable on such material.
The advantages of clinker materials also include the aesthetics of the masonry; such a chimney goes well with any type of roofing. It is worth noting the resistance of tiles and bricks to weather conditions, temperature changes, as well as the strength of the material. For lining the chimney, exclusively solid clinker bricks are used, laid on a clinker mortar; special compounds are used for grouting joints. Thin, lightweight clinker tiles are usually used for lining tall pipes. Finishing a chimney on the roof with plaster is characterized by
:
- affordable cost;
- simple installation;
- versatility (suitable for any roofing);
- the ability to implement any color schemes (plaster can be painted with silicone paint).
Plastering pipes is carried out using the same technology as finishing facade walls. Traditional cement or lime-cement mortar can be used, but a more durable option is to use mineral, silicone, silicate or acrylic plaster. Painting the dried surface increases the wear resistance and durability of the finish.
Small-format cement-fiber boards are durable, resistant to ultraviolet radiation, moisture, temperature fluctuations, and light in weight. This is an environmentally friendly, non-flammable material. Smooth or structured slabs can be used for lining the chimney; the material is available for sale in a wide range of colors.
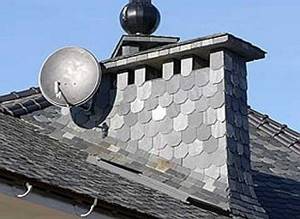
If slate is used for roofing, the chimney lining on the roof is usually made of the same material. Slate slabs can be shaped like an arc, flake, rectangle or octagon. The color of this natural material depends on the deposit. This color is usually graphite, green or purple.
A fairly simple and inexpensive option for finishing a pipe is to use corrugated sheeting. It is used if the roof covering is made of the same material. The pipe, finished in the color of the roof, looks aesthetically attractive.
Manufactured in a factory, the chimney elements for the roof passage have an aesthetic appearance and are quite easy to install. They are equipped with a steel chimney duct and can have a ready-made external cladding made of any material, or be prepared for independent finishing so that the chimney is externally in harmony with the roof. The modular steel structure is not additionally finished; it is enough to install it at the point of passage through the roofing pie.
Carrying out penetration depending on different types of roofing
The roof penetration will vary depending on the shape of the chimney and the material that covers the roof. Thus, to install a sandwich pipe, installation of a heat-insulating box is not required, since the insulation here is laid during manufacture. To penetrate the roof of a brick or ceramic chimney, it is necessary to construct a thermal insulation box to protect the building from fire.
Elastic penetration for round pipe
The simplest but most universal penetration exists for a sandwich pipe. It is a rubber or silicone pyramid that is put on the pipe and fixed to the roof. Moreover, the smoothness of the roof covering in this case does not matter much - the elastic insulating apron is equally hermetically attached to the ribbed surface of the profile, wavy tiles, and soft ondulin. Manufacturers offer ready-made flexible penetrations for sandwich chimneys of any cross-section.
Installation of elastic penetration is carried out as follows:
- A hole is cut in the roof for the pipe outlet so that at least 38 cm remains from the pipe wall to the combustible roofing materials.
- A galvanized metal sheet with a hole for the chimney is fixed to the inside of the roof. The distance from the outer wall of the pipe to the edge of the sheet hole is at least 14 cm.
- Remove the pipe and secure it in the desired position.
- The elastic penetration pyramid is cut to a level corresponding to the diameter of the pipe and put it on the pipe through the top.
- The protective apron of the penetration is applied to the chimney passage, having previously coated the edges with fire-resistant sealant.
- A metal mounting ring (flange) with holes is placed on top and secured with self-tapping screws.
For roofs with a steep slope angle, manufacturers produce special elastic penetrations, where the slope of the pyramid and apron is more pronounced.
Metal penetration for round pipe and smooth roof
A metal feedthrough for a round pipe can also be purchased ready-made. It is a metal cone, the upper hole of which corresponds to the diameter of the chimney pipe. When choosing a metal penetration, you need to know the angle of inclination of your roof.
Installation diagram for metal penetration:
- the hole in the roof and the inside of the protective structure are designed as for elastic penetration;
- a passage pipe is put on the chimney, the edges of the lower part are coated with fire-resistant sealant;
- secure the protection with self-tapping screws with rubber caps to seal the mounting holes.
Penetration for rectangular pipe
Exiting a brick chimney through the roof has its own characteristics. To complete the penetration you will need a grinder, a screwdriver, metal scissors and galvanized iron sheets or stainless steel.
The installation of the brick chimney penetration begins with the construction of a box for thermal insulation. Its size is calculated based on the cross-sectional size of the chimney plus 15 cm on each side. The material for the box must be non-flammable. Sheet iron or asbestos is used.
The space between the pipe and the walls of the box is filled with basalt wool. This material can withstand significant temperatures and has excellent thermal insulation properties. The lower part of the box is decorated with a metal sheet.
Street protection has a complex composite design. The roofing material for a brick pipe is not of great importance, since in any case it has to be removed when removing it. The drainage tie is installed on top of the roofing covering, regardless of its type.
The penetration-casing consists of the following elements:
- four (according to the number of sides) internal protective wall profiles;
- four external decorative elements;
- drainage tie.
If the protection is installed on top of a flat roofing material, then it is glued with a fire-resistant sealant. When installing under a corrugated pipe (profile, slate, tile), a wall profile is installed on the pipe, securing it into a pre-made groove on the pipe. The upper parts of the apron are placed under the roofing material, the lower parts are secured on top.
Preparatory stage of work
To avoid any difficulties during the pipe installation process, you need to prepare the work site and tools in advance. A hole from corrugated sheeting is cut according to the following technology:
- After determining the configuration of the chimney, they plan where the exit to the roof will be located. Let us remind you that it is better to place the pipe vertically.
- The cross-sectional size of the chimney pipes is selected based on the recommendations of the heating device manufacturer. The thicker and higher the pipe, the better the smoke is removed from the stove.
It is important that all segments are of the same cross-section and fit each other, and are inserted without creating a gap.
- On a corrugated roof, mark the outline of the pipe using a permanent marker.
- Using a grinder with a thin metal cutter, cut out a hole, moving a couple of centimeters inward from the intended line. You should work with corrugated sheeting carefully and slowly so that the edge of the cut is smooth, without jagged edges that could cause injury during the pipe removal process.
- You need to make short cuts in the corners of the hole to bend the edges of the corrugated board upward.
- They cut out the same weight in the ceiling.
- A metal box is installed that will connect the pipe to the rafters. The chimney will pass through the hole inside the box; the distance between their walls should be at least 15 cm.
- The insulation, waterproofing film, and vapor barrier membrane are removed from the hole made in the roof. It is necessary that the hole goes through.
Deciding on the type of waterproofing material
The development of chemical production makes it possible today to produce a large number of insulating materials for roof carpets. What type of material should I choose: roll, liquid, powder? What composition should it have in order to long-term and reliably protect the house from water penetration under the roof, especially in places where pipes exit onto it?
Waterproofing of pipes along with the base of flat roofs is carried out using liquid reinforced mastics - mixtures of organic binders with extremely crushed fillers. The composition of such mastics is very different, most often they are hot or cold bitumen-gasoline mixtures. Today, more and more often on the market there are branded liquid or powder mastics, intended for subsequent dilution with solvents, with a complex multi-component composition.
Treating the pipe with mastic
On pitched roofs, roll mastics, film and non-woven materials are used, which are also glued to the base using mastics or fastened with self-tapping screws. The well-known roofing material is one of the roll mastics. A special film, polyethylene and polypropylene, or non-woven synthetic membranes can be used as a material for waterproofing. Roll waterproofing has many modifications, allowing you to specifically select the one that will most fully meet the functions of a particular roof.
Special film is used quite often today as a waterproofing material.
The quality of roof waterproofing work depends to a large extent on whether the joints formed by the pipes exiting to its surface are executed correctly or not. It is these areas that often reveal the unprofessionalism of the builders. Based on the foregoing, one should conclude: contacting specialists at the stage of waterproofing pipes and any exits to the roof will help to avoid unnecessary financial and labor costs in the future.
Heat-resistant chimney sealants
This type of sealing material has a silicone base to which iron oxides are added. Such additives not only increase the temperature resistance of the sealant, but also give it a reddish tint, which makes the composition invisible when processing brick chimneys.
When using heat-resistant silicone sealants, a number of their important features should be taken into account, in particular:
- Such materials may release acetic acid, promoting an acid reaction. This is the reason that they cannot be used for metal chimneys.
- Some types of heat-resistant sealants are not resistant to solar radiation, which limits their use for roof structures.
- Good adhesion to many substances and materials (brick, ceramics, glass, concrete, etc.) makes their scope of application quite wide.
- Due to their high water resistance, they can be used to seal the upper sections of chimney structures.
- They have good ductility and strength, as a result of which they can be used in structures experiencing significant wind loads.
- The hardening process of silicone sealants takes from several hours to several days, and depends on the temperature and humidity of the environment. The optimal values for these indicators are 25 °C and 50%.
- It is not recommended to use silicone sealants for deep seams or cracks.
- To improve the quality of sealing, before applying the composition, the surfaces of the seams should be cleaned of dust, dirt, grease deposits and other debris.
- Silicone sealants can only be applied to completely dry surfaces.
- Conventional silicone sealants used in construction are not heat-resistant and cannot be used to seal chimney structures.
Conclusion
The installation of a pipe outlet through the roof should be approached with the utmost responsibility. If the work is done poorly, moisture will regularly enter the attic. This will entail dampening of the rafter system and insulation.
High humidity has a negative effect on the condition of wood. As a result, many load-bearing elements of the attic are deformed. This can lead to sagging of the roof and the appearance of cracks in it. High humidity in the attic has a destructive effect on the internal cladding material. The durability of the roof depends on the correct selection and installation of sealant.
Norms and requirements
High-quality installation of the chimney passage through the roof is so important for the safety of the building and residents that the state has officially established the rules and regulations for its arrangement. A document that takes into account sanitary, hygienic, fire, corrosion and other loads on the structure and materials is called SNiP 41-03-2003 “Thermal insulation of equipment and pipelines”.
The pipe installation through the roof is planned during the construction phase. If the stove is reconstructed, replaced or repaired during operation, the chimney is usually left in its old place. The fundamental condition for a high-quality chimney is the location of the pipe relative to the roof ridge.
To ensure optimal traction, the best place to bring the pipe to the roof is its highest point - the ridge. This allows the main part of the pipe to be routed through the attic, which protects it from moisture and cold. The difficulty lies in the fact that it is necessary to violate the integrity of the horizontal beam by installing additional supports on both sides of the chimney. More often, the pipe is installed at a short distance, which makes it possible to limit the street part of the pipe to a minimum of fifty centimeters.
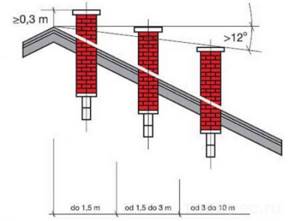
There is the following dependence of the height of the chimney on its distance from the ridge:
- the distance to the ridge does not exceed 1.5 m - the pipe rises 50 cm above it;
- distance from 1.5 to 3 m - it is enough to bring the chimney flush with the ridge;
- when the chimney outlet is more than 3 m away from the ridge, the height of the pipe may be lower than the top point of the roof (the difference should be an angle of 10 degrees).
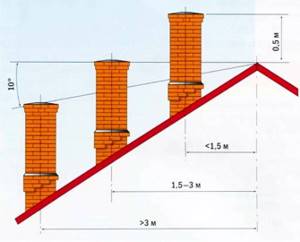
The optimal pipe height is from 0.5 m to 1.5 m. The outlet is located between the rafters, so as not to violate their integrity and leave a distance of 15-25 cm to them.
If the direct vertical exit of the pipe occurs at such a merger of two roofs, then the roof penetration should be shifted half a meter to the side, adding a horizontal section to the chimney (up to 1 m). Snow and ice accumulate in the recess in winter, which creates an additional threat for leaks.
An unfortunate location for the roof penetration for the chimney is the lower part of the roof. Here the pipe can be damaged when masses of snow and ice melt. In addition, a large section of the pipe has to be taken outside to ensure normal draft, which contributes to its freezing and the formation of condensation on the internal walls.
Possible installation errors and how to avoid them
Errors during chimney installation can lead to a fire in the ceiling, roof or wall.
It is important to maintain minimum distances between flammable objects and the chimney
Errors and remedies:
- A common mistake is saving space. Sandwich pipes, as long as they are in good condition, should not heat up. But over time, warm air may pass through the thermal insulation layer. In this case, nearby flammable materials may catch fire. The presence of sufficient space between the chimney and building materials eliminates this possibility.
- Another mistake is neglecting the tightness of the compared parts. It is recommended to cover all joints between the components of the chimney with a layer of sealant, otherwise combustion products may pass from the chimney into the environment. The joints between the pipes can additionally be tightened with special clamps.
- The third common mistake is comparing pipes only by the “smoke” or “condensate” type. Matching “by smoke” means that the socket of the overlying pipe fits onto the underlying pipe. In this case, smoke will not accumulate in the resulting pocket between the pipes, but condensation may drain there. Comparison “by condensate” means that the socket of the underlying pipe fits onto the overlying one. Condensation will not be able to drain into the resulting pocket, but smoke will accumulate there. In the first case, there will be a lot of condensation in the chimney, in the second - soot. In order to take advantage of both options in a sandwich pipe, it is enough to compare the inner cylinders “by condensate”, and the outer ones “by smoke”. Matching both cylinders in the same way can quickly clog the chimney.
- A serious mistake is to use general building insulation instead of thermal insulation. Many insulating materials are used in construction, but when arranging a chimney, it is necessary to choose materials with the best thermal insulation. This material is mineral wool. When installing external insulation, the use of basalt wool is allowed, but if the pipe warms up significantly from the outside, after a few hours the basalt wool will begin to heat up.
We cover the chimney with corrugated sheeting
The priority of autonomous heating of a private home is increasingly obvious. In addition to significant savings, this is the opportunity to independently choose alternative heating methods. Among the sufficient number of available options, stove heating is still popular. Despite certain installation difficulties, this is the best way to create a favorable microclimate in the house.
Any autonomous heating, with the exception of electricity, requires the removal of combustion products through a chimney. Today there are enough materials with which it can be organized. If it is a fire-resistant brick, it is most advisable to protect it from the negative effects of aggressive environmental factors by means of cladding.
Attention. Our readers think that morning fishing is a myth! The secret of the catch has been revealed, you just need to dissolve 1 sachet in 0.5 liters of water read more
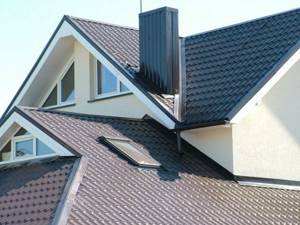
The chimney lining is a kind of shield that prevents the formation of condensation as a result of the interaction of the difference in ambient temperatures and the chimney pipe.