Volpert Grigorovich deflector
This type of device is the most effective and popular.
Therefore, we will talk about it in more detail. This deflector is often installed on the chimneys of gas boilers. The key feature of this design is the presence of an inverted cone under the umbrella. Therefore, during side blowing, a reduced pressure occurs in the channel, and combustion products rush out of the flue.
In case of strong wind “from top to bottom”, the pressure in the deflector area can, on the contrary, increase. This point must be taken into account when designing and installing a smoke exhaust system. But in most cases, the airflow occurs from the side. Therefore, the type of product under consideration is suitable for most gas ducts.
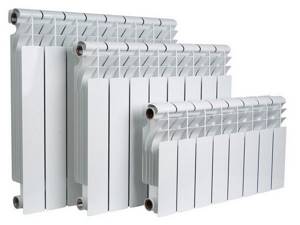
They look like this:
- diffuser diameter: bottom - 2*D, top - 1.5*D;
- diffuser height - 1.5*D;
- immersion of the channel into the diffuser - 0.15*D;
- the height of both cones of the umbrella is 0.25*D;
- the distance between the diffuser and the cap is 0.25*D.

The device is effective all year round
Installing the device allows you to create traction at any time of the year. This is the main advantage of the Volpert-Grigorovich deflector. In addition to it, there are several other undeniable advantages.
- Due to the simplicity of the design, it is possible to make it yourself.
- Returning to the school physics course, it should be recalled that the longer the pipe on the roof, the better the traction. The deflector, without lengthening the chimney, will increase the draft by as much as if 2 meters of pipe were added.
- The efficiency of the heating device increases to 25%, and the ventilation system to 20%.
- Installing a deflector designed by Volpert-Grigorovich makes it possible not to use a forced exhaust system.
Warning! The deflector cannot be placed on the exhaust pipe of a gas boiler. This requirement is reflected in SNiP 41-01-2003 Heating, ventilation and air conditioning and is mandatory for systems installed in all buildings and structures (residential and non-residential premises).
How to build a deflector yourself
The deflector has its own parameters. So, its height should be 1.6-1.7 from the internal diameter of the chimney duct, and its width should be 1.7-1.9. Diffuser width – 1.2-1.3. But first, let's decide on the material from which it will be made:
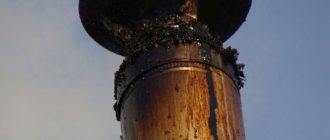
If your chimney has a hole, birds often find it tempting to get inside. Small brownish black birds with a penchant for building nest in chimneys. Having these birds in your chimney can be quite annoying - they are vocal little buggers!
When you find yourself in difficulty with smokestacks, which are classified as an endangered species, there is little that can be done legally. The Migratory Bird Treaty Act, a federal regulation, prevents the removal of swift eggs and chimney chicks. The best thing you can do with quickies is to clean up after they leave. Technicians can be called in later to clean and remove nest residue from the chimney.
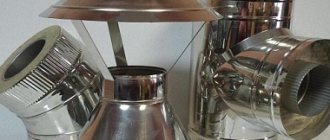
- Copper;
- Galvanized iron;
- Stainless steel.
Why copper if it is such an expensive material? The fact is that the deflector is located in one of the most inaccessible places in the bathhouse, and therefore, so that it does not have to be repaired, it is better to make it as resistant to atmospheric conditions as possible. And copper is the best in this regard.
Chimneys and most other birds are less likely to return to a nesting site if the nest has been removed. Several animals can get into your chimney, including squirrels and bats. Raccoons, usually females, enter chimneys to give birth and care for the pups. Terrible as they are, mother raccoons sometimes manage not only to get inside the chimney, but to pass through the smoke shelf or directly above the fireplace. If they have gotten this far, there is a good chance they will eventually break into your home. If not, you'll probably have to at least deal with various animal odors.
And here's how to make a deflector:
- Draw on cardboard an outline of all the main parts, such as the cap, diffuser and outer cylinder.
- Transfer everything to metal and cut using metal scissors according to these patterns.
- Connect the parts to each other using rivets, bolts or welding.
- Make brackets from a strip of metal - you will use them to secure the cap to the surface.
- Attach a reverse cone to the cap.
The deflector itself must first be assembled, and only then installed on the roof. We first install the lower cylinder and secure it with bolts and nuts. Using clamps, we attach the diffuser to the lower cylinder, and on it - a cap with a reverse cone.
A raccoon is an animal you never want to hang as they are known for carrying various diseases. Raccoons are home to bugs like fleas and ticks that you or your pets can get, as well as diseases like rabies and roundworm.
Luckily, there are ways to remove mom and her babies from the chimney. If you don't mind the smell, items such as predator urine can get rid of raccoons. A humane method of removal is a live trap. You'll probably want to catch the mother while she's going through or even trying to scare her in some way. The babies still can't handle most of the fighting, so it's fairly easy to reach the fireplaces and grab them.
Purpose and use of deflectors
As a rule, chimney systems are considered the most important element of the entire heating system, because it is the operation of the chimney that affects the process of fuel combustion and the removal of all combustion products from the system and the house in particular.
The entire process of operation of a heating boiler depends on a high-quality air flow and on the complete removal of smoke from the system. Without the proper amount of oxygen, the combustion process is impossible, and food residues in a living space can seriously harm the health of residents.
In order to organize the correct level of draft in the system, you need to know some features of the chimney, the design and organization of which must be correct. First of all, it is worth considering the required cross-section of the pipe intended for air inflow and outlet. Important factors include the height of the chimney and its configuration. Now let's look at these requirements in more detail.
The choice of the required cross-section directly depends on the power of the thermal energy generator. The smoke exhaust duct or passage itself must be of a vertical type and straight enough so that no air pockets are created during operation.
In the event that compliance with these requirements does not produce a tangible result, it is worth resorting to the use of a deflector, which is mounted on the top of the chimney pipe.
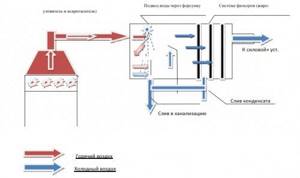
The principle of operation of the deflector is to use the wind as an additional tool in leveling or increasing the level of draft in the system. Externally it looks like this. At the end of the pipe, a part of the system is installed that has a larger internal diameter than the chimney itself.
A strong wind allows you to create a rarefied space in the deflector, into which all combustion products remaining in the chimney move.
Among other things, the deflector has additional useful functions that have a positive effect on the entire operation of the chimney duct. With the help of such an element, you can protect the system from rainwater and snow getting into it in winter. As a rule, this helps the system function efficiently in any weather.
How does the collet deflector work?
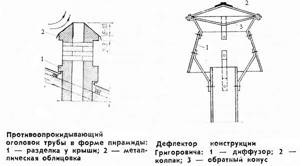
This device is a structure made according to the cross-sectional shape of the ventilation shaft. Below is a figure that schematically shows all the components of the device.
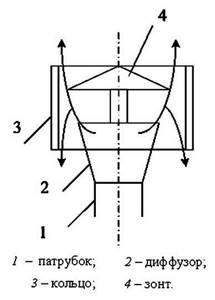
- The pipe is attached to the head of the ventilation pipe.
- a truncated cone, which with its narrow part is attached to the pipe.
- The ring is the main visible part of the device, which is mounted on the outside of the diffuser using brackets.
- The umbrella protects against debris and precipitation getting into the channel. Mounting is done using the same brackets as the ring.
Self-production of the device
To work you will need:
- galvanized or stainless steel sheet 0.5-1 mm thick;
- metal scissors;
- riveter;
- drill;
- a sheet of thick paper or cardboard.
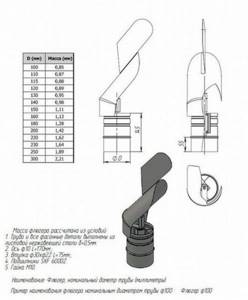
The most important stage is drawing up a drawing. To do this, you need to measure the internal diameter of the chimney and calculate the product parameters according to the table.
If the internal diameter of your chimney differs from the parameters given in the table, calculations are performed as follows:
- the diffuser width is 1.2 d;
- width of the protective umbrella – 1.7-1.9 d;
- the total height of the structure is 1.7 d.
Both measurements and calculations must be as accurate as possible so that there are no difficulties during the installation of the structure and its subsequent operation. If the pipe has a square cross-section, then the deflector must be made square, although the angularity of the body slightly reduces the efficiency of the device.
| Step, No. | Description | Illustration |
| Step 1. | A life-size drawing of the deflector parts is made on paper and cut out. | |
| Step 2. | The blanks are fastened and fitted to each other. If all the elements match, you can begin cutting the galvanized sheet. | |
| Step 3. | The templates are laid out on galvanized sheets, carefully outlined with a marker, and cut out with metal scissors. On the cuts, the metal is bent 5 mm with pliers and tapped with a hammer. | |
| Step 4. | In places of bends, the metal must be riveted with a hammer to make the edges thinner. | |
| Step 5. | The diffuser blank is rolled into a cylinder, holes for fasteners are drilled and connected with bolts or rivets. You can also use welding, but not arc welding, but semi-automatic, so as not to burn through the metal. | |
| Step 6. | The outer cylinder is made in the same way. Next, the cap blank is rolled into a cone and also connected with rivets or welding. | |
| Step 7 | 3-4 strips 6 cm wide and up to 20 cm long are cut out of galvanized steel. The strips are folded along both sides and tapped with a hammer along the entire length. From the inside of the cap, stepping back about 5 cm from the edge, drill the required number of holes for the bolts around the circumference. Fasten the galvanized strips to the cap and give them a U-shape. | |
| Step 8 | Using these homemade brackets, the cap is attached to the diffuser, and then the entire structure is inserted into the shell. |
If the design must have a reverse cone (Grigorovich deflector), the diameter of the protective umbrella is made 3-4 cm larger than the diameter of the cone. After assembling both elements, the cone is applied to the inside of the umbrella and outlined around the perimeter with a marker. Then make two cuts on the protruding part of the umbrella and bend the resulting strip inward. In the same way, make another 6-8 strips at an equal distance from each other, bend them inward and securely fix the reverse cone without additional fasteners or welding.
It is more convenient to attach a cap with a reverse cone to the diffuser with construction pins. To do this, before installing the cone on the umbrella, three holes are drilled around its circumference, the ends of the studs are inserted and the nuts are tightened. Then put the umbrella on top and fix the cone in the manner described above. At the top of the diffuser, on the outside, hinges made of tin or aluminum are riveted and the lower ends of the pins are inserted into them. This design withstands strong gusts of wind, serves for a long time and reliably.
In a similar way, you can assemble a deflector of any type, the main thing is to draw up the correct drawing. The only difference will be in the number and shape of parts. The finished device only needs to be mounted on the chimney.
Making a simple device with your own hands

Despite the complexity of the design, every home craftsman can make a deflector with his own hands. You just need to have the necessary tools and materials. To make this device yourself you will need:
- A sheet of thick paper or cardboard.
- Galvanized metal sheet.
- Drawing of a deflector with calculations regarding the diameter of the pipe.
- Rivet gun.
- Metal scissors.
- Drill with a set of drills.
- Marker or scriber.
After preparing the tools, material and personal protective equipment (goggles, gloves), you can begin making a ventilation deflector with your own hands.
- First of all, you should transfer the contours of the product from the drawing to the metal. There must be scans of all the main parts of the device: cap, diffuser, outer cylinder, racks.
- After this, you need to cut out all parts of the device according to the resulting pattern.
- Connect all parts of the device, according to the drawing or sketch, using a rivet gun.
- Connect the two parts of the deflector using stands cut from the same metal.
After manufacturing, you can install the deflector on the head of the pipe, carefully securing it with clamps.
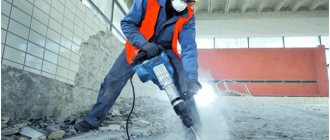
Tip: The deflector will create additional draft in the channels only if all its parts are made to certain dimensions. It should be remembered that the installation should be carried out while working at height, so it is better to do it together and with insurance. If you are not confident in your abilities, contact professionals who have experience in the manufacture and installation of these necessary devices.
The flow of clean air into the room is ensured by the ventilation system. Its effectiveness depends on internal traction. If dust and debris gets into the air ducts, the normal operation of the devices is disrupted. To eliminate such a possibility, a ventilation deflector is installed at the pipe outlet - a device that generates draft in the ventilation ducts .
Why is such a unit needed? – This device is capable of protecting air duct shafts from moisture, snow and rain.
Note ! The absence of this solution leads to a gradual decrease in the diameter of the pipe due to the fact that small particles of debris, dust and grease accumulate on the walls of the pipes
.
There is a wide range of models on sale. Their structure and operating principle are discussed below. The simplest models can be made with your own hands.
- Show all
How much does a deflector cost?
Ventilation devices are calculated together with the entire system. Deflectors of a specific model can be purchased for the required pipe diameter.
Table. Prices for deflectors
| Name | Model | Type of steel | Channel diameter, mm | Price, y. e. |
| "Vent-Class" D-120 | Khanzhenkov deflector | galvanizing | 120 | 18 |
| "Vent-Class" D-250 | Khanzhenkov deflector | galvanizing | 250 | 42 |
| "Fireplace Stoves" TsAGI-100 | TsAGI deflector | galvanizing | 100 | 17 |
| "Fireplace Stoves" TsAGI-220 | TsAGI deflector | galvanizing | 220 | 40 |
| Turbovent "Stabil 120" | Volpert-Grigorovich | galvanizing | 120 | 21 |
| Turbovent "Stabil 260" | Volpert-Grigorovich | stainless steel | 260 | 46 |
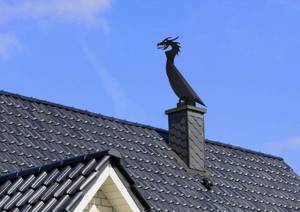
| Turbovent "Dragon" Dr-150-CH-A | Turning | stainless steel | 150 | 100 |
| Turbovent "Dragon" Dr-200-CH-A | Turning | stainless steel | 200 | 115 |
| Turbovent "Dragon" Dr-300-CH-A | Turning | stainless steel | 300 | 140 |
Deflectors are often made in artisanal workshops and small workshops (in this case, the product may not have a specific name or connection to the model). An indicator of the quality of the company’s work will be the product passport indicating the dimensions of the parts, steel grade and other details.
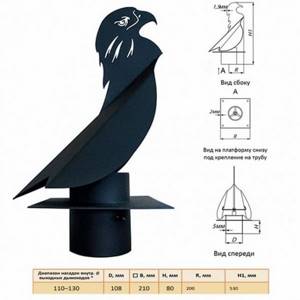
Making your own weather vane deflector
The weather vane allows you to reduce the height of the pipe by increasing traction, since it is always in the right relationship with respect to the wind, prevents precipitation from entering the pipe and decorates the roof.
Tools and consumables for work
To make one of the options for a weather vane on a chimney pipe with your own hands, you need to add to the above tools and materials:
- set of wrenches;
- pipe section;
- a metal (preferably stainless steel) rod or a ready-made pin;
- die for cutting threads on the rod;
- tap for cutting threads for fixing bolts;
- bolts for fixing bearings in the pipe;
- 8 nuts that will need to be screwed onto the rod to secure the bearings and secure the deflector housing.
- two bearings, the size of which is selected according to the diameter of the rod and the internal diameter of the pipe.
Step-by-step instructions and important notes
Operating procedure:
- Initially, a drawing is made, according to which patterns for parts are then made from a sheet of galvanized steel.
- Using patterns, apply the contours of the deflector elements onto a steel sheet with a special chalk or marker.
- Metal scissors are used to cut out parts from a metal sheet.
- The deflector body is assembled from the prepared elements by drilling holes and fastening them with rivets. You must remember to make brackets with which the body will be mounted on the rod.
- Cut off a rod or pin of the required length so that it is enough to secure the bearings and fix the deflector body.
- If a rod is used, the thread is cut using a die.
- Next, two bearings are attached to the stud with the distance between them necessary to create sufficient support when the deflector-vane rotates. To secure each bearing, first screw on the first nut, then put the bearing on the axle, then screw on the second nut and tighten the nuts until the bearing is well secured.
- Cut the pipe to the required length.
- Holes are made in the pipe where the bearings are located. Use a tap to cut the threads for the bolts that will secure the bearings in the pipe. Holes are also prepared for attaching supports that secure the entire device.
- A ring is made from a steel strip to secure the deflector to the chimney.
- Cut sections used as supports for attaching the block with bearings to the ring securing the product to the chimney.
- The final assembly of the product is carried out using rivets and fixing bolts.
There are many options on how to make a deflector for a pipe with your own hands. Everyone chooses for themselves what type of device is best suited. It is only necessary to note that such a design, placed on a pipe to remove combustion products, performs several useful functions - it increases draft when removing gases, protects the chimney from debris and precipitation getting inside. After installing the deflector on the chimney, the heating efficiency in the house increases significantly.
What is a deflector and its assembly
The word "deflector" is taken from Latin, where "deflecto" is translated as "deflect" - this is the imperfective verb from which the name of the device comes. Any of these structures is created on the basis of the law of conservation of energy (Bernoulli's law) and in this case this is expressed in the equalization of air pressure, which is different at a given temperature.
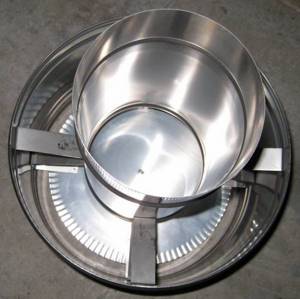
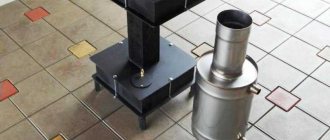
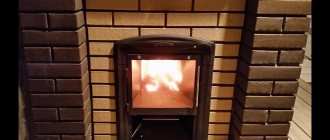
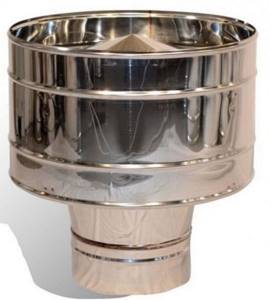
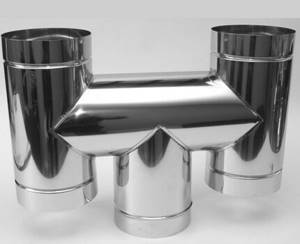
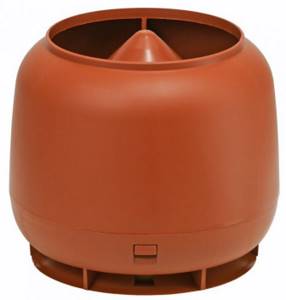
This is what the device looks like from below
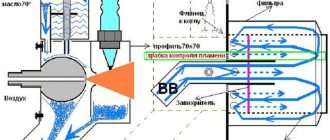
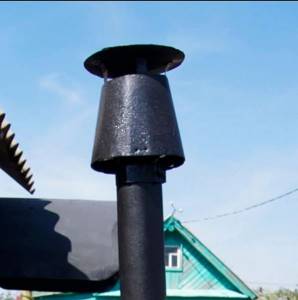
In practice, the Volpert-Grigorvich deflector is installed on the top of the exhaust pipe, and even with a light breeze, the wind flows around the walls of the device and the air inside it becomes rarefied and colder. The air mass from below rushes upward to the zone of low pressure, which is called draft.
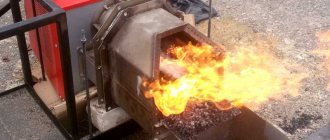
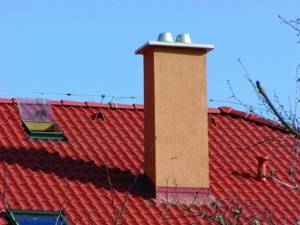
Volpert-Grigorvich deflector in action - incredible effect
Device
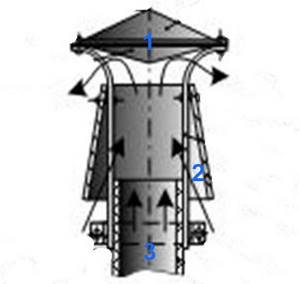
Components of the Volpert-Grigorovich deflector
This deflector is created on the basis of two developments - connecting the Wolpert device with the Grigorovich device. It is incredibly simple (see image above) and generally consists of only three elements:
- Umbrella lid in the form of a double-sided cone.
- Trapezoidal diffuser (lampshade).
- Pipe.
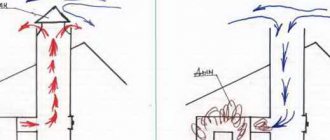
In the top image, the arrows indicate the movement of the wind - blowing on the pipe, it enters the diffuser and. Naturally, it rises upward, where it is reflected on the sides by the reverse cone of the lid or umbrella (call it what you want). It turns out that in the internal space of the diffuser above the pipe the air is constantly rarefied, which causes gases from burnt fuel (smoke) or air from the room to rush up the pipe - a suction effect occurs.
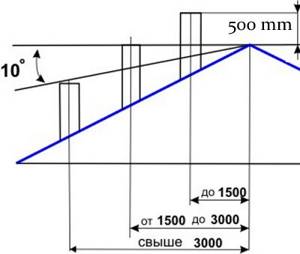
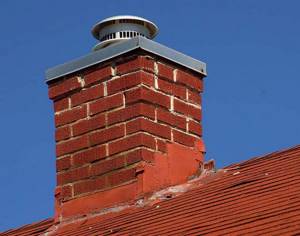
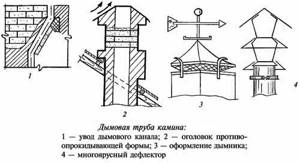
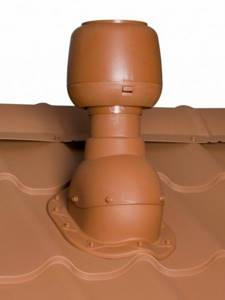
The principle of placing the chimney on the roof slope
Here it would not be superfluous to indicate the location of the chimney (ventilation) on the slope of the roof so that your product and its installation will be beneficial. The top drawing shows the principle of the correct location of the chimney relative to the height of the ridge. For example, if the second and third options (from right to left) are made lower, then the deflector will not bring much benefit. Therefore, if your chimney is shorter than necessary, then it should be raised with a fragment of a metal, ceramic or asbestos-cement (chrysotile cement) pipe.
Materials and tools for work
To make a deflector you will need the following materials:
- sheet of galvanized sheet (it is better to choose a thickness of 0.32 mm rather than 0.25 mm);
- duralumin rivets or small bolts with nuts;
- steel strip for brackets (no thicker than 1-1.5 mm);
- fasteners (there may be plastic dowels with self-tapping screws for a brick or ceramic chimney).
The tools you need to prepare are:
- metal scissors (you can use a grinder with a cutting disc);
- ruler (can be replaced with a level or rule);
- scriber or marker, tape measure;
- school compass;
- riveter;
- battery and/or electric drill;
- extension cord for connecting a drill on the roof.
Let's get started
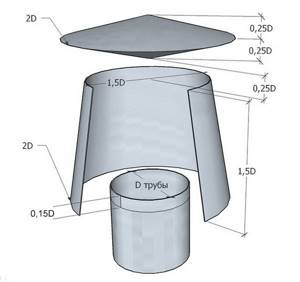
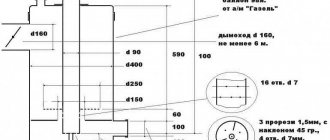
This is the structure to be made from galvanized sheet
To make calculations, you need to pay attention to the top image - there all dimensions are tied to the diameter of the chimney or ventilation pipe, therefore, to make it clearer, we will make such calculations for a pipe Ø200 mm. If the height of the lampshade and its upper diameter are one and a half times larger, then these values will be 200 * 1.5 = 300 mm. The lower diameter of the lampshade is 200*2=400 mm. The overlap of the lampshade onto the pipe is 200*0.15=30 mm. The height of each cone of the lid is 200 * 0.25 = 50 mm, total 50 + 50 = 100 mm. Umbrella diameter 200*2=400 mm. The height from the bottom of the cone (peak) to the lampshade is 200*0.25=50 mm.
Note. The chimney or ventilation may have a different diameter, so for calculations you can independently substitute the required value instead of the number 200 and get results that are suitable in your case.
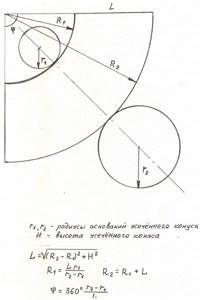
Let's move on to the process of manufacturing a device to optimize the combustion process and start with the lid (we will start from the same 200 mm. First, you need to draw a circle on the tin, but such a large compass cannot always be found, so we will make it from improvised means - a thin strip and a self-tapping screw. In the corner of the galvanized sheet, determine the approximate center and screw a strip there, on which, stepping back from the fixing point 100 mm (radius), drill a hole, insert a scriber there and draw a circle. Cut it out and make a similar copy for the opposite side.
To set the required height of the cone, you will have to cut a wedge from the resulting circle and to do this you need to divide the circle into 36 parts - this is not difficult. First, calculate the length of the chord, which is equal to the diameter multiplied by the coefficient (for 36 parts k = 0.08716). This means 200*0.08716=17.432≈17 mm. We do not need to mark the entire circle - two marks at a distance of 17 mm are enough, from which we make lines with a scriber towards the center, and then cut out the marked wedge.
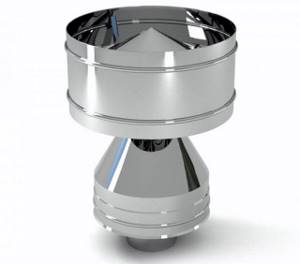
The double-sided umbrella is fixed to the cone diffuser lampshade
You pull the cut edges overlapping and rivet them with aluminum rivets or fasten them with small bolts, although rivets are both more convenient and aesthetically pleasing. Use the same method to make the opposite part of the cover, after which you connect both umbrellas with the fasteners you have chosen into one disc, as in the photo above, and proceed to making a cone diffuser.
Now, based on the ratio of the diameter (in this case we have Ø200 mm) to other values, we cut out a strip 300 mm wide (height), and the length can be calculated using the formula C=πd, where C is the desired circumference, π=3.14 , d=200 mm (in our case). This means that the length of the lower circle is C=πd=3.14*400=1256 mm and 5 mm will be added for overlap when joining, and the length of the upper circle is C=πd=3.14*300=942 mm. First, we cut out a strip of 300 × 1261 mm, but since the difference in the circumference is 1256-942 = 314 mm, we divide this number in half and retreat 314/2 = 157 mm on each side. We trim the edges and get a trapezoidal quadrangle. We rivet it with a 5 mm overlap and proceed to assembling the device.
Attaching the mounting feet to the deflector
All that remains is to fix the double-sided umbrella to the diffuser lampshade and make mounting legs for the final installation of the optimizing device. It is best to cut the strip from sheet metal of suitable thickness (1-1.5 mm), since it is unlikely that you can purchase such a format at any metal warehouse - they usually offer no thinner than 2 mm, although this can also be used.
First, attach the cover to the lampshade using three or four brackets so that the peak of the cone is at a distance of 50 mm from the diffuser - fix the strip with the same fasteners (rivets or bolts). Then attach three or four legs to the diffuser in such a way that you can make a 30 mm overlap on the pipe.
Now all that remains is to install the deflector on the chimney or ventilation, and this, perhaps, for a beginner may turn out to be a difficult operation, since he will have to work at heights. But in any case, even a person with a trained vestibular apparatus would benefit from insurance - the best option is a mounting belt, but you can simply tie yourself around the waist to the pipe. The fastening technology will depend on the material from which the vertical outlet of the chimney or exhaust ventilation is made.
This is how you can make a Volpert-Grigorovich deflector with your own hands
Grigorovich deflector manufacturing stages
The simplest product is the Grigorovich device, which is easy for most people to make.
Calculations and preparation of drawings
When drawing drawings and sizing this product, the following ratio applies:
- the height of the structure is approximately 1.7d;
- the cap must be made with a width of 2d;
- The diffuser width should be about 1.3d.
The symbol d refers to the diameter of the smoke channel. If a different size ratio is used during manufacturing, this will negatively affect the efficiency of the created device.
Based on the drawn drawings, patterns are prepared that are used when cutting galvanized iron into elements, from which the product is then assembled. To do this, transfer the outline of the elements in expanded form and in full size onto the cardboard, using a ruler, tape measure and pencil. When making a deflector for a chimney pipe designed by Grigorovich, prepare patterns for the outer cylinder, diffuser and cap.
Stages and nuances of making a deflector
Next, the following work with metal is performed:
- Using prepared patterns, outlines of the necessary parts are applied to sheets of metal, outlining cardboard figures with special chalk. If special chalk is not available, you can use a simple pencil. Add 20 mm to the contour of the parts in places where they overlap, which will allow you to maintain the required configuration of the finished elements during assembly.
- Using metal shears, the elements necessary for assembly are cut out of galvanized metal, thereby preparing the expanded outer cylinder, diffuser, and both parts of the cap - the umbrella cap along with the reverse cone.
- Then, using a hacksaw, metal strips or a corner are cut into pieces of the required length, through which all the elements will be connected into the finished product.
- The parts are given the required shape by folding and bending them in a certain way.
- The next operation is assembling the product. The elements are placed on top of each other and, using an electric drill, the necessary holes are drilled. Using rivets placed in prepared holes, the parts are fastened together.
- To install the Grigorovich device on a chimney, you can use two options - in the first case, through holes are drilled at the mounting location, through which the structure is fixed with fasteners on the chimney, and in the second option, a clamp is made from a strip, through which the deflector is fixed to the pipe.
Installing the device - installation steps
There are two ways to install a deflector on a chimney yourself: directly on the opening of a brick channel or using a connecting pipe. The first installation option is suitable only if the channel was originally designed for the subsequent installation of an umbrella. The second option is more universal and safe; it is suitable for all types of chimney ducts.

To carry out the installation and installation of the structure, you will need to take threaded rods and a piece of pipe with a diameter slightly larger than the dimensions of the smoke duct. Installation on the pipe is carried out according to the following scheme:
- Mark the locations of future fasteners on the pipe (10–15 cm from the edge) and diffuser.
- Drill holes in the parts at the designated points, make sure they match by trying the elements against each other.
- Insert threaded rods through the holes and secure them with nuts on both sides on the diffuser and pipe. It is better to tighten the nuts at the same time so as not to bend the sheet of metal.
- Raise the structure onto the roof of the house, put the pipe on the chimney and secure it with clamps.
It is necessary to ensure that all parts of the structure are accurately connected to each other, leaving no gaps or cracks. To do this, you need to secure the pipe especially tightly with clamps, and if possible, treat the joints with sealant.
Installing a weather vane on a chimney with your own hands is somewhat more difficult than installing a stable structure of a conventional diffuser. Holes are drilled in the chimney masonry to fix the lower cylinder of the weather vane. It is secured with bolts. It is very important to select a weather vane model that exactly matches the diameter of the chimney. The installation features also include the fact that the structure must be secured to the rotating axis of the weather vane.
Application of deflectors
The main quality of deflectors for which they are used is the ability to increase traction by diverting external air flows. Regardless of the design, any deflector works on a single principle - the air bypassing the obstacle creates a low-pressure zone, due to which the draft in the chimney increases. A good deflector can increase the efficiency of a smoke exhaust system by 20%.
In addition, the deflector has an additional function that occurs indirectly - an obstacle installed on the chimney pipe prevents precipitation and various debris from entering it.
A simple deflector consists of two cylinders, one at the bottom and one at the top, and a protective cone, also called an umbrella. The bottom cylinder is usually part of a chimney made of metal or asbestos cement. Galvanized metal is used to make the deflectors themselves.
There are several standard options for deflectors:
- TsAGI deflector;
- "Volper" with a round body;
- Grigorovich deflector;
- Open deflector Astato;
- H-shaped;
- Star-shaped "Shenard".
Different types of deflectors are used in the following types of structures:
- Collective and private ventilation shafts;
- Collective and private chimneys;
- Systems for the removal of gases and combustion products;
- Garbage chutes.
What is it needed for
The main thing when calculating the parameters of a chimney is to create sufficient draft capable of removing combustion products from the combustion chamber of a solid fuel stove due to a significant pressure drop. To do this, select the required channel diameter, material, cross-sectional shape and pipe height.
A strong wind can blow air into the mouth of the canal, thereby preventing the exhaust gases from escaping. An extreme case is the effect of draft suppression, when the boiler exhaust is not able to overcome the resistance and flows back into the room, which is, in principle, unacceptable.
It is not enough to close the mouth of the chimney from external air flows, but there are no optimal designs for this. It is better to use the power of the wind itself to avoid negative consequences and even further increase traction, which is what the deflector does very well.
Errors and problems with the device
With the deflector, as with all devices, troubles can arise. One, the biggest and completely preventable one is incorrect work. This happens if the device was selected the wrong size. It can simply fall inside the chimney pipe, closing the path for combustion products to escape.
To avoid this situation, you need to pay attention that the diameter of the deflector pipe must be equal to the diameter of the internal chimney pipe. If the chimney is brick, and the installed device has a round cross-section, then you cannot do without the appropriate adapters
If the chimney is made of brick, and the installed device has a round cross-section, then you cannot do without the appropriate adapters.
The second mistake when installing a deflector is choosing a rotating model for areas with cold and snowy winters. Such a solution is fraught with icing of the device, and after a few days it will be covered with snow and not only stop rotating, but will also significantly interfere with the normal operation of the chimney.
To clean everything by removing snow and ice, you will have to climb onto the roof, and this is not the most pleasant activity on a cold and snowy day.
The third problem is the ineffectiveness of the deflector.
The problem may arise if the installation location or model is incorrectly selected:
- the body of the device is poorly blown by winds from different directions;
- in areas with gusty winds, an H-shaped deflector will be more effective;
- you should avoid installing the device in the aerodynamic shadow zone of trees and taller structures located nearby;
- the device must be located above the roof ridge and above other structures if they are present near the chimney.
If the deflector turns out to be ineffective, then it is necessary to look for the reasons for the backdraft of the chimney.
The fourth problem is the breakdown of rotating models. The fact is that the mechanisms that ensure rotation require maintenance. More precisely, you must not forget to periodically carry out maintenance on individual parts of the deflector and lubricate the bearings on time.
If the device was made by hand, and the material used turned out to be cheap and of poor quality, then everything can rust very quickly. In this case, you will soon have to replace it with a new deflector.
Another problem is when a simple cap is installed instead of a deflector. It may become icy and covered in snow. This will have to be fixed. It is dangerous if this situation occurs at night and all combustion products remain in the house. This is fraught with death for all household members.
Therefore, you need to install the deflector right away and not experiment with different canopies. If you don’t want to build an amplifier from scrap materials, you can always buy the model you like and install it on the chimney yourself.
It is necessary to take care of the normal operation of the boiler and the effective removal of combustion products at the heating design stage. Useful information on chimney construction is presented in this article.
Do it yourself or buy a device?
The question of whether it is advisable to purchase a deflector worries thrifty homeowners. This is not surprising, because the simplest device costs about 17-18 dollars. The average purchase price is $45-60.
The options for weather vanes offered by manufacturers and private companies are very diverse. Some models are made so skillfully that they look like a real work of art
In this case, making the device will not be difficult. And the aesthetic component does not always come first. Sometimes a deflector is needed for the chimney of a boiler heating a garage or other utility room.
The cost of the simplest deflector options starts at $17. To buy a Khanzhenkov, TsAGI or Volpert-Grigorovich model made of galvanized steel you will need up to $50. Moreover, these can be factory products or handmade ones.
The efficiency of the device does not depend on the manufacturing method. The main thing here is to choose the correct diameter of the product and the right model that can meet the needs of a particular chimney.
When purchasing, you should pay attention to the characteristics of the deflector:
- material type;
- metal thickness;
- diameter of the pipe for mounting on the chimney pipe.
Manufacturers also offer stainless steel options. They differ in cost - the price of rotary stainless steel models can reach $140 or more.
The most common deflectors used for chimneys in private houses, cottages and baths: TsAGI, round “Volper”, H-shaped, star-shaped “Shenard”, Grigorovich and open Astato.
For chimneys on the roofs of houses located in areas with gusty winds, N-shaped deflector options are often chosen
Whether to buy or build a traction amplifier is a matter of individual decision. For those who like to do something around the house, this task will be a pleasant and interesting activity.
If you don’t have any tools or skills for doing housework, then it will be easier and more convenient to purchase a finished product, choosing the most suitable model that will not stand out from the overall picture of the roof.
Now it’s not a problem to choose a deflector model that can organically fit into the roof composition
When purchasing or making your own device, it is important to consider the material of the roof covering. If it is a flammable material, then it is imperative to provide a spark arrestor. This is an important point that ensures the safety of all family members living in the house.
Installation of a deflector with a wind protection device
The deflector with wind protection is mounted as follows:
- Two bearings and a vertical axis are fixed in the chimney at two levels;
- A semi-cylindrical screen, a weather vane and a roof of the structure are successively installed on the axis.
The operating principle of this type of system is as follows:
- When the wind direction changes, the weather vane rotates and pulls a curtain behind it, covering the chimney from the wind. As a result, smoke can escape from the leeward side of the chimney at any time.
- Air flows pass tangentially over the semi-cylindrical screen and pull smoke behind them, increasing draft in the system.
To increase the efficiency of the structure, it is necessary to periodically lubricate the deflector bearings, and in the cold season, also remove ice that forms in the structure due to condensation. Taking into account the last nuance, we can say that such a nozzle on the chimney pipe from the wind can effectively protect only those structures that are located in warm regions.
Types of deflectors
After analyzing or taking a quick look at the types of deflectors on the market, you can come to a state of slight confusion at the number of available solutions.
From a design point of view, devices are usually divided into several types:
- TsAGI - thrust is enhanced due to air and thermal pressure, high-altitude pressure drop. Mounted directly into the ventilation duct, which makes preventive inspections and cleaning difficult;
- spherical or round (Volper type);
- Khanzhenkov's solution in the form of an open-type dish - the main structural difference lies in the additional wall located around the air duct. The exhaust hood has the shape of a plate;
- rotary products (hood, net) - a wind chute that rotates on a special rod. Due to turbulence, the thrust in the channel increases;
- units operating according to the principle described by Grigorovich;
- in the form of a star.
From the point of view of simplicity of design and possibility of implementation, the unconditional leadership is held by the Grigorovich ventilation device. It consists of several pairs of umbrellas arranged in one “plate”, which is mounted above the channel wall.
Grigorovich device
In the last 2-3 years, there have been a variety of products on sale that do not have a clear affiliation with any type: a rotating deflector with spiral blades, an umbrella, units on bearings.
When choosing a specific model, primary attention is paid to its design. This is one of the key parameters of the product. Having decided on the design type of the device, the optimal size of the unit for a particular case is selected. It is easier to choose the right device if you answer a simple question - why is the structure being installed and for what object.
Best models:
- ASTATO;
- TsAGI disc type.
When choosing, take into account the coefficient of losses and air vacuum. It follows that these values depend on the specific model. If we are talking about DS type solutions, the corresponding coefficient will be 1.4. Obviously, the degree of air rarefaction depends on the wind speed, see table. below:
Device selection table
Types and principles of design and operation of deflectors
Deflectors can be made in several generally accepted configurations and designs:
- TsAGI type deflectors;
- round type deflector (Volper);
- deflector designed by Grigorovich;
- open and H-shaped deflector.
The deflector itself has a design consisting of several separate parts. These parts include the lower type cylinder, diffuser and umbrella. The diffuser has the form of a cylinder located at the top of the element, and the umbrella protects the chimney from rain and snow getting into it. As a rule, deflectors are made from galvanized steel, which eliminates the possibility of metal corrosion by such debris.
The operation of the deflector does not have any features in its concept that even a novice master is not able to master. The wind flow goes around the entire deflector, colliding with it. This allows air to penetrate the upper cylinder of the deflector, increasing the draft in the chimney and drawing out all the smoke stagnant in the system. Due to the intensive movement of air inside the deflector, the traction force increases several times.
The design of this element allows you to increase thrust even when the wind flow moves in a vertical direction. For this purpose, there are special gaps in the upper part of the cylinder through which air penetrates into the ventilation and chimney systems.
It is worth taking into account such a thing as a downwind wind, which can make it difficult to remove smoke and reduce the level of draft in the chimney. Due to this wind flow, multi-directional wind flows are formed under the deflector umbrella, which clog the entire pipe.
The need to install a chimney deflector
The functioning of heating equipment is reflected in how air circulates in the system and smoke is eliminated. If these mechanisms are not debugged, then the fuel combustion process is disrupted, carbon monoxide enters the room and causes serious damage to health.

Each part of the chimney must be installed correctly, otherwise the draft will be poor
It happens that the correct parameters of the chimney, that is, cross-section, height and configuration, are not able to normalize the operation of a stove or fireplace. In such a situation, they resort to a deflector installed on the upper section of the chimney.
According to the rules, the smoke exhaust channel must be vertical and fairly straight. The recommended height of the pipe above the level of the roof ridge is less than 50 cm.
The deflector has an important mission - to equalize or increase draft in heating equipment. The device’s assistant in this matter is the wind, which creates a space with rarefied air and pushes combustion products into it that could not escape from the smoke duct.
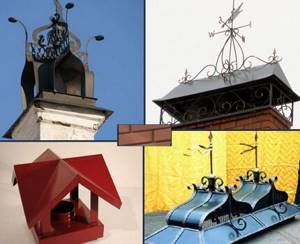
Types of chimney caps
Before you make a chimney cap with your own hands, you need to decide what shape it will have, and then make a drawing. The most common forms that a chimney cap can have:
Chimney caps differ in design features and the material used in the manufacture of the product, but they all serve to enhance draft and protect the chimney from atmospheric phenomena.
When choosing an option, you should take into account the overall architectural appearance of the house. Thus, a chimney cap with a flat copper top is usually installed on houses in the Art Nouveau style. For a European-style home, it is better to make a canopy over the chimney with semicircular finials. Wind vanes with a gable roof serve for effective ventilation and protect the structure from filling with snow.
In wind vanes with a built-in weather vane, you can place a special damper, which in windy weather allows combustion products to escape unhindered. Chimneys with an opening lid are very practical; they allow you to clean chimney channels without much effort (see).
Protection of deflectors from low winds
Due to the presence of this feature of wind flows, deflectors began to be equipped with special protective devices that help increase the level of draft in the pipe in any weather. To do this, an axis is installed inside the chimney on two bearings located at different levels.
A semi-cylindrical screen, a weathervane and a cover are installed on the axis. It is this design that protects the entire chimney from the effects of the lower wind flow.
After the direction of the wind flow changes, the weather vane rotates, thereby closing the chimney from the wrong wind flow. Thus, any direction and strength of the wind is not able to block the path of the exhaust smoke, and the draft in the chimney remains the same power.
Do not forget that the deflectors are designed for round pipes, which can become a problem if you have an old brick pipe with a square cross-section. In order to solve this problem, special pipes are used that act as adapters.
For chimneys with a large square cross-section, which are built for fireplace heating systems, it is necessary to use adapters in the form of spacer legs that connect the pipe and the deflector itself. These legs are made of metal strips that can be galvanized or high-quality painted.
Brick pipes require an appropriate transition with an inlet in the desired direction, which allows you to connect a round deflector and a square chimney. In other words, it is not difficult to secure this element of the chimney system in the presence of any type and shape of chimney structures.
You don’t have to buy a deflector at a hardware store, because you can make it extremely easily with your own hands. To do this, you need to calculate the size and shape of the element, after which you can begin the manufacturing process.
On galvanized steel sheet it is necessary to draw the upper and lower cylinders of the future deflector, which can be easily done using an ordinary pencil. You can cut out the necessary elements using metal scissors, which can easily cope with this task.
Once these two parts have been cut and filed, which is required to properly join the two edges of one part, you can begin to secure these edges. As a rule, a welding machine, bolts or rivets are used for this.
It’s worth noting right away that connecting a galvanized steel workpiece using a welding machine is extremely difficult, because it burns through thin metal quite quickly. It is for this reason that rivets or small bolts are most often used.
The finished cone cap must be secured to the upper cylinder of the deflector. This is done using small brackets made of the same sheet steel. The brackets are secured to the pipe using rivets. Do not forget that the brackets should be attached only to the outer side of the deflector, so as not to create additional interference in the internal part for proper air flow and smoke extraction.
A reverse type cone must be attached to the element umbrella. In addition, the assembly of all parts of the deflector must be carried out directly on the pipe itself, which will allow for high-quality installation and fastening of each individual part of the structure.
Otherwise, it is possible to connect two elements of the system poorly, which will subsequently cause a malfunction of the structure and the entire chimney as a whole. In some cases, it is simply impossible to make this design on your own.
As a rule, this happens with brick chimneys, which require high-quality adapters or stands. From this we can conclude that it is much easier, more profitable and faster to buy this inexpensive element of the system than to try to make it yourself.
It is worth recalling that only galvanized steel can be used to make the deflector, which successfully resists the formation of rust, which negatively affects the life and quality of service of such a system element.
Peculiarities
Installing a deflector on a ventilation pipe significantly increases draft. The device deflects air flows. As a result, a low pressure zone is formed at the exit from the ventilation shaft. Thanks to this, the air inside the pipe rises. This way the pressure is compensated.
There are many designs of deflectors, but they all work according to the principle described above. Interestingly, most modern devices have a narrowing of the channel. This allows for an increase in the speed at which air flows pass over the head of the pipe. As a result, the craving increases. This effect is called the “airbrush principle”.
If you use the deflector on the ventilation pipe correctly, you can achieve a significant increase in the efficiency of the entire system. With the right choice of device and its optimal installation, the power increase can reach 20 percent.
Attention! The ventilation deflector shows the highest efficiency when installed on ventilation ducts with bends and large horizontal sections.
But the main purpose of the deflector is still to protect the air duct from the entry of debris, insects, small birds and precipitation. Since the device is installed externally, the case material is stainless steel or ceramic. In some cases, you can see regular plastic.
Advantages and disadvantages
Before assembling the unit with your own hands, you need to know not only its positive aspects, but also its negative ones. Let's focus on the positive first. The umbrella design effectively protects the pipe from precipitation and dirt, and an increase in traction can also be observed.
The main disadvantage of a deflector on a ventilation pipe is that when the wind blows from below, the flow hits the upper part of the structure and does not allow the air to exit normally. Therefore, problems with the operation of the system may sometimes occur. Fortunately, this happens quite rarely.
In addition, effective countermeasures were invented. Simply put, structures began to be equipped with two cones, which are connected by bases. Therefore, if you want to get a truly reliable unit, it is best to take this into account when creating a drawing.
Attention! The stronger the downward wind flow, the higher the pressure inside the ventilation deflector, which is installed on the pipe.
Possible problems associated with system smoke
Most often, smoke in the chimney system occurs for the following reasons:
- strong wind gusts, as a result of which air under strong pressure penetrates into the pipe, which causes a decrease in traction force and smoke in the living room;
- the smoke passage is too narrow, which is not able to provide the system with the required level of draft;
- insufficient lifting height of the chimney pipe, which does not allow the formation of the required pressure and draft force in the pipe.
Statistical type deflectors are designed specifically to solve all these problems, allowing the chimney to work extremely correctly and efficiently. The use of this element of the system is relevant for private or collective ventilation and chimney systems. As a rule, there are no restrictions on the use of this auxiliary device if its location does not interfere with other functions of the chimney.
Scheme of the Grigorovich Deflector - instructions for creation
Good draft is the key to normal operation of the stove in a private home. If the draft is insufficient, then the fire will not flare up properly, and accordingly, it will not be possible to heat the room. In summer, the chimney can also serve as natural ventilation, thanks to the installed deflector, which will draw out air. Devices of this type can be purchased or made independently. It's not difficult, the main thing is to have the necessary tools and materials. The easiest way is to make a Volpert-Grigorovich deflector according to the drawings. It has a cone-shaped tip and is quite effective.