For the effective functioning of ventilation and chimney systems, stable natural draft is required. Only under this condition will normal air circulation and effective removal of combustion products occur. To prevent foreign objects and precipitation from entering ventilation and smoke ducts, as well as to protect the internal surface from soot and fat deposits, deflectors are widely used.
A modification of the TsAGI type deflector is one of the most common among such devices. This article will discuss the design features, operating principle, pros and cons of this device.
What is a TsAGI deflector and why is it needed?
The TsAGI deflector is a development of the Central Aerohydrodynamic Institute, designed to enhance natural draft, prevent reverse draft and protect against moisture and foreign objects getting into ventilation shafts and chimneys.
The use of these types of deflectors allows you to improve the microclimate in the room due to intensive air circulation and promotes more complete combustion of fuel.
The need to install a chimney deflector
The functioning of heating equipment is reflected in how air circulates in the system and smoke is eliminated. If these mechanisms are not debugged, then the fuel combustion process is disrupted, carbon monoxide enters the room and causes serious damage to health.
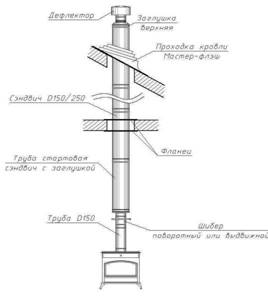
Each part of the chimney must be installed correctly, otherwise the draft will be poor
It happens that the correct parameters of the chimney, that is, cross-section, height and configuration, are not able to normalize the operation of a stove or fireplace. In such a situation, they resort to a deflector installed on the upper section of the chimney.
According to the rules, the smoke exhaust channel must be vertical and fairly straight. The recommended height of the pipe above the level of the roof ridge is less than 50 cm.
The deflector has an important mission - to equalize or increase draft in heating equipment. The device’s assistant in this matter is the wind, which creates a space with rarefied air and pushes combustion products into it that could not escape from the smoke duct.
The deflector is also assigned some other tasks that help improve the operation of the chimney as a whole. The device blocks the access of rainwater and snow to heating equipment. Thanks to the deflector, the stove operates without interruption even on a stormy day.
Design and principle of operation
The TsAGI deflector has become widespread due to its efficiency and affordable cost. The deflector design includes the following elements:
- the lower shell, with the help of which the product is attached to the upper part of the air duct or chimney;
- diffuser, which is an expanded cone located between the pipe and the cap;
- a hollow metal cylinder, which is the outer part of the deflector;
- an upper conical hood designed to protect the air duct from clogging with foreign objects and adverse atmospheric influences;
- upper cone mounting brackets;
- mounting brackets.
Typically, TsAGI deflectors are made of galvanized or stainless steel.
The principle of operation of the device is based on the cutting of the air flow by a deflector, as a result of which an area of low pressure (rarefaction) is formed above the head of the air duct. Thanks to this, the natural draft in the ventilation system increases by 15-20%.
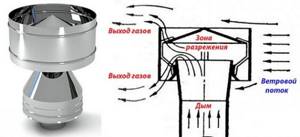
By enhancing natural draft, the efficiency of ventilation and heating devices increases by 20-25%. Fuel combustion occurs with greater heat transfer, which reduces fuel consumption and reduces the emission of toxic compounds into the atmosphere. As for ventilation systems, when using a TsAGI deflector, the intensity of air circulation increases.
Purpose
As we know from physics, warm air is lighter than cold air. Therefore, hot air rises in the chimney. The cold air at the top of the chimney falls down under the influence of gravity. Along the way, these two flows with different temperatures meet and create opposition to each other. This air exchange process is commonly called draft. As it increases, the efficiency increases. Thanks to this, the furnace operates in a more economical mode.
The collet deflector cuts the flow of cold air, thereby reducing its pressure and, accordingly, improving traction. Therefore, the functions of this device include:
- increased traction;
- protection of the chimney (ventilation) from clogging;
- reducing the likelihood of a flow of carbon monoxide moving in the opposite direction (inside the room).
Advantages and disadvantages
Like any other product, the TsAGI deflector has its pros and cons. The feasibility of using the product is determined by their ratio. The advantages of the device include:
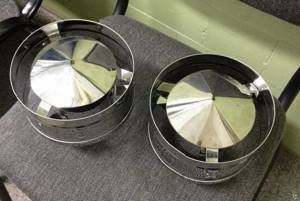
- reliable protection against foreign objects, birds and atmospheric influences getting inside ventilation ducts and chimneys;
- a significant increase in the service life of the head of ventilation ducts or chimneys. This is due to the fact that the presence of a deflector slows down the process of destruction of the upper part of the air duct caused by adverse atmospheric influences;
- prevention of reverse draft even with a large cross-section of ventilation lines and ventilation ducts;
- possibility of self-production. Thanks to its simple design and the use of available materials, a TsAGI type deflector can be made with your own hands. This does not require special tools or experience as a tinsmith.
A significant drawback is that in completely calm or weak wind conditions, such deflectors can create resistance to natural draft. In addition, if the ambient temperature drops significantly, the outer cylinder may freeze, which can lead to partial or complete blockage of the air ducts.
Product installation rules
There are several rules that must be followed during the installation of the deflector:
- Some device models have a check valve under the umbrella. It is necessary to maintain the functionality of the product regardless of wind direction. If such a part is not available, it must be purchased additionally.
- All elements must be securely fastened. The collet deflector is always exposed to wind currents that can tear it off. Therefore, in some situations, additional fasteners in the form of metal plates are used. They are used, for example, when installing the product on a chimney with a large diameter.
- It is possible to install round products on rectangular chimneys. For this, special adapters are used. The same parts are used in cases where it is necessary to make a transition between pipes of different diameters.
The chimney structure for fireplaces and stoves is made of rectangular brickwork. In such situations, adapters are used in the form of metal spacers coated with a layer of paint or galvanization. They connect the pipe and the deflector. Such elements can be installed regardless of the size and shape of the chimney.
The collet deflector has a simple design. Therefore, such a device can be manufactured and installed independently.
Calculation and drawings
Before purchasing a factory deflector or starting to manufacture the device yourself, you need to carry out an aerodynamic calculation and familiarize yourself with the drawings of existing devices.
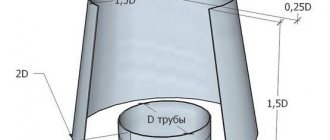
The main criterion when creating a deflector drawing is the internal diameter of the duct (D). The figure shows the dimensions of the structural elements.
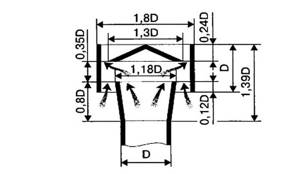
TsAGI deflector dimensions
- diameter of the upper base of the diffuser – 1.18-1.26D;
- outer char diameter – 1.8-2D;
- outer ring height – 1-1.2D;
- distance from the ring to the base of the diffuser – 0.4-0.5D;
- height – 1.4-1.7D;
- diameter of the cap is 1.3-1.5D.
When making a deflector yourself, it is advisable to follow the SNiP recommendations given in the table.
| Deflector No. | Diameter of the lower base of the diffuser, mm | Diameter of the upper base of the diffuser, mm | Outer cylinder diameter, mm | Diameter of the lower base of the cone, mm | total height of the deflector, mm | Diffuser height, mm | Cone height, mm | Cylinder height, mm |
| 3 | 265 | 380 | 600 | 510 | 510 | 295 | 90 | 360 |
| 4 | 375 | 504 | 800 | 680 | 680 | 400 | 120 | 480 |
| 5 | 495 | 630 | 1000 | 850 | 850 | 500 | 150 | 600 |
| 6 | 595 | 736 | 1200 | 1020 | 1020 | 600 | 180 | 720 |
| 7 | 660 | 882 | 1400 | 1190 | 1190 | 700 | 210 | 840 |
| 8 | 775 | 1008 | 1600 | 1360 | 1360 | 800 | 240 | 960 |
| 9 | 885 | 1134 | 1800 | 1530 | 1530 | 900 | 270 | 1080 |
| 10 | 1025 | 1260 | 2000 | 1700 | 1700 | 1000 | 300 | 1200 |
Types of deflectors
The main differences are in the shape of the structure and the number of components. The material for the manufacture of such devices is stainless and galvanized steel, less often copper. They are cylindrical, square, round, open and closed in shape. Devices of the same type may differ in the upper part: some products are made with a cone-shaped umbrella, others have a gable or hip roof, others are made flat or with decorative figured elements.
The diameter of the deflector varies from 100-500 mm, the width of the diffuser from 240 to 1000 mm, the height of the structure - from 14 to 60 cm.
The device is attached to the chimney using brackets, clamps, bolts, and sealing tape. For manufacturing, steel with a thickness of 0.5 to 1 mm is used, depending on the diameter of the deflector itself. Additionally, the device can be equipped with a spark arrester if there is a risk of roof fire.
Deflectors with spark arrestors
Making a TsAGI deflector with your own hands
Considering the relative simplicity of the product design and the availability of galvanized steel sheets, many owners of private houses have a desire to make a TsAGI deflector themselves. This task is quite within the capabilities of any home craftsman; it is enough to have a set of the most common tools and minimal practical skills in sheet metal processing.
What you need
To make a full-fledged deflector at home you will need:
- sheet metal 0.5-0.7 mm;
- Whatman paper or thick cardboard for making templates;
- marker;
- ruler;
- compass;
- scriber;
- pliers;
- two types of scissors: regular and for metal;
- electric drill or screwdriver;
- drills with a diameter of 2 to 2.5 mm;
- special tool for installing rivets.
Design work
First of all, you should measure the diameter of the air duct and obtain the value D necessary for further development of the design. Next, based on the above relationships, draw up drawings of the TsAGI deflector corresponding to the existing diameter of the air duct.
Since the dimensions of the main structural elements remain unchanged for a specific diameter of the chimney or ventilation pipe, for ease of calculation these values are given in the table.
| Diameter Air duct, mm | Diameter Outer ring, mm | Height of outer ring with cap, mm | Diffuser outlet diameter, mm | Umbrella diameter, mm | Mounting height of outer ring, mm |
| 110 | 210 | 130 | 135 | 170-190 | 50 |
| 125 | 250 | 150 | 157 | 215-240 | 65 |
| 160 | 320 | 195 | 200 | 270-305 | 80 |
| 200 | 400 | 240 | 250 | 345-385 | 100 |
| 260 | 510 | 310 | 315 | 425-475 | 125 |
| 315 | 630 | 380 | 395 | 535-600 | 160 |
The drawing up of drawings must be approached with all responsibility, since the efficiency of the deflector will depend on their accuracy.
Preparing templates
When making templates, you will have to remember a short course in geometry. The most difficult thing to make is a diffuser pattern, which is a development of a straight truncated cone. Below is the methodology for its construction.
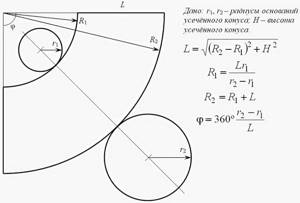
The cap pattern is nothing more than a development of a cone with an upper base with a diameter of 1.18-1.26D and a lower base corresponding to the diameter of the air duct D.
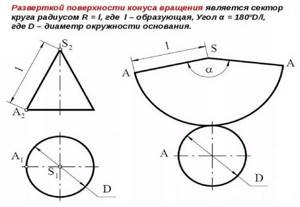
The length of the generatrix can be determined using the Pythagorean theorem. Here the hypotenuse is the desired length of the generatrix, and the legs are the radius of the base, equal to 0.65-0.75D, and the height of the cap, which is equal to 0.24D.
Developments of cylindrical parts are rectangles, the length of which is equal to the circumference, and the width is determined from the above ratios.
Important! When constructing templates, it is necessary to take into account the amount of margin required for fastening the reamers. Usually it is 15-20 mm.
Assembly sequence
From ready-made cardboard templates, using paper clips or another method, a layout is assembled on a scale of 1:1 and the coincidence of its geometric parameters with the specified values is checked. Making a mock-up of the TsAGI deflector completely eliminates the occurrence of inconsistencies during the assembly process.
Product assembly consists of several successive stages.
- The patterns are placed on a metal sheet and traced along the contour with a marker or felt-tip pen.
- Using metal scissors, individual pieces are cut.
- Using pliers, the outer edges are bent to a width of 3-5 mm and tapped tightly with a hammer. This will provide the structural elements with additional rigidity.
- The cut blanks of the outer shell and the input cylinder are given the appropriate shape, so that the overlap is 20-25 mm. After this, holes with a diameter of 2-2.5 mm are drilled in the center of the lining, into which rivets are installed. The distance between the rivets depends on the overall dimensions of the product and can range from 20 to 50 mm. If the necessary tools are not available, the rivets can be replaced with screws of the appropriate diameter. The top hood and diffuser are made using the same technology.
- The next step is the manufacture of connecting brackets. The design provides for the presence of 3 fasteners, but to increase rigidity you can increase their number to four. The bracket blank is a strip, the width of which is 30-35 mm, and the length is 200-300 mm. A 5mm hem is made along the entire length of the workpiece on both sides and tapped tightly with a hammer.
- The brackets are attached to the cone using rivets or screws at a distance of 45-50 mm from its outer edge.
- After this, the strips are folded back and the conical cap is connected to the diffuser.
- Bracket blanks are attached to the conical cap and bent at the desired angle.
- The umbrella with attached brackets is connected to the diffuser using rivets or screws.
- The resulting structure is fixed in the outer shell taking into account the dimensions shown in the drawing. After this, the deflector assembly can be considered complete.
Low winds
Low winds cause difficulties in the operation of the deflector. That is why most models are equipped with special protective elements that allow the device to operate regardless of wind direction and are an axis with two bearings located at different heights. They are complemented by a half-cylinder-shaped screen, a weather vane and a lid.
The principle of operation of this element is simple. When weather conditions change, when a downwind occurs, the weather vane turns and covers the chimney. The path of cold air is blocked, and the exhaust smoke comes out unhindered.
Which is better, a TsAGI deflector or a turbo deflector?
Compared to TsAGI, rotary deflectors provide greater thrust even with the same dimensions. Another advantage of the turbo deflector is its high efficiency.
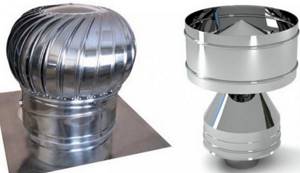
With the same dimensions of the outlet pipe, the dimensions of the TsAGI deflector are significantly larger than the dimensions of the rotating devices. With an air duct diameter of 100 to 150 mm, the operating efficiency of both devices is approximately the same, however, when the passage increases to 200 mm or more, the size ratio changes sharply in favor of turbo deflectors. They have less mass and are several times more compact.
The large weight and dimensions of the deflectors significantly complicate installation work with an air duct diameter starting from 600 mm. In comparison, a rotating device for a 600 mm diameter ventilation duct is between 12 and 15 kg and can easily be installed by one person. A deflector for the same duct will weigh about 40 kg, and two people will be required to install it.
Despite the above advantages of rotary devices, TsAGI deflectors have become more widespread. This is due to the affordable cost of the products and simplicity of design. In addition, such devices are often manufactured independently, which saves significant money.
TsAGI deflectors are widely used in both industrial and civil construction. The design developed at the Central Aerohydrodynamic Institute has proven itself over many years as an effective and easy-to-use device. In addition, many owners of private houses make such deflectors themselves. With correct calculations and careful execution of work, the quality of homemade ventilation devices is not inferior to factory-made analogues.
Self-production of the device
To work you will need:
- galvanized or stainless steel sheet 0.5-1 mm thick;
- metal scissors;
- riveter;
- drill;
- a sheet of thick paper or cardboard.
The most important stage is drawing up a drawing. To do this, you need to measure the internal diameter of the chimney and calculate the product parameters according to the table.
If the internal diameter of your chimney differs from the parameters given in the table, calculations are performed as follows:
- the diffuser width is 1.2 d;
- width of the protective umbrella – 1.7-1.9 d;
- the total height of the structure is 1.7 d.
Both measurements and calculations must be as accurate as possible so that there are no difficulties during the installation of the structure and its subsequent operation. If the pipe has a square cross-section, then the deflector must be made square, although the angularity of the body slightly reduces the efficiency of the device.
Paper cut parts
Preparing for cutting
If the design must have a reverse cone (Grigorovich deflector), the diameter of the protective umbrella is made 3-4 cm larger than the diameter of the cone. After assembling both elements, the cone is applied to the inside of the umbrella and outlined around the perimeter with a marker. Then make two cuts on the protruding part of the umbrella and bend the resulting strip inward. In the same way, make another 6-8 strips at an equal distance from each other, bend them inward and securely fix the reverse cone without additional fasteners or welding.
Grigorovich deflector diagram
It is more convenient to attach a cap with a reverse cone to the diffuser with construction pins. To do this, before installing the cone on the umbrella, three holes are drilled around its circumference, the ends of the studs are inserted and the nuts are tightened. Then put the umbrella on top and fix the cone in the manner described above. At the top of the diffuser, on the outside, hinges made of tin or aluminum are riveted and the lower ends of the pins are inserted into them. This design withstands strong gusts of wind, serves for a long time and reliably.
In a similar way, you can assemble a deflector of any type, the main thing is to draw up the correct drawing. The only difference will be in the number and shape of parts. The finished device only needs to be mounted on the chimney.
Deflector installation
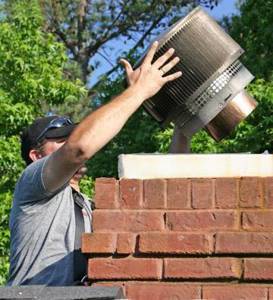
The structure can be installed in two ways - directly on the chimney and on a piece of pipe, which is then put on the smoke exhaust duct. The second method is much more convenient and safer, since the most labor-intensive process is performed below, and not on the roof. Most factory models have a lower fitting that is simply slipped onto the pipe and secured with a metal clamp.
Fixed deflector - photo
To install a homemade deflector, you will need a piece of pipe with a diameter slightly larger than the diameter of the chimney and threaded rods.
Step 1. At one end of the pipe, departing 10-15 cm from the cut, mark the drilling locations for fasteners around the circumference. The same marks are placed on the wide part of the diffuser.
Step 2. Drill holes in the diffuser and pipe, try the elements on each other. The top and bottom holes must match exactly, otherwise the fasteners will not be able to be installed smoothly.
Step 3. Thread the studs through the holes and secure them with nuts on both sides on the diffuser and on the pipe. The nuts should be tightened evenly so that the deflector body does not deform.
Step 4. Raise the structure to the roof, put the pipe on the chimney and secure it with clamps.
Installation and fixation of the deflector
It is very important that there are no gaps between the elements in this area, and therefore the clamp must be tightened very tightly. Additionally, you can treat the joint around the perimeter with a heat-resistant sealant.
Installation of weather vane deflector
The installation of such a deflector is performed a little differently, since its design has certain differences. First, three holes are drilled in the chimney at the same level for mounting bolts. The ring part of the device is inserted into the cut of the chimney and secured with bolts. Next, the axle is inserted into the ring bearing, the cylinder is put on it, then the weather vane, and the protective cap. All elements are connected using brackets or rivets.
When choosing a deflector with a weather vane, remember that the bearings require regular lubrication, otherwise the device will not rotate. You should also not allow the hull to become icy, and knock off the ice as soon as it appears.
