Preliminary work
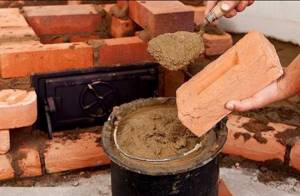
Masonry mortar
The process of preparing a mortar for laying a furnace is much more complicated than a conventional cement-sand composition. The main component in it is fatty clay. First of all, it is cleaned of large foreign inclusions. Then soak for at least 24 hours. When the clay particles swell, it is rubbed through a metal sieve.
Another component is washed river sand, which it is advisable to calcinate before adding it to the mixture.
On average, for 2 parts of clay you need to measure 1 part of sand, but the percentage of fat content of clay is always different, so it is better to determine the correct proportions experimentally. To do this, mix a solution with different amounts of components in three small jars and roll them into flat cakes.
Comparison of solutions
After 3 days, they look at which of the samples has fewer cracks - this means that the entire masonry mixture must be mixed in these proportions.
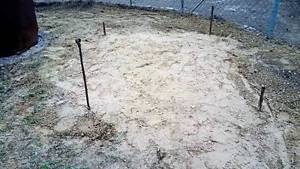
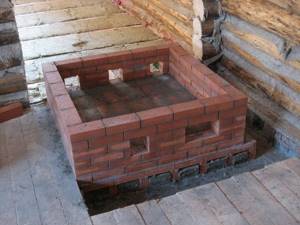
Making the foundation
Such a massive structure, such as a Russian stove with a stove bench and stove, must have a reliable support underneath it, not connected to the foundation of the main structure. Therefore, installing the device in an already built house is much more difficult than at the stage of its construction.
The most reliable support for a Russian stove is a monolithic reinforced concrete slab. It is constructed using standard technology. The depth of its base must correspond to the level of the base of the foundation of the internal wall near which the device is installed.
There should be a gap of 5 cm between the walls of these structures, which is filled with sand. The upper plane of the slab should be 15 cm below the floor level. If a place is chosen for the construction of a Russian stove near the outer wall, under which there is a deeper foundation, then the foundation structure for the stove must be expanded.
Foundation diagram
The process of making the foundation itself is as follows:
- mark the dimensions of the oven;
- tear off the pit 25 - 30 cm wider from the intended lines on each side and 25 cm deeper than the future support;
- level and compact the bottom of the pit;
- pour a sand cushion 10 cm thick with water and layer-by-layer compaction;
- lay a 15 cm layer of crushed stone and also compact it thoroughly;
- install formwork;
- roofing felt is attached to the inner walls of the formwork;
- the reinforcement frame is knitted along the entire height of the support. The mesh is laid parallel in two rows in the lower and upper parts of the base and fastened together with transverse reinforcement rods;
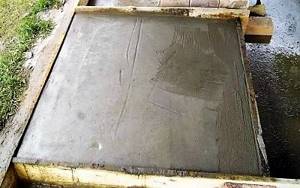
- pour the concrete mixture into the formwork. Concrete should be laid in layers of 20-25 cm and thoroughly compacted with vibrators. This is done to prevent the formation of voids in the body of the structure. The upper plane is leveled using a rule or a regular board;
- the formwork is dismantled a week after the concrete has set and gained its initial strength;
- to protect against the effects of soil water, after 22 - 25 days the side walls of the structure are coated with hot bitumen, and the top surface is covered with two layers of roofing felt.
Choosing a place in the house
In a large room, the stove can be placed in the middle for uniform heat transfer.
As a rule, a Russian stove is placed against one of the walls or in the corner of the room, so it takes up less space. However, it is worth considering that a gap must be left from the walls. In this way, an increase in the useful (heat-transmitting) area is achieved.
In houses with several rooms, the stove is positioned so that the walls of the heating device are in each room.
The mouth of the furnace should be illuminated by light from a side window. The firebox is located in the room closest to the entrance to the house, this way makes it easier to deliver firewood and remove ash.
Important nuances when choosing a location for the stove:
- chimneys are located near internal load-bearing walls;
- no floor beams should pass over the stove;
- a foundation 40–50 cm deep is built under the stove;
- the width of the gap to the walls should be at least 15 cm, which will ensure air circulation;
- a bed is equipped in the bedroom;
- the dryer is installed in the hallway, which will eliminate unpleasant odors in living areas.
In one-room buildings, the location of the stove is not significant; ease of use and minimal occupation of usable space are taken into account.
Making an outdoor Russian stove with your own hands
After you have decided on the design of an outdoor Russian stove, found a place and purchased materials, tools and everything that is necessary for construction, you can begin building the foundation. When the base for the stove is ready, begin laying - strictly in accordance with the diagrams and drawings. First, the bricks are laid on a dry surface - without mortar. This will help determine the correctness of the structure and take into account all the nuances before the final construction of the furnace.
Important! Using horizontal and vertical levels and plumb lines when laying dry, check the correctness of the laid out orders. If the dry masonry corresponds to all the diagrams and drawings, then prepare the solution and begin making row masonry, not missing the necessary holes for the chimney and other technological spaces that correspond to the diagram. If the dry masonry corresponds to all the diagrams and drawings, then prepare the solution and begin making row masonry, not missing the necessary holes for the chimney and other technological spaces corresponding to the diagram
If the dry masonry corresponds to all the diagrams and drawings, then prepare the solution and begin making row masonry, not missing the necessary holes for the chimney and other technological spaces that correspond to the diagram.
Preparing the site at the dacha
The place should be sufficient in area and preferably level. If necessary, the area should be leveled using a shovel and rake.
For the stove, it is better to choose the most comfortable place for you:
- from the sunny side;
- at a distance from wooden buildings and fences;
- no shading of plantings on the site;
- preferably in a gazebo.
It is advisable to build a stove together with a gazebo, in the same color scheme, from homogeneous materials. It is advisable to reflect this in the diagram and project.
How to make a foundation
After choosing a location on your property, begin building the foundation. Its main criteria should be:
- evenness;
- smoothness;
- a certain area;
- reliability;
- durability.
For the foundation:
- dig a hole corresponding to the pattern of width and length to a depth of 30-50 cm;
- pour sand - make a sand cushion 20 cm;
- pour crushed stone on top to ground level;
- choose a base - a monolithic concrete slab of the appropriate size or do-it-yourself concreting;
- for concreting, we put up formwork, install reinforcement, and fill it with mortar.
If the stove is built in a finished wooden gazebo, all fire safety rules must be observed. To do this, basalt cardboard or asbestos cardboard and a sheet of roofing iron, a clay layer and again a layer of basalt cardboard are laid on the boards. Laying begins after the mortar has dried.
Important! Avoid distortions or unexpected voids in the masonry. This will lead to deformation of the entire structure
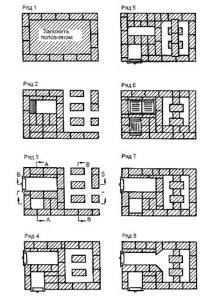
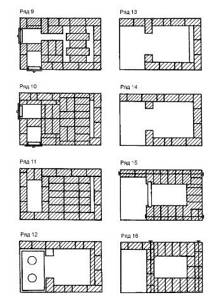
Furnace order
We carry out dry laying of the furnace project. If everything is lined up correctly, taking into account the sizes, shapes and components, you can begin building a furnace with mortar.
In accordance with the photos, diagrams and drawings, they begin laying the furnace in order. A typical project involves 13-20 rows.
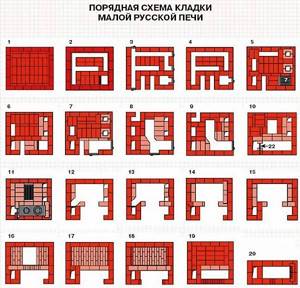
Photo 3. Layout diagram of an ordinary small Russian stove with a hob, without additional elements.
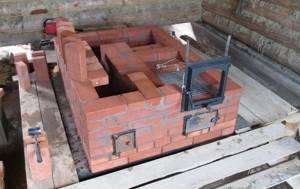
From the second to the third row, we do the masonry taking into account the space for fuel: coal and firewood. Then we take into account the chimney and ash pit. On the back wall of the furnace, approximately on the eighth row, we mount brackets and pins for grates and grids for barbecuing or installing a barbecue (according to the project). You can make more brackets to rearrange the racks depending on the heat of the oven and the method of cooking.
Important! When laying, it is necessary to remove all excess mortar with a trowel. Under no circumstances should clay solution be applied to the inner surface; this will impair thermal conductivity and lead to increased soot deposition on the walls. When laying in rows, do not forget the holes for the view, choke, and damper
We mount according to door dimensions
When laying in rows, do not forget the holes for the view, choke, and damper. We mount according to the dimensions of the door.
Required Tools
The masonry is made on a ready-made foundation.
Equipment and tools for construction are in the arsenal of any home craftsman.
You will need:
- bayonet shovel for digging a foundation pit;
- shovel for mixing the solution;
- level and plumb;
- square and string for setting right angles;
- ruler or tape measure;
- trowel or trowels for masonry and plaster;
- hammer-pick for laying and adjusting bricks;
- container for mixing the solution, buckets.
To accurately select and cut bricks for the vault, it is better to use a grinder with a cutting wheel for stone.
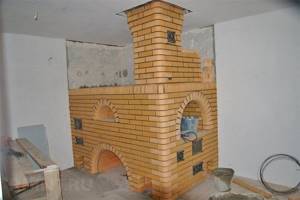
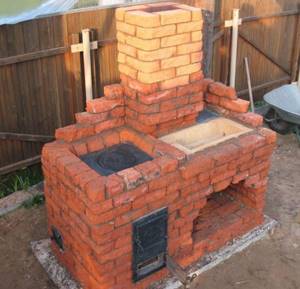
Masonry of a Russian stove with a stove bench and hob
The standard design of a medium-sized kiln unit includes 29-30 horizontal rows of bricks. The laying of a Russian stove with a stove bench and stove is carried out according to the following method:
- When constructing the outer walls of the furnace, the 1st row of brickwork is laid out from solid brick. The internal space between the outer walls is filled with brick chips.
- Installation of the next row is carried out in parallel with the design of internal cleaning channels.
- When constructing the 3rd row, the doors of the cleaning chamber and the blower are fixed with wire.
- The next row closes the treatment channels, forming a bottom vault.
- Laying the 5th row involves installing a grate for the firebox, laying the internal surfaces of the firebox with fireclay bricks cut into 2 equal thicknesses, and installing the firebox door located above the bottom channel.
- When laying the 6th row, a water tank is installed.
- In the process of laying the 7th row, the small firebox is equipped with a grate. Installation of the rear wall of the combustion chamber is carried out without mortar.
- When laying the 8th and 9th rows, the door of the small firebox is fixed.
- When installing the 10th row, you should lay out the bottom of the furnace and connect the arches of the small and large firebox.
- The 11th row involves installing a 50*50 mm metal corner above both combustion chambers, which will serve as the basis for the hob.
- The 12th and 13th rows are laid out in parallel with the installation of the valves of the cooking chamber and chimney.
- When constructing the 14th row, an entrance is made to the chimney channel and the walls of the firebox are removed with a technological hole for installing the damper.
- On the 15th and 16th rows, the masonry narrows. At this stage, you need to close the cooking chamber, remove the chimney pipe and fasten the side walls with metal strips.
- When installing the 17th row, the rear stove wall is mounted.
- On the 18th row above the crucible, a template should be installed according to which the roof of the cooking compartment will be laid out.
- When laying the 19th row, you need to strengthen the wall above the hatch of the cooking chamber.
- When laying the 20th row, the roof of the furnace is compacted with sand.
- The 21st row involves covering the furnace.
- When constructing the 22nd row, the overpipe narrows and is crowned with a metal lid with a hole that will allow flue gases to be redirected through the internal channels of the furnace.
- When installing the 23rd row, you should install a door that provides access to the chimney duct.
- When laying the 24th row, an adjustment valve is installed on the over-pipe.
- During the construction of the 25th and 26th rows, the space above the valve is completely blocked.
- In parallel with the masonry of the 27th, 28th and 29th rows, the overpipe is connected to the chimney channel.
At the final stage, the chimney is laid out to the ceiling level, in which a fireproof cut should be prepared.
The final finishing of a Russian stove is carried out only after the structure has completely dried, which can be determined by the absence of wet stripes on the masonry and the uniformity of its color. At this point, the construction of a Russian stove with a hob and a stove bench can be considered complete.
Laying a mini oven
The construction of any furnace takes place using refractory bricks, which are made from fireclay. The rest of the device is laid using ceramic bricks. In addition, you need to prepare all the necessary elements:
- A fire door with dimensions of 25x25 cm. A blower door with dimensions of 25x14 cm, and two cleaning doors of 13x14 cm.
- Grate 38x25 cm.
- Three valves of different sizes.
- A view with a 23 cm diameter.
- Hot water tank.
- Two-burner stove.
- Several strips of steel.
Features of a mini Russian stove
The mini Russian stove is really small in size, the dimensions of such a standard model are no more than 1x1.3 m, and therefore there is a place for it even in a one-room building with a small area. This device does not have a bench, but it has two fireboxes:
- the first - a large firebox is located closer to the front wall. It is used for heating in the autumn-winter period and for baking various dishes;
- the second is small, located behind the first, closer to the back. It is used for cooking during warm weather seasons. In this case, less fuel is consumed, and cleaning and maintenance of the device is easier.
Combustion chambers are needed not only for cooking various dishes, but also for heating the room. During the heating season, only one of them can work or both chambers can work simultaneously. Fuel can be added directly through the cooking section.
Such a stove also has its own peculiarity: internal channels, which are designed to supply hot gas to the fuel chambers and remove carbon monoxide to the street. During the combustion of the furnace, all flue gases flow from the larger firebox into the 1st compartment of the heating chamber.
Then they pass through the 2nd compartment and, bypassing the underside, move to the back wall of the cooking section, burn there and at the same time heat the stove. The smoke formed during this process, through four passages located at the top of the cooking section, enters the collection channel, and from it into the chimney.
A small firebox does not have special channels for removing smoke; gaseous substances from it pass into the main combustion chamber, and only then go outside.
The small Russian stove also includes a ventilation duct, which is closed as necessary using a valve.
An example of a small Russian stove
Brick kilns: types, design, calculations, construction methods
These products are manufactured in different places - Vitebsk Belarus, Ryazan, Tula and Leningrad regions, as well as in the Baltic countries. For the construction of furnace elements that are not exposed to high temperatures, you can use red solid brick. How much does this material weigh?
One standard copy of the product, which has dimensions x x 65 mm, has a weight of 3.6 kg. When using a standard red stone, please note that it was without external defects - chips, cracks, shells. The color of this material must be uniform over the entire surface.
The dimensions and weight of the red block may be different if non-standard material is used, but one-and-a-half or double bricks. The mutual perpendicularity of all planes must be observed, and the geometric dimensions must comply with the generally accepted standard.
Find out more
How much does a stove stone weigh? The weight of the bar is 3. kg, while its size is x x 65 mm. The characteristics of red heat-resistant brick depend on its shape, which can be not only standard: In this case, all material must be solid, regardless of how much it weighs.
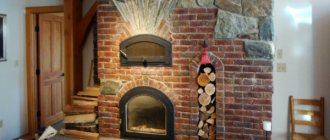
KIV series fireplace stove with oven
Standard material grade M is used for laying the walls of the firebox or chimney. Using a side wedge, you can lay shaped elements, and an end wedge is used in the case of a narrowed butt. Solid brick M may have less than ideal dimensions, as provided for in building standards. In this case, the permissible deviations are the following values:.
These parameters are monitored at the enterprise where solid brick material is produced. If, upon examination of a batch, a large percentage of spoilage is revealed, all copies are removed from sale. For the construction of heating devices, it is important to use materials that meet building standards.
When constructing critical structures that are exposed to high temperatures, it is important to use high-quality fireproof material, which will be the key to the reliability and durability of the structures. Your email will not be published.
The purpose of the old Russian stove
Heating
The main task of a Russian stove is to supply heat to a heated home. Considering the characteristics of harsh Russian winters, maintaining a positive temperature in the house in the old days meant survival. According to this, the stove was considered the main attribute of any living space.
It was placed in the center of the house not only for convenient access. Any room releases heat through openings facing the street. These include doors, windows, as well as cracks in a poorly insulated ceiling or floor. A real Russian stove can warm up a room, regardless of the weather outside.
The washing up
Previously, people very often washed in a Russian oven. Briefly, it happened like this: after the stove was finished heating, the slab was cleaned by removing the ash from there and cleaning out the dust, then covering it with straw. After this, preheated pots were placed there. One with herbal decoction, the other with clean, well-heated water. There was still a place where brooms, washcloths and dried herbs for decoctions were located. Children and old people most often washed themselves in the Russian oven. The nimble guys climbed inside themselves, and the old people were “sent” there on a shovel or a linden board.
Cooking
Food from a Russian oven is significantly different from dishes prepared using modern methods. The secret of aromatic porridges and soups is that they were cooked on cooling coals, which created the effect of continuous simmering of the products. The dishes that were installed at the mouth were usually clay or cast iron. The materials of the cooking containers also contributed to the emergence of an extraordinary taste.
Bed function
Another irreplaceable function of the Russian stove was its use as a bed for sleeping. They slept on the roof, covering it with blankets and zipuns, or on polats - special shelves located between the stove and the wall. It was the stove's job to heat the floor.
Sometimes two-story lofts were built in the hut. Their lower tier was occupied by adults, and children were sent to the upper tier, where it was also always warm.
The wide roofs could accommodate up to six people at once, so on especially cold winter nights the whole family settled down on them, using the couch as a shared bedroom.
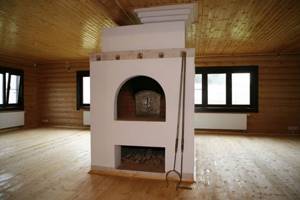
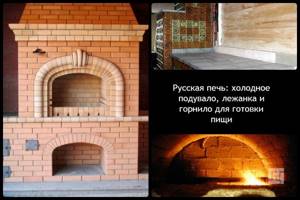
What is a Russian stove and how does it work?
The design itself is a box consisting of important elements, designed both for preparing various dishes and for heating rooms. In addition, it has some features: massiveness - it takes up quite a lot of space in length and height, the heating base is combined with a stove and the presence of a stove bench. Therefore, the third function will be considered to be replacing a bed or sofa. As for the principle of operation, it is a fairly simple process. After the user lays out firewood - the main fuel for the device, air mass circulation begins to occur. It gradually moves through the lower part. Further, the material that was previously deposited slowly flares up, and from this the temperature of the atmosphere slowly increases.
After some time, the resulting product is collected and removed through the upper mouth. And only then does it fall into the chimney. Indeed, it will take a lot of time to let the stove warm up, since it is large in size. But it's worth it: the heat it gives off will remain in the house for a very long time.
Reasons for the popularity of modern Russian stoves with a stove bench
Russian stoves with a stove bench have many advantages, including:
- High efficiency. The bricks from which structures are built are capable of accumulating heat and gradually releasing it. Thanks to this property, the room remains warm for a long time even when the stove is not heated.
- If the heating structure is laid out correctly, it is completely fireproof and can be used for 30 years or more.
- When the location of the unit is calculated accurately, it is possible to provide high-quality heating of a house consisting of several living rooms with minimal fuel consumption.
- When installing a multifunctional stove, it will not only be a source of heat, but will also become a place for preparing hot food, drying wet laundry, and heating water. This type of heating structure is believed to have a therapeutic effect.
Operating principle of the furnace
The mechanism of action of such a device is quite simple. The air moves not only under the influence of natural draft created by the chimney, but also due to the peculiarities of the fuel combustion process. Cold air from outside passes into the mouth and meets a mass of smoke coming towards it. When they meet, they do not touch or mix - the air goes above, the smoke - below. Having met at the outlet and mouth, air masses exchange heat with each other, and natural gas-air heat exchange occurs.
REFERENCE! Those who want to build a stove need to know how it functions. Heated air penetrates the combustion zone, and flue gases leave it from above through the firebox. They exit through the mouth and hilo, and then into the chimney pipe. This does not happen instantly, of course. The combustion elements make a couple of circles inside the firebox and finally burn out. At the same time, they give off heat to the surface of the stove. This happens because the chamber is built at an angle and there is a threshold in it.
Preparation of materials
The solution is prepared immediately before plastering work. If the stove maker uses ordinary clay from a quarry, it is soaked overnight. Fireclay clay is filled with water for up to one and a half days.
The sand is washed in running water. Only fine material with a particle diameter of 0.15 cm or less is suitable for plaster. The ratio of sand and clay in the solution is determined experimentally, ranges from 2:1 to 5:1 and depends on the quality of the clay.
- Cement and lime are added in small quantities - no more than one or two kilograms per three-bucket bucket of mortar.
- Heat-resistant glue is added following the manufacturer's instructions (900-1000 grams for the same volume of solution).
- If asbestos fiber is introduced into the mixture, it is enough to take 100-150 grams of the product.
Important! A normal solution applied to a trowel does not slide off the tool when it is tilted 45 degrees. Construction stores sell ready-made mixtures for plastering stoves.
They contain clay, sand, lime, heat-resistant adhesives, and plasticizers that increase the strength of the plaster. A solution from factory mixtures is made according to the manufacturer’s instructions. If all requirements are met, the result will be a paste of normal composition and optimal viscosity.
Construction stores sell ready-made mixtures for plastering stoves. They contain clay, sand, lime, heat-resistant adhesives, and plasticizers that increase the strength of the plaster. A solution from factory mixtures is made according to the manufacturer's instructions. If all requirements are met, the result will be a paste of normal composition and optimal viscosity.
How to calculate the amount of materials
The amount of mortar for plastering a Russian stove is calculated in the same way as for walls. The calculations take into account the surface area of the oven and the thickness of the plaster:
- We multiply the thickness of the plaster by the surface area, resulting in the volume of the solution.
- We multiply the volume by the specific gravity of the clay-sand paste and obtain the weight of the solution for a given oven area.
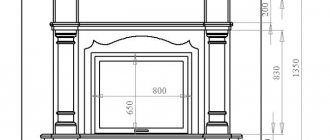
For example, for a wall measuring 1.5x1.35 meters you will need 36.5 kilograms of mortar (with a plaster thickness of 10 mm). To speed up calculations, stove makers use a plaster calculator on the Internet.
The number of tiles is calculated after measuring the surface area of the oven. When purchasing material, take into account that in some places you will have to glue not whole tiles, but parts of them.
Construction stages
There are three main stages of construction:
- arrangement of the foundation;
- construction of the “body” of the furnace;
- chimney construction;
- Finishing work.
In each case you will need your own building materials. The composition and proportions of solutions are important.
Foundation arrangement
To pour the foundation, it is necessary to cut through the floor and remove a layer of soil.
Russian stoves are built from solid brick. The mass of the building is large, so a solid foundation is required.
Step-by-step algorithm for building a foundation:
- They dig a pit 40-50 cm deep.
- The bottom is covered with a mixture of sand and gravel in a 1x1 ratio. Level the surface, spill water on the pillow and compact it thoroughly.
- The formwork is arranged so that the height of the concrete base is 30-40 cm.
- Reinforcement with a diameter of 8 mm or more is laid with a grid pitch of 15x15 cm.
- Pour the concrete mixture. Solution grade M150–M200. To do this, take cement (M500): sand: medium fraction crushed stone in the ratio 1: 2.5: 3.5. Another method of construction is to arrange a rubble foundation, when large stones are laid, and the space between them is filled with cement-sand mortar grade M150 (cement 1 part, sand 3.5–4 parts).
The period for concrete to gain full strength is 28 days. They can be spent on preparing bricks and masonry mixture components.
After the solution gains strength, continuous layers of ceramic solid bricks are laid on the concrete pad, so as to bring the base to the floor level of the first floor.
Construction of the furnace body
To lay bricks, you will need a clay mortar.
Before buying a brick, carefully study the order of the masonry, based on which they calculate the number of bricks needed.
The internal walls in contact with the flame must be lined with fire-resistant bricks. For the walls and chimney, solid ceramic is used, and for the external walls, finishing or the same ceramic, if the finishing consists of plaster or whitewash.
For masonry, use purchased mixtures or prepare a clay-sand mortar yourself.
Depending on the clay used, the ratios are chosen:
- for oily clay - a bucket of clay and 2.5 buckets of sand;
- for medium - 1x1.5;
- for skinny ones - 1x1.
Instructions for making the solution:
- The clay is crushed, cleaned of impurities, and sifted.
- Measure the amount of the resulting component.
- Fill the clay with water for at least 3 days.
- Add sand to the container based on the required proportions.
- Stir the mixture until smooth.
Experienced stove makers recommend a practical way to check the readiness of the masonry composition. It is necessary to put the solution on a bayonet shovel. If it slides when tilted at about 45°, the consistency is correct.
Using the chosen order, the furnace is erected. Doors, flaps and latches must be installed and secured with mortar.
It is not recommended to lay out more than 2-3 rows in one day, since the mortar is plastic and may not withstand the mass of bricks.
To make a hob, it is advisable to use cast iron parts with concentric rings and lids. They allow you to select and open fire for pots of different sizes.
Chimney features
The chimney of a brick stove is laid through the ceiling and attic.
Before 3 bricks reach the ceiling, they begin to arrange cutting - increasing the thickness of the pipe, necessary to ensure fire safety. The rule is especially important for wooden floors.
After exiting the attic, the pipe is returned to its original dimensions. It is allowed to lay pipe bricks on a cement-sand mortar of grade M 200.
As construction progresses, the inner surface of the pipe is plastered and carefully leveled, so less soot will be deposited.
The top of the chimney is protected with a cap.
For residential premises, a mandatory rule applies: the height of the chimney cut from the bottom of the firebox should not be less than 5 m, and the cut itself should be located above the roof ridge.
Drying
After completing the laying of the Russian stove, it will be necessary to carry out the drying procedure. There are two ways. You can, for example, open the blower door, views, and valves (to create a draft). After 2 days, start heating the fireplace at the lowest power (if the fireplace is wood-burning, then use only dry pallets).
When drying, the stove should operate in a gentle manner: 2 times a day for 40-60 minutes daily, until the walls become dry to the touch and the mortar between the bricks becomes light in color.
It is worth considering that moisture from the damp solution will evaporate. It is necessary to thoroughly ventilate the premises after the drying procedure. If condensation appears on the walls, the water must be wiped off with a rag.
Depending on the size of the stove, drying lasts 4-7 days. Then you can start using the oven at full capacity. If you start turning on the fireplace at full power without first drying it, the walls will crack.
Usage [ edit | edit code ]
Cooking [edit | edit code ]
They boiled, steamed, fried, baked, heated and “simmered” in the oven. They fried at the mouth (before the burning fuel), boiled and steamed directly in the crucible with a melted or dying stove, heated it on a stove, baked and simmered in the crucible after heating.
Bread and other baked goods were baked on the hearth of the oven. To do this, the stove was thoroughly cleaned of coals and ash. There should be “hot heat” in the oven - the optimal temperature to start baking; it is determined by throwing a handful of flour onto the floor - the flour should brown fairly quickly, but not char. Thanks to the large heat capacity of the Russian oven, the temperature in it decreases gradually over a long period of time, which is conducive to obtaining good pastries and breads - first, a crispy crust quickly forms, and then the inner layer “reaches.”
For cooking, they used cast iron pots moved by grips (horns), and frying pans with frying pans (tsapelniks, chapelniks). The dishes were mostly made of cast iron, but clay pans and pots were also used; Aluminum pots and pans became widespread in the 20th century. In clay jugs, fatty baked milk with brown foam turned out to be especially tasty. At the stove, in addition to three grips and a frying pan, there were two more pokers for mixing coals and ripping out ash.
The design of the furnace could have a separate entrance for connecting a coal samovar pipe to the chimney of the furnace.
Heating [edit | edit code ]
Usually the stove began to be heated in mid-October (from the Intercession) and was heated until April (before the Annunciation) or May. The Russian stove was located almost in the center of the room and heated it evenly. A sun lounger (bed) was placed on the stove - the warmest place in the house. A golbets (stuffed cabbage) was traditionally built next to the stove, in which household utensils were stored, and the top of it could be an extension of the lounger. The size of the sun lounger varied, the largest allowed up to 5-6 people to sit on the stove, but usually it was double. The height of such a lounger most often allowed a person to sit. In winter, with regular heating on the stove, the temperature is stably maintained at +25...+27 °C. The stove was whitewashed or decorated with tiles.
Washing [edit | edit code ]
In ovens with a wide (up to 1.5 m [14]) and high (up to 1.2-1.4 m [14]) crucible, one could wash and steam [15].
Drying
To dry a Russian stove with a stove bench and a hob, shavings, chips and small logs are used. The first combustion should be carried out with fuel in an amount of no more than 30% of the maximum volume. With each subsequent firebox, the volume of loaded firewood increases.
The drying time is influenced by the size of the oven, the degree of humidity of the brickwork and the temperature in the room. Typically, drying in the summer season takes a week; in the cold season, this period can last up to 25 days. All this time, the valves and combustion damper must be open.
You need to stop drying the oven at the moment when there are no damp spots left on its surface, as well as condensation on metal parts.
Features of operation
ATTENTION! If you have never exposed the structure to use, it must be dried after completion of construction.
This issue should be approached carefully and painstakingly. Then give the device time to burn out for one and a half to two hours. First light a small fire inside. The presence of an air lock will be determined by the appearance of smoke . In this case, it should be removed as follows: in the evening, create a small flame on the view.
This procedure should be done throughout the week. It is advisable to increase the number of chips or splinters placed every day. When there is not a single wet streak left on the bricks, this will mean that your invention is completely dry. Handling the stove requires its own skill everywhere. This applies to both tossing logs and ignition.
Subscribe to our Social networks
List of tools
In the process of building a Russian stove with a fireplace, in addition to consumables and components, you will need working tools. Here is the minimum set:
- Kiln hammer (pick) - used to cut and break bricks into pieces (sometimes you need halves or quarters of bricks). Also useful for straightening wire. It is better to choose a one-sided hammer, it is more convenient to work with.
- Trowel (another name is trowel or plaster spatula). They stir it, lay the solution, level it, remove the remains. It is better to choose a medium-sized steel spatula (20x15 cm with a knee height of 5 cm).
- Rule, square, level - steel or wooden measuring devices help control the evenness of laying the bricks of a Russian stove. To control the verticality of the parts, you will need a plumb line (looks like a sinker on a rope) and guide posts (when laying the stove, it is better to use 4 pieces).
- Scraping - a device is needed to clean smoke exhaust and ventilation ducts that may become clogged with building material during installation of the structure.
- It is useful to have a sieve for sifting bulk materials used in preparing the solution.
- Bucket, trough or mortar boxes - any container where it will be convenient to dilute the solution.
- Benches where the stove maker climbs to work on the upper parts of the Russian stove, as well as lower supports where they place dishes with mortar, are placed with tools.
- Scouring brush – used for grouting the finished surface of the stove.
- Grinder or abrasive for grinding the surface of facade bricks.
- A hand mixer is a steel rod with coils at the end. Convenient for mixing the solution.
Kiln brick weight
This site uses Akismet to reduce spam. Find out how your comment data is processed. In terms of composition and characteristics, diatomaceous earth brick is classified as a fire-resistant building material. It is successfully used for fire protection of reinforced concrete, wood, metal, concrete buildings and structures, thermal insulation of industrial structures and equipment.
Diatomite brick is durable, affordable, and safe for health Read more…. It is known that a pallet of size x mm can accommodate 4 units of brick.
Using this method, you can calculate the weight of a brick on a pallet of any size. It is necessary to know the approximate weight of the future furnace to calculate the load on the floors. The stove will be smaller than a standard one, I think 1. According to data from other forums: approximate calculation of the number of bricks for the construction of a medium-sized stove. Additionally you will need: refractory fireclay brick, concrete, masonry mortar, doors, latches and other fittings.
This comes out to about 4 tons? What will the masters say?
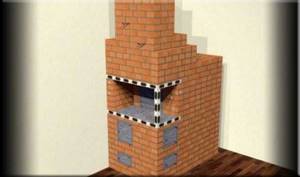
Russian stove vault
Sometimes the vault is made very low, almost level with the top of the mouth. In such an oven, the pies are burning on top, but damp on the bottom, because the hot roof is close. It is not necessary to cut wedge bricks in the masonry of the vault. The seams at the bottom of the vault should be reduced to nothing, and at the top they should be up to 1 cm. For the strength of the vault, it is good to occasionally insert brick plates - wedges - into the seams of each row before driving the castle bricks. Key bricks (the last row in the vault is best done from the front of the vault. After finishing laying the vault, it may turn out to be uneven at the top, which means it is not even at the bottom. This happens due to uneven boards in the formwork. To straighten the vault from below, you need to put it on take a board and, where the tubercles are visible, hit it with a hammer, then the vault is leveled. Afterwards, moisten the seams well with water. I usually lay vaults without formwork, slowly, with dry bricks.
Construction of the stove
If you want to buy a mini Russian stove, you can order an individual project specifically tailored to your needs. To build a Russian stove “Ekonomka”, you can hire a master, or you can do it on your own. Keep in mind that you will spend significantly less money if you build a mini Russian stove with your own hands. The stove will serve you for many years, provided, of course, that you take care of its condition.
If you are an experienced builder or simply confident in your abilities, you can work without using drawings. However, it is better to have on hand a ready-made drawing of a Russian mini-stove, developed by a good craftsman. And remember that the structure must be installed on a solid foundation - made of stone, wood, concrete or brick. It is not always possible to get by with just reinforcing the floor. So before starting work, thoroughly study the basics of building the unit.
Materials and tools
If you have finally decided that you can do it yourself, then first of all you need to purchase red brick. 750 pieces will be required.
You also need sand, asbestos or felt, clay.
Construction cannot be done without roofing felt for waterproofing.
Separately, you need to purchase valves for the stove, two grates, combustion and blower doors, a cast-iron stove made for two burners, a valve for the ventilation duct and a damper.
You will also need consumables. These are steel products - wire, sheets, angles. You will need nuts, washers, nails.
Don’t forget about the tools: spatula, trowel, drill with mixer. Additionally, have buckets or tanks and a sieve on hand. To ensure the oven is level, use a level.
The next stage is the actual work on laying out the mini-stove.
You can make a stove or without a water heating box Having prepared the necessary materials and tools, strengthened the floor or made a good solid foundation, you can begin construction.
The oven should be laid out in rows.
Arranging a mini Russian stove without a water-heating box
The very first row includes the laying of the unit wall. The stitches need to be re-tied. This stage must be carried out using whole bricks, and the middle can be laid out in halves.
The next rows from the second to the fifth are the vent for both fireboxes. The doors are installed at the same time. You also need to lay out the columns. Lay a brick partition on them. Its thickness should be half a brick.
The sixth row of the design includes grates in both fireboxes. Above the additional firebox grate, the front and rear bricks are pressed together into a cone.
The seventh and eighth rows - the doors of the main and additional fuel chambers are installed. The masonry of the main firebox expands towards the partition.
The ninth row is a narrowing of the channel masonry from the main firebox. Dilation of the septum.
The tenth row is characterized by the construction of the hearth. A channel is left near the back wall along the cooking chamber, approximately 8 cm wide.
The eleventh row is the second row of the hearth. The doors of the main and additional fireboxes must be closed. On the front side we secure the masonry with steel corners.
In the twelfth row, the channel is blocked by a cast-iron stove with two burners.
The thirteenth and fourteenth rows are placed according to the drawing.
Fifteenth row - strip steel connections are installed between the side walls and secured with washers and nuts. If the brow is not covered by an arch, it is covered with a strip of steel 4x1x85 cm. The back and side walls of the cooking chamber are laid out brick thick with the lower part beveled to a cone.
The sixteenth row is the overlap of the forehead, the continuation of the connections along the width. The wall thickness of the cooking chamber is the size of a brick.
The seventeenth row - installation of connections along the side walls (as in the 15th row). A base for the cross-pipe made of strip steel is installed on the front and sides. Grooves are made in the brick for the steel strips. A supporting metal stand is installed in the corner.
The eighteenth row is the first row of the masonry of the cooking chamber, which has the shape of a vault. The vault rests on the bricks of the 16th row, inclined inward; pieces of bricks in clay mortar are placed under them. The pole is overlapped, and steel strips are placed at the base of the overtube. Four holes measuring 7 x 12 cm are left in the front part of the arch.
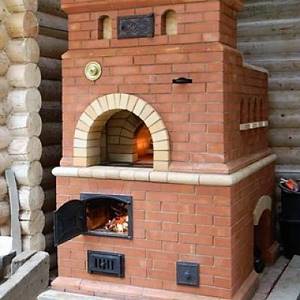
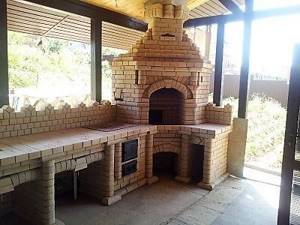
Types of outdoor Russian stoves. Design diagram
When choosing your project, think about what functions the structure should perform: fry, steam, cook, smoke. In accordance with this, make your choice of an outdoor Russian stove:
- with barbecue;
- with barbecue;
- with space for a cauldron;
- only with hob;
- with smokehouse;
- with a bed.
The stove design can be either the simplest or the most complex; it can include elements traditional for a Russian stove:
- a place for drying firewood - an oven;
- a place for storing dishes and other utensils - a stove;
- a place for hot pots removed from the oven - a hearth;
- the chamber under the pole is the overpipe;
- the surface in the cooking chamber where the cooking utensils are placed - under;
- the chamber itself is a crucible;
- covering the chimney to preserve heat - a view;
- a window leading to the chimney - a choke;
- draft regulator - damper.

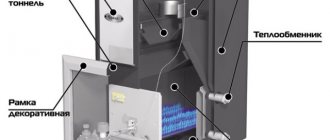
Photo 1. Diagram of the structure of an ordinary Russian wood-burning stove, all the main structural elements are indicated.
A design with a couch is also possible, but in the outdoor version it is not very appropriate or serves other purposes.
Important! The diagram and drawings of the furnace should include everything you plan to build
An ordinary Russian stove for the street
The simplest outdoor stove consists of a frame, a one- or two-burner stove, and a tunnel firebox, which is divided into flame and smoke chambers by a smoke tooth. The scheme of such masonry is relatively simple and does not require special knowledge or the use of technology. It is suitable for outdoor use because:
- thanks to the smoke tooth there is no dependence on the strength and direction of the wind;
- cooking becomes possible at any temperature;
- You can cook even with the lowest quality fuel.
The cooking surface can vary from one to two square meters. m or more - depending on the chosen scheme. The height of the crucible according to the standard version can be 70 cm.
The Russian-style mini-oven measures 100 cm by 130 cm. But it is multifunctional and allows you to cook any dishes, bake bread and has a number of advantages:
- low-cost financially;
- convenient and easy to use;
- quickly built;
- prepares dishes quickly;
- does not require a large amount of fuel;
- environmentally friendly
You can build an outdoor mini-oven in one day.
Advice.
Do not start building a mini-oven if there is no drawing, project, or developed design. Get qualified advice from specialists.
Outdoor device with barbecue
The structure of a self-made barbecue includes a tray with fuel and a grate with meat at a height of 10-15 cm.
The hot air after heating the stove will act as an open flame. Food is cooked not over an open fire, but inside a crucible. The firebox can be located either away from the inserted grills for cooking meat or under them. Different stove designs with barbecue imply different construction options. When choosing a project, focus on your culinary preferences.
Note! Meat cooked in a Russian street oven has more beneficial properties. In the oven, cooking takes place in a niche fenced off with partitions. Thanks to less draft and the absence of wind and temperature changes, the meat is cooked in its own juices
Thanks to less draft and the absence of wind and temperature changes, the meat is cooked in its own juices
In the oven, cooking takes place in a niche fenced off with partitions. Thanks to less draft and the absence of wind and temperature changes, the meat is cooked in its own juices.
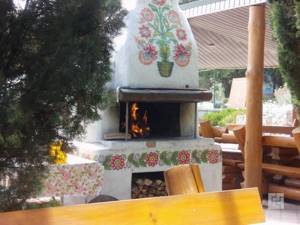
Russian stove in a gazebo under a canopy
Such a project involves the development of a specific design, which should harmoniously fit into the overall interior of the site and fit well with the architecture of the house.
When choosing a design for such an outdoor Russian stove, you immediately think through the gazebo in which the new structure will be located. The project must comply with:
- the size of the area allocated for construction;
- fireproof materials from which it is planned to construct both the gazebo and the stove;
- other characteristics of the gazebo, allowing you to place a structure with a firebox and flame under its arches.
The gazebo should be spacious and beautiful. If desired, it can be designed with closing windows or rollable blinds.
Important! Before building a gazebo, check out all the interesting and modern projects
Advantages and disadvantages
No matter how much you praise the Russian heating unit, among the huge number of advantages there are still several disadvantages. Therefore, we will consider both of them.
Advantages
- Economic factor in terms of stove construction. Available and inexpensive materials are used: refractory bricks and clay-based mortar.
- Not the lowest efficiency. In the simplest design this figure is 60%, in modified ones up to 85%.
- The Russian stove runs on any solid fuel without reducing its technical characteristics.
- High functionality. This includes heating, a hob, and the ability to sleep on a bed.
- Easy to maintain. Here we can say this: I heated the stove in the morning, and its heat lasts until the next morning.
- There are legends about the healing properties of the Russian stove. Let us remind you that in such an appliance food is practically neither fried nor boiled, but simmered. Sleeping on a sun lounger is a pleasure. Just 6 hours is enough, you wake up refreshed and well-rested.
- Safety. Everything is great here. The fire burns in the depths; the coal simply cannot fall out. The stove produces sparks only with intense fire, when the street is very below zero. And if your stove has a three-center arch, then sparks are nonsense in such a design.
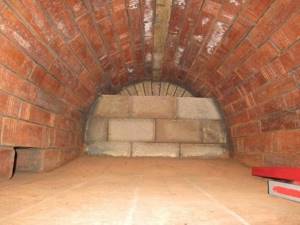
Ready vault
Flaws
- A Russian stove can only operate on slow-burning fuels, which include wood, coal and peat. Gas and liquid types cannot be used here, because there is a constant lack of oxygen in the furnace itself.
- When fuel burns, ash is formed, which must be constantly cleaned out.
- This is a heavy brick structure, so its weight greatly affects the floors. And this suggests that in multi-story construction, a Russian stove can only be assembled on the first floor, arranging a separate foundation for it.
- Unfortunately, the dimensions of the unit are too large, so the stove takes up too much space in the room.
- Not very high heat transfer. On average, one such stove will heat rooms with an area of 45 m². Essentially, like a water heating radiator installed under a window opening.
- Takes too long to warm up. Those who know a lot about Russian stoves assure that after the summer, the device must be heated for the whole day. The fuel consumption is too high.
- It is impossible to automate the processes occurring inside. Many have tried, but nothing works.
- If you decide to build a stove bench with your own hands, then you will need advice from experienced stove makers. Practice shows that flaws during the construction process can cause smoke in the room.
It's good to rest on a bed
Design of a Russian stove
Any mistake made during the construction process leads to the fact that the entire structure has to be redone. A diagram of the laying of a Russian stove, which is attached to the drawing and can be very different, can help in this matter.
Based on their size, these heating units are divided into mini, medium and large. They are used for heating and cooking. They definitely have a bed. To build them yourself, you need to study how a Russian stove works.
If you look at the diagram of a traditional design, you can see that it consists of:
- ovens used for drying firewood are not always made;
- a cold stove for storing kitchen utensils, it may also not be there;
- pole - a niche located in front of the crucible. A hob is placed in it. If the stove is located in a different place, food is kept in the pole to keep it warm;
- hearth - the bottom of the crucible. It is built with a slight slope towards the entrance to the chamber to make it easier to move the dishes in it.
- a furnace or cooking chamber used for heat-resistant cookware and fuel. The chamber arch is similarly made with a slight slope towards the entrance. Due to this design feature, hot air collects under the ceiling, due to which the stove bench and side walls warm up;
- cheeks – the front wall of the furnace;
- oven mouths - holes between the cheeks;
- cross-pipe - a niche above which the smoke exhaust pipe begins;
- views - a window with a door that serves to block the chimney. Using it you can get to the damper that regulates traction;
- a bench located behind the chimney above the crucible. When the oven is running, it warms up.
In the diagram of the laying of a Russian stove with a stove, you can see different departments. Their presence allows you not to heat the entire room in the summer, but to use exclusively the hob. As a result, a pleasant microclimate is maintained in the house and fuel consumption is reduced. In winter frosts, all departments are heated in the stove, and then not only the oven, water and stove are heated, but also the house itself.
Before you build a Russian stove with your own hands, they carry out a number of preparatory activities, which begin with choosing its location.
Related Posts
- Wood-burning stoves and their variety of designs
- Fast and correct furnace repair
- Fire-battery 7b (thermophor)
- Secrets of stove makers: brick stove for a bath
- How to fold a Swedish oven with a stove
- Buleryan oven: do it yourself
- Cast iron stove for bath Vesuvius
- How to plaster a stove to prevent it from cracking: types of putty for stoves and execution technology
- Homemade Russian stove on the street under a canopy
- How to choose a stove for an Ermak sauna: top 7 models with descriptions of technical characteristics and customer reviews
- How to make a long-burning stove yourself
- How to weld a metal sauna stove
- How to install a stove in the house?
- DIY metal rocket oven
- Types of stoves for the home: classification and review of equipment from the best manufacturers
- Installing a stove in a steam room: location, fencing, protective screen
- 9 types of heat-resistant tiles for fireplaces and stoves: choosing the best
- Types of Kuznetsov furnaces and their order
- Manufacturing and connecting a sauna stove with a water heat exchanger
- Mortar for laying a stove: varieties, composition, mixing methods
- Do-it-yourself gas heater: options for the best homemade products
- Do-it-yourself Dutch oven: device, diagrams
- DIY brick ovens: secrets of the craft
- A selection of projects for houses with stove heating
- How to make fire clay
Read with this
- Wood-burning stoves and their variety of designs
- Fast and correct furnace repair
- Fire-battery 7b (thermophor)
- Secrets of stove makers: brick stove for a bath
- How to fold a Swedish oven with a stove
- Buleryan oven: do it yourself
- Cast iron stove for bath Vesuvius
- How to plaster a stove to prevent it from cracking: types of putty for stoves and execution technology
- Homemade Russian stove on the street under a canopy
- How to choose a stove for an Ermak sauna: top 7 models with descriptions of technical characteristics and customer reviews
Device and designs
Russian stoves come in 3 standard sizes: 178x124, 213x147 and 231x160 cm. Of course, deviations from the norms are possible, and the average building has dimensions of: length 213 cm, width 142 cm and height 180 cm. These are the dimensions that are enough to cook food and well-heated living space of 30 m2.
Traditional
Traditional Russian stove design
The Russian stove consists of:
- Sub-bake. It is necessary for drying and storing firewood.
- A cold stove is a small recess for storing dishes.
- The pole is a small space in front of the furnace, it is intended for a pot.
- The under is the floor of the so-called cooking chamber. It has a slight slope towards the mouth to make it easier to move heavy dishes. It needs to be sanded well.
- The cooking chamber, or crucible, is the place where firewood is placed and food is prepared. The chamber arch also has a slight slope at the front. Consequently, hot gases accumulate under the ceiling of the furnace, which heat the entire furnace, as well as the stove bench.
- The overtube is a chamber located above the pole. There is a chimney above it.
- A samovar is a hole that goes into the chimney and is designed to “connect” the samovar pipe. This device is optional for a Russian stove.
- A view is a door that completely blocks the chimney.
- The bench is a horizontal surface that is located behind the chimney. You can sleep well on it.
Modern
The most common in our time is the improved Russian stove. It differs in its heating by the so-called flood part, thanks to which heating the living space becomes comfortable. Cooking food in it is more convenient, since in the summer, when there is no need to heat the house, it simply works as a hob. Wood is burned in a small firebox, and the resulting gases go straight into the chimney, whereas in winter they pass through absolutely all channels to heat the stove. In addition, this design has a water heating tank, which is what is most often found in rural houses. It heats a room of about 35 square meters. m.
Construction of a modern furnace
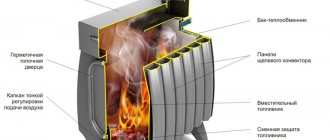
Structural elements of furnaces
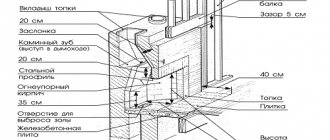
| Illustrations | Description of elements |
| Foundation. This structural element takes on the load from the entire structure. That is, the foundation is the base onto which the weight of the firebox, chimney and other massive and heavy parts is transferred. The foundation is placed directly on the ground and repeats the design of the foundation on which the house is built. The stove foundation is built separately from the load-bearing walls, from the foundation of the house, etc. If the wall is located nearby, a gap of 3-5 mm is maintained when building the foundation. The gap is needed so that the base under the heavy brick structure is independently movable relative to the elements in the structure of the house. | |
| Shantsy. These are the first few rows in the furnace design, starting from the foundation. The use of trenches allows you to increase the heat transfer into the room. The best option is 2-3 rows of brickwork, starting from the foundation. | |
Blower (ash chamber). This structural element performs two functions:
In order for the blower to perform the listed tasks, a door is installed in it. By opening the door to the desired width, you can control the draft. Again, accumulated ash can be removed through this door. The instructions for using the blower are simple - after the fuel has burned out, the door must be completely closed. As a result, warm air will remain in the firebox and will not go up the chimney | |
| Firebox (firebox). A firebox is a chamber designed for burning coal, wood or other types of solid fuel. When constructing the firebox, fire-resistant fireclay bricks are used. To protect the room from sparks and hot coals, a fire door is installed at the entrance to the firebox. The traditional Russian stove is made with an open firebox, that is, it does not have a door. At the bottom of the firebox there is a grate. In the part of the firebox furthest from the door, at the top there is a hole (higho) designed to remove smoke. To prevent ash and hot coals from falling out through the open firebox door when operating the stove, in the lower part of the firebox, before installing the door, the level rises slightly so that it looks like a step | |
| Smoke channels (smoke circulation). These elements simultaneously remove smoke from the firebox to the chimney and remove heat. In order for the smoke to give off its heat, the smoke channels are made as long as possible. As a result, the temperature at the channel inlet and outlet can differ significantly. But the arrangement of smoke circulation is planned in such a way that these channels can be cleaned from time to time from accumulated soot. Incorrectly designed smoke ducts are the reason for the stove to cool down quickly, since most of the heat goes up the chimney. Otherwise, improper design of smoke channels makes draft difficult, which also reduces heating efficiency | |
Chimney (chimney). This element is directly connected to the smoke channels and is designed to create draft.
|