One of the important stages of construction work on insulation is puttying on foam plastic. However, few people think about why to do this and how such work is done. If everything is more or less clear with puttying walls, then with polystyrene foam it’s not so much. There are a number of nuances associated with this.
In this article we will look at why you need to putty foam, how to choose the right putty, what tools and materials are needed for this. And to consolidate the result, we will look at step-by-step instructions on how to putty polystyrene foam.
What does foam putty give?
We are all accustomed to the fact that any action must be thoughtful, logical and have its own reason. For example, we sweep to keep the room clean. Why do you need to putty foam? Thanks to this, the quality of the finish can be improved. But that's not all. Here are some more reasons:
- Everyone knows how fragile polystyrene foam is. It is very easy to damage it if you move it carelessly or hit it. A crack or hole forms in place. If you putty it, this will increase its mechanical strength.
- This allows you to preserve the thermal insulation qualities of the foam. Despite the fact that moisture does not affect the material in any way, since it easily absorbs and releases it, low vapor permeability prevents the rapid removal of moisture from the foam structure. This is why the ability to retain heat deteriorates.
- Thanks to the putty, the anti-feather properties are increased. Everyone knows how resistant polystyrene foam is to fire. Even with a slight increase in temperature it begins to melt. A layer of putty will help eliminate the risk of fire or damage to the material.
- The foam will also be protected from ultraviolet rays and wind. They negatively affect the performance characteristics of the foam. In the sun it turns yellow and loses its original properties. Putty is an additional protective layer.
- Thanks to the putty, it is easy to apply the next finishing layer. This is like a foundation that is easier to work with in the future.

But in order for the putty to really fulfill all its tasks, it is important to choose a high-quality option. How to make the right choice?
Choosing putty for foam plastic
The peculiarity of polystyrene foam is that it melts when exposed to solvents. This means that the putty for it should not contain chemical components that will destroy the structure of the material. Otherwise, choosing the composition is not difficult. There are special mixtures for polystyrene foam.
There are several nuances that need to be taken into account when choosing putty for foam:
- Place of work. This can be façade putty or putty intended for interior work. The conditions outside the house are more aggressive, so the composition is different.
- Date of manufacture of the putty. In order to save money, some people buy discounted putty, the so-called promotional product. Typically, such events are abandoned when the shelf life of the material comes to an end. It is important to monitor this so as not to buy a composition that has lost its original characteristics.
- Storage conditions for putty. You should also consider where the products are stored. It is important that this is not a damp room that is not heated. And if this is a shed on the street, then temperature changes, dampness and sun had a negative impact on the raw materials.
- Presence of glue. Polystyrene foam cannot be called a material with high adhesion. Therefore, without an adhesive, the putty will not adhere well to the surface.
If you take into account all the above requirements, then we can say with confidence that you will buy a quality product that will 100% fulfill its purpose. And now that everything is ready, you can consider how to putty the foam.
Choosing putty for foam plastic
Due to its qualities: reliable thermal insulation, light weight, immunity to moisture, mold and mildew, expanded polystyrene has found application in many areas of construction production.
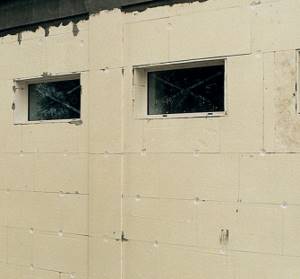
Polystyrene foam cladding is an effective way to insulate walls. The polymer is characterized by increased fragility and is destroyed by ultraviolet irradiation and exposure to atmospheric phenomena (rain and wind), so covering walls with foam plastic requires external protection.
Foam putty is the product that protects the insulation.
Why do you need wall cladding with polystyrene foam?
Polystyrene foam insulates the walls of a house well
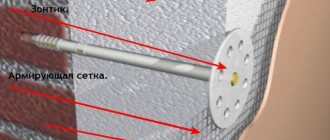
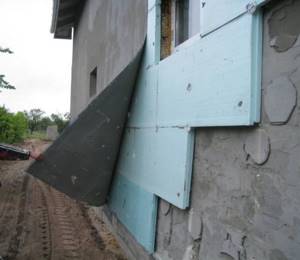
The walls and ceilings inside buildings are finished with polystyrene foam, and the facades of buildings are also covered with this material. Sheets of polymer are attached to concrete and brickwork with umbrella dowels.
We recommend: NC cement (tensioning) and its use in construction work
Since the material cannot withstand even average loads from fasteners, the dowels have a radial plastic extension (umbrella) in the upper part.
Polystyrene foam contributes to significant insulation of the enclosing structures of buildings and structures.
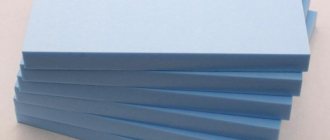
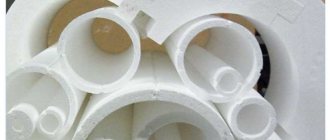
Foam sheet sizes
For cladding facades and internal walls, slabs measuring 1.2 m x 0.6 m with a thickness of 20, 30, 40 and 50 mm are used.
For external work, foam plastic with a thickness of 40 and 50 mm is used.
The internal surfaces of the walls are lined with slabs 20 and 30 mm thick.
Technology of covering walls with polymer insulation
Dowel-umbrella
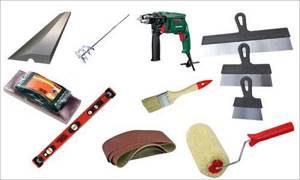
Before starting work, prepare the following tools and materials:
- insulation boards;
- umbrella dowels;
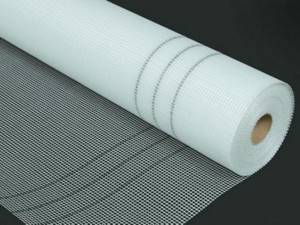
- metal, fiberglass or plastic reinforcing mesh;
- perforator;
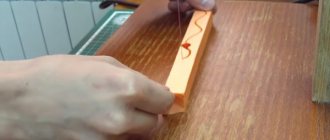
- construction knife;
- roulette.
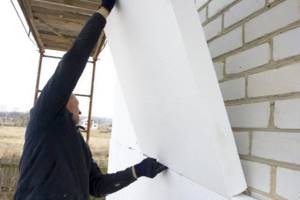
Installing foam sheets on vertical internal fences of a house does not cause any particular difficulties:
- mark the location of expanded polystyrene sheets on the wall;
- additional elements are made by cutting solid foam slabs;
- polymer sheets are secured with umbrella dowels in the corners and in the center of the plane.
It is optimal to use glue or umbrella dowels for installing panels
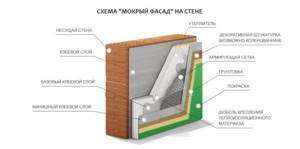
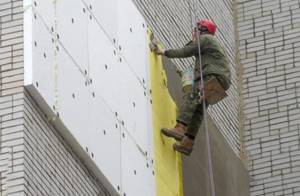
Coating building facades with polymer slabs is somewhat different from cladding the walls of premises:
- The bases of the facades (monolithic concrete, brickwork or wooden frame) are coated with an adhesive primer.
- The insulation sheets are installed with special glue.
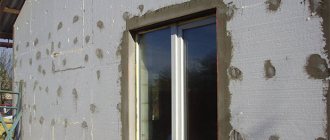
- For more reliable fastening, the foam is fixed with dowels - umbrellas.
- A reinforcing mesh is glued on top. The mesh can be metal, plastic or fiberglass.
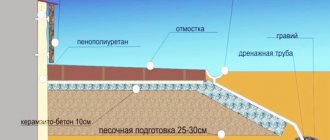
Scheme of wall decoration inside and outside the building.
In some cases, it is possible to install facade insulation without glue on dowels, which ensure reliable fastening of the insulation. The surface of the insulation has weak adhesion, so the polymer coating of the walls must be puttied.
Preparation of putty
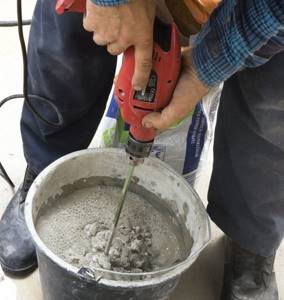
Stir the mixture until the lumps disappear
Prepare the adhesive mixture in the following order:
- The dry mixture is slowly poured into a clean container filled with water. In this case, the solution is stirred all the time. This is done with a wooden spatula or a drill with a screw attachment.
- If the mixture is prepared using a drill, then it is turned on at reduced speed. This guarantees a homogeneous mass without lumps.
- Under no circumstances should dry powder be added to the finished putty. This will cause hard lumps to form. This kind of putty cannot be used.
- After receiving the finished mixture, it should be allowed to stand for 5-10 minutes.
- Then the solution is finally mixed.
Puttying foam
The question of how to putty polystyrene foam does not differ much from the treatment of surfaces made of other materials. The retail chain always has a special putty for expanded polystyrene on sale. The material is mainly sold in the form of a dry mixture. For more information about reinforcing and filling foam, see this video:
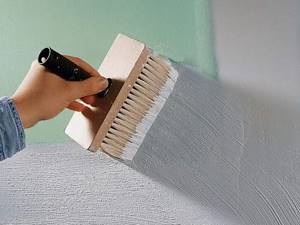
Coat the foam with primer
Before puttingtying the foam, it is coated with a primer. Inside buildings, polystyrene foam putty can be done with an adhesive composition intended for ceramic tiles.
This cannot be done outside on the facades of buildings. To do this, use a special putty on polystyrene foam for exterior work. Leveling compounds for interior and exterior work are not interchangeable.
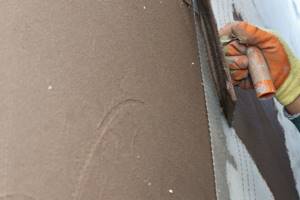
Puttying the polystyrene coating is carried out as follows:
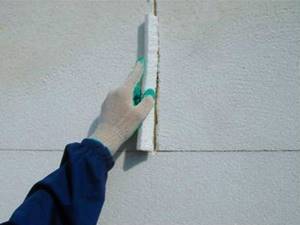
- Apply the prepared solution with a spatula. For work, use a set of blades of different widths. Depending on the complexity of the work and the adhesive composition, metal, plastic and rubber spatulas are used.
- First, fill all the seams and joints between the foam sheets with mortar.
- A special tape is glued to the joints with a width slightly larger than the vertical and horizontal seams. The tape is a small plastic grid.
- The width of the tool is selected for processing certain areas of the surface.
- After the joint joints have completely dried, they proceed to puttying the entire surface. Using a narrow spatula, transfer the glue to a wide spatula.
- Apply the product in semicircular movements with a wide spatula from top to bottom. A narrow spatula is used to treat hard-to-reach and inconveniently located places.
- The thickness of the layer of adhesive composition depends on the angle of inclination of the spatula in relation to the treated surface of the polystyrene cladding. The greater the angle of inclination, the thinner the coating layer.
The quality of polystyrene foam filling directly depends on the experience of the worker. Professional work will not require finishing the evenness of the plane. Minor blemishes in the finishing can be removed using sandpaper.
We recommend: Wall made of aerated concrete: plaster inside the room will preserve the façade without cracks
Finishing of foam cladding
You can trim putty foam with sheets of fiberboard or chipboard
The final finishing of putty polystyrene boards differs for interior walls and building facades.
The final finishing of internal fences is that any type of decor can be laid over a well-prepared layer of putty. There is no need to do any additional work. Wallpaper is glued onto the finished putty surface, sheets of fiberboard, chipboard are installed, or decorative plaster is rolled on.
For the external walls of the facade, putty polystyrene foam boards must be further strengthened. Despite the fact that the facade insulation is fixed with dowels, a reinforcing grid is glued to the walls to securely fasten the decor.
The grate is coated with a primer and puttied with a product intended for outdoor use.
After this, the surface of the facade is finished with decorative plaster or other materials. To see what can happen if the foam is not finished correctly, watch this video:
If you decide to use ceramic tiles for finishing, then, as in the case of finishing facades on foam plastic, a reinforcing grid is glued.
Preparation of materials and tools
Since foam insulation is most often carried out outside, first we will look at what and how to putty it on the street. Very often on the Internet you can find advice that you need to use simple tile adhesive or other mixtures. But why do this? If you have a vacuum cleaner, you won't sweep with a mop. Foam putty is commercially available specifically for this purpose. For example, an excellent option is Ceresit ST85 or Ceresit ST83.
This is a dry mixture that can be used for both external and internal work. The material is universal and has won the trust of many. In addition to the putty itself, the following materials are needed:
- polyurethane foam;
- primer;
- corners for reinforcement;
- fiberglass mounting mesh. It is important to understand that it can be for interior or exterior use.

Now let's look at the list of relevant tools:
How to prepare materials and tools
First, putty is selected using polystyrene foam. The best option is a universal mixture or a special composition for working on the surface of foam material. Finishing putty is also prepared. When choosing a composition, take into account the area of its application: indoors, outdoors (on the facade). The type of components is examined to eliminate the risk of using mixtures containing solvents.
You will also need other materials:
- reinforcing mesh (for work on the facade);
- polyurethane foam;
- primer mixture;
- adhesive composition (determine a suitable option taking into account the type of foam boards);
- decorative material for finishing.
In addition, all the necessary tools are immediately prepared for work:
- container for mixing components (if dry putty is purchased);
- roulette;
- roller;
- spatulas of various sizes and with different types of edges (serrated, smooth);
- corners for processing corner areas of the room;
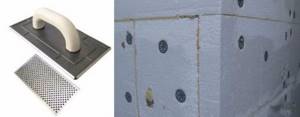
- grater (used to increase the roughness of the foam and remove defects from the surface);
- sharp knife;
- sandpaper;
- drill with a “construction mixer” attachment.
Preparing foam plastic for reinforcement
No matter how correctly and efficiently the foam is glued to the surface of the walls, it simply cannot be done without its additional preparation. What does it include? Here is the algorithm of actions:
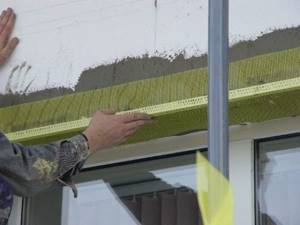
- First you need to evaluate the evenness of the surface. A long rule is taken and applied on top of the foam in different areas. If irregularities and bumps are found, they are removed using a foam grater. Typically, differences appear at the joints of foam sheets.
- Further, if there are gaps between the foam plates, they are filled with polyurethane foam. This is a mandatory event, since the seam will serve as a cold bridge, so the quality of insulation will decrease. If there is no mounting foam, you can place the remaining insulation in the cracks.
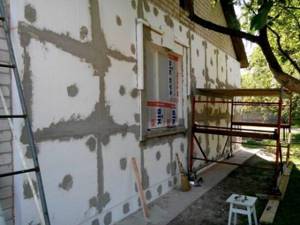
- The next step is no less important. Reinforced corners should be glued to slopes and corners using foam glue. When installing, be sure to use a level so that everything is perfectly level both horizontally and vertically.
- After this, the preparation of the adhesive solution begins, in our case it is putty for foam plastic. It is needed in order to putty the joints between the slabs and the dowel heads. All protruding dowels must be finished off. If this does not work, the cap is cut off with a stationery knife, and a new dowel is fixed nearby.
As a result, you should have a perfectly flat surface, without drops or protruding parts. This is exactly what we wanted. Now puttying polystyrene foam will not be difficult.
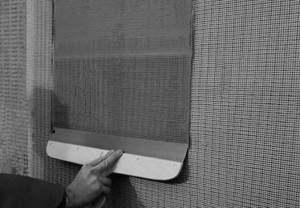
We mount the mesh on polystyrene foam
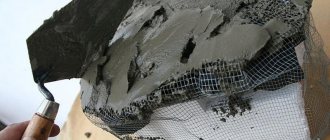
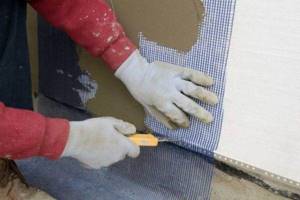
Thanks to the reinforcing mounting mesh, the putty will not crack, and the surface itself will become stronger. There is no way to skip this stage. The step-by-step instructions for gluing the mesh are as follows:
- The fiberglass mesh is prepared for gluing. Use a knife to cut it into pieces of the required size. When finishing the facade, the mesh is also prepared for the slope. It is important to note that the edges of the mesh should overlap each other by about 10 cm. The gap at the corners is also 10 cm.
- The mesh will be glued to the adhesive. It will have to be cooked. The packaging contains instructions on how to do this. Typically the process is as follows: the dry mixture is added to a clean container, after which water is poured into it. The contents are mixed. During the kneading process, additional water is added to obtain a homogeneous composition. It should resemble dough in consistency. All you have to do is wait 7-10 minutes and move the contents again.
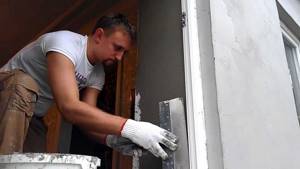
- Gluing the mesh begins with the slopes. To do this, you need to scoop up the glue with a narrow spatula onto a wide one, and transfer it to the slope, maintaining a layer of 5 mm. Next, a piece of mesh is applied to the surface with the adhesive composition, leveled and embedded in the solution with a spatula. Everything should turn out smooth and even.
Already at this stage, you should ensure that the surface is leveled, maneuvering the spatula smoothly and evenly. When the slopes are processed, you can proceed to the entire surface of the wall. The task is the same: apply a 5 mm layer to the surface, apply the mounting mesh and embed it with a spatula. In this case, it is important to ensure that there is a 10 cm overlap at the joints and leave a 10 cm fold at the corners. How exactly to handle the corners can be seen in this photo. For this purpose you will need to have a coal spatula.
That's all, the mesh is glued and the surface is ready for the next stage. After all, the wall is still far from ideal. Now we will try to make it as it should be.
Puttying foam
According to the scheme described above, you need to prepare putty. But it is recommended to make it not dough-like, but more liquid. The consistency should resemble sour cream. When the putty is ready, you can begin to putty. To do this, you need to scoop the mixture onto a wide spatula and apply it to the wall in a thin and even layer. But it should be approximately 3 mm. Use the spatula correctly. You need to place your thumb under the handle and place your palm on the canvas.
Your task is to make quick and even movements with the spatula. The putty layer must be perfectly even. The process is repeated: using a narrow spatula, putty is scooped onto a large spatula, after which the composition is transferred to the surface. This is how the entire wall and slopes are finished. For clarity, you can watch a video on how to putty polystyrene foam with your own hands:
That's all, puttying the foam is considered complete. If the walls turn out to be even and smooth, then the job is done correctly. It is clear that such a surface cannot be called ideal. Moreover, as a finishing stage it is no good. To improve the appearance of the facade, it is recommended to cover the whole thing with decorative putty. Bark beetles, structural and textured mixtures are often used. This will help hide all the flaws and make the walls attractive.
To better navigate the work, you can watch this training video that will show how to perform decorative finishing of foam plastic.
How to putty foam
Puttying penoplex differs from processing other materials. This is due to the peculiarity of the structure of polystyrene foam.
The first thing you need to do is apply the reinforced mesh before puttingty. For internal surfaces this is not as necessary as for external ones, but it is desirable.
Without reinforced mesh, the repair will be of poor quality, especially on external surfaces.
After all, under the influence of the sun, wind and temperature changes, the putty on the foam can peel off, crack and deform, which will significantly deteriorate the quality of the work done.
Surface preparation

For preparatory work you will need to adhere to the following rules:
- The first thing you need to pay attention to is the finishing surface - whether it is being treated for the first time or repeatedly. If you do it again, you need to clean it from dirt, dust and other small particles. If there is already a reinforcing mesh installed, then there is no need to remove it.
- Next, primer work is carried out. To do this, it is necessary to take mixtures that do not contain chemically aggressive substances, since polystyrene foam is a capricious material. The primer must be carried out with deep penetration mixtures. PVA glue diluted with water in a 1:1 ratio is best suited for this.
- After the primer, a mesh is glued, cut into strips along the long walls. This is done when the primer has dried well. Tile adhesive is best for gluing the mesh.
Application
Then puttying is carried out according to the following algorithm:
- The first ball of putty is applied as a thin ball onto the mesh. The less putty, the better the quality of finishing work. The initial putty gives strong adhesion to the exterior.
- When the putty layer has dried, you need to re-prime it, which will give better quality to the putty work.
- The following layers of putty are applied to level the surface and hide traces of the mesh. To improve strength, a primer must be applied between applying the putty mixture.
What does puttying do?
Foam putty will not only improve the quality of the subsequent finishing, but will also provide the following:
- Strengthening. The material breaks easily under mechanical stress, for example, an unsightly hole can form upon impact. The putty protects against such influences.
- Preservation of thermal insulation qualities. Moisture is not dangerous for penoplex, but due to the low vapor permeability of the material, trapped moisture particles from the foam structure take a long time to be removed, which has a bad effect on the ability to retain heat.
- Increasing fire retardant qualities. Expanded polystyrene is very flammable, and the applied putty will serve as an additional way to reduce the risk of fire.
- Protection from wind and sun. Even if interior decoration is carried out, it is impossible to completely avoid exposure to sunlight on the material, and they have a destructive effect on the foam structure.
But how to choose a putty solution so that it has maximum protective qualities?
Light and warm foam must be protected
I insulated a friend's house and satisfied his curiosity. Vadika was interested in building materials and tried to do everything with his own hands. He and I have already glued the slabs to the walls and attached the mesh. We had to do foam putty and decorative finishing.
Installation of foam plastic and subsequent finishing with putty
Polystyrene foam practically does not absorb water. It can float for years without swelling. But when exposed to sunlight, wind and frost, it begins to deteriorate. Balloon material is eaten by rodents and birds. The facade insulated with air plastic must be puttied and plastered. The material is flammable and emits harmful substances.
The top layer must be hard in order to protect soft polystyrene from mechanical stress, contain antiseptics and antistatic agents to protect it from destruction by various representatives of fauna. At the same time, the insulation is protected from UV radiation and frost and direct exposure to water. Putty applied to foam serves as the basis for cladding, plaster and decorative finishing.
Selection rules
Choosing a suitable solution is not difficult, but only putty for expanded polystyrene should be purchased - other building mixtures may contain chemical components that destroy its structure. In addition, when choosing a mixture, you need to pay attention to the following:
- Place of work. Depending on whether you plan to putty in a room or on the street, you select a façade putty or a composition for interior work.
- Release date. Many people, wanting to save money, purchase putty mixtures at sales or special promotions. But the closer the expiration date is, the worse the strength and protective qualities of the composition will be.
- Storage conditions. You can buy cheaper putty in large construction warehouses, but there it is most often stored in damp, unheated rooms or under a canopy outside, which means that the mixture was exposed to temperature changes and moisture could get into it. Such compositions, even if they have a fairly long shelf life, will be of poor quality.
- Presence of glue. Polystyrene foam has low adhesion, and without glue, the adhesion of the putty to it will be weak.

By following the suggested recommendations, you can purchase a putty composition that will ensure durable and high-quality repairs. But it is important not only to determine how to putty the foam, but also to apply the chosen composition correctly.
DIY puttying instructions
Preparation before applying a protective layer over the foam:
- Check the quality of the base (foam material slabs), how firmly they hold.
- Clean the surface from dirt.
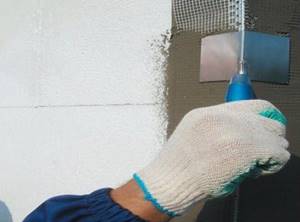
- Use a grater to remove defects (protruding parts of the slabs).
- The mushroom caps of the dowels are hidden. They need to be “drowned” a little into the foam.
- Fill the joints and recesses in the area where the fasteners are located with a leveling mixture.
- Fix reinforcing corners at wall joints and window slopes.
- Prime the surface of the foam.
Depending on the method of decorative finishing, the technology for applying the protective layer changes.
For example, if the coating is heavy, you need to decide how to putty the foam in such a way as to increase the strength of the structure. For this purpose, a reinforcing mesh is used - its density is 140-160 g/m².
Installation instructions:
- The material is cut to improve the ease of use. Moreover, you need to provide a 10 cm margin on each side in order to lay the pieces of mesh overlapping.
- Installation begins with slopes. In this case, a leveling layer of 3-4 mm of putty is applied, then the reinforcement is placed and pressed in.
- Continue strengthening the foam surface on the remaining sections of the walls.
- Use a spatula to level the coating.
The putty is rubbed down to increase the adhesion of materials in the future. When the composition dries, apply another 1 layer - 3 mm. It is also rubbed, but with the aim of increasing the smoothness of the surface.
For painting
It is necessary to carefully level the surface, otherwise all small defects will be visible. After applying the putty for polystyrene foam, treat the surface twice with a special primer (use a roller, preferably one with short pile). Apply the finishing composition. Then the surface is sanded. Painting is carried out after dust removal.
On the street
You need to decide how to putty the foam. The best option is facade putty (adhesive based). This will ensure high-quality adhesion and increase the service life of the thermal insulation “pie” made of foam plastic and other materials. After the putty has hardened, finishing is performed. If decorative plaster is used, primer with a granular structure is purchased.
Indoors
In this case, there is no need to further strengthen the structure with reinforcement. You can use glue. The most suitable type of putty for protecting foam plastic is a universal cement mixture. When the layer of material has dried, proceed to grouting (leveling). At the last stage, decorative finishing is performed.
How to putty
Working with polystyrene foam is slightly different from puttingtying other materials due to the characteristics of polystyrene foam. The first difference is that before applying the putty, a reinforced mesh is glued to the foam surface.
Some craftsmen who do not want to deal with gluing the mesh are interested in whether it is possible to putty without it. It is possible to do it indoors, although it is not advisable, because the repairs will not be of very high quality. But outdoors it is impossible to do without reinforcement, otherwise under the influence of atmospheric conditions the putty will soon begin to peel off, and the finishing will crack or become deformed.
Surface preparation
How to putty polystyrene foam correctly? To do this, you need to follow several steps:
- Primary preparation depends on whether repeated finishing work is being carried out or whether insulation is being installed for the first time. If repeated puttying is carried out, the surface must be cleaned of dust, dirt and decorative finishes; the reinforced mesh does not need to be removed.
- The prepared surface is treated with primer. You can use any deep penetration primer that does not contain chemical compounds that are aggressive to polystyrene foam. Craftsmen recommend using PVA glue diluted with water in a 1:1 ratio for priming.
- After the primer has dried, the reinforced mesh is glued. To do this, neat strips are cut from the mesh along the length of the wall and carefully glued to the foam. You can use any tile adhesive for this.
Application
Next, putty is applied to the foam. This is done in several stages:
- With the first layer, the base putty only slightly hides the reinforced mesh, providing stronger adhesion to the base. It must be remembered: the thinner the layer of applied mortar, the higher the quality of the finish.
- After the first layer has dried, priming must be repeated. Many craftsmen neglect priming, believing that the putty mixture already contains glue, but this makes the result of less quality.
- The second and subsequent layers of base putty are applied in order to hide the mesh and level the surface as much as possible. It is recommended to apply primer between layers to increase strength.

Final finishing
After the last layer of the base putty has dried, you can proceed in two ways:
- If you plan to tile or stick other decorative elements, then you can begin finishing work.
- If the final stage is painting or wallpapering, then it is necessary to achieve maximum smoothness of the surfaces. To do this, the walls are leveled using finishing putty, and then painted or wallpapered.
Anyone who has ever puttyed penoplex can confirm that the work process is simple, and if you follow all the steps, you get a warm and beautiful home. Only when purchasing materials should you not try to save money - this will affect the durability of the finish.
Foam putty is used to make the surface of the insulating layer more resistant to external influences. In addition to putty, foam primer is also used for the same purposes. If these products are applied correctly, the material will retain its basic properties and gain additional properties that are valuable in construction terms.
How to putty polystyrene foam correctly
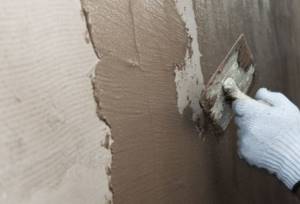
Putty work is done using spatulas. The solution must be stirred to a paste. The putty is applied to the material evenly, with smooth movements. It is necessary to smooth the solution over the top layer until the surface is as smooth as possible.
Expanded polystyrene must be putty through a reinforcing mesh. It can be plastic or metal. If you do not use a mesh, then it is very possible that the structure will last less than 1.5-2 years.
To perform high-quality putty indoors, the following procedure is recommended:
- after installing the foam, the reinforcing mesh is fixed;
- The first layer of cement plaster is applied 1 cm;
- after complete drying, you need to apply lime putty, also 1 cm;
- the last layer of 5 mm is sprayed.
The final and very important stage is the external protection of the foam. The service life and physical properties of the coating will depend on this stage of work. Putties with high adhesion and special adhesives are designed to provide external protection. The market offers mixtures such as Caesarite, Master and Polymin.
Why do you need to trim the foam?
Puttying polystyrene foam is a prerequisite in the process of insulating a room with this material. But, auxiliary finishing of polystyrene foam surfaces is not always used. It all depends on the method of attaching the insulation. If the foam is attached to the wall using construction umbrellas and glue, then puttying is used. Other fastening methods completely exclude this finishing method.
The foam itself is very fragile, so it needs additional protection, which can be achieved using special finishing mixtures - primers and putties.
Finishing materials in this direction are necessary for:
- reducing the risk of mechanical damage;
- minimizing exposure to moisture;
- hiding foam from exposure to direct ultraviolet rays;
- improving the aesthetic appearance of insulating material;
- formation of an adhesive base between all layers of finishing;
- smoothing out temperature differences.
The primer is the fastening link between the surface of the foam and further layers of the finishing coating. Puttying is necessary in order to eliminate defects in the surface of the foam and prepare it for painting or decorative plaster.
On video: how to insulate a house with polystyrene foam.
Preparation for performing work on polystyrene foam putty
There are two ways to attach polystyrene foam:
- using special construction umbrellas and foam glue;
- installation and fastening of formwork with slats. The sheets are inserted quite tightly into the compartments; fastening with umbrellas is not required.
If you use the second method, using formwork, then you will not need to putty the polystyrene foam. But if the material is glued or secured with umbrellas, then putty is required: it is necessary to level the places where the mounting umbrellas are screwed in and the seams between these sheets.

Scheme of styrofoam plastering.
To complete the work you will need the following tools and materials:
- set of spatulas;
- reinforcing mesh (plastic or metal);
- putty mixture.
For puttying you need to use special mixtures (adhesives) with high adhesion. They are the ones who can reliably protect polystyrene foam from the outside and increase its service life.
The question of the need to prime the surface is controversial. Here opinions are divided. Some experts claim that polystyrene foam has good adhesion to putty; Applying a layer of primer for greater adhesion is not required: this is a waste of money.
Other experts stubbornly insist on the mandatory implementation of priming work, since this is a necessary additional protection of the porous material from exposure to sunlight and wind. For external insulation, in addition to weathering and poor transfer of direct sunlight, the application of a primer is justified by increasing the fire safety of the structure: polystyrene foam is a flammable material.
You will have to make the decision about priming yourself, weighing all the pros and cons and assessing your financial capabilities.
What kind of putty is needed?
How to putty foam? Success depends on choosing the right putty material. The composition of this mixture can be different: prepared independently or purchased ready-made. The store sells putty mixtures for polystyrene foam, which just need to be diluted with water in the appropriate proportion.
This product is of high quality if you use certain brands that have earned a reputation over the years. The manufacturing company Ceresit can boast of an optimal ratio of quality and price.
When choosing a material, you should pay attention to the following characteristics:
- Area of application of putty. It can be for external and internal use.
- Manufacturer's recommendations indicated on the packaging. Here are instructions for preparation and use. Some brands require special operating conditions, which relate to air humidity and temperature conditions.
- For exterior work, a regular sand-cement mixture is often used. A reinforced mesh holds this layer on the surface of the foam.
- For interior finishing work of this type, reinforcing mesh is not used; special glue is required.
In order for the choice of finishing material to be correct, you should carefully select the product: establish the correct storage conditions and service life. Under no circumstances should the mixture be used for outdoor use indoors and vice versa.
If you take into account all the quality conditions when choosing construction products, the mixture will serve as an ideal coating for many years. Otherwise, the putty will peel off and crack within a short time after application.
What kind of putty is needed for polystyrene foam: tips for selection and use
Foam putty is used to make the surface of the insulating layer more resistant to external influences. In addition to putty, foam primer is also used for the same purposes. If these products are applied correctly, the material will retain its basic properties and gain additional properties that are valuable in construction terms.
Why do you need to trim the foam?
Puttying polystyrene foam is a prerequisite in the process of insulating a room with this material. But, auxiliary finishing of polystyrene foam surfaces is not always used. It all depends on the method of attaching the insulation. If the foam is attached to the wall using construction umbrellas and glue, then puttying is used. Other fastening methods completely exclude this finishing method.
The foam itself is very fragile, so it needs additional protection, which can be achieved using special finishing mixtures - primers and putties.
Finishing materials in this direction are necessary for:
- reducing the risk of mechanical damage;
- minimizing exposure to moisture;
- hiding foam from exposure to direct ultraviolet rays;
- improving the aesthetic appearance of insulating material;
- formation of an adhesive base between all layers of finishing;
- smoothing out temperature differences.
The primer is the fastening link between the surface of the foam and further layers of the finishing coating. Puttying is necessary in order to eliminate defects in the surface of the foam and prepare it for painting or decorative plaster.
On video: how to insulate a house with polystyrene foam.
What kind of putty is needed?
How to putty foam? Success depends on choosing the right putty material. The composition of this mixture can be different: prepared independently or purchased ready-made. The store sells putty mixtures for polystyrene foam, which just need to be diluted with water in the appropriate proportion.
This product is of high quality if you use certain brands that have earned a reputation over the years. The manufacturing company Ceresit can boast of an optimal ratio of quality and price.
When choosing a material, you should pay attention to the following characteristics:
- Area of application of putty. It can be for external and internal use.
- Manufacturer's recommendations indicated on the packaging. Here are instructions for preparation and use. Some brands require special operating conditions, which relate to air humidity and temperature conditions.
- For exterior work, a regular sand-cement mixture is often used. A reinforced mesh holds this layer on the surface of the foam.
- For interior finishing work of this type, reinforcing mesh is not used; special glue is required.
We recommend: Volma layer - gypsum plaster: instructions, consumption
In order for the choice of finishing material to be correct, you should carefully select the product: establish the correct storage conditions and service life. Under no circumstances should the mixture be used for outdoor use indoors and vice versa.
If you take into account all the quality conditions when choosing construction products, the mixture will serve as an ideal coating for many years. Otherwise, the putty will peel off and crack within a short time after application.
Preparatory work
In addition to the correct choice of finishing material, it is necessary to make appropriate preparations for work: collect the necessary tools and prepare mixtures and products. Preliminary cleaning of the wall is also necessary.
First you need to collect all the necessary equipment:
- reinforcing mesh made of plastic or metal;
- dry putty;
- a certain type of primer;
- wide and narrow spatulas;
- construction mixer for preparing the mixture;
- roller and paint brushes;
- construction float with clamps.
First, the wall surface is prepared for attaching foam blocks or sheets. After installation of expanded polystyrene, a primary primer is performed. This procedure will eliminate the appearance of mold and mildew in the thickness of the finishing material and increase the adhesion of the finishing materials. Afterwards plastering is carried out using reinforcing mesh. And only after that they do the puttying.
Puttying process
Many inexperienced builders have a completely correct question: how to putty polystyrene foam? How to do it correctly, and most importantly, efficiently? The process consists of several main steps and processes that guarantee a good result. This is how façade putty is applied to polystyrene foam:
1. After the surface has been primed, plastering is carried out using an abrasive mesh. The mesh must be completely covered with plaster. When the finishing layer has dried, it should be sanded using a float. Sanding is best done about a day after applying the plaster.
2. Sanding (grouting) must be done efficiently so that no obvious defects or irregularities are visible. Putty is applied to such a base, which is considered the finishing base for painting.
3. Apply the prepared mixture onto a wide spatula with another small spatula, and rub the material over the surface of the wall with smooth circular movements. The layer should not exceed 3 millimeters. Puttying is carried out in separate sections.
4. At the end, the finishing finishing layer is grouted. A construction float is used for this. Such work should be carried out no earlier than every other day, but no later than 4 days. It is important not to overdry the final layer, since when grouting such material there may be a problem with individual parts breaking off.
After the work on strengthening the foam is completed, secondary priming and finishing with decorative plaster will be carried out. The secondary primer is chosen to be based on quartz grains, making it more suitable for strong adhesion. This is followed by finishing with decorative plaster and painting with facade paint.
If everything is done correctly, the reinforcing and decorative layers will last for a very long time - the service life is at least 5 years under optimal conditions. The main thing is to choose high-quality building materials and carry out preparatory and construction work correctly. In addition to aesthetic preferences, the technical side regarding putty is also determined.
Preparatory work
In addition to the correct choice of finishing material, it is necessary to make appropriate preparations for work: collect the necessary tools and prepare mixtures and products. Preliminary cleaning of the wall is also necessary.
First you need to collect all the necessary equipment:
- reinforcing mesh made of plastic or metal;
- dry putty;
- a certain type of primer;
- wide and narrow spatulas;
- construction mixer for preparing the mixture;
- roller and paint brushes;
- construction float with clamps.
First, the wall surface is prepared for attaching foam blocks or sheets. After installation of expanded polystyrene, a primary primer is performed. This procedure will eliminate the appearance of mold and mildew in the thickness of the finishing material and increase the adhesion of the finishing materials. Afterwards plastering is carried out using reinforcing mesh. And only after that they do the puttying.
Puttying process
Many inexperienced builders have a completely correct question: how to putty polystyrene foam? How to do it correctly, and most importantly, efficiently? The process consists of several main steps and processes that guarantee a good result. This is how façade putty is applied to polystyrene foam:
1. After the surface has been primed, plastering is carried out using an abrasive mesh. The mesh must be completely covered with plaster. When the finishing layer has dried, it should be sanded using a float. Sanding is best done about a day after applying the plaster.
2. Sanding (grouting) must be done efficiently so that no obvious defects or irregularities are visible. Putty is applied to such a base, which is considered the finishing base for painting.
3. Apply the prepared mixture onto a wide spatula with another small spatula, and rub the material over the surface of the wall with smooth circular movements. The layer should not exceed 3 millimeters. Puttying is carried out in separate sections.
4. At the end, the finishing finishing layer is grouted. A construction float is used for this. Such work should be carried out no earlier than every other day, but no later than 4 days. It is important not to overdry the final layer, since when grouting such material there may be a problem with individual parts breaking off.
After the work on strengthening the foam is completed, secondary priming and finishing with decorative plaster will be carried out. The secondary primer is chosen to be based on quartz grains, making it more suitable for strong adhesion. This is followed by finishing with decorative plaster and painting with facade paint.
If everything is done correctly, the reinforcing and decorative layers will last for a very long time - the service life is at least 5 years under optimal conditions. The main thing is to choose high-quality building materials and carry out preparatory and construction work correctly.
In addition to aesthetic preferences, the technical side regarding putty is also determined.
How to properly putty foam on an external wall
Extruded polystyrene foam is considered the best insulation for private homes. Due to its low weight, it does not create a load on the foundation. High vapor permeability and the ability to retain heat and not allow heat to pass through create comfort inside the house.
When finishing the facade, foam plastic is puttied to protect it from moisture, rodents and sunlight. The smooth surface of foam plastic does not connect well with finishing materials.
Mixtures for the facade, and glue for polystyrene foam (aka penoplex) - https://goo.gl/scmdUv How to plaster penoplex! New...
Finishing house walls with putty
Light and warm foam must be protected
I insulated a friend's house and satisfied his curiosity. How to attach polystyrene foam to a plastered wall? Vadika was interested in building materials and tried to do everything with his own hands. He and I have already glued the slabs to the walls and attached the mesh.
We had to do foam putty and decorative finishing.
Installation of foam plastic and subsequent finishing with putty
Polystyrene foam practically does not absorb water. It can float for years without swelling. But when exposed to sunlight, wind and frost, it begins to deteriorate. Balloon material is eaten by rodents and birds. The facade insulated with air plastic must be puttied and plastered.
The material is flammable and emits harmful substances.
The top layer must be hard in order to protect soft polystyrene from mechanical stress, contain antiseptics and antistatic agents to protect it from destruction by various representatives of fauna.