Before testing, all plumbing systems must be flushed. Before testing, the compliance of the tested system with the design is checked, an external inspection of pipelines, connections, equipment, instruments, and fittings is carried out.
Systems as a whole and individual types of equipment are tested, and they are also regulated. Based on the test results, reports are drawn up.
Tests are performed using hydrostatic and manometric (pneumatic) methods.
Hydrostatic tests are carried out by filling all elements of the system with water (with complete removal of air), increasing the pressure to test pressure, holding the system under test pressure for a certain time, reducing pressure and, if necessary, emptying the system.
Tests of heating systems, heat supply, boilers, water heaters are carried out before finishing the premises and at a positive temperature in the building. The temperature of the water used to fill the system must not be lower than 278 K (5°C).
Manometric tests largely lack the disadvantages of hydrostatic tests, but they are more dangerous, since if pipelines or system elements are accidentally destroyed under the influence of compressed air, their pieces can fall into the people conducting the tests.
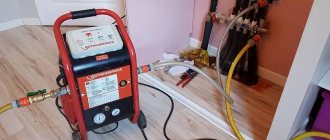
Manometric tests are carried out by filling the system with compressed air at a pressure equal to the test pressure, and maintaining it under this pressure for a certain period, then the pressure is reduced to atmospheric pressure. For testing, a pneumatic and hydraulic unit TSTM-10 is used, made in the form of a biaxial trailer, on which a container with a volume of 2.5 m3 and all the equipment necessary for testing are mounted.
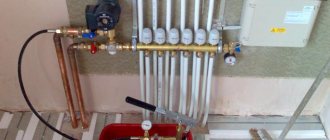
Testing of heating systems. Hydrostatic tests of a water heating system are carried out upon completion of its installation and inspection. To do this, the system is filled with water and the air is completely removed from it by opening all air collectors, taps on the risers and at the heating devices. Fill the system through the return line, connecting it to a permanent or temporary water supply. After filling the system, close all air collectors and turn on a manual or driven hydraulic press, which creates the required pressure.
Water heating systems are tested at a pressure equal to 1.5 working pressure, but not less than 0.2 MPa at the lowest point. During the test, the boilers and expansion vessel are disconnected from the system. The pressure drop during the test should not exceed 0.02 MPa for 5 minutes. The pressure is monitored with a tested and sealed pressure gauge with scale divisions at 0.01 MPa. Any minor faults found that do not interfere with the hydrostatic test are marked with chalk and then corrected.
Hydrostatic testing of panel heating systems is carried out before sealing the mounting windows with a pressure of 1 MPa for 15 minutes. In this case, the pressure drop should not exceed 0.01 MPa. At negative outside air temperatures, manometric testing of these systems is allowed.
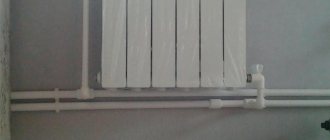
After the hydrostatic test, a thermal test of the system is carried out for 7 hours, checking the uniform heating of the heating devices. If the outside air temperature is positive, then the water temperature in the supply lines must be at least 60°C, if negative, at least 50°C.
Steam heating systems with operating pressures up to
0.07 MPa is tested with a pressure equal to 0.25 MPa at the lowest point of the system. After the hydrostatic test, the steam heating system is tested for the tightness of the heat pipe connections. To do this, steam is released into the system at operating pressure.
Water heaters are tested for density at a pressure of 1.25 times the operating pressure plus 0.3 MPa for the steam part and 0.4 MPa for the water part.
Pumping units are tested first at idle and then under load. Before testing, the installation is carefully inspected, the reliability of the fastening is checked, and the absence of any objects (gaskets, parts) inside. To do this, turn the pump shaft manually and turn it on for 3-5 minutes. If extraneous noise or knocking occurs, the pump is turned off and disassembled. During normal operation, the pump is run in for 12-15 minutes, after which the rubbing parts are checked and there is no overheating. The causes of overheating may be inaccurate fit, distortions, tight tightening, contamination of rubbing parts or lubricating oil. Then the pump is run in for 1 hour, then 6 hours, monitoring its condition. If no defects are found, the pump is put into trial operation and placed under load.
The test results are documented in the heating system acceptance certificate.
Heat pipelines of heating networks are subjected to pressure testing equal to the working pressure with a coefficient of 1.25, but not less than 1.6 MPa. During testing, the following requirements are met: the valves in the test area must be fully open, the seals must be sealed. To disconnect the test section of the heat pipeline from existing networks, plugs must be installed.
Purpose of the work
In accordance with regulatory documents, after completion of installation work and thorough flushing of in-house CO, the following checks must be performed:
- The functionality and correct installation of each individual element of the system.
- For compliance with design parameters for pressure and thermal loads.
CO testing is carried out using one of two main methods:
- Pressure testing using hydrostatic method.
- Manometric method (Compressed air).
Hydraulic and pneumatic tests are used to test CO for leaks. Thermal tests of heating systems must be carried out to verify compliance with the calculated thermal power, correct and uniform heating of radiators and piping.
Hydrostatic CO testing
The hydraulic test of the heating system is as follows: from the lowest point on the return pipeline (return), the route is filled with liquid (water). This allows air to be removed most effectively through open (automatic) air vents and an expansion tank. This type of CO testing is considered completely safe, since it is “run in” under the closest operating conditions. It should be understood that in the event of an emergency (depressurization of the route), flooding of the premises is possible.
The work is carried out in two stages:
- Water supply under pressure equal to 1.25 of the calculated values. For correct measurements, the pressure in the pipeline should not be less than 1.5 MPa. This stage is considered successful if the pressure in the pipeline does not drop by more than 0.5 kg/cm2 for 10 minutes or more.
- At the second stage, testing is considered successfully completed if the pressure in the circuit does not change in the next 120 minutes. or its fall does not exceed 20 kPa.
Important: hydrostatic testing is carried out without a heat generator and expansion tank.
Steam CO is checked exclusively by the hydrostatic method. If the calculated parameters correspond to 0.07 MPa, then testing is carried out with a water pressure corresponding to 0.25 MPa.
Pumps are tested only when the pipeline is filled with water. Initially, the pump is started at idle for 35 minutes, then under load for 10-20 minutes. The test is considered passed if the pump operates in cycles: 1 hour and 6 hours without critical heating and the appearance of extraneous noise.
To check the elevator unit, an initial pressure of at least 10 kg/cm 2 should be used. Upon successful testing, he is promoted to worker. Testing of heating system pipelines should be carried out in compliance with the conditions regulated by the operating rules for power installations No. 115, namely:
- The liquid with which the circuit is filled must have a temperature no higher than 45°C, and the air in the room must not be lower than + 5°C.
- Pressure 1.25 from working.
After 10 minutes in this mode, the pressure is reduced to operating parameters and sufficient time is maintained to inspect the route (seams, pipe joints, fittings, etc.).
Important! The pressure drop in panel COs must be 10 kPa or less; in CO made from polymer materials – 60 kPa, in the next 30 minutes.
After completion of the work, the circuit is washed. Water is discharged through a coupling located at the bottom of the pipeline. The final stage is the process of filling out a hydraulic test report for the heating system.
This document is signed by authorized representatives of the customer and contractor. In some cases, CO tests are carried out in the presence of representatives of supervisory authorities, who sign the report. A sample hydraulic test report for a heating system can be downloaded here.
What is pressure testing of a heating system - description of the process, sequence of work
Hydraulic tests of heat supply systems are usually carried out with different pressure tests depending on the purpose of the system and the type of equipment used.
For example, a heat input unit into a building is pressurized with a pressure of 16 atmospheres, heat supply systems for ventilation and ITP, as well as heating systems for multi-storey buildings - with a pressure of 10 atmospheres, and heating systems for individual houses - with a pressure from 2 to 6 atm.
Heating systems of newly constructed buildings are pressed with 1.5-2 times greater pressure from the worker, and heating systems of old and dilapidated houses are pressed with lower values in the range of 1.15-1.5. In addition, when crimping systems with cast iron radiators, the pressure range should not exceed 6 atm, but with installed convectors - about 10.
Thus, when choosing pressure testing, you should carefully read the equipment data sheets. It should not be higher than the maximum pressure of the “weakest” link in the system.
First, the heating or heat supply system is filled with water. If the heating system is filled with a low-freezing coolant, then pressure testing is carried out first with water, then with a solution with additives.
You should know that due to lower surface tension, coolants based on ethylene glycol or propylene glycol are more fluid than water, so in case of minor leaks on the threaded connections, sometimes they should only be tightened slightly.
When preparing a functioning heating system for the heating season, the working coolant must be drained and refilled with clean water for pressure testing. The heating system is usually filled at the lowest point of the boiler room or heating unit through a drain ball valve.
In parallel with filling the heating system, air must be bleed through air vents on risers, the top points of branches or through Mayevsky taps on radiators. To prevent airing of the heating system, the system is filled only from the bottom up.
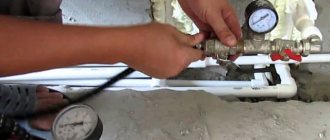
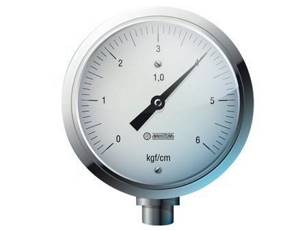
Then the system pressure is increased to the calculated one, with the pressure drop monitored by measuring pressure gauges.
In parallel with pressure monitoring, a visual inspection of the entire system, pipeline assemblies, threaded connections and equipment is carried out for the formation of leaks and the appearance of drops on the seams.
If condensation forms on the system after filling with water, the pipelines must be dried and then inspected further.
Heating devices and pipeline sections hidden in building structures are subject to mandatory inspection.
The heating system is kept under pressure for at least 30 minutes, and if no leaks are detected and no pressure drop is recorded, then it is considered that the system has passed pressure testing.
In some cases, the pressure drop is permissible, but within limits not exceeding 0.1 atmospheres, and provided that a visual inspection does not confirm the formation of water leaks and violations of the tightness of welded and threaded connections.
If the result of hydraulic tests is negative, repair work is carried out with further repeated pressure testing.
Upon completion of the testing work, a test certificate is drawn up in the form specified in the main regulatory documents.
Pneumatic CO test
If it is impossible to comply with the conditions stated above (for example, the ambient temperature will be below 5 ° C or for some reason it is impossible to use liquid in the circuit), then in this case a test is carried out with compressed air. The technique is practically no different from the above. The work requirements are as follows:
The pressure in the circuit is 100 kPa.
Important! Testing is considered successful when the pressure in the circuit does not drop by more than 10 kPa within 5 minutes .
The problem is that when carrying out pneumatic pressure testing it is quite difficult to determine the location of the leak. That is why most specialized organizations use hydraulic testing of heating system pipelines.
Heating pipe crimping technology
In order to identify problems, hydraulic tests are carried out, during which the pressure is 20-30 percent higher than the operating indicators. A special pump is used for this. The pressure gauge allows you to control the amount of pressure.
When it reaches its maximum, its level should remain unchanged for thirty minutes. If it begins to decrease, it means that there are areas where the sealing is broken.

Shutoff valves and gaskets are becoming the most common reasons why seals fail. Heating radiators and bends are also often places where defects appear. The pipeline is considered pressurized only when it is completely ready for further use.
Thermal testing of CO
This type of inspection is carried out to determine the effectiveness of the CRM. Work is carried out when the CO is put into operation and (or) when the configuration of the heating circuit is changed. The main condition for carrying out such a test is the supply of coolant with a temperature not lower than +60°C. The process lasts about 7 hours, during which work is carried out to balance the CO and adjust its elements. The results of the inspection are recorded in a report, a sample of which is shown below.
The degree of heating of individual sections and elements of the circuit is determined by a thermometer or thermal imager. The act includes readings of heating equipment heating and room temperature.
Advice: today it is particularly difficult to test floor-mounted CO systems that use a polymer pipeline. To prevent emergency situations, these heating systems should be checked at a coolant temperature of 25°C with an increase of 5°C every day until the design parameters are reached.

To determine the degree of readiness of heating equipment for operation, it is necessary to carry out special test work. To do this, the pressure in the pipes is artificially increased, after which the tightness of each connection is checked to ensure the complete absence of leaks.
There are several types of heating system testing: hydraulic testing, pneumatic testing, pressure testing.
Let's consider how heating systems are tested, what stages and conditions are met.
Hydraulic tests
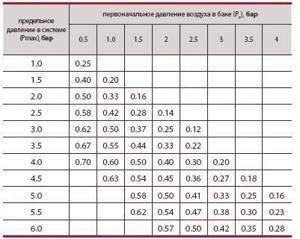
Pressure table for heating expansion tanks.
Hydraulic testing for heating pipes is an important process in preparing equipment for the heating season. In this case, the pipes are filled with water from the bottom up, that is, through the so-called return pipeline. The liquid and air medium move in the same direction, all air from the heating system is completely removed. They begin testing only when all the air is gone so that the data from the pressure gauge can be correctly obtained. If you do not wait for the air masses to leave the pipes, the tests will turn out to be false.
Heating should be checked in this way in open systems, since if there are leaks in a closed (in the wall) system, it will be quite difficult, and often simply impossible, to find places of depressurization. To perform the verification work, the following equipment should be prepared:
- a special hand pump for pumping a flow of working fluid into the heating system;
- working heating boiler;
- a pressure gauge that shows whether there is an increase or decrease in pressure in the overall system. Such data will indicate expansion of pipes and the presence of leaks.
Air crimping
Unlike hydraulic testing, air testing involves filling the system and testing it under pressure using air.
It is performed at the same stage as in the previous case, but with some differences, namely:
- Instead of a hydraulic press, an ordinary automobile pump is used. Both electric and hand (foot) tools can be used. In this case, you will need to independently assemble the device from several elements - a fitting with a fitting for connecting the pump hose, a fitting with a check valve or valve to prevent air from escaping back into the pump hose, and, if necessary, a fitting with a pressure gauge to control the pressure level.
- The assembled structure is connected to the heating system and, by analogy with the previous method, the circuit is sealed from the external supply/exhaust pipes and all valves inside the system are open.
- Using a pump, air is pumped into the system until a pressure of 2 atmospheres is reached (about 2 bar) and left in this state for a day. A drop in pressure after a day is allowed up to 0.5 atmospheres, since temperature fluctuations in the volume of air in the system occur, as well as expansion and contraction of plastic pipes. If the drop is greater, you will need to find a leak.
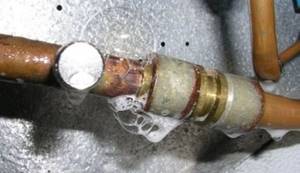
Finding the area with the leak
- A leak can be detected by pressurizing the system again. The problem area can often be determined by ear by checking the entire length of the heating main. If it is not possible to determine it by ear, prepare a soap solution, which is used to coat the joints of the system elements - as a rule, these are the most problematic areas in the circuit. The leak site will begin to bubble and, if it turns out to be a joint, it is disassembled, a few words of fum tape are added, the system is reassembled and tested again.
Thus, we have described two ways to perform pressure testing of a heating system with your own hands, and indicated what tools you need to use for this. If you need to test your water supply, you can do this in a similar way. Read about installation and repair of the heating system in our following articles.
Pneumatic test
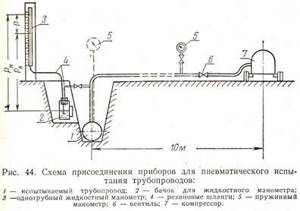
Pneumatic test diagram.
The pneumatic method is tested if the ambient temperature drops below 5°C. In this case, the pressure in the pipes should not drop below 10 kPa. This method is excellent for a system of polymer pipes where there are plastic connecting parts.
The conditions for conducting a pneumatic test of the heating system are:
- in the absence of liquid in the volume required for testing;
- at ambient temperatures below plus five degrees (some experts indicate below zero);
- if for technical reasons it is impossible to use the working fluid.
This method is rarely used. This is due to the fact that it is more difficult to find leaks and leaky connections than during hydraulic tests.
Air crimping
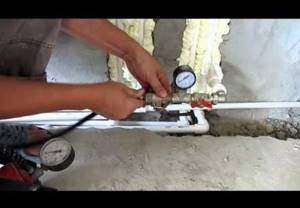
Not everywhere and not always is it possible to rent a crimping machine, just as it is not possible to buy one. For example, you need to test the heating in your dacha. The equipment is specific and the chances that someone you know has it is very low. In this case, pressure testing of the heating system is carried out with air. To pump it, you can use any compressor, even a car one. The pressure is monitored using a connected pressure gauge.
This type of crimping is less convenient and not entirely correct. Heating and plumbing are designed to transport liquids, which are much denser than air. Where water will not even ooze out, air will escape. Therefore, we can say with a high degree of confidence that you will have an air leak - somewhere there will be a loose connection. Moreover, it is difficult to determine the location of the leak during such testing. For this purpose, use a soap solution, which coats all joints and connections, all places where air can escape. Bubbles appear at the leak site. Sometimes you have to search for a long time. This is precisely why such pressure testing of the heating system is not very popular.
Pressure testing of a heated floor has its own characteristics - you must first check the comb and all the devices attached to it. To do this, close all the supply and return valves of the loops, filling only the heated floor manifold, and check it by raising the pressure. Having reset it to normal, the heated floor loops are filled one by one, and only then is excess pressure created. The process is described in more detail in the video.
Pressure test
Pressure test diagram.
What is a heating system pressure test? This is a test for tightness, that is, the absence of leaks during the operation of the heating pipeline during the heating season. For different systems, this process may differ in small details, but the general scheme of the test remains the same.
The test is carried out with an initial pressure approximately 1.5 times higher than the operating level. For example, if the working level is 1 atm, that is, 0.1 MPa, then the level for testing should already be 1.5 atm. For other values, the pressure at the test time is determined in exactly the same way, that is, the working pressure must be multiplied by 1.5 times.
Plastic parts inspection process
When testing, it is necessary to consider whether there are plastic parts. This is explained by the fact that the thermal expansion of plastic has high rates, which means that the temperature of the water in the system and the surrounding temperature must be constant. If the temperature changes and the seal is not maintained, the pressure in the heating system will still increase.
When testing equipment, the pressure should be increased to a value that is approximately 1.5 times higher than the working pressure, then hold it for 30 minutes. If expansion is observed in the pipes, then it is necessary to slightly pump up the pressure level, and then continue checking, maintaining constant values. After 30 minutes, you can sharply lower the value to a level that is half the working level, keeping it in this way for 90 minutes.
If a slight increase is observed, this does not indicate expansion in the pipes, but the tightness of the entire system. When carrying out checks, many experts recommend repeatedly reducing and increasing the pressure level so that you can accurately say about the performance of the entire heating system and the ability to accept any load (limited by the values specified by the manufacturer).
Checking the heating installation is carried out using various methods, including increasing/decreasing pressure in the pipes. When performing such work, it is necessary to follow the instructions exactly to avoid ruptures or leaks. In this case, certain factors should be taken into account that have a strong influence on the inspection process, for example, the material of pipes. Only after making sure that everything is in perfect order can you begin operation without worrying about sudden leaks.