Do-it-yourself pyrolysis boiler manufacturing and safety rules
to menu
Safety rules during the manufacture of a pyrolysis boiler
- use gloves during work;
- when welding, wear a protective helmet;
- When using power tools, maintain a distance of at least 50cm;
- store structural parts in a protected place - away from children and animals;
- do not look at welding with the naked eye;
- The boiler room must be isolated from surrounding factors. It is necessary to install a ventilation system in it;
- The walls and foundation of the boiler must consist of heat-absorbing materials.
to menu
Safety rules for operating a homemade pyrolysis boiler
- do not lean your body against the boiler;
- use gloves when operating the device;
- do not forget to add water;
- do not leave chambers open for storing firewood and slag;
- do not install any structures near the unit, especially those made of wood;
- when removing toxins, use a spatula;
- Do not put unprotected hands into the boiler chambers.
Pyrolysis boiler in the heating system
to menu
Pyrolysis as a long-term combustion process
In a nutshell, pyrolysis is the slow burning of fuel to produce products that are again used to generate heat. The isolated atoms do not mix with each other and represent a combustible substance ready for use. The essence of combustion is a minimal supply of oxygen to maintain the smoldering of briquettes or firewood, but also a large production of thermal energy. Saving is the main advantage of the unit.
Advantages of a pyrolysis boiler
The pyrolysis boiler also has the following advantages:
- High efficiency - efficiency factor. From 85% is an excellent indicator, indicating that fuel energy is converted into heat energy with virtually no residue. For comparison, a gas boiler generates 65% of the energy.
- A boiler or pyrolysis furnace are economical units. In terms of fuel and money spent, they are in second place after the gas generator. And, of course, they are not comparable to electric boilers.
- The units process fuel in two stages - burning wood and using the released gas. The provided container for accumulating flammable gas allows you to arrange a second heating circuit with the generation of hot water for your own needs.
- Do-it-yourself long-burning boiler is a common thing, since the design is simple and you only need to have welding skills. Drawings and diagrams can be found on any network portal, as well as reviews of homemade designs.
- A do-it-yourself, long-burning solid fuel boiler that you assembled yourself does not require a permit, like gas and electric boilers. But you should not refuse the recommendations of master installers - these are, after all, high-risk units, but assembly and installation at a specific location remains the prerogative of the owner, which does not require him to make material investments in fulfilling the letter of the law.
- The time for complete combustion of one portion of fuel reaches several days. For example, a long-burning boiler for up to 7 days is a common case. This frees the owner from constant control over the unit, and its own automatic settings will allow you to leave the house with a working stove.
Advantages and disadvantages
The advantages and disadvantages of such equipment, summarized here in one table, will allow you to more objectively approach the assessment of a possible purchase.
Pros and cons of pyrolysis boilers
| Behind | Against |
| These are so-called long-burning boilers: you can load a batch of firewood that will burn for a very long time, about 12 hours (on coal under certain conditions, even longer) | But you will have to pay for it in blood. These boilers are definitely more expensive than traditional solid fuel boilers. Sometimes the price difference is 50–100% |
| The fuel burns almost completely, which means that we use most of its energy potential. In addition, this minimizes the amount of waste and eliminates the need for frequent boiler cleaning | A forced air injection system is used, which means that the boiler is volatile, that is, potential power outages turn into a big problem |
| Large wood can be used as fuel. In most cases, you can limit yourself to adding unsplit fuel. | The efficiency of the boiler largely depends on the moisture content of the wood. The usual requirement is that humidity should not exceed 25% |
The video below provides another opinion. It should not be considered as the ultimate truth, but you definitely need to think about certain issues.
And here is another video from the same ardent opponent of pyrolysis boilers. Some arguments sound quite convincing, but many need to be taken critically.
As you can see, the operation of such equipment may have some nuances. In any case, before purchasing a boiler, it is advisable to additionally familiarize yourself with the various offers of manufacturers, since there are many of them today.
About the pellet burner
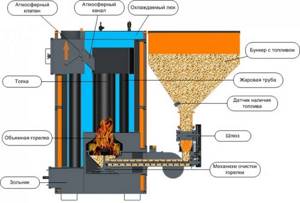
A pellet burner is a special heating device that produces heat by burning pellets or fuel granules in a boiler. In some cases, these burners use unnecessary dry grain.
There are manual and automatic burners; in automatic burners, fuel is supplied to the combustion hopper using a special auger, and the entire process is controlled by sensors, due to which the device requires minimal control from the user. Pellet burners have found their use not only in everyday life, but also in industry. They are used for space heating, water heating and to meet a number of other needs.
Pellets, or fuel granules, are a special solid fuel that is obtained from wood or agricultural waste by pressing and granulating under high temperatures.
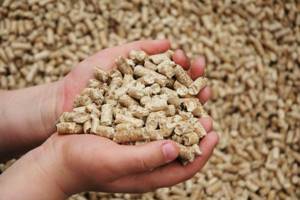
Pellets are an environmentally friendly type of fuel, since when they are burned, the same amount of carbon dioxide is released into the atmosphere as is formed during the natural decomposition of wood
In countries where agriculture and the woodworking industry occupy leading positions, the cost of pellet fuel is much lower than that of coal. The only exceptions are those regions in close proximity to which coal mining enterprises are located.
When burning pellets, hazardous fumes are not released, as happens when burning liquid fuel.
The essence of the pyrolysis process
In solid fuel pyrolysis boilers, types of organics are used that, upon thermal decomposition, give a high yield of volatile combustible substances. Such boilers operate not only on wood (and all types of wood fuel, such as pellets or fuel briquettes), but also on coal, up to coking grades, the combustion temperature of which reaches very high values!
smoldering fuel
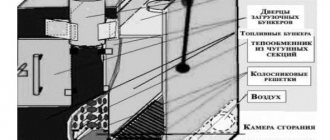
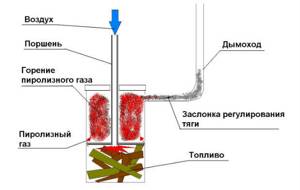
The fuel in pyrolysis boilers is placed on the grate. After igniting the loaded batch of fuel, the tight door closes and the smoke exhauster starts working. As a result, the temperature in the combustion chamber rises high, up to 800 degrees, but there is no oxygen from the air for normal intense combustion. Instead, fossil fuels smolder and char, releasing volatile gases, primarily hydrocarbons.
Under the influence of convection, volatile flammable gases enter the space under the grate. The nitrogen present in the primary air in the furnace also migrates with them. Under the grate, oxygen from the secondary air supply circuit is mixed into the gas mixture. The resulting mixture already has the ability to burn. It burns, performing a useful function (for example, heating water in a heat exchanger), and in addition, the released heat goes back to the organic fuel and supports the smoldering process.
Temperature levels of pyrolysis
to menu
Low temperature degree
This is pyrolysis, the temperature of which is 450 - 900 degrees Celsius. In this process, the flue gas is released minimally, and the residues of raw materials and resin are maximal. The amount of scrap (waste) is greatest. Considered environmentally friendly.
to menu
High temperature degree
This is pyrolysis, the temperature of which is more than 900 degrees Celsius. During this process, the flue gas is released as much as possible, and the resin is released as little as possible. The amount of scrap is the smallest.
As a result of pyrolysis, energy (thermal and electrical), fuel oil, and fuel (diesel oil, gasoline) can be obtained from waste. But subject to detailed waste sorting.
to menu
DIY assembly
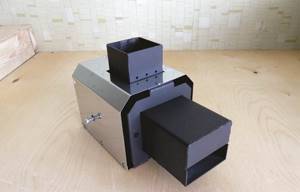
When making a pellet burner with your own hands, it is important to pay special attention to the basket. Often, due to improper implementation, pellets can get stuck. In this case, the combustion process does not follow the required algorithm and the fire returns to the bunker
To eliminate this drawback, you need to look at the upper right part of the figure below. The slot through which the pellets will be supplied does not need to be made solid. It should have holes that are 2 mm smaller than the pellets themselves. It is also worth paying attention to the gap between the bottom of the basket and the back wall. It should be at least 6 mm, but 2 mm smaller than the size of the pellets. The unit where the pellet combustion chamber is separated from the pyrolysis gas combustion chamber must be made with continuous slits. If the burner is designed for a boiler with an area of 150 m2, then the height of the secondary air channels that pass under the bottom of the basket should be 30 mm
In this case, the combustion process does not follow the required algorithm and the fire returns to the bunker. To eliminate this drawback, you need to look at the upper right part of the figure below. The slot through which the pellets will be supplied does not need to be made solid. It should have holes that are 2 mm smaller than the pellets themselves. It is also worth paying attention to the gap between the bottom of the basket and the back wall. It should be at least 6 mm, but 2 mm smaller than the size of the pellets. The unit where the pellet combustion chamber is separated from the pyrolysis gas combustion chamber must be made with continuous slits. If the burner is designed for a boiler with an area of 150 m2, then the height of the secondary air channels that pass under the bottom of the basket should be 30 mm.

In addition to the basket, a scrupulous approach also requires a bunker in which the pellets will be stored. The problems begin with those pellet bins that are made by eye and according to a loose drawing. On the left in the diagram above are the dimensions and drawings of the hoppers that are used in Pelletrons. With a home area of 150 m2, one such bunker is enough for a day. At the bottom right in the same figure is a drawing and dimensions of the combustion chamber. The basis for them was the Pelletron 15 pellet burner. The corridor through which the secondary air will move is best done in the shape of the letter “L”. This is necessary for better mixing of secondary air with pyrolysis gases. This will increase the efficiency of the installation. The combustion chamber will require a special type of steel that can withstand high temperatures. At the same time, welding it at home can only be done with spot welding, since a conventional welding machine will have difficulty warming it up. You will need sheets with a minimum thickness of 2 mm. An interesting design of a pellet burner is shown in the video below.
DIY pyrolysis oven drawings | | The most necessary homemade products
Vasily · 02/17/2015
Operating principle of a pyrolysis furnace
A detailed process with photos of the Pyrolysis oven drawings can be viewed here
Description
To build the boiler, use metal at least 4 mm thick, but be sure to use 8 mm thick metal for the doors and 6 mm thick metal for the bottom of the gasification chamber. Otherwise, due to temperature exposure, the metal will “lead” and the seal of the doors will be broken, and this is not acceptable! Based on the operating experience of my previous 4 mm boiler, it was sufficiently tested over two seasons; no burnout or significant changes in the metal were observed.
To seal and seal the doors, use an asbestos cord with a diameter of 15 -20 mm, or you can use an expensive sealant: Ceramic thermal sealing cord. According to my observations, the asbestos cord needs to be changed once a month; it partially sticks to the surfaces of the boiler and delaminates. Over time, any seal loses its elasticity.
To restore the ceramic cord, it can be washed in a solvent,
You can restore the tightness of the asbestos cord using automotive red sealant. There is a tricky way: degrease the cord laying groove with gasoline or solvent, apply sealant, lay the cord, then stick masking tape on the cord and close the loading door. After the sealant has dried, remove the tape. The seal has been restored. The sealant can withstand up to 350 degrees.
Fan - if it is not possible to find a centrifugal fan with a capacity of 300 cubic meters.
per hour it is possible to install two fans of lower capacity, one for pressurizing the gasification chamber and the other for blowing the heat exchanger; this option is even preferable since the heat exchanger will be blown even in stop mode (smoldering mode).
In the area of the burner and secondary air supply, 6 studs with a diameter of 20 mm are inserted and welded; they are needed to prevent temperature deformation in the secondary air supply system.
During manufacturing, special attention should be paid to the tightness of the damper leading from the gasification chamber (direct draft damper of the boiler for kindling). If there is a large leak, then flammable gases will escape into the chimney and not into the afterburner.
According to operating experience, small cracks of 1-2 mm (and they should be, take into account the thermal expansion of the metal) become clogged with soot and are perfectly sealed.
Screw a nut onto the stud on which the damper is attached from the outside of the boiler and weld the nut to the body - the tightness of the threaded connection will not allow smoke to escape from the gasification chamber.
Making the loading door: I made it using a gas cylinder. While heating, I wrapped the shank around the cylinder (having previously wound a layer of 3mm wire around the cylinder), and welded it into a ring. I wound a wire with a diameter of 3 mm around the top. Then heating another bar on top of the wire. This is how I got two rings. I cut off the balloon with a grinder and got the third inner ring.
I placed all three rings on the inside of the door and placed 3mm wire spacers between the rings. I welded the outer and inner rings to the doors. Then I turned it all over onto the front side of the boiler and welded the inner ring to the boiler. In the war with J, it’s probably understandable. But the doors can be made square as your godfather likes.
The main thing is to ensure tightness and a groove for laying the sealing cord.
And another important detail when making a door! The hinges on which the doors are held must be at the maximum distance from the door itself! Otherwise, opening and closing the doors will be impossible due to the grooves for the sealing cord. Attach the hinges to the very edge of the front of the boiler. To adjust, connect the doors with the hinge using a threaded connection with adjusting nuts.
I made the bottom door from an 8mm piece of metal, welded a rectangle made from a 15x15 square profile pipe to it, then cut off one side of the pipe with a grinder and got a groove for laying the sealing cord. I placed pieces of the shank in the gutter, welded the shank and welded this rectangle to the front of the boiler.
Fixing the doors can be done by tightening with a nut, or you can use ready-made handles and clamps.
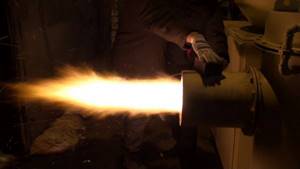
Setting the air supply for optimal combustion of wood in the boiler:
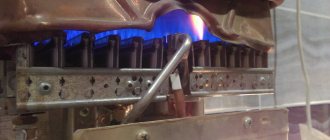
If the color of the flame is white, then there is excess air; too much heat is carried into the chimney with it. If the color of the flame is red, then there is not enough air, combustion is incomplete, unburned fuel is deposited on the walls of the chimneys, carried into the atmosphere, and drains in the form of condensate.
Optimal flame color is yellow.
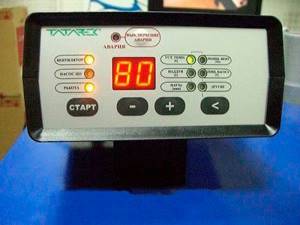
Boiler control
To control the boiler, you can use any temperature controller, even such as in “mother hen” incubators; they are on the market for about $10. The main thing is that it measures the temperature in the room and turns off the boost fan when the temperature rises higher than set on the regulator and the boiler goes into “stop” mode - smoldering mode.
Principle of operation
All pellet installations that can be purchased in the store are equipped with additional components:
- Auger – supplies fuel from the bunker to the combustion chamber;
- Controllers for automating the work process;
- Bunker – the place where the fuel is located before being supplied to the combustion chamber;
- A lambda probe is a special sensor that monitors the oxygen content in smoke chambers and independently controls the fuel combustion process depending on conditions.
The pellet burner must be protected with a plastic corrugated pipe. It acts as a fuse when reverse draft occurs. If the fire begins to move towards the bunker, the pipe burns out, preventing the flame from spreading.
Additionally, a fan is used, which enhances the combustion of pellets by pumping air, as well as a thermoelectric heater, which allows the fuel to be ignited without human intervention.
In automated devices, pellets are fed into the combustion chamber automatically; a person is only required to monitor the amount of fuel in the bunker. The need to supply fuel to the combustion chamber is determined using temperature sensors (they can monitor the air temperature in the room, the water temperature, or any other environmental indicators depending on the operating mode of the equipment).
The required temperature of the coolant is set by the user, all further increases and decreases are controlled using automated equipment. As soon as the temperature reaches the set level, the burner begins to operate in standby mode (the pellets do not go out, they begin to smolder). If the temperature, on the contrary, drops, the controller activates the built-in fan. Under the influence of air, the pellets flare up and the burner goes into operating mode. If during downtime the pellets go out for any reason, the heating element is activated, which re-ignites.
Main characteristics of pyrolysis boilers
The main features of boilers operating on pyrolysis technology are the following:
- Possibility of manufacturing from inexpensive structural materials.
- The long time of one pyrolysis cycle, reaching about 30 hours,
- Complete explosion and fire safety.
- Simplicity of design, accessible for self-production.
- A wide range of wood fuels used (from classic firewood to pellets).
- Highly environmentally friendly boilers, low amount of combustion products.
How often should you add firewood?
In a conventional furnace, you will have to add fuel at least every two hours. The reason for this is the high intensity of fuel combustion in furnaces of this design. Most of the heat literally “flies down the drain.” The efficiency of such boilers is minimal; in addition, there are a lot of residues left in it, which have to be raked out regularly.
But if you limit the flow of oxygen, the combustion period increases significantly. In this case, heat is released not only during the smoldering-pyrolysis process itself, but also from the combustion of the released gases. As a result, the operating time from one load can increase to a day or more.
Design and principle of operation of a pellet burner
Most pellet burners include the following modules:

- Screw conveyor, through which granular fuel is supplied to the combustion chamber;
- Drive motor;
- An electronic controller that monitors fuel combustion parameters and ensures timely adjustments to the operation of the device;
- A special sensor that controls the amount of oxygen in the exhaust gases;
- Corrugated hose to prevent pellets from burning in the hopper when backdraft occurs;
- Combustion chambers with built-in grate;
- A blower fan that supplies the air necessary for efficient combustion of pellets. The amount of air supplied to the combustion chamber depends on the fan rotation speed and is regulated automatically depending on the selected temperature mode;
- An electric heating element that provides automatic ignition of pellets in the combustion chamber.
Operating principle of a pellet burner
From the external hopper, the pellets fall into the loading window of the screw conveyor, which delivers the pellets to the combustion chamber of the burner. The intensity of combustion depends on the amount of fuel entering the combustion chamber, which is directly related to the rotational speed of the drive motor shaft. The engine speed required to ensure the specified temperature regime is regulated by an electronic controller.
An equally important factor for ensuring the stability of the combustion process and complete combustion of fuel is the presence of a sufficient amount of oxygen in the combustion chamber. In pellet modules, air is supplied to the combustion chamber using a special fan, also controlled by an electronic controller.
The coolant temperature adjustment scheme looks like this:
- From the bunker, using a screw conveyor, pellets enter the combustion chamber. At the same time, the fan turns on to provide air supply.
- Based on a signal from the controller, the granules are ignited using an electric heating element;
- As soon as the coolant temperature reaches the set value, the temperature sensor transmits a corresponding signal to the electronic control unit, which switches the device to standby mode;
- If the coolant temperature drops below the programmed value, the temperature sensor again sends a signal to the electronic controller. The automatic control unit turns on the fan, thereby providing additional oxygen flow into the combustion chamber. Excess oxygen leads to an increase in the intensity of the combustion process and the coolant is again heated to the set temperature.
- If the pellets fade in standby mode, the automatic control system sends a corresponding signal to the electric heating element, which ensures automatic ignition.
Despite the fact that the operating principle of a pellet burner is not particularly complicated, the cost of this unit is quite high. To reduce material costs associated with converting a boiler to pellet fuel, some owners of solid fuel heating units make a pellet burner with their own hands. Like any other production, the manufacture of this device begins with the creation of a set of technical documentation, in other words, drawings.
Advantages of the Blago pyrolysis boiler ↑
The Blago boiler was developed by the inventor Yu.P. Blagodarov, who declared the advantages of his creation. In terms of the duration of firewood combustion at maximum calorific value, the Blago gas-generating apparatus is superior to other boilers.
In this model, the grates completely cover the bottom of the fuel bunkers. Therefore, with natural draft, a high heat of combustion of the fuel and a longer combustion period are observed due to the layout of the fuel bunkers, which makes it possible to increase the volume of the fuel bunkers without compromising efficiency.
The design of a pyrolysis boiler allows fuel to burn in one of two combustion chambers, and to gas in the third. The Blago device is non-volatile and always produces the required power. Complete combustion of compounds of phenolic groups - tar, resins, alcohols, essential oils - takes place.
The installed rails in the combustion chamber act as good heat accumulators. Peat briquettes, sawdust and coal can be burned in a pyrolysis boiler. During periods of low temperatures, fuel can be constantly added to the combustion chamber, maintaining the optimal temperature in the room.
Thus, despite the fact that it is the 21st century, people still turn to wood as a natural resource for heating. Now it is clear why, of all solid fuel devices, pyrolysis boilers are of the greatest interest to the population.
How to make a pyrolysis boiler with your own hands, step-by-step instructions and drawings
Unfortunately, the process of “gasification of all Rus'” is still far from complete.
Installing a heat generator powered by the electrical network in a private home is not a cheap option, given the existing electricity tariffs and their endless growth. Probably, mainly for this reason, the popularity of solid fuel boilers does not decrease, one of the varieties of which is pyrolysis models (another name is gas generators). How and from what to assemble a pyrolysis boiler for domestic use with your own hands is the topic of the proposed article-instructions.
Operating principle of pyrolysis boilers
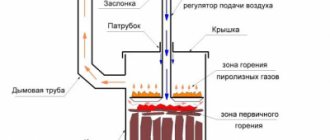
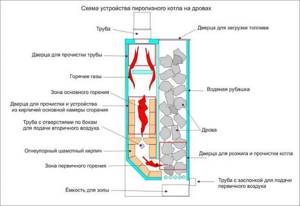
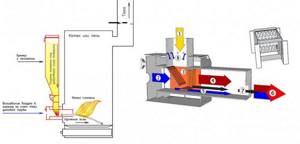
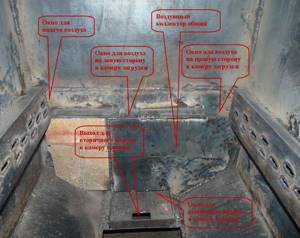
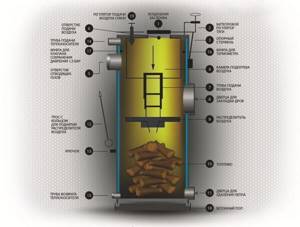
High efficiency, therefore, economical fuel consumption in such installations is achieved by dividing the combustion chamber into 2 compartments. There are several designs of pyrolysis furnaces. For example, this.
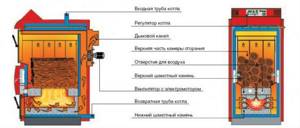
Upper chamber. Fuel is loaded into it and burned. The peculiarity is that it is necessary to ensure a lack of oxygen. Under this condition, the process of decomposition of the product slows down, but in fact, only its charring occurs (economical consumption!) and increased gas formation is initiated. Actually, this is what is called pyrolysis.
Down Cam. It receives volatile substances from the 1st compartment, which, due to additional air supply, burn, releasing heat. Only a small part of it is spent on maintaining the pyrolysis process, and the rest goes to heating the coolant.
The figure clearly illustrates the main operating cycles of a pyrolysis boiler.

In some models, the cameras are located on the same level.
Actually, the point is not in the engineering solution, but in assembling an installation in which the pyrolysis process can be implemented, that is, to ensure long-term combustion of fuel. And the choice of a specific scheme is at the discretion of the master.
Features of manufacturing a pyrolysis boiler
Materials
It is better to make the body of the pyrolysis boiler from sheet steel (from 2 mm, depending on the design power). Boiler models that are assembled from thick-walled pipes are hardly suitable for heating a private home. Basically, such installations are used to heat various utility rooms, garages or temporary sheds.
Larger pyrolysis boilers are mounted like most heat generators - rectangular in shape. In some cases, if the model is powerful, it is advisable to line its walls (inside) with fireclay bricks.
Dimensions of pyrolysis boilers
One of the most interesting and “mysterious” questions on this topic. All calculations are made in relation to a specific house, its heating system, with all its nuances, diagrams, and so on. The author will not provide mathematical calculations and asks you to take his word for it. It is better to entrust the design of a pyrolysis boiler to a specialist. Developing documentation costs money, but in any case it will cost less than purchasing an industrial-made installation.
Specifics of operation of pyrolysis boilers
Without knowing some of the nuances of using such equipment, it makes no sense to start manufacturing such a model of a heat generator.
Quite “strict” criteria for the moisture content of burned fuel. For example, for firewood the maximum value is 33±2%. What is this connected with? An increase in temperature initiates the evaporation of moisture contained in the product. Naturally, the steam will begin to mix with pyrolysis gases and negatively affect the intensity of the combustion process. The use of wet fuel sharply reduces the efficiency of the installation.
Not all types of solid fuel are suitable for combustion in pyrolysis boilers. Taking into account the specifics of their work, only materials characterized by high gas formation during combustion can be used. The lack of volatile substances affects the operating efficiency of pyrolysis models. Simply put, a lot of firewood is consumed, but the benefits are minimal.
In conclusion, we can point out that the cheapest model (and of low power) costs around 48,000 rubles. In conclusion, we can point out that the cheapest model (and of low power) costs around 48,000 rubles. And it is not a fact that such a pyrolysis installation will completely suit the owner. For example, dimensions in accordance with the chosen installation location. If you think about it, making a pyrolysis boiler with your own hands, according to individual drawings, is a good solution to the problem of heating a private house, especially if it is impossible to connect it to the gas supply line.
Device
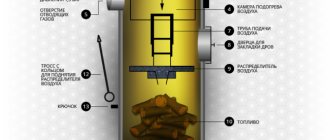
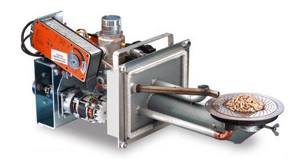
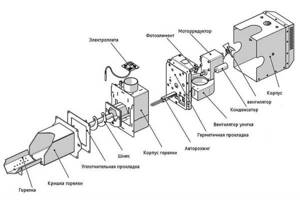
Any burner has one goal - creating a powerful flame to heat the air or water jacket of the boiler. At the same time, the combustion power itself can be adjusted independently.
A pellet burner has similar goals. The device is a wind tunnel into which solid fuel is supplied and air is pumped for combustion. Fuel is supplied to the pipe using a special screw-type conveyor. The fuel itself is located in the loading hopper before combustion. The bunker can have a different volume, and it depends on the volume how long the burner can burn on its own without human intervention (adding fuel).
Pellet burner structure: 1 - The pellet enters the burner under the influence of gravity; 2 - Air enters the burner due to the vacuum created by the draft of the chimney; 3 - Pellet combustion occurs in the combustion chamber, which is called the “basket”; 4 - Due to the high temperature, thermal decomposition of wood occurs in the basket, which forms a flow of flammable gases; 5 - A secondary air flow passes under the basket; 6 - In the burner nozzle, the flow of combustible gases and secondary air mixes, forming a torch; 7 - Solid combustion products are ejected from the burner into the ash pan of the boiler or furnace by a stream of secondary air; 8 - Ventilation of the supply channel does not allow hot gases to diffuse up the channel and destroy the pellets, ensuring a stable supply of pellets.
Air is forced into the combustion zone by means of a fan.
The combustion chamber in the burner can be round or rectangular. Round burners are the most common due to their ease of manufacture. A pipe connection is attached to the outside of the combustion chamber, through which fuel is supplied from the conveyor.
The design also includes an ash pit in which combustion waste accumulates. During the combustion of pellets, a little ash is formed, so you need to clean the ash pan no more than once a week when the burner is actively used.
There are several types of pellet burners, each of which has its own advantages and disadvantages.
Flare type
Initially, the device was used to generate heat by burning grain, but later it was converted to burn solid compressed fuel.
Side view of a flare type burner
- Small overall dimensions;
- Can be used in conjunction with boilers with a small combustion chamber;
- Simplified operation;
- Increased reliability;
- You can burn low quality pellets.
- Low power compared to other burners;
- The flame is directed horizontally, which is why it heats the boiler locally.
Volumetric type
Unlike the previous model, they have increased power and high efficiency. The disadvantages of the device include a complicated design, large overall dimensions, and dependence on the quality of the pellets used.
General view of the volumetric combustion burner
Fireplace
Combustion of pellets in a fireplace burner
Similar designs are mainly used in domestic conditions, installed in fireplaces and boilers. The operating principle of the device is as follows: pellets fall into a special bowl, where they are burned under the influence of air supplied from below.
The disadvantages of the model include the size of the device and the need for precise adjustments for proper combustion.
Detailed analysis of the scheme
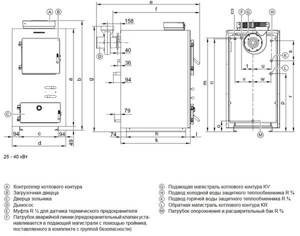
According to the diagram presented above, our DIY pyrolysis boiler will consist of the following parts:
Apart from the fan, such a controller is the only electronic thing in the entire unit. It is strictly not recommended to save on it.
- Electronic controller that controls the fan for the boiler;
- Door for loading firewood (you can make it yourself or buy a ready-made one);
- Ash pan door;
- Blower fan (purchased in a store, creates draft and draws pyrolysis products into the afterburning chamber).
The controls include the controller itself and handles for opening/closing doors.
The procedure for manufacturing a pyrolysis boiler
Before you start making a boiler, check out some useful tips. Subject to their compliance, the finished equipment will be as productive, efficient and economical as possible.
Useful tips
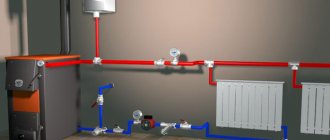
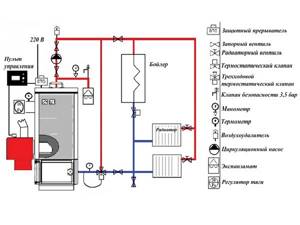
- The system must be equipped with a valve to regulate the flow rate of the coolant.
- To increase heat transfer, it is better to make the coolant pipe curved, for example, in the shape of a coil.
- The opening for loading fuel must be rectangular. In this case, the hole door should be equipped with a steel plate for sealing.
- To control the intensity of the incoming air flow, the system is equipped with a limiter.
Instructions
Drawing of a pyrolysis boiler
First step. We cut out the walls of the boiler body from sheet metal in the amount of 4 pieces. In the front wall we cut out holes for the combustion chamber and ash pan.
Second step. We cut holes for the pipes and the smoke exhauster.
Third step. We connect all the metal walls together, with the exception of the back one. For this we use a welding machine. We carefully sand the joints between the sides of the future heating boiler.
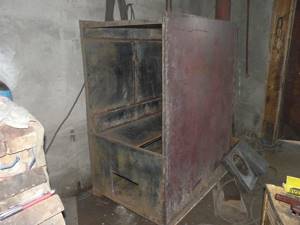
Boiler walls
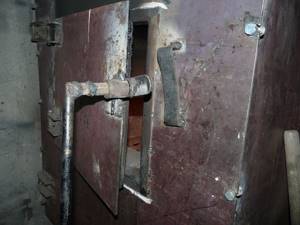
Door
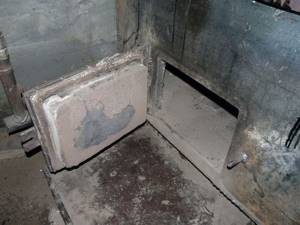
Ash pan
Fourth step. We assemble the boiler heat exchanger in accordance with the diagram presented. We weld pipes.
Boiler
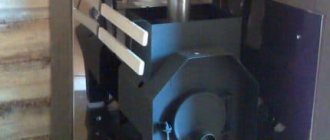
Fifth step. We insert the heat exchanger into the boiler body. We make sure that the connections are tight using a compressor. If there are no leaks, we weld the rear wall of the housing.
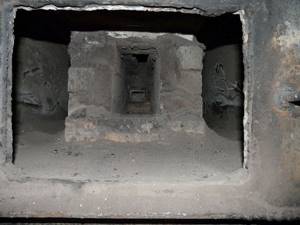
Sixth step. Install the grate. It will divide the boiler body into 2 chambers. In one (bottom) the load will smolder, in the second the gases will burn. We complete the lower chamber with an air duct, and then line it with fire-resistant bricks on each side.
Pyrolysis boiler body from the inside
Seventh step. We install the doors of the ash chamber and firebox. They should fit as tightly as possible to the body.
Eighth step. We install the assembled boiler on a pre-laid brick support platform.
Ninth step. We connect the chimney. It is recommended to wrap the smoke exhaust pipe with mineral wool for insulation.
Tenth step. We connect the water circuit to the unit.
Eleventh step. We install the blower pump.
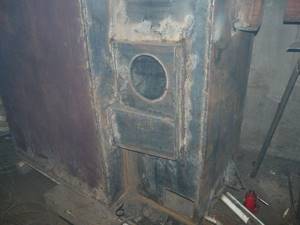
Boiler
DIY pyrolysis boiler
Additionally, the boiler can be automated by installing a system of temperature sensors and regulators. They will control the intensity of air supply.

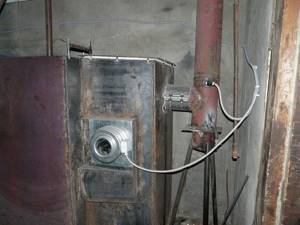
Hood near the boiler
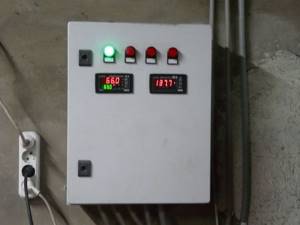
Automation unit (pump, exhaust and sensors connected)
Pyrolysis boiler: advantages and disadvantages
Obvious advantages:
- Enlarged fuel loading chamber;
- High efficiency , allowing you to maintain a given temperature for longer;
- Can operate up to 24 hours on one load of fuel;
- Possibility of power adjustment from 40 to 100% ;
- When burned, no soot is formed, only ash, and even then in a minimal amount.
Flaws:
- The classic disadvantage is the high cost of the boiler. Making a pyrolysis boiler with your own hands solves this problem;
- Forced draft is required, as a result of which there is a need for a constant connection to electricity;
- Impressive dimensions of the structure;
- Mandatory use of dry wood. It is impossible to achieve an effective pyrolysis process with fuel with high humidity. Moisture content significantly reduces efficiency .
Making a pellet burner
Pellet installations are often ignored by buyers because of their high cost compared to gas and electric equipment, and the problem is solved by making the device at home.
General diagram for making a pellet burner yourself
The combustion chamber can be constructed from a square or round pipe. It is better to give preference to heat-resistant steel that can withstand elevated temperatures; the wall thickness should be at least 4 mm.
The home-made installation is fastened to the boiler using a flange plate made of heat-resistant steel with a thickness of 3 mm.
A container for supplying fuel to the combustion chamber can be purchased or made by yourself. The best option is to immediately make an installation in which fuel will be supplied automatically. To do this, place an auger in the purchased pipe of the required diameter. The rotation of the device will be carried out by a bearing, gearbox and motor operating at low speeds.
Additionally, the store can purchase a fan that will pump air. The fan is mounted on a plate, which is made depending on the size and door design of the boiler used in your home.
It is also important to take care of adjusting the amount of incoming fuel and the volume of air pumped by the fan, otherwise the homemade device will work unstably. In home devices, the air supply force and the number of pellets are adjusted manually
This method is inconvenient because it requires constant supervision of the burner.
For automation, an electrical incandescent element and a photosensor are purchased. The first device ignites the flame if the pellets go out and also regulates the switching on of the device. The photo sensor monitors the appearance of the flame: if the flame is stable, the sensor transmits a signal to the glow element to stop ignition.
To automate the system, a filling sensor is also purchased. It will notify the electronics of the device about the degree of filling of the combustion chamber with pellets.
Pellet burners are modern equipment for boilers, which can improve the environmental friendliness of the process and reduce fuel costs. At the same time, the equipment in the store itself is expensive. For basic household needs, it is better to give preference to homemade devices, the operation of which can be automated if necessary.
Natural
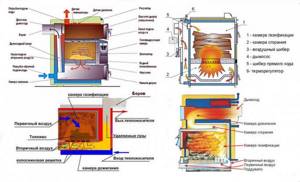
Pyrolysis boilers using natural draft are preferable to forced ones at powers up to 25-30 kW. They are, naturally, cheaper, and the loss in efficiency of 5-10 percentage points in heating costs at such powers is almost not felt, but no power supply is required. You just need a chimney with good draft, at least 5-6 m high. If you plan to install a boiler to replace an old Dutch oven or an out-of-place boiler, then a natural draft boiler is the best option.
However, here too you need to choose from two different types. The first (bottom left in the figure with boiler diagrams) is with a separate supply of primary and secondary air. The second (right there) – with a single air flow.
Negative effects of reduced loads
In addition, during calculations, one should take into account the negative impact on the entire fuel system of working with a reduced load.
Do-it-yourself operation of a long-burning pyrolysis boiler
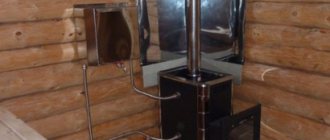
Setting up the correct functioning of the boiler after installation also has its own characteristics. Normally the boiler does not smoke. Before turning on for the first time, the boiler is connected to the chimney and filled with water. A thermostat is placed on the boiler to control liquid temperature indicators. To mount the thermometer, special holes are provided in the boilers.
Boiler activation sequence:
- The fan is connected to the power supply and tested for functionality. The air dampers should be in the middle position.
- A small amount of paper and wood chips should be placed in the hopper. The chamber doors will need to be closed.
- The chimney throttle valve opens, the fan turns on and the paper is set on fire.
- After the firewood burns, the nozzle closes.
- Combustion control is carried out through the lower combustion compartment.
- After the liquid boils, you will need to turn off the fan. The flame will go out and the water will begin to cool.
Installation of the boiler requires compliance with safety regulations. It is better to install the device in a separate boiler room. The device is installed on a brick or concrete base. An interval between the boiler and the walls is provided - from 20 cm.