Many people believe that in order to take a steam bath in camp conditions, you need special equipment and special skills and knowledge. In fact, a camp bathhouse with a stove is very simple to build, and does not require practically any tools other than those that you already take on a hike: an ax, a shovel and, in some cases, a hammer.
The easiest way to arrange a bathhouse
The main stages of constructing a bath using improvised means
This chapter is a kind of instruction on how to make a sauna in camping conditions, and by following each of the stages, you can easily take a steam bath even far from the benefits of civilization. The requirements are quite simple, but the reliability and convenience of the structure depend on their implementation.
Selection of location
The following factors should be considered at this stage:
- The soil at the construction site must be quite dense, especially if a frame of stakes driven into the ground is being built. It is impossible to build a reliable structure in soft soil.
- It is best to choose a place next to a body of water - after the steam room it is pleasant to plunge into cool water, in addition, in the wild this is the only way to wash.
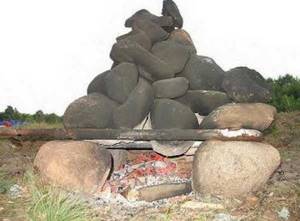
- The stove for a camp sauna is made of stones, so it is worth inspecting the area for their presence. Carrying boulders for a kilometer is not very smart, and it’s hard.
The stove requires quite a lot of heavy stones
Construction of the stove
Perhaps this is the most important stage, which determines how good the steam room will be.
To achieve a good result, you should follow a few simple rules:
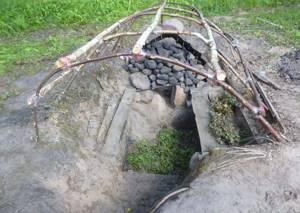
- In the place where the heater will be located, it is necessary to remove a layer of soil and lay out an improvised foundation of stones.
- The stones must be oblong in shape, the surface must be smooth and uniform without foreign inclusions. The size of the stones is 20 cm or more; as is known, the larger they are, the longer the heat lasts.
- The construction of the hearth can be carried out in two ways: alternating layers of stone and firewood and subsequently maintaining the flame, or laying out a kind of hearth with a diameter of about 70 cm and the same height. Space is left inside for storing firewood, and a flat stone is placed on top. So that you can put a bucket of water on it to heat it up.
- After finishing the installation, you can make a fire, since the improvised stove for a camp bath heats up for quite a long time - about 4 hours, until the stones are white-hot or red-hot, depending on their type.
Advice: do not use layered stones, as when heated they lose strength and when water is poured over them they can simply explode, which can lead to quite serious injuries.
If you can find steel pipes or other elements, it’s much easier to make a hearth
Frame structure
A bathhouse in camp conditions is constructed from any available means that provide the necessary reliability of the structure. It’s a good idea if you have a ready-made metal frame of a suitable size - this greatly simplifies and speeds up the process.
If there is no ready-made frame, you can build it from improvised means:
- Wooden poles are quite strong and can be prepared on site.
- Rope, insulated wire (metal can melt the canopy when heated), twine and other materials to strengthen connections. If you have a hammer and nails, even better.
First, the size of the building is determined, after which 4 poles are hammered into the corners; if the building is long, then additional poles can be placed between the corners. Two more crossbars are laid crosswise on top; they are designed to prevent the ceiling from sagging.
Some people prefer a safe design in which the heater is located in a separate area, this minimizes the danger of touching hot stones. You can see the features of its device in the figure.
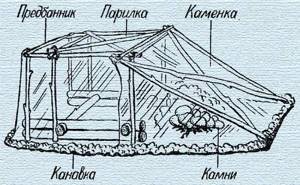
One of the options for a camp bathhouse frame that you can build with your own hands
After this, the frame can be further strengthened with spacers or cross members and all connections can be checked for reliability and stability. If everything is fine, you can proceed to the next step.
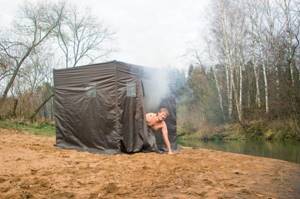
Canopy for camping steam room
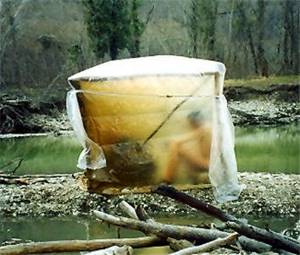
Most often, one or two pieces of plastic film are used for these purposes. It is quite light, in addition, it can be used as a means of protection from bad weather. You can also use an awning for a camp bath made of tarpaulin or other fairly reliable material that retains heat well.
The size of the material should allow the canopy to be strengthened near the ground using stones or sand (a reasonable solution is to dig a groove around the perimeter, with its help you can significantly increase the tightness of the structure).
The floor in the steam room also needs insulation. First, coniferous spruce branches are laid, and branches of deciduous trees can be laid on top.
Using this simple method, you can significantly improve thermal insulation and increase the comfort of your stay in the bathhouse. The easiest way to use logs as seats.
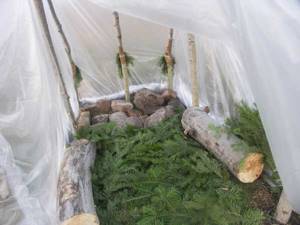
In the photo: insulation with spruce branches and seats made of logs
Advice: never use synthetic materials used in the manufacture of modern tents as canopies - when exposed to high temperatures, they emit harmful substances, in addition, this option is very short-lived, and after several uses the fabric will become unusable.
Bath accessories: what we put in a backpack
Camping baths are not just a tent structure. In order to build it yourself, you will need certain tools.
- A container for heating water - a kettle or a bucket will do. Consider the square footage of your tent.
- Ax and saw. Preparing firewood for future use is the first rule in a sauna tent with a stove.
- Dried brooms, light and compact. There is no point in steaming without them. A fresh broom made from living branches is dangerous.
- Clothes and towels. For drying the body and hair after a steam room or swimming in a pond (if there is such an opportunity near the bathhouse).
- Mat for sitting. Mats, a blanket or blanket to prevent catching a cold on the cold ground.
- Dry field herbs for tea, fragrant steam.
- Metal or wooden tongs and a bucket for hot stones.
Homemade stove for a camp sauna
Firewood, clean water and stones for a makeshift stove can sometimes be found at the bathhouse stop. If you go to a proven, familiar place, then you probably know the features of the area.
Features of visiting hiking steam rooms
We looked at how to make a sauna while camping, but we should note the basic rules that should be followed to ensure safety and achieve the best effect:
- Until the firewood burns out, one of the walls or the ceiling should be left open to prevent the accumulation of smoke and carbon monoxide.
- When the stones are hot enough, a container of water is placed on them, which will be used to water the heater.
- After the wood burns out, all the heat is carefully removed, after which the tent is completely closed.
- It is reasonable to additionally protect the walls around the heater with thick fabric or a screen made of wooden poles.
- You should ensure that the canopy is securely fastened; the less heat loss, the longer the good temperature in the bath will remain.
- The stones are watered, causing steam to be released. Cooling down takes one and a half to two hours, this time is enough for an average tourist group to take a steam bath.
- You should not build a structure that is too large for several people; the larger the frame, the greater the heat loss.
Small sauna for two or three people
The need for a mobile sauna
Not only in camping conditions there is a need to arrange a place where you can take water procedures. This idea of how to make a mobile bathhouse with your own hands will be a good solution for summer residents and developers who have just started building a private country house and utility block.
If you have such a temporary bathhouse, you will be able to go to bed clean and relaxed after procedures in a small but excellent bathhouse. As a result, the night's rest after a hard day will be complete.
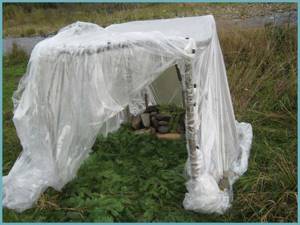
Ready-made camp baths
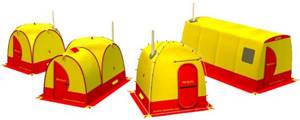
A ready-made tent for a camp sauna is the choice of those who like to take a steam bath in nature
Nowadays, there is no shortage of options for mobile sauna tents.
It is worth considering the main points:
- The size of the building and its features - the design may include a dressing room, windows and much more. The price depends on the availability of these parts.
- The material from which the tent for the camp sauna is made. It must be light, durable and resistant to high temperatures. To use the steam room in cold conditions, models with double walls are available, this allows you to use the steam room at temperatures down to -40 degrees.
- Presence of a frame. Some tents are a canopy that fits over any structure of suitable dimensions, and some have a frame, thanks to which the installation of a mobile steam room is greatly accelerated and simplified.
- Lightness of design. Some models weigh 2.5-3.5 kilograms when assembled, which allows you to carry them even while hiking.
Bathhouse for hiking for 4 people, the weight of which when assembled is 2.5 kg
Brick, stone or block bathhouse
The walls can be made of ceramic or silicate bricks, rubble, limestone, shell rock, foam blocks, cinder blocks, and gas blocks.
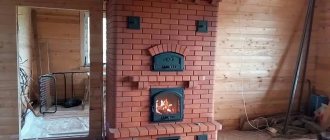
Special stoves for camp baths
If you most often travel by car, a smart decision would be to purchase a ready-made mobile sauna stove. It is quite compact and light weight. It requires much fewer stones to work (many people carry them with them so as not to waste time searching).
Such stoves are equipped with a spark arrester, which is very important when used in tents made of flammable material. They have a fairly attractive appearance.
Pipes for the chimney are included; most often, tents have special holes for their installation.
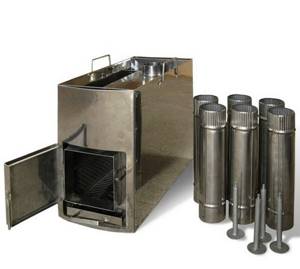
Compact camp stove for sauna
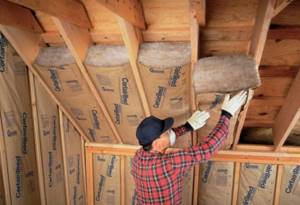
Insulation and vapor barrier
A frame bathhouse is not insulated - when constructing the frame, thermal insulation is immediately installed in it. A wooden structure needs a sheathing where the necessary material will be laid. But other types require more complex work.
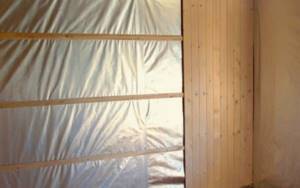
You will need mineral wool, the thickness depending on the climate conditions and the type of bath. As a rule, the layer thickness is about fifty millimeters. The insulation itself can be either mats or rolls.
Vapor barrier is very different from waterproofing. The first one will do its job perfectly, even if it’s cheap, while the second one will only ruin everything.
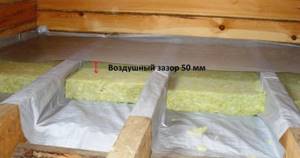
Therefore, you need to be careful not to confuse them and not buy a fake.
Conclusion
How to make a camp sauna and what to use for it depends on your desires and capabilities. Naturally, if you travel on foot, carrying a ready-made stove and a tent with a frame is quite expensive. In this case, the easiest way is to carry only a ready-made awning, and build the frame and stove on site (see also the article “Do-it-yourself camping sauna - in nature with comfort”).
If you are a fan of car travel, then you can carry a complete set and build a mobile steam room in a matter of minutes. Moreover, its size can be very impressive, which is important when vacationing with a large group.
In order to understand all the intricacies even better, we recommend watching the video in this article, which clearly shows the beauty of using a bathhouse on a camping trip.
Did you like the article? Subscribe to our Yandex.Zen channel
Construction of a bath structure: “in white” and “in black”
Let us consider step by step the process of installing a bathhouse “in white” (the stove is located outside the steam room):
- We make the frame. We take 8 wooden poles at least 1 m high. We need to build a frame. We drive 4 supports into the ground, using the remaining ones we form the sides of the tent. We secure the corners with a large amount of tape.
- We are building a heater. To do this, you will need 3 poles about 30-50 cm long. We attach them at an angle to the smaller side of the frame using tape.
- We cover the base with film. The standard width of a film sleeve is one and a half meters. We cut it and get a three-meter covering material. Now you can carefully cover the base with prepared polyethylene. This should be done carefully so as not to damage it on the sharp ends of the frame.
Camping sauna in white
- We secure the polyethylene with good old tape or clothespins, leaving enough of it for the door of the structure. In the future, it can be closed either with a clothespin or with the help of a person who will hold it from the outside.
- We fix the film to the ground using heavy stones. We cover the roof and floor with spruce branches for better heat retention.
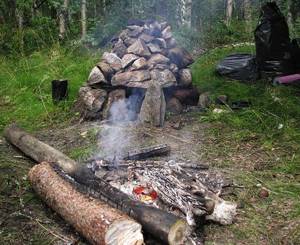
- We build a small structure in the form of a well from stones prepared in advance. We cover it around the perimeter with a dense layer of firewood and light a fire (the stones will warm up sufficiently in about an hour).
All that remains is to transfer the hot stones into the heater using a sapper shovel, for example. And the bathhouse is ready!
The main difference between a “black” sauna and a “white” one is the location of the stove. In this case, it is located directly inside the steam room. The process of installing a black bath is somewhat different from the previous one:
- We make a small frame from reinforcing bars about 50 cm high. We lay stones on top. This stove design is very convenient and practical.
- While the stones are heating up, you can start building the frame (right above the stove). We do this using the same principle as in the previous case, or simply put up a tent.
- When the stones heat up to the desired temperature (this will take more than one hour), cover the frame with polyethylene (we fix the tent tightly to the ground around the perimeter). You can remove the coals. The steam room is ready!
Taking a steam bath is great. And it’s even better when it’s always “at hand.” Now you can feel the heat of the steam room when you go on vacation, because it’s easy and simple to build a camp bath. Steam with pleasure!
For comparison: how much does a factory sauna tent cost?
Today, camp baths are produced by both Russian and foreign companies. The price of the finished model ranges from 25,000-30,000 rubles. (the set consists of a heater, a hood and a thermal tent). The amount is considerable, but you can save money: build the frame yourself and buy only a small metal heater. In this case, the costs will be about 9000-10000 rubles.
Factory-made mobile sauna
Options for mobile baths
Prices for a camp sauna
camp sauna
Principles for selecting ready-made models
To choose a good camp sauna in a store, you need to know what criteria should be taken into account when purchasing and study models of ready-made structures.
Criteria
Criteria for choosing a ready-made sauna tent:
- Number of visitors. You need to calculate in advance how many people will go to the steam room. This will allow you to choose the size of the tent. The tourist steam room is suitable for 2-3 people visiting at the same time.
- Frame material. It is better to choose structures made of aluminum rods or hollow metal tubes. The former are used to assemble a semicircular canopy, and the latter – a rectangular or cubic frame.
- Number of layers of awning. It is not recommended to buy three-layer products, since moisture begins to accumulate inside, which can leak onto visitors during bath procedures.
- Awning material. It must be solid and manufactured. Products made of water-repellent material should be used.
- Availability of additional elements. Often a floor is included with the kit. It is better if it is a product made of flexible material with PVC coating on the front side.
- There is a hole for the chimney. It should be located in the roof or side wall.
- Build speed. It's better to check it right away in the store.
You need to think in advance whether a waiting room is needed. It will retain cold air from the street and add free space for preparation for bath procedures.
You also need to pay attention to various little things (hangers, windows, shelves, etc.), furniture for a camp bath. Some ready-made baths are equipped with folding shelves and chairs.
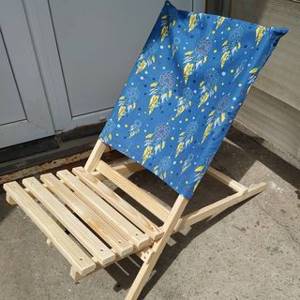
Folding chair (Photo: Instagram / wood_in_zp)
Advantages and disadvantages
Positive sides:
- Bath procedures can be carried out in nature, without postponing them until you come home.
- To build the frame, it is enough to find a flat surface and secure the structure with spacers.
- You can assemble a steam room using available materials. It is important to have a thick film with you to cover the frame.
Flaws:
- Excess weight if the steam room consists of a metal stove and hollow frame tubes.
- Low level of comfort. It is very difficult to lift it in a tourist steam room.
- High price of finished structures.
It is impossible to lie down and relax in a portable steam room.
Models and prices
The highest quality steam rooms for travel:
- Nova Tour;
- "Mobiba".
Price - 12,000 rubles.
Hiking steam room "Mobiba" (Photo: Instagram / mobiban.ru)