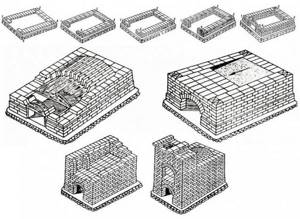
Projects
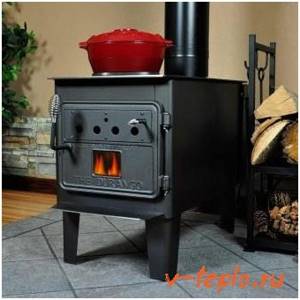
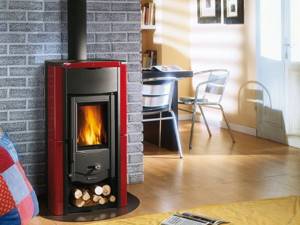
The first project that we want to propose is a combined design that is responsible for two functions at once: space heating and cooking, in other words, a cooking and heating stove.
Perhaps this is the best option for a country stove, since it is small in size, quite economical and easy to build. The appearance is very ascetic, but quite sufficient for a dacha. The second option worthy of attention is a compact stove designed only for heating rooms. The competitive advantage of the model is its small dimensions and high heat capacity.
Another stove that is perfect for a summer residence is the Malyutka stove, which is a compact cooking and heating stove. It has a higher efficiency compared to the first option, but is a little more difficult to build. We have discussed in detail the procedure for constructing a baby stove in a separate material - design and construction of a baby stove.
Perhaps some readers will want something more. For you, we have prepared a selection of stoves, which are usually built not in a country house, but in a residential building. Of course, they are more complex and expensive to build:
- “Swedish” - a heating and cooking structure with an enlarged brass section;
- Dutch - an ergonomic heating stove with a spacious rectangular firebox without a vent;
- Russian - a large-sized cooking and heating stove with a characteristic wide upper part, which can be used for household needs.
- fireplace - for those who don’t need to cook on the stove, but just want to add coziness.
Advantages and disadvantages
The advantages of such units are obvious and significant:
- They are completely autonomous. Wood-burning stoves will in no case depend on any external communications.
- They can be equipped independently; they do not require any special care.
- Finally, such stoves are simply calming. You will feel completely at peace.
But they also have disadvantages, albeit not so significant. However, when purchasing them you should consider:
- They need firewood. Firewood needs to be stored somewhere. And the chimney should be installed correctly so that smoke does not occur later.
- You should always keep an eye on such a stove, especially if there are small children living in the house.
- The firebox requires periodic cleaning.
- There is no need to place any interior items near such a stove.
Average cost of wood heating stoves.
Heating equipment is not bought for a week or even a year, so the purchase should be taken seriously. Today there are a lot of models, from the most economical to the expensive elite ones. So you should buy according to the manufacturer and, of course, according to the amount of money you have.
Most suburban residents prefer foreign-made models. Perhaps the most popular brand is Harvia, as it is characterized by environmental friendliness and high quality of materials used in production. Yes, the Finns are at their best again.
Important! Pay attention to the presence of chromium impurities in the material, as this significantly increases the durability of the devices. The fact is that such materials are more heat-resistant.
Another important point is the efficiency of a wood-burning stove; the higher it is, the higher the efficiency of its operation will be. It is also desirable to have ventilation and safety of the unit so that accidental burns do not occur, excuse the pun.
Regarding how much heating wood stoves cost, the range in this case is very wide: from twenty to one hundred and fifteen thousand rubles. Thanks to this, buying a stove is accessible to almost everyone, but the quality largely depends on the cost, so you shouldn’t really expect a miracle from a “twenty thousandth” unit.
We would recommend using domestic stoves more temporarily, in rooms where people do not live permanently. There are good reviews on the Internet about, most of the models of which have a wonderful panoramic window that allows you to enjoy a live fire in the house.
It is characteristic that modern ovens have thinner walls than models, for example, ten years ago. After all, the use of heat-resistant steel allows this, but the strength of the units does not suffer at all from this.
Video review
What do experts advise?
Indeed, what would experts advise regarding such stoves? And they say that the main points are the following:
- External cladding.
- Economical.
- Can the oven provide the highest possible temperature?
- Simplicity of the stove design.
- Finally, the heating of the entire surface should be equally good.
In addition, it must fully comply with all current fire safety standards, because the essence of its work is based, as you might guess, on open fire. It is also extremely important that there are no cracks in the shell of the device, because they will not only deteriorate the efficiency of heating the house - they can even cause a fire! So be careful.
And lastly: if there is a choice between buying a stove and buying a battery, then it is better to choose a stove, since it does not dry the air, and it does not require a large footage of various pipes.
Where is the best place to install?
The place where the stove is placed in a house or cottage is important. The best option is to install the stove near a wall with an adjacent room.
With this arrangement, you can heat several small rooms with one heating device. And in this case, there is no need to install several heating structures in one house.
When choosing an installation location, various factors need to be taken into account:
- Ceiling height;
- Area under the base;
- The exit point of the chimney pipe should not be near the floor beam or rafter system of the house.
Good installation option
Choosing a location to install the stove is one of the most important steps. If you make a mistake already during this period, then even the most correct bricklaying and good wood fuel will be unable to help in long-term heating of the entire room.
Stove heating: advantages and disadvantages
Despite the abundance of high-tech boiler installations, simple wood-burning stoves have not lost their relevance in our time.
- Low fuel cost. Cut branches and dried trees can be found at any summer cottage, so you can prepare firewood for the winter without serious labor or any expenses.
- Independence from energy supplies.
- A lot of additional possibilities with maximum simplicity of design: drying things, cooking (in designs with a hob), installing a thermoelectric module - this is not a complete list of the capabilities of wood-burning stoves.
- Ease of use.
- Possibility of heating several rooms at once (when installed in the center of a country house).
There is another advantage that is not entirely obvious, but it is the simplicity of the design, which makes it possible to create a wood-burning stove with your own hands.
However, the owner of a stove heating system will have to put up with such disadvantages as: fire hazard and the absence of any automation that controls the combustion process.
Wood stove prices
The secret to the popularity of wood-burning stoves lies in their wide capabilities and variety of offerings. On the market you can find both budget compact options and luxurious units that can decorate the most sophisticated interior. No matter how charming a stove may be, constantly throwing firewood into the firebox is a boring task, which is why more and more owners of country cottages prefer long-burning stoves.
A modern version of a traditional way of heating a homeSource savoie-mont-blanc.com
If you look at average prices (in the Moscow region), they will look like this:
- Metal stoves. Heating: 5-16 thousand rubles. (depending on design). Heating and cooking: 9-35 thousand rubles. (domestic and imported). Stove-fireplace: 20-40 thousand rubles. (may have a stove and heat exchanger).
- Cast iron: From 20 to 120 thousand rubles, depending on the size and design.
- Stoves lined with tiles (tiles): 50-80 thousand rubles.
- Stone (from granite to Brazilian sandstone): 60-200 thousand rubles.
- With a water circuit: 20-55 thousand rubles.
- Long-burning stoves: 15-45 thousand rubles.
- Potbelly stove: 9-16 thousand rubles.
Types and classification
Wood-burning stoves can be divided into different groups according to several parameters:
- According to the material from which they are made.
- According to design features.
- And finally, on the principle of operation.
We advise you to learn more about heating briquettes - a more economical alternative to firewood
Now, in more detail about each of the classifications.
Types of wood stoves by material
For the manufacture of this device, steel, brick or cast iron is often used. The surface of such stoves is mostly smooth, which allows them to “fit” into almost any interior of the room. If they are made of metal, then a special door with a viewing glass is built into them, which allows you not only to monitor the process of burning wood, but also to simply admire the “live” flame.
But heating wood-burning stoves made of cast iron are a kind of old fashioned, decorated in most cases with decorative patterns. People associate them with retro style or even classics.
Types of furnaces by design features
If we consider the units from this point of view, we obtain the following classification:

- Heating stoves.
- Cooking and heating.
- With water circuit.
- Fireplaces.
And now briefly about them. As the name suggests, heating stoves can be used solely to heat a home. The second group (cooking and heating) can not only heat, but also allows you to cook food. Fireplaces, in addition to their direct heating “responsibilities,” are also a decoration of the house, a kind of decorative element.
They are compatible with almost all styles. Their combustion chamber is open, and this is necessary not only for heating, but also in order to visually enjoy the burning flame. This creates a characteristic atmosphere of coziness and comfort, with its own smell and so on. Finally, units with water circuits, in addition to heating, also allow you to prepare hot water. This is especially important in those buildings that do not have a centralized water supply. After all, of course, everyone needs hot water.
Types of furnaces according to operating principle
Here the conversation should have been almost about what heating wood stoves work on. But here’s the catch: only wood can be such fuel, and that’s why this type of heating is so cheap and suitable for any settlement, regardless of its remoteness.
So, according to this principle, ovens can only be divided into:
- Conventional devices that can function for no more than five hours after one bookmark.
- Long burning stoves. This became possible thanks to control of the incoming air, which, in fact, allows you to control the intensity of fuel combustion.
Wood-burning stove with a water circuit: which one to make
The essence of stove heating is the direct heating of the room due to convective and infrared heat exchange emanating from hot surfaces. To implement this principle, it is necessary that the heat source be located in the heated room. Often there is a need to make a heater with a water circuit. The latter is connected to remote radiators to distribute heat throughout the house.
To heat the coolant and supply it to the radiator system, the wood stove is equipped with a water heat exchanger. There are several types of homemade heaters and options for their installation:
- Storage tank. It is built directly into the firebox or into one of the chimney channels. It constantly contains a large amount of water, which then enters the heating system.
- Welded register or coil. A built-in heater that implements the principle of constant coolant circulation. Stopping the movement of water is fraught with boiling.
- Economizer. The hot coolant accumulator uses the heat of the exhaust flue gases. Install it purely on the chimney.
- Water jacket. The design is inherent in steel or cast iron heaters. The water jacket is enclosed between two walls and surrounds the combustion chamber and flues.
To organize water heating in a small country house, installing a tank inside a brick oven is perfect. This is a proven and reliable method that allows you to constantly heat water. Provided the liquid level is constantly replenished, it is even possible to organize hot water supply. In addition, due to natural circulation, there is no need to use centrifugal pumps powered by electricity.
When installing the heat exchanger, the nature of the impact of high temperatures on it is taken into account. Inside the firebox, where there is open fire and heat, the metal parts will not last long: after 4-6 years the design will have to be changed. The stainless steel structure will withstand this mode for up to 10 years. The optimal option is to place the heat exchanger in the smoke channel, where it will be heated by convection.
How to make a simple but effective stove?
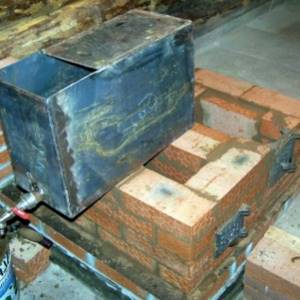
This option can serve as an alternative to the simplest metal heating devices - for example, a potbelly stove. With the help of this stove you can heat the room, cook food, and even admire the flames.
The structure occupies just over half a square meter. Unlike full-fledged brick ovens, this one does not require a foundation. The weight of the structure is not so great as to make a strong base - it is enough to lay a strong board.
The oven can be made in just a day. One of the advantages of this option is that starting heating is possible in the evening. Certain skills are necessary, but they do not go beyond the skills of the average male.
On a note! No qualifications are required to build stoves. But it is necessary to maintain order - this will make the design as effective as possible in the context of its potential.
What will you need for the job?
This is not only a simple, but also a budget option. To build the structure you will need:
- brick:
- *fireclay – 37 pcs.;
- *red – 60 pcs.;
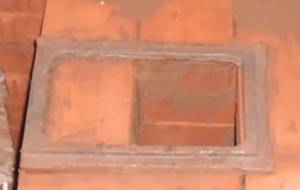
- ash door;
- firebox door;
- lattice;
- valve;
- hob made of cast iron.
Clay solution is used as a binder. In total you will need about 20-25 liters of the mixture.
It will also be interesting: barbecue oven - types and characteristics.
Preparation
The first step is to decide on the location of the stove. Since the mass of the structure is small, there are no limitations inherent in traditional brick solutions. By securing strong boards or a suitable alternative material, the “foundation” is thermally and waterproofed.
The role of an insulator can be played by a non-flammable material - for example, basalt wool. Polyethylene or roofing felt is placed on top of the base. The size of the latter corresponds to the dimensions of the base plus a small allowance.
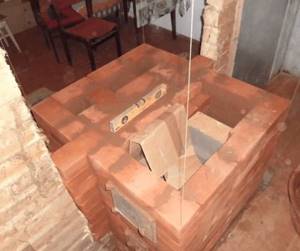
A layer of sand 1-2 cm thick is poured on top. The bedding is leveled. It is important to make the base level - the quality of the design and the convenience of subsequent work depend on this.
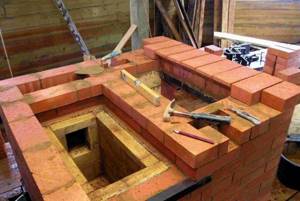
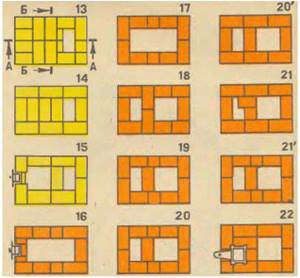
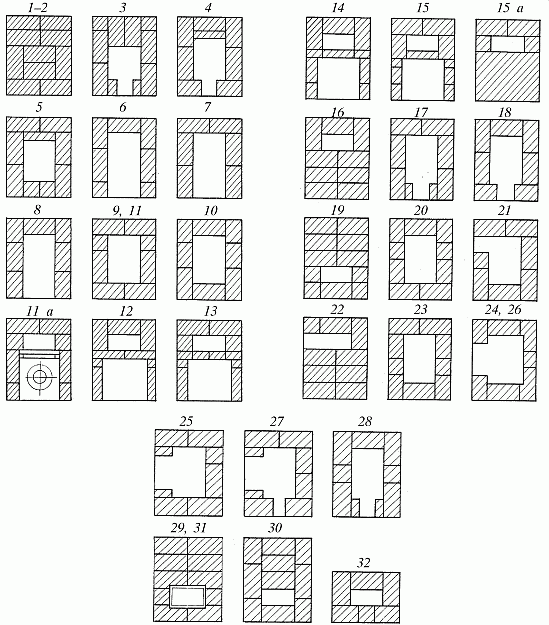
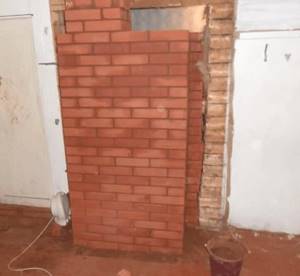
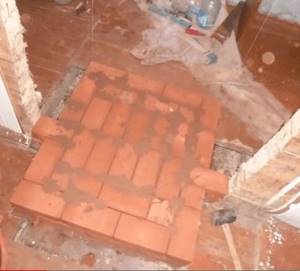
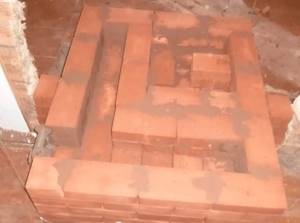
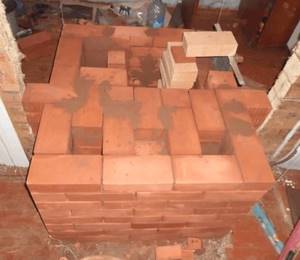
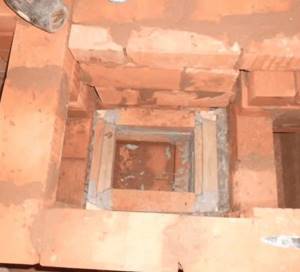
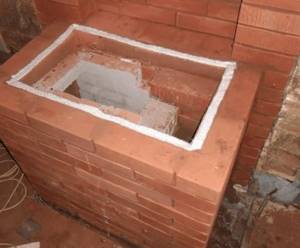
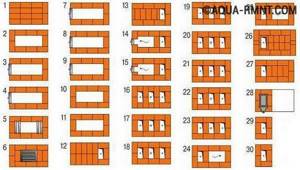
Masonry scheme
Figure 2. The order of the stove masonry
* The stove order is as follows:
- The first row is laid on sand without using a solution. A dozen bricks are leveled strictly. The bricks are coated with a thin layer of the mixture, after which the blower door is mounted at the end. The door is pre-wrapped around the perimeter with an asbestos cord, which compensates for the thermal expansion of the metal.
- After fixing the door with wire, lay the second row according to the diagram. Form a ash pit.
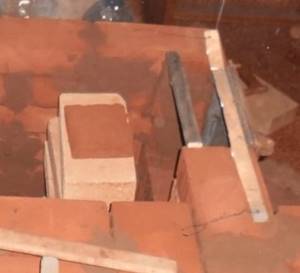
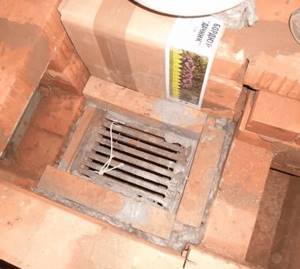
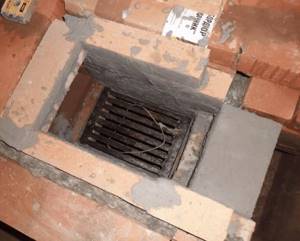
- Fireclay is used (in the diagram it has a yellow tint). After laying, a grate is installed above the ash pit.
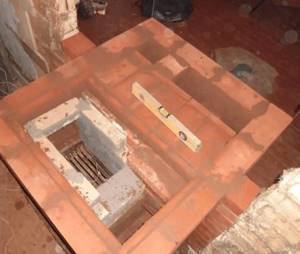
- Before this, bricks were laid flat. On this row it is placed on its edge. A smoke exhaust channel is formed, inside which a base for the partition is made. One of the bricks (seen in the illustration) is laid “dry” - it will later be removed. After this, the firebox door is installed, which is wrapped several times with asbestos strips before installation. But this must be done so that the door opens well to the top. The element is fixed with wire and a pair of bricks.
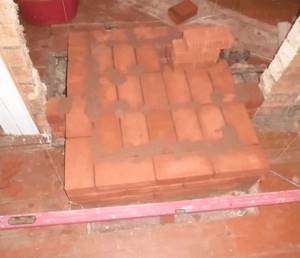
- The brick is laid flat again, duplicating the previous row.
- Again the “rib” row is the second and last row in which the brick is laid in this way. The exception is the next row, in which one of the walls is formed by laying on edge. The walls of the chimney channel should be wiped with a damp cloth.
- The brick is laid flat according to the diagram. The back wall is made using the edge-on format again.
- This row closes the firebox. A couple of bricks should hang over the firebox so that the flame moves to the middle of the hob - in case the stove will be used as a fireplace (without closing the firebox door).
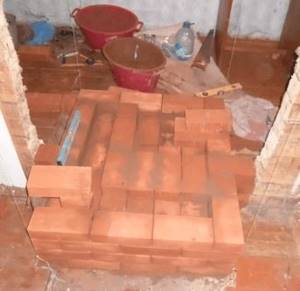
- The bricks are moved slightly towards the back wall to support the firebox door. Strips of asbestos soaked in water are laid in front of the brickwork. Thanks to this, they ensure sealing of the gap between ceramics and cast iron. A cast iron panel cannot be placed directly on a clay solution, otherwise the difference in the thermal expansion parameters of the materials will lead to the appearance of cracks.
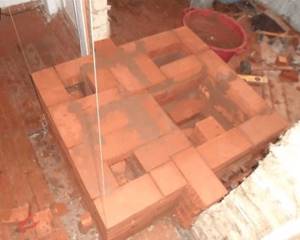
- At this stage, the formation of the smoke exhaust pipe begins. The latter, according to the plan, should gradually expand towards the back side. But only the chimney base is made of brick. The rest is made of light metal. Otherwise, the excess mass of the element may lead to a shift in the center of gravity of the stove.
- A valve sealed with asbestos strips is installed here. It is recommended to pre-coat the latter with clay mortar. This is the final row, which is used to complete the construction of a brick oven directly with your own hands. The remaining couple of rows are given to the chimney, which will then be connected to a lighter metal channel.
After this, those bricks that were laid “dry” on the 4th row are removed. At the same stage, the smoke exhaust duct and the surface of the stove are cleaned of construction debris.
Final works
The simplest stove does not require serious decorations. The only decoration is whitewashing. It is recommended to add a little blue and milk to the composition - this will protect the coating from the formation of a yellow coating and bleaching.
Important! Brick and metal should be protected before work. If this is not done (for example, using film), you will not be able to get rid of the stains.
It is necessary to coat the seams between the brick and the metal of the chimney very well, as well as the seams between the ceramics and cast iron.
It is imperative to close the joint between the stove brick and the floor. This will prevent oven sand from getting into the room. It is advisable to cover the joint with an L-shaped sheet. Then they make a plinth edging, which serves both as decoration and as an additional element that prevents the “foundation” bedding from spilling out.
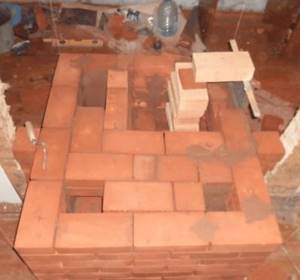
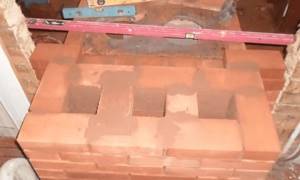
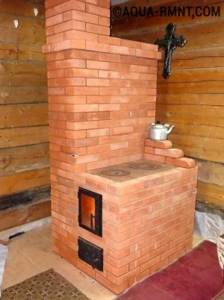
Figure 3. Functioning oven
The stove is ready. The entire process took no more than one working day. Now you can try making low-power kindling. You cannot use logs - only wood chips or paper. Wood burning will create too high a temperature and the structure will crack. For the mixture to fully set, you need to give it a week or two. After this, you can already heat it “like an adult.”
This is interesting: which stove to choose for your dacha? Review of 10 options.
Brick pyrolysis stove
Such heating equipment can be classified as long-burning. Solid fuel burns without oxygen. With the help of wood, volatile gases are saturated, and then burned at a temperature of more than 450 ° C, and they are mixed with the remaining air in the 2nd chamber.
This design has a high efficiency, which can reach up to 95%.
You can install the equipment in a country house, garage or small country house. The pyrolysis furnace consumes little fuel at maximum operation. All solid material burns almost completely. Soot practically does not settle, since coals and gas are burned.
All pyrolysis models work on this principle, but different designs differ in characteristics and appearance.

A pyrolysis oven may not be very different from classic brick ovensSource stop-othod.ru
Basic masonry techniques
In production, heat-resistant and fire-resistant materials for the firebox, as well as hardened bricks, are used. It is not recommended to build a stove yourself. It is necessary to contact specialists for high-quality and safe masonry.
Specialists carry out work in compliance with all safety standards and regulations. For laying bricks, cement mortar is used, which is diluted with sand in a ratio of 1 to 3.
For binding material, many craftsmen use clay and sand.
Each row of bricks is laid out in a certain way to form a stove for a given project. Source pechki.net.ru
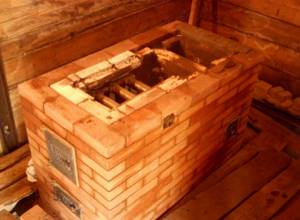
Examples of brick stove designs
Stove for a summer residence
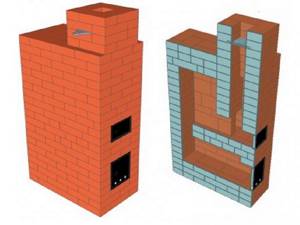
The average size of a country house is about 15-20 square meters. With a consumption of only 280 bricks, you can build a small stove with dimensions of 2 meters by 3 and a heat capacity coefficient of 1.90 kW. As mentioned earlier, the combustion part is made of refractory brick, and the entire body is built of red ceramic.
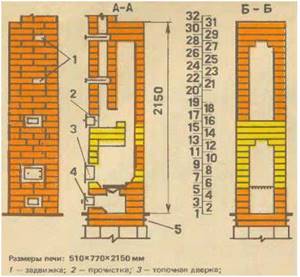
The figure shows a sectional view of the furnace design
This simple option can be easily made by every beginner out of brick with his own hands, without even making mistakes.
Scheme with order, order instructions
Despite its small dimensions and light weight, it still requires the construction of a separate foundation. The foundation must also withstand the pressure of the chimney.
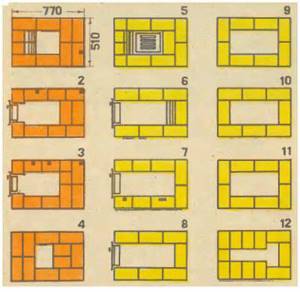
The thickness of the seam for masonry should be standard 8-10 mm, while the thickness of the seam between refractory bricks should be half as much.
It is better not to change the drawing if you do not have your own experience.
For such a stove, the chimney is laid in a brick floor.
Quantity of material:
You will need about 210 pieces of regular bricks, about 75 pieces of fireclay bricks. The clay solution will take about 70 liters. Sand 0.4 cubic meters m. One grate, door for combustion chamber, ash chamber and cleaning room. Two smoke valves. Sheet of metal for the foundation. For waterproofing, about 3 meters of roofing material.
The number of bricks is approximate, since there will be a certain percentage of broken bricks.
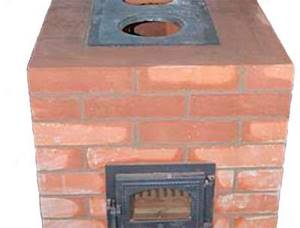
Russian stove
Such a furnace has an efficiency of 80 percent. She has a beautiful appearance. You can cook food on such a stove and its design includes a bench. The masonry and construction schemes are quite simple. Its main disadvantage is its design feature, due to which it only heats the upper part of the room. But in our country, it is still popular.
What it consists of:
- A) heated part;
- B) niche;
- B) pole;
- D) forge;
- D) shower part;
- E) shield;
- G) valve;
- H) chimney pipe;
- I) Repainting the furnace.
Large, small and medium furnaces are built according to their size. Let's consider a small one, measuring 1270 by 650 by 2380 mm.
Necessary materials:
Red bricks, about 1620 pieces. The clay solution will take about 1000 liters. Made of steel, a plug measuring 430 by 340, a valve measuring 300 by 300 (two pieces), a samovar measuring 140 by 140 (one).
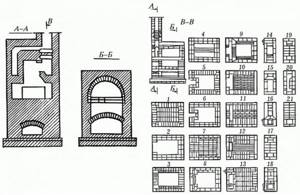
Order of the Russian stove:
Row No. 1 is laid out from solid ceramic bricks, on a lime mortar with the addition of cement. The formation of the furnace part occurs;
Row No. 2 to No. 4 a well is laid out. All seams are tied. On the one hand, they leave room for baking;
Rows No. 5 to No. 7 erect a vault over the oven;
Row No. 8 to No. 10 a castle for the vault is being erected;
Row No. 11 lay out a cold stove. Sand is poured into the remaining space between the stove and the oven;
Row No. 12 is laid out “under”. It is made from special bricks;
Row No. 13 is the beginning of the cooking chamber;
Rows No. 14 to 16 are done in the same way as the previous one;
Row No. 17 installs the arches of the mouths;
Row No. 18 laying the furnace walls;
Row No. 19 vault walls;
Row No. 20, using half bricks, narrow the hole above the pole;
Row No. 21 aligns the walls;
Row No. 22 is the stage of leveling and reducing the front pipe part;
Row No. 23 lay out a samovar;
Rows No. 24 to No. 32 installation of view valves;
Row No. 32 chimney laying. In a Russian stove, the chimney is made of 2 bricks.
Some features can be seen in Fig.
Before you start laying stoves, it’s worth trying to lay out at least one without mortar to understand the essence of the schemes. But with effort and patience, everyone can make a stove with their own hands.
Types of brick wood stoves
- Heating;
- For cooking (predecessors of modern stoves);
- Cooking and heating (combination of the two previous models);
- Special (the design is intended for special needs - drying clothes, etc.).
Heating stove with oven - step by step
It is advisable to carry out construction in the summer, at a constant air temperature.
For construction you will need: 220 bricks, three doors for the firebox (13x13 centimeters), a cleaning door (14x14 cm), a cast iron stove (38x35 cm), an oven (32x28x42 cm), a valve (27x13 cm), a sheet of asbestos cement, a grate - grate (20x30 cm), steel strip 4 mm thick (35x25 cm).
Laying instructions:
Before laying, we must build a foundation. We select the type of foundation after studying the type of soil and groundwater level. We wait for the foundation to completely harden and begin construction.
We print out the drawing, prepare a tape measure and a building level. Before construction, it is recommended to lay out the stove without mortar as a practice to avoid mistakes in the future. We will number the rows along the course of the laying for convenience. Be sure to use plumb lines and check the quality of the brick (no chips or cracks). Soak the bricks in water.
- We lay out the first two rows according to the drawing, continuous. To do this you will need 10 bricks for each row.
- In the third row, we lay the ash pan and install the blower door (we attach it to wire and special metal fasteners).
- 4: we build this row, checking the order, building up the walls.
- 5: we build a brick ceiling over the blower door, lay the grate (don’t forget to leave a small gap from the metal grate to the brickwork, pour sand into the gap).
- Next, we take an asbestos cord and wrap it around the frame of the combustion door. We build the sixth row, clamping the door fastening with bricks.
- The seventh and eighth row - we build up the walls, observing the order, again checking the drawing.
- In the ninth row, we lay bricks on top of the firebox door, creating a ceiling above it. In this row we begin to build a smoke collector and finish it by the eleventh row.
- To separate the cooking area and the smoke exhaust channel, we lay a strip of steel, which will additionally support the bricks laid on edge. We fix the cast iron hob (row number 12).
- From the thirteenth to the fifteenth row we lay out the bricks “on edge”. We cover the cooking chamber with a layer of asbestos cement.
- Sixteenth row - we build the bottom of the first channel, which will be located horizontally.
- In the seventeenth and eighteenth rows we install a cleaning door and build up the walls of the oven.
- Nineteenth row - we block the door from above with bricks. We form a jumper in the center of the smoke circulation.
- The twentieth row according to the drawing (we build the walls of the furnace by tying the previous row).
- The next two rows (21-22) are the construction of a cleaning hole and the completion of the smoke circulation masonry.
- After this, we install the oven, and up to the 27th row we carry out the masonry according to the drawing. In rows 27 and 28 we leave space between the bricks to clean the oven.
- Then we completely cover the furnace and install the valves (29-31).
- From the thirty-second row we build a chimney and take the chimney to the street.
How to light a brick stove with wood?
We inspect the furnace and pipes for cracks. If there are any, cover them with a clay solution. We clean the stove from combustion products. We prepare the firewood. We warm up the chimney. We put firewood in the firebox, leaving the ash door ajar for air access. To ensure even burning of the firewood, stir it with a poker as it burns. It is optimal to add additional firewood after the formation of the first coals.
Wood-burning stone stove for home
For the manufacture of stoves, rocks that are resistant to high temperatures are selected, such as granite or sandstone.
The laying of stoves from flat, elongated or stones of different volumes and shapes is a rather impressive design that can decorate the living room of a country house.
In addition to its unusual appearance, such a device has a number of advantages:
- gradual uniform heating of the room;
- long-term heat retention;
- safety, no release of toxins and odors;
- availability of materials.
The disadvantages include the difficulty of building a stove - the technique of laying a stove from stones of various sizes differs significantly from an ordinary brick one, so it can cause difficulties even for an experienced craftsman. The disadvantage will also be the massiveness and heavy weight of the resulting structure. Such stoves necessarily require a separate foundation, so construction is planned even before the construction of a house or bathhouse.
Features of stove heating
Stove heating has a number of advantages, thanks to which wood-burning brick stoves have not lost their popularity for several centuries. The most important advantage is the ability of the ceramic bricks from which the stoves are made to accumulate and release heat for a long time.
At the same time, radiant energy useful for the human body is released into the space, giving a feeling of warmth and comfort. With regular heating during the cold season, the house is always warm and dry, and natural ventilation is formed due to the stove draft. In hot weather, the stove, on the contrary, cools the rooms by removing excess heat into the ground and air through the foundation and chimney.
In addition to creating a comfortable microclimate, a brick oven can provide additional functions, the availability of which depends on the design:
- cooking - boiling, frying, stewing and baking;
- drying clothes, shoes, food;
- heating beds for sleeping;
- opportunity to admire the open flame.
Furnaces that provide several functions are called combined. These types of stoves include heating and cooking stoves, fireplace stoves, as well as several popular basic models, including the Russian stove.
Stove heating also has disadvantages, including the inability to effectively heat remote rooms. Therefore, in large houses, they usually install several stoves with separate or combined chimneys or combine stove heating with other types of heating.
In compact houses consisting of one or several rooms, the stove is usually located in the center, so that its walls are located in all rooms. The hob and oven are placed on the kitchen side, the stove bench is in the bedroom or nursery, and the open fireplace is in the living room or dining room.
Making a wood-burning stove for your home: Instructions for building a brick stove
This stove is optimal for heating two rooms or a house with an area of 30-40 sq.m.
The stove has three smoke channels located vertically. Their length is more than four meters. It has two firing modes - summer and winter.
For work we purchase:
- solid ceramic bricks grade M175 - 400 pieces;
- fireproof bricks – 20 pieces (ШБ8);
- two-burner cast iron stove 70x40 cm;
- valves 28x18 cm - 2 pieces;
- fire door 27x30 cm;
- 2 blower doors 15x16 cm;
- masonry tools (trowels, containers for mortars, etc.).
We build a foundation for the furnace and begin laying out the first row. It is the most important, as it determines the dimensions of the furnace. The thickness of vertical seams is no more than 8 mm.

Second row: we bandage the initial row and lay the foundation for the fireproof cutting.
Third row: we form a chamber for collecting ash and install the ash door.
Fourth row: we continue the construction of the ash collection chamber. And in the future we will line the combustion chamber with fireclay bricks. In the same row, we fasten the cleaning door and form the lower horizontal channel.
Fifth row: we cover the blower door with one solid brick, since its length is only 14 cm. We continue the construction of a horizontal channel and a fire separation between the stove and the walls of the house.
Sixth row: we overlap the cleaning door and the horizontal lower channel. At the same time, we see two vertical smoke channels of 12x12 cm being formed.
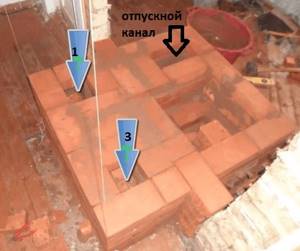
Let's designate the left channel as number 1 (it will be directly connected to the chimney), the right one as number 3 (a long channel for the passage of gases and heating the stove in winter). The dimensions of the release channel are 25X12 cm.
Seventh row: we continue to form the channels and install the combustion door.
Eighth row: we tie row number seven and form the second vertical channel of the oven.
We install the summer valve. If it is opened, the smoke will flow directly into the chimney without overheating the room. If the valve is closed, the flue gases will enter channel number 3 and travel along a long path, heating the entire furnace structure and, accordingly, the room.
The ninth row is similar to the eighth. We are preparing a support for installing the locking cover of the fire door.
Tenth row: close the combustion door and connect channel 1 and channel 2. Here the transition of flue gases from the second channel to the first will occur when firing in winter mode.
We cut out slots for the grate from fireclay bricks and place them inside the oven. We insulate the back wall with mineral wool.
We continue laying the walls of the furnace and laying the grate.
Next, we line the furnace with fireclay.
We are completing the pass.
We lay a cast iron slab 40x70 cm (11th row).
First, we lay the slab on the bricks “dry” and make a pencil marking of the perimeter of the slab. Using a grinder, we cut out a recess in the brickwork for the stove. The depth of the recess is 10-15 mm. We lay the sealant (asbestos cord). Place a slab on top. We check its horizontality.
Row 12: making a three-channel heating panel.
The 13th row overlaps the previous one and so on until the 18th row. In the 18th row we install the second valve. Row 19 – we continue construction. Rows 20-21: overlap all channels except the first. Row 22: we begin the construction of the chimney.
Such brick wood stoves can quickly heat a room and are suitable for cooking. After completion of construction, it is important to finish the stove with natural or artificial stone, ceramic tiles, or plaster the surface.
Key aspects of building a Swedish stove
Just like for any other furnace, a Swedish stove requires a separate foundation, which can be made monolithic, backfill or brick. The last option is used most often.
Under no circumstances should its base be connected to the base of the house, in order to avoid rupture of the masonry during shrinkage.
The classic Swede is built from fireclay bricks with a fireclay clay bond. However, this is financially very costly, so the project can be reduced in cost by constructing from these materials only those parts in which the heat load is significant - the firebox, smoke ducts, hob area, oven, and the rest of the “body” can be built from solid stove, red brick and ordinary clay. The foundation and the chimney facing the street are laid out on a cement-sand mortar. About 5–6 rows of fireplaces are laid out per day.
Just like when building a stove of any other design, during the construction of a Swedish stove it is necessary to strictly follow the diagram and control the level of the masonry. You can use the device only after the device is completely dry.
The Swedish stove rightfully occupies a leading position in the popularity rating. This compact, powerful stove, if properly installed, can replace full-fledged gas heating.
Advantages and disadvantages of a wood-burning stove
If firewood is used as fuel, then the stove located in the house, garage or country house must meet a number of requirements. Both the firebox and the chimney of the device are constructed so that they do not collapse during operation.
The laying of brick wood stoves is carried out according to a special scheme, ensuring structural strength and maximum heat transfer to the surface
Thanks to the special manufacturing technology, a wood-burning stove has many advantages:
- Efficiency. A stove with firewood placed in its firebox easily heats the air in a room with an area of at least 4 m².
- A pleasant aroma emanating from wood engulfed in flames.
- Possibility of using not only firewood, but also coal.
- Long service life with timely repairs.
- Low costs for purchasing fuel.
However, it is worth paying attention to some disadvantages of a wood-burning stove:
- The need to monitor the fuel combustion process every 15 minutes, adding new batches on time.
- The requirement to remove ash from the stove, the accumulation of which impairs draft.
Choosing a wood stove for home heating
There are a huge number of options and modifications of modern heating stoves. As the number of options increases, the problem of choice always arises. Usually guided by the following principles:
- The size of the stove should be selected based on the dimensions of the room and the number of heated rooms;
- functional purpose: cooking, heating, combined;
- correct selection of furnace power.
Everyone's taste preferences are different. It is difficult to give advice on this matter. You must always proceed from the functional purpose of the stove. If the stove just needs to heat, then you can take it to a separate room. If you like an open fire, next to which you can sit on a cold winter evening, then you should choose a design that allows installation inside the house. Such a stove will perfectly complement the interior of the room.
Main stages and important features of furnace laying
From the moment the foundation is poured to the start of construction, 3-4 weeks should pass. During this time, the base will gain the necessary strength and will be able to withstand the weight of the brick oven. The work in question requires maximum responsibility and concentration on the part of the performer. Any mistakes can lead to irreparable consequences, so get ready for the work in advance and allocate enough time to complete it.
DIY brick oven
The laying of the furnace is carried out in several stages.
First stage. Lay out the ash pan and the lower part of the first cap from brick. Carry out the laying using the previously discussed sand-clay mortar.
Second phase. Install the ash pan door into the masonry. Use galvanized wire to secure the door.
Install the ash pan door into the masonry
Third stage. Install a grate over the ash pan chamber.
Install a grate over the ash pan chamber
Fourth stage. Mount the firebox. Line the inside of this compartment with fire bricks. Place the bricks “on edge”. At this stage you need to use a special masonry mortar. It is prepared in the same way as the standard one, but instead of simple clay, refractory clay is used, i.e. fireclay. Secure the combustion chamber door using a steel plate and the wire you are already familiar with.
Fifth stage. Continue standard laying until you reach the 12th row. Having reached this row, close the combustion chamber and lay the tiles with burners evenly. This stove must be made of cast iron. Check the evenness of the installation using a building level.
Sixth stage. Lay out the first cap. It is erected at the left edge of the stove. At the same stage, a canal for the summer passage is being built.
Seventh stage. Install the stove and line the walls of the cooking compartment. Lay out the previously mentioned lower cap.
Eighth stage. Install the valve for the mentioned summer passage channel. This valve is located in the inner corner of the cooking compartment.
Ninth stage. Lay the masonry up to the 20th row. When you reach this row, close the brewing compartment and the first hood. Be sure to leave the required number of holes in the solid masonry for the summer passage and lifting channel, as well as the vent for the cooking compartment. Place the bricks on steel corners - this will ensure higher strength and reliability of the stove.
Tenth stage. Close the portal of the brewing compartment with hinged fireplace doors. It is better if the doors have heat-resistant glass inserts. This solution will allow you to monitor the fuel combustion process and admire the flame.
Eleventh stage. Install cleaning doors for easy soot removal. For installation, choose a location that is easiest for you to get to.
Twelfth stage. Lay out the walls of the hood almost to the top edge of the wall opening. Cover the top of the stove with a couple of rows of bricks. Fill the gap between the top of the stove and the jumper with mineral wool. Thanks to this, additional thermal insulation will be provided and heating efficiency will be slightly increased.
Thirteenth stage. Place a decorative band around the upper perimeter of the unit.
Fourteenth stage. Proceed with the installation of the chimney. It is better if the chimney is made of brick. This design will last much longer than the same metal or asbestos pipes.
At the end, all you have to do is lay out the entire chimney and, if desired, finish the exterior of the stove. The simplest option is plastering. For the rest, be guided by your own preferences and available budget.
Thus, although laying the stove is not a simple task, it can be done with your own hands. It is enough to simply understand the technology and follow the instructions in everything. Remember, the materials for work must be of the highest quality. And stove designs that have been tested over the years will allow you to independently build a unit that will efficiently heat your home for many years without any problems or complaints.
Do-it-yourself long-burning stove: diagram and step-by-step instructions
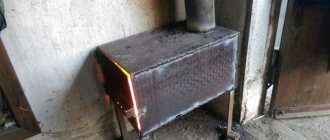
The most common materials for making long-burning stoves are metal and brick.
Making a “bubafonya” stove from a gas cylinder
For making your own “bubafonya” stove, a used gas cylinder with a volume of 50 liters is best suited. The order of work is as follows:
- Cut off the top part of the cylinder at the place where the body is rounded using a grinder. This fragment will serve as a cover in the future design.
The top part of the cylinder can be conveniently used as a stove lid
- Weld a metal strip to the upper edge (at the cut point of the future lid). This side will prevent the lid from sliding off.
- Next, it is necessary to make a pressure piston, thanks to which the combustion material will be pressed during combustion. Cut a circle from a thick steel sheet with a diameter slightly smaller than the body. The circle should fall freely inside the cylinder. The gap between the housing wall and the circle should be 8–10 mm wide.
- Drill a hole with a diameter of 100 mm in the middle of the circle. It is convenient to do this using a core drill.
- Take a pipe with the same diameter and weld one end to the middle of the circle. The result is a part with a common hole.
- Then weld four sections of channel in a cross pattern to the back side of the circle. They form unique channels through which air will flow into the combustion chamber.
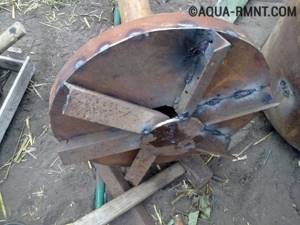
Instead of channels on the piston, you can use angles
- Weld the handles and stands.
- Clean sharp and protruding welding fragments with a file or grinder.
Video: how to make a “bubafonya” stove from a gas cylinder
Making a long-burning stove from brick
Of course, in comparison with a homemade metal structure, a brick oven looks more advantageous. However, making it yourself is a labor-intensive process that requires certain skills and time.
There is a hob above the combustion chamber for cooking
Foundation preparation
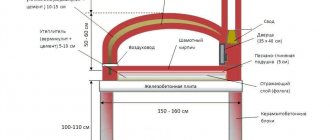
Since the brickwork is quite massive, the stove definitely needs a solid foundation. The depth of the foundation must ensure the stability of the structure. The foundation is prepared as follows:
- First you need to dig a small pit 30 cm deep. Its width and length should be 10 cm larger than the expected dimensions of the stove.
- Level the bottom of the pit and cover it with roofing felt or other insulating material.
- Pour a 10 cm thick layer of sand on top, which must be compacted.
- Place a layer of fine gravel of similar thickness on top of the sand cushion.
- To ensure the reliability of the base, it can be reinforced with a metal grid. To do this, use reinforcing bars connected to each other with wire. The width of the grid cells should be no more than 10 cm. The thickness of the rods is selected in the range from 8 to 12 mm.
- Place the grate in the pit so that it does not touch the bottom. To do this, place broken bricks under the metal frame.
- Pour concrete mixture grade M-200 or M-250. The concrete must completely cover the metal frame.

For reliability, the foundation can be reinforced with a metal grid
Order of brickwork
After a few days, when the base has hardened, you can begin laying brickwork for a long-burning furnace. Before starting construction work, it is necessary to soak the brick in water for a day. This must be done so that the bricks laid in rows do not draw moisture from the mixture. Bricks should be laid as follows:
- The first and second rows must be laid out in continuous layers.
- An ash pan will be installed on the second row, so you need to provide space for the door.
- On the fifth row, a ceiling is installed above the door. Subsequently, a drying chamber box will be installed in it.
- The sixth and seventh rows are designed to accommodate the grate and install the door into the combustion chamber.
- From the eighth to the tenth row the firebox will be placed. When laying the combustion chamber, it is necessary to use fire-resistant material - fireclay bricks. Use clay-based mixtures as an adhesive for masonry. Ready-made mixtures intended for laying stoves are available for sale.
- The eleventh row serves as the ceiling of the combustion chamber and forms the area for the chimney. On top of this row it is necessary to lay steel reinforcement and fill it with cement mixture.
- On the twelfth row, a place for the hob is formed.
- Starting from the thirteenth - fourteenth row, rows for the chimney are laid. Its height is made according to individual projects, so the number of rows can be increased several times.
The procedure for laying bricks for a long-burning stove with a hob
Video: long-burning brick stove modeled on a children's construction set
Fire safety requirements for stove heating at home
Before installing a stove, you should think about fire safety in advance, since during combustion the stove will heat up to a high temperature. To avoid fire when installing the stove, the following safety precautions must be observed:
- The stove must be installed at some distance from the wall. Firstly, there will be no direct contact with the wall, especially if the surfaces are wooden. Stone walls will further cool the stove, which will affect fuel consumption. Secondly, the air in this gap will heat up, and not the wall itself;
- The walls where the stove is installed should be additionally sheathed with non-combustible material. Sheet slate is ideal for these purposes. It conducts heat poorly and does not ignite. All walls should be sheathed in places where the future stove will even indirectly come into contact with the wall.
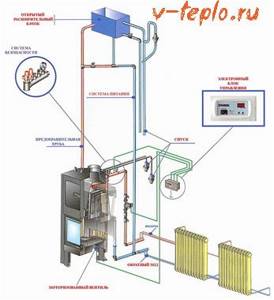
Choosing a furnace with a water circuit
The choice of a furnace with a water circuit has its own characteristics. Here we will omit the issue of calculating and constructing a brick kiln with a heat exchanger - it is quite problematic to carry out the entire complex yourself; the best solution would be to invite specialists in this field. Moreover, it is recommended to initially build a brick oven with a heat exchanger - from scratch, because it is not easy to install a heat exchanger later - it is problematic to install and can make changes to the technical and thermal characteristics of the oven itself.
As for metal furnaces, it is better to turn to industrially produced products. They have a more attractive appearance, are made of high-quality materials, and in any case have greater efficiency compared to homemade ones.
The thermal power of factory products is indicated in the equipment passports
Here you need to pay attention to the power division. The total power is divided into 2 parts - the performance of the heat exchanger and the convective-radiant power of the furnace body
For example, for a 20 kW furnace it could be 12 kW for the casing and 8 kW for the heat exchanger.
The future configuration of the heating system - placement of the stove, power and number of radiators - depends on the division of power. In this case, the stove acts as a powerful heating device and is usually located in the largest room. The power of the heat exchanger is distributed among individual heating devices.
You should also pay attention to the functionality of the stove - sellers often refer to stoves with a DHW circuit as stoves with a water circuit. At the same time, the heat exchanger does not have serious power and is not intended for heating needs
Furnaces with a water circuit are a rational solution to improve the characteristics of a classic furnace. Modernization allows for better heating of premises and reduction of fuel consumption. The selection and installation of this equipment depends on the desire of the owner of a private home, the availability and cost of fuel, the required functionality and operating mode of the equipment.
Homemade stove for heating a room
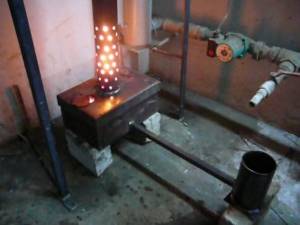
Owners of country houses often resort to heating the garage using homemade heating devices. This question is most relevant in the winter, when low temperatures outside create uncomfortable conditions for working in a shell.
Cold air has an adverse effect on the car, reducing its service life. There are several ways to make a stove for a garage, depending on the financial capabilities of the owner.
A DIY garage stove will require the use of certain fuel resources.
Figure 1. Diagram of a frame furnace.
The owner of the shell must maintain the temperature in the room within 5°C. When the temperature changes downward, the optimal process of operating the vehicle is disrupted. The engine starts with great difficulty and the antifreeze freezes.
A car enthusiast cannot fill the radiator with hot water. Faced with such problems, the owner comes to the conclusion that he needs a stove for the garage, which he can buy in a specialized store or make with his own hands.
The main thing is that it maintains a constant temperature in the room.
Choosing the right furnace for heating a garage
Before purchasing the necessary options for heating devices, the garage owner determines the time period during which the car parking lot will be heated.
In a separate building, an individual heating system must be installed. All heating devices are systematized depending on the energy source that powers the technological process.
Figure 2. Metal corners are welded to the side walls of the furnace, on which the grate will be laid.
In the garage you can install a heating boiler that runs on gas fuel. It has significant efficiency, is affordable, does not depend on power sources, although it has a significant drawback - explosion hazard.
You should arrange heating for your garage yourself if it is not possible to purchase a factory-made stove. Heating units are affordable, reliable, and fuel efficient.
Electric heating devices are an expensive type of room heating, but the garage owner can always choose a device with the appropriate power. For heating, you can use stoves running on recycled machine oil. Even with a good garage insulation system, heat loss is quite significant due to frequent opening of the garage door.
Models that consume solid fuel must have a significant power reserve, be safe and mobile. Oil heating systems and heat guns are installed in the room. Heating systems running on solid fuel are economical and made of energy-resistant materials. A garage stove is often installed independently by its owner. This is the cheapest option for heating a room.
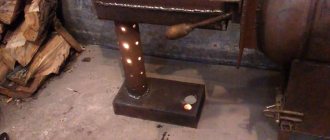
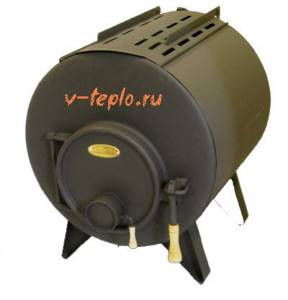
Stove "potbelly stove" - an economical option for heating
The best type of heating for a car park located autonomously is a metal stove “potbelly stove”. When starting its installation, you must strictly fulfill two basic requirements.
Figure 3. We weld the reinforcement for the grate in the form of a lattice.
The stove is installed in garages equipped with good ventilation and pipelines that form exhaust ventilation.
The stove must be installed in places away from flammable liquids, wood products, and flammable objects.
The "potbelly stove" has several undeniable advantages: it has an affordable price and high efficiency. It is easy to install without resorting to the services of professionals. Servicing the unit is not particularly difficult. There is no special foundation placed under the stove.
It can additionally be used for cooking and heating food. The disadvantages of using a stove include the large amount of fuel consumed.
Firewood must be prepared in significant quantities due to the fact that the stove does not accumulate heat and does not store it for long.
The metal body of the stove cools down very quickly, but heats the area around it in a short period of time. If you slightly modify the standard design of the stove, the consumption of combustible material will decrease.
For these purposes, the pipe is mounted in the furnace body at the level of the door, and not as in the basic model - not far from the rear wall. After reconstruction, the furnace walls heat up much faster. The period of time during which the ambient temperature rises will increase significantly.
Determination of the main structural elements of a “potbelly stove”
Scheme of a stove-stove.
Types of furnace designs
Wood-burning country stoves differ not only in the materials used for their manufacture, but also in a number of other characteristics. In particular, there are several purposes:
- Heating, used for heating residential premises;
- Cooking, used for cooking ovens;
- Dryers with a special oven or drying chamber;
- Boilers designed to heat water for heating large areas.
The design of the stove also depends on its location in the room. The most commonly used method is the classic method of placing it - under the wall. In rare cases, you can see stoves designed and located using the island method - in the central part of the room. You can often find stoves located in corners.
Let's take a closer look at stove structures made of various materials.
Cast iron stoves
Cast iron options are not suitable for performing the functions of the main heating system. Most often, they play an auxiliary role, or replace gas or electric stoves for cooking.
Cast iron products are compact, easy to maintain and have a high efficiency rate of more than 90%. What are the disadvantages of such stove designs? Cast iron stoves require special conditions when installing them. Sealing the chimney and the stove itself causes difficulties for untrained specialists. And also such stoves are very demanding on the quality of fuel.
https://youtube.com/watch?v=Z3n_bVoruCI
Hardware
Wood-burning metal stoves for the home have the ability to heat up quickly and cool down just as quickly. Therefore, most metal products are not used as the main source of heat. But they are perfect for cooking food and heating baths, i.e. for occasional use.
Brick or stone masonry
The best, but at the same time expensive, option is to install a brick or stone wood-burning stove for your home or garden. Heating systems made from this material provide the longest operating time and the highest quality heating of rooms.
Stoves have been used by people living in harsh climates since time immemorial. They were made from a wide variety of materials, but the main ones were brick and stone. Time passes, technology develops, and, accordingly, heating systems become more complex. Choosing a heating design is quite a responsible task. At the same time, it’s easy to do; you just need to know the pros and cons of each type and compare it with your own needs.
Peculiarities
Wood-burning stoves for a country house are somewhat different from traditional heating stoves for several reasons:
- Most summer residents do not need heating all the time, but only on weekends. Many people go on vacation to their dacha not only in the summer, but also in the cold season, and they need to quickly heat the house, where the temperature has set low. This means that it should quickly heat up itself and warm up the room.
- The size of a country house is most often small. For this reason, a stove for a summer residence should have a compact size.
- A summer cottage is not a village estate, and there is no place to store large volumes of fuel on it. Therefore, a stove for a summer cottage should use wood sparingly and be highly efficient.
- Not all dacha cooperatives have gas, and electricity is expensive. Many summer residents use stoves not only for heating, but also for cooking. An ideal stove should be equipped with a hob.
- A weekend at the dacha is a lot of things to do and have fun, and there is often no time to be distracted by constantly adding firewood. Therefore, many summer residents appreciate the presence of a long-burning mode in the stove.
That is, the ideal stove for a summer residence is compact, heats up quickly, uses wood economically, is equipped with a hob and can operate in a long-burning mode. Is it possible to combine all these qualities in one heating stove?
This article discusses various simple designs of smokehouses for cold smoking, which can be quickly made at home and in the field. Read about how to make a smoke generator for cold smoking here:
Operating rules
A fireplace, a small sauna stove or a wood-burning model with a steam generator should not create fire situations. The operation of wood heaters involves:
- Installation next to the combustion chamber of a metal sheet 2 mm thick. The length of the protective product is 30 cm, the extension beyond the brick structure is 15 cm.
- Installation of smoke exhaust systems for metal structures made of acid-resistant materials.
- Use for burning dry firewood stored indoors.
- Dense fuel laying - thick lumber is on top.
- Use thin dry twigs for ignition.
- Laying firewood with a gap of 1/5 of the height of the firebox to the roof.
Operating rules
The laying of the stove must be carried out by a master in compliance with all norms and requirements. Once a year, whitewash chimneys and main pipes to promptly detect the appearance of cracks in the structure. The floor near the stove and wooden structures located next to the chimney are covered with tin. Use dried firewood for kindling and avoid using flammable substances. Do not place firewood, peat, briquettes, paper or flammable liquids near a burning stove.
Only adults should light the stove and support the combustion process. Place furniture at a distance of 50 cm from the stove.
The brick stove is equipped with an outlet valve, which is necessary to retain heat in the house and regulate the release of carbon monoxide. By making only a few through holes in the valve, you can avoid the risk of gas poisoning if the valve is not closed in a timely manner.
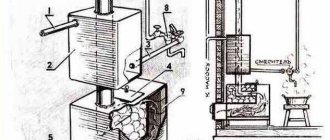
Device and distinctive features
So, the required components of the classic heat generator that we will manufacture.
- Combustion chamber.
- Blower or so-called ash pit.
- Chimney.
But here we should also name the main parts necessary for the operation of the installation.
- Cell doors.
- Grate for pouring ash (grid).
- A retractable damper located in the chimney (or the so-called damper).
- Hob lid.
Let's illustrate all this with a diagram.
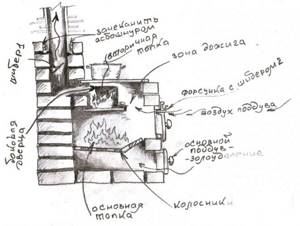
The presence of a side door and a secondary firebox is optional
The grate for shedding ash is also called a grate.
Before manufacturing the furnace, calculations and sketches are made.