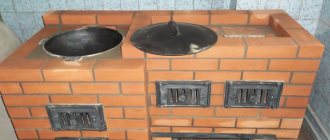
Correct temperature in the steam room
A lot can be said about the rules of classic health bath procedures, but in this article we will dwell in detail on the temperature. If we talk about the temperature in the steam room that is most suitable for health in all respects, then this indicator lies
between 50 ° C and 70 ° C. In the classical Russian bathhouse, the stoves were always built of brick and, as a rule, they had closed heaters. This design was simply not able to heat the steam room above 60 ° C and in order to get a good sweat, it would have been necessary to sit in it for too long, but a way out was found.
A ladle of water was poured onto the stones, heated red from the direct flame, which instantly turned into light, hot, finely dispersed steam, most comfortable for both the respiratory tract and the skin. A cloud of steam rose to the ceiling and a person lying on the shelf was gradually doused with small portions of this steam using brooms. With the right technique of pumping steam onto various parts of the body, the steaming process brings not only unforgettable positive sensations, but also the strongest healing effect.
When designing your own sauna, it is important to understand that in addition to the correct temperature to obtain the full range of positive effects of steaming on the body, the sauna must also have a certain humidity. The optimal figure is within 60%. It is this combination of temperature and humidity that provides ideal conditions for the health of the whole body.
It is this combination of temperature and humidity that provides ideal conditions for healing the entire body.
It is possible to ensure that the steam room has both the specified temperature and the correct humidity at the same time only if the stove is in it with a closed heater
To obtain high-quality finely dispersed steam, it is very important that the stones in the furnace are heated to at least 300 °C. And if the heater is open, then when the stones in it are heated to such an extent, the stove itself will be so hot that the temperature of the steam room will go beyond 70 ° C
Brick or iron?
The period of warming up the sauna room with a brick stove will take from three to five hours. This means that it must be melted in advance, which is not very comfortable.
Basically, brick ovens operate on the principle of periodic operation. This means that you should initially light the bathhouse, and only after the fuel combustion procedure is completed will it be possible to use the steam room. An iron stove operates on the principle of constant operation.
A good iron stove can heat a sauna in 1 hour, but it will cool down quickly - in half an hour. Therefore, combustion should be constantly maintained.
During installation, care should be taken to take certain additional protective measures for the bathhouse against fire. The difficulty is that the walls are made of thin material and get very hot, which can cause a fire in nearby elements or wall decoration.
You can install the device in a bathhouse of a decent size, but this will not be a rational solution. In this situation, for high-quality warming up, you will need to increase fuel consumption several times. And for a modest-sized bathhouse this will be the ideal solution.
By purchasing an iron stove, you will spend much less money compared to building a brick version. The main issue here is not the cost of materials, but the payment for the work of a professional stove maker. To build a brick stove with your own hands, it is not enough to have only masonry skills; you will need special knowledge.
What we need - tools and materials
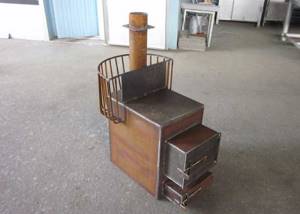
Before you start making your own sauna stove from a 530 pipe, you should prepare a place to work and stock up on the necessary tools:
welding machine;
- grinder with different attachments;
- electric drill;
- metalworking tools;
- door handles;
- mortise tap;
- asbestos cord.
In addition to tools, you will need the following material:
- Thick-walled metal pipes for fireboxes and water tanks, having a diameter of 500 to 650, a wall thickness of 8-16 mm, and a length of 1.2 to 1.5 meters. Also the pipe through which carbon monoxide will escape, its diameter is 120 - 150, and the wall thickness is 2 - 4 mm.
- A steel pipe where the stones will be placed. The thickness of its walls is 5-8 mm, and the diameter is 350.
- Sheet metal, size 600 by 800 mm, having a thickness of 8 - 12.
- Hinged steel hinges.
- Water pipe - a small piece, suitable diameter ½ or ¾ inch, length 50 - 80 mm, and a ball valve with a similar thread.
- Metal reinforcing bars - 500 mm, diameter 12 - 18.
- Cement.
- Brick.
- Sand.
Sauna stove options
The shape of the sauna stove is of great importance. Performance and heat transfer depend on this. Experts consider rectangular ovens to be the most convenient. The coals do not become hot. This shape ensures more uniform heat exchange in the steam room. As a heating device, you can build a gas boiler for a bathhouse with your own hands.
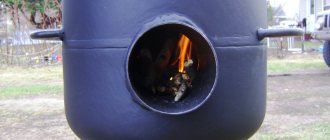
Steam locomotive stove for a bath
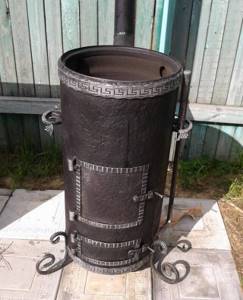
It is more convenient to make a stove for a steam locomotive with your own hands from a pipe with a diameter of 30-50 cm - this is a ready-made body, which is supplemented with some elements. Walls without seams will last much longer than welded structures. It is recommended to use steel grade St3 for the furnace. A closed heater will allow you to use the sauna continuously.
Installation steps:
- The metal pipe is cut to the dimensions of the drawing. A hole is made at the bottom the size of the ash pan.
- Corners are welded inside to accommodate the grate.
- Cover the back walls of the heater and ash pan.
- A hole is made for the chimney and the pipe is welded.
- A pipe is welded inside.
- The pipe is welded to the chimney.
- The body is sheathed with sheet metal according to the size of the stove. Doors, hinges and latches are welded. Install grates above the ash pan and a grate under the heater.
Buleryan stove for baths
The Buleryan unit is equipped with many tubes around the body, through which heating of the room is achieved. The principle of operation of a do-it-yourself gas sauna stove is the constant movement of heat. The tubes welded into the firebox heat up, and under the influence of draft, warm air moves. The oven body has a low temperature and is therefore safe.
The air movement is regulated by a valve, which is placed on the firebox door or on the nozzle.
Operating principle of the Buleryan stove
To make a stove you will need:
- pipe with a diameter of 70 cm and a thickness of 5-8 mm;
- sheet metal 5-8 mm and 2 mm thick;
- pipes with a diameter of 7 cm;
- electrodes;
- welding machine.
Cut the pipe to the size of the future stove and place it on legs. At the top of the cylinder, two plates in the form of a cone are welded. The works are bent at an angle of 45° and welded to the upper part of the body. Pieces of metal are secured in a checkerboard pattern. The structure is placed in the housing and welded. Cut out holes for the chimney and oven doors. Install hinges, plugs and doors.
The efficiency of the resulting unit is 75-80%, but there are disadvantages:
- many elements that increase production time;
- the unit turns out to be large;
- very heavy construction.
Potbelly stove for a bath
Small-sized stove for a hot potbelly stove.
Drawing of a potbelly stove for a bath
To install the stove you will need:
- chimney pipe and base
- Metal sheet;
- rods;
- grate bars.
The pipe is cut to size. Make holes for the doors of the ash pit and firebox. We weld the middle wall with a hole for the grate, the top with a hole for the pipe and the bottom of the stove. The chimney, hinges, latches and doors are welded. Install grate bars.
Stages of constructing a potbelly stove from a bathhouse pipe
Attention! The minimum height of the chimney pipe installed above the firebox is 4 m. This will provide the necessary draft
Do-it-yourself bath unit:
Rocket stove for a bath
To make a sauna stove you will need the following materials:
- 2 square pipes of different diameters;
- metal corners;
- grate bars.
Drawing of a metal reaction furnace
Pipes are cut according to the dimensions of the drawing. In a smaller container, at a distance of 4 cm from the bottom, corners for the grate are welded to the side walls. A hole is made on the top wall to align at an angle of 45° with a larger pipe.
The bottom of the larger container is cut off at an angle of 45 degrees. The two structural parts are welded to each other. The bottom, hinges, doors and legs of the unit are welded.
Square tube reaction furnace
People call the simplest stove design “topi wash”.
Gas cylinder stove for a bath
Empty gas cylinders are ideal for making a small sauna stove with a volume of up to 10 m3. The container is carefully emptied of gas residues and the tap is cut off.
A hole is made in the upper part of the cylinder for the firebox door. The container is turned on its side and 5 rows of holes are made on one side with a pitch of 2 cm and a diameter of 1 cm.
The ash pan holes are located at the bottom of the oven
A piece of channel is welded over the hole. This is a box for a retractable ash pan.
Doors and latches are welded onto the firebox and ash pan. A chimney pipe was welded to the rear wall.
The doors were welded onto the ash pit and firebox
Next, a test fire is carried out.
Heating device for a bath from a gas cylinder:
Construction of metal furnaces
Metal is a more malleable material than ceramics; it can be melted and cast, drilled, cut, bent, and forged. There is a considerable amount of metal processing. Basically, when making a stove with your own hands from metal, you need to focus on its quality. The metals used for the production of the heating mechanism are: ordinary steel, heat-resistant variations of steel, surrogates and cast iron.
The second step will be to create a stove and choose the type of its design. The dressing comes in different forms, the main thing is to follow the joining technology. For this, there are diagrams where the structural properties of all elements are depicted in detail. It can be created with an open or covered heater. Carefully take into account the dimensions of the bath itself. The elementary design should consist of a water tank and a firebox, and definitely have a tube, a rod and a grate.
It should also have strong latches. To remove the results of combustion, it is advisable that the stove be equipped with a chimney pipe. And also a tap that will be mounted on a water tank. Not all stoves look harmonious in the interior of the house; this problem can be solved by removing the portal for the sauna stove with your own hands.
Differences between metal stoves for baths and saunas
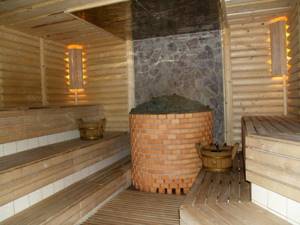
Steam rooms in a sauna and a bathhouse have impressive differences, these are the temperature and dryness of the air. In the bathhouse, the temperature varies from 50 to 70 degrees, resulting in the formation of soft steam. The temperature in the sauna is above 85 degrees Celsius, the steam comes out dry. To create certain conditions in the steam room, different stoves and various approaches to their installation are used.
To build a sauna, it is necessary to maintain maximum contact between the stove shell and air in order to ensure rapid circulation of air flows along the walls.
It all comes down to heating the air faster. In the bathhouse, the microclimate is organized in a different way, where a high temperature is reached and a lot of steam is generated. To achieve the effects, stones are placed in a firebox, that is, in a closed heater. A small heater is placed above the firebox, which helps heat the stones to 250 degrees Celsius.
The next difference is that metal sauna stoves are convection, and all baths are organized in such a way as to avoid thermal convection without any trace. Convection in the usual syllable is the movement of air inside a room.
Do-it-yourself stoves for Russian baths
The current Russian bathhouse is a small house made of timber or logs. Inside, as a rule, there is a division into 2 rooms, namely a dressing room and a steam room. A stove for a Russian bath is not just a heating mechanism, it is its most important accessory. The temperature, dryness and heating level of the steam room depend on it. There are many categories of sauna stoves.
But not everyone is suitable for a Russian bath. The fundamental difference will be warming the air to a temperature of 65 degrees Celsius, while creating steam between 60 and 80 percent. As a result, so-called weak steam is formed in the steam room.
This is a pleasant, moderately or almost non-burning velvety steam. In a true Russian bath you can breathe nicely and simply, and your skin will not experience severe thermal stress.
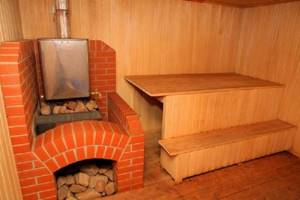
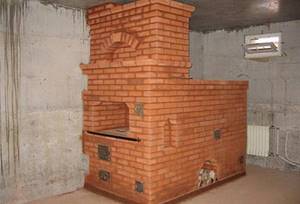
Often a brick or steel stove is installed in a bathhouse. All these materials heat up well and transfer heat well to the room. There are no stamps for the construction of stoves; only the general principles of architecture and construction are observed.
Brief description and dimensions of the metal stove
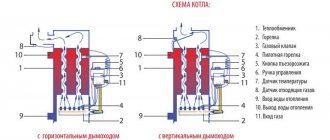
An iron sauna stove can effectively heat small rooms. It is created by a covered, open and combined design. The mechanism has a tank for heating water and a heater built into the upper part of the stove. The closed device consists of 3 compartments, this is a chamber with a blower, a heater and a hole for steam outlet, and a tank for heating water.
An open-type installation has a metal grate on which stones are placed, which is located above the combustion chamber. There are no barriers between the firebox and the stones. Combined devices of this group are distinguished from others by the presence of an enlarged combustion chamber, equipped with double bolts and grates.
Fire from all edges heats the heater, and this significantly increases the productivity of the stove. The volume of the oven varies; during its construction, the parameters of the steam room and the number of people washing in it are taken into account.
The size of the heating system depends on the strength of the heating system. The higher the coefficient, the more fuel needs to be burned. For ideal air heating, the parameters of a sauna stove must be as follows: the ratio of the size of the firebox to the area of the heated room is 1:50 or 1:70, the depth of the firebox opening is 1:2 or 2:3, and the volume of the firebox to the cross-section of the chimney should be in proportion 1: 10.
A heat exchanger for a sauna stove is a technical unit that heats the incoming liquid and then transfers it to a hanging container.
Design features of a metal furnace firebox
The furnace firebox is the most important element of any hearth. It sets the characteristics of the furnace, since the heating speed and the quality of the steam produced depend on it. A firebox or firebox is a device for burning organic fuel. Fireboxes are made from different materials, are designed for different types of fuel, and have different sizes.
A metal or ready-made furnace firebox is a high-tech device that is more economical in fuel consumption. Its efficiency depends on proper design.
The classic firebox for sauna stoves consists of the following basic elements:
- front is the front part of the combustion space where the loading door is located;
- the head wall, where, depending on the furnace mechanism, an outlet window for removing flue gases may be located;
- the arch of the firebox or ceiling where the exit window is located;
- sole - the lower horizontal part of a closed combustion volume.
It can be internal, located directly inside the furnace, or external, this is a tunnel passage; fuel can be loaded from another room.
What are metal sauna stoves made of?
An iron sauna stove is a classic version of long-burning with a water outline. The device consists of a sealed metal box equipped with a combustion door and an exhaust pipe.
To produce metal sauna stoves with your own hands, you will need raw materials and parts:
- a steel sheet with a thickness of approximately 8 millimeters;
- doors for the firebox, blower and heater;
- tap water;
- grate;
- chimney pipe.
When carrying out the equipment, it is necessary to use thick metal, so the device will predominantly generate heat when heated.
Installing a stove in a bathhouse
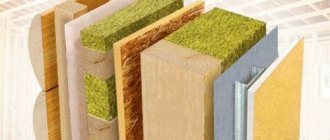
Since a proper steam room is always built of wood, the main requirement when installing a wood-burning heater is fire safety. To survive it, follow simple rules:
- the stove cannot be placed directly on a wooden floor, but only on a sheet of iron protruding 70 cm in front of the firebox;
- wall cladding made of flammable materials also needs to be protected from fire with sheets of roofing iron or mineralite;
- when installing a heater with a remote firebox, the opening in the wooden partition is also sheathed with non-combustible materials, as is done in the photo;
- the distance from the insulated chimney pipe to wooden building structures is 38 cm.
It is recommended to make a channel for venting combustion products outside from a double-walled sandwich filled with basalt wool. Often, the same square-shaped water tank, built directly into the ceiling, is used to insulate the chimney. How to properly install a stove in a bathhouse is shown in the diagram:
Types of fuel and types of stoves
Bathhouse stoves are divided into 2 main groups: metal (cast iron) and brick options. Brick sauna stoves are heat-intensive; they take longer to heat up, but also take a long time to cool down. An iron stove is an economical heating item due to its multitasking, simplicity and convenience of equipment. When choosing a stove or fireplace, you need to look not only at the design of the heat source, but also at the type of fuel. When burning the same mass, different fuels will release different amounts of heat. There are many variations of the energy carrier.
According to the aggregate content and type of fuel, all fuel groups are divided into solid, liquid and gaseous fuels. Solid is a common class of fuel, it includes: coal, peat, briquettes, firewood, pallets. They are used only in ordinary ovens as they burn quickly. Liquid fuels are kerosene, fuel oil, diesel, boiler, and coke liquid.
They have significant calorific value. The first type of gaseous fuel is natural gas, obtained from gas reservoirs, or associated gas from naphtha production. It has good calorific value.
How to make a potbelly stove from steel
Potbelly stove of convection type.
If you need to heat a house in the country and cook food, you should definitely know how to weld a potbelly stove yourself from sheet steel. This design will not require a lot of fuel. This is achieved through the installation of partitions in the firebox, reliable fastening of the doors and the ability to adjust the air flow. To make such a device with your own hands, you will need to prepare the following elements:
- sheet metal 4 mm thick or more;
- metal 8-12 mm thick, from which the partitions will be made;
- lattice;
- chimney pipe;
- corners from which the legs will be constructed;
- welding device.
Sequence of manufacturing actions
From the steel sheet, the first thing you need to do is cut out elements for the body and several partitions that will be mounted in the upper part of the firebox. They will be able to create a labyrinth for the smoke, which will increase the efficiency of the stove. In the upper part you can make a recess for the chimney structure. The recommended recess diameter is 100 mm. Next, you will need to make a recess for the hob with a diameter of 140 mm.
Potbelly stove made of sheet steel.
Using a welding device, you need to attach the side elements to the bottom of the structure. You will need to attach thick strips of metal to the side walls. As a result, it will be possible to attach the grate. This can be a sheet of metal with recesses with a diameter of about 20 mm. The lattice can be made of reinforcing bars. At the next stage, you need to attach supporting elements from a metal strip to the side walls. After this, the partitions are installed.
Doors for the firebox and ash pan should be cut out of metal. They can be installed on ordinary hinges. However, a more reliable option is to use curtains made of steel pipes and rods. They can be secured to wedge latches. The elements are cut out of a stainless steel sheet and then secured with bolts. In order to be able to adjust the intensity of fuel combustion, a recess must be made on the door that closes the ash pan for mounting the damper.
A sleeve 200 mm high must be attached to the recess for the chimney structure, on which the pipe will be mounted. A damper in the tube will help retain heat. For it you will need to cut a circle from a metal sheet. One extreme part of the steel rod needs to be bent. After this, you will need to make several parallel holes in the tube. Next, the rod is mounted, after which a round damper is welded to it.
Diagram of a brick fence for a potbelly stove.
The chimney pipe should be installed at an angle of 45°. If it passes through a recess in the wall, the part must be wrapped in fiberglass in this place, and then secured with a cement mixture.
To prevent burns from touching a hot stove, you will need to build a steel protection screen on several sides and place it at a distance of 50 mm. If there is a desire to increase the thermal efficiency coefficient, the structure can be covered with brick. After the firebox is finished, the brick will continue to heat the house for some time. The laying should be done at a distance of 12 cm from the metal body.
A pillow of air can act as a heat protector.
To implement it, holes for ventilation must be made in the masonry at the top and bottom.
What can a Bubafon cauldron be made from?
Half of the entire structure is the boiler, which can be made of any material, suitable shape and characteristics. These may be the following items.
- Do-it-yourself bubafonya stove from gas cylinders. Welding cylinders are the best basis for a boiler. Just adjust it to size and you can use it. Since the gas is under pressure, it is held back by thick metal walls, which will prevent burning in the stove.
- Old fire extinguisher. Large volume industrial fire extinguishers are convenient for boiler making. Despite the fact that their diameter is smaller, they are able to withstand thermal stress.
- Metal barrel. Manufacturing instructions are similar to the previous options. To prepare, you need to cut out the top and use it as an air vent.
- Pipe. A wide sewer pipe with wide walls is suitable for the boiler. But to do this, you need to cut two circles from sheet steel yourself and weld them as a bottom and a lid.
- Homemade body made of sheet steel. You can make your own boiler from a steel sheet by rolling it into a cylinder and welding it.
One of the simplest barrel designs
One of the easiest ways to assemble is from a tin barrel. It has thin walls, which reduces efficiency and low heat transfer. The advantage of the method is the large loading volume and on one tab it can work for more than twelve hours. Barrels are standardized sizes. If the walls burn out, it will be easy to replace it with a new one.
Assembly instructions:
You need to remove the weld that secures the cover. It is best to do this with an angle grinder to prevent the formation of burrs. To ensure a perfectly even seam, you can use a diamond-coated disc. The edges of the barrel are beaten with a mallet or hammer. On the lid, on the contrary, they are flared. As a result, the lid should fit tightly onto the barrel. A hole is drilled in the center for installing the chimney. The distributor will require a lid from a similar barrel. If this is not available, the part can be made from sheet steel. Air vents are welded to the lower part. They can be made from sections of U-shaped profile or channel. This is necessary to increase the performance of the stove. If you need low efficiency for a small room, you don’t have to do this. A damper is mounted on an axle on top of the hot air pipe. To increase ease of use, it is better to provide a “wing” fastening method. A hole is made on the body for the chimney pipe
a32e90f082c6ee15780523adacd52837.jpe
It is important that the seam is sealed.
For added convenience, you can install a screen made of a solid metal sheet.
Cylinders and pipes
Do-it-yourself bubafonya stoves made from a gas cylinder are relevant. The principle of manufacturing from a cylinder and a pipe is similar. The main difference is that the pipe will need to be prepared. Two circles in diameter are cut from a sheet of steel and the bottom is welded.
You need to cut several steel disks to fit the diameter of the cylinder. In each of them you need to cut out a small segment to make it larger than a semicircle. They are installed inside by welding
It is important to weld them so that they are mirrored to each other. This results in a multi-stage system for lifting air. At the level of the first floor, you need to make several holes in the wall with a diameter of 5 millimeters. The end of the channel is connected to the outlet of the pipe. In the middle of the wall there is a door for a rectangular firebox. A grate is mounted below the door.
Recommendations for selection
When choosing a specific model, you should take into account the type of fuel that you plan to use. Take note of the size chart above. The grate must be taken in such a way that the rods can easily support the maximum possible weight of one fuel portion. This information can be clarified with a store consultant or specialist.
To clear ash, it is better that the gaps occupy at least 40% of the area of the entire structure. If there are fewer of them, the combustion chamber will not function as efficiently, because the volume of incoming air will be small for good combustion. If ventilation is poor, gases may accumulate. In the case of large gaps, fuel that has not had time to burn out will fall into the gaps along with the ash.
Advantages and disadvantages of the design
A metal stove is widely used for baths due to the many advantages it has:
- Due to its small size, it can be used even in the smallest home baths. Moreover, such structures do not require a separate foundation, which significantly saves time and money on building a furnace. The foundation is built light and simple enough to protect the structure from fire and fire.
- Constant combustion, which can be maintained in the furnace, guarantees uninterrupted thermal conditions. This gives you the opportunity to steam and do all the necessary procedures.
In addition to the advantages of metal products, there are also some disadvantages:
- Due to the fact that there is no material to store energy, the structure cools down quite quickly. To maintain heat, it is recommended to use combined or brick products.
- Such a stove is not suitable for heating a large sauna.
- Fire protection must be installed.
Thus, we can conclude that a metal stove is perfect for small baths. If there is a need to heat a large room, it is better to install another stove.
Varieties
Sauna stoves are distinguished by type of fuel:
Electric
Provides a housing with heating elements and materials for thermal insulation.
Gas
It is a unit with a thermostat for the ability to regulate power. A mechanism that immediately stops supplying fuel when the flame goes out is responsible for the safety of the device.
Wood-burning
Such units heat up slowly, but will delight you with the warmth of a natural fire and a pleasant smell. The disadvantage is that they will require a significant amount of fuel with simultaneous constant maintenance.
A little history
Previously, firewood was burned on a blind hearth - combustion air was supplied through a slightly open fire door. This method has a fire hazard - coals may fall out of the firebox. It is also difficult to accurately select the optimal combustion mode - the regulator is very rough. The ash that covered the coals over time also did not contribute to the normal combustion of fuel - it is an excellent heat insulator (in the combustion chamber of a Russian stove, this is exactly how coals were stored in the ash for the next kindling). Therefore, they began to install a grate - a grate on the hearth through which oxygen enters the combustion zone. The ash is also removed through the grate - nothing interferes with the combustion processes.
The absence of a grate or its damage is not critical - the stove operates without it. True, the efficiency is somewhat lower. And the zone of intense heating of the masonry moves below the hearth - now the base of the ash chamber is also heated. And here you need to be careful if the stove is installed on a wooden base.
Expert opinion on a homemade heat exchanger for a heating furnace
A stove with a water circuit is filled with firewood once a day.
Professionals make several comments about installing the boiler in a heating installation:
- The effectiveness of the result of the combined system without overpayments.
- Possibility of using any type of fuel. Sawdust, coal, pallets and firewood stored in a dry place are suitable.
- A stove unit that has a water boiler does not need to be heated constantly. Fuel is added once every 12-24 hours.
- A system that implements a long-term combustion type allows for high-quality heating of the building and provision of hot water.
- If you lack welding skills and understanding of the manufacturing process, you should avoid homemade heating devices. As an exception, installation in a country house or in populated areas with power outages is considered.
- The optimal type of chimney for a stove with a boiler tank is a bell-type chimney. A heat exchanger in the form of a register made of pipes with a large cross-section is placed inside.
- In order not to spend money on copper fittings, you can work with seamless pipes. They do not crack when heated.
Scheme and dimensions
When choosing the most preferable pipe option, you need to take into account the internal cross-section and thickness of the steel. To do this, look at the marking: for example, it says “400*7”, which means 400 mm is the diameter, 7 mm is the wall thickness of the profile pipe. For sauna stoves, it is recommended to use pipes with a diameter of 500-600 mm and a thickness of 7-13 mm, but this is not mandatory; the choice of the size of a metal pipe depends on the area of the steam room and the required volume of water.
The most common pipe size for a bath is 530 mm; such installations are considered optimal for standard steam rooms. Some baths cannot boast of spacious steam rooms; they are used, rather, for washing, rather than for long rest, and then small stoves are placed here, for example, with a diameter of 426 mm. If the steam room space allows, then a pipe with a diameter of 630 mm will do.
Vertical
Vertical ovens are usually compact in size. The grate and heater are located under each other, and therefore the diameter of the stove is the diameter of the pipe. Making this variety is not difficult.
Horizontal
Assembling the horizontal version requires more labor-intensive work. For steam rooms, tubular stoves are used; they are distinguished by high strength indicators and create conditions for effective heat transfer into the air of the bath room.
Differences between vertical and horizontal types of furnaces:
- the flame in the vertical pipe travels a short path to the chimney in the upper part of the structure, the hot gases barely touch the sides of the body, but are mostly located in the middle;
- the horizontal version allows hot gas flows to the top of the installation, after which the gas, due to air rarefaction, exits into the chimney;
- the design of the vertical stove efficiently heats the walls of the steam room, but the floor and air at the top of the room are not able to warm up effectively;
- the horizontal version warms up all parts of the space, except for the area adjacent to the floor and the space under the firebox.
Before creating a furnace of any type, but especially a horizontal one, you need to make a competent drawing of the future device. Draw a diagram of the product, indicate all dimensions on it, and strictly follow these instructions. Errors made during the manufacturing stage of the stove can affect not only the performance of the installation, but also threaten the health of vacationers. In addition, this will greatly simplify the installation process.
Making a furnace firebox for a bathhouse from metal
The installation of the firebox must be carried out in accordance with all standards. The foundation for the firebox is a very important element. The reliability of the base determines the duration of its use, which can range from several months to decades. The firebox itself does not look quite aesthetically pleasing, so it is decorated with fireplace tiles. There are a lot of variations on how to make a firebox for a bath.
For the frame you will need a sheet of steel with a thickness of at least two millimeters; you can also use a chylous barrel, but with additional fastening. The sheet is divided into several sections for the firebox, tank and heater.
The remainder will be needed to make the ash pan and door. Corners or plates will be welded along the length where the grate will rest. It is best to purchase it in a store.
Making a heater
This type of stove is called a heater because it consists of individual stones. When fuel burns, the stones heat up, and the water that ends up on them forms steam. First of all, you need to choose the design and dimensions of the mechanism for heating the water. For the heater, the rods are attached by welding. Since it is heavy, the rods or square must be at least 10 millimeters.
A door is cut into the heater to transfer water to the stones. In this case, the heater door must face into the steam room, and the firebox must be placed opposite the entrance. The stones are distributed into the heater with some clearance, not closely. It is a good idea to use stones with small crystals of small size. It can be diabase or just chlorite.
Stones containing mica are prohibited; it promotes the release of carbon monoxide, and this is harmful to life. You need to attach a metal chimney cover above the heater, and then install a water tank.
Creating a tank for heating water
The most practical method of heating water in a bathhouse is to use heat from the stove. There are several ways to install a tank for a sauna stove, the main thing is the location of the tank, it can be: internal, mounted or remote.
To design the tank, three versions of the material are used: cast iron, stainless steel containers or stainless steel. To make an iron barrel, you need to carry out a number of actions.
First you need to cut the desired piece of pipe. The cutting areas must be carefully processed. Then you need to start installing the bottom and top lid of the container. The next stage is soldering all the cut parts. Afterwards you need to install a tap and pipes, as well as a heat exchanger for the sauna stove. Then the installation of the module is carried out.
Assembling a sauna stove with your own hands from metal
They prefer to build the stove supply for the bath separately. This is due to the fact that it is possible to create exactly the model of the stove that you wanted. Then, to make a metal sauna stove with your own hands, you will need blueprint reading skills, construction tools and materials. First you need to draw up a project and determine the dimensions of the device.
There are 2 design options for homemade stoves, these are the horizontal and vertical versions. To make a stove you will need:
- a rod ten millimeters thick;
- sheet steel, 8 mm thick;
- iron pipe;
- latches;
- water tap;
- two meters of pipe.
We take a large piece of pipe and cut out an opening in it for the blower. In the middle of the pipe, on the side of the opening, we weld fastenings for the grate. Then we equip the firebox, for this we weld fastenings for the heater rods. On the back side of the heater we cut a hole through which steam will flow. We fill it with stones suitable for this type of unit.
We cut a hole in the roof for the stove for the chimney pipe and install it. And don’t forget to cover the sauna stove with useful material to create a classic stove. It’s not difficult to build the device; just follow the instructions.
Necessary equipment for work
Installing a sauna stove is an important matter, the correct operation of which depends on the correct organization of the installation. Initially, you should choose a place to place it. It is also necessary to adhere to fire safety rules.
According to standards, the distance between the stove and a flammable wall must be at least 25 centimeters. First you need to determine what kind of stove you decide to install. The next stage is drawing up a plan and counting the necessary material.
To assemble a homemade stove, you will need tools: a grinder, metal scissors, a welding machine, a variety of measuring and marking kits. You will also need material. The step-by-step manufacturing process can be seen in the video presented in this article.
Making a heater stove for a bath from a metal pipe
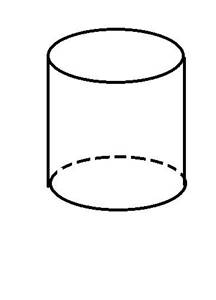
A do-it-yourself sauna stove made from a pipe is the easiest and most economical option for furnishing a room. A similar design will work well in every room. Thanks to the sealed housing, the stove made from 530 pipe will not emit carbon monoxide when active, so it is completely safe. A pipe bath can be made in two types: a horizontal and a vertical model.
This type of furnace significantly reduces the number of welding steps. In order to obtain an improved stove, only high-quality tubes are used, without corrosion. The workpiece should be cut into two parts, a longer section is needed for making a firebox and heater, and the remaining piece is suitable for constructing a tank. First you need to start making a pod.
A hole is cut at the bottom of the pipe, and a strong round-shaped plate is welded above it. Then we make a firebox and a door for it. We hang the door on a loop or hooks. A piece of pipe is welded above the firebox, which will be used as a heater.
Material for a metal stove in a bathhouse
Making stoves is an interesting and labor-intensive procedure. There are many types of metal stove models. The main task is to create a structure that is strong enough to prevent deformation and high thermal conductivity. For the manufacture of the mechanism, different materials are used: cast iron, steel and heat-resistant steel. The most common manufacture is steel.
This matter tolerates temperatures up to 400 degrees. The thickness of steel starts from 4 millimeters, but the disadvantage of the material is that it quickly burns out. The next material used is heat-resistant steel.
The minimum metal thickness is 3 millimeters. The stoves are made from the safest material, efficient and easy to install. Another material for forming metal sauna stoves is cast iron. It is not inferior in strength to steel, but at the same time its heat capacity and fragility are comparable to ceramics.
Installing a stove in a bathhouse
Precisely installing a stove in a bathhouse with your own hands is a responsible procedure, since the comfort and safety of its operation will depend on this.
In order for the steam room to warm up effectively, you need to select the location of the stove structure. By following all the rules and regulations for the placement of the heating medium, you will not have to worry about altering the bath unit for many years.
First of all, you need to calculate the dimensions of the device for the size of the high-temperature room, because the roof and interior decoration can burn, smolder, or melt; to prevent this, you need to choose the correct placement of the stove. You should also take care of installing a hood for a sauna stove, and do it yourself. It should be placed 50 centimeters from the wooden covering.
If it is protected by a metal screen, the distance can be reduced. The partitions opposite the firebox may not be insulated. The gap from the ceiling to the top cover should be 1.5 meters.
There must be unhindered access to the elements of the furnace structure in case of an emergency. You also need to plan in detail the ventilation system in the steam room, and think about the release of combustion products. When installing a brick kiln, you need to create a solid foundation, and place light metal structures on a non-combustible floor base.
Making a potbelly stove during mining
Diesel fuel and used engine oil are very high-calorie fuels. If you get it inexpensively, then there is no point in messing with wood and coal; it’s easier to make a reliable stove - a dripper. Its principle of operation is to burn waste dripping into a hot bowl. Moreover, along the way, the liquid fuel has time to warm up, as it passes through an oil line built inside the afterburner pipe. The design of a drip-type potbelly stove is shown in detail in the drawing.
For efficient oil combustion, air is forced into the stove using a fan, and waste flows naturally from a tank suspended from the wall next to the heater. Another option is the forced supply of fuel by creating pressure in the fuel tank (for example, with a hand pump).
The stove body can be either a pipe Ø219 mm or a propane cylinder with a diameter of 30 cm. Making an oil stove with your own hands is not a difficult task, the main thing is to correctly make the holes and slots in the afterburner and lay the fuel line to the bowl installed on the bottom. A complete assembly guide is provided in our other article. You can get a closer look at the operation of the heater from the video:
Metal selection
The technical characteristics of the future heating device largely depend on the metal chosen for it, which affects the cost of the work and the complexity of its implementation.
To create aggregates use:
- Surrogates. These include, for example, aluminum milk cans. But their use cannot be called the best option. The reason is that afterburning of exhaust gases, during which the temperature reaches at least 400 degrees, can provide high efficiency, and when operating an environmentally friendly stove, it rises to 600 degrees. But at 660 degrees aluminum melts. This means that the can will not make a long-lasting stove.
- Ordinary structural steel. It is characterized by a tensile strength of up to 400 degrees (over 2 hours) and 600 degrees (up to 2 hours). Only thick steel is suitable for stoves - at least 4 millimeters. But frequent use of such a unit is impossible, since it will burn out in just one winter.
- Heat-resistant steel. Factory furnaces are made from it using special steel 1.5 - 3 millimeters thick. These structures last up to 20 - 30 years. They are compact, light weight and high efficiency. Factory units are usually certified by the relevant services and can be installed in residential buildings. On top they have low-power water heating registers or hobs. It is quite possible to make a metal stove from heat-resistant steel with your own hands, since the assembly of individual models does not require major welding, and the connections are made differently, for example, using steel rivets. An example of such a device is the Slobozhanka product.
- Cast iron. Iron with an admixture of carbon is characterized by an insignificant thermal conductivity and thus retains heat well inside the furnace. The cast iron unit warms up quickly, and after heating it continues to provide heating for another 3–4 hours. It is used to supply heat to rooms up to 60 square meters. For the manufacture of stoves, cast iron with a thickness of 6–25 millimeters is suitable. A thinner alloy is more brittle, while an alloy that is too thick may crack during the first heating. Due to their significant weight, cast iron stoves cannot be installed directly on the floor, and therefore it is necessary to install a concrete screed. To do this, the floor is dismantled and a concrete pad of the required height is poured. It will not be possible to make a stove from cast iron yourself, since it is impossible to process it in artisanal conditions. Such units are used for heating utility rooms or greenhouses.
Positive and negative qualities of metal sauna stoves
There cannot be a steam room without a stove, because it is it that heats the room and maintains the desired temperature. Nowadays you can find a wide range of different options. But it’s best to make the oven yourself.
The advantages of a metal device include:
- actions are carried out quickly, and at the same time not very expensive, this can be done autonomously with basic knowledge and experience;
- a significant part of the models are compact, so they are suitable for small saunas;
- rapid heating of the steam room to the required temperature, even in winter;
- the mechanism can last a long time, it all depends on the welding condition and the thickness of the metal;
- economical fuel consumption;
- easy to use, even a person who does not have the proper skills can handle it.
An iron stove has negative qualities, these are:
- low heat capacity, it is not enough to heat the rest room;
- excessively rapid cooling, so you need to heat it regularly;
- the walls heat up and nearby objects can catch fire.
It is not easy to determine which stove is best for a bath; there are a lot of design qualities.
Long-burning potbelly stove
The potbelly stove has become a real symbol of Russia since the times of the Revolution and Civil War.
This is the name given to the simplest iron stove of a cylindrical or cubic shape. Its advantage was that the smoke channel - an ordinary iron pipe - could be taken out anywhere - through a wall or roof, into a window.
Taking the simplicity and practicality of a potbelly stove, you can make a small stove that will embody some simple ideas that significantly increase its efficiency, safety and environmental friendliness.
Basic scheme
The classic potbelly stove has a cylindrical design. However, it is difficult to do this when making it yourself, so you need to take a cube or parallelepiped as a basis.
Contains the following structural elements:
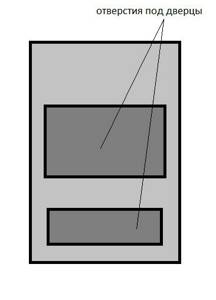
- Firebox. This is the chamber in which fuel combustion occurs, most often wood. The walls and bottom of the firebox must be thick, since they bear the main temperature load. There is a door in the front for storing firewood in the firebox; if desired, it can even be equipped with heat-resistant glass.
- Ash pit (ash pan). The compartment under the firebox is separated from it by a grate. The ash pan is also equipped with a door, only of a smaller size. It is used to remove ash and ash. which fall through the grate from burnt firewood. But this is not the only point of the ash pan - air is sucked in through the ash door and passes through the fuel layer from below, ensuring the best combustion.
- Smoke channel. To arrange it, a round hole is cut out in the upper part of the stove, a piece of steel pipe is inserted into it and scalded. In the future, you can attach other sections of the pipe here or use a factory sandwich chimney with special locks.
Expert opinion Dmitry Konstantinovich Levin
Some manufacturers of homemade stoves believe that the design with a blower and grate is not suitable for a sauna stove - it creates too much draft, which prevents complete combustion of the wood. Instead, it is proposed to lay the firewood directly on the bottom of the stove, and ensure air flow by drilling several round holes in the lower part of the combustion door and equipping them with a sliding damper.
How to make a door
The door is made of a thick sheet of metal. For fastening, you can use store-bought factory hinges or make your own. To seal the fit, an asbestos thread is used - it is wedged in a groove cut by a grinder.
If there is a suitable sheet of heat-resistant glass, it is inserted as follows: cut a window in the door and grind the cut area. Then they lay the glass, lay asbestos fiber around the perimeter, invisibly from the outside of the part, after which, using small steel tongues, I make tacks on each side.
The turning handle of the latch is easiest to make from the outside.
Homemade secondary gas afterburning system
The main disadvantage of a potbelly stove is its low efficiency. A stream of air passes quickly and strongly through the entire oven, carrying with it not only unburned food, but also heat. As a result, the case does not warm up sufficiently and gives off less heat. To solve this problem, a simple but ingenious modification was invented.
By placing two steel sheets above the firebox, the smoke passage channel can be significantly increased the length of the path that burnt gases travel before exiting through the chimney opening:
- The first horizontal sheet is welded directly above the firebox so that a channel remains for the passage of gases in the rear part of the stove.
- The next sheet is cooked higher, offset so that the passage is now at the front of the oven. It turns out that smoke, gases and heat, once in this labyrinth, snake through it all the way to the chimney. Along the way, they give off all the accumulated heat to the sheets, side walls and top plate of the oven.
If you drill several holes from the bottom from the back and cover them with a screen made of steel sheet, then at the top point, when fresh air, but already heated by the screen wall, meets unburned gases, the process of afterburning secondary gases will take place in the channel, which will lead to a significant increase in efficiency ovens.
Step-by-step instructions for creating a potbelly stove for a bath
If you decide to take a fundamental approach to this issue and do everything “forever”, so as not to have to deal with repairs every few months, we recommend that you strictly follow our instructions! It has been tested more than once, thousands of people have built their stoves using this technology, it is time-tested!
Foundation
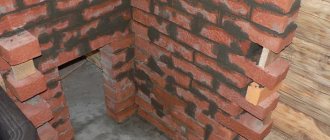
The most reliable foundation is a layer of cement below the floor level, two layers of waterproofing material (roofing felt) and two levels of brickwork. A reliable foundation will prevent the stove from tilting and ensure the proper level of fire safety.
- We dismantle the floor and dig a pit. The size of the pit is calculated based on the dimensions of the furnace with a margin of 30 cm around the perimeter. The optimal depth is about half a meter.
- We fill the bottom of the pit with a layer of broken bricks or small crushed stone, compact it and fill it with cement mortar, checking the horizontalness of the pour.
- After the cement has dried, two layers of roofing material are laid on it.
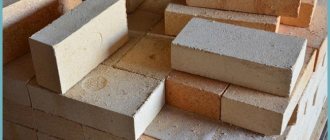
- Two levels of baked brick are laid on top of the roofing felt. The first level of brick is placed on edge. Refractory bricks resist moisture well and withstand high temperatures.
Firebox assembly
- The metal can or pipe used to make the firebox should have a thickness of about three millimeters. We cut the pipe on both sides with a grinder so that we get a cylinder of the required volume.
- We cut out the doors - for storing fuel and for the blower. In the absence of a grinder, work is carried out with a hammer, chisel and hacksaw. Irregularities are smoothed out with a file.
- Inside the furnace (between the ash pan and the firebox) we weld four stops to install the grate.
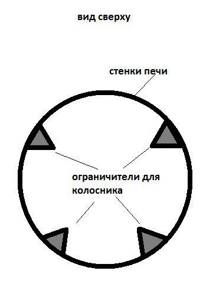
- The grate itself is made of metal wire or rods welded together. There is no need to weld the grille to the limiters.
- We cut out two circles from sheet metal, the size of which corresponds to the diameter of the pipe (barrel). In one of them we cut a hole for the chimney. We weld them hermetically to the oven.
- We use the remaining pieces of metal for the doors. We weld handles, latches and hinges to them. The simplest loops are made from sections of a hollow tube and a metal rod of appropriate size.
Scheme of a potbelly stove for a bath
Chimney and water tank
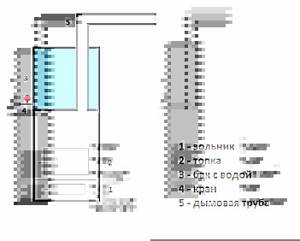
The chimney in a bathhouse consists of internal and external parts. The internal part is located indoors and passes through a tank of water, heating it.
The outer part is equipped with a fungus to protect against precipitation and dirt. In places of contact with flammable surfaces, it is insulated with asbestos sheets.
We weld the first, inner part of the chimney to the stove. Next, install a water tank on top of the stove. We weld it hermetically to the firebox. In this case, the chimney must pass through the tank. We cut a water tap into one of the walls.
After this, we extend the pipe to the ceiling level and lead it through the roof to the street.
To close the chimney after finishing the stove, install a valve. To do this, during the assembly process, the pipe is drilled, and a metal circle mounted on a rod is installed inside. Operating principle: by turning the rod, the position of the metal damper inside the pipe also changes, changing the size of the gap and the amount of air and smoke circulating inside it.
Facing
The outer part of the furnace (except for its front part) is lined with refractory bricks. This improves heat transfer and promotes more uniform heating of the room. Metal parts of the stove may only be painted with heat-resistant paints (to protect the stove from corrosion).
Furnace assembly process
Naturally, a do-it-yourself stove for a bathhouse made from a pipe will not look super ideal in appearance. However, it looks quite decent, and will perform its main functions no worse than the factory model - uniform heat release.
When installing a stove in a bathhouse, it is worth remembering that it carries with it the danger of burns and must comply with all fire safety measures, so you must follow the installation rules:
- it must be placed on the foundation, 0.2 meters away from the wall;
- where the pipe exits to the outside, a thickening of 120 mm should be made, and it should protrude above the roof by at least 0.5 meters;
- all wooden elements must be treated with an insulating compound containing clay;
- the section of the chimney between the ceiling and the roof must be plastered and lime mortar applied;
- place shelves near the wall where the stove is installed.
Foundation
Independent production of any stove model in a bathhouse begins with installing the foundation.
- In the place in the bathhouse where the stove is planned to be placed, it is necessary to dig a hole 0.5 meters deep, and the length and width can reach 0.7 meters.
- Cover it 0.3 meters with crushed stone, small fractions, and compact it well.
- Prepare mortar, cement and sand, at the rate of 1 to 4, dilute with water.
- Pour the solution into the hole and leave for 24 hours until it dries and becomes hard.
- You need to put roofing felt on top, it will protect from moisture.
- Prepare a concrete solution, its composition is cement, sand, fine gravel and water, in a ratio of 1 to 2 to 4. Pour the roofing material with the resulting mixture.
- It is good to level the base with a building level.
When the mortar dries, you can use brickwork for a more aesthetic appearance.
grate
The grate is a special grate that provides traction. There are two ways to make a grate.
First:
- Cut a metal rectangle 10 - 12 mm thick, the size corresponding to the parameters of the pipe inside.
- In the manufactured part, remove the middle, leaving places for welding along the edges.
- Weld metal rods to this frame, placing them horizontally or vertically.
Second:
- Cut a circle out of metal, its diameter should coincide with the pipe inside.
- Cut large holes in the circle to create something similar to a sieve.
The structure is welded inside the pipe, it is located 15-20 cm from the bottom.
Chimney
Chimneys are:
- Ceramic - most resistant to high temperatures. These models have the longest service life.
- Brick - since the surface is rough, soot accumulation occurs quickly, which leads to slower air draft.
- Steel - this option is the most suitable for a self-made bathhouse, since its price is not high. The material is light in weight and highly durable; in addition, it can withstand temperature changes well and is resistant to water and corrosion. It heats up quickly, so a tank of water is placed on it for further bath procedures.
The assembly process is simple:
- First you need to mark the location for the hole and make it according to the marks.
- Attach a steel casing to the pipe, put on the rings and fix them to the ceiling. Secure its lower edge with self-tapping screws.
- Bring the second edge to the roof. Expanded clay, clay or asbestos can be used to fill the gaps between it and the roof.
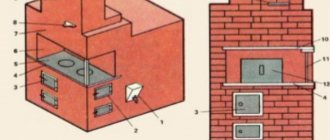
The main parts of the design of a potbelly stove for a bath:
- foundation;
- firebox and ash pan;
- grate and box for collecting combustion products (ash, ash);
- heater with a window for steam outlet;
- chimney (to improve heat transfer, the pipe is often made in the form of a spiral or zigzag);
- water tank (10 liters of water per person);
- brick cladding.
The water tank is welded from steel sheets of increased thickness. A woodshed may be provided next to the stove.
Operating principle of the furnace
Solid fuel, burning in the firebox, releases heat, which is partially used to heat the room, and partially enters the chimney, which in turn heats the water tank.
Potbelly stove made from a barrel or thick-walled pipe with a water tank
This is the simplest and most popular design of a sauna stove.
To install it you will need:
- skills in using a welding machine and grinder;
- cutting wheels;
- electrodes;
- a barrel (or thick-walled pipe) for a firebox and a water tank;
- tap;
- smoke exhaust pipe;
- bricks and mortar;
- metal corners and rods for the grate;
- loops (or pieces of suitable sized rods and hollow metal tubes);
- sheets of heat-insulating material;
- heat resistant paint.
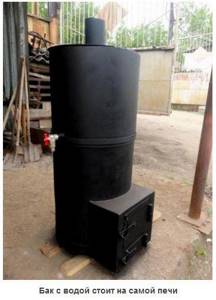
The water tank is located on the stove itself
The easiest way to make a potbelly stove with a round cross-section is from a piece of thick-walled pipe, an ordinary metal barrel, or from bent and hermetically welded sheets of metal.