We must pay tribute to Professor Butakov, the inventor of gas generator furnaces, which have gained popularity among the Russian population. They are widely used in everyday life due to their high heating capacity, power, efficiency and functionality. To heat a relatively large room, fuel will be required 2 times less than, for example, when using a stove with brickwork, and also 12 times less compared to a potbelly stove. The design of this stove is not much different from an iron temporary stove, so the unit has found its application in heating dachas, garages, large warehouses, hangars, change houses, mobile booths.
User tips
At the initial stage, the oven needs to be tested and the operating mode determined. To start the unit, you must perform the following steps:
- Remove the top cover.
- Load fuel. In this case, the firewood is located tightly to each other.
- It is better to put paper on top of the firewood, after moistening it with kerosene. This circumstance will significantly speed up the ignition of the furnace.
- The stove is equipped with an air supply pipe. You need to throw a rag into it to start the kindling process.
- After the firewood has ignited, you will need to close the pipe damper.
Additional Information! It will not be possible to light the stove of the engineer and Professor Butakov with matches.
During operation of the stove, you need to control the ignition to avoid unpleasant consequences.
Operating the heating unit
Before making the first bookmark, the device must be checked for functionality. The cone of the structure gets very hot, so the distance to the nearest surfaces should be at least 40 centimeters . You also need to check the tightness of all joints.
Starting the boiler:
- Remove the cover.
- Remove the disc with the air circulation pipe.
- Load solid fuel. Firewood should be stacked tightly in a vertical position.
- Place small branches and paper on top to make it easier to light a fire.
- After bookmarking, the disk needs to be installed in place .
- Close the top cover.
- Throw lit paper into a special hole .
- When the wood is completely ignited, you need to close the damper.
It is not recommended to leave the heating device unattended . The operation of the oven must be checked periodically. If you can’t install the equipment yourself, you can use the services of professional craftsmen who will complete the necessary work in a short time .
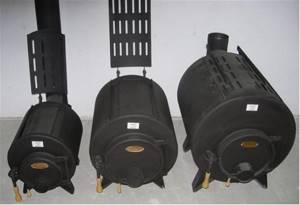
Types of stoves
Butakov devices are produced in several models
It is important to note that all furnace options operate on the same principle and also have the same design. Models differ in power, dimensions, number of pipes
Therefore, you can easily choose a unit for any room. Existing models:
- “Gymnasium student.” This design is no longer produced on an industrial scale, as it is ineffective.
- "Student". The stove can heat a room with an area of 150 m3. It is an excellent option for residential premises.
- Model “Engineer”. The design is capable of heating 250 m3.
- “Associate Professor” is designed for a room with an area of 500 m3.
- “Professor” will heat 1000 m3.
- "Academician".
Some designs have a hob for cooking.
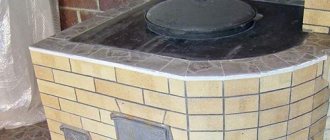
Main structural elements of Butakov models
The design of models from different series of furnaces has its own distinctive features, but the basis of each of them is a fuel chamber, an ash pan and a system of convective pipes.
Additional elements of Butakov brand heat generators:
- Grate – separates the firebox and ash pit.
- Gate - is a damper located at the outlet of exhaust combustion products.
- Gas guide flaps - installed in the openings for the outlet of heated air.
- Chimney system.
Specifications
Of the entire range of Butakov heaters, the Professor stove is the most powerful.
The engineering parameters speak for themselves:
- the volume of the heated room is about 1000 m³;
- maximum power – 40 kW;
- efficiency – 85%;
- dimensions (L x W x H) – 1110x670x1250 mm;
- unit weight – 57 kilograms;
- firebox range – 400 liters;
- chimney diameter – 20 cm;
- The minimum height of the chimney pipe is 8.0 m.
The average cost of this model, depending on the variety, is approximately 32.5 thousand rubles.
Please note: Butakov’s wood-burning convection ovens easily cope with the resulting condensate - it flows down the pipe into the firebox and burns out there.
How to choose a Butakov device
It is important to note that during operation of the heating equipment there is no burning smell, since the condensate flows into the firebox and burns . To choose the right model, you need to consider some nuances :
- The area of the heated room. If you need to heat a private house, then it is enough to purchase a simple model, for example, “Student”. For warehouse premises, the “Engineer” option is suitable.
- Heating time for one bookmark. The Docent oven operates the longest . But in the “Student” model it is necessary to add fuel more often
- Fuel used. The “Engineer” stove operates on any solid fuel.
- Additional components and installations .
- Volume of the smoke exhaust pipe.
It is important to note that any model of the Butakov stove is sold in a ready-made version, so installation can be done with your own hands.
- It is necessary to carefully connect all sections of the chimney pipe and seal all joints.
- It is not recommended to install the structure near flammable surfaces and objects.
- It is recommended to additionally insulate the surface of walls and floors to reduce the risk of fire.
The lineup
These stoves are intended for individual use at home or in a bathhouse. There are six main models of the furnace mechanism:
- Student.
- Engineer.
- High school student.
- Professor.
- Assistant professor.
- Academician.
Important! Professor Butakov’s installations have the same operating principle. They differ only in power and size
The maximum permissible power of the installation should not exceed 55 kW. Serial production is aimed only at the production of Student, Engineer and Associate Professor furnaces. To obtain other models of stoves, you will have to place an individual order.
The entire range of Butakov stoves has a beautiful design that will suit almost any interior.
High school student
Model "Gymnasium student"
The chimney outlet is located in the upper part of the body, which saves space in the room. However, this design has significant disadvantages: condensate and soot fall directly into the furnace;
It is inconvenient to clean the chimney, because... Each time you have to take it out of the oven, which is quite problematic.
The Gymnasist-1 modification features a design without a hob.
Characteristics:
- Power - 5 kW
- Efficiency - 85%
- The size of the heated room is 50-100 m³
- Weight - 34 kg
- Dimensions - 400x500x500 mm
- Wall thickness - 2.5 mm
- Firebox volume - 60 l
- Chimney pipe diameter - 115 mm
- The cost, depending on the modification, is from 4800 to 6800 rubles.
Model "Student".
Student
One of the most common models, ideal for country houses and small private houses, as well as for well-insulated larger private houses. The heating stove of Professor Butakov Student has an increased diameter of pipes, as well as a smaller thickness of their walls, which allows for increased heat transfer, because The “live” cross-section for air movement through the pipes increases in this case from 35% to 70%.
Characteristics:
- Power - 9 kW
- Efficiency - 85%
- The size of the heated room is 150 m³
- Weight - 57 kg
- Dimensions - 370x545x650 mm
- Firebox volume - 74 l
- Chimney pipe diameter - 120 mm
There are 3 modifications of this model:
- wood-burning with a metal door, price - 11,900 rubles;
- coal with a metal door, price - 12,800 rubles;
- with a cast iron door with built-in glass, price - 13,900 rubles.
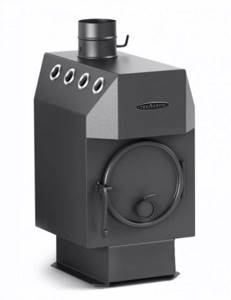
Engineer
Model "Engineer"
It is the most popular model from the entire model range, because... ideal for private houses and cottages, as well as for small industrial premises. Just like the “Student”, the “Engineer” design consists of convective pipes of increased diameter with thinner walls, which also significantly increases the heat transfer of the furnace.
Characteristics:
- Power - 15 kW
- Efficiency - 85%
- The size of the heated room is 250 m³
- Weight - 75 kg
- Dimensions - 440x645x800 mm
- Firebox volume - 120 l
- Chimney pipe diameter - 120 mm
- Cost - wood: 16,000 rubles; coal: 16,700 rubles; with glass door: 17,700 rub.
Assistant professor
Model "Associate Professor"
This model is mainly used for heating warehouses and industrial premises, as well as large private houses.
Characteristics:
- Power - 25 kW
- Efficiency - 85%
- The size of the heated room is 500 m³
- Weight - 143 kg
- Dimensions - 570x800x1000 mm
- Firebox volume - 250 l
- Chimney pipe diameter - 150 mm
- Cost - from 28,000 rubles
Professor
Model "Professor"
Characteristics:
- Power - 40 kW
- Efficiency - 85%
- The size of the heated room is 1000 m³
- Weight - 57 kg
- Dimensions - 670x1110x1250 mm
- Chimney pipe diameter - 200 mm
- Cost depending on modification - from 32,500 rubles.
Self-production
Before you start building a device with your own hands, you need to study its diagram:
The assembly sequence of this unit is no different from the installation of gas generator furnaces. The basis of the device is a metal barrel.
To get a high-quality unit with safe, economical and efficient heating, follow the instructions below:
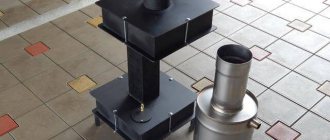
- Using a grinder, you need to cut off the top of the barrel, smooth out the sharp edges with a hammer and bend them down.
- It is necessary to cut a circle with a diameter of 1.5-2 cm in a steel sheet. This is much smaller than the corresponding size of the barrel itself.
- In the cut out element you need to make a hole with a diameter of 10 cm and weld a steel pipe of the same size to it.
- You will need to attach channel sections to the bottom of the product using a welding machine and install them so that they can move freely inside the barrel. During operation of the unit, metal beams will put pressure on the fuel.
- A damper is mounted on top of the pipe, and the pin is installed strictly vertically.
- This element must be fixed by welding. A hole needs to be drilled at the edge of the valve, cut from steel with a diameter similar to the corresponding pipe size. After installation, the pin should cover the product.
- The damper is screwed on with a nut. Installing this element allows you to further monitor the volume of incoming air, as well as the intensity of the device’s operation.
- The side of the lid must be leveled with a hammer. The edges need to be bent outward to ensure a tight fit and adherence to the base.
- You need to make a hole in the lid with a diameter of 10.5 cm. To do this, you need to stock up on a chisel.
- The pipe needs to be welded to the pancake and brought out through a hole made in the lid, which then needs to be welded.
- For the base of the furnace, you can prepare a not too deep brick platform.
- In the upper part of the device body, you need to cut a hole with a diameter of 15 cm. A smoke channel will pass through it, which is 1.5 times longer than the body itself. A previously measured section of pipe is welded to the hole on top of the structure.
- You need to make a small square hole at the bottom of the device, then weld the door to it. This will be an ash pan - a hatch for collecting ash, where a box is installed for convenience and ease of cleaning.
- The lower part of the chimney pipe is carefully welded. It is desirable that the product stands on legs.
- An elbow is welded to the channel and the furnace is connected. The structure is fixed with a clamp. A fiberglass base is preliminarily placed under this device to ensure the tightness of all connections.
If there is no barrel, then you can use a fire extinguisher for the base of the stove, from which you need to remove the body. A gas cylinder is also suitable for these purposes. The device is assembled in a similar way.
Features of various models of such stoves
Professor Butakov’s range of stoves is regularly improved, as are their performance characteristics. The initial version of the “Gymnasium Student” design was produced without a hob. The power of this design is 5 kW. After some time, a device with a power of 8 kW was released. The latter can be used in domestic and commercial premises. Such a device has the following disadvantages:
- Vertical tube arrangement. Due to this, soot and condensate will fall.
- The first model does not have a grate.
- Cleaning the chimney structure is carried out after disconnecting it from the stove.
Long-burning stoves called “Engineer Hydraulics” have a high sales rating; they are capable of heating a room with an area of up to 250 m². This device provides for the installation of a vertical chimney, there are no grates, and combustion takes place in gas generation mode. The power of this product is 15 kW.
The “Student” model can organically fit into the space of a small country house or private house. The design can heat rooms up to 150 m², if they are insulated. Professor Butakov's stove is equipped with cast iron grates. The tube is connected using a tee into which soot will fall. The diameter of the chimney structure is increased to 120 mm, and the walls are thinner. Due to the increased cross-section of the chimney, it was possible to speed up air movement by 35%. As a result, heat transfer was increased. Product power – 9 kW.
Disadvantages of heating installations Professor Butakov
Like other heat generators, heating installations of the Butakov brand have certain disadvantages:
- Cooking food on Butakov brand stoves takes longer than on conventional heating and cooking heat generators.
- Many users note the difficulty of cleaning chimneys and stoves themselves after using raw wood or garbage as fuel. However, if you follow the instructions and burn the stove once every three days (use open burning mode), then this problem can be avoided.
When purchasing heat generators of the Butakov brand, you should clarify what energy carrier they can operate on. Not all models have the ability to use peat and coal as fuel resources. Professor Butakov’s units of the “Student” and “Engineer” series, according to reviews from their owners, do an excellent job of heating small country houses. Moreover, twigs, branches and other waste, which are present in sufficient quantities at the dacha, can be used as fuel for them.
https://youtube.com/watch?v=NHj9sJBlhQU
Advantages and disadvantages
Modern long-burning stoves have a lot of advantages, which can play a decisive role in the initial selection of heating equipment. However, the disadvantages of existing designs require weighing the pros and cons before deciding to replace an existing heating unit with a newfangled pyrolysis boiler.
The advantages of the structures under consideration include:
- multiple increase in operating time on one fuel load;
- possibility of full autonomy - when entering the main mode, operation of the unit does not require operator intervention;
- the fuel burns with virtually no residue;
- the interval between downloads increases;
- using not only coal and firewood as fuel, but also wood chips, sawdust, dry plant waste, pellets, etc.;
- reduced weight and dimensions;
- possibility of adjusting the combustion process;
- The efficiency of long-burning pyrolysis boilers reaches 90%;
- smoke residues do not contain soot or harmful substances;
- many designs available for DIY.
Be sure to check out the disadvantages of this type of oven:
- increased requirements for the chimney. It must have sufficient height and thermal insulation;
- In long-burning furnaces, only dry fuel can be used. Excess moisture reduces the flame temperature, and water vapor blocks the access of oxygen, which makes it impossible for the unit to operate in gas generator mode;
- the reduced smoke temperature promotes the layering of soot and other combustion products on the walls of the chimney;
- when burning wet fuel, heavy fractions and dangerous chemical compounds appear in the smoke residues;
- higher cost compared to conventional furnaces.
If you weigh all the pros and cons, it is not difficult to understand that the wide popularity of long-burning stoves is not an accident at all, but the result of precise calculations and a carefully designed design.
User manual
Some consumers complain about the rapid combustion of solid fuel in the stove. But experts insist that they install and operate the unit incorrectly. The fuel must not only be placed correctly, but also ignited correctly.
Stack firewood correctly
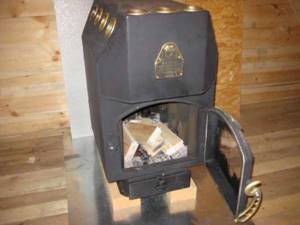
In order for it to smolder as long as possible, you first need to set fire to a small amount of wood and obtain coals. Then add solid fuel, after which it will smolder for 8-10 hours and give off a large amount of heat.
Basic recommendations:
- Before putting the boiler into operation, it needs to be tested. This will help determine the optimal method for operating the structure.
- To prevent objects from igniting from the hot stove body, it is installed at a distance of at least 40 cm from them.
- During boiler operation, slag appears on the damper and inside the chimney. To get rid of it you need to use special cleaning agents “Miracle Log” or “Umbrella Pipe”, which increase the movement of the air mass in the chimney.
- It is not recommended to use fuel from coniferous trees, as it emits an unpleasant odor or smoke, while fuel from deciduous trees (birch, aspen, etc.) fill the room with pleasant and environmentally friendly warm air.
- The chimney must be open. Fuel can be placed horizontally or vertically in the firebox.
Features of application
Consumer reviews about Polinor insulation are quite common, which is explained by the ease of its use. The principle of working with it comes down to the following:
- Preparing the working surface for further finishing. To do this, you need to rid it of stains, dirt, and thoroughly moisturize it.
- The cylinder with insulation must be in the room at a temperature of at least 18 degrees.
- Before work, you need to put the special nozzle that comes with the kit on the cylinder until it clicks.
- Remove the cover from the cross and screw the gun onto the base. By the way, it is not included in the package. During this procedure, the balloon must be held vertically.
- The container is thoroughly shaken.
- Sprayed insulation is easily applied by dosing by pressing the gun trigger. You need to spray a layer no thicker than 5 cm.
It is recommended to shake the container during operation. To clean the gun after completion of insulation, you need to use a special liquid PULP Cleaner.
Due to its ease of use, Polinor insulation is very popular in everyday life. The instructions for its use are simple, so even a novice user can handle it. As already mentioned, the material can only be applied to a cleaned surface. Moreover, if you are working with a galvanized profiled metal sheet, you must first wipe its surface, remove all stains and oil film, which is always present on the metal due to the peculiarities of the technological process. Heating the aerosol is necessary so that the mass in the container does not freeze and is sprayed evenly.
Preparing pipes and parts
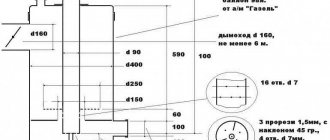
The oven has an outlet of 14 convection pipes. The diameter of the chimney outlet is 200 mm; we purchase it ready-made from a corrugated ventilation pipe.
For manufacturing we will need to prepare several parts. From 4 mm sheet steel we cut out:
- 2 side parts measuring 800/950 mm. The second dimension is the height of the structure;
- For the front and rear walls, we use a grinder to cut out parts 1110/670 mm. After final assembly, the protruding metal will be cut off and can be used as reinforcement for the base;
- for the top we cut out a piece measuring 350/950 mm. It is necessary to mark 6 holes of three pieces on the narrow sides and drill or cut them by welding. Pipes with a diameter of 40 mm will come out of them;
- for 2 side jibs, cut the workpiece to a size of 200/950 mm;
- for the base you can use a corner with a 100 mm shelf or a channel. 2 pieces 950 mm and 2 lintels 470 mm each. It is necessary to make holes in the base for the pipes, which must be coaxial with the top ones;
- For convection pipes we use steel parts with a cross section of 40 mm. 6 of them are straight, they run along the front and back walls. There are 4 holes on the jibs. 8 pipes will need to be bent to a certain angle. It is better to do this on a pipe bender.
You will also need to leave a sheet for making a door and an ash drawer. To make a grate, you can use a sheet 10 mm thick, making longitudinal grooves in it with a grinder. You can weld a grid from reinforcement or a rod with a diameter of 8-10 mm.
To install the grate, we will prepare several pieces of corner. It is better not to secure the grate tightly; this will make it easier to replace and maintain the stove. A hole is marked on the top part and made for connection to the outlet pipe. You will need to prepare a section with a cross-section of 180-190 mm and a length of 170 mm.
Installation and connection
Installing a stove is simple, but it is important to position it correctly in the room. To do this, follow simple recommendations:
- When carrying and installing the heater, remember that the stove is heavy;
- when choosing a location, you should not install the stove in a narrow corridor or other areas where it will interfere with free passage;
- It is not recommended to install it in a residential area. The best place would be the kitchen or a separate niche in the hallway or hallway;
- the shortest distance to the wall from the homemade product is at least 1250 mm, the minimum gap between the ceiling and the top of the stove is 1200 mm;
- if you have to install the stove against a wooden wall, the distance to it is at least 500 mm and it must be covered with additional protection against deformation from heating;
- if the heater is installed in a building with walls made of fire-resistant materials, the gap can be reduced to 350 mm;
- To install the stove, it is recommended to make a concrete foundation if it is placed on a flammable floor. Additionally, it is covered with a sheet of non-combustible material and the gap between the floor and the ash collection compartment must be at least 140 mm.
If the stove needs to be fixed to the foundation, then during manufacturing it will be necessary to weld a piece of corner with holes onto the base and fix it with self-tapping screws or anchors.
When connecting to a chimney, you must follow the basic instructions:
if the pipe is led directly vertically through the ceiling to the roof - the minimum distance from the bottom of the stove to the upper section of the chimney is 5000 mm; When using a corrugated pipe for exhaust, it must be secured to clamps with braces at the turning points; When a pipe passes through floors and roofs, it is important to reliably insulate these places from heat loss and water passage. Condensation does not form in such boilers
A small layer of it flows into the firebox and evaporates. As insulators, you can use industrial sleeves or tightly wrap the hood with mineral wool or fill the cavity with foam insulation.
After making and installing Professor Butakov’s stove with your own hands, you need to perform a test ignition. After making sure there is sufficient draft, we put firewood into the firebox. We lay them tightly, but do not close the upper cavity completely. The damper is open, we light the stove.
After making sure that the flame has gained strength, you can close the slide valve. At the same time, gradual smoldering of the firewood begins and heat is released through the convection pipes. At first, smoke may come out of the pipes, do not be alarmed. This burns the oil out of the pipe cavity.
For a more visual aid on how to make a Butakov stove with your own hands, a diagram and drawing cannot provide complete information. Videos with step-by-step instructions for making a stove will help with this.
All about stove installation Engineer
To facilitate installation, each Termofor oven comes with detailed installation instructions. The company has thought out a convenient and simple design that facilitates installation work.
To begin installing the Engineer furnace with your own hands, you should begin by determining the location. It will not be unimportant to decide which chimney to use when connecting.
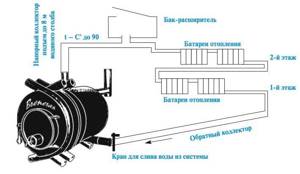
To heat adjacent rooms, a heat sink is installed on air heating furnaces for routing air ducts, and a heating system pipeline is connected to water heating models. After installation, the stove will be able to effectively heat the entire building, and not just the room in which it is installed.
Requirements for placement
The efficiency and uniformity of heating largely depend on the correct location of the stove. For normal operation, the Engineer stove needs a large volume of air and no obstacles in the way of convection currents.
An essential condition is compliance with fire safety rules. Some points that must be followed are contained in the instruction manual. In particular, it states:
- The stove is installed on a non-combustible base.
Protection is provided for walls and ceilings (where the chimney passes) when installed in a wooden house. The section of the wall adjacent to the stove is insulated with non-flammable insulation, and then covered with steel sheet or brick.
The surface of the chimney is heated to a temperature of over 200°C, which, according to the rules of PPB, requires the use of a special passage unit filled with mineral insulation when passing through floor slabs and roofing.
The special design and the use of a special base simplifies the installation of the Engineer furnace and makes it possible to do the connection yourself.
Which chimney is better
Solid fuel heating equipment belongs to the class of furnaces with high flue gas temperatures. During combustion, inside the combustion chamber, the heating intensity reaches 450-550°C. Although due to the use of gas generation, the smoke at the outlet cools significantly, the temperature still remains sufficient to lead to burnout and deformation of a conventional steel chimney.
Additional requirements apply to traction characteristics. Insufficient pressure leads to backdraft, air locks and other operational difficulties.
Reviews from owners and practice have shown that the optimal choice for convection and water heating stoves is a sandwich pipe and a ceramic chimney. An additional advantage of the systems is the simple installation of the chimney yourself. Sandwich pipes and ceramics are assembled like a construction kit and do not require special skills for installation.
On the Internet you can find negative reviews about the stoves of Professor Butakov Engineer, but they are rather the exception to the rule. Basically, owners point out the advantages of Termofor products:
- Affordable price.
Long service life.
A simple design that allows for independent installation of the stove in the house.
Thermal efficiency due to the ability to connect to a water heating system and air ducts.
All of the above factors ensure uninterrupted and comfortable operation of the Butakov stoves of the Engineer series and explain the popularity of the models among Russian consumers.
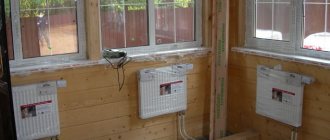
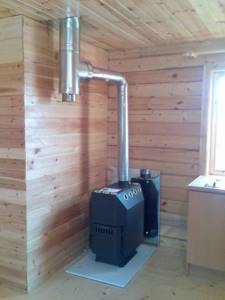
Furnace installation
For installation you will need an asbestos board or sheet of iron
To install a chimney on an engineer Butakov stove, you will need to read the installation instructions, which describe in detail all installation operations. There is also a diagram for connecting pipes to the output manifolds of the unit.
When installing them, special attention is paid to the issue of fire safety, which is primarily manifested in the selection of a suitable location
The Butakov boiler, as a rule, is installed directly on the floor of a residential or industrial premises. It is placed on a flat surface covered with a sheet of iron on top of a ten-millimeter asbestos flooring. On its base there are mounting holes that allow, if necessary, to fix the body to the flooring.
During installation, it is important to ensure that the stove firebox and body are at least 380 mm away from the walls and floor. If it is impossible to provide the required gap, it is recommended to insulate the wall surfaces at a level of 25 cm above the top of the boiler
To do this, you can use one of the following methods:
- cover with a layer of reinforced heat-insulating plaster 25 mm thick;
- place a 10 mm piece of asbestos with a steel sheet on top on the protected surfaces.
It is also important to determine the exact location of the chimney pipe installation in the ceiling area on the ceiling surface. After marking it, a square hole is made in the selected area, insulated with basalt wool over metal sheets
According to the drawings, the Butakov stove is connected to the finished chimney using a special tee, which ensures that combustion residues of wood (soot) and condensate settle in it
Particular attention is paid to the quality of pipe joints, for which all joints of the gas exhaust system are sealed with heat-resistant sealant
Before starting installation, it is necessary to prepare the place where the unit will stand. To complete the task, it is not necessary to install an additional foundation. The stove can be placed on a brick stand.
Note! It is recommended to pre-insulate the installation site. Metal sheets are used for this purpose.
The surface must also be flat, without any drops.
The walls adjacent to the device must be insulated. Plaster mixture on a metal mesh is an excellent option for thermal insulation.
Important! The device must not be installed close to a wall. In this case, it is recommended to maintain a distance of at least 40 cm
Also, pipe joints must be treated with a special sealant. Moreover, the space near the unit should not contain flammable materials.
By observing the above requirements, it is possible to avoid a fire.
Rules and technology for constructing a furnace
The laying of a stove for heating a private house most often begins with the arrangement of a brick “pillow”. That is, they lay two continuous rows of bricks on top of the base waterproofing material. In this case, a clay solution is used and care is taken to ensure that the thickness of the seams is 8-10 mm.
Next, they continue laying the stove with their own hands, according to the chosen order. In this case, the following rules are observed:
- Before laying, each brick is immersed in water for a couple of minutes. This is necessary to ensure that cracks do not subsequently form in the pipe and furnace firebox. One of the features of brick is that it is capable of strongly drawing water out of the mortar. And this, in turn, leads to cracking of the seams.
- In the construction of stoves, a trowel is usually used only when laying pipes. When assembling a firebox, the solution is traditionally leveled simply by hand. At the same time, when performing this procedure, they try to feel all the small pebbles remaining in the clay and remove them.
- After laying four rows of the stove, take a trowel and remove the mortar squeezed out of the seams. In this case, the inner surface of the structure being laid out is additionally wiped down with a damp cloth so that subsequently the dried concrete does not crumble and clog wells or channels. The seams on the outside of the stove are unstitched.
- Every 2-4 rows when doing masonry, check the evenness of the corners, verticals and horizontals.
- When laying fireboxes and channels, do not allow fireclay and ordinary bricks to be tied together. These building materials have different coefficients of thermal expansion. Therefore, using them when laying one row can subsequently lead to cracking of the furnace structures.
The pipe is routed through the ceiling and roof in compliance with fire safety rules. That is, they create a layer between the chimney and the wooden roof structures using asbestos sheets and basalt wool.
Buying tips
In order for an ignorant user not to make a mistake when buying a stove, it is necessary to know how the original Novosibirsk Termofor product differs from a fake. Considering that the product is designed for long-term combustion, high-quality material is used for its manufacture: thick steel for the body and durable cast iron for the grates and doors. It is the design of the firebox door that is the main difference between the original and the fake.
Depending on the modification, the cost of the structure starts from 15,000 depending on the model. Considering the high functionality and efficiency of the devices, the price of Professor Butakov’s “Student” stove is quite adequate, which allows everyone to economically heat their country houses.
Practical DIY Butakov stove
It is quite possible to create a Butakov design with your own hands, even a simple model, even with complications. True, you first need to make or find a drawing of the modification that you need.
Instructions for creating a Butakov stove:
- First, you need to weld a cylinder from a metal sheet, or you can remove the top of the barrel and process its edges;
- Next, you need to cut out a circle slightly smaller than the bottom of the structure, and then another one in its center;
- After which a pipe is fixed to the center circle, and channels to its lower end;
- A damper is placed on top of the pipe, which should move freely, but not let smoke through;
- The side of the lid must be made smooth and its edges must be bent outward, and then a hole must be made in the lid through which the pipe can be brought out;
- The lid remains to be welded;
- Next, you need to make a hole in the stove body for the chimney;
- You need to make a hole at the bottom of the stove and weld a grate on top of it, and place a box for ash at the bottom;
- Next, you need to hermetically weld the entire structure, and then attach the chimney to it.
It is better to place the stove on a stand made of bricks so that the floor does not heat up.
Positive aspects of Butakov brand heat generators
Reviews from owners of heating installations highlight both the positive and negative aspects of these devices. Let's talk about the advantages first:
- Butakov furnaces are equipped with a special system for collecting pyrolysis products. When burning, condensate with an unpleasant odor is formed, which collects in a vertical pipe. From the pipe, the condensate flows back into the firebox, where it burns without a trace.
- Due to the efficiency of the heat generator, the main element of the furnace - the firebox - can have modest dimensions. Therefore, such installations do not take up too much space.
Attention! In their reviews, users of heating installations note the participation of walls in convective exchange as both a positive and a negative quality. On the one hand, this design feature makes it possible to quickly warm up the room, on the other hand, it greatly increases the risk of burns when adjusting the gate and gas guide flaps.
- A retractable ash drawer makes it possible to quickly remove ash directly during the combustion process.
Types of stove heaters
There are a lot of stoves for summer cottages into which you can load firewood. But based on the material from which the stove is made, they are divided into two types.
Table 1. Efficiency of different types of furnaces.
| Type of oven | Efficiency |
| Dutch oven | 45 — 55 % |
| "Swede" | 50 — 60 % |
| Iron potbelly stove | 60 — 70 % |
| Long burning stove | 80 — 90 % |
Brick ovens
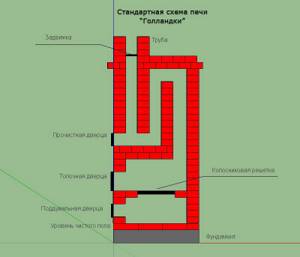
Such structures are built from refractory brick - red, which is not afraid of temperature and does not crack from heating. Hollow bricks are used to lighten the load on the foundation. The furnace can have different shapes and configurations; not only its dimensions, but also its efficiency and degree of fuel combustion depend on this. The well-known Russian stove is also made of brick, and then coated and whitewashed. But it is not suitable for a modern dacha: it is too large and heavy, difficult to build, and in addition, it must be constantly heated. After complete cooling, it will heat the room only after a few hours.
More compact options with quick heating are much better suited for a country house: “Dutch” and “Swedish”. Both of these stoves do not require rough construction; heat is emitted by walls with a chimney duct running inside them. The heat transfer of the furnace, the degree of fuel combustion and other factors depend on the number of elbows and bends in the channel. Any summer resident can build such stoves with his own hands if you follow the instructions.
You can lay out a brick oven according to your design
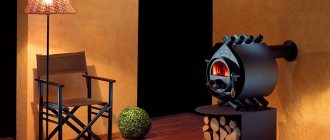
Metal furnaces
The material for these products is cast iron or steel. Cast iron structures are good because they have thicker walls with a porous structure. Once heated, they cool down more slowly, continuing to give off heat. Steel ones have their own advantage - they weigh less, since the steel is stronger, and the walls of the furnace are made thinner. Such a stove, having gone out, quickly cools down, but also heats up in a matter of minutes - just right for a small house.
Market Review
Steel stoves include a potbelly stove - the simplest cylindrical stove with one door and a chimney made of a simple pipe. If you have the materials, you can do it yourself using a home inverter welding machine. At dachas they also install more complex structures - Buleryan and Butakova stoves. Their configuration allows the stove to operate as a convector, pumping air through flame-heated pipelines. Such systems are characterized by a very high warm-up rate.
The main advantage of metal stoves is that they are ready-made; you just need to pick them up and buy them. On the other hand, the price may be higher than when laying a brick oven yourself.
The iron stove is ready for use
Principle of operation
Operation
oven is carried out simultaneously by pyrolysis and convection:
- The pyrolysis process occurs directly in the firebox. In this case, the fuel does not burn, but simply smolders. If you close or open the door vent, you can regulate the flow of fresh air inside. During this process, a large amount of gas is released, which is sent to the second chamber, where, when mixed with oxygen, it is completely burned. At the same time, the air in the room always remains fresh.
- The convection process occurs in special pipes installed in the structure. Through channels mounted in the firebox with protruding ends at the outlet, hot air is directed directly into the room. Heating is carried out naturally. Cold air is taken in from the lower openings of the pipes. It passes through the entire structure and is sent upward while still hot. However, this leads to sudden changes in temperature in the chimney, which is why condensation is possible, which is a significant disadvantage of this design. But the problem can be solved if you install a pipe. Through it, the condensate will not escape outside, but will settle directly in the firebox, in which it will simply evaporate under the influence of heat.
Potbelly stoves and many pyrolysis units operate in approximately the same way, but there are still some differences. Among them the following are noted:
Pipes in the furnace are not installed arbitrarily, but at an angle
It is important to set the exact angle when arranging the structure yourself. The doors are not just hung on hinges, they contain a convection chamber, which contributes to faster and more uniform heating of the room. The oven, unlike some pyrolysis models, is quite easy to maintain. The ash pan is easy to remove and quick to clean
Among similar designs, it is the Butakov unit that is considered the most efficient, simple, and has high heat transfer.
What to make it from?
Several variants of furnace designs have been developed. This can be a simple barrel in which firewood is placed on top and the air flow is blocked by a gate valve. It will take more time to produce an analogue of industrial samples with a system of convection pipes and a separate gas combustion chamber.
The simplest and most uncomplicated scheme is a Butakov stove made from a gas cylinder. In this option, you can do without convection pipes or use 2-3 convection inserts.
We will examine in more detail the production of an analogue
an industrial design of a rectangular shape and a complete circuit of convection tubes and a system of pyrolysis long burning of wood. This design is the most productive and economical.
But during the manufacturing process it will be necessary to perform turning and drilling work. You can take the dimensions and bend angle from industrial sample pipes. The amount of material required for work depends on the chosen option and the dimensions of the furnace.
A little more about pyrolysis...
The essence of pyrolysis lies in the process of technological gas-generator combustion. When solid fuels such as coal, pellets, peat briquettes or firewood are burned, the room warms up. The operating principle is similar to that of a dry distillation boiler. The pyrolysis system is due to its exothermic properties, and can heat the incoming air due to the heat generated. The fuel is ignited and the fan turns on when the door is closed. The high temperature regime (200–800 °C) and low oxygen capacity in the pyrolysis combustion furnace lead to a chemical process - the wood decomposes into coke and pyrolysis gas. Also, when wood burns, it can form methyl alcohol, acetone, vinegar and resin.
The released gas combines with oxygen and goes into the combustion process. The smoke generated during combustion does not contain bad carcinogens and other dangerous components. Burnt fuel produces thermal energy, which heats the room. The water contained in the boiler enters the heating structure in a hot state with a simultaneous return supply. The coolant is also used as a coolant. This is how a boiler with a bottom-mounted chamber functions.
Furnace design
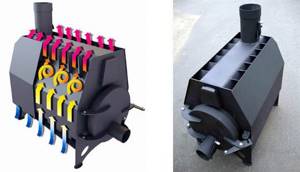
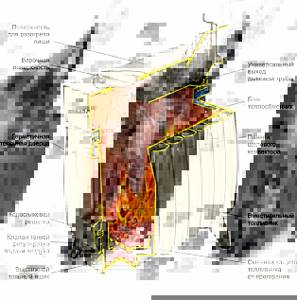
Butakov's heating device is very simple. The unit consists of the following elements:
- ash pan for collecting combustion products;
- air outlet pipe;
- two-chamber firebox: one compartment is provided for connecting to gas, the second is for afterburning fuel;
- grate in the form of a damper;
- smoke channel.
The pipes run along the edge of both sides of the furnace, are arranged in two rows, close and cross in the upper part. Thanks to this design, the floor warms up well when cold air moves through pipes located in the combustion zone. Due to them, the heating area increases and the furnace walls do not burn out. Thanks to special jets with hot air inside, located at the top of the firebox, the secondary gas is burned in full. This once again confirms the efficiency of the device: the fuel burns out entirely, and the heat is retained indoors for a long time.
Design and principle of operation
Professor Butakov’s “Associate Professor” stove has a simple but original design, consisting of:
- all-welded 2-chamber body;
- straight and curved convective pipes built into it;
- gas guide screen;
- jets for dosing the intake of secondary air;
- firebox;
- grate;
- ash pan, where there is a special container for collecting ash;
- metal door of the combustion chamber or combined with heat-resistant glass;
- gate welded to the body;
- chimney.
The operation of the furnace is carried out with the simultaneous flow of pyrolysis and convection processes:
- The pyrolysis process is carried out directly in the combustion chamber in smoldering fuel mode. The gas released when wood burns enters the second chamber, where it mixes with oxygen and burns completely;
- the convection process occurs in special air ducts that pass through the firebox and have ends protruding outward. Cold air enters them from below the structure. Then it passes under the influence of natural draft through the combustion chamber and comes out to the top in a heated state.
The firebox door also has a special design. There is a convection chamber inside it, which also participates in heating the room.
Features of installation and assembly
Considering that the surface of the device gets very hot, the installation provides enhanced thermal protection for floors and walls. This can be done in the following sequence:
- A basalt slab is laid on a wooden or other combustible floor, the surface of which should be sheathed with metal.
- Walls located close to the device are protected with basalt insulation. This will reduce the distance between the wall and the stove to 50 cm.
- The presence of supply and exhaust ventilation, both forced and natural, is unacceptable when installing a stove.
- When laying a chimney, you will need to protect the walls from heat. To do this, install a special fireproof cutting and spark arrester.
If you plan to heat adjacent rooms with heated air, you will need to connect thermal extractors and additional air ducts. The oven is installed in such a way as to facilitate the installation of the corrugated pipe.
Installation example
Another installation option (in the corner)
How to install a Student stove
Detailed installation recommendations are provided in the operating instructions. Despite this, as practice and consumer reviews show, during installation work, the same mistakes are made.
Violation of the advice in the operating instructions leads to a decrease in the thermal efficiency of the stove, refusal of warranty service and rapid failure
It is important to pay attention to the correct location of the stove and ensure fire safety
Where is the best place to put the oven?
The Hydraulic stove is installed in the same way as a conventional solid fuel boiler. For placement, a boiler room with a ceiling height of at least 2.2 m and a non-combustible base is selected. The batteries are connected using special taps on the side of the case.
For air heating furnaces, due to the principle of operation and design features, a place is chosen for installation that provides unhindered air convection. Optimal location, in the center of a heated room.
If you plan to distribute heated air to adjacent rooms through air ducts, when choosing a location, take into account the need for connection using a heat extractor and air ducts. The stove is installed so that it is easy to route the corrugated pipe to other rooms.
The Termofor company additionally supplies heat removers from air ducts, designed for quick connection of a steel corrugated pipe for hot air distribution. When installing the stove, it is better to use branded components.
How to ensure fire safety
During operation, the walls of the oven become very hot, so thermal protection of walls and floors made of wood and other flammable materials will be required. The work is performed as follows:
- A basalt slab is laid on a wooden floor, sheathed with metal on top.
- The walls located next to the building are protected with basalt insulation. The stove is installed at a distance of 1 meter from any flammable surface. After thermal insulation, the distance can be reduced to 50-70 cm.
- An unacceptable condition for installing a stove is the presence of natural or forced supply and exhaust ventilation with three times air replacement in the room within an hour. Air heating channels are also insulated. A fan that is resistant to thermal stress is installed inside the pipes.
- Protection of walls from heat will also be required in places where the chimney is laid. When passing through floor slabs and roofing, a special fireproof cutting is installed. A spark arrestor is mounted on the chimney head.
What and how to heat the stove Student
Furnaces of the Student series belong to gas-generating or pyrolysis equipment that is demanding on the quality of fuel.
The heat generator must be heated with wood with a humidity of no more than 20-25%. When using raw fuel, the stove cannot be switched to gas generation mode; the wood will burn as usual, which will lead to an increase in fuel consumption and a decrease in efficiency.
The operating instructions indicate the possibility of using the following types of fuel:
- Firewood for the Student model - coal - if necessary, a stove designed for coal can be heated with wood. To do this, you will need to remove the grates from the firebox.
- It is allowed to keep the stove constantly burning. As a general recommendation from the manufacturer, it is best to allow the stove to cool down after each firing for 20-30 minutes.
- Wood and peat briquettes are optimally suited for operating Termofor stoves. The use of briquettes increases the operating time from one stack. During the combustion of compressed fuel, 20-30% more heat is released than when burning wood.
It is prohibited to burn wood stoves with coal. The design and internal structure of wood-burning models is not designed for the characteristics of coal combustion.