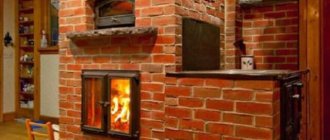
Installing a stove in a bathhouse with an external firebox
Most Finnish and Swedish saunas use heater stoves with fireboxes without tunnels, with firewood loaded directly from the steam room. This is due to traditions and the harsh climate, but more often – to the small size of the steam room of the bathhouse. For temperate and mild climates, a more rational solution would be a sauna stove with a firebox from the dressing room. And this is not a matter of fear of burning or causing a fire. Despite all the inconveniences associated with maintenance, a stove with a remote firebox provides a noticeably greater level of comfort than a classic heater - potbelly stove.
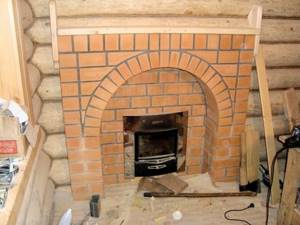
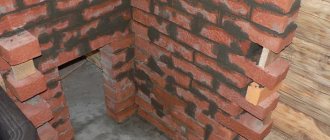
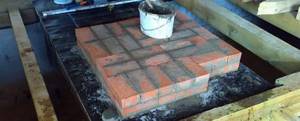
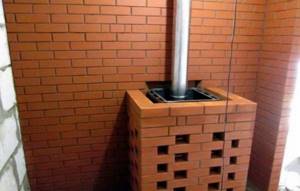
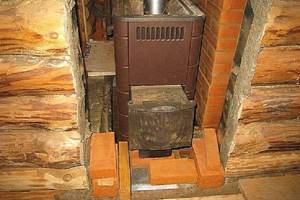
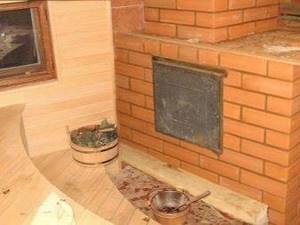
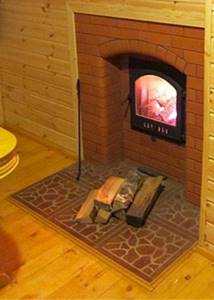
It’s easy to make a brick portal for an external firebox in a chopped bathhouse
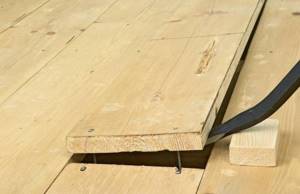
Stage two: floor preparation
If the floor is a flammable material, its protection should be approached with the greatest responsibility. The surface is covered with the above-mentioned metal sheet on asbestos cardboard, the thickness of which is 1 cm . During this operation, it is important to ensure that the gap from the surface of the bottom of the oven to the floor covering is at least 10 cm.
An alternative option for such protection could be brickwork with 25 cm indentations on all sides of the stove. On top of such a base you can lay the same sheet steel or form a screed on a cement mixture.
Coverings made of low-flammable floor materials must be protected from fire . which may take place under the combustion door. This operation should be performed using a metal sheet. If you are installing a sauna stove with a rectangular design, then you can provide a sheet fragment with parameters of 70x50 cm, the long side of which will be placed along the unit. The gap from the combustion door to the opposite wall is no less than 125 cm.
Advantages of a furnace with a remote firebox
A design with a tunnel requires more space for installation, a special foundation, and in addition, you will have to cut an opening in the wall of the steam room of the bathhouse. At the same time, do not damage the insulation of the walls and at the same time properly perform thermal protection, otherwise the hot parts of the firebox can cause charring or even fire of the wooden cladding or floors of the bathhouse.
Having solved the installation problems, the owner of the bathhouse actually benefits significantly compared to a conventional stove:
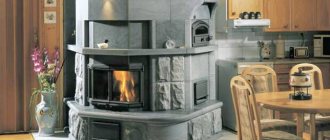
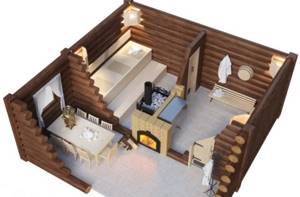
The dressing room does not have to be a narrow and uncomfortable room; on the contrary, most owners repurpose the room as a rest room. In this case, a sauna stove with a firebox from a dressing room ideally performs the functions of a home fireplace.
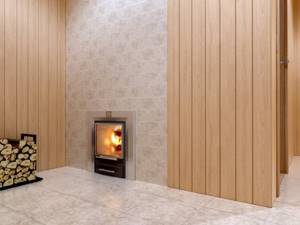
Thanks to the remote firebox, the bathhouse looks beautiful and firewood is always at hand
Another big plus is the simplification of heating the dressing room itself. Due to radiant heat, a sauna stove with an external firebox warms up a standard dressing room of 5-6 m2 quite well, while it is possible to dry clothes and shoes. At first glance, this is a trifle, but among lovers of active recreation in the autumn-winter season, such qualities of an external firebox are highly valued.
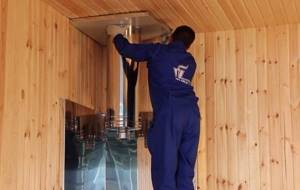
Connecting the chimney to the wall
There are two main arrangement options:
- If we are talking about the fact that the chimney will exit through the wall . then it is necessary to disassemble a certain section of it (according to the diameter of the pipe) and strengthen the places for installing the bracket. Then the bracket itself is assembled and installed with corners along which the tee will move freely when installing the chimney. The wall must be covered with a centimeter-long plywood sheet, asbestos sheets secured on top of it with screws, and then a galvanized metal sheet - 2 * 1.2 centimeters - secured even higher. In the created structure, a square piece is cut out through which the chimney will pass. The bracket is coated with anti-corrosion varnish. In the end, the sandwich pipe is placed on the inner one. During installation, you can also create a concession - a space from the chimney to the wall.
- If the sandwich pipe is discharged through the roof . then first a galvanized sheet is applied to the area through which the pipe will be routed. After this, the pipe is removed. Then the sheet is fixed to the roof. It is best to fix it by placing the edges under the sheets of roofing material.
Features of the design solution
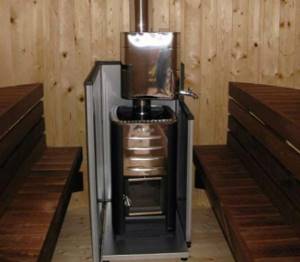
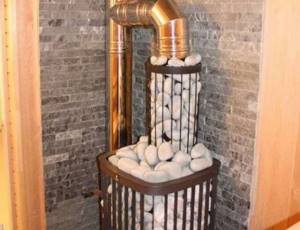
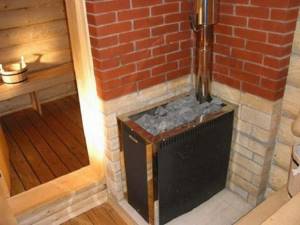
The vast majority of sauna stoves with remote fireboxes are built according to the same design. The only differences can be in the design of the heater, the presence of a water tank, and a built-in heat exchanger to provide boiling water to bathhouse visitors.
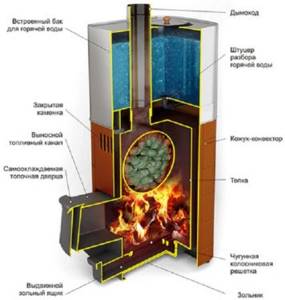
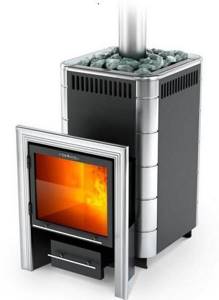
Model with self-cooling firebox door and built-in tank
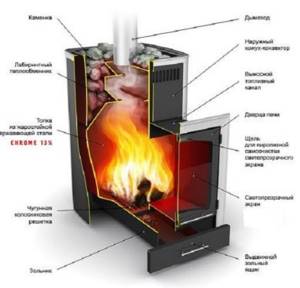
According to its design, a sauna stove with an external firebox is divided into several main units:
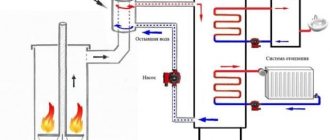
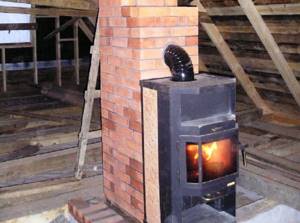
It is the transition channel for all models of wood-burning sauna stoves with an external firebox that is almost always made according to an individual design. This can be a simple steel box or a quadrangular socket-shaped channel. Moreover, the length of the channel may differ for different models, since most manufacturers produce stoves for different types of baths with different wall thicknesses and insulation schemes.
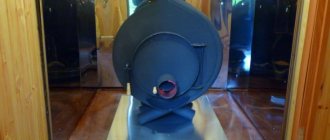
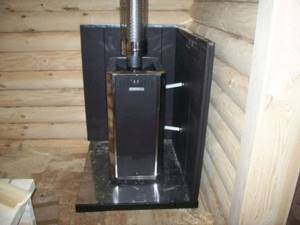
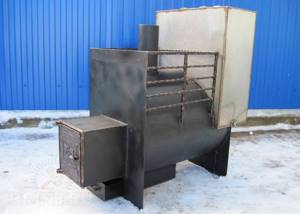
Steel and cast iron stoves with remote removable firebox
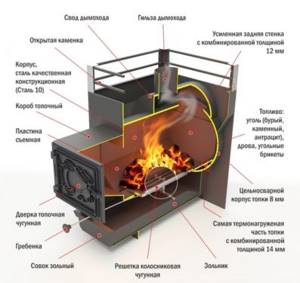
The dimensions of the loading portal for models may also differ, from small windows with a cast-iron door, the same cross-section as the transition box, to huge openings covered with heat-resistant glass. Therefore, the first thing you need to do after selecting a model with the required length of the loading box is to pay attention to the dimensions of the opening and the material of the walls and firebox of the furnace.
Successful examples and options
A stove placed inside the steam room in the center, with benches and shelves on the sides.
A stove installed in the corner of a steam room, equipped with a heater to create soft steam.
A metal sauna stove with a metal fire screen, which is built into the wall itself.
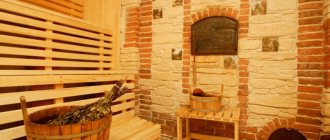
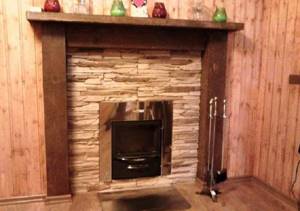
Sauna stove lined with brick. This option will protect against burns. The heat of the stove will not decrease due to the air gap between the body and the finishing material.
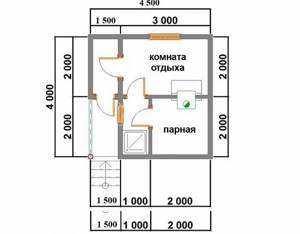
The best location for the firebox door
The next step is to decide where to install the stove. It is important to take into account the weight of the stove, the material of the walls and firebox. Most customers plan to install the stove in a bathhouse with an external firebox directly next to the front door. This is not entirely true for two reasons:
The most convenient location for the portal will be the middle or central point on the wall between the entrance door to the steam room of the bathhouse and the main wall.
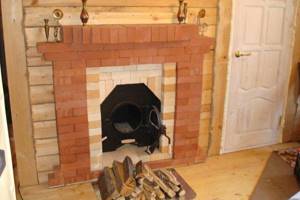
Fireplace option for the location of the firebox portal in the bathhouse
Another nuance that you need to pay attention to when choosing a location for a stove with a remote firebox. This is the weight of the unit. Steel stoves with a full backfill of the heater, which is 50-100 kg of stone, can weigh up to 250 kg. Cast iron stoves with a remote firebox have twice the mass due to the thick casting walls.
Most customers prefer not to take risks, so the stove is installed either against a solid wall or on an individual foundation. With the obligatory lining of a sauna stove with an external firebox with bricks.
The joists of the bathhouse floor best support the load precisely under the main wall; there is less deflection of the beam, which means that the risk of breaking the floor waterproofing will be minimal. In addition, you need to take into account the location of the rafters and beams of the bathhouse roof. Therefore, any installation of a stove with a remote firebox begins with checking with a plumb line and a laser level the point at which the chimney pipe passes through the roof.
The construction of a bathhouse box for a ready-made purchased stove with an external firebox is rather an exception to the rule; usually they install a house, then insulation, and only then think about the location of the firebox and stove. Therefore, when planning a steam compartment, restrictions on the location of the firebox and door must be taken into account in advance.
Fire extinguishing equipment and personal safety
Baths and saunas must be equipped with fire extinguishers marked A (for hard surfaces).
Water, air-foam, air-emulsion and powder devices are suitable. The bathhouse may be equipped with automatic or manual fire extinguishing systems. In saunas, deluge or sprinkler sprinklers are justified. Smoke detectors or smoke detection devices can be installed in the waiting room or locker room.
For personal safety, you must:
- Do not cover the stove with various objects.
- Control steam temperature and air circulation;
- Do not go to the sauna if you have high blood pressure or have taken alcohol.
- Use special aromatic oils intended for baths.
- Do not place clothes on the stove to dry.
The air temperature in the steam room is set individually.
Self-installation of a metal stove in a sauna or bathhouse is possible subject to certain rules. The serviceability of the equipment and human safety depend on the preparation of the installation site, walls and chimney.
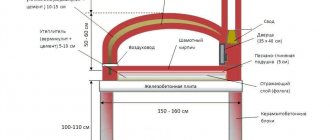
Drawing of a sauna stove with a firebox from a dressing room
The standard option for installing a steel stove box inside a finished bathhouse building is shown in the simplified diagram below.
This is a standard solution for installing a steel stove with an internal sandwich chimney in a bathhouse. For a cast iron stove, the safety requirements are approximately 1.5-1.8 times stricter, that is, the fire safety distances must be greater.
The reason is simple - the thermal conductivity of cast iron SCh10, SCh15 is 59-60 W/mC, for chromium steel this figure is 27-28 W/mS. This means that the heat flow through the cast iron walls of the furnace firebox is at least 1.5 times higher. Therefore, it is necessary to better insulate the wooden parts of the bathhouse walls from the hot cast iron. At a minimum, use vermiculite or basalt cardboard, mineral fiber and stainless steel sheets.
What to pay attention to
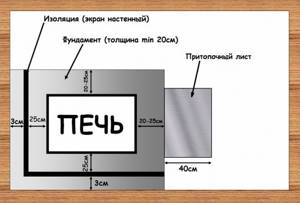
The first and most important requirement for the installation procedure for a sauna stove with an external firebox is related to maintaining safe distances. Firstly, the distance from the outer casing of the furnace to the nearest wooden structures must be at least 250 mm.
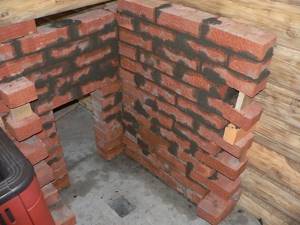
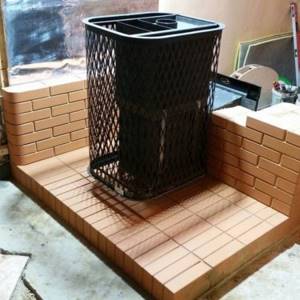
Secondly, the stove and the steel firebox channel should not come into contact with any material. Moreover, the brick screen is laid out so that there are air gaps between the metal parts of the stove with the brick, the steel parts of the heat-resistant cladding, and even between the brick base and the bottom of the stove there should be a gap.
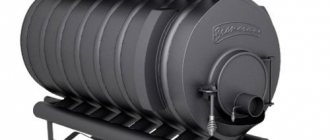
Characteristics of the fire-battery stove
When considering Termofor stoves for your country house, it is definitely recommended to read the reviews. The latest metalworking technologies, as well as computer design methods, have made it possible to produce a truly unique stove, which is called a fire-battery. The design is distinguished by an impressive firebox volume, the presence of a heat exchanger, a hob, and a remote-type water heating tank. It must be admitted that the hob is the most significant advantage in everyday life.
Installation of a sauna stove with a remote firebox
The installation sequence of a stove box with a tunnel is no different from installing a simple Finnish heater with direct access to the firebox. The only difference is a slightly different sequence in marking the space for the stove.
The installation process is as follows:
Issues of decorative finishing and design will be resolved after heating the stove and identifying and eliminating all deficiencies.
The most important thing in installation
The most difficult stage is the correct marking of the chimney line through the ceiling and roof of the bathhouse. You can often find recommendations to install a metal pipe - a sandwich - on the outer wall of the bathhouse. It is believed that less work will have to be done; there is no need to cut holes and make a passage unit in the ceiling and roof of the bathhouse.
In fact, external chimneys are only good for fireplaces and stoves that heat the room continuously. The sauna stove is heated much less frequently, so the thermal insulation of the chimney collects a huge amount of condensate, making it quite difficult to light and warm such a firebox without burning and smoking.
Therefore, we climb onto the roof of the bathhouse, then into the attic, look at the rafters and find several suitable options for installing a chimney. We transfer the coordinates to the plan and use it to determine the dimensions of the site where the stove can stand with the prospect of inserting the firebox into the partition. Next we make the foundation.
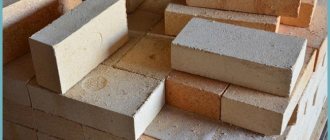
For a light steel stove, the pedestal can be made of high-quality solid or even finishing bricks.
For a cast iron stove with an external firebox, the foundation must be made on the ground:
Despite the small size of the reinforcement, it is impossible to weld the mesh to the rods; it is better to tie it with wire. The cement-sand mortar is mixed in a ratio of 1:3, always with the addition of soap or plasticizer.
We fill the concrete pad and cover it with a double sheet of roofing material; after five days you can lay out a brick pedestal on a clay mortar. The stove can be placed directly on the brick. Usually, the first rows of fire-resistant partition in the opening are immediately laid out of brick. You will first need to cut an opening for the brickwork around the remote firebox; the recommended dimensions of the wall are given in the product data sheet.
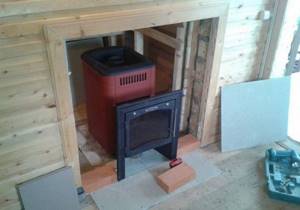
We embed the stove firebox into the internal wall of the bathhouse
Experts recommend that before installing the housing on a finished brick pedestal, tie a rope plumb line with a weight to the ceiling of the bathhouse; it should point to the center of the exit of the future chimney. This simple device will help you correctly orient the stove when installing it in the prepared opening.
Next, we install the chimney, make a passage unit with expanded clay backfill and temporarily fix the pipe with a cuff on the roof. Until we have checked the functionality of the remote firebox, we fix all the parts according to a temporary scheme. You may have to raise the height of the pipe above the ridge of the bathhouse and look for the optimal position for the best traction. At the same time, we check how hot the walls of the external combustion chamber heat up. You need to heat it carefully, using a small amount of wood chips, otherwise you can get soot streaks right above the portal of the remote firebox.
After installing the stove and checking the functionality of the remote firebox, we completely fix the chimney and complete the brickwork. We seal the remaining cracks with asbestos cord, adjust the opening of the firebox door and the operation of the ash pan. Full heating of the stove through the remote firebox can be done no earlier than metal protection from the chimney is sewn onto the walls of the bathhouse.
Marks on the wall may appear due to improper operation of the chimney
Finishing the firebox of a sauna stove
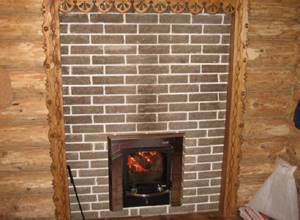
Ideally, the length of the extension part plus a gap of 40 mm should be equal to the thickness of the brickwork of the partition with a reflective screen, if one is installed. In this case, the glass door of the remote firebox on the dressing room side looks like a picture in a frame.
Often for a bathhouse they buy a cast-iron stove with an external firebox and a cast door. This option is considered more fire hazardous, since cast iron becomes very hot and can cause charring of the interior walls of the bathhouse. Therefore, the loading opening of the remote firebox is hidden in a brick niche. More heat enters the bathhouse, and all of it is directed to the opposite wall of the dressing room, and at the same time the risk of getting burned on the cast-iron door at the exit from the steam room is reduced.
If the extension of the remote firebox turns out to be greater than the thickness of the wall, then the portal will need to be additionally covered with a stainless steel frame on thermal insulation made of asbestos. Most manufacturers of sauna equipment complete their stoves with remote fireboxes with an overhead decorative screen with thermal insulation and fasteners.
Customer reviews about Kalina models
Termofor sauna stoves have become quite popular among modern buyers. If there is a need for a fairly powerful stove, then you should prefer the Kalina model. It can be lined with brick, providing a gap of 100 millimeters. It will be able to retain heat for 6 or 8 hours straight. Such equipment will be multifunctional, because in the steam room you can not only wash, but also dry clothes in the winter. This approach can be considered practical and economical.
Required Security Measures
First of all, you need to maintain fire distances. There should be at least 400 mm from the stove body to the wooden cladding of the walls of the bathhouse, but if the surface is lined with a brick or steel screen, then the distance is reduced to 250 mm. At the same time, the screen itself must be larger in size than the side profile of the stove by at least 10 cm in one direction. The wall itself is laid out in ½ brick, it is not worth doing less.
The safety ventilation gap between the wall and the furnace body, 50 mm wide, is often sealed with a fire-resistant heat insulator, for example, basalt fiber. As a result, the brickwork of the wall heats up less, which reduces the risk of cracking of the masonry. Experts recommend not doing this, since the stove and remote firebox are cooled unevenly, and cracks may appear in the housing. In addition, using open mineral wool in a bathhouse can lead to an allergic skin reaction.
Main characteristics of some models
If you choose a Termofor stove for your home or steam room, then you need to consider the main quality characteristics of some solutions. For example, “Geyser” is capable of heating a room whose dimensions can vary from 8 to 18 cubic meters. The mass of the stones is 60 kilograms. During operation, you can use firewood whose length reaches 450 millimeters. You can purchase such a model for a price that starts from 16,000 and ends at 20,000 rubles.
“Angara” heats a room of the same volume, but the volume of stones is 10 kilograms less. The length of the firewood has been increased to 500 millimeters, and the cost starts from 10,000 and ends at 20,300 rubles. The Compact stove is purchased for smaller rooms, which are limited to 6-12 cubic meters. The weight of the stones does not exceed 35 kg, and the cost varies from 7,500 to 11,700 rubles. The Kalina stove can be purchased for rooms whose minimum volume is 12, while the maximum is 30 cubic meters. It can hold 100 kilograms of stones, and the cost is perhaps the most impressive, it starts from 26,500 rubles and ends at 30,000 rubles.
The Cinderella stove can be installed in rooms with a volume of up to 50 cubic meters. Its cost can be equal to the limit from 6200 to 7400 rubles. The battery fire can be installed in a room that reaches 250 cubic meters. The minimum figure is 100 cubic meters. The cost of such equipment varies from 9,400 to 17,500 rubles.
How to install a stove in a bathhouse: step-by-step instructions from foundation to chimney
You don’t have to worry about how to install a stove in a bathhouse if this is done by real professionals who are responsible for the results. But not everyone has the opportunity to use their services. If such specialists cannot be afforded or they simply could not be found, this work will have to be done independently or closely monitor the actions of hired workers. But some issues can only be resolved by the owner himself.
Choosing a location for the oven
The most correct decision would be the initial design of the bathhouse, taking into account all the rooms and the location of the stove. If it is possible to heat all other rooms from another source, it is placed in a steam room. If not, consider the option of installing a stove in a bathhouse with a firebox from the dressing room so that it heats both it and the washing compartment. To do this, an opening is provided in the partition between these compartments, which is subsequently lined around the firebox with fireproof materials.
Both options have their positive and negative sides:
However, convenience is not the only and not the most important criterion for choosing a suitable location for a heating unit. The issue of fire safety is much more pressing.
First of all, you need to decide how and where to bring the chimney through the roof. It is best if it is connected to the stove in a straight line, without unnecessary bends or turns.
When placing it in a corner or against one wall, you need to follow the rules for installing a stove in a bathhouse with a firebox from a dressing room in a wooden log house. The distance from the metal body to walls made of flammable materials must be at least 50 cm on any side. It can be reduced by insulating the walls with fireproof shields. This can be sheets of mineralite, asbestos cardboard or basalt cardboard, as well as facing with ceramic tiles or a screen made of red ceramic brick.
A distance of at least 120 cm should be maintained from the firebox door to the front door. And in front of the firebox, be sure to lay a metal sheet or cover the floor with tiles.
It is easier to provide for all these points at the design stage. If this has not been done, the task will become more complicated, and there will be fewer options for convenient placement of the stove.
Stage four: installation of a mounted tank
The tank can also be selected as a mounted type. To calculate its volume, you can use the following rule: one user will need an average of 10 liters >>
Installation is carried out on the nozzle of the furnace air duct . This design will allow you to bring the water temperature to a level of 95 °C by the time the temperature in the steam room reaches 100 °C.
As water is consumed, the area of its contact with the hot surfaces of the pipe of the hanging tank will decrease, which will make it possible to prevent unwanted boiling and penetration of steam into the steam room. This usually happens when the oven is operating in temperature control modes.
Base structure
Before installing the stove in the bathhouse, you need to decide whether to make a solid concrete base for it. This depends on several factors: on the condition of the existing floor, on the material from which it is made, on whether the stove will be covered with brick:
Calculating the weight of the furnace to select a base
Standard flooring made of magpie boards on joists laid in increments of up to 1 meter will withstand a load of up to 700 kg. Therefore, if you want to do without a concrete foundation, before installing the stove in the bathhouse, you need to make sure that its weight does not exceed the specified value.
As a rule, metal structures are much lighter, but not only their weight is taken into account, but also the entire accompanying load. Namely:
5-10 cm in each direction is added to the external dimensions of the stove to create an air gap between the brick and the metal body, and the perimeter of the cladding is obtained. Since masonry is usually carried out in half a brick, the quantity required for one row is calculated by dividing the perimeter by the length of the brick (25 cm).
Then calculate the number of rows of masonry to the required height, dividing it by 7 cm (6.5 cm - brick height + 0.5 cm - joint thickness).
The results obtained are multiplied and the amount of brick required for masonry is obtained. The weight of one brick is about 4 kg. We multiply the amount of brick by its weight, add the weight of the mortar and get the total weight of the cladding.
All that remains is to add the weight of the stove, tank, heater, chimney and heat shield together. If the total weight does not exceed 700 kg, an additional base need not be made. If it is higher, you will have to build a foundation for the stove in the bathhouse: how to properly make such a foundation yourself will be described below.
Preparing the wooden base
Before installing the stove, the floor area allocated for its installation is finished with heat-resistant materials. It is lined with porcelain stoneware or artificial stone, or covered with sheet fire-resistant material and a sheet of iron screwed on top.
Features: advantages and disadvantages
Of course, installing a standard heater is simpler than the complex arrangement of such an additional accessory as a firebox placed in the dressing room or in another room. This is more expensive, but we can confidently say that all this will be covered by the comfort that this option will create when using it. Especially this configuration of the stove will have its say in the winter.
Based on practical considerations, the dimensions of a brick stove primarily depend on the size of the steam room, the number of people, the seasonality of the use of the bathhouse, and the purpose of using the stove itself.
Exiting the firebox of a brick stove into the dressing room is convenient because
- There is always the opportunity to clean out the ash and light the stove;
- firewood is always at hand, it is always well dried;
- The heating mode of the furnace is easier to control;
- heating of the dressing room is always provided by the heat of the stove;
- If the firebox door does not fit tightly, carbon monoxide enters the dressing room and not the steam room;
- the iron parts of the firebox do not overheat, do not burn out oxygen in the steam room, and do not dry out the steam.
Disadvantages of locating the furnace firebox in the dressing room:
- a brick oven takes a long time to warm up;
- the stove consumes more wood than a metal stove;
- To throw firewood you have to run out to the dressing room.
Video description
One of the options for how to install a stove in a bathhouse on a wooden floor, how to finish the floor and walls, is shown in the video:
Such protection should be larger than the dimensions of the heating unit by 5-10 cm at the back and sides and protrude beyond the firebox by 40-50 cm to prevent accidental fire from coals falling out of it.
Making a concrete foundation
If calculations have shown that you need a foundation for an iron stove in a bathhouse, how to do this work yourself? This depends on whether there is already a floor at the installation site or its arrangement has not yet begun. In the first case, the flooring will have to be disassembled and re-installed after pouring the foundation. It may be necessary to rearrange the joists or lay additional ones around the perimeter of the concrete base.
Rules for installing electric furnaces
Electric stoves in a bathhouse must be powered by 220 V.
In private construction, electric stoves powered by a 220 V network are used to equip saunas and baths. When installing them, the following rules should be observed:
- Select the type and cross-section of the cable according to the power of the stove. For modifications to 3; 4.5 and 6 kW a 1.5 mm2 conductor is suitable.
- Lay the floor under the electric heater with ceramic tiles.
- Leave a gap of at least 7 cm from the stove fence to shelves and flammable objects.
- Place washed stones only on top of the heating element.
- If you have a stove, use lamps designed for a temperature limit of up to 140 degrees.
- The ventilation hole should be located behind the heater at a height of 5-10 cm from the floor.
- Apply water as carefully as possible; do not water the stones with sea water.
Do not use abrasive products to maintain the electric heater.
Preparing for installation
There is no need to rush to install the new unit in place. Before placing the stove in the bathhouse, you need to heat it well in the open air by loading the heater. This is done for two reasons.
Firstly, the paint that covers the metal body finally sets only at high temperatures. At the same time, it partially burns out and releases an unpleasant odor.
Secondly, bath stones often contain sulfides, which decompose at high temperatures into sulfur oxides. In turn, when combined with water they turn into acids. Sulfuric acid fumes don't just smell bad - they are very dangerous to health. But sulfides burn out quite easily, so it is advisable to heat the stove outside until the smell of sulfur completely disappears.
If the task is how to install a stove in a bathhouse with a firebox from a dressing room with your own hands, then if there is a partition between it and the steam compartment, part of it will have to be cut out. If there is no partition, it is better to immediately build it from a non-combustible material, for example, red brick. Or lay out the masonry to the desired height and continue with timber.
The dimensions of the opening in the combustible partition under the firebox are also not taken “from the ceiling”, but are determined depending on the power of the heating unit. With factory-made stoves, everything is simple: these parameters are indicated in the product passport. You can’t reduce them, but you can’t increase them as much as you like.
It is difficult to determine the power of a homemade stove. In such cases, the opening is made in such a way that there remains 25-35 cm from the firebox to the wooden wall, provided that it is protected along the contour with heat-insulating material: a strip of asbestos cardboard, basalt wool, etc. If such protection is not provided, this distance is increased to 40-50 cm.
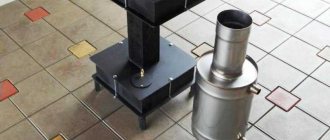
Making your own sauna stove from a pipe
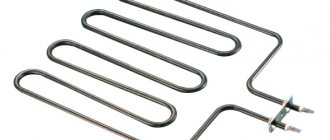
To make a sauna stove from a pipe with your own hands we will need:
- A piece of pipe with a diameter of more than 500 mm and a length of at least 1500 mm.
- Pipe with a diameter of 157 mm. Needed for the construction of a chimney.
- Sheet metal with a thickness of at least 4 mm.
- Pipe with a diameter of 325 mm. Needed for the firebox.
- Equal-shelf corner (shelf width 25 mm).
- Water tap for tank ½.
- Welding machine.
- Gas cutter.
- Grinder of low power.
The preparation of parts is carried out according to the following scheme:
- First of all, make a rough drawing of your future pipe bath stove depending on the size of the room. Consider all the nuances of construction.
- Using this diagram, calculate the amount of metal required.
- Our tube furnace will consist of several main parts: a firebox, a container for stones, and a water tank. To install them, we initially cut the pipe into two parts of 900 and 600 mm, respectively - for the firebox and for the tank.
- To separate the tank from the firebox to build a container for stones, we will cut out stands from the corners, on which we will raise the tank above the firebox. The length of each such structure should be 300 mm. In total you need to cut 3-4 corners.
- For the bottom and lid of the tank and firebox, we cut out circles from sheet metal with a diameter equal to the dimensions of the pipe.
- We measure the length and cut the chimney pipe. We do this with utmost precision. We cut out a loading vestibule for the firebox from a 325 mm pipe.
Let's start assembling the lower part of the stove - the firebox. This is quite an important stage. So, the lower part of the structure is assembled according to the following scheme:
- So, cut 2 holes on one side of the pipe. One for the loading vestibule (its diameter is equal to the dimensions of the pipe under the vestibule), the other for the ash pit.
- Using a grinder, we adjust the hole in the firebox and the end of the vestibule for welding. We weld these structural parts. At the other end of the vestibule we install the firebox door.
- We mount the door to the hole for the blower using hooks. Inside the furnace, we weld fasteners for the cast iron grate into the bathhouse from a pipe, slightly below the level of the loading vestibule.
- We install the grate and weld the bottom of the oven.
- Then, slightly below the top edge of the firebox, we place and weld the firebox cover, having previously cut a hole for the chimney. We weld the structure hermetically. This operation is quite important, since carbon monoxide can enter the room through a leaky seam, which is very dangerous to health.
- Next, we weld the racks for the tank from the corner. The lower part of the structure is ready.
The next step is to assemble the tank:
- We cut holes for the chimney in the bottom and lid of the container. Their dimensions must match the dimensions of the chimney opening in the firebox cover.
- Cut the top cover into two parts. Let's connect them together using curtains so that it can be opened to add water.
- A little higher from the bottom of the tank, we weld a piece of ½” pipe on which we install the container.
- We “mount” the finished tank onto the chimney and place it on welded racks.
- We scald the structure completely. In this case, you need to carefully monitor the quality of the weld connecting the chimney and the bottom of the tank. This is necessary to prevent water leakage.
Installing a pipe stove in a bathhouse is the final stage. So, the stove in the bathhouse must be installed on a hard fireproof covering, preferably concrete. The structure must be resistant to tipping over. If the corner in which the tubular stove will be placed is lined with wood, the distance from the walls to the structure must be at least 1 meter. To prevent the floor covering from catching fire, it is recommended to install a metal or asbestos sheet in front of the firebox.
Wood stove installation
There are usually no problems installing a metal stove in a steam room: it is simply placed on a prepared base and connected to the chimney. Another question is how to properly install a stove in a bathhouse with a firebox from the dressing room. The main difficulty lies in filling the opening in the partition.
Rules for laying an opening around the firebox
As a rule, the opening is filled with solid ceramic bricks, leaving small gaps around the walls of the firebox. This is done so that the brick does not heat up too much from the hot metal and does not transfer heat to the wood.
The resulting gaps are filled with fireproof materials that are not destroyed by high temperatures and do not emit harmful substances when heated. Basalt cardboard or basalt wool in the form of mats made without the addition of binding components are best suited for this purpose.
Product range
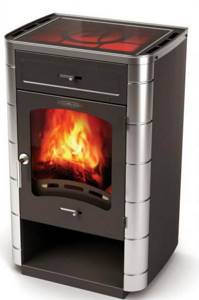
If you decide to purchase a Termofor stove, you can choose one of the colors on sale, namely: terracotta, anthracite, chocolate, which allows the device to fit most harmoniously into any interior. Thanks to the presence of elongated combustion chamber channels, it is possible to carry out combustion from an adjacent room, thereby increasing the heated area. If you decide to buy a Termofor stove, then it is worth considering that consumers most often choose those models that are equipped with doors made of heat-resistant glass. Such options are so in demand today for the reason that the equipment has the appearance of a modern fireplace. At the same time, the channel itself does not heat up, so, if necessary, it can be routed through any wall.
Video description
The video presented here shows a competent and accurate solution to this problem:
Also, when installing the stove, you should think about the convenience of opening the firebox door. It is advisable that it opens in the other direction from the place where the firewood is stored, otherwise it will interfere with kindling, and the next time it is stacked it can cause a burn from accidentally touching the hot metal. Therefore, if possible, the door should be moved to the convenient side.
Selection and installation of a chimney
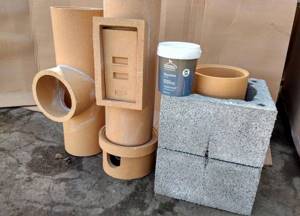
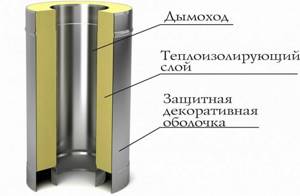
It is impossible to solve the problem of how to properly install a stove in a bathhouse without knowing the requirements for installing a chimney. But first you need to decide on its type. Chimneys are made of brick, steel, ceramic and in the form of a double pipe made of galvanized or stainless steel with a thermal insulation gasket - the so-called sandwiches.
The first option in the case of a metal stove can be immediately dismissed as too heavy and requiring the construction of a powerful foundation on which the brick structure will rest. This is very difficult and expensive, as it will require considerable expenses for materials and the services of specialists, who are also difficult to find in our time.
The remaining types are quite acceptable, and each of them has its own advantages:
Most factory stoves are produced for such chimneys or even complete with them. However, the durability and performance characteristics of sandwich pipes largely depend on the quality of their assembly and the type of filler. If condensation forms in the internal space, the wet thermal insulation will cease to perform its functions. The same thing happens with mineral wool, which is not designed for heating above 800 degrees - it burns out, crumbles down, leaving the internal cavity of the chimney half empty, and therefore unable to prevent heating of the outer wall.
In addition, the sandwich pipe cannot be placed directly on the outlet pipe of the furnace. A single-wall pipe must first depart from it, which is connected to a double-wall pipe with a special adapter.
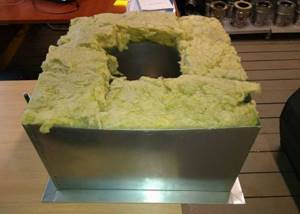
Regardless of the type of chimney, the algorithm for installing it is the same. The first step is to determine the place where it will pass through the roof and ceiling of the steam room. The only condition: the passage should not go to the rafters and go to the ridge of the roof, only to its slope.
After marking is completed, a through square opening is cut out in the ceiling to install a cutting box. All wooden elements around the cutout are treated with fire retardant impregnation.
The cutting box with a hole for the chimney is made of metal, its perimeter is made slightly smaller than the perimeter of the opening so that a layer of thermal insulation can be laid in the resulting gap.
A box filled with basalt wool or expanded clay is installed in place and secured to the ceiling with galvanized self-tapping screws. Its external walls are lined with mineralite or basalt cardboard to insulate wooden structures.
Additional consumer recommendations
Termofor stoves, reviews of which you will read in the article, must be used for their intended purpose. For example, if there is a need to equip a commercial sauna, then you should not use equipment for a family sauna. This is due to the fact that such a device is not suitable for round-the-clock operation, and also will not provide sufficient heat. The durability of the device will depend on the operating mode. Experienced craftsmen do not advise under any circumstances to carry out manipulations to shorten the gas duct. After all, with a short length, it will not have time to heat up to the required temperature, and condensation will begin to collect at the outlet, which is completely undesirable.