Ecology of consumption. Estate: The facing materials used to decorate the ancient temples of our cities and the architecture of the Babylonians and Egyptians have too obvious advantages to send the technology of our ancestors into oblivion.
For many centuries, tiles have been a part of our culture. Gradually, this type of ceramics lost its former popularity. But over the last 20-30 years we have seen a renewed interest in decorating stoves with tiled elements.
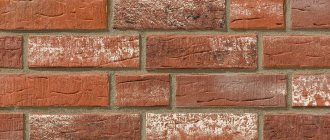
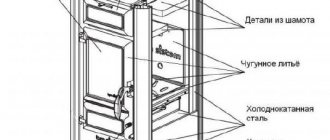
Stove lined with tiles
For some time, the ceramic-finishing culture succumbed to the pressure of Western technology and the huge variety of tiles. But the facing materials that decorate the ancient temples of our cities and the architecture of the Babylonians and Egyptians have too obvious advantages to send the technology of our ancestors into oblivion.
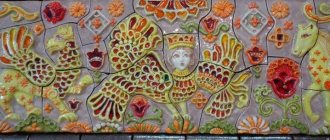
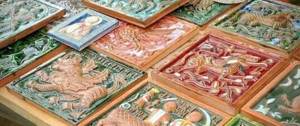
Tiles design
Tiles are ceramic tiles of an original design. The slabs can have different textures - smooth, rough, structural. But the essence of the products is the box-shaped format.
The tile consists of:
- front part;
- plates - the topmost layer;
- rumpa - the element that distinguishes this ceramics from all other types;
- holes for pins located in the tiller.
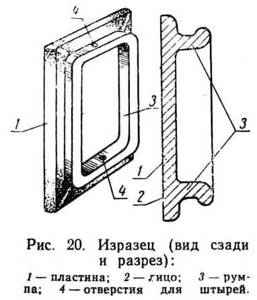
Tile design
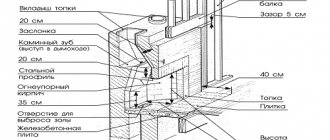
The volumetric shape formed by the pump makes the lining thermoinert - the heat transfer of the stove coating is felt for several days. Thanks to the boxes, space is created between the tiles and the surface of the fireplace. We owe it to him for the accumulation of heat and such a long-lasting heat transfer to the room.
Holes in the tiller are needed for pins or wires that are embedded in brick joints - this makes the finish more durable and reliable. The classic cladding scheme involves the abandonment of glue or other similar binders. For this reason, heat transfer increases even more.
Despite the inertness of the coolant, the heat of a stove covered with tiles is very soft. While heating the room well, the stove is not capable of burning.
The main functional advantage of such tiles is the heat transfer from the oven for several days
A little more about the advantages of tiled cladding:
- Thick-walled tiles are characterized by high performance: thermal resistance and heat capacity, thermal energy accumulation, strength and durability
- The beneficial effects of the radiant energy released from the tiles are comparable to the energy that a person receives from the sun's rays.
- Tiles are not afraid of water; their formulation and technology ensure low water absorption. Tiles are used not only for stoves, but also for facade decorations and in wet rooms.
- Glazed surfaces do not retain settling dust; as a result, the burning of dust particles does not lead to the release of toxins into the air.
- Clean ecology both in terms of raw materials, production technologies and further operation.
- The designs of the tiles themselves and their fastenings provide unique properties: the lining can withstand any temperature on the surface of the stoves, even fluctuations up to thermal shock, and retains the accumulated heat for a long time.
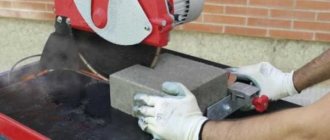
The structural strength of tiles, especially those with solid tiles, and the precision of installation using the right technologies are the key to the cladding’s service for decades without repairs, subject to careful handling. The only thing that is required is periodic simple washing and cleaning, and to protect the tiles from strong impacts.

Types of tiles
Based on their shape and purpose, tiled ceramics are divided into several main types. Among them:
- flat slabs - elements that cover the main area of the fireplace;
- corner – designed for decorating corners;
- basement and cornice - designed for finishing the lower and upper zones of the stove, respectively;
- shaped – corner tiles, which are necessary for decorating corners of complex shapes.
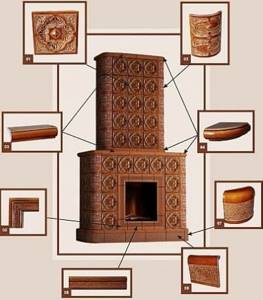
Tile options
How are tiles made using the industrial method?
The original format of facing ceramics appeared as a response to the need for good heating of the room and long-term heat retention. Some modern furnace models are characterized by a noticeable temperature difference between the internal and external zones of the furnace surface. Thanks to this, the usual ceramic tiles are quite enough for their cladding. In other cases, it is much more appropriate to use box-shaped slabs.
In the past, pottery with rumpa was cast in wooden molds, after which the box was mounted and painted in a certain way. Today, traditional technologies and modern developments are combined in the production of slabs.
Stages of modern tile production:
- make a plaster mold; based on the calculated dimensions of the slabs, the workpiece is cast; Having assembled a base from several parts, it is coated with a special composition, after which the formwork is installed and the model is filled with gypsum mixture; the form is finished, cleaned and dried;
- prepare raw materials - clay; raw materials must be cleaned of impurities and made plastic; to impart the required degree of viscosity, the clay is allowed to rest, and then mixed for a long time and very efficiently - the air is removed from the mixture;
- the finished raw material is filled into the mold, carefully pressing it in the direction from the center to the periphery; after this, the clay is left to dry - the mold absorbs moisture from the raw material; as a result, the clay mass shrinks and moves away from the walls of the mold without effort; at this stage, semi-finished products are removed from the molds and sent for drying to a special chamber characterized by the required temperature and degree of humidity;
- future tiles are sent to the kiln for firing; here the tile gains strength, acquires color and the required moisture resistance;
- the canvas of the elements is decorated with clay or glaze, after which it is painted in a certain way;
- at the final stage, the slabs are fired again - this is necessary to form a monolith of the base and glaze and to form the final shade; sometimes after final firing, another layer of decorative composition is applied to the tile - for example, paint.
All this is interesting, but many people have a logical question: is it possible to make high-quality tiles for stoves with your own hands? It’s not easy, but the answer is positive – you can make time-tested ceramics yourself.
How to make tiles yourself?
The ceramics manufacturing process is divided into stages. You need to start with preparing the raw materials.
Preparing clay
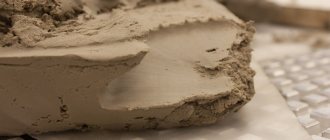
Clay is commercially available, but you can prepare it yourself. If you plan to work independently, it is recommended to take care of supplies during the warm season. Clay lumps should be dried well in direct sunlight.
The dried clay is broken up with a tamper and sifted, removing impurities. The crushed raw materials are poured with water and mixed thoroughly. During this procedure, all the slag appears on the surface - it is removed. The manipulation is repeated until the debris stops floating up.
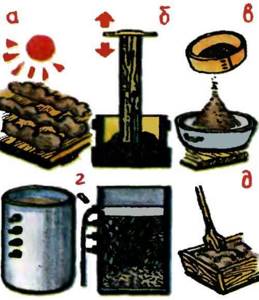
Preparing clay
For work, it is advisable to use a special container in which holes of different heights are made. The latter are initially clogged, but gradually open as they are washed. Thanks to this, the liquid is drained - liquid raw materials remain in the container. The clay is moved into a wide, low basin and dried again in the sun. During the evaporation process, the source is constantly stirred. A dough-like plastic material is considered ready.
It is important to achieve purity and plasticity of the clay. This will allow you to work comfortably and not worry about the strength of the product.
Mold making
Rolling out the workpiece
Facing materials can be made of any geometry. Based on what is desired, a plaster mold is prepared. Scheme for making a clay blank:
- a flat cake is rolled out from a piece of clay;
- with a sharp tool, cut out the required shape and align the edges;
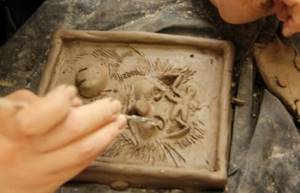
- sculpt a structural illustration and apply a patterned sketch using a stack; The outline of the workpiece is formed with clay rollers.
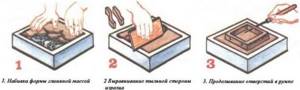
Next, a frame is made from the bars into which the workpiece is placed. After this, gypsum is diluted in water using a ratio of 7:10 (gypsum:water). The clay model is moistened and then filled with plaster mixture.
Important! Plaster must be used immediately. It hardens very quickly and loses its plasticity after just a few minutes.
First, the model pattern is covered with the mixture in thin layers. After this, the frame is filled with the composition to the very edge. It takes 15 minutes for the plaster to set. After a quarter of an hour, the frame is removed, and the mold is cleaned, washed and dried. At this stage it can already be used to make tiles.
Molding and firing of tiles
Tile molding
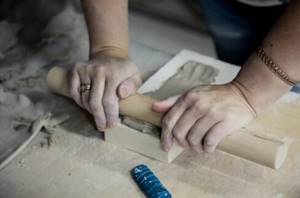
The plaster model is ready - it is filled with pliable material. By pressing the clay into the structural surface of the mold, make sure that the raw material fills all the details. Next is the turn of the rumpa. The box is made of four rollers, which are placed on the workpiece. You need to be aware of the wire holes. After the semi-finished tile has hardened slightly, it is removed from the base.
Using any smooth element, clay is polished. The result should be a slight shine to the surface. The decorative element is left for a while - it needs to dry.
Product molding process
The dried tiles are placed in a muffle furnace (a heating device that is characterized by protection from fuel and combustion products). There must be a small space between the tiles, otherwise the elements will sinter together. Firing temperature is about 900 degrees. Firing time is approximately 4 hours. After heat treatment, you can remove the tiles from the oven only when they have cooled completely.
Tile painting
Tile painting
At this stage of production, the tiles are functional, but not spectacular enough. The disadvantage is eliminated with the help of painting. There are two decoration options:
- cold method; oil paints are used - the tiles are dried, dried during the day, decorated, dried again and varnished; re-firing is not necessary;
- painting with engobes (liquid clay coating); different grades of clay and a second firing are required; there are two sub-variants of this method: the tiles are moistened in water, after which they are treated with a thin layer of light engobe; after letting the tile dry a little, it is painted with heat-resistant gouache; if you refuse to enamell the tiles, crushed glass is added to the engobé to strengthen it; after painting, the parts are sent back to the oven;
- the tiles are covered with creamy clay; It should be taken into account that during heat treatment, painted tiled ceramics may change color.
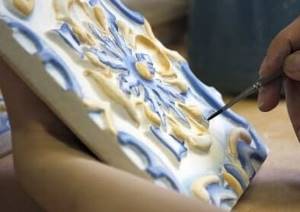
Glazing process
Ready-made glazed tiles
Glaze is needed to enhance the effect and increase the strength of the tile canvas. Enameling scheme:
- prepare a paste and mix it with crushed glass; the mixture should be creamy;
- tiles are dipped into the finished composition - either painted or without additional artistic processing;
- dry the ceramics;
- re-fired.
When heated, the paste and glass are sintered with the tile and form one whole.
To simplify the production of tiles, you can use gypsum putty instead of clay, and you can prefer to purchase ready-made silicone molds over the difficult process of making molds. In this case, firing is not necessary, and the casting procedure is noticeably easier. But with this approach there is a departure from tradition.

Stove lined with thermoinert ceramics
Tips for choosing
You must adhere to the following recommendations for choosing this exquisite decor:
- Tiles must be of high quality and have the correct relief.
- If the interior is made in country style, classical or neoclassical, then the use of tiles will have some success. The kitchen apron, stove, and bathroom walls are subject to finishing.
- For a laconic interior, a style of restraint and rigor - minimalism, it is better to use tiles in soothing colors with a relief pattern.
- If there is a need to emphasize the fireplace or stove, then tiles with bright patterns are perfect. The material, made in light colors, without patterns, looks good when finishing large areas. Light glossy tiles can make the room more spacious and comfortable. The main thing is that after installation the reflections of the sun's rays fall on it.
- If the room is made in soothing colors, then you can dilute it with bright tiles with Yaroslavl painting. Tiles with large flowers will look especially harmonious.
- Gzhel tiles in blue and white tones will be relevant for a classic interior, Provence style, and country style. It’s also good to combine it with ceramics in blue, white or light blue.
- For rooms in an elegant, restrained style, it is better to choose tiles with Dutch painting, where all the elements, even the smallest ones, are very well expressed.
The right tiles can make your fireplace a real masterpiece in your home
. Tip! To enhance the effect, tiles should be combined with surfaces made of wood, natural stone or any suitable ceramics.