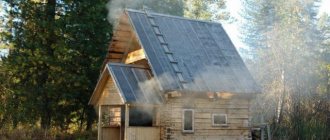
When we were finishing the washing area and installing the floor in the steam room, due to the peculiarities of the local microclimate, tiles were the best option. In conditions of high temperature and humidity, the tree's lifespan is too short, especially if special measures are not taken to increase its ability to withstand water and heat. Today we will make the floor in the waiting room. Fortunately, the conditions here are as comfortable as possible for both humans and wood. However, let's see for ourselves.
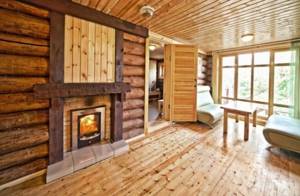
Features of the microclimate and purpose of the dressing room
The dressing room, as a separate functional room, appeared when our ancestors began to move en masse from black baths to white-heated structures. Centralized and controlled removal of flue gases made it possible to divide the internal volume of the bathhouse into a steam room and a washing compartment and, at the same time, the absence of smoke made it possible to equip a dressing room, a room that was as versatile as possible; clothes were folded here, the current supply of dry firewood was stored, and the body was adapted to visiting a hot place. steam room, set up an external firebox for the sauna stove, and finally, rested after the procedures and drank tea. To a large extent, all these functions have been successfully preserved to this day, in their modern interpretation.
What requirements must a dressing room in a classic Russian bath or traditional Finnish sauna meet:
- The interior solution should be made in a single manner with the steam room and other functional areas allocated in the internal volume of the bathhouse.
- It must be well insulated so that heat loss does not affect the overall comfortable microclimate during the cold season.
- It is important to arrange effective supply and exhaust ventilation in order to ensure an acceptable room temperature in the summer heat and get rid of condensation, the appearance of which may be simply inevitable in some cases.
- In addition to ventilation, reliable waterproofing is also designed to combat dampness in the room, especially for the lower part of the structure, especially if the bathhouse is located, anywhere, on the banks of a river, pond or forest lake.
Important! Floors in the dressing room can be waterproofed using various methods: monolithic, impregnating, pasting and backfill. You can read more about the techniques and principles of a waterproofing system in a bathhouse here.
Ceiling insulation
The thickness of the insulation depends on the number of storeys of the building.
| Location | Insulation thickness (mm) |
| Under a heated room | 50 |
| Under an unheated room or attic | 100 |
| Ceiling-roof | 150-200 |
The ceiling insulation in the dressing room is carried out with moisture-resistant materials. Warm steam rises and condenses in the upper part of the room. The greater the temperature difference on the surface, the more intense the release of moisture.
Insulation is carried out from inside the room or by insulating the attic floor. In the first case, it is advisable to use:
- polystyrene foam;
- expanded polystyrene;
- foamed polyethylene.
All materials have a low moisture absorption rate. When sealing seams, they eliminate the use of hydro- and vapor barriers. This reduces installation costs.
- embedded in the space between the rafter beams;
- fills the cells of the frame;
- attached to the ceiling by gluing.
The finishing also needs to be low-hygroscopic. Suitable:
- moisture-resistant drywall;
- plywood;
- plastic;
- lining;
- suspended ceiling.
To create natural, effective and useful attic insulation, you need to use seaweed. As insulation, they are sold in the form of mats. The product is rolled out on the floor of the attic or in the space between the load-bearing elements.
Ladders with a thickness of 200 mm are used. They do not require moisture insulation. Seaweed:
- are not afraid of moisture;
- fireproof;
- not susceptible to mold and mildew;
- hypoallergenic;
- have a healing effect.
You can create insulation yourself. In coastal areas, the material costs pennies. It is enough to dry the seaweed and cover the surface with it.
Ecowool is becoming more and more popular, as it tends to release absorbed moisture. To do this, it is enough to ventilate the insulation layer. Cotton wool can be installed dry or wet. The second method is more common due to adhesion to the surface and the ability to insulate inclined slopes.
Due to the good adhesion and integrity of the insulation, polyurethane foam is often used. It is also waterproof. Due to the integrity of the coating, it can also be used to insulate metal roofing elements. Thanks to this, the cold bridges that serve as metal are removed.
The disadvantage is the high cost and the need for specialized equipment. The foam is applied with a special sprayer.
Making a classic wooden floor
If the owner of a bathhouse is a big follower of the traditional bathhouse style, then he will probably choose a wooden flooring, equipped according to all the rules of carpentry.
What will it take? Of course, the tool:
- Hand saw or electric jigsaw. If the volume of work is large enough, then it is worth acquiring a hand-held circular saw, widely known in everyday life as “parquet”;
- To adjust the elements, a mallet with a wooden or rubber working part will not be superfluous. It will allow you to avoid nicks on the surface of the material when settling it;
- A hammer and a screwdriver will be needed to fasten the elements in the supporting set and the finishing coating. In the absence of a screwdriver, a screwdriver will do, but its use will require considerable strength in the hands, especially if the wood is dry and the hardware is quite long and large in cross-section. As a fastening tool, a construction stapler is useful for fastening vapor and waterproofing sheets with staples. This also includes adhesive tape, which is convenient for gluing the joints of the same fabrics;
- To control the dimensions and horizontal lines, you need a bubble-type building level, a synthetic cord and a tape measure. To apply serifs, use a slate pencil or permanent marker;
- A stationery knife is required to cut insulation and insulation sheets.
Briefly about the choice of material
The floor in the waiting room is arranged with your own hands - it will require high-quality material. What you should pay attention to:
- The base of the supporting structure is a log; you will need a high-quality edged board with a cross-section of 50×150 mm. In principle, wood of any species will be used, except for cases where the area in which the bathhouse is being built is damp and damp. In this case, it is better to give preference to larch, the outstanding properties of which we have already talked about;
- For a finished floor, you need a calibrated “inch” board, the thickness of which, as the name suggests, is 25 mm, and the width can vary between 120 - 150 mm. It is this material that ensures ease of installation and good visual perception of the finishing set;
- When purchasing wood, you should choose dry wood, although very often they sell freshly sawn wood at the bases. This circumstance can provoke the phenomenon of shrinkage of wooden elements and a change in their geometric dimensions. If this happens for a number of reasons, then the situation can be corrected using a 30x30 mm cross section. It is laid perpendicularly along the top of the joists, and the weakened areas are selected using wooden dies - linings. It is this layer that will set the horizontal level, a kind of base for the “inch” finish coating;
- It is obvious that the wood of all elements should not have visible defects in linear dimensions and shape - torsion, warping, bending, cracking, as well as signs of damage by insects - grinders and molds. It is necessary to avoid the presence of through knots in load-bearing joists.
Where to begin?
In fact, the problem of choosing the optimal floor design and materials for its installation is not so significant. It all depends on the type of foundation and ceiling. Having decided on them, the acceptable options for implementing the base of the dressing room will be reduced.
For clarity, we present in the table the main types of foundations and possible types of floors (the table is a recommendation):
| Bathhouse foundation | Optimal overlap | Possible overlap |
| Tape | Wooden beams, metal beams | Beamless (floor slab) |
| Columnar with reaming | Beam wooden | Beam metal, beamless (floor slab) |
| Slab | Insulation screed | Beam wooden |
| Pile | Beam wooden | Beam metal |
Let's look at the most common types of floors in more detail and continue choosing the optimal floor design for the dressing room.
Work order when arranging the floor

At the preliminary stage, the owner must clearly decide whether he needs a subfloor or not. Basically, the arrangement of underground space is mandatory where there are seasonal fluctuations in groundwater levels.
The sequence of work is as follows:
- The foundation of the underground is being prepared. To do this, the soil is leveled in a horizontal plane, carefully compacted and a sand-crushed stone cushion 120 - 150 mm thick is poured. Supporting columns made of brick or monolithic concrete, reinforced with a central reinforcing rod, rest on it. The base of the soil must be sufficiently watered with clean water to ensure the quality of compaction;
- The load-bearing capacity of the load-bearing frame can be calculated based on this table:
| Geometric dimensions of the board, mm | Distance between lags along their axes, mm | Maximum span length between two supports, mm |
| 25×120 | 250 350 470 | 3000 2800 2400 |
| 25×150 | 250 350 470 | 3100 2900 2450 |
| 25×190 | 250 350 470 | 3200 3000 2550 |
| 25×230 | 250 350 470 | 3500 3250 2800 |
Remember! The specified data is valid for an ordinary non-grooved board.
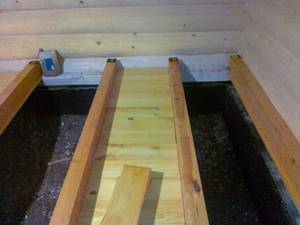
- According to the indicated scheme, the step for placing the logs is selected, while they are set at the zero level, the horizontal positioning is controlled by a bubble level, and visual perception can be ensured by pulling a synthetic cord along the diagonals of the room from opposite corners. If the logs are not calibrated in size, then the horizon is provided with pads of the required thickness;
- The logs are pre-treated or on site treated with fire retardants and antiseptics - in several passes;
- Laying the logs should provide for a gap between its side and the wall within 150 mm.
- The columns on which the logs rest must be waterproofed by any available method. The most convenient to use roofing material is based on modified bitumen. Bitumen mastics require good heating of the mass to acquire a sufficient degree of fluidity or to introduce effective solvents;
- If the climate in the region has rather cold winters, then lathing is installed on top of the joists, perpendicular to their laying. It is placed in the lathing substrate, and with the help of a construction stapler, the hydraulic barrier sheet is secured. Extruded polystyrene plates, cut to size using a stationery knife, are placed on the resulting base. The joints are glued with tape. If the climate in the region is quite harsh, then the cross-section of the lathing can be raised to 50 mm. This will allow you to lay a thicker layer of insulation and will significantly increase the load-bearing capacity of the floor as a whole. If there are severe winters, the underground can be filled with bulk insulation based on expanded clay, perlite or boiler slag;
Attention! If the underground remains free, then according to the requirements of SNiP, if the area of the dressing room is more than 15 sq.m. the space under the floor should be equipped with two ventilation holes located diametrically opposite each other, at the level of the baseboard rebate. It is advisable to cover the cross-section of the holes with a metal mesh with a 5x5 mm mesh to prevent rodents from entering the room.
- The laid insulator is covered with a vapor barrier based on a membrane film. The joints are made by overlapping the material within 150 - 180 mm and are also taped;
- The finished floor can be installed using either a tongue-and-groove board or a calibrated edged board. A tongue-and-groove connection provides a higher degree of quality of mating of adjacent elements and a clean surface as a whole. However, such material is much more expensive than ordinary boards. In addition, if the tongue-and-groove board is sold in sealed plastic bags, then before installation it must be freed from the film and kept in natural conditions for 3 - 4 days;
By the way! For the floor of a bathhouse, it is not advisable to use a board with a thickness of more than 38 mm, since constant fluctuations in temperature and humidity can cause some deformation, and the load-bearing capacity of such a material will be excessive.
- Boards can be fastened with both nails and self-tapping screws in an open or hidden way. With an open type of fastening of elements, it is necessary to deepen the heads of the hardware into the body of the board by 2 - 3 mm. With the hidden method of mounting a tongue and groove board, the hardware is attached to the groove at an angle of 35 - 50 degrees and is also recessed into the body by 2 mm. We should not forget that the boards adjacent to the wall should be 7 - 10 mm away from it to ensure a deformation gap. The starting board is laid with the groove towards itself. To tightly fit adjacent elements, it is necessary to use the “wedge on wedge” technique;
- After installation, the surface must be sanded, removing visible defects that were present both initially and that arose during assembly. This can be done using belt and vibration sanders, but their performance leaves much to be desired. It is better to rent scraping machines for large processing areas and, before starting, carefully inspect the surface for the presence of loose fasteners. Contact with hardware is fraught with breakage for a carbide scraping knife;
- The completion of the work can be considered covering the floor surface with a protective composition. Although some adherents of the natural bath believe that any chemicals in the bath are absolute evil and, at best, are limited to wax-linseed impregnation.
It is worth saying that the arrangement of a concrete floor also has the right to life in the conditions of a dressing room, and we dwelled on the intricacies of the process in previous articles.
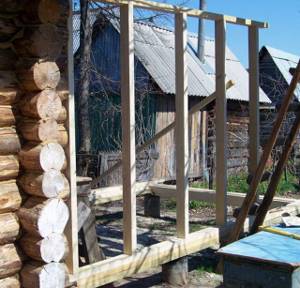
Foundation for frame construction
As a foundation for a frame dressing room, a lightweight foundation should be used: pile or shallow foundation.
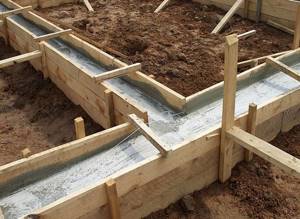
Creating a shallow foundation is done as follows:
- The area is being planned and marked.
- In places where the walls of the building should be located, half-meter trenches with a width of 30 centimeters are dug.
- Sand is poured into the trench in layers and also compacted layer by layer with water wetting.
- Formwork is created along the perimeter of the trench.
- The base of the formwork is reinforced.
- The concrete solution is poured according to the level of the formwork.
- After the concrete hardens, waterproofing roofing felt is laid.
If a bathhouse with a large dressing room is being built, then you need to additionally insert reinforcement into the poured solution, which will increase the strength and reliability of the structure. In the same way, a bathhouse with a utility block can be built, which is quite practical.
Insulation of premises
A lot of water pours onto the floor in just one compartment – the washing area. There is much less moisture in the waiting room or rooms intended for relaxation, so it is not at all necessary to waterproof the floor surface in them. As for a steam room in a building that is already finished and in use, it is not necessary to dismantle the floor.
It is possible to lay another floor on joists on an existing surface, having first laid an effective insulation. This solution fits well with the recommendations of experts: the floor of the steam room should be 10-20 cm higher than the floor level in other centimeters - thanks to this, the volume of the steam room is reduced and it warms up faster.

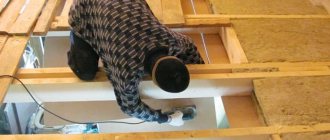
Insulation by joists
Rolled or pressed mineral wool, foam plastic or bulk materials can be used as insulation.
Step 1. The so-called “skull bars” need to be nailed to the bottom of the floor beams; the size of the bars is 20x20 mm. The subfloor will lie on them.
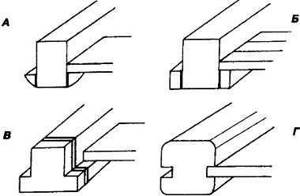
Installation of cranial bars for rolling: A – from scraps; B – from bars; B – reinforced with metal brackets; D – using longitudinal samples
Step 2. For the subfloor, you can use unedged boards, pieces of plywood or OSB, the subfloor does not have to be made solid, leave a gap of up to five centimeters between the boards, this will reduce the amount of materials, but the quality will not suffer.
Laying the subfloor
A vapor barrier must be installed on the subfloor. The fact is that in an underground house there is always high humidity; moisture or condensation on insulation or wooden structures is prohibited.
Insulation laid on subfloor
Step 3. Fill the space between the floor beams with insulation, making sure that the material lies evenly without gaps or cracks.
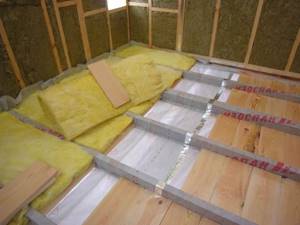
Laying insulation - photo
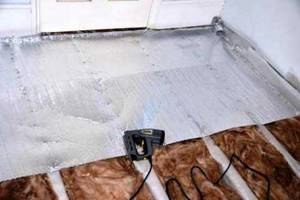
Cover the insulation with waterproofing
The thickness of the insulating layer must be at least ten centimeters, otherwise the effect will be insignificant. There are options for insulation over joists on a concrete base. The insulation technology has no fundamental differences. The only difference is that wooden logs need to be placed on a flat cement base, and thermal insulation is laid between them. It goes without saying that the logs should be insulated from the concrete with insulating materials, and the insulation on top should also be covered with waterproofing.
Video - Floor insulation using joists
If you plan to insulate the floors in the bathhouse in advance, then the work can be simplified and cheaper. To do this, reduce the distances between the floor beams. For standard cases, beams are installed under the joists at a distance of approximately one meter. Then logs and flooring are installed on them. Reduce the distance between the floor beams to 50÷60 centimeters; use ordinary 50×150 mm boards for their manufacture. Then the insulation will be located in the niches of the beams, and the finishing floor covering can be laid on the upper plane.
Interior decoration
Upon completion of insulation, work begins on finishing the dressing room. Usually it is covered with wooden clapboard, taking into account the unique design and style of the bathhouse. When covering the floor, the first step is to lay the beams on the waterproofing layer. And again, the entire tree needs to be treated with a water-repellent solution.
You need to fix the floorboard to the beams using self-tapping screws using the tongue-and-groove system. It would be a good idea to install a rubber coating on top of the boards. After the floor is covered, we proceed to finishing the ceiling and then the walls. You can sheathe walls in different ways. So, you can make clapboard cladding horizontally, vertically or diagonally. This is where your imagination comes into play.
Time-tested material
As many years of practical experience show, in the competition of thermal insulators, expanded clay wins in many respects:
- The base of expanded clay is a natural material, clay;
- during the firing process, it acquires the structure of porous, but closed with a sintered crust, granules;
- it is fire resistant;
- its 15 cm layer is superior in thermal protection to 25 cm of wood, 60 cm of foam concrete, 1 m of brick;
- withstands loads up to 300 kg/sq.m. m;
- cheap.
The sequence of work when insulating the floor in a bathhouse with expanded clay is the same as with other insulation materials:
- a thick layer of plastic film is spread on the rough screed, extending onto the wall;
- beacons are placed at the finishing level;
- expanded clay (preferably a mixture of two fractions - gravel and sand, without splitting the granules) is filled in using the “wedging” method; (also, the method of insulation with expanded clay directly in bags, with pre-made holes, is used);
- The top layer of leveled expanded clay backfill is held together with cement “milk”;
- if necessary, lay a reinforcing mesh;
- a screed of 3-4 cm is poured onto the surface of the expanded clay, gripped with cement; (concrete will dry for 28 days, polymer - 7);
- Air bubbles are removed from concrete using a special roller.