What should the fireplace lining be like?
Since there are many options for making a fireplace, it is difficult to name the ideal finishing material . It all depends on a lot of factors :
- fireplace type . The material for a wood-burning fireplace should be selected as carefully as possible, taking into account the constantly exposed high temperature. If you decide to go with an imitation fireplace with candles or an electric version, then the finishing requirements will not be so strict;
- fuel type The combustion temperature of different types of fuel is different, which must be taken into account when analyzing the parameters of finishing materials. For example, if you are going to use firewood, then it is important that the lining can withstand temperatures of about 9000C, but if we are talking about coal, then it is better to take a material that can withstand temperatures of about 11000C;
- installation location . If you are going to install a fireplace on the terrace, then it is important that the material has excellent frost resistance. If used in a heated room, such a requirement is not made. If the fireplace is located in a house where people visit only occasionally, then pay attention to such a parameter as moisture resistance;
- material weight . Material that is too heavy (for example, natural stone) may require strengthening the foundation, which is only possible in a private house and when installed on the ground floor. If it comes to an apartment or the upper floors of a private house, then you should definitely take into account what load the floors can withstand;
- appearance. The purpose of cladding is to decorate the fireplace, so when choosing a material you should take into account its appearance and compliance with the chosen interior style and color scheme.
What you need to know before finishing
Regardless of what material you use to cover the fireplace, there are some rules that are always relevant. Moreover, they apply to both fireplaces made of heat-resistant steel and cast iron stoves. For the most part, this section is dedicated to precisely the design component.
Materials and design should match the overall style of the room. Decorating with wooden half-bars in a strict hi-tech interior will look ridiculous, just like, in principle, “marble” cladding in a log house .
If you want to decorate the fireplace with tiles or some kind of pattern, you should do this only if there are no such elements in the surrounding interior. Otherwise it will look too intrusive. Examples of good design can be seen in videos on the Internet or on relevant forums. People often share their work there, so you can learn something for yourself.
Also, special attention should be paid to the form. It is necessary to maintain proportions so that the upper and lower parts are in perfect harmony. Often people make a small open furnace firebox from below, and the rest of the space, right up to the roof, is occupied by plasterboard finishing . It looks strange, to say the least.
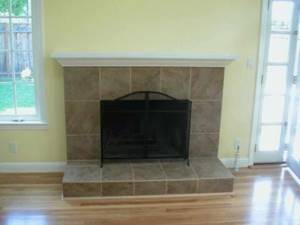
No. 1. Fireplace tiles
Tile is the most popular way to decorate a home. You cannot use ordinary tiles - they will not withstand high temperatures. As a rule, the following types of ceramic tiles are used for facing a fireplace:
- terracotta tiles Made from baked clay, it has a beautiful natural reddish tint. In most of its properties, it resembles the refractory red brick from which fireplaces are made, so as the temperature in the firebox rises and falls, the tiles will expand along with it. Terracotta tiles have a smooth, coarse-grained structure. Additional pigments are not used in production, but the natural range of shades ranges from light brown to almost black;
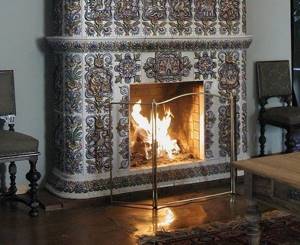
- majolica It is also made from baked clay, but is covered with painted glaze on top, so it costs more, but also looks very beautiful. When decorating a fireplace with majolica, you need to carefully think through the sketch, because cutting such tiles is not entirely impossible, but very stupid. In addition, installation requires sufficient qualifications from the master, because the slightest flaws will be clearly visible. Due to the high cost and difficulty of working, our fireplaces are very rarely decorated with only majolica - it is usually used fragmentarily, as an accent and decoration. This solution looks great;
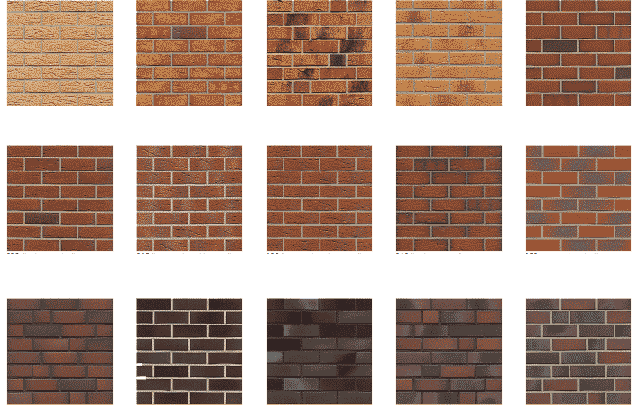
- clinker tiles It is made from special refractory types of clay, therefore it can withstand high temperatures, and also has excellent frost resistance and moisture resistance. The color range is represented by shades of brown and terracotta, but thanks to various surface decoration technologies you can get very interesting options;
- fireclay tiles It accumulates thermal energy well, cools for a long time, and retains heat well. The material will expand with the fireplace body and can withstand extremely high temperatures. Fireclay tiles are thicker than terracotta tiles.
Porcelain stoneware and tiles are sometimes included in this group , but the uniqueness of their characteristics forces us to consider each of these materials separately.
Tiling a fireplace has many advantages :
- resistance to high temperatures, the ability to “breathe” with the fireplace;
- high heat transfer and the ability to accumulate heat, which increases heat transfer;
- moisture resistance, frost resistance, resistance to sunlight;
- ease of care;
- durability;
- environmental friendliness, no odors when heating;
- chic appearance and ample choice.
It’s hard to name any downsides, except that the price of some products can be intimidating. To install tiles, you do not use ordinary tile adhesive - you need a heat-resistant compound. You can make a special clay composition yourself, but you will need to find suitable clay and experiment with proportions, so it’s easier to settle on a ready-made version.
It is better to buy tiles with a margin of 10-15%, and you can purchase not only standard format products, but also corner elements. Installation does not require special skills or the use of specific tools:
- preparatory work consists of removing the old lining from the fireplace. After this, it is also advisable to embroider the masonry seams 1 cm deep. Dust is carefully removed, the brick is moistened with water. Using heat-resistant mastic or clay mortar, minor unevenness is eliminated. If there are significant deformations, it is better to use a grinding wheel. If the brick begins to crumble, it does not hurt to install a reinforcing metal mesh with a mesh size of 1.5 cm;
- Before starting work, it is necessary to heat the fireplace for several hours so that the brick warms up sufficiently. The tile itself must remain in the room where the work will take place for 48 hours;
- the surface of the fireplace is primed, reducing dust levels and improving adhesion. The primer should be allowed to dry for about 2 hours;
- The tiles can first be laid out on the floor to understand which elements will have to be trimmed;
- The glue is prepared according to the instructions indicated on the package. It is better to mix with a construction mixer, but a drill with an appropriate attachment will do;
- The laying begins with special corner elements, if they are used. Then the lower rows are installed;
- The adhesive solution is applied with a flat spatula, and 3-4 elements are installed at once. To ensure that the distances between the tiles are the same, special crosses are used;
- After installing the tiles, the seams are grouted. To do this, use special store-bought solutions or a homemade clay mixture with sand and dyes;
- when everything is dry, it is advisable to cover the surface of the unglazed tile with a layer of heat-resistant varnish. This will simplify subsequent care.
Analyzing the numerous advantages of the material and the ease of its installation, it is easy to guess why it has gained such high popularity.
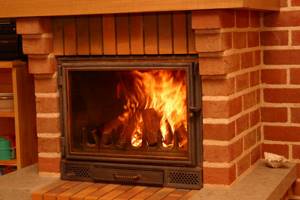
Furnace operating conditions
Fireproof tiles for fireplaces – Clinker tiles for bricks.
A variety of coverings are offered. There are many variations that allow you to effectively and stylishly surround a fireplace in accordance with the taste of the owner and the stylistic solution of the interior. But not only the aesthetic component is important, but also the operating conditions. They must meet a number of criteria, otherwise using the firebox for a long period is unlikely to be possible:
- The finishing must be made from heat-resistant materials that do not deform, crack, or deteriorate when exposed to high temperatures.
- The material for the firebox should be easy to maintain, easy to clean, and easy to use.
- The lining of fireplace stoves must be made from durable materials with excellent wear resistance characteristics. It should not change its appearance or deteriorate when exposed to external factors.
- One cannot fail to mention the aesthetic appeal - of course, it is important to line the firebox with a beautiful, eye-pleasing material that emphasizes the unique style of the room.
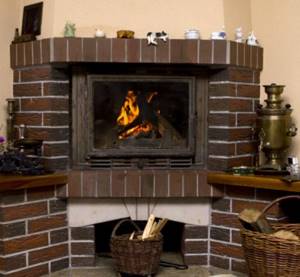
Finishing a fireplace with brick
It is not so easy to find all the listed factors in one material for lining the firebox. There are many unscrupulous manufacturers on the market who offer low-quality material. Sometimes even finishing a fireplace with brick can give a not entirely desired result, despite the fact that previously it was brick options for finishing a fireplace insert that were considered the most relevant in terms of quality and appearance. It's all about the quality of the product itself. Therefore, you need to be very careful when choosing cladding versions to personalize the stove in the room. A competent choice of finishing method will allow you to cover the fireplace with high quality, even if the work is done with your own hands.
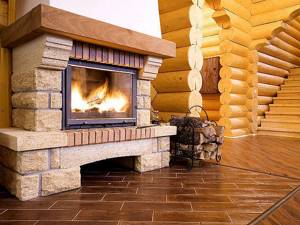
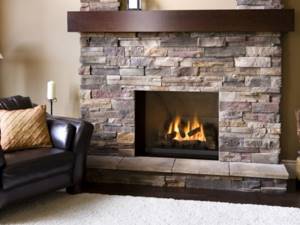
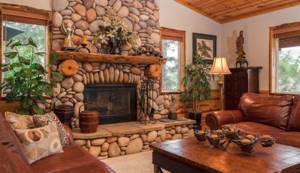
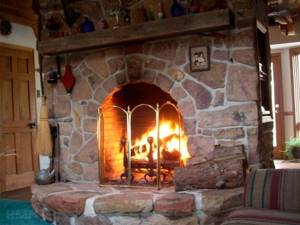
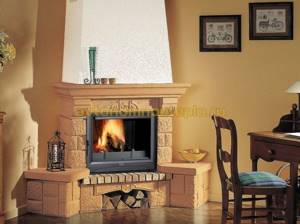
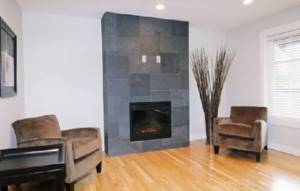
No. 2. Natural and artificial stone for facing the fireplace
The stone in the decoration of the fireplace looks as organic as possible and may even resemble the Middle Ages, but the perception of the portal will largely depend on what type of stone is chosen (or what type of artificial stone imitates).
As for natural stone the following rocks are used for cladding the fireplace :
- granite is a hard rock, has a wide range of shades, does not collect scratches, and is easy to care for. The surface can be either wild (with “ragged” edges) or smooth polished;
- Marble is the most popular stone for finishing a fireplace. It has a huge range of shades, is relatively inexpensive, and looks great;
- Shell rock captivates with its low price and easy processing. Looks great, but isn't very durable. It has a soft porous structure, so soot particles will gradually accumulate in the pores, spoiling the appearance. If you light the fireplace infrequently, then shell rock will do;
- limestone and sandstone have a sufficient number of shades, but cannot boast of strength, and soot may remain in the pores of the material;
- slate - durable and beautiful material, but its peculiar appearance does not allow us to call the breed universal.
Natural stone is heavy and quite expensive, so today its artificial counterpart is actively used. Natural stone for fireplaces is sold in the form of slabs . Often this format is called stone tiles or flagstone . Since the shape of such tiles is usually different, it is better to first lay out all the elements on the floor so that you can select and process all the elements in time. When installing natural stone, you cannot do without a mesh, otherwise the finish risks collapsing.
Artificial stone is made from Portland cement with the addition of expanded clay or from gypsum. The mass is poured into molds, which are obtained by making casts from natural stones. Such products are cheaper, weigh less, can have any color and shape, and in terms of strength and other performance qualities they are practically not inferior to natural stone, and some types are even superior.
The main advantages of facing a fireplace with stone:
- resistance to high temperatures;
- environmental friendliness and safety;
- chic appearance;
- durability;
- for artificial stone, ease of installation and processing, low weight, price;
- for natural stone – the uniqueness of each element.
The technology for laying stone is similar to the installation of tiles described above. It is not necessary to leave gaps of the same size between the stones (as is the case with tiles), so everything will be even simpler. For installation, use a special heat-resistant adhesive for stone. It is recommended to additionally secure the heaviest stones with anchors. Otherwise, everything is the same as with tiles. First, the surface is prepared, primed, glue is diluted, then the installation of stone begins from the bottom row. Before starting work, it is recommended to heat the fireplace and lay the stone on the floor to assemble the future “drawing”. In the case of natural stone, the elements may have a slightly different shade. This must be taken into account in advance. It looks best when the bottom rows are slightly darker than the top rows. If desired, the stone is coated with heat-resistant varnish.
Rules for finishing a fireplace insert
Correct installation of the cladding requires not only a basic understanding of the process, but also compliance with the basic rules of finishing related to the peculiarities of the fireplace insert. Among other things, you need to take care of the following measures:
- Preparing a reliable foundation is required when lining the combustion chamber with natural stone. The weight of the structure reaches several centners, which should be taken into account at the design stage of the building. When facing with foam block or plasterboard, the increase in load is insignificant.
- Fire protection - the firebox is installed on a protected floor surface. It is allowed to cover the floor in front of the firebox using any non-combustible materials: ceramic tiles, sandstone, etc. If a fireplace insert is installed in a wooden house, fire breaks must be provided.
To prevent fire, when manufacturing the cladding frame, maintain a minimum gap between the firebox and the cladding.
What is the gap between the firebox and the cladding?
PPB standards regulate the minimum distance between the firebox and the lining made of fireproof material, 100 mm. If you plan to lay a layer of basalt wool, the convection gap between the insulation and the fireplace is reduced to 60 mm.
What is the best way to glue the cladding?
The adhesive composition for cladding is selected depending on the finishing material. As a rule, manufacturers indicate the grade and type of glue on product packaging. Granite and marble tiles are fixed with a two-component adhesive, ensuring the most durable adhesion to the surface. The composition is heat-resistant.
Cladding with artificial stone requires the use of a special one-component tile adhesive. The material must be heat resistant and able to withstand temperatures up to 200°C.
For natural stone, dry compounds with the addition of clay are used. Laying on a self-prepared clay composition is allowed. The seams are painted over with grout.
Thermal insulation materials
Thermal insulation under the cladding is used in cases where it is planned that the fireplace insert will serve solely as a decorative element and not as a source of heating in the house. Fire safety rules stipulate the minimum requirements for insulating materials that can be used for this purpose. These include:
- Slight hygroscopicity - the material should not absorb moisture. During the heating and cooling process, condensation inevitably occurs. If moisture accumulates inside the insulation, this leads to a loss of the basic properties of the material.
- High melting point - mineral and basalt insulation is made by heating rock to the melting point. Cotton wool is made from the resulting fibers. The initial melting point shows what thermal load the material will be able to withstand.
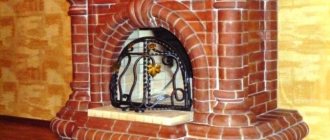
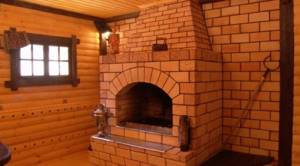
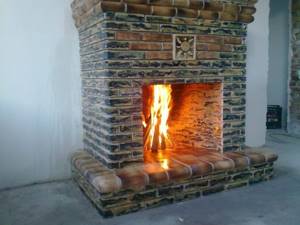
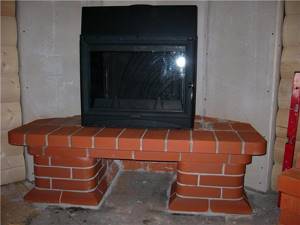
No. 3. Brick fireplace decoration
This is not even finishing in the traditional sense of the word. In this case, there is no question of installing some kind of facing material on top of the fireplace. The brick from which the fireplace is constructed is finished accordingly. This is both the simplicity and complexity of the method.
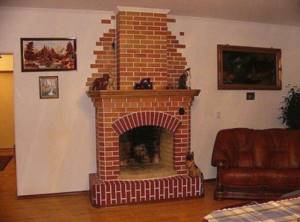
If you initially planned not to use any additional facing materials, then when laying the fireplace, the mortar must be laid so that 5-7 mm remains to the outer edge of the brick. Later this void will be filled with decorative grout. If the fireplace has already been built, then you can grout the joints in order to subsequently use grout of a certain color. The brick can be left untouched, but can be sanded or chamfered. Such work should be performed by an experienced specialist. Not every stove maker is ready to take on this, so it’s better not to do this type of cladding yourself . Brick can be treated with hydrochloric acid solution - this will give the material a more saturated color.
There is a more standard way. This is finishing with ceramic facing bricks . The material can withstand high temperatures, looks great and expands the possibilities of decoration. The masonry is not much different from the laying of ordinary bricks. True, you will have to ensure that the seams are even (as is the case with tiles), and then seal them with heat-resistant mastic.
Material
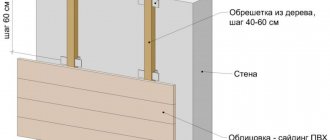
In fact, it doesn’t matter at all what material you choose for cladding. This can be as ordinary brick, plasterboard, or even installation with aerated concrete blocks or porcelain stoneware.
By the way, lining is necessary not only to create a beautiful appearance, but also to ensure that the processes in the furnace are more efficient. The fact is that in the presence of the same drywall, much less heat will be uselessly dissipated in space. At the same time, its cost is quite low.
Almost everyone can also afford to buy bricks. Those people who have private plots often keep them after construction.
No. 4. Cladding the fireplace with porcelain stoneware
Porcelain tile is not a natural material, but it contains natural components. A special technology makes it possible to create a material that is not inferior in strength to natural stone. The composition includes clay, mica, sand, metal oxides, feldspar and granite or marble chips. Porcelain tiles can replicate the pattern of any natural stone and are distinguished by a minimal number of pores , which explains its performance qualities.
Advantages of the material:
- wear resistance and high strength;
- ability to withstand high temperatures, so porcelain stoneware is definitely suitable for facing a fireplace;
- moisture resistance and frost resistance;
- environmental friendliness;
- ease of maintenance, resistance to mechanical damage and chemically aggressive substances;
- a huge variety of colors and textures. Porcelain tiles can copy ceramic tiles, any type of stone, majolica and clinker.
Porcelain tiles cost a little more than terracotta tiles and can compete with them. The main disadvantages: higher weight and relative difficulty in processing - cutting porcelain stoneware is not as easy as tiles. However, for cladding fireplaces, slabs of material with a small thickness are used, so there will not be a significant load on the floors. If cutting is difficult to do at home, you can entrust this task to special companies.
Porcelain tiles are installed using glue or a metal frame. The first method is virtually identical to the tile installation described above, so it makes sense to dwell in more detail on the second option:
- A frame is created from a metal profile around the perimeter of the fireplace; anchor bolts are used for fastening. The profiles are connected with self-tapping screws. The pitch between the profiles must correspond to the format of the porcelain stoneware;
- using special brackets, the porcelain stoneware is fixed to the frame;
- the space between the brickwork of the fireplace and the porcelain stoneware must be filled with clay mortar with the addition of sand and crushed stone;
- porcelain stoneware joints are treated with a composition of clay, sand and color pigment;
- After finishing the work, the fireplace must be heated for a couple of days - this way the clay will bake and form a denser layer with a high degree of heat capacity.
This method is convenient for covering fireplaces with a lot of unevenness, defects and slopes, because with the help of a metal frame and mortar they are all leveled out.
Plasterboard cladding
It is not necessary to buy fireproof boards; you can also use moisture-resistant material. Cutting drywall parts is done using a simple paint knife. A cut is made along the marked line under any straight plank, after which the canvas is bent. The cardboard on the other side is trimmed.

When making a functional fireplace, the firebox and smoke exhaust box must be installed with thermal insulation and a foil reflector inside the device.
Do-it-yourself lining of a fireplace insert with plasterboard can cause difficulties in hard-to-reach places. And so the assembly technology is no different from any other gypsum board construction:
- The sheets are sewn to the profiles using metal screws. The hats go deeper into the canvas. It is better if individual parts are cut from a single sheet. This will make pre-finishing much easier. To process the corner joints of the structure, use a special plasterboard plane or a painting knife.
- For thermal insulation on the inside, the cladding is made using a basalt slab and foil. There is foil mineral wool. But attention should be paid to the quality of the glue used in this material. It must meet safety standards and withstand prolonged exposure to elevated temperatures.
The smoke exhaust box can also be made of plasterboard. Thermal insulation and foil reflector should be installed inside the device. The chimney box has holes for ventilation grilles.
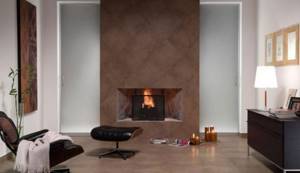
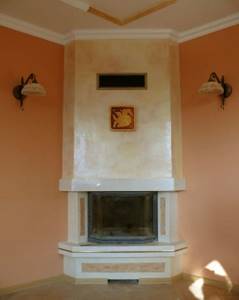
No. 5. Cladding the fireplace with plaster
The easiest and most cost-effective way to decorate a fireplace is to cover it with a layer of plaster. Moreover, with the help of plaster you can create both a smooth and decorative relief surface (using various spatulas, brushes, rollers and even household items, such as plastic bags, you can achieve an incredible result). With proper skill, even the texture of a stone can be conveyed. Plaster can be painted and drawings can be made on it. It is very easy to change the appearance of a plastered fireplace by simply repainting it. In addition, the plaster weighs a little , so it does not bear a significant load on the floors. The finish is durable and practical , if, of course, you choose the right composition.
For plastering fireplaces, it is better to use the same composition that is used when working with stoves. The easiest way is to buy ready-made material, to which the manufacturer has added the necessary additives and additives. For those who know how and like to do everything with their own hands, there is a more complex method - preparing the plaster mortar yourself. Its composition includes clay, sand and lime, but in order for the solution to have the necessary performance qualities, it is important to correctly select the fat content of the clay and the proportion of clay and sand - all this is done through experimentation. To be sure that such plaster will not crack and will withstand heat, you will need experience.
Many manufacturers offer both base and finishing plaster. The first is applied in a layer of 10 mm, intended for rough finishing and preparing a flat base. The finishing layer is applied with a thickness of 3 mm.
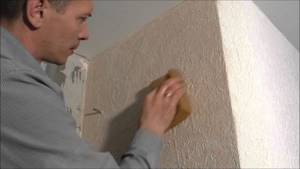
The process of plastering a fireplace is not much different from plastering walls:
- all old cladding, if any, is removed;
- to increase adhesion, it is better to unstitch the masonry seams to a depth of 0.7-1 cm. A chisel or screwdriver is suitable for scraping out the mortar;
- It is better to seal the cracks with heat-resistant sealant;
- if the walls of the fireplace are relatively flat (the height differences and the depth of the depressions do not exceed 5 mm), then you can wet the brick and proceed to applying plaster. For more significant unevenness, reinforcement with reinforcing mesh will be required. It is attached to the masonry brick with nails, on the heads of which metal washers are placed;
- Before starting work, it is better to heat the fireplace so that the brick acquires the dimensions that will be characteristic when the fireplace is in operation. If the base is not warm, the plaster may crack during the first fire;
- The prepared plaster solution is applied with a spatula and leveled along the beacons. It is recommended to apply at least two layers of plaster, with each subsequent one applied after the previous one has completely dried. The finishing layer can be leveled with a spatula. You can create a certain relief on it.
For additional decoration you can use paints . Organosilicon ones are best suited because they tolerate heating well to high temperatures. The hearth can be painted in a single color or you can draw certain patterns on it - it all depends on your imagination, skills and interior.
Furnace lining process
After assembling the base, you should move on to work such as lining the fireplace insert (for more details: “How to veneer a fireplace - tips on cladding”). Panels intended for this purpose must be fixed to plasterboard sheets, maintaining a gap of about 1 - 2 cm between the cladding material and the fireplace to prevent the accumulation of excess hot air. Installing a ventilation hole in the case will also help get rid of it.
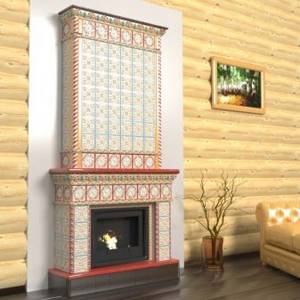
No. 6. Tiles
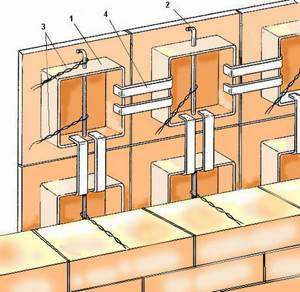
Tiles are, in fact, the same terracotta tiles or majolica. The difference lies in the special structure. The tiles have a rumpa, a square hollow projection that holds the tiles in place during installation. Rumpa is also important for another purpose - it helps to retain heat. Tiles can be used to decorate a fireplace only during its laying. If the moment is missed, you will have to choose another finishing method.
Tiles have the same advantages as tiles. The choice of colors is huge, there are very sophisticated samples that will bring special chic to the interior.
Installation of tiles is carried out in this way:
- The pump is filled ½ full with a mixture of clay and broken bricks, and the so-called crutch, thick (5 mm in diameter) wire with a bend at the top;
- a flexible soft wire is attached in the middle of the crutch, which will later be embedded in the brickwork;
- the pump is filled to the brim with clay mixture;
- As the laying progresses, the tiles are installed and the wire is hidden in the seam. The individual parts are connected to each other using U-shaped brackets.
It is difficult to do such installation yourself, which makes installing a fireplace a more expensive pleasure. In addition, the material itself is more expensive than regular tiles.
Preparing the base
Considering that fireplaces are fire hazardous equipment, preparation of the floor and adjacent walls should be provided before covering the fireplace with fireproof plasterboard.
Floor preparation
The fireplace insert has a significant mass. Plus is equipment with an increased fire hazard. Therefore, at the first stage, a concrete base is prepared:
- The portal is marked on the floor.
- The formwork is being installed.
- The base is primed and filled with concrete.
- After hardening, a podium is laid out (4 rows of brickwork). Then install metal corners under the firebox.
- Lay the final level of masonry.
The whole process is carried out strictly according to the level. A misalignment of the foundation and podium will cause problems with the quality installation of the firebox.
Preparing the wall
The simplest option is when the adjacent wall is made of aerated concrete, foam concrete blocks or bricks. In this case, it is plastered and whitewashed. If the adjacent wall is made of flammable materials (logs, beams, etc.), then the following work is performed:
- Treating the wall with fire retardant compounds.
- Fastening a foil-coated basalt slab to a metal profile. A ventilation gap is required between the wall and the facing slab. The dimensions of the protective screen should be 500 - 600 mm larger than the dimensions of the future furnace.
- Fixing drywall, which is puttied, and clinker or porcelain tiles are laid on top.
Making plasterboard shelves with your own hands
Other options: asbestos board, magnesite. If the equipment will be installed in a corner, the joint between the walls is treated with a special fire-resistant sealant.
The same thermal insulation is also applied under the chimney. You should know that the gap from the fire-resistant wall to the rear surface of the firebox must be at least 100 mm, from the combustible surface - at least 700 mm.
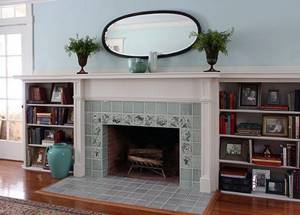
No. 7. Wood fireplace cladding
Probably, this method of cladding may seem impossible to many, because it is no secret that wood is very afraid of fire. However, if you follow certain rules, you can decorate your home with warm and cozy wood - such a fireplace will look great in living rooms designed in a classic style. Wood is an aesthetic, durable and natural material that has a special aroma. To enjoy these benefits, you will have to meet a number of conditions:
- It is necessary to choose rocks that are as resistant to high temperatures as possible and are not very susceptible to deformation due to constant temperature changes. It is clear that all types of wood, without exception, burn, but those that have a denser structure ignite much later. Oak, hornbeam, maple, and cherry are suitable for finishing a fireplace . Larch has average density, but pine, cedar and linden are not worth considering at all;
- impregnation is required to prevent fire. These are fire retardant-based products that penetrate well into the wood structure;
- It is better to place the tree as far as possible from the hearth . Therefore, consider partially finishing the wood or create a niche for installing the cladding 5-10 cm larger than the brick frame. Then the wood will heat up within acceptable limits;
- In any case, it’s better to cover the firebox protective screento prevent sparks from hitting the wood.
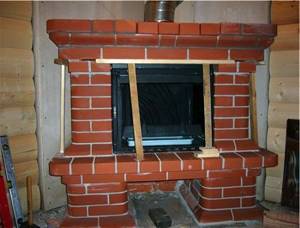
Installing a fireplace on a brick
The classic method of installing a firebox, which has the advantage of solving several main problems at once - increasing the stability and strength of the structure, its reliability and safety, as well as the aesthetics of the result!
The installation of the fireplace is carried out taking into account the requirements of the project, which specifies the main directives and standards. First, the foundation for brickwork is prepared. It is made on a foundation capable of bearing and distributing design loads. It is desirable that it be a concrete monolith, taken into account in the design of the foundation of a private house.
Along the foundation part, brick laying is carried out with the appropriate order, which includes lining, laying the base for the firebox and decorative finishing of the side structures, the base of the smoke exhaust system with blind chambers, and then the passage of the ceiling, insulation systems, construction of the upper part of the chimney!
One of the difficult stages is installing a lintel over the future firebox, for which craftsmen often use tricks to facilitate their own work in the process of laying the material. They prepare the individual elements of the lintel above the firebox, trim them and drill them. Next, they install a steel pin inside, putting the sequentially prepared elements on it, and install a solid jumper above the firebox niche, securing it to the mortar!
Tip: To control the masonry and dimensional parameters of the overall structure, you can initially install steel fences that correct future shapes. They will not allow you to go beyond the limits and make mistakes!
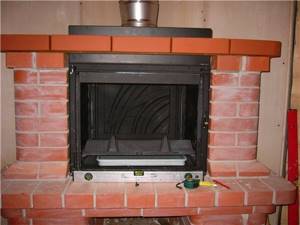
When building a brick fireplace for installation of a firebox, it is important to use appropriate heat-resistant materials, check dimensional parameters and levels, and follow basic standards and requirements that ensure the safety of subsequent use.
Previously, the installation of the firebox and other elements of the fireplace is carried out using the dry method, without clay and heat-resistant compounds, as well as sealants. This stage is necessary to check the correctness of the markings and brick laying.
It happens that the prepared niches do not fit in size and need to be modified. If the check is carried out for each row of masonry, such errors are excluded by default. If errors are noticed after laying several rows at once, you should make your own decision - disassemble the masonry and make it with the appropriate corrections, or wait for the mortar to gain strength and modify the niches and holes mechanically, for which you can use an abrasive and cutting tool!
Tip: Often the firebox involves preliminary installation and only subsequent finishing with brickwork. Consider such possibilities by first studying the technical characteristics of the future fireplace, as well as the instructions for installing the firebox!
Upon completion of this stage, the chimney is installed and exterior finishing is carried out. It depends not only on your own wishes for the appearance of the structure, but also on possible temperatures and safety rules. They, in turn, indicate the maximum limits of the characteristics of materials that can be used for lining the fireplace itself and the smoke exhaust system!

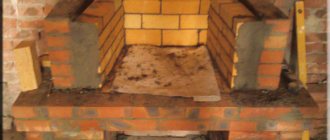
Firebox layout
After assembling the tabletop, you need to start working on the combustion part of the structure. Not knowing how to cover a cast-iron firebox or fireplace with brick, we recommend using the following instructions:
- To create the best and most effective traction inside the structure, make sure that the combustion part is laid out as evenly as possible;
- The distance from the stove installation to the outside of the brick base should be about 4-8 centimeters. Thus, air masses will be able to move and circulate freely in the interior of the unit;
There should be a small gap between the base and the hearth for the circulation of air masses
Only refractory bricks are used to assemble the frame

Masonry near the hearth is done at one angle
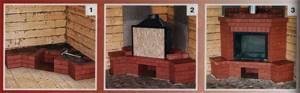
Brick laying diagram for corner placement option
Important: under no circumstances allow the masonry to come into contact with the hearth itself. This can cause not only deformation of the coating itself, but also overheating of the heating installation and interruptions in the operation of traction.
- The shelves made earlier must be secured in the lower and upper parts of the oven. It is important that the mass of these elements fully corresponds to the size and stability of the brick frame. Otherwise, provide additional reinforcement with bricks or wooden beams.