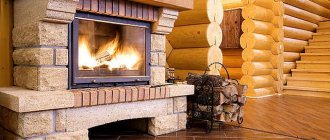
Fireplaces made of facing bricks Fireplaces made of facing bricks can be found quite often. This design attracts and speaks of a person’s wealth. Today, facing bricks for a fireplace can be chosen to suit almost every taste - the variety of shapes and colors will not disappoint. A fireplace lined with brick not only looks stylish, but also has its own practical advantages that set it apart from other finishing materials. Let's figure out how to cladding a fireplace with bricks with your own hands!
Brick fireplace installation process
The work may not be as simple as they say on many sites. Please note that facing a fireplace with brick is a process that requires a certain sequence and compliance with all masonry rules, only then the result can be successful. There are no trifles here, everything has its own weight. If you do something wrong, you can disrupt the entire system of the structure. Everything is interconnected here.
Before starting work, it is worth viewing photos and videos on this topic in order to have an idea of the progress of the work. Instructions are provided below.
Advantages of a cassette firebox
It has many advantages:
- Extensive model range.
- Safety.
- There is no need to calculate the cross-section or lay out the order according to obscure diagrams.
- It can be replaced with a new one in the future when it becomes unusable, as well as repaired.
- It is very convenient to clean such a portal.
- You can cover it with brick, and it will be no different in an aesthetic sense from a classic fireplace.
Advantages of brick cladding of a fireplace cassette:
- There is no need to regularly repair the cladding or take any special care of it.
- The cost will be less than the services of a stove maker, despite the fact that the cladding can be done with your own hands, even without special skills.
- Solid stove brick has a heat-accumulating effect, which means its efficiency is higher than that of most other materials, so it is necessary to sheathe the box on all sides with it.
- Powerful supporting box for the portal.
Choosing a brick
You can easily purchase facing bricks for a fireplace in retail stores, but keep in mind that not every material is suitable. How to choose? First, correctly calculate the volume you will need. There are many different configurations that need to be calculated correctly. Some rules will also help in choosing the material.
Choosing the right brick shape
- For laying the furnace part of the structure, it is necessary to select the material most carefully. Here the temperature will be the highest and everything also depends on the combustion material, which creates different temperature conditions. When using coal for this part of the fireplace, you should choose fireclay bricks that can withstand fairly high temperatures (up to 1200⁰). If you are thinking of using only firewood for the firebox, then you can limit yourself to ordinary red brick, which will withstand temperatures up to 800⁰.
Attention: When using any type of fuel, you should use only high-quality material without overburning or underburning. In the first case, dark spots on the surface are characteristic, and in the second, the brick has a pale color. The coloring should be uniform.
- Facing bricks for fireplaces must have a grade of at least 200. Pay attention to this immediately and check the quality certificate.
- You can even use recycled bricks to make secondary parts of the fireplace; you just need to check it first for cracks and chips. When heated, such material may simply crack.
- To line the firebox, you should use only fireclay bricks, which can withstand combustion temperatures up to 1600⁰.
Fireplace foundation
A fireplace with a brick lining is quite heavy. Therefore, the installation site should be properly prepared. It is necessary to prepare a foundation that must support the weight of the structure. There are a few tips to heed when doing this job.
- Bricks for facing the fireplace should be laid on a foundation made of concrete, rubble stone or brick. When carrying out work, a gap of about 50 cm should be provided between the foundation of the building and the fireplace. The most important thing is to under no circumstances put a bandage between them. There must be soil between them.
- Fireplace facing bricks should be laid on a foundation that is 10-15 cm wider than the dimensions of the fireplace.
Attention: If you use rubble bricks in the foundation, do not make the masonry to the level of the fireplace installation. The last two rows should be made of brick.
- The fireplace facing brick must be installed correctly in relation to the pipe. Calculate and determine the dimensions of the foundation. To do this, carefully mark the installation points in relation to the pipe, be sure to use a plumb line that will help to maintain the perpendicular correctly.
- When determining the foundation, take into account the dimensions of the fireplace table, which should be 20 cm less than the area of the foundation.
- The depth of the foundation for a one-story house must be at least 50 cm. For a two-story house - at least one meter. Some may neglect this, but if you take into account the weight of the pipe, which will be twice as large, then you will understand the feasibility of such costs.
- When installed on the second floor, brick fireplace lining must be placed on an independent foundation. You can also use I-beams, which will provide the required rigidity. If the structure is large, then it is worth welding the I-beams together (ribs are welded to ribs). This way the beam becomes much stronger, and installation can be done. When doing this work, do not neglect safety precautions, they are important!
- If concrete is used to make the foundation, it should be reinforced. This will significantly increase the rigidity of the structure. To do this, it is advisable not just to apply reinforcement, but to weld them together in the form of a lattice.
- If the fireplace structure is large, then after digging a hole in the ground, add a small layer of sand there. Some masters still pour water. Then the sand penetrates the soil and fills the voids, and the fireplace does not shrink so much, and if it does, it is not significant and even.
- Make the last row of the foundation in the desired plane, and use a building level, only its length must be at least one and a half meters. Then you will be able to maintain the plane correctly.
- After making the foundation, let it dry completely and before starting work, be sure to lay a layer of waterproofing. It is made from roofing felt or a bitumen coating is used.
Features of furnace installation depending on the material
According to the shape and design of the furnace, there are:
- horizontal;
- vertical;
- cylindrical;
- rectangular.
They are made from:
- cast iron;
- metal (steel, iron);
- bricks
Some models are equipped with a grid for stones and a tank for heating water.
Cast iron
Cast iron is an alloy of metal (iron, graphite, carbon). This is an environmentally friendly and safe raw material.
Advantages of a cast iron stove:
- Long service life - 30 years or more.
- The creation of the structure does not involve welding. The absence of seams has a positive effect on the quality and service life of the product.
- The material is highly resistant to temperature changes. He is not afraid of deformation.
- Heating rate. Cast iron heats up quickly and retains heat well. Such a stove can heat a large sauna in 2–3 hours. One load of fuel lasts up to 9 hours of heating.
- The device is assembled from individual elements connected to each other by locks. If one part breaks, it is easy to replace.
- A cast iron stove will fit perfectly into any room design.
Among the disadvantages of the unit:
- Heavy weight. It will not be possible to install such a structure alone. Its average weight is 200 kg.
- It is susceptible to corrosion, so it is not recommended to place such a stove directly in a steam room.
Any cracks or damage to the product must be repaired in a timely manner to prevent a fire.
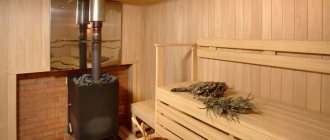
The stove will look great in the dressing room or rest room.
Steel (iron)
Among owners of summer cottages and country houses, metal stoves are in great demand due to the availability and low price of the material compared to other types.
Advantages of metal stoves:
- Light weight of the finished product - from 80 kg.
- Many stove models do not require a separate concrete foundation to be poured.
- The oven will be easy to install. One person can handle this.
- Compact size - it won't take up much space.
- The metal heats up quickly, releasing heat, reducing fuel consumption.
- The housing is completely sealed. The risk of carbon monoxide leakage is minimal.
- Affordable price of finished products.
- You can make the oven yourself.
Among the disadvantages of the device:
- Rapid cooling of metal. To maintain a comfortable temperature in the premises, you will have to constantly heat in winter.
- Strong heating of the metal dries out the air.
- Hot surfaces not protected by partitions can cause burns.
- Steel and iron in conditions of constant humidity without additional protective treatment will quickly begin to rust.
In bathhouses with wooden floors, additional protection should be given to the areas around the stove by installing a covering made of non-combustible materials. The same applies to products with 4 legs. The floor underneath them, without protective flooring, will gradually collapse.
Brick
The furnace is laid with refractory bricks (fireclay), and the finished product is lined with ceramic.
Advantages of a classic heater:
- Long-term heat retention.
- Fire safety.
- Ability to heat large areas.
- Soft water vapor is produced.
- The building warms up evenly and gradually.
- The material is non-flammable and resistant to temperature changes.
- Durability. A properly laid stove will last for decades.
But this design also has disadvantages:
- Difficulty of masonry. Without knowledge of ordering technology, it is not worth taking on construction.
- High cost of materials and work.
- The large weight of the finished product requires pouring a reliable foundation.
This material will be useful:
- Installation of a foundation for a brick oven
- Which brick for the stove is better to choose?
Preparing the solution
Fireplace facing bricks should be placed on the correct mortar. After all, it is stupid to select high-quality material that will withstand 1600⁰ and lay on a mixture that will withstand only 700⁰. Therefore, for high-quality execution, high-quality masonry material should be used. Some people use simple cement mortar. It can withstand elevated temperatures, but will not last very long. Cracks will appear in the masonry, and the facing brick will begin to fall out.
The best option for doing the job would be a clay solution, which you also need to know how to prepare.
- To begin with, clay is purchased in the required quantity.
- The solution is made from clay and sand. It is better to use mountain rather than river water. It will provide better surface bonding. To determine the ratio of components, it is necessary to determine the fat content of the clay. This cannot be done by eye. We make about ten balls with a diameter of 1 cm. We add sand differently for each ball.
- Now let's dry them. After this, we drop it onto a hard surface from a height of one meter. One that has not broken or deformed and will indicate the correctness of the choice of composition.
Attention: When making a ball, it is worth writing down the composition for each of them. So that you don't forget later. And if you are thinking of using solid fuel in the firebox, then you should add fireclay powder to the solution, which should be about 15%. Then the masonry will definitely withstand any temperature.
- Bricks for facing the fireplace should be laid on a homogeneous mortar without stones and clots. Ducts should not be allowed to form in the masonry. To do this, it is necessary to clean the entire solution from impurities and stones. We pass the clay through a sieve and separate the stones and knead the lumps.
- Now, after determining the composition of the mortar and preparing the entire mass so that the fireplace brick lining is of high quality, it is correct to prepare the mortar. To do this, we select a container; give preference to a container without edges on the bottom and edges. Pour clay into it and fill it with water for a day. During this time, the clay will absorb the required amount of moisture; as the masters say, it will “sour.”
- After this, add sand and fireclay. Mix the solution, it should be plastic and homogeneous. To do this, use a drill with an attachment. It is this simple tool that will make the mass completely homogeneous.
There are several options for determining the composition of the solution. We have provided the simplest and most accessible one.
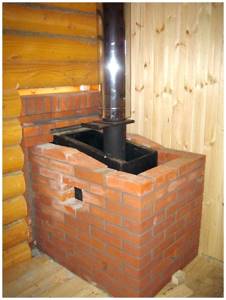
Laying out the fireplace
The fireplace is faced with brick according to certain rules, which are strictly not recommended to be violated. The facing of a brick fireplace must be done rigidly, this will be the key to the durability of the structure. The price of such work is quite high, so doing it yourself saves a lot.
Attention: There is one rule that must be followed without fail. When laying the cladding, the seams should not match, there should be a bandage. This rule must be followed.
- The first step is to lay two corner bricks. We put the solution under the first, and a little more under the second. After this, use a level to set it parallel to the ground. When installing the first two elements, you should correctly calculate the dimensions of the structure. You can easily complete this work if your foundation is done correctly.
- Never start laying brick right away. To begin with, you should lay out the entire row on a dry surface and try it on. After this, adjust the elements; to do this, use a grinder and a cutting wheel for stone. You don’t just need to lay it down, you also need to maintain the thickness of the seam.
- After this, a fishing line or a thin nylon thread is attached to the first installed bricks and the rest of the row is laid.
- We carry out the laying further, starting again from the corners. To perform it correctly, use a plumb line. Remember, every 1mm deviation of an element will cost 1cm across five rows. Do everything efficiently and carefully measure everything in order.
- When laying, you should alternate each row and start laying either three-quarters, or half, or the whole. You just need to immediately decide on the configuration to do the dressing correctly.
Attention: Before starting work, you should put the brick in water, then it will pick up moisture and after laying it will sit properly and harden correctly, the whole process will be quite uniform. If this is not done, then the brick begins to very intensively remove moisture from the mortar and hardening does not proceed evenly.
- After making two rows, you will need to make a fireplace vent. It is made only from good quality fireproof material. If you did not add fireclay to the mortar for laying the front part, then be sure to do so here.
- We cover the blower, observing the correct dressing, and lay a continuous row. After this we need to make a firebox.
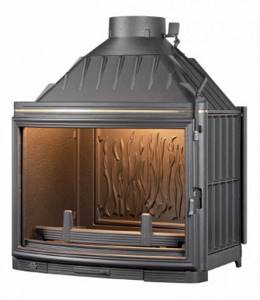
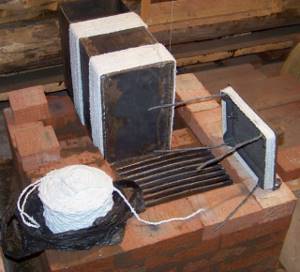
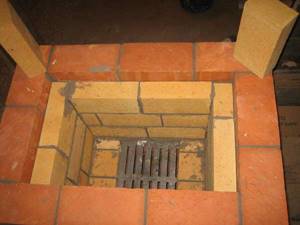
Installation of grates in the combustion chamber
- If you use a closed type of fireplace, grates are placed on the lower part of the firebox. For this, it’s easier to buy ready-made ones; cast iron grates are best suited. They come in different sizes. We select the desired size, then place it on the brick and trace along the contour with a pencil. Then take a grinder and make a groove not along the line, but provide a size 1 cm larger. The depth is at least 5 mm greater than the thickness of the plate. This gap will save you from trouble when the material expands. Be sure to provide for it.
Door installation
- When you have completed half the lining of the fireplace insert with bricks (using refractory material). After this, you attach the doors (with the structure closed). Never put it end to end. To begin with, you should make a winding along the contour of the door using an asbestos cord and only after that do the fastening. As a result of this fastening, the installation seam is of the highest quality.
- Fastening the doors in the masonry is done as follows. If they are made of cast iron, then a hole is made and a steel wire is inserted into it in a pigtail, after which it is mounted into the masonry. If the door is made of metal, then you should simply weld the mortgages and then place them in the masonry as well.
Tying doors with asbestos cord
Attention: Remember, brick lining of the fireplace insert is done only after treatment with asbestos cord and not otherwise.
- This is how the work is done when making a closed fireplace. If you chose the open option, then it is still better to make a blower, which is also done at the bottom. It will increase traction and improve the quality of fuel combustion.
- The fireplace insert, lined with brick, is also made in compliance with the dressing.
- After completing the combustion part, you continue with the full lining. For each row we use a building level and check the correct installation.
- The ordering should be done with a uniform seam - this is the key to a high-quality appearance. To do this, use a template and simply install it at each corner.
- We check each corner brick using a plumb line and a square.
- Next, you must install a pipe, which can be made using various materials; you should read the article on the pages of our website and choose the right one. This element is needed not only for appearance, but also performs a certain job; both the removal of exhaust gases and the quality of fuel combustion will depend on this. A fireplace is a single organism where everything performs its functions, and the quality of work of each of them completely affects the operation of the entire system. There are no trifles here, everything is interconnected.
After complete installation, cladding is done, the material for which is commercially available. When choosing, be sure to take into account the fuel; if it is solid, then check the quality certificate and pay attention to the temperature of use. The material must be fireproof.
DIY assembly
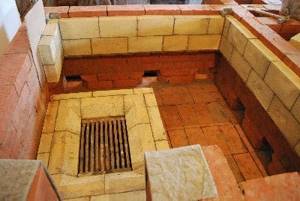
In order to properly brick the fireplace insert, it is necessary to carry out all work strictly in stages. The first stage is the assembly of the lower base of the furnace.
Assembly instructions:
- The lower part of the base is shaped like the letter M. In order for the fireplace to have the necessary stability in the future, each of its angles must be ninety degrees;
- We prick the first row in the shape of the letter M. Next, each row should lag slightly behind the previous one by about half a brick, thus the structure will have T-shaped joints;
- The number of rows from which the lower base of the furnace unit is assembled depends on the order you used. On average, their number can range from 3 to 7;
Laying is done at a slight bevel
The first rows should go at the same angle
The key point is to assemble the first rows of the fireplace
- At the location of the firewood box, it is necessary to make several gaps. There should be enough of them so that air masses can circulate and move freely, but not too quickly. These gaps are the entrance for cold air masses that will enter the interior of the furnace.
Creating a shelf
In order for the design to be as convenient and functional as possible, we advise you to additionally equip it with a small tabletop or so-called shelf. Knowing how to line the fireplace insert from the bottom, you can proceed to the next stage.
Tip: this element is a reliable support for the combustion chamber. To create maximum comfort and convenience, you can install and place two shelves at once (bottom and top).
Step-by-step assembly of the shelf:
- Based on the size, shape and design features of the planned structure, you need to cut out the formwork from wood;
- Bricks are cut using a grinder according to the dimensions of the shelf;
- The brick is laid out in formwork and reinforced. For reinforcement, you need to use pre-prepared metal rods with a thickness of 3 to 7 millimeters;
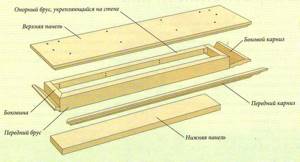
Wooden shelf assembly diagram
If desired, a shelf or tabletop
The countertop makes the stove unit
The mantel serves as additional support
- This formwork is completely filled with cement mortar. We compact it in such a way that there are guaranteed to be no voids inside;
- We remove all excess solution from the side parts and leave to dry completely for 2-4 days.