Do you want to install underfloor heating from central heating? It's real! Let's look at all the points regarding the installation of such floors in apartments with central heating. In principle, it is allowed to use water floor heating where the heating circuit is specially wired. Where there is one main coolant throughout the entire apartment, distributed throughout all rooms and a large return main pipeline. Accordingly, if you have heat meters installed, then you can safely count on installing warm water floors in your apartment.
Scheme of a warm water floor The only thing to remember is that a sufficient amount of heat is allocated completely to the entire apartment. Otherwise, a situation may arise when energy consumption will be more than expected, which can significantly upset the balance of heat energy exchange between neighboring apartments. But such destabilization of the balance can be eliminated by regulators, which, in turn, forces the underfloor heating system from central heating to consume a dosed volume of water.
Types of central heating systems
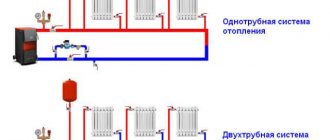
There are three main types of central heating schemes in multi-apartment residential buildings:
- Single-pipe scheme;
- Two-pipe scheme;
- Scheme with centralized risers and apartment-by-apartment connections.
Permission to connect to a single-pipe and two-pipe system can only be achieved by using a heated floor unit with a heat exchanger. Moreover, the unit is equipped with a heat metering device. Even in this case, management companies often refuse to connect, justifying the refusal on the small diameter and low throughput of the risers.
It is impossible to obtain permission to connect to the Leningradka and two-pipe system by other technical means. In houses equipped with central risers for apartment-by-apartment connections of large diameter, it is possible to obtain such permission.
Commissioning
Full maturation of the cement screed occurs after a month, which is when balancing needs to be done using collector flow meters.
Using balancing valves, the coolant flow is regulated; it should become the same in all circuits. If you have no experience with self-balancing, it is better to invite a specialist.
After manipulating with cold water, if the system is working correctly, you can conduct tests with heated coolant. At this point, the installation of the heated floor is considered complete.
Heated floor mixing unit diagram
Proper connection of a heated floor system requires the presence of a thermostatic mixer in the circuit. This device is designed to create the operating temperature of the coolant in underfloor heating circuits.
The coolant temperature in apartment buildings ranges from 650C to 900C. This temperature is unacceptable for heated floors. Their surface will be hot, sometimes even in shoes people feel uncomfortable in such conditions. In addition, a temperature of 900C is the limit for the integrity of polymer pipelines - the main material for installing heating of this type.
The temperature of the coolant in the circuit should be in the range of 40 – 500C. The floor surface under these conditions has a surface temperature value from 23 to 330C. This value is most comfortable for humans and thermal conditions.
Achieving this temperature is ensured by mixing hot water from the supply pipeline with a certain amount of cooled coolant from the return pipeline. Thermostatic mixers are divided into 3 types according to the control method:
- Manual;
- With thermal head;
- With servo drive and remote sensor of surface-mounted or submersible type.
Manual devices have a graduated temperature scale mounted on the drive (flywheel) of the product. The flywheel can be replaced by a thermal head of various modifications, also equipped with a regulation scale. In this case, the operation of the mixer is controlled automatically.
The most accurate are thermal mixers with a remote sensor. The sensor can sample the water temperature in the circuits, and can control the air temperature in the heated room.
According to the hydraulic direction, mixers are divided into 2 types:
Schemes for laying the thermal circuit.

Laying schemes for heated water floors
To avoid many mistakes during the floor installation process, before starting work, you should draw for yourself a diagram of the thermal circuit. Also, if repairs are required later, you will greatly simplify your task.
- Laying a warm water floor in a “snake” pattern. This is the easiest way to lay a pipe. The main disadvantage of this method is the rather large temperature difference at the ends of the circuit (from 5 to 10 degrees). This is due to the fact that the coolant, passing through the pipe from beginning to end, cools down significantly.
- Laying a heated floor in a “snail” pattern. The method is much more difficult to install than the “snake” method. But in the end, the floor temperature over the entire floor surface will be almost the same
- Combined method of installing heated floors. Usually the edges of the room are laid out as a “snake”, and the main part as a “snail”.
To achieve acceptable pressure inside the pipes, the following rules must be observed:
- All circuit pipes used in the work must be of the same length.
- One circuit should not extend beyond the boundaries of one room
- The floor area of a room heated by one circuit is no more than 40 sq.m.
- In areas where furniture and plumbing fixtures are located, a contour is not required
Connecting a water heated floor to a heating radiator
Water heated floors are most often connected to heating radiators. With this connection, the floors can duplicate the operation of the heating device or perform the function of independent heating. With all connection methods, a decrease in the efficiency of the radiator is observed. This is caused by the return of cold coolant to the device from the return of heated floors. In general, the temperature background of the room does not suffer from this; the decrease is compensated by the floors.
The main direction for attaching the floors in this case is the plugs on the back side of the radiator, opposite the connection side. They are replaced with pass-through plugs, to which units and pipes of the heated floor are connected through shut-off and control valves.
In all floor connection options, a low-power circulation pump must be used. This is caused by the high resistance of the floor complex - water from the heating system simply will not circulate through the pipes.
The pump is best used with stepwise control of the impeller rotation speed. This provides additional opportunity for regulation. Three-speed pumps have an average electrical power in the range of 50 - 70 W.
The simplest is a direct connection scheme, when the pipelines of one circuit are connected to one radiator. In this case, taps are installed at the inlet and outlet of the circuit, and it is advisable to use at least one valve. It is needed to regulate the flow rate.
This scheme is the most unsuccessful in hydraulic terms. The appearance of such an element will negatively affect the operation of the riser as a whole, and will most likely be noticed by residents of neighboring apartments. Complete closure of the valves at the inlet to the circuit may result in the pump operating in “dry running” mode and failure.
An improved version of the previous circuit is a circuit with the installation of a bypass circuit and installation of a thermostatic valve on it. In this case, the quality of coolant temperature regulation will improve. The valve on the bypass will dilute the supply with coolant from the return.
At the same time, the hydraulic operating mode will improve somewhat - less water will be drawn into the underfloor heating, which will have a positive effect on the operation of the riser. The quality of adjustment, although it will improve, will still leave much to be desired.
The best configuration for direct connection is a circuit with a thermostatic mixer.
The hydraulic mode of operation is similar to the nature of the operation of the second scheme (with bypass). Temperature regulation is qualitatively improved. Organizing a bypass with such a hydraulic scheme loses its meaning, although the network is replete with schemes with similar ridiculous “art” of copywriters.
The optimal connection option is to use a special unit with a heat exchanger.
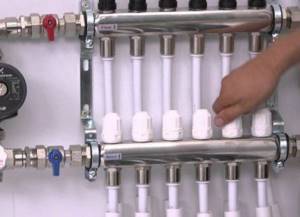
The circuit water is heated by the coolant of the central network in the heat exchanger, and complete hydraulic separation of the systems is carried out. The units are equipped with a circulation pump, a thermostatic mixer and two distribution manifolds. Such units are optimal for apartment-by-apartment connection to the central heating network - they do not introduce hydraulic and temperature imbalances, and there is the possibility of integration with a heat meter.
In factory control units, a four-way mixer is most often used instead of a three-way mixer. This system is the best version in terms of hydraulic and temperature control.
Scheme with heat exchanger
100% of heating engineers will say that without breaking the law, you can create heated floors in an apartment with individual heating.
Despite the ban from public utilities on making any changes to the centralized heating system, experts came up with a scheme, the implementation of which would create an autonomous heating system, where an indirect heating tank (buffer tank, heat accumulator) and a heat exchanger would act as a heat generator.
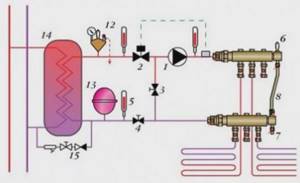
This system does not affect the design of the central CO in any way, does not change the pressure and does not increase hydrostatic resistance. The numbers indicate the following equipment:
- 1 Circulation pump
- 2 Three-way mixer
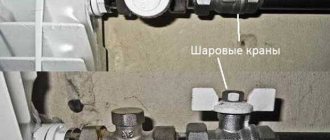
- 3 and 4 Ball valves
- 15 Heat exchanger piping group, which includes: check valve; ball valve with sump.
Any home craftsman can assemble a Warm floor from heating in an apartment with his own hands according to this scheme. For a clearer understanding of the assembly process, we recommend watching a video on the topic:
Connecting a heated floor to a riser
Another technical solution in choosing the connection point is to tap directly into the heating risers (one-pipe and two-pipe schemes). Connection is carried out in 4 ways:
- Parallel;
- Consistently;
- With and without bypass organization;
- With and without installing a valve on the bypass.
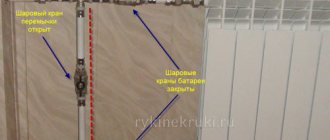
It is recommended to always install a bypass line, regardless of the connection type. The bypass will allow you to easily turn off the floors during depressurization, without disrupting the operating mode of the heating riser.
Taps and valves on bypasses are prohibited by management companies. In case of illegal installation, it still makes sense to install the faucet - this will allow for a small adjustment in the amount of coolant passing through the riser pipeline and through the contours of the floors.
What floor should we choose for a private home?
When choosing a warm floor for a private home, you need to take into account all the pros and cons, as well as the characteristics of the room and the strength of its floors. For cottages, screeded water floors are the most suitable and economical option. Despite the labor-intensive installation, their operation will be cheaper than electric ones.
However, if the building is wooden, with old floors, then this model is not suitable. Since the structure is heavy, and the floors may not withstand the additional load.
Then, it is recommended to install the pipeline not in a screed, but in a “dry” way, or opt for electrical types. The installation process is simpler, but operation will lead to increased energy costs.
Electric floors are a fire hazard, especially for wooden buildings, so if the floors allow it, it is better to install them in a screed.
Infrared floors in a private house are suitable only as additional heating, since their power is not enough to heat the entire building.
Features of connecting heated floors
Connecting underfloor heating to centralized heating has a number of features. The coolant of the system is of low quality and is contaminated with solid particles, dissolved hardness salts, rust particles, and so on.
Therefore, after the shut-off valves of the connection point, a coarse filter must be installed. This will partially protect pipes installed in the floor from blockages and will extend the life of thermostatic valves and mixers.
A constant phenomenon in central heating is airing of the system, the formation of air “bags” in dead zones. Floors made of polymer (plastic) pipes are subject to oxygen diffusion - the penetration of air through the material of the pipe walls. To neutralize this effect, install a manual or automatic air vent.
When legally connecting and constructing heated floors using the “dry” floor principle, the apartment owner needs to prepare for an increase in heating payments. Underfloor heating according to the “dry” principle is not installed in a concrete screed, but in metal or wooden guides, then covered with finishing materials with high thermal resistance.
This design contains air - a powerful heat insulator. Therefore, to reach a floor surface temperature of 300C, more heat will be required to overcome the insulating properties of the materials.
Installation nuances
Economical option for autonomous heating
The first question concerns residents of multi-storey buildings. After all, what is the floor for some is the ceiling for others.
And it is very important to take into account the opinions of your neighbors. It is possible that some of them will not like the idea, since the ceiling is decorated with materials that do not withstand rising temperatures well
No problem. A special heat-reflecting layer is placed on the base. Owners benefit from energy savings, and residents below receive no changes to their living conditions.
The second nuance is related to the thermal conductivity of the material. Building elements and structures with poor thermal conductivity placed on top of a “warm floor” can negate the operation of the entire system. That is why for finishing it is necessary to use only those textures that conduct heat well.
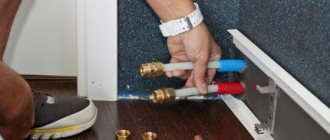
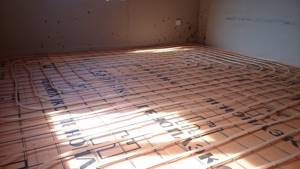
Polymer pipes must be laid in a sand-cement screed. There are two reasons for this:
- This results in a very strong base that prevents mechanical damage to highways.
- Cement screed is an excellent medium for heat distribution. Contacting the hot surface of the pipes, it becomes a huge panel that heats the air.
In other words, a durable surface also significantly improves system performance.
Selection of materials for heated floors
The main elements of a water heated floor are pipelines and thermal insulation. For the installation of heated floors, pipeline systems made of the following materials are used:
- Cross-linked polyethylene;
- Metal-plastic;
- Polypropylene;
- Copper;
- Stainless steel.
When choosing a pipe material, you should be guided by the diagram that will be used when connecting floors to central heating. When connecting directly, polymer systems should not be used - their service life at high temperatures is significantly reduced. In this case, you need to use copper or corrugated stainless steel pipes with a polymer coating.
Annealed copper pipes have excellent qualities - flexibility, high heat transfer. If the polymer pipe used has a nominal diameter of 20 mm, it can be replaced with a copper pipe with an outer diameter of 15 mm. This can reduce the thickness of the overall floor structure. Copper pipes are not sensitive to high temperatures. You can read more about the types of pipes for water heated floors here.
When choosing thermal insulation, you need to be guided by the thickness of the future “pie” of heated floors. The greater the thickness of the insulation, the greater the value of the overall thickness of the structure. In addition, if the floor levels in the rooms differ, the leveling screed can reach its maximum thickness. This takes away volume from the room and increases the weight load on the floor.
Therefore, there is no need to use thick mats or polystyrene foam boards with a thickness of more than 20 - 30 mm. It is better to use rolled penofol 5 - 10 mm thick with a reflective foil layer. To eliminate the negative effect of concrete mortar on aluminum foil, cover the penofol with plastic film.
The principle of constructing a water heated floor is the same for all the described schemes; the construction method can be easily found in articles on the World Wide Web.
What will you need?
For water heated floors
- Pipes
- Collector
- Damping tape and film for waterproofing
- Thermal insulation material (expanded polystyrene, mineral wool, etc.)
- Reinforced mesh and stands for it
- Wire or clamps
For electric heated floors
- Heating elements - cable or mats
- Thermal insulation material (cork)
- Heat-leveling material (foil)
- Thermostat
- temperature sensor
- Corrugated pipe
- Electrical wire
Do you need heated floors in your apartment?
It is impossible to answer this question unequivocally. There are advantages and disadvantages to building a heated floor system.
The main advantage is heating comfort. An illegal connection allows you to use heat to increase the temperature in rooms without paying for it.
But there are also significant disadvantages:
- If an illegal connection is discovered, the apartment owner faces a large fine and the floors will have to be dismantled.
- When a pipe is depressurized, it is often necessary to open large sections of the floor, remove baseboards, laminate, and tiles. To repair open radiator heating risers, this is not required; repairs are often carried out by employees of management companies.
- If a pipe is clogged, it is impossible to determine the location of the blockage - you will have to completely open all the floors.
- The expiration of the service life of the pipes also requires complete dismantling of the existing underfloor heating structure.
- When carrying out constant stripping operations, serious disagreements will arise with neighbors due to violation of the silence regime.
- Due to the low quality of the coolant, you will have to clean the filter frequently, sometimes daily.
- The cost of materials and labor for the construction of heated floors significantly exceeds the cost of radiator heating.
- It is necessary to place circulation and mixing units, but they do not always fit harmoniously into the interior.
Water heated floors are a heating configuration designed primarily for autonomous individual systems. In centralized heating of an apartment, a good analogue for heating “comfort zones” - bathroom, kitchen, toilet - is an electric heating cable, mat and other types of electric floor heating products.
The decision to build a heated floor and connect it to centralized heating is a personal matter for each apartment owner. It is accepted after analyzing all the factors described in our article.
(946, 2 today)
Underfloor heating
The “warm floor” heating system is installed quickly. If plastic pipes are used, installation takes place in a few hours. During operation, a lot of dirt does not form. The system has its advantages.
- Efficient room heating. Warm air rises from the floor covering and from interior items. The temperature on the floor is higher than near the ceiling. There is no need to lay carpets or wear warm house shoes.
- There are no air turbulences, dust does not rise, and for people who suffer from bronchial diseases, a “warm floor” is a more favorable heating system.
- The floor temperature does not exceed 25 0C. Air humidity remains normal.
- No radiators in the room.
Among the disadvantages of an underfloor heating system is the prolonged heating of the room. The liquid line is hidden in the screed. If there are leaks, it will be difficult to carry out repair work.
However, underfloor heating is used both as a main and additional means of heating. The owner of the cottage independently decides which system to choose, warm floors or radiators.
We recommend: How to install a heated floor sensor?
The floor water line is removed from the boiler. The circuit is connected to the supply and return manifolds. The comb is connected to the outlets in the boiler.
A circulation pump with three-way or two-way valves is connected to the return circuit. They are equipped with thermostats with temperature sensors. The heating system operates automatically.