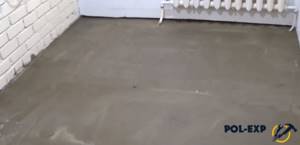
In earlier times, it was considered normal practice to lay finished flooring directly on the concrete base of a private or panel house, which resulted in cold floors. This is very uncomfortable for the people living there due to the unpleasant feeling of cold in the legs. In digital terms, heat loss through such a coating amounts to 20% of the total heat loss of the building. This is why it is important to insulate a concrete floor, and we will tell you how to do it correctly with your own hands in this article.
What is the best way to insulate a floor?
The range of materials that can be used to insulate concrete floors in a private home is so wide that it is sometimes very difficult for an ignorant person to choose the appropriate insulation.
To determine what can be used to insulate a concrete floor and which material is the best, you should find out the following points:
- Where is it planned to carry out thermal insulation - in a house, apartment or country house?
- How is the insulated concrete base located relative to other structures: above the basement of a panel house, on the ground on the ground floor of a private cottage, or is it the interfloor ceiling of an apartment?
- Is the purpose of the event to carry out simple insulation or the installation of a warm water floor (as an option - electric)?
- What is the chosen method of thermal insulation?
- the amount of budget allocated for the event.
Generally speaking, you can take any of the currently existing insulation for a concrete floor. The main thing is that it fits the listed conditions. There is only one limitation: materials containing glass wool cannot be used inside residential premises. This is the answer to a frequently asked question: is it possible to insulate a floor with foam plastic?
What does clarification of the first point give us? If we are talking about an apartment in a brick or panel house, then we may be limited by the height of the ceilings, and therefore we need to choose the most effective and thin insulation - penoplex or extruded polystyrene foam. Otherwise, the floors will rise by no less than 150 mm; this must be taken into account when insulating the floors on the loggia. Moreover, penofol or isolon will not work, it has insufficient thermal resistance.
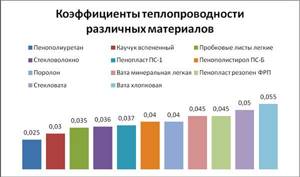
For reference. To imagine the required thickness of different materials for floor insulation, it is suggested to study the diagram with thermal conductivity coefficients. The lower the coefficient value, the better the properties of the insulator, and the thinner the layer.
You can inexpensively insulate a concrete floor in your dacha by using expanded clay for this purpose, you just need to choose the right layer thickness. It should be taken into account that expanded clay transmits 3-5 times more heat than foam plastic. If the dacha is heated constantly and the requirements for thermal insulation are high, then the thickness of the layer on the ground must be at least 300 mm. When periodically heating a dacha, it is enough to make the thickness of the expanded clay insulation 100-150 mm so that the event will cost you quite cheaply.
The greatest heat loss through floors is observed when a concrete screed is placed on the ground. Then there are 2 options: use the best and most effective insulation like penoplex, or something cheaper, but with a thicker layer. As a rule, in these cases, all types of foamed polymers are used, as well as high-density mineral wool. You can also take rolled materials, but there is only one way to put them into insulation - on joists.
It makes sense to insulate interfloor floors in a panel house only in one case - when installing electric or water heated floors. If this is not done, then your heated floor will heat the ceiling of the neighbor below, and there will not be enough heat for your own home. Since the temperature difference on both sides of the ceiling will be small, polystyrene foam up to 50 mm thick or polystyrene foam 25-30 mm thick will be suitable for insulation. You will have to add a larger layer of mineral wool or lay it together with foil foam, which will also serve as waterproofing.
Advice. The ceiling on the ground floor of an apartment or private building should always be insulated if the basement is not heated.
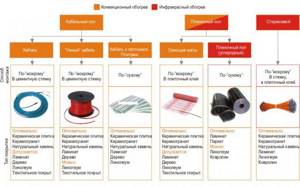
Thermal insulation methods
At the moment, there are only 2 methods for insulating concrete floors in any residential buildings; the choice of a suitable material largely depends on them:
- the so-called dry method - insulation on joists;
- “wet” method - laying insulation under a cement-sand screed.
Note. There is a practice of thermal insulation of rooms on the first floor from below, from the basement. This is convenient and cheap, but not very effective, since it must be combined with insulation of the foundation and basement of the building. When there is none, the cold will penetrate from the street through the edge zones of the concrete foundation.
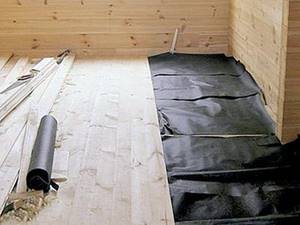
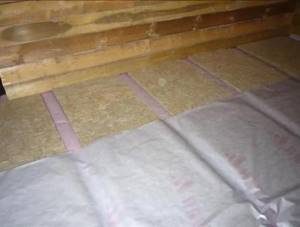
The method of insulation on joists is quite accessible and, with the proper approach, can be easily done with your own hands. It involves the use of both roll and slab insulation for a concrete floor and is designed for subsequent laying of a finishing coating of linoleum or laminate over a flooring made of boards or OSB (chipboard). The list of insulation materials used is very wide:
- mineral or ecowool in rolls and slabs: has high fire resistance, but easily absorbs moisture and at the same time ceases to be an insulator;
- foamed polymers in slabs (foam plastic, extruded polystyrene foam, penoplex), on the contrary, are not afraid of water, but are susceptible to combustion and have better thermal insulation characteristics than cotton wool;
- foamed foil polyethylene (penofol, isolon): the material repels moisture well and has zero vapor permeability, but is flammable. Works great together with other insulation materials;
- sprayed polyurethane foam: the best insulation of all, but also the most expensive, resists moisture, flame (for a certain period of time) and has the highest thermal insulation rates;
For reference. There is also cork insulation on sale, but it is usually not chosen for insulating concrete floors; it is intended for heat and sound insulation of walls.
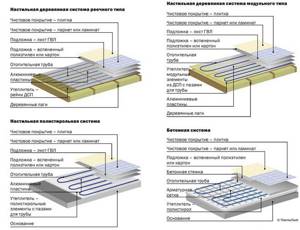
The essence of the second method of insulation is to monolith the heat-insulating layer under a cement-sand screed, and lay almost any floor covering on top of it. This means that floors insulated in this way are not only made for laminate or linoleum, but are also suitable for laying tiles. This is true in the kitchen or bathroom, where there is high humidity, where the screed will last much longer.
When installing electric or water heated floors, this insulation method is also the most effective. Of course, you can lay heating circuit pipes between the joists, but this will not achieve a large heat transfer area. And the screed monolith becomes like a solid heating device, heating the room with its entire surface. Therefore, warm floors are usually made of the same type (under screed) throughout the entire house, and not just in the bathroom or kitchen.
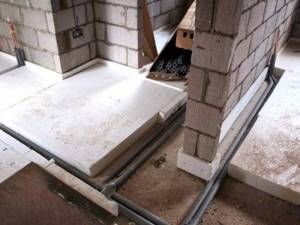
It is logical to assume that for the second method of insulating concrete floors it is impossible to use soft or rolled materials. Foamed polymers or basalt wool in slabs are suitable here, and the density of the latter should be at least 115 kg/m3 and thickness 100 mm. Expanded polystyrene can be taken thinner - 50 mm, polystyrene - 80 mm with a density of 35 kg/m3.
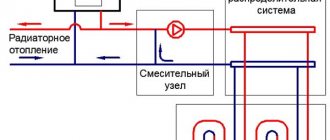
What is underfloor heating and when is the best time to do it?
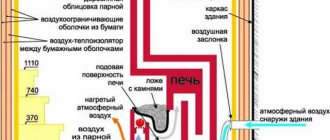
Let's say right away that the conversation will not be about underfloor heating. We will talk about heating devices - convectors that are built into the floor. They are called built-in because the heating device itself is located in the floor. The entire device is located in a floor niche, and only the decorative and protective grille is visible, which should be flush with the floor covering.
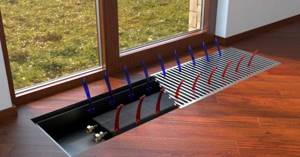
How does floor heating work under a window?
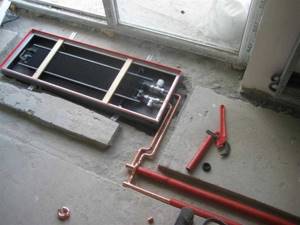
Several limitations emerge from the installation method. First. The body of the built-in radiator must be hidden somewhere, so the height of the floor structure must be no less than the height of the convector body. And this is one of the biggest disadvantages of this type of heating. The thinnest convectors are 70 mm thick, but there are only a few of them. Most manufacturers have the thinnest built-in convector - 90 mm or more. That is, the floor must be raised from the base by about 10 cm or higher. Or make a notch in the base, which is not always possible. If this doesn’t scare you, great, but you need to figure out the other pros and cons.
Advantages and disadvantages
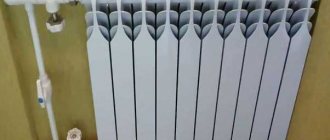
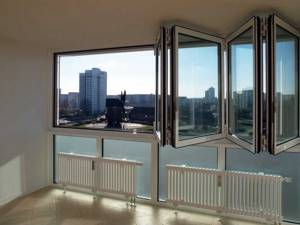
The advantage of built-in heating devices is that the heating in the floor is invisible. We have long been accustomed to radiators and practically do not notice them. But conventional batteries are not applicable for panoramic glazing. With floor-to-ceiling windows, there are only two options - built-in convectors or low floor radiators. Moreover, the second option is not applicable if the glazing is sliding. If these are doors to a balcony or terrace, you will not step over small but protruding devices. Here you either leave the passage without heating, or install a convector built into the floor.
Also an option, but not many people like it
Floor heating has more disadvantages. The first is the price. Each device costs several times more than a regular radiator, even from the coolest brand. The second is the complexity of installation. The appliances are built-in, so either raise the floor level or make a recess in an existing one. This again increases the cost. Third, for efficient heating you must either install larger (and more expensive) appliances, or install more compact ones, but with a built-in fan. In this option, you need to run a separate power cable, which again increases the cost at the installation stage, and even the heating becomes energy-dependent.
Convectors with a built-in fan have other features that are considered by some to be disadvantages:
- The fans are noisy. There are low-noise models or those operating on natural circulation. Convectors with low-noise fans are more expensive, and those using natural convection are ineffective. They need to be large, which is expensive and difficult to install. In general, there is still a way out. In the kitchen, living room or dining room, where no one sleeps, the noise is not very disturbing. Therefore, you can install it with a not very high noise level. In bedrooms, noise is a problem. A solution is to turn off the fan at night. Doctors recommend sleeping in cool air. The second option is to install models on natural convection.
Complex installation and high price of the device are two main disadvantages - Any convectors drive dust. But with the fan on, the process is much more active and people with allergies should take this into account.
- Dust and dirt accumulate in the housing. This problem is more far-fetched. Dust can be removed with a vacuum cleaner with attachments; weekly wet cleaning will generally solve the problem.
As you can see, the main disadvantage is the high price and complexity (expensiveness) of installation. Other points need to be taken into account, but they are not really disadvantages.
Floor insulation with polystyrene foam
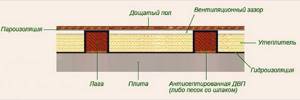
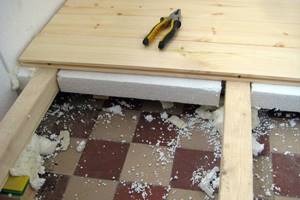
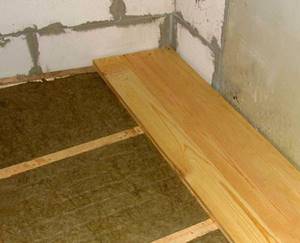
If you chose the first method, then you should lay wooden blocks - logs - on the leveled and cleaned concrete screed, maintaining an interval between them equal to the width of the selected insulation. The lags are fastened with anchors or self-tapping screws on steel corners; their leveling is done using wooden spacers. Calculation of the height of the upper plane of the block above the floor looks like this: insulation thickness + 50 mm clearance for ventilation.
Advice. When concrete floors are insulated with mineral or basalt materials, it is better to make the distance between the joists less than the width of the insulation by 1 cm so that the insulation fits there as tightly as possible. For expanded polystyrene boards, the interval should be made smaller by a couple of millimeters for the same purpose.
Now let’s talk about how to properly install the insulation. First, waterproofing is laid from a dense polyethylene film with an overlap of 100 mm between the sheets and the joints are taped. Then the thermal insulation slabs are laid. On top they are again covered with a vapor barrier film so that moisture from the premises does not penetrate into the insulation.
Advice. Contrary to popular belief, polystyrene foam absorbs moisture, although in very small proportions. Therefore, protective films on both sides of the insulation are always needed when using any materials, especially cotton wool and polystyrene foam. This will significantly extend their service life.
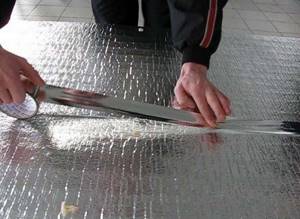
Penofol is often used instead of film; it allows you to reduce the layer of the main insulator and protect it from moisture. The joints are also taped, only with foil tape. This completes the insulation of the concrete floor; you can lay the coating and laminate or linoleum.
Floors under cement screed are also insulated using waterproofing laid on a concrete base. If the process begins with the soil itself, then it must be compacted, and then a concrete preparation 5 cm thick must be made. After it has completely hardened, the waterproofing layer film is laid out, and then polystyrene foam slabs are laid out. Usually the cement screed is poured directly on top of the insulation, but we recommend laying a second layer of film first. This is inexpensive, but it will help preserve the insulating material of the floors longer.

For reference. The thickness of the cement screed should be in the range from 50 to 80 mm. The optimal option, taking into account different loads on the floors of a living space, is 70 mm.
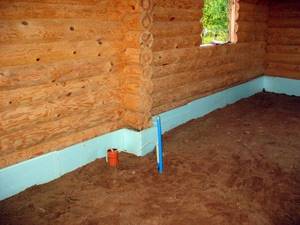
When it comes to a wooden house, it should be taken into account that such structures can be slightly deformed because the wood “breathes”. This is almost unnoticeable in an old house, but in a newly built one, concrete floor coverings can crack if damping is not provided. To do this, a thin layer of polystyrene (up to 15 mm) is laid along the entire perimeter along the walls, even before work begins, as shown in the photo:
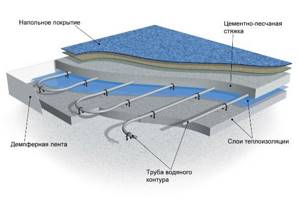
Similar measures should be taken before installing heated floors, where a special damper tape is laid around the perimeter of the premises, and only then waterproofing is laid, which is reflected in the diagram:
Owners of old houses often wonder whether it is possible to insulate the floor without opening it. There is no definite answer, since everything depends on the condition of the concrete surface. If the screed has retained its strength and does not crumble or crack, then laying insulation on top of it is possible. Only then will you have to raise the thresholds of all the doors and trim their leaves, which will immediately affect the interior. So the best solution would still be to open up the old floors, insulate them and pour a new coating.
Making a warm water floor with your own hands
Let's take a closer look at the work process when installing water floor heating. It includes a number of stages - preparation of the rough base, installation of the system itself, as well as pouring the screed and laying the finishing coating. In this case, a budget option for creating a heating system will be considered.
Warm floors are a serious cost item during renovation, so it is important to accurately calculate how much and what materials will be needed. To ease your labor costs, we have prepared special instructions telling you how to calculate a heated floor - water or electric. Online calculators included. And in the article “What do you need for a heated floor?” you will find a complete list of everything that may be needed during installation.
Do-it-yourself water heated floor installation
Preparing the base
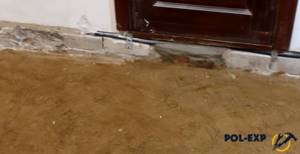
Let's look at how to make a subfloor for installing a water system based on expanded clay.
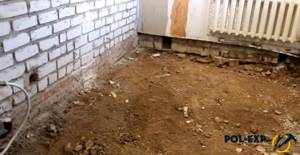
Step 1. First of all, the old wooden floor is completely dismantled. Boards and joists are removed. Remnants of bricks and oversized construction debris may be left on the foundation.
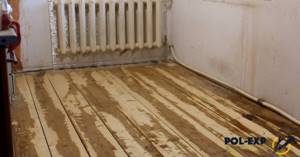
Wooden floor needs to be removed
The boards have been dismantled
Lags have also been removed
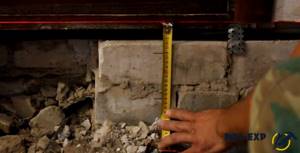
Step 2. A laser level is used to determine the height of the final floor. The main reference point for the required level is the front door. The marking should be 1.5-2 cm below the threshold.
Application of laser level

The marking should be 1.5-2 cm below the threshold
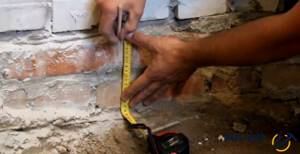
Step 3. Markings are applied to the walls. The first mark marks the boundary of the screed with the installed heating pipes (the thickness of the screed should not be less than 6 cm thick). The second indicates the thickness of the expanded clay insulation (in this case, the thickness of this layer will be 10 cm).
Marking the walls
The second mark indicates the thickness of the insulation
Step 4. Along the laser level line, marks are applied to the walls along the entire perimeter according to the level of the finished floor.
Marks are applied according to the level of the finished floor
Step 5. Markings of two other levels are applied to the walls - expanded clay bedding and screed. The reference point in this case is the finished floor mark.
Marking process
Step 6. The rough concrete floor is covered with sand, which is evenly distributed over it. You can focus on the lower mark.
The floor is covered with sand
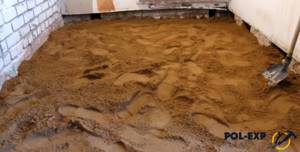
The sand is evenly distributed
Step 7. Next, the sand is compacted as much as possible and leveled. The work is performed in several approaches; there is no need to rush here.
Then the sand is compacted
Step 8. Communication pipes are protected with energyflex.
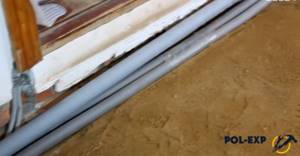
Communication pipes are protected with energyflex
Step 9. Holes in the walls left from the joists are sealed with pieces of brick and cement mortar.
Example of a sealed hole
Step 10. Waterproofing is laid on the sand layer. In this case, it is a thick polyethylene film that is factory-installed on the walls. For convenience, the film is fixed with tape.
Laying PET film
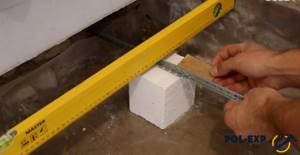
Step 11. Installation of beacons begins. For this purpose, high-density foam block cubes are used, on which metal beacons will then be installed. The cubes are placed on polyethylene at a distance of about 1 m from each other. The height of one cube is 9 cm.
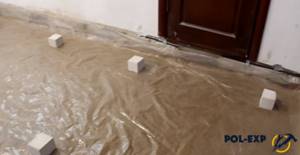
Foam block cubes
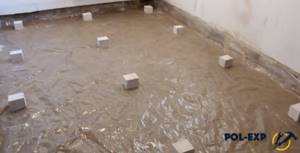
Photo of foam block cubes
Step 12. Metal beacon profiles 1 cm high are installed on the cubes.
Installation of beacons
All beacons are installed
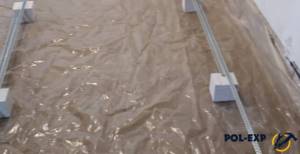
Step 13. A cube must be installed at the joints of the beacons. For proper docking, the beacons are trimmed. When docked correctly, the beacons overlap each other in the direction of the future movement of the rule.
Trimming beacons
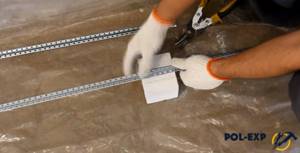
When joining, the profiles must overlap each other in the direction of the future movement of the rule
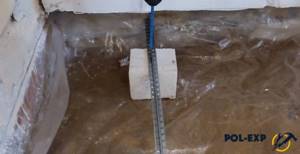
Step 14. Beacons are set according to level. Landmark - a line on the wall indicating the height of the screed. To level them, you can use plywood pads.
Checking beacons at the construction level
Using plywood underlay
Step 15. When the beacons are level, they are fixed to the cubes using self-tapping screws.
Fixing the beacon
Step 16. The subfloor should have a slight slope (the difference is up to 5 mm for each meter of base length). If necessary, the cubes can be pressed into the sand to achieve the desired result. The operation is carried out along the entire length of the beacons.
The subfloor has a slight slope
Step 17. Additional cubes are installed between the main cubes.
Additional cubes installed
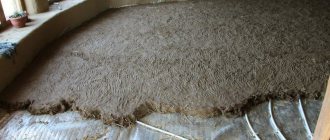
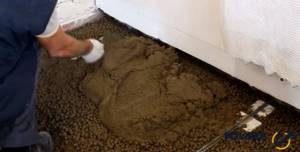
Step 18. Expanded clay is mixed with a small amount of cement mixture. This will result in a stronger floor. For a bag of expanded clay, a bucket of sand, 2 kg of cement and about 3 liters of water are used.
Expanded clay is mixed with cement mixture
Step 19. The prepared expanded clay is laid out on the base and leveled. Backfilling is done starting from the far corner of the room. There should be about 1.5 cm of free space left to the top level of the beacons.
Laying expanded clay
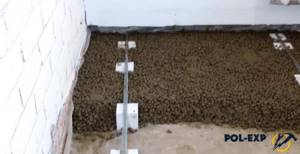
Photo of the expanded clay laying process
Step 20. The expanded clay layer is covered with cement mortar. The solution is leveled with a trowel over the entire surface.
Leveling the cement mortar
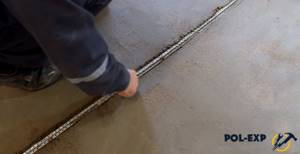
Step 21. The screed is aligned using the beacon rule. Ideal evenness may not be achieved. To make the beacons easy to remove from the screed, their surface is not covered.
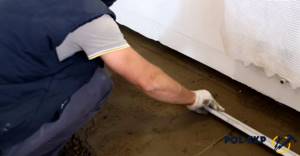
Aligning the screed with the rule

Lighthouses are not covered with mortar
Step 22. After two days, when the screed has dried, the beacons are removed. To do this, the screws securing them are unscrewed. Wooden linings are removed along with the beacons.
Removing beacons
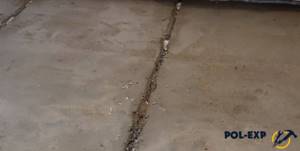
Beacons removed
Step 23. After this, the resulting cracks are cleared of debris and sealed with cement mortar.
Sealing recesses with cement mortar
Laying the pipe system and connecting
After preparation, the installation of the heating system itself begins.
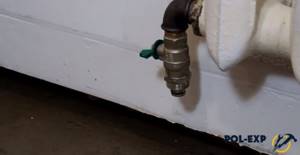
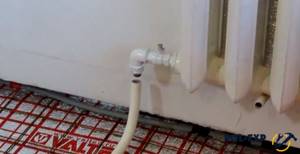
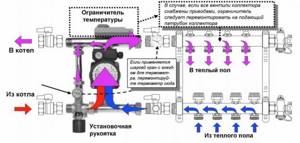
Step 1. In this case, the existing heating system will be retained based on the gas boiler. The battery is powered by a supply circuit located on the second floor. The water leaving the radiator is directed to the return circuit, which is located in the basement. The warm floor will be connected to the second output of the battery and to the return circuit. Taps will be installed to turn off the radiator and heated floor. A circulation pump will be installed at the entrance to the return circuit.
Supply and return circuits
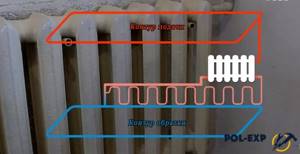
Connecting a heated floor
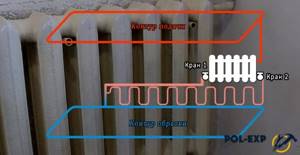
Location of taps
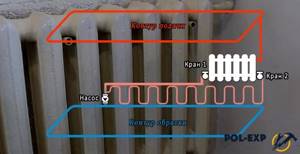
Circulation pump installation location
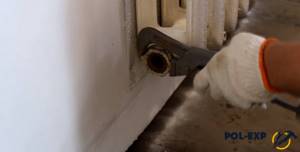
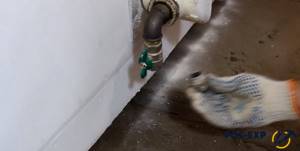
Step 2. The radiator is equipped with the necessary fittings. These are connectors and pipes. Plumbing flax and sealant are used to seal the connection.
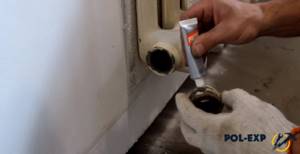
Sealant is used to seal the connection
Let's start installing the battery outlet
Installation process
Another photo of the process
Faucet installation
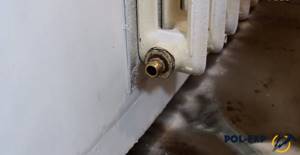
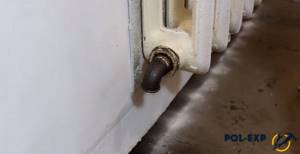
Step 3. This is what the finished battery outputs will look like. One of them will be used to connect the heated floor.
Ready output from battery
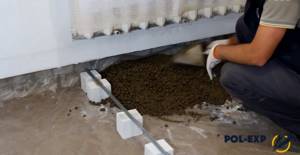
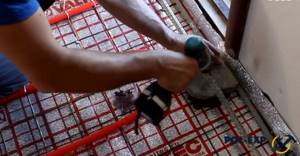
Step 4. Before further installation of pipes, a damper tape is glued around the perimeter of the room (we have already written about its choice). She sticks to the walls using glue.
Gluing damper tape
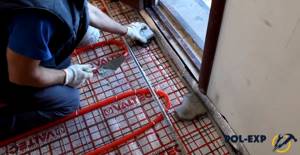
Step 5. Multifoil, a special insulation material, is laid on the rough screed. Individual strips of material are fixed to each other using tape.
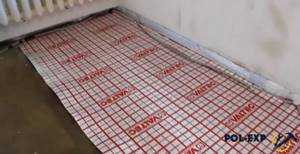
Laying multifoil
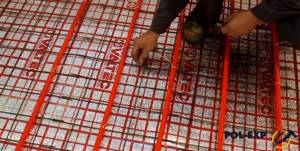
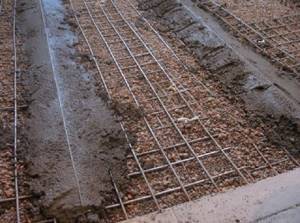
Step 6. A reinforcing mesh with 10x10 cm cells is placed on top of the foil. The individual pieces are overlapped by 1-2 cells. The mesh is connected to each other using wire.
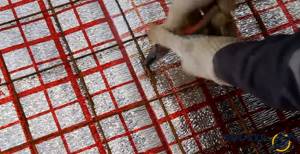
Mesh pieces are connected with wire
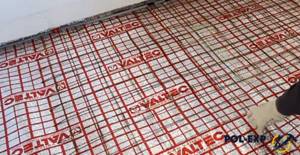
Laying reinforcing mesh
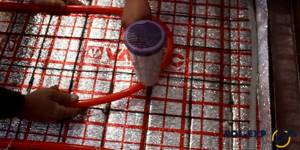
Step 7. The pipe leading to the return line is installed and connected.
Pipe connection
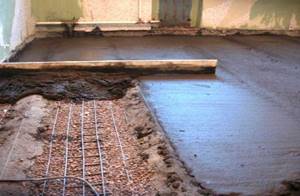
Step 8. A water floor pipe with a cross-section of 20 mm is mounted to the other exit from the battery. You can put a piece of protective corrugation on the initial section of the pipe.
Connecting a water heated floor pipe
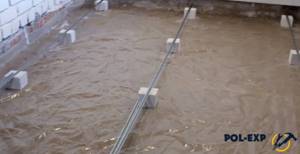
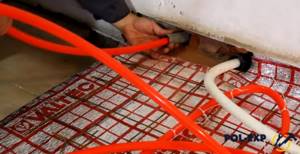
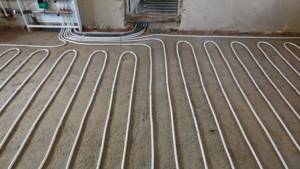
Step 9. The pipe is laid on the floor and fixed to the reinforcing mesh using plastic clamps. When laying, it is important to ensure that there are no kinks in the pipe. To form the elbows, you can use a hairdryer to heat the pipe. The distance in the circuit between adjacent pipes should be about 20 cm in this case.
Fixing the pipe with a plastic clamp
Heating the pipe with a hairdryer
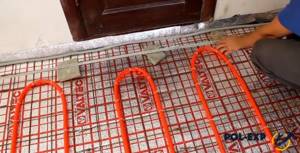
Step 10. The heated floor pipe is laid in a snake pattern.
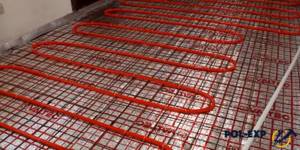
The pipe is laid in a snake
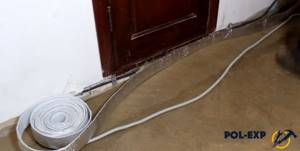
Step 11. The ends of the return pipe and heated floor are directed into metal pipes leading to the basement. Voids can be sealed with foam.
The ends of the pipes are directed into metal pipes

The voids are filled with foam
Step 12. The sections of metal mesh that rise above the floor level are fixed to the base of the floor using dowels and metal plates.
Additional mesh fixation
Step 13. Next work will be carried out in the basement. A circulation pump is being installed. It connects to the return pipe. Two taps are also installed in the system. One of them will block natural circulation. The lower valve completely closes the entrance to the return pipe.

Cranes are being installed
Step 14. The control unit is assembled and all pipes are connected. In natural circulation mode, water flows through the heated floor pipe into the return line with both taps open. If you turn off the top tap, water from the heated floor will move through an additional pipe towards the pump - this is a mode for quickly warming up the floor. If the bottom tap is closed when the pump is turned off, the heated floor will be completely turned off.
Assembling the control unit

Build process
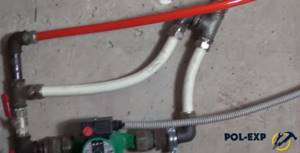
Pipes connected
Filling the screed
The final stage of installing a water floor is pouring the screed and laying the floor covering.
Step 1. To make the screed smooth, metal beacons are installed. They are located on pieces of concrete.
Installation of beacons
Step 2. Pieces of concrete are fixed to the base using cement mortar.
Fixing pieces of concrete
Step 3. The beacons are fixed to the concrete using self-tapping screws in pre-made holes. All of them must be strictly level.
Fastening beacons with self-tapping screws
Advice! It is better to start installing the first beacons from the side of the door. This will allow you to more correctly select their height relative to the doorway.
Step 4. Concrete solution is prepared according to exact proportions.
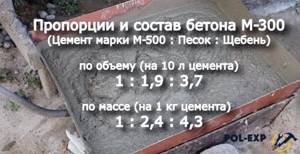
Required proportions
Step 5. Concrete is evenly distributed over the prepared floor.
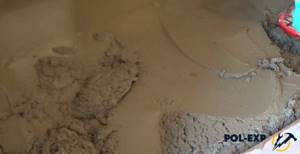
Distribution of concrete on the floor
Important! At the time of laying the screed, the floor pipes must be filled with water.
Step 6. The concrete solution is leveled along the beacons using the rule.
Leveling concrete using the rule
Step 7. The screed is dried for 28 days. The floor is covered with a finishing coating.
Drying the finished screed
Video - Installation of a water floor
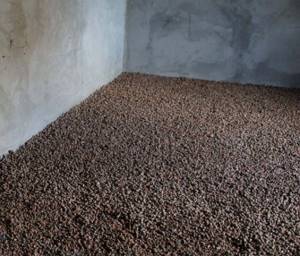
Floor insulation with expanded clay
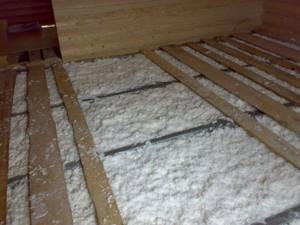
This insulation can be used for thermal insulation of floors in any way, even by filling it between joists or laying it under a screed. It simply replaces polystyrene foam or cotton wool, and the entire technology remains unchanged. It will cost less, but there is a question about the effectiveness of such insulation. In simple words, the best expanded clay in terms of thermal insulation properties is three times worse than the worst polystyrene foam.
Hence the conclusion: the expanded clay layer must be at least three times larger, otherwise such insulation will be of little use, the concrete floors will remain cold. It turns out that you need to fill in 300 mm of material, but in what rooms is this possible? In an apartment and on a loggia - definitely not, it won’t work above the ceilings either. Floors remain on the ground in buildings with a high base or on joists supported by brick columns.
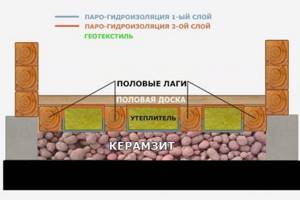
But in the first case, most often there is a basement floor and there is nowhere to place such a thick layer of insulation, and there is no need to, it is necessary to insulate the foundation there. What remains are floors with joists on brick pillars, the kind found in old houses and on verandas. By the way, such an open veranda can be glazed, and the floors can be insulated with expanded clay from below; there will be enough space for it.
Construction works
Once you have decided on the layout, begin construction and installation work. Open up the old floor, move walls, install electrical wiring, and install plumbing.
Once you have completed this stage, remove the trash. The subfloor must be clean, dry and level.
Selection of thermal insulation material
When designing the insulation of a concrete floor on the first floor in an apartment or country house, you should take into account the features of existing thermal insulation materials:
- Vapor barrier;
- Thermal conductivity;
- Density;
- Price.
For the same conditions in construction, there are always several technical solutions. An option is selected with a rational combination of the construction budget, safety margin and operational life, taking into account the requirements of the developer and the actual conditions of the project.
Compatible with concrete and wood
Before insulating a concrete floor in an apartment on your own, you need to consider the following nuances:
- the necessary increase in the level of the finishing floor covering;
- the presence of underfloor heating circuits and its design (electric, water, film);
- characteristics of the construction materials used.
To eliminate heat loss from the lower floor, foamed polymers are not considered in principle. The materials most in demand for these purposes are:
- expanded clay is a bulk product with a fairly high thermal conductivity, so it must be covered with rigid sheet material inside one structure;
Important! Specific insulation materials should be considered only in conjunction with their installation technology. Since for some finishing floor coverings only screeds are suitable, for others - a wooden subfloor.
Layer thickness
Insulation materials have unequal thermal conductivity, which affects the thickness of the layer to eliminate the same heat loss. For the materials under consideration, this characteristic is:
| Insulation | Density (kg/m 3 ) | Thermal conductivity (W/m*K) |
| Ecowool | 30 – 75 | 0,04 |
| Basalt wool | 50 – 200 | 0,045 |
| Glass wool | 30 – 100 | 0,035 |
| Expanded polystyrene PSB | 45 | 0,042 |
| Expanded polystyrene EPS | 150 | 0,031 |
| Foam glass | 100 – 150 | 0,05 |
| Expanded clay | 150 – 800 | 0,16 |
The thermal conductivity of all of these insulation materials, with the exception of expanded clay, is approximately the same, but the performance properties differ. For example, ecowool is considered the only effective remedy against mice; in all other thermal insulators, these rodents either make passages or settle in families.
When choosing expanded clay, you will need a much larger layer to insulate the floor in your apartment with your own hands to the level of other materials. However, it is this bulk product that is used in dry screeds, which is why it is considered on an equal basis with the others.
Advantages of heated floors
Installing a heated floor in an apartment, despite the obvious advantages, is associated with some difficulties. I want to dwell in more detail on all the pros and cons associated with installing heated floors. First, let's list the main advantages:
- Helps create a comfortable microclimate in the room due to its uniform heating;
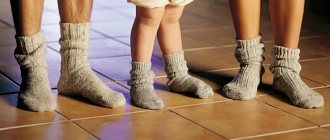
- Heating the air from bottom to top meets hygienic standards to maintain health;
- Ideal for families with small children, so that they can play on the floor without danger to their health;
- Does not dry out the air;
- When choosing a heated floor as the main source of heating, you can improve the design of the room and increase its usable area;
- Available to all citizens with average income;
- You can do your own installation.
THIS IS IMPORTANT: Using heated floors instead of conventional radiators helps reduce dust formation due to the absence of static voltage, which is very important for respiratory tracts prone to diseases.
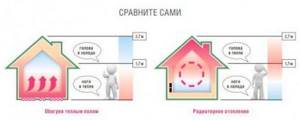
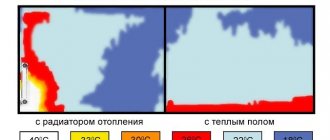
As can be seen in the diagram, when using heated floors, a comfortable microclimate is created
I would like to note that the advantages are almost the same for all types of heated floors. The existing disadvantages are characteristic of each individual species.
Technology selection
Before insulating the floor on the first floor of an apartment, it is necessary to consider several technologies depending on factors:
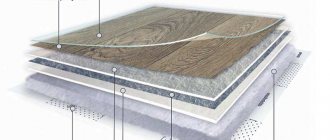
- humidity of the room - in the bathrooms and kitchens there are hot water supply, cold water and sewage pipes, there is a high probability of leaks, so it is better not to use dry screeds and wooden floors on joists with your own hands, you should give preference to a concrete screed or self-leveling floor;
- type of flooring - porcelain tiles and tiles have the maximum service life exclusively on screeds; for parquet and tongue-and-groove boards, logs or a wooden subfloor are more convenient; for other coverings (laminate, carpet, linoleum, PVC tiles) there is not much difference.
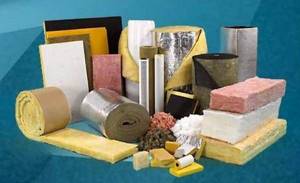
Popular thermal insulation materials and their features
The modern construction market offers a large selection of materials, the characteristics and properties of which allow them to be used for insulating the floor of the first floor. Each insulator has both a number of advantages and a certain list of weak qualities.
Mineral wool

Types of mineral wool by density
| Those. characteristics of mineral wool | Indicators |
| Density | 115 kg/m3 |
| Water absorption at full immersion, no more | 1% |
| Average fiber diameter, no more | 0.2 µm |
| Content of non-fibrous inclusions in the mass, no more | 4,5% |
| Thermal conductivity at 283+1 K, no more | 0.044 W/m*K |
| Shear strength, not less | 50 kPa |
| Compressive strength, not less | 100 kPa |
| Tensile strength, not less | 150 kPa |
The most popular material for insulating various structures is mineral wool. Among its main advantages are:
- high thermal insulation properties;
- fire resistance;
- good sound insulation;
- relatively low cost.
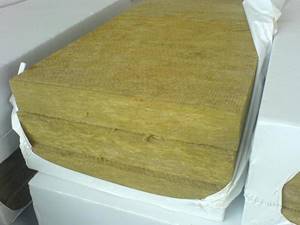
The photo shows mineral wool insulation

The main disadvantage is poor resistance to moisture, against which there is a need to install a high-quality waterproofing layer, otherwise the insulation will collapse very quickly.

Comparative characteristics of different types of mineral wool
Choosing a method for arranging a thermal insulation layer
Before starting thermal insulation measures, you need to study not only the properties of the most popular insulation materials, but also become familiar with the features of their arrangement. Depending on the structure, materials are classified into:
- bulk;
- solid. This category includes roll insulation, as well as thermal insulation materials in the form of mats and slabs;
- liquid.
Loose thermal insulation
It is performed using the already mentioned ecowool, as well as the following materials:
Bulk materials are convenient because they can be used to insulate even the most inaccessible places. The method is equally effective both in private houses and in apartments on the ground floor.
However, despite its effectiveness, bulk thermal insulation is not widely used, because more modern and easy-to-use insulation materials are available on the market.
Solid thermal insulation

Types of mineral wool by density
Rolls, slabs and mats are most often used for insulation. Such materials have a relatively small thickness - on average up to 100 mm, so the living space when using them is reduced insignificantly.
Typical representatives of the category are mineral wool and polystyrene foam. Mats made from natural plant fibers are also gaining wide popularity.
Liquid thermal insulation
Not very common, but very effective method. The following materials are used:
- cement mortar with the addition of sawdust, expanded clay and other fillers;
- sprayed polymer-based compositions.
Insulation with liquid thermal insulation
The quality of such thermal insulation is in no way inferior to slabs, mats and rolled materials. However, to spray the compositions it is necessary to use special equipment, which does not have the best effect on the cost of the work.
Prices for thermal insulation materials
Advantages and disadvantages of electric heated floors
It does not take a lot of time to reach the maximum temperature of the heating element - therefore, even a cold room will warm up much faster than, for example, when starting individual water or steam heating.
Contrary to popular rumors, the use of an electric floor is absolutely safe for humans, provided that the installation technology is followed.
All heating elements are reliably shielded with a special braid, so they do not produce any harmful radiation for humans.
Cable diagram
In fact, an electric heated floor is as harmless to residents as an electric iron, refrigerator or electric stove. Using a relay, you can easily regulate the heating temperature to create a comfortable microclimate in the room.
The main disadvantage of electric heated floors is their high energy consumption. This significantly affects, first of all, the cost of heating during the cold period. In addition, to install an electric floor, it is necessary that the electrical wiring in the house can withstand additional loads.
THIS IS IMPORTANT: Having decided to install an electric heated floor, it is necessary to take into account the existing restrictions on the consumed load. You may have to completely replace all the wiring in the apartment, right down to the supply substation.
TIP: It is necessary to place electric heating elements in the room in such a way that furniture and equipment are not located above them. This will prevent damage to the cable and will also save on heating costs, since bulky objects interfere with heat transfer.
Heated floor scheme in the apartment: kitchen
Options for floor insulation and instructions for their implementation
Floor insulation options
The procedure for insulating the floor of the first floor will vary depending on whether there is a basement or basement below.
If there is a basement
If there is a basement or basement in the house, thermal insulation work should begin there. First, you must insulate the walls and ceiling of the basement. Secondly, before insulation, the surfaces must be properly waterproofed. Otherwise, groundwater will seep through the walls and destroy the insulation.
If you do not want to dismantle the floor or intend to create the highest quality thermal insulation, use a method whose essence boils down to insulating the basement ceiling.
First step. Lay out and secure the moisture-proof film. Lay strips of film with a 10-15 cm overlap. Be sure to seal the joints with tape.
Second step. Nail the sheathing strips to the waterproofed surface. Select the width of the slats and the spacing of their placement in accordance with the parameters of the insulation used.
Third step. Place slab or roll insulation in the space between the slats. To fix the thermal insulation, use wire or stuff cross slats.
Fourth step. Nail the flooring elements (boards or OSB) to the slats.
After insulating the basement, you can proceed directly to insulating the floor.
First step. Lay the joists and attach the skull blocks to them.
Lay the joists and attach the skull blocks to them
Lay wooden boards or OSB on the fixed bars. The flooring should be such that there are no even minor gaps at the joints of the elements.
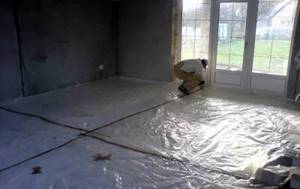
Second step. Cover the flooring with waterproofing film.
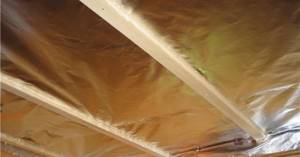
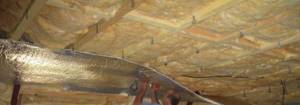
Third step. Place the selected insulation on top of the film. Nail the support joists to the base.
Laying thermal and waterproofing
Laying thermal and waterproofing
Fourth step. Make another deck from OSB or boards. The gap between the flooring and the insulation should be about 10 mm.

Floor insulation algorithm
If there is no basement
If there is no basement or plinth, the work of insulating the floor will be easier and faster. If there are no mentioned premises, then the floor, as a rule, is located directly on the ground or on the foundation.
In such a situation, the insulation sequence will be as follows.
First step. Remove flooring, if present, to gain access to the foundation or soil. If the floor is made on the ground, carefully level the ground.
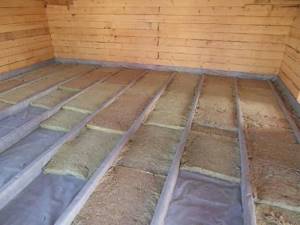
Second step. Spread expanded clay onto the base in a 10-15 cm layer. This backfill will provide additional thermal insulation.
Place expanded clay on the base
Third step. We lay the reinforcing layer. An ordinary chain-link mesh will provide the necessary rigidity. Place it on the base.
Beacons under screed
Fourth step. Make a new tie.
Fifth step. Cover the hardened screed with moisture-proofing film.
Sixth step. Nail the sheathing battens to the base.
Seventh step. Place the selected thermal insulation material in the space between the slats.
Insulation of concrete floor
Eighth step. Install the deck boards and complete the finish to your liking.
Insulation option using a floor heating system
This technique is not insulation in the literal sense of the word, but it allows you to make the room much warmer. The system can be electrical (film, cable) and water.
Types of underfloor heating systems
The easiest to install is a film infrared heated floor. To install it, you simply need to level the base, lay out the film in the required places and connect the system to electricity. The screed is not poured. The key advantages of such a system are the ability to install it under any finishing coating and ease of installation. The disadvantage is the relatively high cost.
Infrared heated floor, installation
Cable flooring is also relatively easy to install and can be combined with most varieties of existing flooring finishes. There is no need to make a screed. The main disadvantage is the high cost of operation.
Cable heated floor
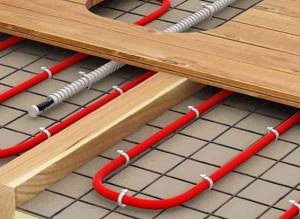
Water heated floors are the most popular. This system is the most economical. It requires preliminary arrangement of waterproofing of the base, laying special mats (it is best to use slabs with so-called bosses, since in this case you will not have to use additional fasteners) and subsequent pouring of the screed.
Technology for laying water heated floors
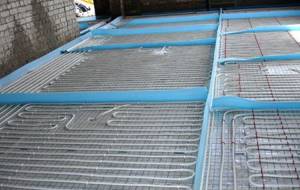
Warm water floor
How to make a warm water floor
Thus, a wide variety of materials and techniques can be used to insulate the floor of the first floor. Now you are aware of the features of each available option and can make the best choice.
| Insulation material | Thermal conductivity coefficient, (W/m×K°) |
| Mineral wool | 0,045-0,08 |
| Ecowool (cellulose insulation) | 0,038-0,046 |
| Glass wool | 0,033-0,06 |
| Foam plastic (expanded polystyrene) | 0,031-0,040 |
| Expanded clay | 0.16 |
| Expanded clay concrete | 0.31 |
| Foiled polyethylene foam (penoflex) | 0,032-0,037 |
Prices for heating cable and components
Video - insulating the floor above a cold basement
Heated floors
This heating system for residential premises in combination with heating through radiators is gaining increasing popularity today. This is due to its availability and legality of use. This method is considered a convenient and effective option for creating the optimal temperature in an apartment or house during the cold season.
After installing this structure in a room, the heat in it is distributed evenly, ensuring that there are no temperature changes.
Heated floors have a number of advantages:
- They do not occupy the living space of the room, as they are located under the floor covering, while the heat transfer is much higher than from radiators installed on the wall of the room.
- Possibility of temperature control.
- They allow you to avoid carpets or other additional elements for insulating the room.
However, such a system also has its disadvantages:
- Eliminates the possibility of using laminate or parquet as flooring.
- High energy consumption leading to monthly financial costs.
- The high cost of the structure itself and its installation, as well as monetary costs if dismantling becomes necessary for repair work.