The creation of an autonomous heating system begins (or ends) with the installation of a gas boiler.
This procedure is one of the most important and critical stages of work, although it is not fundamentally difficult.
Depending on the design features, additional actions of various types may be required.
This applies to installing your own chimney of one type or another, connecting the boiler to a common chimney, choosing a location and other actions.
In the process of work, many issues arise, both technical and organizational and administrative, which should be discussed separately.
Where should a double-circuit boiler be installed?
Installation of a double-circuit boiler must take into account several requirements:
- The design features of the unit itself are outlined in the user manual.
- Current norms and rules for the installation of gas installations.
- The location of the common chimney, the specific placement of the heating system and other features of the system.
Most double-circuit boilers require connection to a special coaxial type chimney. This is a short unit, arranged like a “pipe in pipe” .
It is passed through the outer wall at the installation point of the unit, connected from the inside to the flue gas outlet, and from the outside it is designed according to its own operational requirements (special cap, mesh fencing or other protection elements).
To install such a chimney you need an external and strong wall . Typically, such units are installed in the kitchen.
If the boiler is of an atmospheric type (with an open combustion chamber), it requires a separate room with an area of at least 8 m2, which has its own window opening.
Floor-standing boilers, as a rule, have large dimensions and weight, so they choose separate rooms in the lower floors of the house.
IMPORTANT!
First of all, you should carefully read the instructions, which clearly describe the conditions of installation work and give instructions for their production.
Determination of boiler power
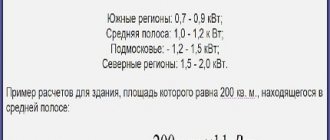
Having decided on the type of boiler, you need to calculate its power. You can order a thermal engineering calculation that will determine the heat losses of your premises. Based on this figure, you can accurately select the boiler power. But you can do without calculations: use the norms determined empirically. Typically, 10 m2 of heated area requires 1 kW of unit power, but to this power a “reserve” is then added for various types of losses.
Boiler power depends on the area of the heated room and heat loss
Let's look at an example. If the apartment is 56 m2, you will need a 6 kW unit for heating. If you are going to heat water with it, you need to add another 50%. It turns out that 9 kW of power is required. Just in case, you need to add another 20-30% (in case of abnormal cold). Total - 12 kW. But this is for central Russia. If you live further north, you need to further increase the boiler power. How specific depends on how insulated your home is. If it is a panel or brick high-rise building, 50% or even more would not be out of place. When choosing a boiler power, the main thing is to take it with a reserve: if the performance is not enough, the equipment will operate at the limit of its capabilities, and this is far from the best mode, which will lead to premature wear and failure. So we have no regrets: the difference in the cost of equipment when changing capacities is not very large, but comfort will be guaranteed to you. There will be no excess consumption of gas if you buy an automated boiler (and these are the most economical models) - the consumption depends on the heat loss in your premises and the parameters of the system, and not on the power of the boiler. So on this side, productivity reserves are not a hindrance.
What requirements must be observed during installation?
When performing installation work, you will have to combine two types of requirements:
- Installation conditions set out by the manufacturers.
- Norms and rules for working with gas equipment.
The installation procedure is always described in detail in the instructions. Even if there are no specific requirements, any manufacturer must outline the procedure.
To install wall-mounted units, you must:
- The presence of a strong, ideally load-bearing wall, capable of supporting the weight of the boiler.
- Installation on thin or plasterboard partitions is prohibited.
- Gas boilers with an open burner require a separate room. If installation is in the kitchen, there must be a door and window opening.
Floor-standing boilers have their own requirements:
- The installation is carried out on a layer of asbestos covered with a sheet of metal. This seems unnecessary, but most manufacturers, as well as gas service workers, are unanimous on this.
- The room is separate, ventilated, with access to any point of the boiler.
- The distance from the walls to the surfaces of the unit is at least 0.3 m (for some installations it is greater, please check the instructions).
- The room used as a boiler room should be free of trash, flammable materials, and foreign objects. There should always be quick access to the window, and access to the boiler from all sides should be free.
When mounted in the kitchen, it is allowed to use a quick-detachable decorative box with opening doors.
The gas service requirements are a separate list of conditions. The main one prohibits unauthorized actions with gas equipment . According to it, no one, except gas specialists who have all the required permits and approvals, has the right to install, move or perform other actions with gas appliances.
There is a fine for violation. According to the rules, upon commissioning, the owner undergoes instructions, signs in the log and begins to bear full responsibility. In practice, the situation is somewhat confusing, since these rules were developed for residents of apartment buildings.
Therefore, in most cases, some deviations from the norms are ignored, provided that they do not pose a danger.
In particular, they usually make a compromise - the owner can connect the boiler to the gas supply pipeline, but the connection of this pipeline to the main line is carried out by specialists.
NOTE!
According to Art. 7.19 of the Code of Administrative Offenses of the Russian Federation, unauthorized connection to gas networks is punishable (for individuals) with a fine of 3-4 thousand rubles. Any inspector from the gas service can qualify the connection as unauthorized, so all actions should be agreed upon in advance.
Rules and regulations
If you do not adhere to clear instructions from regional authorities, then at the time of inspection, specialists from the gas distribution company will simply refuse to connect the owner to the unit to the gas pipeline. To avoid such a situation, you need to carefully study the requirements and standards, and then adhere to them during the installation process.
Installation is always carried out only after designing the system; this stage must be taken as seriously as possible in order to avoid big problems in the future.
Do I need to coordinate the installation?
The answer is unequivocal - yes, and to say more, obtaining permission and approval from the authorities takes the lion's share of the time in relation to the entire process. It is better to analyze the algorithm of actions in detail; the first thing the owner of a private house or apartment needs to do is visit the nearest office of a local company to obtain technical specifications.
There he writes an application, which will be considered for some time; it often takes 1-2 weeks to draw up the form, after which the person is given the document in his hands.
As soon as the papers are at the owner’s disposal, it is worth starting to order the development of a project, which includes a piping diagram for a double-circuit boiler and other important installation points.
Such orders can be made at the nearest engineering and design office; specialists with proper education check gas communications and carry out the order, having previously agreed on the terms. When the project is drawn up, it should be sent for consideration to one of the services:
- Gorgaz.
- Raygas.
- Regional gas
- Mingaz.
When purchasing a double-circuit boiler, you should pay attention to the presence of a passport; these documents will also need to be provided.
General requirements for the project
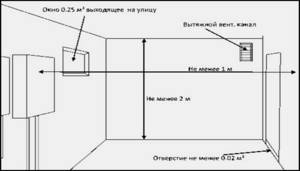
All important points can be found out by reading SNiP 42-01-2002, which contains information regarding the rules for installing a double-circuit boiler. The owner chooses the room in which the equipment will be installed at his own discretion; often in an apartment the unit is installed in the kitchen, but for such a room it is allowed to use devices with a power not exceeding 60 kW.
A separate combustion chamber is provided for units for which this figure reaches 150 kW. There are generally accepted requirements for a room for installing a double-circuit boiler; they look like this:
- Minimum volume values are 7.5 cubic meters. m, and the ceiling height is not lower than 2 m.
- It is prohibited to equip basements, balconies, corridors and bathrooms with devices that operate on gas.
- The walls must be protected from heat; for this purpose, non-combustible materials are used.
- To organize lighting, there is a calculation algorithm: for 10 cubic meters. m. 0.3 windows will be required.
- Connecting to the electrical network requires the use of a grounded cable, as well as for circuit options with a boiler.
- There are separate requirements for the cross-section of the chimney; it must correspond to the power of the equipment.
- The unit is removed from the wall by 0.7 m; there should also be no obstacles in front of it at a distance of 1.25 m.
- From the outlet of the vertical chimney to the device you should retreat no more than 3 meters.
In addition to these rules, special attention is paid to the ventilation of the room; it must be in good working order and function well.
Documentation
To approve the project, you will need to provide a package of collected documents, which include:
- Technical data sheet for the device.
- Operating instructions.
- Certificate of compliance with sanitary and technical requirements.
- Conclusions after passing the examination aimed at inspecting the unit.
If, after performing all the necessary actions, the owner received a written refusal, then employees often make changes that will need to be corrected in order to re-check for compliance with the rules.
Wall-mounted unit installation and connection diagram
First of all, you should carefully study the instructions and prepare all the necessary materials and tools. You can start working only when there are no unclear points left.
If all issues are resolved, proceed with the actual installation.
Let's look at the procedure:
- The boiler delivery set usually includes a template, according to which holes are made on the wall for anchors and a coaxial chimney. The bearing surface is marked on it.
- Using a hammer drill, holes are made for the anchors.
- A mounting plate is attached to the anchor, onto which the boiler is hung. This point cannot be neglected; the plate provides a technological and fire safety gap between the boiler and the wall. Its size must be at least 45 mm.
- The boiler is attached to the plate using standard elements included in the delivery set. All parts must be used and their quantity must not be reduced. There are often situations when the unit is installed in a corner, thereby violating the condition of having a 30-centimeter gap on all sides of the housing. In this case, there is no possibility to secure elements located in the corner. This setting is unacceptable.
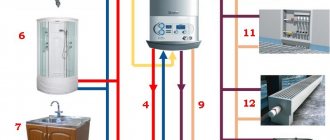
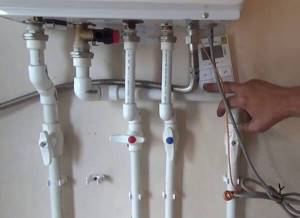
- Communications are connected according to the location and purpose of the pipes. As a rule, the extreme left and right are the forward and return lines of the heating system. In the center there is a gas pipe connection pipe. the second ones on the left and right are the hot water pipeline and the cold water supply line. This arrangement is most common, but there may be other options. It is necessary to carefully study the instructions and clarify the location of the pipes of the existing model.
The last step is to connect the boiler to the power supply system. This also has its own characteristics . Most volatile boilers are extremely sensitive to changes in supply voltage.
For proper operation it is necessary to use a power stabilizer.
If this is a standard device produced by the boiler manufacturer as an additional peripheral element, then to connect it you will need to insert a plug into the output of the stabilizer, and connect the device itself to the network.
Other types are connected in a similar way. The main requirement will be the presence of a connected grounding electrode, without which the boiler electronics will constantly generate errors (diagnose a stray flame).
After this, the installation can be considered complete and proceed to the next starting operations.
IMPORTANT!
When connecting pipelines, you can be guided by the diameter of the pipes. On some boiler models it is different, which eliminates the possibility of erroneous connection of communications.
Premises requirements
There are several rules that must be followed when choosing a room to install the unit:
- The presence of a window that can open at any time.
- Functional ventilation.
- The room must have outlets for all necessary pipelines to which the home boiler will be connected. Particular attention should be paid to the gas pipe. It must have a counter.
Usually the connection of similar devices is the same. The only thing that may differ is the location of the pipes. But this does not happen often.
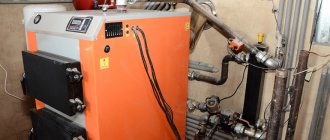
Installation of the floor model
Since installation is carried out on the floor, it is necessary to provide it with sufficient strength and rigidity. A cement screed or reinforced concrete slab is required; floor units should not be installed on wooden floors.
There is no direct prohibition on this installation method, but we must remember that wood is prone to warping, drying out, and cracking. Over time, the stability of the boiler may become impaired, which will entail very undesirable consequences.
If possible, a floor-standing boiler should have its own foundation . This is done for powerful and massive models, but you need to take care of flexible adapters, since the position of your own base relative to the general foundation may change, and a significant load will be created on the pipes.
This may result in leaks or destruction of connecting elements.
Procedure:
- Unpack the boiler and check for the presence of the necessary documentation. Make sure the device is complete.
- Place the boiler on a prepared non-combustible base. Carefully align it horizontally. To do this, you need to use all the possibilities - when building the podium, ensure that the horizontal support plane is as level as possible, and use height-adjustable boiler supports. As a last resort, you can place tiles made of non-combustible material under the legs.
- Connect the chimney.
- Connect the direct and return pipelines of the heating system. On the return side (the flow coming from the system to the boiler), it is necessary to install a filter to remove metal particles, scale and other small elements. This will help preserve the boiler heat exchangers and increase its service life.
- Connecting hot and cold water pipelines is no different from connecting a heating system. A filter must also be installed on the cold water supply pipe. Some experts recommend installing shut-off valves; this will help quickly shut off water under pressure.
- Connect the gas pipe through a special shut-off valve. This is mandatory; there must always be a shut-off unit that allows you to quickly stop the fuel supply. You can only connect the gas pipe to the boiler yourself. Only a gas service specialist who has a permit and all the necessary documents has the right to connect to the main line. He will also check the quality of the connections using a soap solution.
- The power connection should be made using a special socket with a grounding electrode. It is strongly recommended to use a voltage stabilizer so as not to spend money on expensive repairs to the boiler electronics.
The last step will be another thorough check of the correct connection, strength and reliability of the pipeline connection.
After this, you can begin setting up and launching for the first time.
Main nodes
Due to the fact that there are many different models of gas boilers on the market, it is difficult to talk about all specific installation schemes. We can only highlight the main components that must be present so that the unit is not only easy to install, but also to use in the future.
Key points:
- Water filter. A mandatory element of a gas boiler in a private home, which will help protect the system from debris generated in the pipes. Another such device is installed on the return line to stop possible contamination from the heating system. It must be placed on a horizontal area along with the tap.
- Magnetic filter with tap. Used to combat rust and scale.
- Gas filter with tap. Allows you to protect the installed boiler from scale and dust. The use of this element allows you to significantly increase the service life of the installation.
- Ball valves, which are needed to shut off highways to make it easier to carry out repair work.
- A special expansion tank is installed for the heating system. In wall-mounted boiler models, they are usually installed at the factory.
- Safety devices – valves, pressure gauge and other elements. Again, wall-mounted models already have all this. For floor-standing ones, everything must be purchased separately and placed next to the installation.
- Radiators.
- Pipeline.
- Grounding.
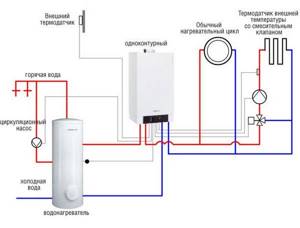
How to connect a boiler
There are different options for installing a boiler, depending on its design.
Can be used:
- Indirect heating boiler with heat exchanger.
- Layer heating boiler.
- Electric storage boiler.
The most accessible and inexpensive option is an external stratified heating boiler. It is not equipped with its own heat exchanger, so it is inexpensive and easy to operate.
Any type of connection is made according to the user instructions. The process is not difficult at all, you just need to connect the boiler inlet and outlet to the corresponding boiler pipes, and also connect the hot water collection line to its outlet.
Depending on the design, a connection to a break in the heating circuit supply line, or a direct DHW outlet from the boiler can be used to accumulate hot water in a container.
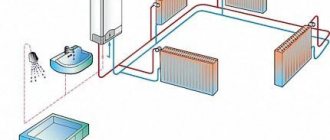
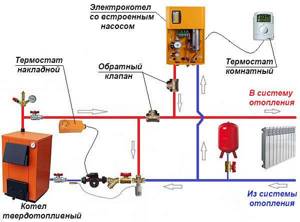
Parallel operation of wood and gas boilers
This option for heating a house from two boilers provides for their separate connection to the circulation system. Each heat source must have its own circulation pump installed at the return line inlet. There is no need to do this for a wall-mounted gas boiler; the pump is already installed by the manufacturer. If solid fuel burns out, the temperature of the coolant will decrease and the gas boiler will automatically turn on.
An important design point is the piping of the solid fuel boiler with metal pipes and the presence of an emergency discharge device with the simultaneous supply of cold water to the return line.
1 scheme (open and closed systems)
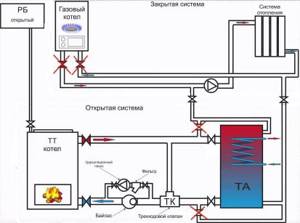
This method is convenient because the liquids of the two systems do not mix. This allows the use of different coolants.
Advantages and disadvantages
| pros | Minuses |
| Possibility to use different coolants | A large number of additional equipment |
| Safe operation, the reserve tank will release excess water in case of boiling | Efficiency is lower due to excess water in the system |
| Possibility of use without additional automation |
2 scheme, two closed systems
It uses a closed system, which eliminates the need for a heat accumulator. Control is carried out by thermostats and three-way sensors. Operational safety is ensured by automation.
Here we use the battery for excess heat. Thus, we increase the efficiency of the system and eliminate the need for temperature sensors and automation.
Heat supply via 3-way valve
Each boiler must be equipped with its own circulation pump, and another pump will be required to ensure circulation through the heating system devices. An automatic air vent should be installed at the top point of the hydraulic separator, and a tap for emergency drainage of water at the bottom.
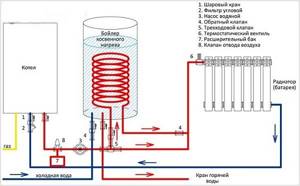
System with a heat accumulator, why is it used?
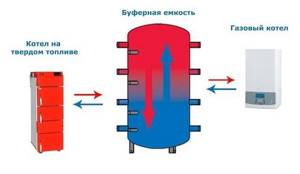
The heat generated by the wood-burning boiler enters this container. From not, through a coil, heat exchanger or without them, into a gas boiler. The automation of the second understands that the water has the required temperature and turns off the gas. This will continue as long as there is enough temperature in the heat accumulator.
A heat accumulator or a heat-insulated container with a built-in coil, designed to accumulate heated coolant and supply it to the heating system. In this scheme, the gas boiler, heating devices and battery are connected by pipelines into one closed system. The solid fuel boiler is connected to the built-in battery coil and thus heats the coolant in a closed system. The organization of heating operation in this scheme occurs in the following order:
- In a solid fuel boiler, wood burns and the coolant is heated from the coil in the container;
- solid fuel has burned out, the coolant has cooled;
- the gas boiler turns on automatically;
- the firewood is laid again and the solid fuel boiler is ignited;
- The temperature of the water in the battery rises to the same temperature as that set on the gas boiler, which stops automatically.
This scheme requires the greatest costs for the purchase of materials and equipment, but has a number of advantages:
- the solid fuel boiler can operate in an open circuit;
- highest level of security;
- no need to constantly replenish the firebox with wood or coal;
- coolant circulation through a closed system;
- the possibility of simultaneous operation of two boilers simultaneously and each separately.
Additional costs include the purchase of an accumulator tank with a coil, two expansion tanks and an additional circulation pump.
calculate the required volume of container
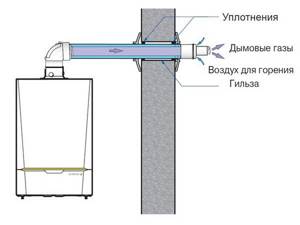
Installing a coaxial pipe step by step
The coaxial chimney is installed in close proximity to the boiler, along the axis of the chimney outlet. A hole must be made in the outer wall, 5-10 mm larger in diameter than the external size of the chimney.
This is done using a special diamond crown, or with a conventional hammer drill (which takes a long time and will require additional plastering and finishing work).
After that:
- The base of the coaxial pipe is connected to the boiler chimney outlet.
- The first chimney segment is installed. Immediately securely fixed with all appropriate fasteners.
- After it, the second section of the chimney is connected, the whole procedure is repeated. All pipe sections required by installation conditions are connected in a similar way.
- The joints of the pipe and the gap between the chimney and the wall are carefully sealed.
- The performance of the chimney is tested.
A through hole in the wall is made with a slight inward slope so that condensate can drain into a special container. If this is not done, the chimney outlet will freeze in the winter.
Popular methods of canning carrots
Delicious pickled carrots - a simple recipe for pickling carrots for the winter.
kerescan — Sep 1st, 2015
Category: Marinating
This simple homemade recipe on how to make crispy pickled carrots will become a lifesaver for many housewives. Having such a preparation in the “bottoms” you can quickly set the table when guests unexpectedly arrive. It is also irreplaceable when you need to quickly prepare a winter salad or soup. And although fresh carrots are available at any time of the year, it is worth spending a little of your free time to prepare such a tasty and healthy carrot preparation for the household.
kerescan — Sep 2nd, 2015
Category: Pickled platter
This simple homemade recipe allows you to prepare such a delicious pickled assortment from ordinary and familiar ingredients. Pickled carrots with apples are tasty and healthy. Can be used both as an original snack and as a savory dessert.
kerescan — Jun 30th, 2015
Category: Pickling-fermentation
An easy recipe for canned carrots will make it possible to prepare any dish with this root vegetable in winter, when there are no fresh ones in the house.
Winter salad: carrots, horseradish and apples - a delicious recipe for preparing horseradish for the winter.
kerescan — Oct 4th, 2015
Category: Salads
I love this homemade horseradish, carrot and apple salad recipe because it is so easy to prepare. Simplicity and ease of preparation makes this delicious assortment even more attractive. Take some of your free time, use the recipe for this horseradish preparation and make a healthy, delicious fruit and vegetable platter.
Pickled carrots with onions - a simple homemade recipe for fermenting carrots for the winter.
kerescan — Sep 2nd, 2015
Category: Pickling-fermentation
If you have prepared delicious pickled carrots with chopped onions, then the question of what appetizing appetizer to quickly put on the table will disappear on its own. I am posting a homemade recipe for this carrot preparation here for those who have not yet had the opportunity to appreciate these simple and affordable products. Both components complement each other perfectly, generously sharing sweetness and piquancy.
How to start the boiler after installation
The first launch is carried out in stages:
- The system is slowly filled with water. This is necessary so that all the air has time to escape. Fill until the pressure is 1-1.5 Bar.
- Check the condition of all connections, look for possible leaks.
- After this, gas is supplied and the boiler is tested. These actions are performed by technicians from the service center. They determine what adjustments need to be made to the factory settings, determine the upper and lower limits of temperature conditions, and perform other necessary actions. Starting the boiler on your own is not recommended even for experienced people, and this procedure is strictly prohibited overnight.
Wall mounting
Installation of gas boilers begins with determining the location where it will be located, taking into account the need for free space for maintenance and compliance with all rules. Then you should turn to the already mentioned template, which marks the places of attachment to the wall and the places where the wires are connected.
You need to transfer this drawing to the wall using a pencil or drill. Using a drill of the required diameter, a hole is drilled for the dowels, and the corner is secured. Dowels must match the material and thickness of the wall.
The next stage involves partial disassembly of the unit: you need to remove the front panel of the boiler. To do this, you will need to fold back the cover and release the crossbars on the right and left - this will release the trim panel. The final procedure is to hang the gas apparatus on the hanging angle, which was previously secured to the wall using fasteners.
Preparation of documents for a gas boiler
To be completely sure, you should collect the following documents:
- papers for boiler room equipment according to all requirements;
- technical passport of the gas double-circuit boiler itself;
- a contract with a gas company for the supply of fuel;
- documents for the meter and certificate for the inlet valve of your installation;
- papers about those changes in the plan of your house (apartment) that will be made when installing the unit;
- application to the gas office for the design and specifications of your gas boiler;
- a document confirming the call of a specialist for installation and piping of the unit;
- application for commissioning of the system;
- conclusion of a gas service engineer on the suitability and permission to use a gas boiler;
- a document with your signature stating that the specialist has familiarized you with the rules for operating your device.