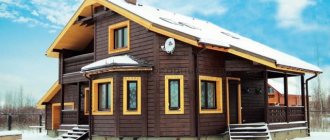
Insulation of a panel house from the inside and outside
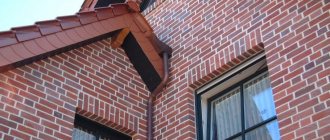
At one time, the construction of multi-storey residential buildings from reinforced concrete panels was very common, which is why even now the majority of city residents have apartments in buildings constructed in this particular way.
The method of using ready-made panels in itself is not bad, as it allows you to build a structure quite quickly. However, a few years after the completion of the project, problems begin with the seams between the blocks, especially vertical ones. They cease to be airtight, which causes inconvenience and discomfort for apartment residents living in such a building, who are faced with the problem of drafts, dampness and the inability to make full repairs inside the apartment in the place where the gap between the panels passes. Judging by the reviews that can often be found, the problem of sealing and insulating interpanel seams worries many apartment owners, so later in the article we will look at what can be done in a situation where, due to a gap in the entire wall, there is no life, especially in winter.
Why is there blowing from the seams?
At the time when the bulk of panel houses were built, there were no reliable “long-lasting” sealing products. Therefore, the gaps between reinforced concrete building blocks were filled with ordinary sand-cement masonry mortar. And that's not a bad thing. But until the time when the building shrinks so much that the slabs move relative to each other. This could happen in a year, or maybe in ten years, but anyway, as practice shows, such a situation happens.
As a result of such displacement, and we can talk about several millimeters, the substance filling the seam cracks. And, even in the absence of visible damage, the resulting gap becomes a conductor of cold and moisture that enters the apartment from outside. With the subsequent movement of the building, the situation only gets worse and can reach such an extent that through the resulting gap you can observe what is happening on the street. It is clear that in such a situation it is impossible to do without radical measures.
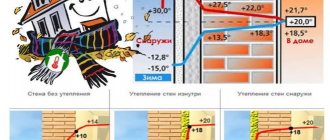
Is it possible to fight stitches from the inside?
Of course, it’s possible and necessary, especially if it’s -20 outside the window and you can stick your finger through the crack. That is, it is necessary to take urgent but temporary measures. Why temporary? Because sealing seams from the inside is basically wrong. Just imagine that the existing gap between the panels was sealed with ultra-modern and durable sealant from the inside. And outside the crack gapes, and after each rain a lot of moisture accumulates in it. Previously, the gap was ventilated, so moisture quickly evaporated. Now it will be here permanently, destroying not only the solution that binds the panels, but also the concrete slab itself. Can you imagine what the consequences could be?
The same applies to the idea of insulating the wall from inside the apartment. In this case, according to the laws of heating engineering, the dew point, which was previously somewhere in the middle of the panel thickness closer to the outer surface, will shift just to the inner surface of the wall. That is, from inside the apartment between the wall and the insulation, streams formed by condensate will constantly flow down the surface. And this moisture will begin to destroy from the inside the floor covering next to the wall and the finishing below, where fungus and other “micro-living creatures” will grow.
So what to do? Seal seams and insulate panel houses. Only outside.
Sealing seams between panels from the outside
The work itself of sealing the gaps between reinforced concrete blocks is not that difficult. However, given the height, only industrial climbers, who will have to be hired, can do it. But there is a category of lucky ones, which include the residents of the first floor. So they can do this simple work on their own. So, what needs to be done:
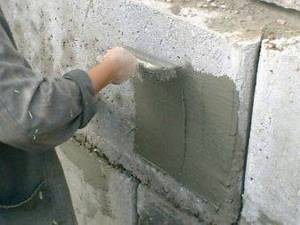
- You need to remove the contents from the seam using a punch. There may be old sealant, mortar, and the corpses of deceased insects. Ideally, you should end up with two butting slabs and nothing between them.
- Now the surfaces of the panels need to be moistened with water from a spray bottle and the existing gap must be filled with polyurethane foam. It is better to use professional foam (applied with a gun), it is denser, expands less and is generally of much higher quality.
- We wait for complete polymerization (hardening) of the polyurethane substance, after which we remove it from the outside by about 3 cm. We place a special cylindrical roller made of polyethylene foam (vilatherm) into the existing groove along the entire length of the gap between the panels.
- We cover the top of the polyethylene insulation roller with a special sealant designed for this purpose, which is necessary for waterproofing.

Sealing the seams from the outside is a good and useful thing, but to achieve the desired effect, you should also insulate the wall from the outside.
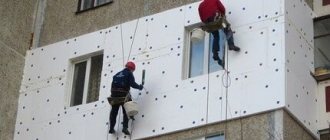
Insulation of a panel house from the outside
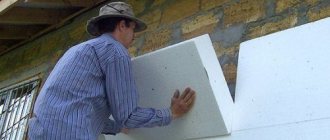
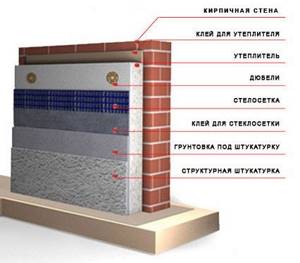
And here the residents of the first floor are lucky, who can do the insulation of concrete walls outside their houses on their own. Everyone else, those who live higher, will again have to turn to the services of specialists with climbing equipment. They usually know what needs to be done. But for residents of the first floor, it is worth offering instructions on how to insulate walls, using inexpensive and easy-to-use polystyrene foam. It’s worth noting right away that before installing the insulation, you still need to seal the gaps between the panels. So, we insulate the wall of the first floor:
- The wall must be cleaned of debris and all kinds of contaminants, and then treated with a high-quality primer intended for outdoor use (should be indicated on the packaging).
- If necessary, a support plate is attached to support the first row of foam.
- Cement-polymer adhesive is prepared using a construction mixer according to the instructions on the package. The correct solution should adhere to the metal (working) surface of the spatula.
- The glue is applied to the foam board in several places (along the edges and in the center) in the form of slides. The insulation sheet is pressed against the wall. During this, you need to control the verticality of the installation.
- After installing the first row, the second is installed, and the vertical joints should not coincide (as in brick laying). And so on to the top.
- Once the glue has set (about a day), the sheets are secured with special dowels (umbrellas).
- A layer of plaster glue is spread over the surface of the foam using a spatula, into which the façade mesh is pressed for reinforcement. Another leveling layer of solution is placed on top.
- When all the plaster layers have dried, the working surface should be lightly sanded with a flat emery stone, and then treated again with a primer. Now everything is ready to apply decorative plaster, bark beetle, for example, or “lamb beetle”.
That's all. We think that the information obtained from the article will help you deal with the problem of sealing seams between reinforced concrete blocks, as well as insulating panel houses from the outside.
The need to insulate interpanel seams
Building structures in a panel house are assembled from panels manufactured at the factory. At two or more points of each joint, the embedded parts of adjacent panels are connected by welding. The gap between the elements is called the interpanel seam; it must be insulated and protected from the effects of weather. If the insulation and sealing of joints is poor, cold, dampness and drafts will penetrate into the home. This not only reduces comfort, but can also lead to mold and mildew. Then living in an apartment will become impossible.
Before opening the seam, you need to make sure that it is the seal that is broken. Drafts can also be caused by poor sealing of windows and doors.
A suspicious seam is checked by beating off a small section of it with a mason's hammer or an ice pick. If after a couple of gentle blows the suture material crumbles, the seam will have to be disassembled and sealed again.
Methods for wall insulation of panel houses
To improve the indoor climate, residents can use one or two insulation methods:
The implementation of the first method is often complicated by two factors:
The second method is not without a number of disadvantages:
- certainly reduce the usable area of the room;
- for high-quality insulation inside, you will have to seriously prepare the walls, destroying ordinary life;
- temporary relocation of residents is required, especially if work is carried out with materials containing harmful impurities;
- Insulation work from the inside reduces the service life of the panel structure, because during winter the wall penetrates into the territory of negative temperatures.
Still, insulation inside the walls is better than thermal insulation on the outside in terms of savings - residents will not have to spend money on work at heights. They will also spend less on thermal insulation.
Sealing seams during construction
If earlier they used tow or rubber for these purposes, today builders more often work with materials such as dowels, cement mortar, and swelling cord made of hydrophilic rubber. Here are several reasons why such sealing cannot be considered high-quality and complete:
- the presence of chips and cracks in the slabs formed during transportation;
- the appearance of gaps during installation work;
- poor quality, dishonest performance of work.
Heat-saving materials for house walls made of panels
The operation of the apartment is accompanied by a periodic increase and decrease in the ambient temperature in the middle of the premises.
Therefore, the material must not only be an excellent heat insulator, but also have optimal moisture-resistant characteristics.
This requirement is fully met by the two most popular materials for insulation, which we will consider. Nowadays, liquid heat insulators are also becoming very popular, but these are already topics for our other publications.
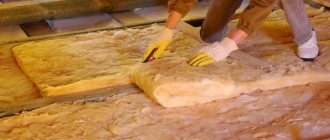
Artificial latex
Thermal insulator supplied in the form of foam that hardens after application. It has a low thermal conductivity, thanks to which it perfectly retains the air that has heated up in the house. For uniform application and crystallization, formwork must be used. Its role is usually played by bars with a cross-section of 25×25 mm or slightly larger, placed vertically and horizontally along the surface of the wall. The resulting cells (parts) will be equally filled with artificial latex.
Application
The technology for applying waterproofing differs depending on the type of seams.
Interpanel
Poor quality sealing of interpanel seams leads to negative consequences: mold appears on the walls of the room, dampness, and damp spots. To avoid these unpleasant moments, it is necessary to properly seal all seams. Seam waterproofing must be done inside and outside the building. This process occurs in several stages:
- At the first stage, you should carefully remove old insulating material and various construction debris from the seam.
- After the seam is cleaned, it is necessary to apply a primer to the inner surface of the joint. The applied primer layer must be thoroughly dried.
- Next, you should insulate the joints of the panels. To do this, you can use polyurethane foam or polyethylene foam padding.
- Then a layer of mastic or sealant must be applied over the installed special gasket. The waterproofing material must be applied in such a way that the interpanel seam does not protrude as a bump.
Deformation
The main purpose of expansion joints is to compensate for various loads on the structural elements of a structure. Such overloads occur under the influence of temperature changes and seismic activity. Waterproofing of expansion joints must be carried out strictly observing all the requirements and nuances of the technology.
Lubrication is carried out as follows:
First you need to thoroughly dry the walls. Next, the expansion joint is filled with crushed stone
It is important to remember that the material must be dry. Crushed stone is poured in several stages, gradually. Each layer of crushed stone is filled with bitumen solution
This is necessary so that the bitumen fills all the voids between the factions. Then the operation is repeated, and so on several times, until the expansion joint is completely filled.
Cracks
As a result of precipitation, vertical cracks very often appear in the walls of various structures. First, it is necessary to identify and eliminate the cause of the settlement, and only after that can you begin to seal the cracks.
This is done as follows:
- minor damage to the surface of the walls is slightly expanded to make it easier to introduce the solution, while it is necessary to remove poorly adhering pieces of plaster;
- Before applying the solution, the wall surface should be moistened;
- The consistency of the waterproofing solution must be identical to the composition of the plaster solution.
Ceilings
Seamless waterproofing of floor coverings can be done in several ways. The best option is to use special impregnating compounds. Penetrating into the concrete base, they combine with the salts contained in the concrete composition. In this case, crystalline compounds are formed. These compounds grow, adhesion to the base, and serve as excellent protection against moisture penetration.
For seam waterproofing of ceiling coverings, in addition to penetrating compounds, you will need a special tape. The ceiling surface is thoroughly dried and cleaned of dirt and dust. Next, you need to impregnate the seams and corner joints with the impregnating composition. After this, the treated surface is thoroughly dried. A special tape is applied and carefully rolled out using a roller. Then another layer of impregnating composition is applied over the tape. The surface is dried. Next, you need to treat the entire surface of the ceiling using an impregnating mixture. Two, or in some cases three layers should be applied for more reliable insulation.
Work methodology
When insulating, you must adhere to the working steps described below.
- Selection of thermal insulation method (outside/inside; the second is easier to implement).
- Calculation of insulated area, purchase of materials; transition to the preliminary stage.
- Drying the surface (heat guns and heating devices are used). The walls are insulated strictly during hot periods!
- Old coverings (wallpaper, paint, decor) are removed, the plaster is removed down to the concrete base.
- The surface is cleaned of dirt and dust (use a broom or vacuum cleaner).
- Treating the walls inside with an antiseptic.
- Priming the original surface (it is better to use a good penetration primer and apply it in several layers).
- Allow the walls to dry thoroughly.
- Leveling using specialized mixtures (those used for tiling bathrooms are acceptable). When drying the plaster, do not use heating devices - this way it will acquire normal reliability.
- Installation of foamed polymer. Unlike artificial latex, it does not require formwork - the slabs are attached with glue directly to the dry surface. When using polyurethane foam, the heat insulator is applied a little later after creating the wooden frame.
- After the glue has completely dried, the joints of the plates are sealed with sealant.
- A second wall with the final cladding is applied on top of the resulting structure.
If all steps are completed correctly, the temperature increase in the middle of the panel house is guaranteed. If the work does not produce results, you will also have to insulate the floor of the apartment.
The range of good thermal insulators is very large, but few of them are suitable for panel buildings. Due to the impossibility of insulating the living space from the outside, residents need to carry out work inside that is not incredibly complex, productive and does not require specialized abilities or knowledge. Even residents of irreparably freezing panel buildings can achieve an increase in room comfort if they use the heat insulators proposed above.
Sealing the joints of loggias and windows
The construction of loggias and balconies implies the presence of joints between the slabs and the walls, through which water gets inside when it rains.
Due to constant dampness, construction materials will gradually deteriorate, and fungus and mold will form on the walls. If the loggia is not yet insulated and cold air gets in, the furniture will deteriorate, and the level of comfort inside is not at all what the residents expect. To prevent drafts and remove cold bridges, you need to take care of high-quality thermal insulation. The main reasons why water leaks onto a balcony or loggia include:
- poor quality sealing;
- damaged roof;
- poor tides or no tides at all.
To determine the cause, as well as plan a further course of action, you need to invite a specialist to inspect the premises. A prerequisite for thermal insulation is the treatment of the joints of the wall and ceiling slab. If you ignore this process, in the near future the water that will accumulate on the stove will begin to get inside.
Sometimes people complain that after installing windows, water seeps into the windowsill and slopes. This may occur due to the fact that there is no sealant at all between the flashing and the wall or there are no flashings.
Modern materials presented by well-known manufacturers make it possible to quickly and, most importantly, efficiently, perform thermal insulation of panel joints. If you can’t do the outside work yourself, and it’s not financially possible to order the services of specialists, don’t despair, because you can insulate the joints from the inside. To avoid unpleasant consequences due to incorrectly performed work, it is recommended to immediately contact professionals.
For information on the technology of insulating interpanel seams, see below.
Methods for wall insulation of panel houses
To improve the indoor climate, residents can use one or two insulation methods:
The implementation of the first method is often complicated by two factors:
- apartment location on the top floor;
- layout of the living space, in which a large number of walls border on the walls of adjacent rooms (it happens that only a balcony can be sheathed from the outside).
The second method is not without a number of disadvantages:
- certainly reduce the usable area of the room;
- for high-quality insulation inside, you will have to seriously prepare the walls, destroying ordinary life;
- temporary relocation of residents is required, especially if work is carried out with materials containing harmful impurities;
- Insulation work from the inside reduces the service life of the panel structure, because during winter the wall penetrates into the territory of negative temperatures.
Still, insulation inside the walls is better than thermal insulation on the outside in terms of savings - residents will not have to spend money on work at heights. They will also spend less on thermal insulation.
Warm seam technology
The highest quality way to seal interpanel seams is this technology. Its cost is quite high, but the result lives up to expectations. The work is carried out according to a simple scheme:
The interpanel seam should be opened along its entire length. The old sealant must be completely removed. The entire surface of the seam is treated with a primer. Then the seam should be filled with foam. It must be remembered that it can triple. That is why the foam should be applied to the depth of the seam. It is necessary that it fills about a quarter of the thickness of the panel. When the volume of foam begins to increase, it is necessary to lay Vilaterm in the joint - this sealant is made of polyethylene. Thanks to this, the foam will not come out. This seal is sold as hollow tubes. However, there are often continuous options. Vilaterm can have dimensions exceeding the dimensions of the seam by 10%! (MISSING) It must be installed in the desired place with a spatula. It should be slightly pressed into the mounting foam. It is better if the Vilaterma roller is located at the same height as the outer edge of the panel. After sealing the seam, you just need to apply water-repellent mastic to it.
This technology for sealing joints today is the most effective way to repair the external surfaces of panel houses. When choosing this method, the work efficiency is the highest. The seam is insulated, becomes waterproof, and also protected from precipitation. This allows you to increase the service life of the entire house.
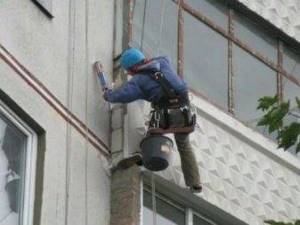
Sealing of interpanel seams in multi-storey structures is carried out by professionals. It is possible to conduct experiments only at the level of the first and second floors - if the scaffolding is secure. In other cases, it is necessary to call industrial climbers.
2
We select the material and understand the technological nuances
To seal joints, it makes sense to use materials recommended by professionals. These include:
special mastics; sealants; polyurethane foam; sealing tape.
The choice of sealing material should be approached truly responsibly
And at the same time take into account the level of destruction of the interpanel space. If the old seam has minor defects, its restoration requires a minimum of effort
We need to degrease the problem area, let it dry, and then treat it with a silicone-based moisture-proof mastic.
If the old seam is characterized by more serious flaws, you will have to open it up to 20-40%!, (MISSING) to remove dust and crumbs. We degrease the voids cleaned in this way and then let them ventilate well (12–20 hours). After this, we fill the space between the joints with sealant and place tubular polyethylene insulation in the latter. The next step is to carefully compact the resulting layer and level it. Then we wait until the new joint filling has completely hardened, and we treat the hardened joint with mastic.
In cases where the wear of the sealing layer is catastrophic, there will be more work. We need to open the seam, remove the old insulation and pieces of old caulking, small particles of debris and dust from it, and process it according to the scheme described above. Cleaned and degreased large spaces (cracks more than 0.5 mm wide) are best sealed with polyurethane foam. It flows into the gaps without any problems, quickly sets and hardens. Foam fills the voids between the slabs. And after drying, its excess parts can be easily cut off with a knife. At the end of the operation, we apply a layer of putty on top of the repaired area of the slab.
Blowing in serious seams in a panel house is usually done with Polymerflex foam or its equivalent. We also don’t use just any mastic. To seal joints between slabs, we use compounds made from rubber-bitumen materials, rosin, polyisobutylene, asbestos, resin, for example Espogerm
It is important that the mastic contains an antiseptic!
We use Elastomix paste as a sealant. Instead, it is allowed to use any other polymer-bitumen composition that has a high resistance to temperature changes and humidity. One more nuance. Sealing of joints in panel houses is usually carried out using Vilaterm tubular insulation. However, you can also work with urethane foam products under other brands. All of them allow you to efficiently seal the seams and protect the walls of the apartment from moisture, and the home itself from heat loss.
Heat-saving materials for house walls made of panels
The operation of the apartment is accompanied by a periodic increase and decrease in the ambient temperature in the middle of the premises.
Therefore, the material must not only be an excellent heat insulator, but also have optimal moisture-resistant characteristics.
This requirement is fully met by the two most popular materials for insulation, which we will consider. Nowadays, liquid heat insulators are also becoming very popular, but these are already topics for our other publications.
Artificial latex
Thermal insulator supplied in the form of foam that hardens after application. It has a low thermal conductivity, thanks to which it perfectly retains the air that has heated up in the house. For uniform application and crystallization, formwork must be used. Its role is usually played by bars with a cross-section of 25×25 mm or slightly larger, placed vertically and horizontally along the surface of the wall. The resulting cells (parts) will be equally filled with artificial latex.
Thermal insulation of house walls made of panels using polyurethane foam has a couple more properties:
- after hardening of the polyurethane foam, an additional waterproofing layer is required (to reduce the amount of condensate formed);
- impossibility of finishing and finishing (you will have to build a second plasterboard wall on top of the PPU, on which you can apply wallpaper, plaster, etc.);
- if the previously listed conditions are met, a minimum of condensation will appear, after which it will be diverted to the wall joint using insulation.
The cost of work on wall thermal insulation of a house from panels on the outside or in the middle using polyurethane foam is high - you will need the necessary equipment, as well as professional workers. Thanks to this, consumers prefer the second good material.
Foamed polystyrene extrusion (foamed polymer)
The most serious difficulties when working with a material appear at the stage of its installation process. The foamed polymer is supplied in ideal slabs of 100×50 cm or more, due to this, when covering walls that need to be leveled, its distortion is inevitable. Therefore, it is necessary to carefully prepare the initial surface, otherwise layers of air will appear where condensation will penetrate.
The boards are attached to the wall surface with a special glue, applied equally to the entire sheet, and the joints are lubricated with sealant. The use of anchor connections is excluded - leaky transitions may appear throughout the entire layer of foamed polymer. It is better to use a T-shaped profile fixed to the floor and ceiling.
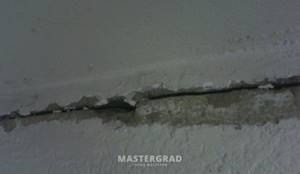
Errors when performing joint repairs
If the work is performed unsatisfactorily and the quality of the materials used is poor, the facades of buildings will require repair within a few years. Facades with seams carelessly coated with black sealant look bad. Stripes of various widths (up to 20 cm
) go beyond the dimensions of the seams and cover the front part of the wall structure.
Coating the seams of wall panel joints
It is applied even in places where possible water penetration is expected - as a result, mottled, roughly applied black stripes appear on the facade. When aging, the sealant comes off the seams, exposing the tarred tow used to caulk the seams, which in turn causes local darkening of the surface and leakage of the joint.
NOTE: Surface sealing of joints
wall panels, made
without proper cleaning of the seams
and
deep compaction of the mortar
, does not give the desired results and requires rework again and again.
Construction organizations and housing and communal services offices quite often resort to re-caulking seams and sealing with mortar. Such work is usually carried out in autumn or winter (when leaks intensify), and the quality of such work is very low.
ATTENTION! Repair work and insulation of joints
should be performed in the warm season in dry weather.
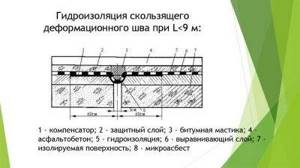
The insulation diagram of vertical and horizontal conventional open joints
of reinforced concrete wall panels
is shown in Fig. 5.
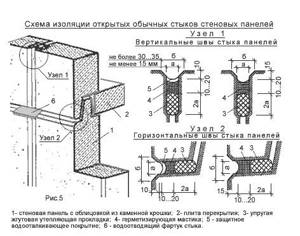
Joints (seams) between wall panels
should be no wider than
30...35 mm
(Fig. 5 pos. "b") and somewhat
recessed
(due to the chamfering).
NOTE: Depending on the joint width
it is filled with sealant to such a depth that after laying the filler (Fig. 5, item 3), there remains sufficient area for adhesion between
the sealing gasket of the filler and the sealant
(Fig. 5, item 4).
The thickness of the elastic band of sealant
take the smallest width in the middle of the seam (Fig. 5 pos. "a").
Typically, the thickness of the sealant bundle should be at least 10 mm
.
And for wide joints
of more than
20 mm
- about half the width (with size “2a”) of the joint.
READ ALSO: The best slot machines at the Vulcan Prestige casino
ATTENTION! If it is impossible to ensure clamping of the adhesive bitumen waterproofing
Its use is NOT RECOMMENDED.
Therefore, glued bitumen waterproofing
in the seams of wall panels
is used in places where this is allowed - in wall panels with wide seams (for example, in the seams
between the ceramic cladding
of external wall panels).
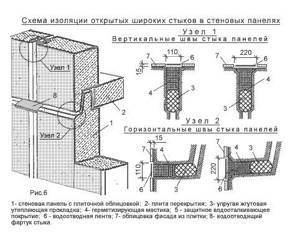
The insulation diagram of vertical and horizontal wide open joints
of reinforced concrete wall panels
is shown in Fig. 6.
Repair of joints
can be carried out with or without preliminary clearing, depending on their condition. Insulating compounds and materials must be applied in continuous and uniform layers or in one layer without gaps or sagging.
ATTENTION! Each layer must be arranged on the hardened surface of the previous one.
with leveling of applied compounds,
with the exception of painting ones
.
Work methodology
When insulating, you must adhere to the working steps described below.
- Selection of thermal insulation method (outside/inside; the second is easier to implement).
- Calculation of insulated area, purchase of materials; transition to the preliminary stage.
- Drying the surface (heat guns and heating devices are used). The walls are insulated strictly during hot periods!
- Old coverings (wallpaper, paint, decor) are removed, the plaster is removed down to the concrete base.
- The surface is cleaned of dirt and dust (use a broom or vacuum cleaner).
- Treating the walls inside with an antiseptic.
- Priming the original surface (it is better to use a good penetration primer and apply it in several layers).
- Allow the walls to dry thoroughly.
- Leveling using specialized mixtures (those used for tiling bathrooms are acceptable). When drying the plaster, do not use heating devices - this way it will acquire normal reliability.
- Installation of foamed polymer. Unlike artificial latex, it does not require formwork - the slabs are attached with glue directly to the dry surface. When using polyurethane foam, the heat insulator is applied a little later after creating the wooden frame.
- After the glue has completely dried, the joints of the plates are sealed with sealant.
- A second wall with the final cladding is applied on top of the resulting structure.
Work execution algorithm
After the applied primer has dried, we measure the gap between the PP and determine the materials that will be needed to seal it and their quantity. Next we do the following:
To fill the seam, you can use plaster based on either gypsum or cement. The finished solution should have a creamy consistency. If the gap is shallow and not wide, then the plaster can be applied in one layer (after wetting the groove with water). If the seam dimensions are larger, then we fill it in several stages. Moreover, we apply each subsequent layer only after the previous one has already dried.
On a note! To prepare the mixture, it is better to use tensile cement (NC). Of course, it is 20 percent more expensive than Portland cement, but it differs in that its use promotes rapid hardening and expansion of the concrete solution (thereby improving adhesion to the floor slab).
To seal a deep and wide seam, you can use polyurethane foam (it is applied to a pre-wetted surface in small portions), the excess of which, after hardening, is cut off with a construction knife. If the gap is narrow and shallow, then a polyethylene foam roller is suitable for sealing it. After the elastic materials have been laid in the seam, we lay a layer of plaster (for example, gypsum) on top of them.
Regardless of what materials you choose to seal the seam, the subsequent stages of work are identical:
We embed a painting fiberglass mesh (that is, serpyanka) into the still uncured plaster layer, the use of which prevents cracking of the material used after drying. We smooth out the reinforcing tape with a spatula so that a small depression remains in the sealed seam (this is necessary for better adhesion with subsequent decorative finishing).
On a note! To make laying the serpyanka easier, you can cut it into small pieces. They must be overlapped (its value is 10 mm).
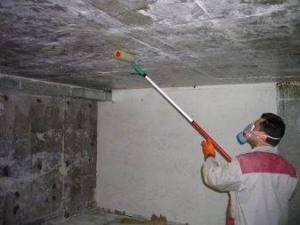
- After 3 days (when the material placed in the gap has completely dried), we wipe the entire surface of the ceiling with a rag soaked in water. We are waiting 24 hours.
- Next, using a spatula (preferably a wide one), apply a layer of starting putty to the ceiling surface (its thickness is 2-3 mm). We leave it to dry.
- We level the ceiling surface using an abrasive material (having a medium grain) applied to a paper base (that is, “sandpaper”).
- Apply a layer of finishing (leveling) putty.
- After it has dried, we sand the surface of the ceiling using fine-grain sandpaper.
We are painting the ceiling.
How and with what to seal the joints (seams) between the panels in the apartment on the ceiling and walls with your own hands
WITH
The construction of panel houses involves joints between these panels, that is, seams. The slight mobility of the entire structure of the house and various types of vibrations suggest that the panels, albeit by millimeters or even fractions of millimeters, will be movable, and the panel house will also settle after construction for about 2-5 years. These small movements will provoke the appearance of cracks at the joints of the panels, that is, in the mortars sealing them.
To protect your finishing from the appearance of cracks at the joints of house panels, there are several ways to reinforce them and seal them with special ones. compositions. We will talk about how and with what to seal the joints between the panels of the house so that the finish does not crack at the seams between the panels. In addition, the panels are often blown through, and there is draft from them, but you need to contact the management company so that they can deal with this issue.
Types of seams and their execution
Having mastered the theory, newly minted needlewomen usually pick up a needle, thread it and try to embroider the first rococo seam. You can do it step by step following a simple scheme:
- Thread the fabric from the inside out, not forgetting to secure the thread with a knot at the end.
- They step back from the place where the thread exits towards the future seam and pierce the fabric so that the tip of the needle comes out near the thread.
- Pull the needle out halfway and make the required number of turns around it.
- Pull the needle and thread through the turns, holding them with your free hand.
- Pass the needle through the wrong side and tighten the seam, straightening it from the front side.
Following these simple instructions, perform any stitches. They differ mainly in the number of turns and the density of the winding. There are four types of seams:
- Knot. The main difference from its counterparts is the small number of turns and the beginning of this seam coincides with its end.
- Spiral. A type of knot, only there are many more turns in such a seam (up to 15 times).
- Loop. The same knot, only the seam is made to the width of the turns. This type of seam has a step, unlike a knot.
- Stitch. A long loop is called a stitch. The difference from its brother or sister is the presence of a large number of turns and, accordingly, a longer pitch.
After practicing the basic stitches, you usually begin to embroider simple patterns. Most often these are rococo roses. Embroidery of these flowers, beloved by many, is the most common decorative element.
Seal the deep interpanel seam
If the seam is deep and air leaks through it, it needs to be sealed and insulated. Management companies need to be involved in such work.
After all the work on insulation and sealing of seams has been completed, you can begin renovating the room yourself. If for some reason it is not possible to attract a management company, we will consider the issue of sealing deep cracks between the panels ourselves, and at the same time check whether the management company is acting correctly.
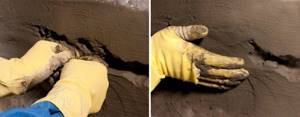
We embroider the interpanel seam
First of all, to fill a careless seam, you need to unstitch it, that is, remove everything that is falling off from it. If there is already some kind of insulation in the seam and it is well preserved, you can leave it, compact it and simply add a new one. The main thing is that everything is tight, there are no voids.
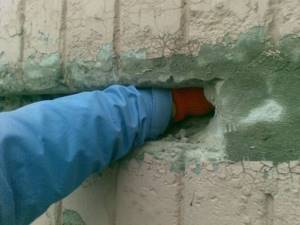
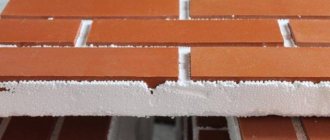
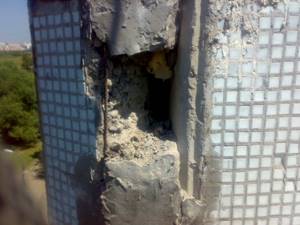
The photo above is a very difficult case and relates more to outdoor work. I hope you don't have this.
How to fill, seal, and insulate deep interpanel seams
There are several materials, all of them relate to insulation, and at the same time work as sealants.
The easiest way is to fill the seam 3/4 full with polyurethane foam, after drying, cut off the excess foam with a utility knife, and plaster the top with gypsum plaster, reinforcing with fiberglass mesh. You can use cement-sand mortar of about M200 grade or tile adhesive.
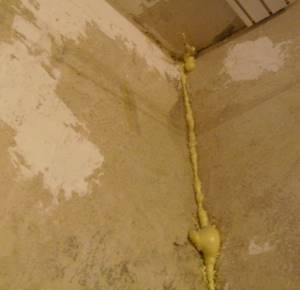
Sealing the interpanel seam with foam
Before pouring, be sure to dust the surface: go over it with a brush, remove the dust and moisten the surface with water. After this, without waiting for it to dry, you can pour in the foam. Please note that foam expands 1.5-2 times.
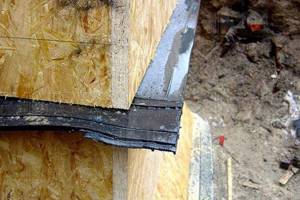
Foamed polyethylene tubes are well suited for sealing interpanel seams, or even specially designed for them.
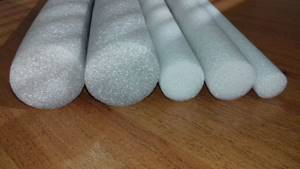
Foamed polyethylene tubes are ideal for thermal insulation of interpanel seams
The tubes have different diameters and are suitable for sealing deep seams. Select the tubes according to the size of the seam with a small margin so that they fit tightly. You need to install the tube using a spatula, gently pressing it into the seam so that it fits tightly. After installation, you can seal the remaining hole with a cement-sand mixture or gypsum plaster, just as in the previous method.
Any of these insulation materials is generally suitable for sealing an interpanel seam, but cutting it to fit the seam is not very convenient.
You can combine any insulation with polyurethane foam. For example, fill the seam with foam a little and press the Vilaterma tube, we will get a good connection without gaps.

We figured out how to seal a deep seam, let's look at the small ones.
Seam tightness
The main technological feature of a concrete structure is the presence of seams. Poor sealing of seams causes uncomfortable living in the apartment. “It blows from all the cracks” - you often hear from residents of panel houses. Dampness and high humidity in the room lead to the formation and spread of fungus and mold, which negatively affects the health of household members. The solution to this problem is insulation of interpanel seams. The work is carried out using various building materials: mastic, sealant, polyurethane foam and others.
Is it worth opening the seam? Before answering this question, it is necessary to check the condition of the connecting section. For these purposes, use a climbing hammer with a sharp tip. Using a tool, the seam is checked for strength. They strike and judge the state of the connection based on the result. If the seam breaks into pieces, it means that opening and complete sealing is required. When working with concrete joints, it is recommended to use a bumper.
How to seal a shallow interpanel seam
Not deep interpanel joints can be sealed with a simple cement-sand mortar. If it's just a matter of aesthetics and nothing is blown out of the seam, then that's enough. If the seam is blown out, then most likely you need to unstitch it and before that contact the management company so that they can look from the outside to see what’s wrong with it.
If nothing is blown out, you can pour polyurethane foam into the seam for reliability and plasticity of the structure if the tip of the gun (or tube) fits into the seam. The main thing is to leave room for plaster.
How to order
If you need help or order thermal insulation of seams, leave a request on the website or call the phone number 8 964 646-42-94
. Our specialists will contact you, answer all questions and calculate the cost. The final price depends on the volume, the current condition of the seams, the distance to the object (we work in Moscow and the region) and the materials used.
We work with all series of houses: P-3 | P-3M | P-3M-7/23 | P-44 | P-44T | P-44TM | I-155N | P-46 | P-46M | 1-515/9M | II-68 | P-111 MO | P-55 | P-55M | II-18/12| IP-46S | KOPE
How and with what to seal the joint between the panels so as not to crack
And now let's look at how to make sure that our sealed interpanel seams no longer crack and spoil the finish. Such cracks are especially offensive on painted ceilings; they are not visible under the wallpaper, although with strong cracks they can tear the wallpaper.
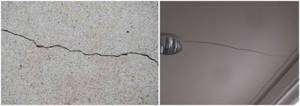
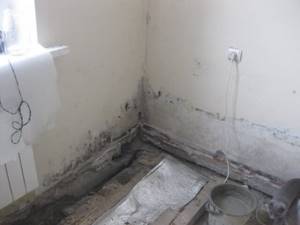
Interpanel crack in the ceiling
The first is to seal the interpanel seams with silicone or polyurethane sealant (which is specially designed for sealing seams) instead of insulation.
We apply plaster on top and reinforce it with sickle mesh. We take the most durable plaster, for example Fugen or Perlfix glue (Knauf). You can use cement-sand mixture M300 or tile adhesive.
Firstly, it is necessary to reinforce all interpanel seams with sickle mesh and seal it with plaster - this will partially protect the seam from cracks.
Primary sealing
This type of sealing is usually carried out in panel houses immediately after their construction is completed.
Interpanel seams of new buildings are processed in 3 stages:
Empty interpanel cavities are filled with heat-protective polyurethane foam. The interpanel seam is treated with innovative insulation “Vilaterm”, which is a fine-celled, fairly lightweight white material. Additionally, the seam is sealed from the outside with a special mastic that has good water-repellent properties.
The use of these three stages allows you to create a so-called “warm seam”, which allows you to provide reliable thermal and waterproofing in all weather conditions.
Necessary materials
A seam is a cut in the structure of a building. During the sealing process, it is filled with a special material.
Creating seam waterproofing is a painstaking and responsible process, so only proven and high-quality building materials are used for it. Most often used for this:
- Soil mixtures. They contain quartz sand, cement and various special chemical components.
- Waterproofing materials. During construction work, very often minor defects are left unattended, which can lead to negative consequences: the appearance of mold, dampness on the ceiling and walls inside the building. To eliminate them, waterproofing building materials are used.
- Very often, special hydraulic seals are used to eliminate and prevent leaks.
- An excellent option for seam sealing is waterproofing cords. When in contact with moisture, they tend to swell, thereby filling the space and eliminating any leaks. However, it should be noted that this material is only a suitable option for small seams.
- To optimally protect a building from moisture, waterproofing dowels . They also perfectly compensate for the mobility of the structure.
- Special sealants.
To produce this type of waterproofing, special rubber and the latest technologies are used. Highly durable and waterproof, waterstops come in a variety of shapes and sizes, allowing you to choose the right option for any seam.
Materials we use for sealing joints
To seal seams, we use only high-quality materials that we have been using for many years, the technology for working with which has been proven, and we know how they behave after 5-10 years.
Vilaterm
This is an environmentally friendly material that simultaneously provides heat, vibration and sound insulation of the surface. It is used for sealing joints of different diameters; it is made from high-density polyethylene by foaming with a butane-propane mixture.
This is an environmentally friendly material, primarily thermal insulating. It is manufactured specifically for sealing interpanel seams of different diameters. It is selected for the seam - the diameter of the vilatherm should be one or two centimeters larger than the width of the seam, so that, on the one hand, it completely covers the seam, and on the other, it is not too flattened.
Construction foam
We use professional construction foam, which has a minimal expansion coefficient. so that when drying the sealant does not stick out. This is a common building material, which, on the one hand, is not very chemically complex, on the other hand, new manufacturers often encounter defects when the cylinder is half filled. Therefore, it is better to take foam from well-known brands.
Sealant
Our situation with sealants is this - there are excellent sealants, but, as a rule, they can dramatically simplify/change the recipe, which is why their quality decreases. Moreover, this applies to both domestically produced sealants and Baltic ones as well. Therefore, every two to three years we replace the sealant we are using with a new one.