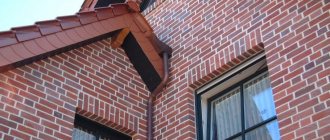
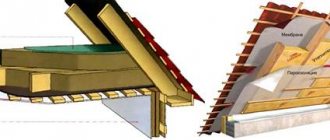
How and with what to seal the joints (seams) between the panels in the apartment on the ceiling and walls with your own hands
The
construction of panel houses involves joints between these panels, that is, seams. The slight mobility of the entire structure of the house and various types of vibrations suggest that the panels, albeit by millimeters or even fractions of millimeters, will be movable, and the panel house will also settle after construction for about 2-5 years. These small movements will provoke the appearance of cracks at the joints of the panels, that is, in the mortars sealing them.
To protect your finishing from the appearance of cracks at the joints of house panels, there are several ways to reinforce them and seal them with special ones. compositions. We will talk about how and with what to seal the joints between the panels of the house so that the finish does not crack at the seams between the panels. In addition, the panels are often blown through, and there is draft from them, but you need to contact the management company so that they can deal with this issue.
Contents:
1.
Seal the deep interpanel seam.
1.1
We embroider the interpanel seam.
1.2
How to fill, seal, and insulate deep interpanel seams.
2.
How to seal a shallow interpanel seam.
3.
How and with what to seal the joint between the panels so that it does not crack.
4.
How to get rid of cracks on the ceiling or walls if they appeared after finishing.
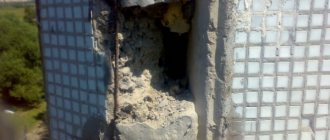
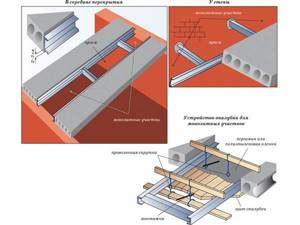
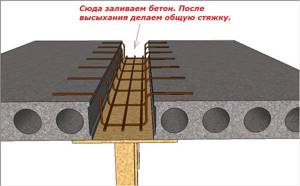
Monolithic sections with a width of more than 300 mm
If the gap between the slabs is from 100 to 300 mm, we construct a monolith with reinforcement. Options are also possible here.
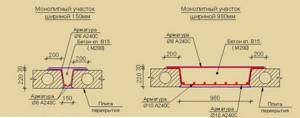
Option 1
Used when formwork from below is not possible.
- We install load-bearing beams with a cross-section of 40x100 mm on the edge, in increments of 1 m, resting on adjacent slabs;
- We attach the formwork panels to the load-bearing beams with wire twists;
- We cover the formwork with roofing material or film;
- We install the reinforcement cage on the glasses so that the reinforcement is 30...50 mm above the formwork;
- We are concreting.
Option 2
If it is possible to secure the formwork from below, you can use reinforcement to construct the supporting structure.
- We construct the formwork;
- We make mounting parts from A1Ø8…12 reinforcement (depending on the width of the gap to be bridged), taking into account that there must be a distance of at least 30 mm between the bottom of the formwork and the reinforcement;
- We lay protective material on the bottom of the formwork;
- We install mounting parts;
- We lay reinforcement or reinforcement cage;
- We are concreting.
Important!
Do not settle for filling the gap between the wall and the slab with lightweight concrete cellular blocks (foam concrete, expanded clay concrete, etc.) - they do not have the required load-bearing capacity. Taking into account the arrangement of furniture along the walls, this section of the floor is subject to a large load, this will lead to the destruction of the blocks and the need for costly repairs of the floor.
Reference
The areas between the wall and the slab are sealed in the same way.
This story tells not only about sealing seams, but also about anchoring the slabs to each other:
Seal the deep interpanel seam
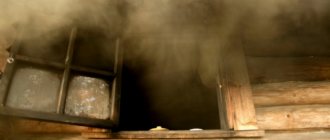
If the seam is deep and air leaks through it, it needs to be sealed and insulated. Management companies need to be involved in such work.
After all the work on insulation and sealing of seams has been completed, you can begin renovating the room yourself. If for some reason it is not possible to attract a management company, we will consider the issue of sealing deep cracks between the panels ourselves, and at the same time check whether the management company is acting correctly.
We embroider the interpanel seam
First of all, to fill a careless seam, you need to unstitch it, that is, remove everything that is falling off from it. If there is already some kind of insulation in the seam and it is well preserved, you can leave it, compact it and simply add a new one. The main thing is that everything is tight, there are no voids.
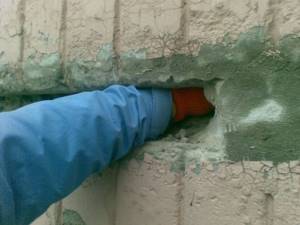
The photo above is a very difficult case and relates more to outdoor work. I hope you don't have this.
How to fill, seal, and insulate deep interpanel seams
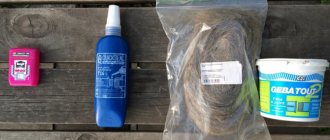
There are several materials, all of them relate to insulation, and at the same time work as sealants.
The easiest way is to fill the seam 3/4 full with polyurethane foam, after drying, cut off the excess foam with a utility knife, and plaster the top with gypsum plaster, reinforcing with fiberglass mesh. You can use cement-sand mortar of about M200 grade or tile adhesive.
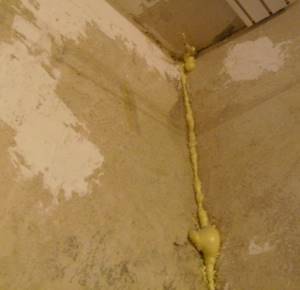
Sealing the interpanel seam with foam
Before pouring, be sure to dust the surface: go over it with a brush, remove the dust and moisten the surface with water. After this, without waiting for it to dry, you can pour in the foam. Please note that foam expands 1.5-2 times.
Foamed polyethylene tubes are well suited for sealing interpanel seams, or even specially designed for them.
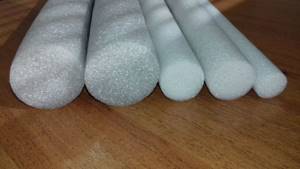
Foamed polyethylene tubes are ideal for thermal insulation of interpanel seams
The tubes have different diameters and are suitable for sealing deep seams. Select the tubes according to the size of the seam with a small margin so that they fit tightly. You need to install the tube using a spatula, gently pressing it into the seam so that it fits tightly. After installation, you can seal the remaining hole with a cement-sand mixture or gypsum plaster, just as in the previous method.
Any of these insulation materials is generally suitable for sealing an interpanel seam, but cutting it to fit the seam is not very convenient.
You can combine any insulation with polyurethane foam. For example, fill the seam with foam a little and press the Vilaterma tube, we will get a good connection without gaps.
We figured out how to seal a deep seam, let's look at the small ones.
What technologies are used to seal seams inside an apartment?

Also, work from inside the building may be required if the situation has become critical, and funding for seam sealing work is not included in the current estimate of the management company responsible for maintaining the house.
Methods for sealing interpanel joints from inside an apartment are no different from repair technologies used on the facade of a building. As a result, two technology options are most common:
- Filling with polyurethane foam.
- Sealing joints with a combination of vilaterm and polyurethane foam.
How and with what to seal the joint between the panels so as not to crack
And now let's look at how to make sure that our sealed interpanel seams no longer crack and spoil the finish. Such cracks are especially offensive on painted ceilings; they are not visible under the wallpaper, although with strong cracks they can tear the wallpaper.
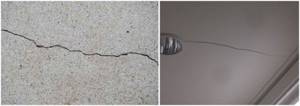
Interpanel crack in the ceiling
The first is to seal the interpanel seams with silicone or polyurethane sealant (which is specially designed for sealing seams) instead of insulation.
We apply plaster on top and reinforce it with sickle mesh. We take the most durable plaster, for example Fugen or Perlfix glue (Knauf). You can use cement-sand mixture M300 or tile adhesive.
Firstly, it is necessary to reinforce all interpanel seams with sickle mesh and seal it with plaster - this will partially protect the seam from cracks.
How to get rid of cracks on the ceiling or walls if they appeared after finishing
The task is difficult. You may have to redo the entire wall or ceiling, but that's your choice. In its simplest form, the crack is first opened along the edges; if wallpaper is glued, then the wallpaper is first removed. The crack is filled with silicone sealant and plastered or puttied over a serpyanka mesh or fiberglass. You can also glue paper tape for the gypsum board joints after the serpyanka, but it’s not a fact that a crack won’t tear it. Ideally, this is the best method of sealing, a “triple strike”, so to speak.
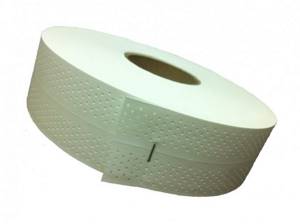
Paper tape for gypsum board joints
If a painted ceiling cracks, it needs to be refinished after repair. It won't be easy anymore.
The easiest way to repair a crack in the ceiling is to first fill it inside with silicone or acrylic sealant, then, after drying, fill it with putty reinforced with fiberglass strips.
This way we will get a reliable, non-cracking seam that will not protrude above the surface, but will be flush with it. Next, if it’s a ceiling, we put additional putty on the seam, sand it and paint it.
The nuance is that if you paint a separate piece of the ceiling, the paint will differ in color and texture and this will be visible to light from different angles, so think about it, maybe you should first repair the seams, and then → paint the entire ceiling.
That's all! Good luck with the renovation!
Leave your tips and comments below. Subscribe to our newsletter. Good luck to you and good luck to your family!
Source
Next steps
In order to further prevent damage between the joints of the slabs, it is necessary to perform a series of sequential actions, namely:
- It is necessary to allow time for the latex putty to harden. This may take two days.
- The recesses made need to be prepared for reinforcement. That is, apply a starting layer of putty. When laying, it is necessary to create a protrusion beyond the edges of the slabs. This is approximately 40-50 mm.
- A reinforcing mesh must be inserted into the applied material. We work with a roller or spatula with a narrow blade.
- After which the excess solution is removed. We work with a wide spatula, removing excess solution.
- Before sanding the working surface. You can use medium and then fine grit sanding material. You must first allow time for the applied layer to harden.
- The next stage is applying the finishing layer in two passes, sanding each of them.
After which, the prepared surface can be painted or wallpapered.
How to repair seams in panel houses: Technology and who should do it? Review +Video
Repair of seams in panel houses : technology of work and who should do it.
One of the many problems with panel houses is poorly sealed seams between the panels. This can manifest itself in the form of walls becoming wet, the appearance of fungus, and sound insulation problems. If the joints are poorly sealed, this will not only cause discomfort when living in an apartment, but will become a further cause of destruction of the panels, and the welded joint may lose strength. But the biggest damage is caused by moisture getting into the seams and freezing. To solve this problem, you need to insulate and repair seams in panel houses.
Such work requires large expenses and is carried out by contractor organizations during the next home renovation.
Types of repairs
At the stage of construction of panel houses, the joints are initially sealed and insulated; when the installation is completed, insulation is placed in clean grooves, the joint is filled with mortar and sealed from the outside. At this point, the work is considered completed and the seams are sealed. During the subsequent operation of the building, due to the shifting of the panels and shrinkage of the house, the sealing of the panel seams is broken. From this moment on, the real problems begin for the residents.
Repairs of interpanel seams in panel houses are carried out by industrial climbers. The main goal when sealing seams is to prevent moisture from entering the internal cavity of the seam and to prevent freezing of sealing materials in winter.
Technology and methods for repairing joints
The main requirement for carrying out high-quality repair work is precisely the correctly selected and high-quality materials, as well as the precise implementation of the entire production technology.
There are 3 main repair methods
- Caulking the seams.
- "warm seam"
- Waterproofing works.
If we are talking about caulking joints, then such work is performed without opening and replacing the main sealant. In this case, mastic is applied on top. This repair method is used when there are no visual signs of a leak inside the apartment, and the damage to the seam and its top layer is in itself insignificant. Such work is usually carried out immediately during cosmetic repairs.
But waterproofing joints involves complete cleaning and replacement of the sealing material. But despite all this, insulation of the joints is not carried out. As a rule, they use a one-component polyurethane sealant for interpanel seams and joints, called Germaflex 127. This material is excellent for insulating a vertical seam, and also withstands temperature changes over a fairly wide range (from -50 degrees to +80), and also hardens quickly .
It comes in white or gray, and goes well with any type of facade paint. The warranty period is a full 8 years. Repairing interpanel seams in panel houses using this technology makes it possible to protect them from moisture, but still this will not protect against the cold that will enter the room through horizontal unsealed joints.
Sealing the outer seam means that this will only protect against moisture and water getting inside, but we are not talking about cold here. For this purpose, waterproofing compounds are used, and the seam between the panels is completely filled using polyurethane foam, which creates an insulating effect.
Please note that in this way the foam will be located between the slab, which means it will be protected from ultraviolet rays. This will extend the service life. If you used a sealant, it will protect the slabs and joints from water getting into them. Sealed joints are a guarantee that you will not have fungus and mold in the room.
Warm seam
The “warm seam” technology for repairing seams in panel houses is quite new, but more effective than those given above. To carry out such work, it will be necessary to partially or completely open the interpanel seam. Old sealant and insulation material are removed, and the joints are cleaned of various debris. When this work is completed, Vilaterm hollow insulation is placed in the joints.
Useful tips
In old apartments, with the constant destruction of insulation, mold begins to develop on the walls. For this reason, mold areas are treated before resealing is performed. This work is performed in the following order:
- the contaminated area is cleaned;
- dried by natural ventilation for three days or using a heat gun;
- treated with biocide;
- covered with finishing materials with antiseptics.
The walls of old buildings, into which fungi have penetrated quite deeply, are very difficult to “cure”. Therefore, it is better to hire a construction team that will process and clean the surface in accordance with technology.