How to make the floor of the first floor correctly
Hello readers of my blog! Today we will talk about how to properly make the floor of the first floor. It would seem that the matter is not tricky, but when you are faced with this problem, you have to think about how to do it correctly, what preparation to do, what materials to choose. Thus, I decided that this article would be useful to someone, and I am devoting my efforts to this subject. In it I will answer a number of questions that will arise immediately before How to properly make the floor of the first floor, and some even after that. This topic is quite broad, because before work, thorough preparation is necessary, but how to do this? And this is a separate topic. You can learn about all this in great detail in the article below.
Floor screed is a necessary stage of any renovation.
Many owners prefer to entrust this work to professionals. However, if you have the necessary knowledge and free time, even a non-specialist can cope with this. In this article we will talk in detail about how to properly make a floor screed and give step-by-step instructions that will help you master the technology.
A brief educational program, or What kind of floor screed do you need?
Before raising the question of how to make a floor screed, it is necessary to agree on terms.
A screed is usually called a layer of construction mixture laid between the base of the floor and the finishing floor covering. This layer performs such important functions as:
Depending on the composition of the mixture and the installation method, there are several types of screed.
Cement-sand mortar is most often used as a floor leveling material. Industrially produced dry mixes are most common in construction. They are made on the basis of cement and sand with the addition of plasticizers - agents that impart elasticity and plasticity, fiber fiber and other components that improve the properties of the screed.
According to the method of laying the floor screed, there are
- wet,
- dry,
- semi-dry.
The classic method - wet - consists of filling the base with screed mortar and then allowing it to harden.
The mixture is laid directly on the floor slab or on a layer of hydro- or thermal insulation. The last requirement is mandatory when installing the screed directly on the ground (for example, structures like a garden gazebo). A waterproofing layer is necessary for rooms with high humidity (bathhouse, bathroom).
Currently, wet screed is used less and less because it has many disadvantages:
A dry screed is made of sheet material, which is laid on the base on top of an insulating layer (expanded clay, sand, etc.). The advantages of this method are speed and ease of installation, low weight of the structure. The main disadvantages of dry screed are that the sheet material is afraid of water, so it cannot be used in rooms with high humidity, as well as its high cost.
Semi-dry screed can be called an improved version of the wet method. The composition is prepared on the basis of cement-sand mortar with the addition of fiber fiber and plasticizers. When laying, a pneumatic blower is used, which mixes the components and delivers the mixture to the object.
Note: A pneumatic blower is a special compressor machine for preparing, mixing and transporting various building compounds.
This method is called semi-dry because the additives significantly reduce the moisture content in the solution. Thanks to this, the screed becomes light, strong, and elastic.
It takes only 12 hours for the solution to dry. After a few days, the final decorative coating can be laid on the screed. This method has, perhaps, only one drawback - the need to use special equipment.
Vapor barrier - why is it needed?
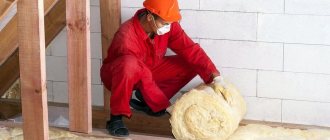
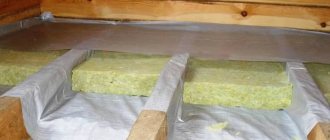
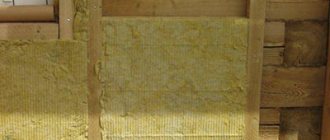
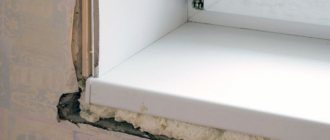
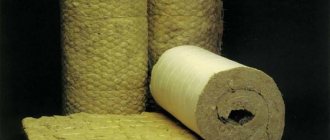
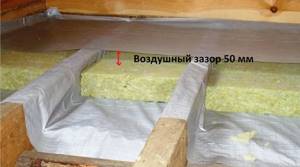
The insulation must be protected from moisture. Any insulation, if it gets wet, greatly loses its heat-protective properties. And since mineral wool is a hygroscopic material, you need to take care that moisture does not get on it.
But protection is required not only from water. Protection is required against steam penetration. Vapor barrier plays a big role in creating optimal operating conditions for insulation.
Without delving into the concept of partial pressure, we note the importance of understanding two points:
-it is the vapor barrier that is the barrier that prevents moisture (in the form of steam) from penetrating into the insulation;
- it is important to correctly determine in which place of the “pie” the vapor barrier should be placed.
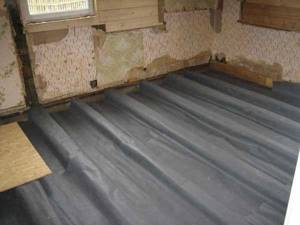
Vapor barrier
The principle of placing vapor barriers
In order to briefly but clearly understand where the vapor barrier should be placed, you need to remember: steam always spreads from a place with higher pressure to an area of lower pressure. It can be put simply this way: warm steam always (almost) spreads from the room to the outside. You need to remember this and then it will be easier not to get confused about where it should be placed.
From the above it follows that the vapor barrier is not placed “above” or “below” the insulation. It is placed “between” a warm room-source of steam (usually internal heated rooms) and a cold room (outdoor space), where this steam moves. Therefore, in the case of insulating the attic floor, the vapor barrier will be under the insulation, and in the case of insulating a wooden floor above the basement - above the insulation.
Concepts of vapor barrier, waterproofing, membrane
In order for the vapor barrier to be effective, i.e. worked correctly and did not cause harm, the film must be laid on the correct side. To do this, you need to study the manufacturer's instructions and consult the seller. Nowadays a large number of different materials are produced for protection against steam and water. But there is a difference between them. The scope of their application depends on the type of premises, their humidity and temperature conditions, ambient air temperature, and for what structure they are used - roofs, ceilings or walls. Often confusion stems from the concepts themselves: vapor barrier and membrane; instead of waterproofing, a vapor barrier is used.
Vapor barrier is designed to protect against water vapor that is in the air of the room. In fact, steam is a water-saturated gas, or one can say the gaseous state of water. The vapor barrier must have a low vapor permeability rate, i.e. it shouldn't leak steam. It is approximately 10 g/m2/day.
Basically, vapor barrier is a film. They can be roughly divided into:
-vapor-permeable or “breathable” (membranes);
-vapor-tight, practically impermeable to steam, water, or air.
Waterproofing is designed to protect structures from water. Water molecules are larger than gas molecules.
Membrane . Nowadays the word membrane has become very popular. Membranes are already more high-tech films. In relation to the topic of vapor barrier, we can say that this is a material capable of permeating or, conversely, trapping certain substances. The most commonly used expression is a vapor-permeable moisture-proof membrane. This means that this material does not allow water to pass through, but at the same time allows steam to pass through and allows moisture to evaporate. These are the properties that are required during construction to protect thermal insulation.
The direction from which the membrane allows steam to pass through and from which it does not allow water to pass through may be different for different membranes, depending on its intended location. Therefore, you need to be very careful when choosing and ask the seller for all the necessary characteristics.
How to properly screed a floor using the wet method
First, let's get an idea of how to make a smooth floor screed using the wet method. Having mastered the basics of classical technology, it is easier to master other techniques.
Necessary materials
Installation of a wet screed requires a minimum of materials. The solution is prepared from cement, sand and water. PVA glue can be added as a plasticizer.
The construction market offers an assortment of ready-made dry mixtures for preparing mortar. They are certainly more convenient to use and are often cheaper than cement.
It is important
The industry produces various brands of cement.
For example, the M400 marking [1] indicates the ability to withstand a load of 400 kg per cm 3. The larger the number in the designation after the letter M, the higher the strength of the cement.
Approximate costs
On average, to prepare 1 m 3 of M150 solution, approximately 490 kg of M400 cement is required [2]. To calculate the required volume of screed, you need to multiply the area of the room by the thickness of the layer.
In the case of the finished mixture [3], the consumption is about 1800 kg per m 3.
The approximate cost of a bag of M400 cement weighing 50 kg is 250 rubles, ready-made dry mix is 120 rubles for a package weighing 25 kg.
Laying time
According to technology, installation of a wet screed should be carried out in one step.
Storing the finished solution is not allowed because it hardens quickly. The recommended use time is no more than 1.5–2 hours. In this case, the floor in the room must be filled completely, not partially.
But even if pouring a wet screed takes a little time, its hardening is a long process. It is generally accepted that it takes 1 week for 1 cm of mortar to dry, while the recommended thickness for residential premises is at least 4 cm. Thus, on average, a month or even more will pass from the moment of pouring to laying the decorative coating [4].
Laying stages
Proper floor screeding in a house is carried out in several stages.
Marking and calculations.
First of all, you need to use a level to determine and mark around the perimeter a horizontal plane relative to which the floor will be leveled. From the drawn line you need to draw as many verticals as possible to establish the highest and lowest points of the base. This will help determine the optimal thickness of the screed and calculate the required amount of mortar.
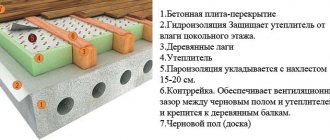
Preparing the base. The subfloor should be cleared of debris and dust, and cracks should be repaired with mortar. Next, a layer of primer is applied.
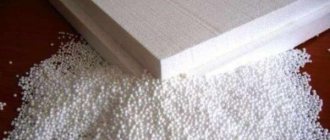
Its task is to improve the adhesion of the screed to the base. Laying a heat-insulating layer (if necessary). For this purpose, polystyrene foam boards or expanded clay are used.

If the screed is mounted on the ground, thermal insulation is a mandatory structural element. Waterproofing. It is required for rooms with high humidity (kitchen, bathroom, toilet).
Roofing felt and thick polyethylene film are used as waterproofing material. Installation of beacons. To get a perfectly flat surface, you need to know how to correctly set the beacons for floor screed.
They are horizontal guides made of a metal profile along which the leveling tool (rule) moves when pouring. Thus, the height of the beacons corresponds to the thickness of the screed. The guides should be installed at a distance of 20 cm from the wall and 1–1.5 m from each other [5].
Self-tapping screws and cement mortar are used for fastening. Preparation of the solution. A mixture of sand and cement is prepared in a ratio of 1:3.
The components are mixed until a homogeneous mass is obtained. It is best to use a construction mixer for this purpose. After adding ½ part of water, the solution is thoroughly mixed again.
The finished building mixture is diluted with water according to the instructions on the package. Filling. You should start laying the solution from the far side of the room.
The mixture is evenly distributed between the beacons using a rule. The freshly applied layer of solution must be pierced in several places to release air and prevent the formation of bubbles. A day or two after pouring, you need to remove the beacons and fill the resulting depressions with a solution, after applying a layer of primer.
Experts recommend...
...lay the screed in a layer of at least 4 cm, otherwise its strength will be insufficient.
The maximum thickness is not limited, but in practice it rarely exceeds 15 cm. A large layer of screed is necessary in rooms experiencing increased load, for example in a garage.
Care during the hardening period. The main measures at this stage boil down to preventing drafts and regularly moistening the surface with a dampened roller.
Water is needed for the curing process to proceed properly. Otherwise, the solution will dry out and cracks will form. Finishing.
It is advisable to sand the frozen layer of mortar to smooth out any existing irregularities. If linoleum or other thin material is chosen as a decorative covering, a self-leveling mixture (the so-called self-leveling floor) is applied on top of the screed. This allows you to make the surface perfectly smooth.
Do-it-yourself monolithic ceiling above the first floor
Monolithic reinforced concrete floors are naturally used in cases where the house is not built from wood. Although, covering the basement, if the foundation is made of concrete or brick, is even welcome.
Construction of a monolithic reinforced concrete floor
Such a floor is made, like any reinforced concrete product, using formwork. The difference is that the formwork will rest on “legs” that will rise directly from the floor of the previous floor, or basement. The thickness of the monolithic floor, as a rule, is 20 cm, the minimum is 15 cm, it all depends on the strength of the walls. A thinner ceiling rests on a less durable wall.
If the thickness of the monolithic slab is 20 cm, then the distance between the supports should be at least 1 m. With a thickness of 15 cm, this distance can be increased to one and a half meters.
Installation of monolithic ceiling
It is carried out according to the usual scheme: logs are placed on the supports, transverse beams are placed on them, a step of about half a meter. Shields are placed on top. Once the formwork is ready, they begin to reinforce the monolithic floor.
The reinforcement is made from rods with a diameter of 10-12 mm, which are laid in a grid with cells measuring approximately 20x20 cm. The corners are boiled.
All. You can start pouring concrete. Pouring is carried out in one step; a deep vibrator is used to compact the mixture and remove air bubbles. After pouring, the formwork is not disassembled for at least three weeks (30 days according to Western technologies) until it dries completely. It turns out that we made a monolithic slab on our own. The strength of such a floor is much higher than that of a wooden floor or even a floor made of reinforced concrete slabs.
Installation of monolithic slabs

The use of floor slabs is impossible without the use of heavy construction equipment, in particular, a truck crane. This makes the task more difficult. On the other hand, this is the fastest type of creating an overlap. You just need to take into account that the slab should rest with its ends on the mortar previously applied to the wall.
The width of the support of the monolithic floor on the brick wall at each end of the slab should be at least 10-15 cm.
Do not forget that before installing the slabs, the wall surface must be leveled and leveled. The gaps between the slabs should be sealed with cement mortar.
Similar news
Installation instructions for dry screed
Dry floor screed does not force you to rack your brains over how to make the floor screed evenly. The prefabricated structure is not very durable, but it is easy to install and has excellent heat and sound insulating properties.
Necessary materials
The main components of a dry screed are sheet material and backfill. Expanded clay, perlite, vermiculite and other fine-grained bulk materials with low hygroscopicity are used as the latter.
Sheet material also varies, most often these are gypsum fiber sheets.
Approximate costs
The cost of a dry screed depends primarily on the thickness of the backfill and the selected materials. GVL panels for the floor will cost an average of 300 rubles per piece (600×1200 mm).
The approximate cost of a bag of expanded clay weighing 50 kg is 100 rubles. The finer the fraction, the higher the cost of backfilling. Additional materials (film, edge tape, glue, screws, etc.) will also require some expenses.
Laying time
The entire process of installing a dry screed takes from one to two days.
Laying stages
There are several rules necessary to properly screed a floor with expanded clay using the dry method:
Waterproofing. The polyethylene film is laid on the prepared base with an overlap, overlapping adjacent sheets by 20 cm and extending onto the walls up to 15 cm [6].
Along the perimeter of the room you need to lay an edge (edge) tape - a strip of foamed polyethylene, the width of which is about 15 cm, thickness - from 4 to 10 mm, and length - 50 m. Marking and installation of beacons. These operations are carried out in exactly the same way as when installing a wet screed.
Backfill. Expanded clay is placed in the space between the beacons and leveled. It is better to backfill in portions as the sheets are installed.
Important
The thickness of the dry screed is determined by the presence/absence of communications, the characteristics of the base, and thermal insulation requirements.
The backfill height recommended by experts is 3–5 cm [7]. For larger thicknesses, it is recommended to lay an additional layer of slabs to increase the strength characteristics of the screed.
Installation of sheets.
The slabs should be laid offset relative to each other, like bricks. The fold of the first sheets must be removed, otherwise they may be buried in the expanded clay. The fastening of the plates is carried out using self-tapping screws; for greater reliability, it is better to glue the seams.
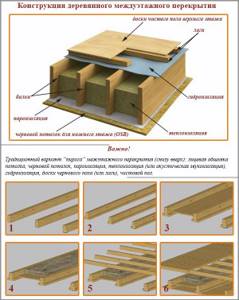
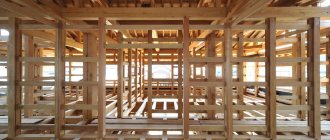
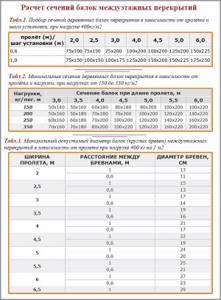
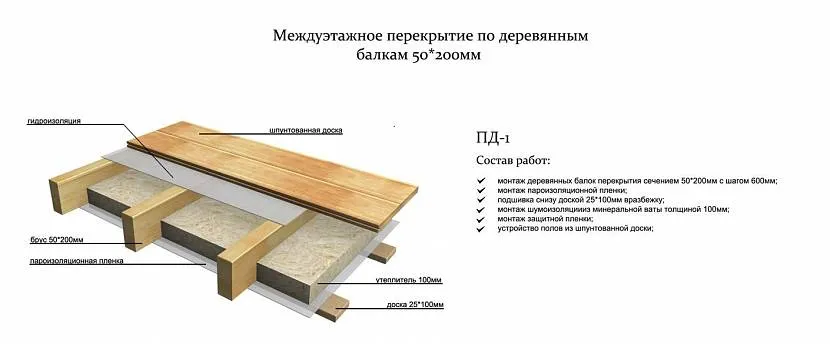
Basic parameters of timber for beams
The parameters of the beams directly depend on the geometric dimensions of the rooms on the lower and upper floors and their intended purpose. Calculation of parameters is an important stage in creating an interfloor ceiling; the reliability and durability of the entire structure largely depends on it.
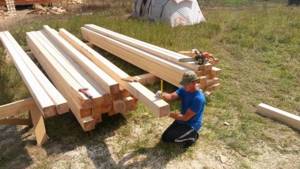
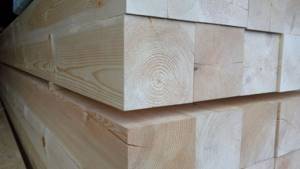
Shape and section
Rectangular timber seems to be the optimal material for the manufacture of beams. Mounted on the edge, it has a sufficient margin of safety and high reliability. Sometimes round timber or lumber of specific profiles, for example, I-section, are used as load-bearing structures.
The exact parameters of the beam directly depend on the expected load, span length and distance between adjacent beams. By the way, it is not at all necessary to calculate all the parameters yourself; you can use ready-made tables and diagrams.
Length calculation
Calculating the length of the beam is simple - it is the width of the span plus tolerances for embedding in the grooves. Regardless of the cross-section, it is not recommended to make spans wider than 6 m; this will inevitably cause sagging, which can result in an accident. If it is necessary to make a larger wooden floor, you can get out of the situation by installing supports and supports in the form of columns from the same timber.
Quantity of material
To make it easier to calculate the amount of material, it would be useful to sketch out a diagram of the future overlap. It should be taken into account that the distance from the outer beams to the wall will be approximately 50 mm, and the rest will be evenly laid between them at the same interval (0.5–1.0 m).
Proper floor screed using the semi-dry method
If the question of how to make a cement floor screed using dry and wet methods is not new to you, then a semi-dry screed will seem almost an ideal option. The method allows you to obtain an equally smooth, strong and moisture-resistant base, but at the same time significantly saves hardening time and eliminates leaks and cracks.
Correct filling of floor screed using this technology requires the use of a pneumatic blower and other automatic devices. In a small area you can do without them, but due to the properties of the mixture, such installation will be extremely labor-intensive. In addition, thanks to special equipment, the solution is mixed evenly, and the surface is perfectly smooth, which is very difficult to achieve manually.
Necessary materials
When installing a semi-dry screed, M500 cement and washed coarse sand with a fineness modulus of 2–3 mm are most often used. A mandatory element of a semi-dry screed is waterproofing (polyethylene film) and polypropylene fiber, which replaces metal mesh.
Approximate costs
The consumption of cement and sand for preparing the mortar is calculated in the same way as when installing a wet screed. The recommended amount of polypropylene fiber is 600 g per 1 m 3 of solution [8].
Laying time
A team of specialists usually completes the installation of semi-dry screed in 1 day (for an area of up to 250 m2). Self-installation without a pneumatic supercharger will take much longer.
Laying stages
The stages of manual installation of a semi-dry screed are almost no different from those with the wet method. There are just a few nuances that we will focus on.
After determining the horizontal, upper and lower levels, and calculating the thickness of the screed, a plastic film must be laid on the prepared base.
The sheets are arranged overlapping, with an overlap on the walls. An edge strip needs to be laid around the perimeter of the room. The composition for the screed is prepared in such a way that the lump of the finished mixture does not disintegrate when squeezed in a fist.
A small amount of moisture may be released, but the solution should not be liquid under any circumstances. When installing without special equipment, the mixture must be evenly distributed in the space between the beacons and compacted with feet. Next, you should level the surface using the rule.
The final stage of laying semi-dry screed is sanding. This operation is most conveniently performed using a special trowel. You can step on the screed 12 hours after completion of work.
There is no need to remove the beacons from the screed. The use of a self-leveling mixture with the semi-dry method is not required: the surface will be smooth and even without it. Laying the decorative coating on the screed is possible already on the 4th–5th day after completion of installation.
Of all types of screeds, semi-dry screeds are the most popular.
And this is not surprising, because it has a number of advantages over other methods. Unlike classic wet screed, the technology reduces the hardening time of the solution, eliminates the risk of cracks and moisture seepage, and does not involve “dirty” processes. Compared to prefabricated structures made from gypsum fiber board sheets, semi-dry screed is much more durable.

Floor screed
Floor screed is a significant part of the cost of renovation. However, it is necessary - if the base is not prepared properly, no decorative coating will look good and will not last long.
It is necessary to make a floor screed if you need to level the concrete base in the room. The screed also improves the hydro- and thermal insulation characteristics; it allows you to create the required slope angle if a water drain is to be placed in the room; it also increases the rigidity of the floor.
What are the current prices for floor screed and what determines the final cost of the work?
Tools for arranging interfloor slabs
All work can be done independently. To do this, you need to prepare the following tools and materials:
- drill;
- saw;
- hatchet (large and small if necessary);
- chisel;
- hammer;
- nails, screws;
- construction level;
- fasteners.
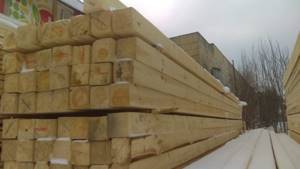
As for the building material, the wood must be of high quality and well dried. Before carrying out all work, it is necessary to treat each individual element with a product that will prevent rotting and make the wood less flammable.
Prices for floor screed using the wet method
Wet screed is a classic method that has been used for many decades.
The technology itself is relatively simple - the prepared and primed base is poured with liquid concrete or cement mixture along special beacon strips. Spreading, the mixture levels the floor, although after hardening some additional work is required to finish sanding the surface.
But a wet floor screed has several significant disadvantages: it can crack if the technology is not followed and the correct microclimate in the room is not maintained, and such a floor takes a very long time to dry, up to 4-6 weeks depending on the thickness of the coating.
The cost of materials for arranging a liquid screed - dry sand concrete mixture for preparing the solution, beacons, metal mesh for reinforcement and primer - is approximately 350 rubles per 1 square meter of area.
To this should be added the cost of delivering materials to the site, and this figure can vary significantly depending on its location, floor height, amount of material, etc. Delivery and lifting of materials for wet screed can reach up to 25–30 thousand rubles (in the case of a large room area).
The cost of the work itself on arranging a wet screed is about 450 rubles per square meter, it also includes the cost of renting a compact concrete mixer, without which it is impossible to prepare the mixture for pouring the floor.
Note: Currently, wet screed technology is not often used in apartments, but it is still used in industrial premises.
Cost of dry floor screed
Dry screed is a more advanced and simpler technology, and these days it is used more often than wet screed, especially in residential areas.
When installing a dry screed, waterproofing is laid on the prepared floor, and a layer of expanded clay or sand is poured onto it. The layer of bulk material is leveled and sheet material, for example, plywood, is laid on it. Then the seams are puttied, strengthened, and the floor is ready.
Speed of installation is a big advantage of dry screed. There is no need to wait for it to dry - the decorative coating can be applied immediately after laying the plywood. Dry screed has quite satisfactory soundproofing characteristics; special equipment is not needed to install such a floor.
The disadvantages include low resistance to loads, which is why dry screed is only suitable for apartments, but not for industrial or utility premises - such a floor can be deformed under the weight of a car or heavy equipment. The waterproofing of dry screed also leaves much to be desired; it should not be installed in rooms where humidity is high - although a waterproofing layer can solve this problem to some extent.
The cost of installing a dry floor screed in an apartment averages about 300–400 rubles per square meter. The materials themselves - dry backfill, floor covering elements, screws, edge tape, plastic film - will cost approximately 600-800 rubles per square meter, this price includes delivery. Price depends:
Important: Prices for floor screed strongly depend on the area of the room - the larger it is, the lower the cost of 1 square meter. The difference can be very significant, for example, when installing any type of floor screed in a room with an area of only 30 square meters, the cost of 1 square meter will be 2-3 times higher than when working on a facility with an area of more than 100 square meters.
How much does it cost to screed a floor using the semi-dry method?
Semi-dry floor screed is the most popular floor leveling option for residential and industrial premises. When constructing it, a cement-sand mixture is used with the addition of plasticizer additives and a small amount of water. The consistency of this mixture resembles not a solution, but wet sand, and it is not so much poured as filled.
Since the percentage of water in the mixture is small, it dries much faster than a wet screed.
Plasticizer additives also contribute to this. After just 12 hours, you can walk on the screed while continuing finishing work indoors. It takes about 25 days for the mixture to dry completely.
When leveling the floor using the semi-dry method, the surface is perfectly flat; it does not require any additional finishing or chipboard flooring. Reinforcement allows you to achieve amazing strength. Moreover, due to the low cement content in the mixture, this type of screed has much less weight than a wet one.
The disadvantage of a semi-dry screed is that its installation requires special equipment - a mixture pump and a trowel to level the floor.
With the help of the latter you can achieve a perfectly even coating. And although such a floor can theoretically be made manually, semi-dry mechanized screed is much preferable. By the way, the method allows you to save on lifting material to the floor, since the mixture is prepared in a mixer on the street and supplied to the desired height (up to 30 floors) through a special hose.
Materials for arranging a semi-dry screed are relatively inexpensive - approximately 250–350 rubles per square meter, depending on the thickness of the layer.
This cost includes sand, Portland cement, fiberglass, plasticizer additives and polyethylene film. The cost of work without material is from 250 rubles per square meter. The larger the area to be filled, the cheaper the cost of materials and work.
The cost of installing a semi-dry turnkey floor screed by professionals ranges from 350 to 750 rubles per square meter. This amount includes both work and materials. The larger the area of the object, the cheaper the price of semi-dry floor screed will be.
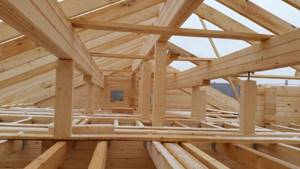
Do-it-yourself wooden floors above the first floor
Wood, unlike other bases (reinforced concrete slabs, monolith) used for floors, is an environmentally friendly material. In addition, a wooden ceiling or floor gives the room a unique look and retains heat well. Previously, wood was used for these purposes quite often. Nowadays, interfloor wooden floors, as a rule, are made only in wooden houses, although there are exceptions.
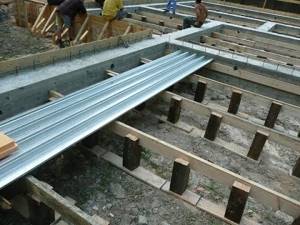
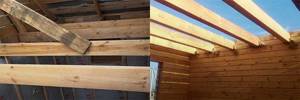
Wooden floor installation
Wooden floor installation
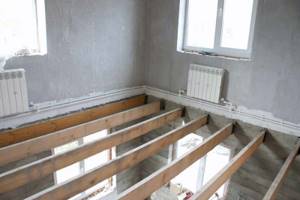
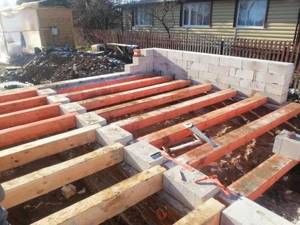
Installation of wooden floors between floors begins with the installation of support beams. The cross-section of beams depends on several reasons, in particular on the length of the span and the load on the floor of the floor above. The type of wood used for them also plays a big role in choosing the cross-section of beams. Pine is most often used, but sometimes oak is used.
The determining factor is the price of wood; naturally, oak is more expensive. In this case, the thickness of the beams can be reduced and the design slightly changed.
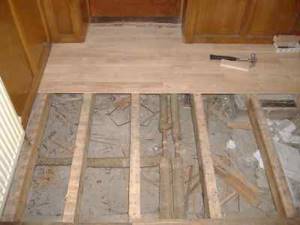
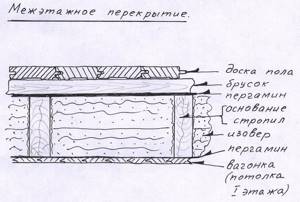
Construction and installation of wooden floors
The process of constructing wooden floors involves placing beams into pre-prepared recesses in the wall. The cross-section of the beams is made equal to both height and width. It happens that the height is chosen slightly higher. In any case, the beams are laid on waterproofing, with a gap in both planes of the order of 1-2 cm. This is done in order to eliminate the expansion of the walls when such a floor gets wet or dries out.
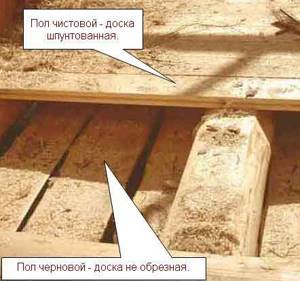
Further, to the beams at the level of their lower plane, slats are packed along the entire length, which are used to attach thermal insulation and ceiling lining. An additional layer of waterproofing is laid on top of the thermal insulation, and finally a subfloor is laid.
In the case of oak, in order for the ceiling of the lower floor to look “antique,” the beams are planed before installation. Further overlap is carried out on top of the beams. In any case, the span length for a wooden floor should not exceed 5 m. A span length of 4 m is considered optimal.

Do-it-yourself wooden floors above the first floor
Final cost calculation for floor screed: which is cheaper?
Installation of a dry screed will cost at least 900 rubles per square meter, this is due to the relatively high cost of materials, and repairs can be continued immediately after laying the floor.
A traditional wet screed will cost you about 800 rubles per square meter or more. This is an inexpensive way to level the floor, but the process is quite complex, “dirty” and takes time - you will not be able to begin subsequent finishing work until the screed is completely dry.
A semi-dry screed costs from 350 rubles per square meter and, in comparison with the wet method, today is the best option both in cost and in terms of the strength and practicality of the coating.
Floor on the ground
In houses without basements, the floor of the first floor can be made according to two schemes:
Which of the two options will be better and easier?
In houses without a basement, floors on the ground are a popular solution for all rooms on the first floor. Floors on the ground are cheap, simple and easy to implement, and are also beneficial to install in the basement, garage, bathhouse and other utility rooms. A simple design, the use of modern materials, and the placement of a heating circuit in the floor (warm floor) make such floors comfortable and attractive in price.
In winter, the backfill under the floor always has a positive temperature. For this reason, the soil at the base of the foundation freezes less - the risk of frost heaving of the soil is reduced. In addition, the thickness of the thermal insulation of a floor on the ground may be less than that of a floor above a ventilated underground.
It is better to abandon the floor on the ground if backfilling with soil is required to a too high height, more than 0.6-1 m. The costs of backfilling and compacting the soil in this case may be too high.
A ground floor is not suitable for buildings on a pile or columnar foundation with a grillage located above the ground surface.
Three basic diagrams for installing floors on the ground
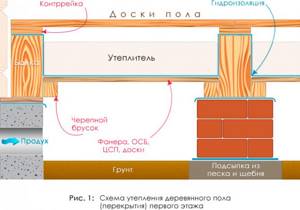
In the first version, a concrete monolithic reinforced floor slab rests on load-bearing walls, Fig. 1.
After the concrete hardens, the entire load is transferred to the walls. In this option, a monolithic reinforced concrete floor slab plays the role of a floor slab and must be designed for the standard load of the floors, have the appropriate strength and reinforcement.
The soil is actually used here only as temporary formwork when constructing a reinforced concrete floor slab. This type of floor is often called a “suspended floor on the ground”.
A suspended floor on the ground has to be made if there is a high risk of shrinkage of the soil under the floor. For example, when building a house on peat bogs or when the height of bulk soil is more than 600 mm. The thicker the backfill layer, the higher the risk of significant subsidence of the fill soil over time.
The second option is a floor on a foundation - a slab, when a reinforced concrete monolithic slab, poured onto the ground over the entire area of the building, serves as a support for the walls and a base for the floor, Fig. 2.
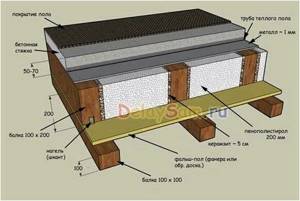
The third option involves installing a monolithic concrete slab or laying wooden logs in the spaces between load-bearing walls supported on bulk soil.
Here the slab or floor joists are not connected to the walls. The load of the floor is completely transferred to the bulk soil, Fig. 3.
It is the latter option that is correctly called a floor on the ground, which is what our story will be about.

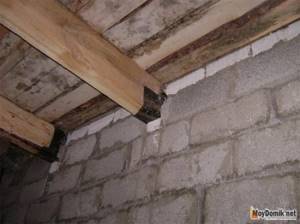
Beams in a brick house
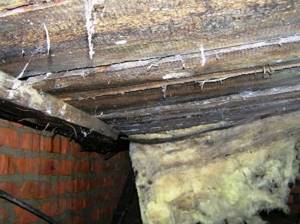
In a brick private house, before laying, the ends are wrapped in roofing felt or tarred. The space between the end of the beam and the brick is filled with insulation, more often with mineral wool. Be sure to leave a gap for ventilation so that the material does not rot or become covered with condensation. If grooves are not provided, then the beams are fixed with your own hands onto anchors previously embedded in brick or reinforced concrete.
The insulation is placed exactly between the joists and beams, no more and no less. It is allowed to leave 3-4 cm for ventilation . It is not advisable to use polystyrene foam and polystyrene in this case, as they have poor sound insulation.
Calculation of sections of beams between floors
Extruded polystyrene foam and material that suppresses rattling noise are allowed. Next, chipboard and flooring are laid out.
The role of sound insulation is performed by insulation from glassine sheets; any heat-insulating material is used.
When building interfloor wooden floors with your own hands, special attention is paid to the places where the pipe options pass: boiler rooms, chimney rooms, fireplace rooms. The gap between the beams and pipes must be at least 0.25 m. An asbestos gasket is installed around the pipes. Instead of asbestos, you can use basaltite.
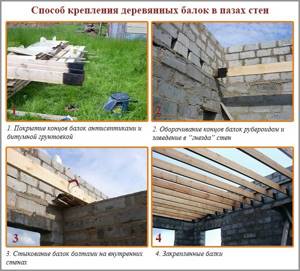
Method of fastening wooden beams in wall grooves
Backfilling the soil cushion for the floor on the ground
The surface of the future floor is raised to the required height by installing a cushion of non-heaving soil.
Before starting work on backfilling, be sure to remove the top soil layer with vegetation. If this is not done, the floor will begin to settle over time.
Any soil that can be easily compacted can be used as a material for constructing a cushion: sand, fine crushed stone, sand-gravel mixture, and if the groundwater level is low, sandy loam and loam. It is beneficial to use the soil remaining on the site from the construction of the foundation, well and septic tank (except for peat and black soil).
The soil of the pillow is carefully compacted layer by layer (no thicker than 15 cm) by compacting and pouring water on the soil. The degree of soil compaction will be higher if mechanical compaction is used.
Do not place large crushed stones, broken bricks, or pieces of concrete into the cushion. There will still be voids between large fragments.
It is recommended to make the thickness of the bulk soil cushion within the range of 300-600 mm. It is still not possible to compact the bulk soil to the state of natural soil. Therefore, the soil will settle over time. A thick layer of fill soil can cause the floor to settle too much and unevenly.
To protect against ground gases - radioactive radon, it is recommended to make a layer of compacted crushed stone or expanded clay in the cushion.
This underlying captage layer is made 20 cm thick. The content of particles less than 4 mm in size in this layer should be no more than 10% by weight. The filtration layer must be ventilated.
Read: “Protecting your home from radioactive soil gas radon”
The top layer of expanded clay, in addition to protecting against gases, will serve as additional thermal insulation for the floor. For example, a layer of expanded clay 18 cm thick.
in terms of heat-saving ability it corresponds to 50 mm. polystyrene foam To protect insulation boards and waterproofing films, which in some floor designs are laid directly on the backfill, from crushing, a leveling layer of sand is poured on top of the compacted layer of crushed stone or expanded clay, twice the thickness of the backfill fraction.
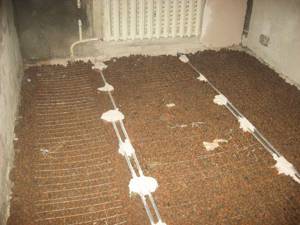
Before filling the soil cushion, it is necessary to lay water supply and sewerage pipes at the entrance to the house, as well as pipes for the ground ventilation heat exchanger. Or lay cases for installing pipes in them in the future.
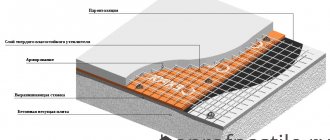
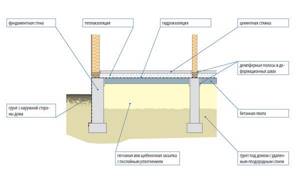
Concrete floor on the ground
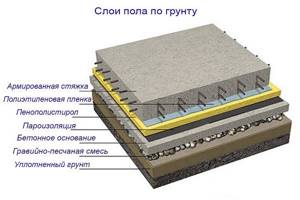
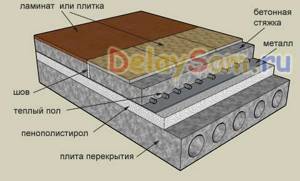
Floors on the ground are a multi-layer structure, Fig. 4. Let's go through these layers from bottom to top:
A material is placed on the soil cushion that prevents moisture contained in freshly laid concrete from filtering into the soil (for example, a plastic film with a thickness of at least 0.15 mm). The film is applied to the walls. Along the perimeter of the walls of the room, to the total height of all layers of the floor, a separating edge layer made of strips 20-30 mm thick, cut from insulation boards, is fixed. Then a monolithic concrete preparation of the floor 50-80 mm thick is arranged. from lean concrete class B7.5-B10 to a crushed stone fraction of 5-20 mm.
This is a technological layer intended for gluing waterproofing. The radius of concrete contact with the walls is 50-80 mm. Concrete preparation can be reinforced with steel or fiberglass mesh.
The mesh is laid in the lower part of the slab with a protective layer of concrete of at least 30 mm. To reinforce concrete bases, steel fiber 50-80 mm long and 0.3-1 mm in diameter can also be used. During hardening, the concrete is covered with film or watered.
Welded waterproofing is glued onto the hardened concrete floor preparation. Or two layers of rolled waterproofing or roofing material on a bitumen basis are laid on mastic with each layer placed on the wall. The rolls are rolled out and joined with an overlap of 10 cm.
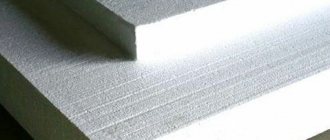
Waterproofing is a barrier to moisture and also serves as protection against the penetration of ground gases into the house. The floor waterproofing layer must be combined with a similar wall waterproofing layer. Butt joints of film or roll materials must be sealed. Thermal insulation slabs are laid on the hydro-gas insulation layer. Extruded polystyrene foam will probably be the best option for insulating the floor on the ground.
Foam plastic with a minimum density of PSB35 (residential premises) and PSB50 for heavy loads (garage) is also used. Polystyrene foam breaks down over time upon contact with bitumen and alkali (these are all cement-sand mortars). Therefore, before laying foam plastic on a polymer-bitumen coating, one layer of polyethylene film should be laid with an overlap of sheets of 100-150 mm.
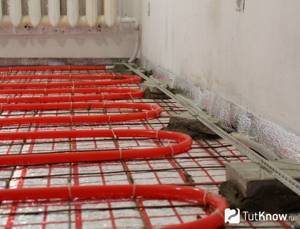
The thickness of the insulation layer is determined by thermal engineering calculations. An underlying layer (for example, a polyethylene film with a thickness of at least 0.15 mm) is laid on the thermal insulation layer, which creates a barrier to the moisture contained in the freshly laid concrete floor screed. Then a monolithic reinforced screed is laid with the “warm floor” system. (or without a system). When heating floors, it is necessary to provide expansion joints in the screed. The monolithic screed must be at least 60 mm thick.
made from concrete of class not lower than B12.5 or from a solution based on cement or gypsum binder with a compressive strength of not lower than 15 MPa (M150 kgf/cm2). The screed is reinforced with welded steel mesh. The mesh is placed at the bottom of the layer.
Read: “How to properly make a concrete floor screed.” To more thoroughly level the surface of a concrete screed, especially if the finishing floor is made of laminate or linoleum, a self-leveling solution of factory-made dry mixes with a thickness of at least 3 cm is applied on top of the concrete layer. The finishing floor is mounted on the screed.
This is a classic ground floor. Based on it, various design options are possible - both in design and in the materials used, both with and without insulation.
Types of floors according to the method of fastening
The supporting beams are securely fixed to the walls. There are two main ways to attach them: installing them in a socket or using additional fasteners.
Installing beams into grooves
This method is great for brick houses, cinder block buildings and similar materials. To attach the beam, you need to make a groove (groove) in the wall. The dimensions of the groove should be 2–3 cm greater than the thickness and width of the beam, the depth varies from 100 to 150 mm. It is easy to ensure waterproofing of the connection using ordinary roofing felt; it is used to wrap the ends of the beams, which are recessed into the wall.
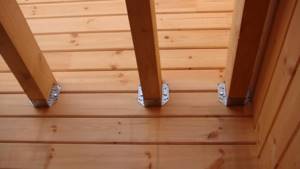
Using metal fasteners
If it is not possible to recess the beams into the wall, you can use external steel fasteners. Technically, this method is simpler, but it provides less strength, therefore, the wooden floor will withstand less load. Such a hinged mount can be used to create small ceilings or between the first floor and the attic (attic) of a garden house.
Fasteners of different shapes are available for sale, some are designed for fastening to the wall, others are mounted on internal or external corners. There will definitely be no problems with choosing the optimal configuration of supporting elements.
Option - concrete floor on the ground without concrete preparation
Using modern building materials, a concrete floor on the ground is often made without a layer of concrete preparation. A layer of concrete preparation is needed as a basis for gluing roll waterproofing on a paper or fabric base impregnated with a polymer-bitumen composition.
In floors without concrete preparation, a more durable polymer membrane specially designed for this purpose, a profiled film, which is laid directly on the ground pad, is used as waterproofing.
Due to the textured surface, the profiled membrane is securely fixed into the sand base without deforming or moving during installation.
Fixed into a sand base, the profiled membrane provides a solid surface suitable for laying insulation and concrete.
The surface of the membranes can withstand the movement of workers and machines for transporting concrete mixtures and solutions (excluding crawler-mounted machines) without breaking.
The service life of the profiled membrane is more than 60 years.
The profiled membrane is laid on a well-compacted sand bed with the spikes facing down. The membrane spikes will be fixed in the pillow.
The seams between the overlapping rolls are carefully sealed with mastic.
The studded surface of the membrane gives it the necessary rigidity, which allows you to lay insulation boards directly on it and concrete the floor screed.
If slabs made of extruded polystyrene foam with profiled joints are used to construct a thermal insulation layer, then such slabs can be laid directly on the ground backfill.
A backfill of crushed stone or gravel with a thickness of at least 10 cm neutralizes the capillary rise of moisture from the soil.
In this embodiment, the polymer waterproofing film is laid on top of the insulation layer.
If the top layer of the soil cushion is made of expanded clay, then you can dispense with the insulation layer under the screed.
The thermal insulation properties of expanded clay depend on its bulk density.
It is enough to make a thermal insulation layer 25 cm thick from expanded clay with a bulk density of 250–300 kg/m3. Expanded clay with a bulk density of 400–500 kg/m3, in order to achieve the same thermal insulation ability, will have to be laid in a layer 45 cm thick. Expanded clay is poured in layers 15 cm thick and compacted using a manual or mechanical rammer. The easiest to compact is multi-fraction expanded clay, which contains granules of different sizes.
Expanded clay is quite easily saturated with moisture from the underlying soil.
Wet expanded clay has reduced thermal insulation properties. For this reason, it is recommended to install a moisture barrier between the base soil and the expanded clay layer. A thick waterproofing film can serve as such a barrier.
The base for the floor, made of large-porous sand-free expanded clay concrete, will be durable, warm and with low water absorption.

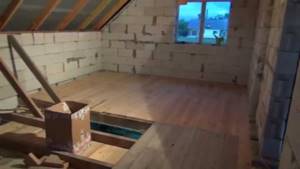
Independent installation of a wooden floor on the second floor
Wooden houses were very popular at one time, but then with the development of modern building materials they faded into the background. But today, wooden buildings are regaining their former glory. This is due to the fact that only in a wooden house the atmosphere is filled with harmony and tranquility. The decoration in such a house can be made of any material. But this is not very advisable, since walls made of logs look much more attractive and natural than paint or wallpaper.
Scheme of interfloor slabs in a wooden house.
But the question of surface finishing will depend only on personal taste preferences. As for the construction of the wooden floor of the second floor, it is also made from beams. There can be no other option. Reinforced concrete slabs cannot be laid on wooden walls. When finished, the entire structure is made of natural material – wood.
Floor on the ground with dry prefabricated screed
In ground floors, instead of a concrete screed as the top load-bearing layer, in some cases it is advantageous to make a dry prefabricated screed from gypsum fiber sheets, from sheets of waterproof plywood, as well as from prefabricated floor elements from different manufacturers.
For residential premises on the first floor of a house, a simpler and cheaper option would be to install a floor on the ground with a dry prefabricated floor screed, Fig. 5.
A floor with a prefabricated screed is afraid of flooding. Therefore, it should not be done in the basement, as well as in wet rooms - bathroom, boiler room.
Well, now it's time to finish the article. All the material I wanted to share has been reviewed. I hope it will be useful to you, and you will use it if you need to make the floor of the first floor. Improve your own practical skills and gain new knowledge, as they say: “It’s never too late to learn!” That's all, thank you for your attention, successful and easy repair!
Floor installation
Having installed the supporting frame, it is sheathed at the top and bottom, forming the floor of the upper floor and the ceiling of the lower one. Flooring designs can be different, and the technology for their construction depends on the type and purpose of the floors:
- Attic flooring on wooden beams requires mandatory insulation if the attic is non-residential, since up to 30% of the heat in the absence of such insulation leaves the house through it. However, the installation of a floor is not necessary here.
- Thermal insulation is also needed for basement floors in the absence of a heated basement. Moreover, the insulation from below must be protected from moisture with a layer of waterproofing. If the basement or basement is heated, such a ceiling is considered interfloor.
- Interfloor ceilings require more sound insulation, floor and ceiling construction with finishing appropriate to the premises.
The simplest is the design of the interfloor ceiling, in which the beams act as joists for the floor covering.
The insulation here is a soundproofing material Source tvoygarazh.ru