Wintering bees in low temperatures allows you to extend their life by a couple of weeks and get excellent honey without any impurities. The fact is that in the wild, insects consume 3-4 kg more honey, and increased food consumption leads to a stronger filling of the intestines with feces and can cause deflation of nests. However, in order for the bees to successfully winter outside, you need to create some conditions for them, which you can learn about below.
Is it possible for bees to winter in the wild?
Wintering insects in natural conditions allows beekeepers to reduce labor costs and save money on the construction of winter huts. At the same time, for good preservation of bee colonies, you will need to pay attention to several factors:
- Quality hive . They need to be insulated, made of 2-walls or made of 60 mm thick boards. In addition, the hives should be wrapped in paper, roofing felt and covered with snow 0.5 m or more above the roof. The fact is that snow has low thermal conductivity, so it will provide an optimal microclimate in the nest and prevent sudden changes in temperature.
- Access to feed . The nest of wintering insects should have a sufficient amount (up to 30 kg) of high-quality food. To allow them to move freely under the canvas, it is worth laying slats with a cross-section of 10x10 mm across the frames in the fall.
- Snow removal . In early spring, the snow needs to be pushed away from the front wall of the hive so that it is heated by the sun's rays, and the bees can make their first flight. Warming and bright light will help them come out of dormancy, which is necessary for their earlier development and the rapid replacement of wintering bees. Simultaneously with snow removal, hay or straw should be spread in front of the hive so that insects do not die on the snow when flying around.
If all the necessary requirements are not met, the bee colony will die or emerge from wintering weakened, so in the summer they will have to be strengthened, which may be ineffective. However, even if all conditions are met, there may be large waste and weakened bees in the wild, but there is no need to worry about this. The fact is that those families that successfully survive the winter will have special energy, efficiency and gain strength faster than the family that wintered in the omshanik.
It is believed that the mobilization of their defenses and the will to survive is of great importance in the successful overwintering of bees. If insects spend the winter outside every year, they go through natural selection and can subsequently withstand bad weather. If bees winter indoors every year, they get used to optimal conditions, and their genes develop other skills and hope for help. The likelihood of their successful wintering in natural conditions is low.
Wintering in the wild in steppe zones, where there is practically no snow until January, is undesirable, since strong winds will blow away the meager covers, and bee colonies will die, unable to survive such conditions.
Insulating the hive with hay
An excellent and affordable way to insulate bee houses is to use compacted blocks of hay or dry leaves. The formed cinder blocks are placed tightly on all sides of the hives. The surface is covered with a tarpaulin, the corners of which are fixed with guy ropes into pegs previously driven into the ground. The disadvantage of such insulation is the voids that cannot be avoided. In addition, rodents, which pose a danger to bees, do not mind warming up in such a shelter. Cold bridges are easily eliminated by a protective box that covers each piece of evidence. The structure can be made from moisture-resistant thick plywood or OSB sheet.
Wintering conditions in the wild
You should prepare for it in the fall, before the cold weather sets in. Experienced beekeepers determine the readiness of hives to meet winter by the following actions:
- They find the uterus and determine its age. The further offspring and growth of the family depends on it.
- Check the quantity of brood available.
- They look through the honeycombs and use them to determine the bees’ suitability for wintering.
- They closely monitor the bees, identifying and removing sick insects.
When preparing for wintering bees, pay attention to the following parameters:
- Stern . The highest demands are placed on them, because the life of the whole family depends on the quality of honey. So, they take it from the main bribe, since it rarely hardens. It is important to make sure that there is enough food, since neither hunger strikes nor overfeeding of bees should be allowed.
- Frames with beebread . They don’t forget about the frames containing beebread. They are placed close to the club, preferably around the perimeter. Mostly light honey is used, since it is most suitable for winter - it crystallizes and thickens less often. Honey should not contain honeydew. To clarify this, it is sent to the laboratory.
- Disinfection . They treat the hive, destroying all pests, because they are distributors of various infectious diseases. It is carried out after the nest is fully formed and the hatching of the young is completed. All bees must undergo treatment. Hives are disinfected with steam and smoke, as they will not harm the insects. Read about how to fumigate bees using a smoke gun here.
This video explains how to prepare bees for wintering in the wild:
In general, to create conditions favorable for bees, the following recommendations are followed:
- Each family is left with 3 kg more honey than the bees that winter in the omshanik. It is important that the honey is of high quality, without honeydew impurities. If it is contained even in small quantities, the family will die.
- Creates a large frame space. The insulation must be porous, and an upper taphole is required.
- By the end of September, the insulation in the form of cotton pads is removed from the hives so that the bees do not form a club in the warmest corners of the hive. If the hive is poorly insulated, the bees will find the warmest place, which is usually located in the middle of the frames, right at the location of the brood.
- By the end of October, the canvas, which will be impregnated with propolis, is replaced with a new one. The nest is insulated with breathable, porous material. It could be:
- dry moss;
- finely chopped straw;
- hay.
- If the hive has several tiers, where two families live, they put a mesh store, and not with a closed bottom. You can even use empty housings filled with cut straw, since bees overwinter much better in them. In them, insects are engaged in raising brood much later, so there will be a lot of winter bees. Such stores are also an excellent preventive measure against varroatosis in the autumn and spring seasons. Read how to treat bees for varroa here.
- They arrange up to 5 tiers in the hive. They are insulated both from the sides and from the inside. In this case, the buildings are separated by breathable ceilings. Bees on tiers 2 and 5 are heated by neighboring colonies. They eat less food, so their intestines are not particularly full, and there is almost 2-3 times less death.
- A board with a slight slope is placed against the hive to protect the structure from cold gusty winds that can blow into the entrance. In addition, this device will be a good protection against birds.
- For better wintering, they put on the hive some kind of shirts made of cellophane film, which is excellent protection from winds and snow. You can put on this insulation as early as the end of August and not remove it until mid-May. By winter, the lower entrances are closed, and the upper ones are left open. The shirts protect families very well, which can be noted already in the summer, when the bees will collect more honey. However, it is important to ensure that moisture does not accumulate between the wall and the film, as it will gradually turn into ice.
Beginning beekeepers should know that hives should not be left over the winter if high-voltage wires pass nearby. The fact is that the electric field affects the activity of bees: the temperature in the nest rises, and they begin to consume more food, which affects their wintering.
Wintering in the North-West region
The place is not the most problematic in terms of severe frosts, but this does not negate the need to carry out appropriate work on insulation and protection from moisture. Work should be carried out in three directions: creating a hive structure designed for a long winter, thermal insulation and ensuring air exchange. As for the design, in this zone they often use framed double- and single-walled hives, in which it is more convenient to store honey and fertilize. The next question about how to prepare bees for wintering outside in the North-West region concerns thermal insulation and air exchange. These measures should be combined, since insulation affects ventilation, and vice versa. As practice shows, it is best to use insulating material with high thermophysical properties. It will help remove water vapor from the hive, and the family in such a house will consume less honey.
How to arrange nests?
There are several ways to form bee nests for the winter:
- Double-sided . It is used in cases where the family is strong enough. Place 2 frames weighing 2 kg in the central part of the hive. The most complete frames weighing up to 4 kg are installed around these frames. In total, the total weight of honey should be 30 kg.
- Installation of frames using the corner method . In this case, frames are installed from the edge. First, take a frame completely filled with honey with the greatest weight. Behind it comes a smaller frame, and so on in descending order. The latest frame should not weigh less than 2.5 kg.
- Beard method . An excellent option for young families. Heavy frames completely filled with honey are fixed in the center. Already from them come the lightest frames in weight. The total amount of honey should not be less than 15 kg.
Preparing bees for winter

In autumn, preparations for winter begin with the end of the season and a drop in temperature. The insects stocked up on their main food - honey and beebread.
Bribes are gradually being reduced. Then egg laying stops completely. The final sowing is carried out in the very center of the warm part of the hive from the south. After the brood emerges, the empty cells are filled with food. Bees independently eliminate cracks with propolis, reducing the size of the entrances. Overwinter:
- uterus;
- young animals;
- some adults.
The drones are expelled at the end of the honey harvest. Until the next season, they do not participate in the life of the family. Insects consume food rationally, so it is not advisable to feed drones.
The guarding of the entrance to the hive ceases, moving to the center. Wintering takes place without flights, so it must be done on the last warm day. This is the last time the insects defecate for the season. As the temperature drops, the activity of bees fades away. A club is formed, adjacent to each other.
When preparing for wintering, it is important to take into account the characteristics of the breeds. For example, Karnika is adapted to frosty conditions and variable winds. They winter in small families. For the Carpathians, family unification is practiced.
Ways to organize wintering in the wild
When wintering bees outside, it is extremely important to properly insulate the hives. There are several simple methods of insulation that were invented by experienced beekeepers. We'll look at them below.
In casings
To insulate hives, some beekeepers use covers that protect insects from gusty winds and frost. They do them as follows:
- They make casings for 2-6 hives at once. For these purposes, wooden boards are used, as well as straw, sedge, reeds and tree branches.
- Logs or logs are placed at the bottom, at a height of 10 cm from the ground, so that the casing does not rot from dampness. Then they lay insulation from natural materials and install the hives so that the entrances face in different directions. They make corridors so that the bees can fly around. The entrances are protected with overhead planks.
- The side walls and floor are fastened together. To do this, use nails and hooks. At the same time, a space is left, which is filled with insulating materials from leaves, straw, and hay. Insulation is also provided on top. The roof is placed in such a way that atmospheric moisture cannot penetrate into the hive. It is attached to the side walls of the casing. Everything is covered with roofing moisture-proof material.
- When snow falls, the casings are covered with a layer of about 50-80 cm. This will serve as additional insulation. With the onset of spring, the snow is removed and the entrances are cleared of it so that the bees can make spring flights.
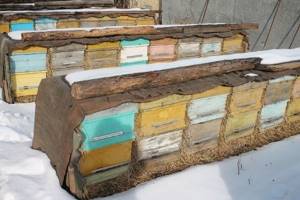
If the hives are covered with covers, the bees fly around in the fall, when others no longer fly. In the spring, they behave more actively than other relatives.
After winter, the casings are thoroughly dried in the sun and stored in a warehouse.
In the trenches
Bees will survive the winter better if the hives are placed in trenches. To do this, choose a dry place, near which groundwater does not flow. A good option is the southern slope, where the soil is loosest. The hives are placed in trenches in this way:
- The hives are installed in one or two rows at once. A trench is dug about 1 m deep. The width at the bottom should be about 80 cm, and at the top – 110 cm. For one family, you need to calculate about 70 cm. You should not install more than 20 hives in one trench, but it is better to dig another one nearby.
- After the trench is dug, wait some time for the soil to dry completely. Then sand about 5 cm thick is poured onto the bottom and logs are laid.
- The hives are placed on the stacked logs and leveled in the middle. The walls should not touch the ground or neighboring hives.
- Logs are again placed on the hives, and then boards and well-dried straw, which will serve as insulation. The optimal thickness of its layer is 30 cm. Then earth about 50 cm thick is poured on top. It is slightly compacted and slightly inclined so that the water flows into a ditch that is dug nearby. It should have a depth of 25-30 cm and a width of 40-50 cm.
- To supply air into the trench, at a distance of approximately 8 m, ventilation pipes are installed. Their diameter should be about 10 cm. They try to lower the pipes deeper, but they should not come into contact with the hives. The top should be raised. A canopy is installed to protect against rain and snow. These pipes should always be open, but in low temperatures they can be closed slightly.
Some beekeepers believe that ventilation pipes in trenches are not needed, since carbon dioxide is beneficial to bees. However, water evaporation is also released in the trenches, so insects still need fresh air, for the passage of which pipes are installed.
- The entrances are completely opened, and the insulation on the sides is removed. It is enough to place a thin straw mat on top.
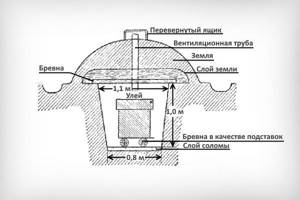
Approximately the same temperature is established in the trenches, but the beekeeper cannot control the condition of the bees and regulate air humidity, which is the disadvantage of this method.
The bees are dug out at the same time as in the case of wintering in omshanik. This time falls at the end of March - beginning of April. They dig trenches in the evening so that by morning the bees become calmer and can be exposed to the open air. The death toll during such wintering is small, and about 6 kg of feed is consumed per family.
Under the snow
The most natural way to overwinter bees is to cover the hives with snow. There is no need to worry about insects suffocating. You just need to leave the entrances open and make sure that they are not clogged with snow.
Snow is an excellent thermoregulator, so bees under the snow will feel no worse than in the snow. Only the front wall should be covered with a plywood sheet to create an air gap. The sides can be covered with a tarpaulin to prevent the wind from blowing into the small cracks. The big advantage of this method is that tits will not be able to eat bees under the snow.
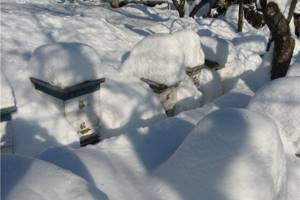
There is also a group method of wintering bees under the snow, which involves installing hives in a dense row in a protected place, with entrances to the south.
Kokorev N., Chernov B. Wintering of bees. / M.: TID Continent-Press, Continental-Book, 2005. - 128 e., - (“World of Hobbies”)
Wintering in the wild
According to some beekeepers, the wintering of bees is more successful if the colony is not separated from the external environment. Bees need clean air.
In the Moscow region there are not always ideal conditions for wintering bees in the wild, but even with frequent thaws it goes well. Wintering is most successful when there is a lot of snow at the beginning of winter and frosts persist. The temperature under a layer of snow 0.5 m thick in calm weather can, with a certain approximation, be considered constant, close to zero. At this temperature it is dry under the snow.
When organizing the wintering of bees in the wild, it should be borne in mind that the temperature under the snow near the hives (according to A.F. Gubkin) is not only even, but also 20 ° C higher than the open air temperature. According to E.K. Eskov (1981), to reduce daily temperature fluctuations at the outer walls of the hive by 100 times, the layer of freshly fallen snow (density 0.2 t/m3) above the hive should be 0.3-0.4 m, and for compacted (density 0.3 t/m3) is about 0.5 m. Moreover, under a layer of snow 0.5 m thick, the lag time of daily temperature fluctuations is within 15 hours.
- In areas with stable snow cover, it is better to use snow for thermal insulation of hives.
Thermal conductivity (the amount of heat passing in 1 s through 1 m2 of an area 1 m thick with a temperature difference of 1 ° C) of freshly fallen snow is 0.1 W/m*deg. With compaction it increases 3-4 times. The thermal conductivity of wood used to make hives is approximately within the same limits (pine across the grain - 0.14-0.16, along the grain - 0.35-0.41 W/m*deg.).
Bee colonies wintering in the wild under the snow consume much more feed. Wintering in the wild is not suitable for weak families; they need to be moved to a winter hut.
At the same time, medium and strong families that wintered in the wild are energetic, characterized by high activity and flight activity. In conditions of continuous harvesting, they collect more honey than families that spent the winter indoors.
- Wintering in the wild hardens the bees, increases their vitality and winter hardiness.
It is in such harsh conditions that the prerequisites are created for the selection of viable, highly productive families.
When organizing the wintering of bees in the wild, it should be borne in mind that at a temperature of +4°C and below, bees already gather in a compact club, and at a temperature of -4°C, bees gathered in a club regulate heat exchange with the external environment only by changing the size of the club and the thickness of its crust.
In a well-insulated nest, the area of temperature rise is shorter, and the area of passive heat loss is longer than in an uninsulated hive. A bee colony produces as much heat as is needed to cover heat loss. Therefore, it is impossible to re-insulate the nest during wintering in the wild. All troubles occur due to insufficient ventilation or its absence at all. To remove water and carbon dioxide from the hive, the air there needs to be changed 40 times a day. Bees release about 700 ml of moisture when eating 1 kg of honey. Moisture is released in the nest gradually as food is eaten, so with sufficient ventilation it is also not removed immediately. On the other hand, with excessive ventilation, any insulation becomes meaningless.
- What is the main reason for the appearance of dampness and mold during winter?
In the temperature difference between the air released by the club and the cold walls of the hive. Therefore, the walls of the hive must be insulated, but insulated from the outside, not from the inside. The air leaving the club rises, gives off some of the heat to the ceiling, cools, flows down along the walls, giving off heat to them, and sinks to the bottom. If the ventilation holes are located directly above the club, then the warm air leaves the nest without having time to give off heat to it.
To reduce heat loss, you should reduce the nest as much as possible, protect it from the sides with diaphragms, leave only built frames in the nest, give preference to canvas, which should be placed directly on the frames, and eliminate drafts.
- Losses due to thermal conductivity can be reduced by using porous and multilayer materials.
Preference should be given to dense top insulation, but not to make the ceiling airtight. Since the temperature inside the top insulation changes from positive below to outside above, somewhere inside condensation conditions are created for water vapor passing through it. The thicker and denser the insulating material, the deeper the condensation zone is from the surface. This is why thick cotton pillows are always damp. It is better to make the top insulation multi-layered (of 2-3 pillows): the bottom ones are the densest and thickest, the top ones are looser and thinner.
Diaphragms are needed in winter, and they must be warm.
The role of the bottom in the heat exchange system is twofold: in autumn and early winter, when it is dry, the thicker the bottom and closer to the nest, the more heat is returned due to reflection and secondary radiation, and closer to spring, when it becomes damp, the wood removes heat from hive.
In conditions of dense packing, the club, protecting itself from the cold, increases the temperature inside and thereby provokes the uterus to lay eggs untimely. In this case, brood appears in the family in January and even in December, sometimes on several frames. With the next severe cold snap, the club shrinks and part of the brood ends up outside it, which creates ideal conditions for the occurrence of various diseases.
- Here is one of the options for organizing the wintering of bees in the wild.
Hives with prepared families of bees are left in their summer places or moved to some building on the leeward side, taking into account that the best location for the central zone of Russia is south-east. The hives are placed on stands made in the form of boxes covered with insulating material (sawdust, leaves). The outside of the hives is wrapped in roofing paper or glassine if the thickness of the hive walls is 35-40 mm. When the wall thickness is 20-25 mm, insulating material (dry sawdust, dry leaves) is poured between the wrapper and the wall of the hive. The hive entrances are protected with special mice barriers. Opposite the tap hole, an air duct is made from boards or plastic tubes. An air duct made from a milk bag attached to the hive with buttons is very convenient. The bottom of the bag is cut off and the end is brought out. The air duct must not be metal. The introduction of metal into the hive must be carried out very carefully. If you have to use metal, it is better to dip it in melted wax.
The upper edge of the wrapper must be tucked under the lid and secured with buttons or small nails so that in the fall rainwater does not fall on the walls of the hive and soak the insulating material. For reliability, you can cover the top of the hive with roofing felt or roofing felt so that the covering material hangs over the body to prevent water from getting into it.
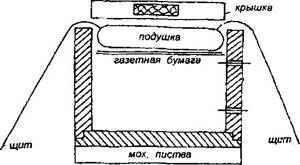
The nest is insulated from above with a moss cushion, under which 7-10 sheets of newspaper or porous corrugated paper or cardboard are first placed. Preference should be given to a moss cushion, if only because 1 kg of moss with a humidity of 30% can absorb up to 15 liters of water. To check the moisture penetration of the insulating pad, in calm, windless weather, light a match and bring it to the tap hole. If the flame “pulls” into the hive, then the pillow is suitable for wintering. If the flame deviates back, the pillow must be fluffed up or replaced completely. If frost forms near the lower entrance in frosty weather, it means the hive will be damp.
A cover is placed on the moss cushion, and the front and back walls of the hive are covered with shields made of wood or other material. The shield can be even wider than the hive. Slate is often used as shields. You can cover the hives with bags of moss.
- When wintering in the wild, the beekeeper must ensure that the hives are covered with snow as early as possible.
If the first snow cover is not sufficient to cover the hives, then snow must be thrown onto the hive so that it is covered up to the roof. In winters with little snow, it is advisable to pour snow piles on the apiary territory for snow retention or make barriers from any material for the same purpose. The piles and barriers are erected across the prevailing winds. With such snow retention, snowdrifts form in the apiary area, well protecting the bees from winter weather.
If heavy snow has covered the hives, then there is no need to dig them out, especially if severe frosts are coming. As mentioned above, a snow coat is an excellent protection against low external temperatures.
- In garden plots, it is good to place hives between currant or gooseberry bushes, which are a good snow-retaining agent.
In winter, you need to make sure that an ice crust does not form over the hives (especially in the second half of winter). If necessary, it is crushed with a rake.
If the sun warms during the day, but the temperature is low and the nights are cold, the hives are not dug up, but a hole is punched in the crust of snow until the entrance.
In mid-March, snow is thrown away from the front (only!) walls of the hives. Shields removed from the front wall are laid on the ground, roofing felt or straw, as well as any other material, even rags, are spread. This is done in order to ensure the free exit of bees from the hives during the first cleansing flight. Then the bees that have settled against the hive will be able to rise and go into the hive. Bees that sit on the snow freeze and cannot rise.
- But here is the author’s method of wintering bees in the wild, which does not require much effort and involves the use of protective covers.
To place the hives in selected locations, a platform is made of 4 cm thick boards with dimensions of 110x110 cm. The platform rests on a link of four pieces of logs with a diameter of 15-20 cm. The link, in turn, is located on four brick supports. The height of the supports is chosen so that the hive is raised 30-50 cm from the ground. The two opposite sides of the platform are oriented along the north-south line. The platform can also be made from pieces of logs split in half lengthwise. The flat surface is processed with a plane.
To protect the hives from adverse weather conditions (wind, rain, snow, etc.), protective casings are made of hardboard. This cheap material lasts for 5 years and currently does not require replacement.
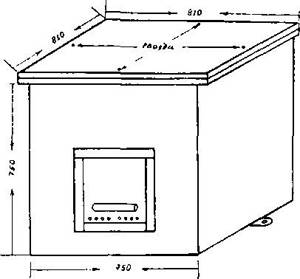
A general view of the protective casing for Dadan-Blatt hives is shown in the figure. For other types of hives, the dimensions can be calculated by adding 10 cm to the external dimensions of the hive on each side. The dimensions of the casing for the hives used are 75x75x75 cm. The walls of the casing are nailed to 3x3 cm slats. In the upper part of the casing, the slats are nailed both from the inside and and outside (for ease of carrying). The dimensions of the casing cover are 81x81 cm. Along the edges it is reinforced with slats of the same thickness. To protect the hardboard cover from sagging in the middle, it is also reinforced with a lath. The cover is held on the casing body with the help of 4 nails, which are freely inserted into special holes in the slats of the cover and body. The ends of the nails are ground off to avoid injury. Thus, the cover can be easily removed from the body if necessary.
The protective casing is secured to the platform with screws using two lugs nailed to the bottom rails of the side walls and cannot be moved.
- The flight of bees in the central regions of Russia usually takes place until March 20.
At this time there are usually several sunny, warm days. And in the period from March 25 to April 4, there is a strong wind with heavy snowfall, so it is not advisable to remove the protective cover for bees to fly around. In this regard, on the front wall of the casing, at a distance of approximately 10 cm from its lower edge, there is a window with dimensions of 40x40 cm, covered with a shield. By lifting the shield up and securing it with a hook in this position, the bees are given the opportunity to fly around, and when bad weather sets in, the window can be closed again. Thus, the protective cover may not be removed until almost the spring inspection.
To make a window, you need to have three strips 4 cm wide and 1 cm thick. Each strip has a groove 5 mm deep on one side, 2 cm apart. The strips are nailed along the edge of the window, forming a groove for the protective shield. To make the shield, take the same hardboard and another plank. The hardboard of the shield is nailed to the plank in a flush groove. Thus, the shield fits freely into a groove 2 cm deep.
For air ventilation, 10 holes with a diameter of 8-10 mm were drilled at the bottom of the rear wall of the casing, covered on top with a protective visor (not shown in the drawing). The same holes and visor are made in the lower part of the shield.
In general, the design of the protective casing does not require special explanation and can be seen from the drawing. The temperature inside is somewhat stabilized and a flow of fresh air is ensured. Installing and removing the protective cover can be done by one person and takes very little time. If it is necessary to feed the colony in winter, the design of the casing provides easy access to the bee colony.
In order to utilize bioenergy, the casing cover can be made in the form of a pyramid. Its dimensions are shown in the figure.
It should also be added that the author’s apiary is equipped with an electric heating system, which allows maintaining the temperature inside the hive within the most favorable limits for bees. Variants of such a system for wintering bees in the wild are given below.
- I would like to draw the attention of beekeepers to one more circumstance.
It is known that a structure in the form of a tetrahedral pyramid concentrates biological energy in the region of the lower third of its height. The theoretical dimensions of the pyramid in conventional units are as follows: the base of the square is 1, the height is 0.64, the side edge (not the face) is 0.95. There is a special microclimate inside the pyramid. The biofield level in the area of the lower third of the height is 5 units (the bioframes rotate 180°C), and at the roof level - 2 units. Bees need bioenergy. They develop well and in conditions that are quite modest for honey collection (for example, the Tver region) produce at least 35-45 kg of marketable honey per family, without the use of additional methods to increase the honey productivity of families.
- A general view of the pyramid above the hives is shown in the drawing. Expensive materials are not required for its manufacture.
Four posts, several stakes and unedged boards 2 cm thick. Old iron for the upholstery of the pyramid, although it is permissible to use any material, can be found in sufficient quantities in numerous landfills.
The pyramid not only feeds the family with bioenergy, but also protects from the scorching rays of the sun and rain in the summer, and from wind and snow in the winter. It is advisable to make a stand next to the pyramid for folding magazines, a roof, and an undercover, and attach two shelves for tools on the posts.
In conclusion, it should be said that the protective casing, platform and pyramid, made once, make it possible to transfer bee colonies from summer to winter beekeeping conditions and back without extra effort (this is important for older people) and create the most favorable conditions for keeping families and working with them. For a homestead apiary of 5-6 families, this is a very real task, especially for families of a breeding group.
Features of wintering in the northern regions
Experienced beekeepers organize wintering of bees in the wild in the northern regions, taking into account some nuances:
- They use thin-walled hives, but free in size. They keep bees all year round. The entrances are kept open.
- Hives are built from several buildings. Wintering is carried out in two of them, but sometimes only in one, but a magazine must be attached to it. 9 frames are installed in each case, taking into account that the upper bars should be 12 mm thinner than usual. Due to this, the uterus can move into a higher body.
- Only those families that occupy two buildings at once are allowed to spend the winter outdoors. The honey is completely removed because it may contain honeydew. In the fall, bees are given sugar syrup at the rate of up to 25 kg per family. Be sure to leave 3 frames of beebread for the winter. In the spring, food is not added to the bees, since it is still quite cold in the north.
- To prevent accumulation of moisture evaporation in the upper part of the hive, insulation made of thin foam plastic (3 cm) is laid. Holes are made in the roof to allow moisture to escape.
- To prevent the wind from blowing into the cracks, the hives are wrapped in paper that does not allow moisture to pass through, and the entrances are covered with inclined boards.
- They try to bury the hives as deep as possible in the snow.
In the harsh Siberian conditions, bees will survive in the wild only under a layer of snow.
How much honey should be stored?
When preparing for winter, one rule should be taken into account: it is better to increase feed reserves than to miscalculate in the direction of reducing them. It is better for the surplus honey to remain unclaimed in the hives than for the family to die or be exhausted from hunger. Bees under no circumstances waste food in vain, so economy in this case is inappropriate. If a multi-body nest is planned, then preparing the bees for wintering outside will require a food supply of approximately 40 kg. It should also be taken into account that in winter families move only vertically. It is best if the reserves are located in the upper part - insects will fly up to them from below. The most natural configuration would be a two-tier nest, in which the bees can easily move around the streets. As a last resort, to ensure freer movement, the inter-hull space should be expanded.
If you plan to use traditional nests in beds, then the calculation of honey should be made from the number of frames. For example, in a 12-component hive you should leave 2.5 kg of feed per frame. In addition, the wintering of bees outside will be successful if full-copper stores are maintained. This will at a minimum prevent families from going hungry, and will also allow them to conserve their living resources.
Features of wintering in areas of the southern strip
The wintering of bees is most favorable in the southern regions, where the temperature in winter fluctuates in the range of -5...-3°C. In such conditions, it is better to leave the bees outdoors for the winter. However, even in this case, some nuances should be taken into account:
- In the south, winds often blow, and damp weather lasts for a long time, so it is very difficult for insects to maintain a constant temperature inside the hive. Icing of the walls often occurs. After warming, the ice melts and mold appears, which is destructive for bees. To prevent this, it is still recommended to insulate the hives with at least moisture-proof paper or roofing felt.
- When warm weather persists for a long time in the fall, the bees are forced to fly and look for honey for bribes, due to which the colonies are weakened. In order for them to survive such periods, they need to leave more food.
- It is necessary to protect bees from strong, cold and wet winds. For these purposes, the apiary is installed inside bushes or a fence is built. This step should not be neglected, given that bees tolerate frosts more easily than winds.
The disadvantage of overwintering bees in the wild in the southern regions is that, due to warm weather, they are forced to fly around in winter and early spring. Because of this, insects become weaker, and many of them do not survive until late spring.
Checking the habitat of bees in winter
If the wintering of insects is organized in compliance with all the rules, there is no need to check and disturb the bees. In practice, most beekeepers prefer to periodically visit hibernating insects. This is done in compliance with certain rules:
- To look inside the hive, remove the lid. This work is done with great care, without making unnecessary noise.
- The weather during testing should be warm and without wind. At the same time, it may be cloudy so that the bees do not want to fly around.
This video shows how to inspect bees in winter:
In order not to open the lid of the house, you can determine what sound is coming from the hive. If it is quiet, then everything is fine in the hive, so the bees should not be disturbed.
Pros and cons of wintering in the wild
There is still controversy regarding the wintering of bees. Some believe that insects do better in natural conditions, while others prefer to keep them in a warmer environment.
The main advantages of overwintering bees in the wild are as follows:
- It is much easier for the beekeeper to prepare for winter.
- When the temperature outside is above zero, the beekeeper can organize a flight of colonies so that they are freed from their full intestines. When placing insects in an omshanik, this is much more difficult to do, since you will need to carry the hives back and forth. This is especially true in those regions where there are no constant temperatures (it jumps from negative to positive values and vice versa).
- Bees in the wild make their first flight earlier, and the queen lays eggs. They can clean up the waste themselves.
As for the minuses, they are as follows:
- Not all beekeepers have the means and capabilities to build a winter hut. In addition, you will have to drag the hives, and they are heavy, so you won’t be able to do it without an assistant. There is an alternative option - to transport the hives, but this entails the investment of additional funds.
- You will need to find materials to protect the apiary from snow drifts and cover the wall, which is located on the sunny side.
- It is necessary to consider protecting the hives from tits, since they disturb them by tapping the walls with their beaks. The bees begin to fly out, and the tits eat them.
- You should clear the snow around the hives, and also monitor the air temperature so that at the slightest warming the bees do not fly around.
- It is necessary to take care of weak families where there are only 4-6 frames. Most likely, they will not be able to survive the winter safely, so it is advisable to place them with another family.
Organizing the wintering of bees in the wild is a difficult task, on which the health of bee colonies, their ability to collect honey and the increase in offspring depend. With the correct organization of the necessary conditions, insects will be able to winter favorably in natural conditions and will delight beekeepers with excellent honey.
0
0
Copy link
Preparing families for winter
It is necessary to increase the mass of young, healthy, untrained women workers. Old bees are not needed for wintering: they won’t live to see spring anyway. Only honey is used in vain for its maintenance.
- We calculate the time until which the queen should lay eggs. We subtract a month from the date of the last flight in your area. So that freshly hatched bees have time to fly around before wintering.
- Until this time, we stimulate egg laying with incentive feeding (in the absence of bribes). When maintaining an apiary, we change queens annually or every other year: young worms last longer.
- We carry out therapeutic measures. We treat it twice against varroa, which, alas, now infects all apiaries. The first time is after the end of the main bribe: without reducing the number of parasites, it is impossible to raise full-fledged workers. The second time - after all the brood has emerged: in its absence, the effectiveness of any treatment is maximum, the entire mite is in the nest. If the apiary is infected with other diseases, we treat it. Before forming a club, it is good to give medicinal fertilizer to prevent nosematosis. A good wintering of bees is impossible if we have sick insects sucked out by mites!
- We try to keep old female workers busy with the work of processing sugar syrup, drying and repairing damaged frames. To do this, we give all the fed syrup in large doses immediately after the main feeding.
- If it turns out to be a good day for flying, and the insects are already in the club, you can try to encourage them to fly by knocking, making noise, or partially dismantling the nest. The later they fly around, the lower the fecal load during the wintering of bees.
Printing honeycombs in the apiary
We allocate spare queens into small families. Usually there is enough time to form nuclei after the main harvest on a mature queen cell. The queens will fly around and have time to grow enough young individuals for a good wintering of the bees. Such families are inexpensive in terms of cost: there are enough workers and queen cells at this time, with minimal effort from the beekeeper. Keeping 10% of spare queens from the number of apiary colonies allows you to save a lost queen from death. Or develop it into a full-fledged unit next season, as in the video.
We begin preparations for wintering immediately after the main harvest, simultaneously with the selection of honey. Even then, sorting through the frames, we leave the brood and low-copper brown ones (I prefer their queens in the spring), form cores for spare queens, clean the folds, prepare and distribute sugar syrup. We carry out therapeutic measures.
