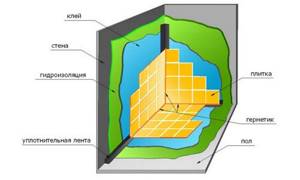
In the process of renovating a bathroom, the shower stall becomes a key element, which requires increased care. Waterproofing a shower is a necessary procedure to protect all surfaces from moisture penetration. Thanks to the insulating layer, it is possible to prevent water from flowing down to the neighbors, destruction of the base of the device, and the formation of fungus and dangerous microorganisms. Moisture should be removed from the surface into the sewer pipe, and not retained on the field or between porous material.
Where is waterproofing needed?
First of all, you need to identify the areas that are most susceptible to moisture, and therefore prone to destruction.
The most important areas:
- Floor. In the case of using a pallet, the adjacent areas of the floor and the space under it are taken into account, and without a pallet, the entire surface is treated with waterproofing;
- Formed seams between the pallet, floor and wall;
- The wall, especially its lower part and places where water actively enters;
- Metal pipes and risers on which condensation can form and fall on a horizontal surface;
- Connections between pipes, pan and floor.
High-quality waterproofing of the cabin implies taking into account each zone and preventing negative effects from moisture.
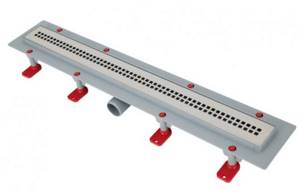
Drain installation
If you are going to make a shower without a tray, first of all, finish installing the drainage system. To install the drain, we move on to the construction of the drain. The drain consists of several elements: a body with an oblique outlet, a locking siphon and a decorative grille. It is best to place the drain in the center of the shower stall and make a slight slope towards it in the corners so that the water drains faster. If the location of the pipes causes difficulties, then you can choose another location. The following video shows how to make a shower floor slope.
The main part of the body is lowered several centimeters below floor level, taking into account the screed. Also add the thickness of the flooring here. The gaps between the ladder and the walls are sealed with a special elastic profile, tightly coated with waterproof glue on top. The slope to the central opening of the cabin, where the water goes, is made no more than 3%. If for some reason you cannot build a slope, then to prevent water from getting onto the floor outside the shower stall, install a side about 10 cm high.
Material selection
Today, waterproofing for showers can be of various types, since the choice of building materials is very large. To best determine the appropriate material, it is necessary to carefully study the conditions of its use. It is necessary to determine what lies at the base of the wall, for example, the tile can withstand moisture well, but if installed incorrectly, water leaks into its cracks.
Important! In simple cases, only one waterproofing material is used, but more often it is necessary to combine different types depending on the location of use.
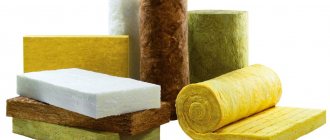
Insulation types:
- coating - these are wet materials that harden and prevent moisture from entering;
- elastic - soft coating with easy application;
- penetrating - liquid insulation that penetrates into the surface and prevents moisture absorption;
- polymer-cement waterproofing is used as a base for forming a pallet or other covering;
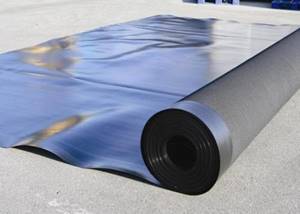
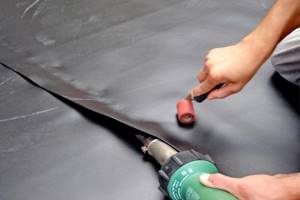
- roll is the oldest and most reliable method of insulation.
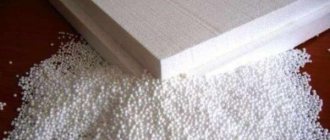
The roll method involves the use of materials in rolls, which are unrolled and laid on top of a rigid base. Fiberglass or bitumen with polymerization is predominantly used. Materials can be guided, when special glue is used for fixation, and self-adhesive, which require the use of a gas torch for application. The advantage of the technique is its low price, the disadvantage is its short period of use.
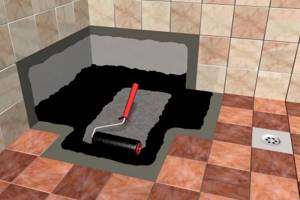
Today there is a more practical method - coating insulation, when mastic is used as waterproofing, mainly from bitumen with the addition of polymer or rubber. High elasticity rates, high-quality adhesion and long service life are the advantages of the technique. At the same time, simple installation also contributes to the popularity of the technique.
Polymer-cement compositions are a mixture that must be diluted with water; it is used to cover plastered walls. Often used when installing heated floors and to create a layer in “wet areas”. Waterproofing without a tray under tiles often uses this method, since its elasticity and volume allow for quick installation.
It will be interesting: Review of Domestos products and methods of use
Penetrating materials saturate the substrate and push water away from the material, creating a surface protective layer. When the mastic dries, the layer becomes more durable and waterproof. In practice, they have proven themselves well: Ceresit CL 51, Grida HydroMEB Acrylic and Knauf Flachendicht.
How and how to waterproof a shower in an apartment or house
No matter how long the bathroom renovation is delayed, there comes a time when there is no point in waiting any longer. All the tools and materials were purchased, time was found for work, everything that was possible was read, the rest was asked from “Uncle Petya.” All that remains is to turn off the water and proceed to the “dirty” stage, but you need to understand that this room is the most difficult to remodel and improve due to high humidity.
Mold and mildew spores will thrive here if you fail to take protective measures correctly. Constant moisture can gradually penetrate into other rooms, becoming an excellent breeding ground for their spread. And, if the waterproofing of the floor becomes unusable, the neighbors below are also unlikely to like it.
Waterproofing your shower room is a necessity that cannot be ignored.
What you should especially pay attention to
Not all areas in the bathroom are exposed to excess moisture.
Therefore, it is worth paying attention to:
- bottom of walls and floor;
- shower cabin;
- place near the washbasin;
- bathroom.
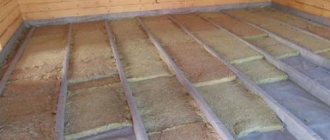
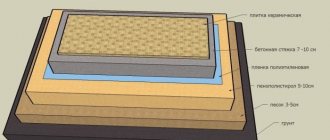
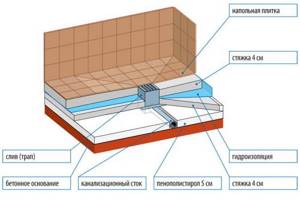
Floor composition and waterproofing of a shower without a tray
How to choose waterproofing
Manufacturers are ready to offer a wide range of products in this area. But, everyone has their own “responsibilities”, so it would simply be unreasonable to purchase the first one you come across.
Each package usually contains instructions that describe where this or that mixture is used and for what purpose. So, before you go to the construction supermarket, find out what your walls and floor are made of. (See also the article Rain shower systems: features.)
Tip: It happens that using one type of waterproofing is enough, but we strongly recommend an integrated approach to this process so that the most suitable material is used in each zone.
How to waterproof a shower without a tray
Kinds
Let's take a closer look at what waterproofing option the industry can offer in this case:
| Rolled |
The method is the cheapest, but the service life of the moisture protection is short. |
| Coating room |
The second type is dry mixtures of polymer materials and cement. They are prepared by adding water. Application:
The advantage is high elasticity and does not require additional screeding. |
| Polymer |
|
| Penetrating |
|
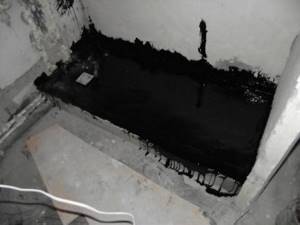
Waterproofing a shower cabin without a tray using bitumen-based mastic
Tip: when choosing a waterproofing material, the type of base on which it must be applied plays an important role. For concrete, penetrating or polymer-cement options can be recommended; when treating brick walls, bitumen mastics or polymer-cement membranes can be recommended.
Waterproofing the shower floor
Regardless of whether there is a pallet in the room or not, the floor requires the most reliable waterproofing. At the same time, we recommend lowering its level relative to other rooms in the house, or making a high threshold to separate the room from the hallway. (See also the article Wall-mounted shower: features.)
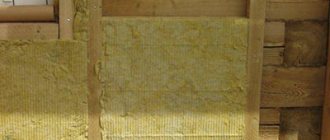
Self-adhesive waterproofing in a shower in a wooden house
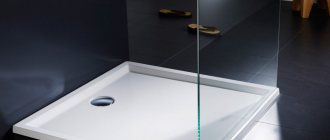
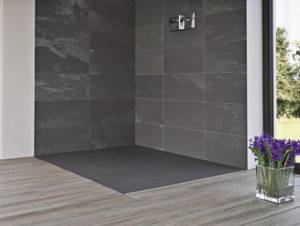
Waterproofing a shower stall with a tray
A tray is a bowl that collects and holds water in the shower stall. Thanks to the use of a pallet, it is easy to provide waterproofing and install a connection to the sewerage system. The use of this bowl is mandatory in an apartment building, since other methods are extremely difficult to use.
Pallets are:
- made of plastic - quite durable and cheap;
- made of metal - high-strength bowls with high cost;
- made of concrete - a long installation process and difficulty in manufacturing in an apartment building.
To prepare the insulation of shower stalls with trays, it is necessary to treat the floor, walls, and junction points. The pallet from the factory is mounted in a prepared place, usually in the corner of the room. The connection areas with the wall are lubricated with sealant. In other areas, sealing is carried out using rubber gaskets.
Waterproofing a shower tray made of concrete is carried out in a similar way, but you should use polymer cement, which does not allow moisture to pass through.
If the cabin is not completely enclosed, but is adjacent to the wall, it is worth using penetrating insulation to prevent water from flowing down through the cracks. It is advisable to lay tiles or make plaster using polymerized cement.
If the device is completely closed, then you should take care of insulating the sewer pipe, which should not leak. For a quality connection, it is not enough to use a standard rubber gasket; it is better to enhance the effect with silicone or other sealant. At all joints, metal or plastic must be treated with waterproofing material.
When a cabin begins to leak, there are several reasons: leaks in the wall, probably voids or incorrectly selected material, a sewer pipe or a shower door that does not fit tightly.
Which one to choose: with a dry seal or a wet seal, dry or water seal
Each shower drain is equipped with a seal, which can be dry or wet (hydraulic seal) . The second option is a simple and inexpensive system that uses water as a barrier to sewer odors. Evaporation of moisture leads to the fact that odors easily penetrate into the room, so it is not recommended to install a water seal if the shower stall has heated floors. This design is practical in those showers that are used regularly , at least twice a week. Irregular use leads to the gradual disappearance of the water plug. Stagnation of water is also possible, which will cause an unpleasant odor in the shower.
Shower drain Anya Plast “Reef” 650 mm water seal, matte. Photo by Leroy Merlin
A dry shutter system is equipped with a special valve (shutter, damper), which opens under the pressure of the water flow and closes after the water goes into the sewer. This option is characterized by increased reliability , but there are also disadvantages: over time, the valve becomes dirty and performs its own functions worse. models with mechanical shutters on sale , i.e. with a tap, which in case of prolonged downtime of the shower cabin is tightened manually. The valve in dry valves can be in the form of a membrane, pendulum or float.
Waterproofing a shower without a tray
The absence of a tray means that a separate corner of the room is used as a shower, where water and sewage are supplied. The floor is relatively flat and does not rise above the general level. To prevent water from flowing throughout the room, a threshold is used that protrudes 5 cm above the surface.
For such waterproofing, you need to pay attention to the threshold, which should be prepared from moisture-resistant cement. Protective materials are applied to the improvised “bowl” itself, to the threshold (on each side), and adjacent walls. At the same time, the floor is insulated; the material necessarily covers some part of the wall where there will be a lot of water, 20 cm is enough.
The algorithm of actions is as follows:
- Initially, all dust and dirt are removed from the working surface, this part is very important, otherwise efficiency and durability will be significantly reduced;
- Mastic or rolled material is applied to the leveled and cleaned surface using a roller/brush;
- Other wet areas are treated with the material: bidet, shower, toilet, sink, joints;
- After the material has dried, the drip and protective grille are installed on the pipe. Do not forget about the polymer lining to seal the connection. Silicone or bitumen is used for compaction.
It will be interesting: How to permanently defeat mold in the bathroom and shower
Important! The application of the material must follow a pattern; chaotic coating often leads to leakage.
It is recommended to apply it parallel to some wall, and the second layer of coating is laid perpendicularly.
Waterproofing for bathrooms in Moscow
Waterproofing for the bathroom and other products can be purchased at Leroy Merlin in Moscow at low prices. Select the product you are interested in on the website and buy it in our online store. The range of products presented in the catalog is extremely wide. Among them there will certainly be a position suitable in all respects.
All products presented in the “Bathroom Waterproofing” section are produced by well-known companies that have proven themselves to be of high quality for their products.
You can always place an order and pay for it online on the official website of Leroy Merlin in Russia. For residents of the Moscow region, we not only have low prices for products in the “Bathroom Waterproofing” category, but also fast delivery to cities such as Moscow, Balashikha, Podolsk, Khimki, Korolev, Mytishchi, Lyubertsy, Krasnogorsk, Elektrostal, Kolomna, Odintsovo, Domodedovo, Serpukhov, Shchelkovo, Orekhovo-Zuevo, Ramenskoye, Dolgoprudny, Pushkino, Reutov, Sergiev Posad, Voskresensk, Lobnya, Ivanteevka, Dubna, Yegoryevsk, Chekhov, Dmitrov, Vidnoye, Stupino, Pavlovsky Posad, Naro-Fominsk, Fryazino, Lytkarino, Dzerzhinsky, Solnechnogorsk, Istra and Zhukovsky.
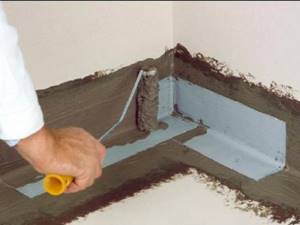
Laying roll insulation
To install material from a roll, you should do the following:
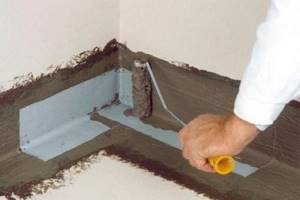
- The surface on the field is leveled with cement; the difference should not exceed 5 mm. At the junctions of the floor and wall, rounding is performed using a DSP.
- Cutting the canvases requires taking into account an overlap of 15-20 cm on each wall. After receiving the pieces, it is necessary to moisten the material with solar oil, which gives the material greater elasticity and high adhesion, and also helps eliminate excess quartz sand.
- Before laying, the canvas is laid on a flat surface for curing and leveling, the duration is 1 day.
- The surface is cleaned of all debris.
- Now they cover everything with a layer of bitumen, and sheet material is applied on top, and the sheet is rolled on top.
- After pasting (if it is self-adhesive) or melting the material with a gas lamp, the surface is left for a day.
- When the material hardens, a second layer is applied in the transverse direction from the previous material.
- The entire surface is treated with heated mastic.
Why is it necessary?
Waterproofing a shower is a very complex process consisting of several stages. There is a high level of humidity in the shower room, and on a constant basis. As you know, moisture is a source of mold and mildew. It can spread to other rooms in the house or apartment.
In order for the room to meet sanitary standards, it is necessary to insulate the shower room so that increased humidity does not spread to other rooms. It is very important to waterproof a shower that does not have a shower tray. After all, water that gets on the floor can easily get into other rooms, as well as neighbors. This may provoke conflict. Therefore, special attention should be paid to waterproofing work.
Using penetrating waterproofing
When choosing a material, there are no significant differences; most manufacturers have made approximately the same compositions. Penetron will be used as an example.
- High-quality surface preparation is an extremely important step; it is better to treat the surface with a primer.
- 25×25 mm grooves are installed around the entire perimeter, which are properly moistened.
- The material is diluted with water (if required and permitted by the instructions).
- The prepared mixture is placed in a groove, approximately 1.5 kg per 1 running meter.
- When the material at the seams has set, I moisten the bottom of the walls and the floor, and then apply a layer of material.
- After the first layer has been prepared and hardened, a second one is applied, only the coating must be moistened.
- All surfaces need to be hydrated with water for another 2-3 days.
- After 3 weeks, the entire surface is treated with a medium-hard metal brush to remove residual sand and cement.
- At the end, a decorative coating is applied.
If the Plombizol complex is used to waterproof the floor:
- The surface is thoroughly cleaned of debris and dust.
- The joints of walls and ceilings, as well as the seams of panels and slabs, are expanded to 2-2.5 cm.
- “Penetrating Plombizol” is diluted in the form of a suspension, as indicated on the packaging, and applied manually to the floor surface, joints with walls.
- Longitudinal and corner grooves are moistened and filled with Expanding Plombizol.
- Coating waterproofing is carried out with “Expanding Plombizol” mixed with water in the specified proportions. You can see how to work with Plombizol in the video material on our website.
If you are planning a shower corner without a tray, waterproofing is carried out under a layer of covering screed. That is, under the facing layer (tile) there will be a concrete screed, and under it there will be a water barrier.
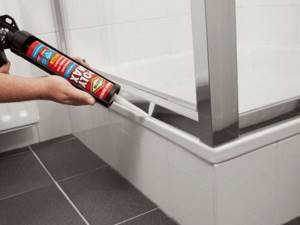
If you install a ready-made shower tray, you can do without a cover screed. After installing the pallet, all seams along its perimeter must be sealed with a moisture-resistant sealant; polyurethane sealant is best suited for this.
Consequences of lack of waterproofing on walls and floors in the shower
One customer complained that water was dripping from the second floor ceiling. Finding the cause right away is problematic, since on the second floor in the area of the leak there are other communications, including water supply pipes and sewerage. It turned out that water was seeping through the walls in the shower, dripping down.
The problem was that there was no waterproofing on the gypsum board walls. Whereas, waterproofing was done on the floor. See below for the consequences of constant leakage. As you can see, mold began to form inside the wall.
The plasterboard profiles have rusted. The drywall also fell into complete disrepair. I had to completely cut out the bottom of the wall, replacing the profiles and the drywall itself.
According to rough estimates, the damage amounted to about 100,000 rubles.
Pros of creating a tile shower
Making your own tile shower tray has many obvious advantages, which include:
- significant savings in the family budget;
- the opportunity to use your imagination to create a pallet from tiles of an unusual shape and the desired size;
- choose tiling in accordance with the design of the bathtub;
- the opportunity to take advantage of the independent choice of equipment that you consider necessary for the bathroom in your own apartment;
- the ability to select materials that are used in rooms with high humidity;
- the ability to make a custom-made shower enclosure, the installation of which will not create problems.
Another obvious advantage is the appearance in your apartment of an exclusive shower cabin, the quality of which you can not doubt.
Materials and tools needed for work
When deciding how to make a shower tray with your own hands from tiles, it is important to know that the set of necessary tools will not require additional costs. Almost any home craftsman has everything you need.
You need to prepare:
- a manual or electric tool for cutting tiles (especially if you have chosen a large-format tile type),
- trowel, spatula and chisel,
- roller or paint brush,
- ruler, square and pencil for marking,
- drill with attachments,
- rule and level for leveling the surface.
The set of materials includes:
- cement,
- brick or additional cement to fill the sides of the pallet,
- purchased waterproofing mixture or bitumen,
- facing tiles (it is important to choose a material intended for constant contact with water and having a non-slip safe surface),
- waterproof tile adhesive,
- self-tapping screws
Note: To level the tiles, use a rubber hammer or a spatula with a rubberized handle. Do not forget about the “crosses”, with the help of which it is easy to maintain the same width of the seams between the tiles or blocks of the mosaic canvas.
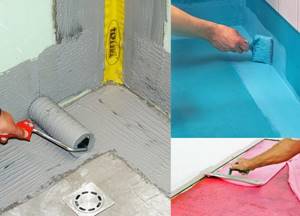
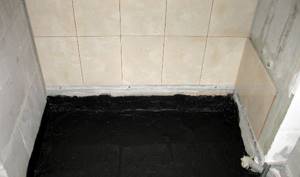
Coating or painting insulation
Bitumen-rubber or bitumen-polymer mastics (“liquid rubber”), for example, “Elastopaz”, “Elastomix”, “Tekhnoprok” and others are used as coating waterproofing of a shower room. These materials are easy to apply with your own hands, and the work does not require special preparation.
Preparatory stage
The installation of insulation begins with careful preparation of the base. If it requires leveling, then use a cement screed.
After the solution has set, the surface is cleaned and dusted, a primer is applied, it can be “Ceresit”, “Polastra” and others. After the soil has dried, work with mastic begins.
Application of the composition
“Liquid rubber” is applied with a brush, the layer is made from 2 to 4 mm, the junctions of the floor and walls, as well as the surface around the pipes and drains, are especially carefully coated. Not only the base is painted, but also the walls to a depth of 15–20 cm.
After complete polymerization of the composition, a continuous waterproof layer is formed, on which a cement screed is laid to protect it from external damage. After the solution has dried, you can begin finishing the premises.
Plaster insulation based on polymers
A polymer-cement mixture is an example of plaster waterproofing. When carrying out work, a certain set of this cement material is simply diluted with water and then laid on the floor and walls, like ordinary plaster. No additional clamping device is required.
Polymer crystals grow together with concrete, and therefore you don’t have to worry about the durability of the material. However, when choosing this method of insulation, you should remember that this is plaster, so you will need to make efforts to level it. And this leads to more complicated work:
- the surface must be cleaned of debris and moistened;
- the polymer-cement mixture must be diluted to a homogeneous consistency;
- The plaster should be applied with a brush (!) with hard bristles both on the floor plane and on the lower part of the walls;
- you need to carefully place the mixture in the exit points of the shower communications: water pipes and sewer drains;
- if the base surfaces were initially flat, then a polypropylene mesh should be laid on the first layer of plaster;
- you should wait for the first layer to dry (see instructions for the plaster) and apply the second (same one).
After the polymer-cement plaster has dried, the work on waterproofing the shower can be considered completed and you can begin the finishing phase of the bathroom renovation.
How to choose the right type of insulation
When choosing a material, the required height of the shower step and the intensity of use are taken into account. When there are 4 or more people in a family, the right option would be to use several types of insulation at the same time. If a low step is required, it is advisable to use polymer-cement compositions on which to glue the tiles. For higher lifts, mastics or rolled materials can be used, covered with an additional concrete screed.
One of the determining factors is price. Bitumen-polymer mastics cost on average 150-200 rubles. per kg, roll waterproofing 160-180 rubles. per 1 m², polymer-cement dry mixture - 150 rubles. for 1 kg.