When building a house, one of the main tasks is to ensure reliable protection of the structure from interaction with water, which has a destructive effect on any building material.
Other factors that negatively affect materials are steam and moisture. If you do not think about how to protect structural elements from them, then such frivolity can lead to the appearance of fungus and mold. To avoid this, when building houses, a layer of vapor barrier is laid.
Why do you need a vapor barrier?
Currently, many people who are building individual residential buildings are thinking about installing vapor barriers. Vapor barrier is especially relevant in those houses in which a warm microclimate prevails and the humidity level is quite high. This primarily concerns bathhouses and basements located below ground level.
During their operation, steam is constantly generated in them, which must somehow escape from the room. Therefore, it settles on the walls and ceiling.
With prolonged exposure to steam on these surfaces, the destruction of building structures occurs, which negatively affects the condition of the structure as a whole. To prevent this from happening, install a vapor barrier. With its help, walls and ceilings are protected from steam penetration.
It should be noted that in addition to bathhouses and basements, vapor barrier of surfaces in interior spaces should also be carried out in cases where the building has external insulation with a material with low diffusion resistance.
At the moment there is no material that would be equally good for buildings made of different materials. When deciding which vapor barrier to choose for the walls of a house, one starts mainly from the elements that make up the structure of the wall structure.
The difference between vapor barrier and waterproofing
Despite the fact that waterproofing and vapor barrier are used to protect against moisture, there is a certain difference between them. Vapor barrier is necessary to prevent the formation and absorption of condensation by the insulation and maintain high-quality air circulation. Waterproofing agents help retain several water particles. They are not able to stop the vaporization process.
When food is constantly being prepared in the house and clothes are washed, the humidity level remains consistently elevated. Steam can escape from the room through window openings or open vents. However, it will be difficult to keep the windows open throughout the year. For this reason, during the construction process it is necessary to ensure sufficiently effective ventilation of the walls. This is only possible when using a sufficiently effective feather barrier.
When is it necessary to install vapor barrier on walls?
In some cases, you simply cannot do without a vapor barrier device, the installation of which should be carried out correctly:
When insulating walls from the inside.
Especially if cotton-type materials were used during thermal insulation work. Glass wool and mineral fiber boards have excellent thermal insulation properties. In addition to this, they have the ability to “breathe”.
But they have one serious drawback. It lies in the fact that these materials have poor resistance to moisture. Penetrating inside these insulation materials, it reduces their performance characteristics.
And this, naturally, affects the efficiency of insulation. The installation of a vapor barrier helps to avoid these negative consequences; In houses built using frame technology, vapor barrier materials must be present in the wall structures. This will protect the insulation from moisture and ensure the effectiveness of insulation for a long time; The installation of a vapor barrier layer is also carried out in ventilated facade systems.
In them it acts as protection from the wind. By means of a vapor barrier, the flow of outside air is softened. In addition, it protects the insulation from overloads and allows it to breathe freely.
An example is a brick wall that is insulated with a cotton-type material covered with a layer of siding on top. The vapor barrier included in this design provides protection from the wind and eliminates situations of increased ventilation. The ventilation gap present in the insulation design ensures effective removal of excess moisture from the surface of this layer.
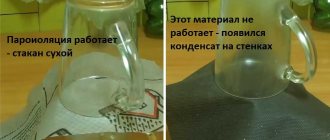
The term “vapor barrier” should not be taken as a barrier that does not allow vapor to pass through.
Membrane materials currently used in steam protection work ensure minimal air passage, which completely eliminates the possibility of a greenhouse effect. Excess moisture is retained in the membrane, and the air freed from moisture is not able to harm the wall structure or reduce the performance characteristics of the insulator. Steam protection materials have an internal “coat” that redirects moist air along the desired path through the ventilation system.
Types of vapor barrier materials:
Polyethylene is a material traditionally used for vapor barrier of house walls. When performing installation work using it, you should handle it with particular care. The insulator must be fastened so that it is not too stretched, otherwise the film will simply tear when the climatic conditions change again.
If polyethylene without perforation is used during vapor barrier work on the walls of a house, it will become reliable protection not only from steam, but also from air. And in this case, there can be no talk of comfortable conditions when living in a home. Therefore, it is best not to use such material to create a vapor barrier layer; the group of vapor barrier materials includes mastics that were developed specifically for these purposes.
Using them during work from inside the building, the material will retain moisture and allow air to pass through. Note that the work of applying mastic to the surfaces of walls and ceilings is carried out before their finishing; membrane films are a new material for vapor barriers. Their appearance on the market happened some time ago.
In a short period of time, this material has become in demand and is currently actively used in vapor barrier work on the walls of wooden houses. The main advantage of these materials is that they allow air to pass through and retain moisture. The vapor permeability that is characteristic of them is relative.
This allows you to ensure normal operation of the heat insulator. The use of membrane materials to protect walls prevents the cotton insulation from getting wet. It does not lose its integrity and can perform its functions for a long time.
Currently, vapor barrier materials are presented in a wide range. Moreover, each of them is intended for a specific area of use.
Construction of a vapor barrier layer - learning the procedure
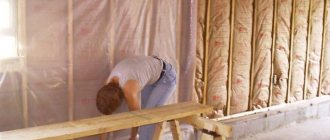
To properly perform a vapor barrier, you need to know that it is performed differently outside and inside the building. Insulation of frame walls is carried out from the inside, so the vapor barrier is also laid on the inside. On the ground floors and in the basement, the vapor barrier layer is installed from the outside. In swimming pools, vapor barrier is required on both sides; the installation technology is the same as for the basement floor.
Before thermal insulation work on the basement floor, the working surface should be prepared. First it should be cleaned, then a protective coating should be applied. Liquid rubber is more complex in terms of application technology, as it requires the use of special equipment. The material consists of two mixtures, which, after mixing, instantly polymerize. Therefore, the solution is prepared immediately before use and applied using a two-torch gun that sprays liquids under pressure.
When installing a protective layer against water vapor with bitumen, the following steps are performed:
- The first layer is applied with mastic, which acts as a primer;
- Then bituminous materials in the form of rolls or mastic are applied in two layers.
For structures located above the basement and ground floor, vapor barrier of the walls is carried out indoors. When installing internal vapor barrier, a number of rules should be followed:
- first you need to install the sheathing;
- a heat insulator is placed in the sheathing;
- then the film is laid, and if it has a reflective surface, then the reflector should be turned inward;
- for tightness, the joints are glued;
- for polypropylene, a counter-lattice is installed;
- the final stage is finishing.
When installing a protective layer from moisture and steam, it is advisable to leave free space for air movement and removal of excess moisture.
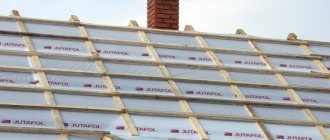
Vapor-proof materials installed outside
This group of materials includes “Izospan A”, “Izospan B”. One of their features is that the materials contain fire retardant additives, which increases their fire safety. This also includes “Megaizol A”, “Megaizol SD”.
All of the listed materials are used to protect structures made of timber, as well as houses built using frame technology, and panel buildings. These insulators provide protection from precipitation, snow and wind. They are used for all types of external insulation.
When using them, it is extremely important to ensure a tight fit of the membrane to the insulation.
Therefore, these materials should be securely secured during work. There should be no sagging or loose areas. Otherwise, in case of strong winds, rare gusts will occur.
Requirements for insulation for interior work
Since the insulation will be located inside the apartment, its properties must be studied especially carefully.
What to pay attention to:
Environmental safety - the material must be inert and not release microscopic particles into the air.
The lowest possible thermal conductivity coefficient. Don’t be afraid that you “over-insulate the wall” - thermal insulation creates the effect of a thermos, that is, it retains heat in the apartment in winter, and in summer, on the contrary, allows you to stay cool.
Vapor barrier. The lower the vapor permeability coefficient, the less moisture the material absorbs.
Material thickness. The smaller it is, the less space you have to sacrifice in the apartment.
Compatibility with finishing materials. Please note that you will need to install a layer of finishing materials (wallpaper, plaster, etc.) on top of it. Make a choice in favor of dense solid insulation - finishing over them is easier.
Materials for installation indoors
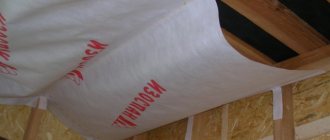
When the task is to perform a vapor barrier on walls and ceilings from the inside of a wooden house, “Megaizol V” is used.
It is a polypropylene film, which consists of two layers. On the outside of this material there is an anti-condensation surface. The use of this material in winter ensures its protection from phenomena such as condensation and fungus.
In addition, its use eliminates the destruction of wall structure elements. This material also protects the room from insulation particles. The same function is inherent in Izospan V.
Preparatory work
Before installing the insulating layer, you should select a material taking into account the characteristics of its installation process. For example, when working in a wooden house, all materials must undergo protective treatment with antiseptic agents and fire retardants.
Before attaching the vapor barrier to the insulation layer of the internal walls, dismantling work should be carried out to clean the surfaces from the remnants of previous finishing materials. Cleaned natural wood surfaces are treated with compounds to prevent burning and rotting. Concrete or block buildings should also be treated with a deep penetration antiseptic compound.
When insulating brick walls from the outside, it is recommended to carefully eliminate all cracks and cracks. And after this, treat the surfaces with an antiseptic solution. Only on completely cleaned surfaces can leveling mixtures be applied and a vapor barrier coating system installed.
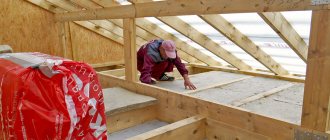
Ceiling vapor barrier
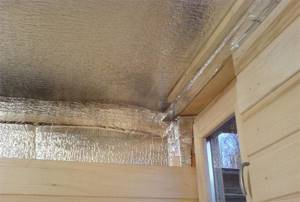
For the ceiling, you can also use materials with foil surfaces. They are laid with the heat-reflecting side inside the room for better heat retention. Fastenings are made using nails with wide heads, and the joints are additionally insulated with tape.
Rules for vapor barrier of frame walls
In frame-type houses, high-quality insulation is more important than in brick buildings or houses made of timber.
The comfort of your stay largely depends on this. Therefore, special attention should be paid to vapor barrier. To protect the insulation from steam on the walls, the membrane must be fixed with the correct side.
It should be attached to the posts using a stapler. The membranes formed after installation on the walls must be insulated using special tape. Or you can use special mastics to seal them.
If ecowool or polystyrene foam is used in frame buildings as insulation, and an effective ventilation system is installed in the house itself, then you can refuse to install a vapor barrier. If the owner of the building has decided to provide protection from steam, then in this case one of the following schemes can be used:
The first scheme involves sewing a membrane onto the wall frame post elements.
After laying the film, surface finishing work is carried out. The material can be plasterboard or lining. This option is optimal for wooden houses, which are used by the owners for temporary residence and are empty in winter.
It can be used in guest houses and workshops. When using such a vapor barrier scheme for the walls of a house, it is necessary to arrange an effective ventilation system. the second scheme involves installing a sheathing on top of the laid vapor barrier membrane, located in a vertical and horizontal position.
Thanks to it, an air gap of 30-50 mm is provided. It is best to use this design in houses that are used for permanent residence. In this case, increased humidity occurs in the premises of a wooden house and the structures need effective protection from steam.
Insulation methods
Insulation with plaster
Peculiarities
This is the “dirtiest” method of insulating from the inside, associated with the need to completely empty the room. At the same time, one of the most inexpensive and easiest to implement. It takes a lot of time and effort.
Technology
- Preparing the wall surface. Cleaning wallpaper, paint, plaster.
- Installation of slats up to 5 mm thick on the wall (layer between the wall and the mesh).
- Surface reinforcement with mesh with mesh size up to 50 mm.
- Consecutive application of layers of plaster with a total thickness of up to 10 cm.
Insulation with foam plastic or polystyrene foam
Peculiarities
One of the best methods of insulating the inside of a house. It allows you to significantly enhance not only thermal insulation, but also sound insulation in a brick house. Expanded polystyrene has better performance characteristics than polystyrene foam, but is more expensive.
Technology:
- Cleaning the surface of the walls from wallpaper, paint, old plaster.
- Leveling the surface of the walls.
- Applying a layer of antifungal agent, primer.
- If the wall is being prepared for drywall, then install brackets.
- Fastening the panels to the wall using glue or special mushroom-shaped dowels.
- If the wall is being prepared for wallpaper or painting, install a reinforcing mesh followed by plastering the surface.
- If the wall is being prepared for plasterboard - assembly of the plasterboard wall, jointing, leveling.
- Next is painting or wallpapering.
- In case of significant humidity, a vapor barrier is installed.
Insulation of a brick wall with penofol
Peculiarities
Penofol is a material consisting of several layers, including foil. It is only advisable to insulate them only in rooms used exclusively during the warm season (dacha, barn, etc.).
In other cases, this material is used as an additional heat-insulating layer and vapor barrier (with mineral wool). The aluminum included in the material requires increased electrical safety measures.
Technology
- Preparing the wall.
- Treatment with anti-mold compounds.
- Fastening 20 mm bars to provide an air gap.
- Using a construction stapler, sheets of foam foam are attached to the beams.
- Glue the joints of the sheets with aluminum tape.
- Another layer of bars is strengthened on top of the penofol.
- Drilling sheets of plasterboard, fiberboard, chipboard or other selected material.
- Preparing the wall surface, wallpapering or painting.
It is allowed to glue penofol directly to the wall using glue. But in this case, thermal insulation and vapor protection are reduced.
Insulation of walls from the inside with mineral wool or glass wool
Peculiarities
Mineral or glass wool are afraid of moisture, so special precautions must be taken in relation to moisture. It is necessary to install slats on the wall to provide an air gap and remove the dew point.
They have a soft surface, so it is imperative to install some kind of rigid structure, be it drywall, fiberboard, chipboard or something else (mineral wool will not hold plaster or wallpaper).
Technology
- Cleaning the surface of walls from old layers of paint, wallpaper, plaster.
- Prime the wall and cover it with antifungal agents.
- Installation of vertical slats to ensure clearance (the pitch should be narrower than the thickness of the mats).
- A vapor barrier is installed on top of the slats.
- Installation of frame profiles. The dimensions of the sections should be slightly narrower than the dimensions of the mats or sheets of thermal insulation (for tight contact).
- Filling sections with sheets or mats of heat-insulating materials.
- A vapor barrier is installed on top (protection from moisture from the side of the room).
- Fastening gypsum board sheets or other final surfaces to the profile.
- The final stage is preparation for wallpapering or painting the wall (if necessary).
Thermal insulation with liquid products
Peculiarities
Thermal insulation of walls with liquid spray agents is used infrequently, as it requires special equipment and trained personnel.
It is the most expensive of the listed methods.
It is produced by spraying special compounds (polyurethane foam). When using this method, a vapor barrier is usually not required.
Technology
- Cleaning and priming the surface.
- Building a profile from beams or metal profiles.
- Filling sections with polyurethane foam.
- Trimming coating defects.
- Finish coating.
Vapor barrier of wooden house walls
The walls of a wooden house should have a higher vapor barrier compared to brick buildings. When choosing membrane materials for insulating surfaces in wooden buildings, one should proceed from the thickness of the timber, the tightness of the grooves, and the presence of cracks in the wall material.
A popular material for the construction of wooden houses is laminated veneer lumber. During its manufacturing process, the wood is dried in special chambers.
As a result, a low level of moisture in the finished material is ensured. It has grooves that provide a seal. The material is characterized by low shrinkage, so it enters the insulation in limited quantities.
When a wooden house is built from timber with a natural level of humidity, the process of drying the material occurs during the operation of the structure. During the first five years in such a house, cracks appear in the material. The geometric dimensions of the beam change, and the tightness of the grooves is broken.
Therefore, house finishing work cannot be carried out during the shrinkage period. Otherwise, upon completion, it will be impossible to restore the tightness of the grooves. In the case of such buildings, two options are possible:
- wait for the wood to dry; perform a vapor barrier on the walls of the building using Izospan B, Izospan FB or Izospan FS membrane films during work.
Why is excess moisture harmful to a wooden building?
Since wood is considered a fairly porous material, it perfectly allows air to pass through and absorbs moisture. Water vapor released in the house in cold weather is absorbed into the walls and tries to escape outside. at a certain level the steam is converted into water. When a liquid freezes, several processes occur that are harmful to the integrity of the structure:
- The wall or insulating layer cools down;
- Walls will freeze if the moisture inside the wall freezes;
- The wall structure will gradually collapse;
- Mold or even mildew may form.
All these factors will not bother homeowners if they install a high-quality vapor barrier.
In modern climate conditions, it is imperative to insulate the walls of residential buildings.
Moisture and air protection concept
The advantages of wooden houses are the good permeability and thermal insulation properties of the material itself. Its naturalness allows us to hope for the absence of harmful emissions in the air.
But timber or logs, when used as a structural material, also exhibit significant disadvantages. The ability to absorb moisture entails a decrease in heat transfer resistance and biological decomposition of the material.
The development of mold negates all the advantages of an environmentally friendly design. Warping due to periodic wetting and drying worsens the tightness of the joints. They start to blow out.
There are a huge number of sources of water vapor in a living room:
- cooking; evaporation of water in the bathroom; breathing of the inhabitants of the house; flowers on the windows; periodic cleaning of the premises.
If there is no vapor barrier on the walls, the breathable structure allows moist air to pass through itself and retains some of the water from it. Overmoistening of the walls of a wooden house can and should be combated.
Vapor barrier device for a wooden house
It is enough to place a barrier permeable to air, but not permeable to moisture, at the junction of warm indoor air and colder enclosing structures. This will significantly improve the working conditions of wooden elements. Let the steam leave the house when ventilating and through the ventilation system.
The residual moisture of the material further complicates the work in such buildings.
After all the elements have been erected and the seams have been sealed, the tree continues to lose moisture for about 5 years. This leads to its deformation and loss of tightness. It is advisable to let the structure stand for several years, re-caulk the joints and only then carry out work on the interior and exterior finishing. It is very difficult to fix anything under a sealed vapor barrier.
Exterior finishing should not include layers that retain water vapor - this interferes with natural drying.
For external insulation, materials that have greater permeability relative to wood are used. On the street side, a gap is left between the surface of the wooden wall or the breathable insulation on it and the waterproofing and windproofing coating under the exterior finish. This layer creates conditions for air circulation.
It should enter freely under the plinth and exit under the roof. This way the log house and the insulation on it will remain dry. To insulate wooden walls from the outside, basalt wool, low-density foam concrete, wood concrete and other breathable materials can be used.
The vapor barrier is installed on top of the insulation
Properties of materials and installation technologies
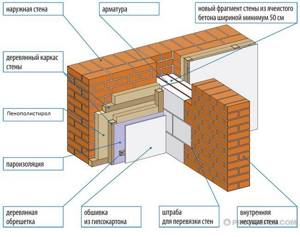
Let’s figure out which insulation is best for the walls of a brick house, taking into account the advantages and disadvantages of each option, as well as the installation features of popular materials.
Note! The thickness of the thermal insulation layer is calculated individually, taking into account the heat loss of the house and the thermal insulation properties of the selected material!
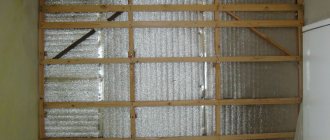
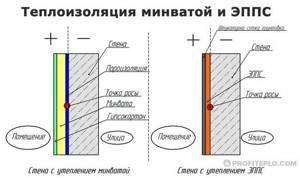
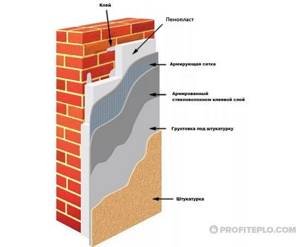
Mineral wool
Internal insulation of brick walls with mineral wool slabs has certain specifics due to the vapor-permeable structure of the material. The heat insulator must be covered on both sides with a vapor barrier film, ensuring tightness in order to prevent heated moist air from contacting the enclosing structures.
Scheme of insulation of internal brick walls with mineral wool
- a vapor barrier film is attached to the wall (overlapping the adjacent planes of the walls, floor and ceiling), the joints of the rolled material are securely taped;
- a vertical sheathing is installed in increments slightly smaller than the width of the heat insulator, the depth of the cells should correspond to the thickness of the insulation;
- Mineral wool slabs are inserted into the cells;
- a vapor barrier material is attached on top with hermetically sealed joining seams;
- a counter-lattice is inserted to secure the sheathing made of chipboard sheets, plasterboard or other materials.
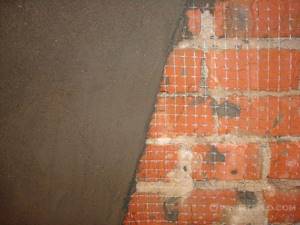
Extruded polystyrene foam
The advantages of modern material are excellent thermal insulation properties, lightness and strength. Extruded polystyrene foam is fire resistant. It is possible to insulate structures with this material by analogy with mineral wool, but the lathing promotes the formation of cold bridges, which lead to the formation of condensation zones.
Scheme for insulating brick walls with polystyrene foam indoors
Let's look at how to properly insulate a brick wall from the inside using extruded polystyrene foam
:
- the surface is cleaned, leveled with a thin layer of plaster and primed;
- using polyurethane foam or foam glue, slabs of foamed polymer are glued to the wall - the elements are placed with a shift of half the width to avoid long vertical seams;
- The joints are filled with polyurethane foam, and after hardening, the excess is cut off.
The best option after this work may be gluing reinforcing mesh and plastering the surface for painting or wallpapering. You can also use “fungi” dowels to attach pieces of metal profiles about 10 cm long, onto which you can then sew drywall. But the use of “fungi” violates the integrity of the heat-insulating layer.
Styrofoam
The advantage of polystyrene foam is its low cost; in all other respects it is significantly inferior to extruded polystyrene foam. The main disadvantage of the material is flammability with the release of toxic substances. Foam plastic with a density of at least 35 kg/m 3 can be used as a heat insulator. To insulate the walls of a brick house from the inside, high-density material (about 50 kg/m3) can be installed using the technology of fastening extruded polystyrene foam, and looser, steam-permeable material can be used as mineral wool. In this case, the joints between the thermal insulation elements and the sheathing are sealed with polyurethane foam.
Scheme of insulating walls from the inside with foam plastic
Penofol
Thermal insulation made of polyethylene foam can have a foil coating on one side or on both sides. The material is characterized by its low thickness and high thermal insulation properties. Penofol with a thickness of 4 mm can replace mineral wool with a thickness of 80 mm. At the same time, it is often used together with mineral wool slabs to increase the thermal insulation properties of the “pie”, while simultaneously reducing its thickness. In this case, it is attached instead of a vapor barrier film after laying the heat insulator into the sheathing.
You can make thermal insulation of walls and partitions from foam foam alone. Slats with a thickness of 20 mm or more are stuffed onto the walls to create an air gap. Using staples, horizontal strips of penofol are mounted with a foil layer to the room, gluing the joints with aluminum tape. Then they fill the counter-lattice for cladding the walls for finishing. The foil layer reflects thermal radiation, helping to retain heat in the house.
Sprayed polyurethane foam
Sprayed polyurethane foam will help create a warm wall without cold bridges. The foamed polymer is applied in an even layer to the prepared surface using special equipment. If the estimated layer thickness exceeds 3–4 cm, it is recommended to install formwork lathing, which will serve as the basis for attaching the sheathing for finishing. The disadvantage of the material is the high cost of work.
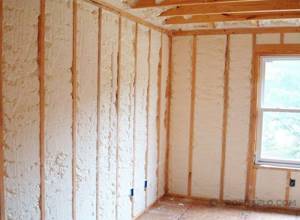
Internal insulated walls with polyurethane foam
Plaster
Plastering walls is a classic method of insulation. This is a good option if you don’t want to turn the room into a sealed box with artificial ventilation, since the plaster layer is “breathable”, like the brick wall itself. The disadvantages include the duration and labor intensity of “wet” work - you will have to plaster in several layers to achieve the required thickness of thermal protection.
Application of plaster for brick walls
Practical implementation
Vapor barrier of walls can be carried out directly on the inner surface of the log house, but this option is low-tech. It is better to pre-make the lathing, which will become the frame for the interior decoration.
Vertical slats are sewn along the surface of the wall.
They need to be immediately leveled. To do this, wooden wedges are stuffed into the depressions, and excess material is removed from the protrusions. The outermost strips are installed first.
The intermediate ones are aligned along them using a cord. The location step is selected depending on the type of interior decoration. So, for plasterboard sheathing it will be 60 cm, and for lining - 40 cm.
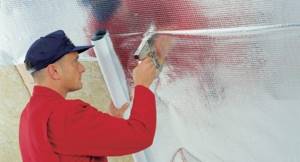
Attaching the vapor barrier using a construction stapler
A vapor barrier is stretched across the sheathing using a construction stapler in horizontal sheets from bottom to top.
It is important not to make a mistake with the orientation of the vapor barrier.
Carefully study the markings on the film.
An additional guideline can be the roughness of the vapor-repellent surface of vapor barriers from many manufacturers. The matte rough layer reduces the likelihood of condensation. This side should face the inside of the room.
Don't try to stretch the fabric too much. As the house dries out over time and there is movement in it, the tension may increase even more. Then the vapor barrier of the walls will simply break.
The joints of the panels are overlapped and taped with double-sided tape.
It is more convenient to use a film with a self-adhesive layer along the edge. This speeds up the process. As you move, the adhesive-based protective coating comes off and the joints are pressed tightly against each other.
Finishing materials can already be sewn onto this base. But it’s better to add counterbattens along the sheathing.
This will further secure the vapor barrier and create a gap between the inner lining and the insulation. If condensation forms on the latter, the casing will remain dry. The presence of a gap will also reduce the likelihood of damage to the blade during subsequent work.
Installation of vapor barrier material for insulation inside a brick house
Vapor barrier of brick walls is made using several types of materials to choose from. Indoors - these are films and membranes.
Materials based on foil are also applicable. They have reflective properties. In this case, the foil side is placed inside the room.
If a brick wall is insulated from the inside with mineral wool, then it must be protected on both sides. On the wall side from condensation, and on the room side from vapors penetrating into the insulation.
Protective materials used include Aluf, Penotherm, and Penofol.
First of all, prepare the wall: it is cleaned of sharp protrusions and dust.
Afterwards, the vapor barrier is fixed, the insulation is placed in the created sheathing, and a vapor barrier is placed on top again. In this way, the mineral wool is protected on both sides.
Which side to lay to the insulation inside the building: how to lay
Depending on where the material is being installed, determine which side to lay it on:
- When laying insulation on the street side, the vapor barrier is fixed to the insulation on the street side.
- When treating ceilings and roofs, antioxidant materials are used. They are fixed to the insulation.
- If there is no additional fastening of the ceiling and roof insulation, then the material is attached to the bottom of the rafters.
- If there is thermal insulation on the inside of the walls, then fixation is done on the outside of the insulation.
Many materials are used that have the same surface on both sides. Therefore, it makes no difference which side the vapor barrier is attached to.
Which side to attach and nail?
When the question arises which side is used to fix the vapor barrier, nuances arise:
- There are materials that have the same sides. Their use does not affect the protective functions.
- The antioxidant insulator is placed with its smooth side facing the insulation.
- Foil membrane - fixed with a shiny surface inside the room.
- Film materials – smooth side to the insulation.
- When choosing a diffuse component, you need to study the instructions, since they can be double-sided.
The dark side of the material is the outer side.
What to glue
The vapor barrier is fixed in several ways:
- use nails with wide heads;
- use of a construction stapler;
- on top of the layer, wooden planks are fixed at a certain distance.
The joints are glued together with adhesive tape for vapor barrier.
Concrete and film
There is a basement of the house, it is covered with stone-like plaster. Uneven, cracking crap. You need to somehow attach a vapor barrier to it. How? Suggest options on how to fix it?
There is such a moisture-resistant sealant - Sikaflex 221. Apply it along the seams, having previously cleaned the places where peeling begins and apply the sealant. I can immediately warn you that it is black. As for the vapor barrier, I can suggest an option: stick butyl tape to the cleaned surface. There is another option, fix it with an external connection (aluminum at the desired angle)
Masters online: 147 Orders per week: 2,304 Offers per day: 1,265
Alexey, if you want to insulate the foundation with basalt insulation, then it is mounted on the wall and covered with a windproof film, then a ventilated facade. If you use penoplex, then level the wall and also mount it directly on the wall, putty on the mesh and apply a decorative coating.
There is such a moisture-resistant sealant - Sikaflex 221. Apply it along the seams, having previously cleaned the places where peeling begins and apply the sealant. I can immediately warn you that it is black. As for the vapor barrier, I can suggest an option: stick butyl tape to the cleaned surface. There is another option, fix it with an external connection (aluminum at the desired angle)
I found double-sided tape for carpets at OBI, it was written that it can be glued to concrete, everything stuck, everything is fine, today they already put the sheathing on top.. Thanks for the advice.
if the plaster is cracked, it must be removed. Then prime it and then it depends on what you are going to do. It seems to me that a vapor barrier is not the only solution. It is possible to install waterproofing and then everything else.
vapor barrier the base from what? dismantle the old plaster and continue with everything as it should be
a) the plaster is not mine. b) the manufacturer of thermal panels wants vapor barrier on the walls, I honestly don’t understand why it’s there, but the manufacturer wants it, so we have to do it. I wouldn’t want to dismantle it, it’s time and money, in general I’ve already solved the problem with a good double-sided tape for the floors. Thanks to all!
Alexey, vapor barrier is done from inside the room. The only thing that is important to the manufacturer of thermal panels is that these panels of his do not get wet, and he doesn’t care about anything else. I would think 100 times before contacting such a contractor, who does not care that your walls get wet, because the vapors will have nowhere to go, their elasticity will increase and they will begin to condense. But the thermal panels will be dry.))))) Complete bungling! I would still advise you to sort out this issue, otherwise it will be too late to drink Barjomi.
a) I am the contractor, I install these thermal panels, this is Fried. b) everything is explained to the customer of the work, that this is insanity, the customer refers to the manufacturer’s technology - if anything, all the questions go there. I didn't sign up for anything. :-))