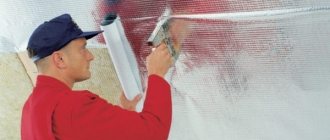
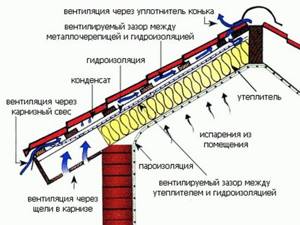
Why do you need roof waterproofing? Temperature changes lead to the appearance of condensation on the inner surface of the roofing material, which flows onto the thermal insulation and wooden structure of the roof, stimulating its rapid destruction. In this case, wet insulation loses its insulating properties and the ability to perform its functions efficiently.
Previously, the most common material for waterproofing the roof of a house was roofing felt, which is still found today. Considering that the base of the material is paper, its service life is significantly reduced when exposed to moisture. As a result, after 4-5 years of service, the roofing material cracks and allows moisture to pass through, necessitating roof repairs. In addition, the material can tear from a small load, and also has considerable weight, which makes its installation difficult. Typically, this material is used simultaneously as a roofing material for sheds or low-angle pitched roofs.
Insulation with a reinforced film hydrobarrier is a modern technology. This is the most inexpensive and easy-to-use material used for pitched roofs for any type of roofing material. A distinction is made between film and membrane, characterized by the presence of microholes. It is the same film, but capable of passing air only in one direction, therefore it is considered a new and more modern material. The main advantages are:
- high strength;
- light weight;
- ease of installation of waterproofing on the roof;
- presence of ventilation micro-holes.
Video description
This video explains in detail which side to lay the film on. General tips for installing it are also given:
As mentioned above, the overlap should in any case be at least 15 cm. Sealants and glue should never be used: diffusion film, as well as alternative materials, contains acrylic components. They are destroyed when using glue.
However, tape is acceptable for use. It not only glues parts of the film, but also eliminates defects that appeared during its installation.
There has long been a debate among repairmen about whether it is worth installing a vapor barrier. Some argue that this should never be done - if it does not sag, the degree of steam evaporation will drop many times. For others, on the contrary, it seems that tensioning the vapor barrier is a necessity. As they say, sagging film deteriorates very quickly.
General advice on how to properly install a vapor barrier ends here. During operation, some other nuances may arise, but their number is small.
As well as their degree of importance
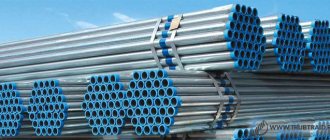
Roof vapor barrier fasteners
Roof installation deserves special mention. Steam protection is especially important for a roof, and it is when installing insulation on it that the most problems arise. If the film is installed incorrectly in winter, the material can suffer greatly: steam can turn into frost.
To understand how to properly install a vapor barrier for a roof, you first need to study the physics of steam. Being lighter than air, it always rises and never falls. Therefore, thin wooden slats need to be attached on top of the film every 0.5 meters. Then there will be a small gap between the vapor barrier and the interior finishing of the roof.
The following are the main mistakes made when insulating a roof from steam:
The seams are sealed with tape that is too thin. Its width must be at least 50 mm; The film is wrapped around the rafter beams. This is unacceptable, and insulation should only go on top of them; Do not leave a reserve of film during installation. This is vitally important - with changes in temperature and humidity, the material can become deformed; Do not seal the junction of the film to the ceiling
This is vitally important to do, otherwise sooner or later the material will simply peel off.
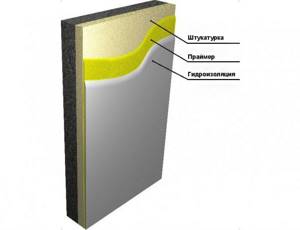
Laying waterproofing
Places of application: insulated roofs, structures with external insulation, suspended ventilated facades, attic floors.
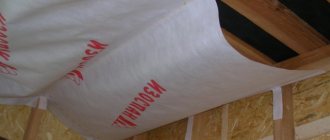
How to lay: in the middle between the insulation and the outer cladding, the rough side towards the thermal insulation, the smooth side out. Often there is a manufacturer’s logo on the waterproofing; such a film should be attached with the logo facing out.
Characteristics: water resistance - from 300 to 1000 mm water column, vapor permeability - from 800 to 2000 g/m2 per day, tensile load - from 160 to 190 N/50 mm.
Briefly about the main thing
A residential building located in a cold climate is isolated not only from water in its liquid state, but also from steam. If this is not done, then over time the frame of the living space itself may begin to collapse due to the constant ingress of moisture from the inside.
To understand which side to lay the vapor barrier on, you first need to look at its color and tactile sensations when running your hand over it. After the required side has been determined, the work is carried out carefully and slowly. The technology for carrying out the work varies depending on where the film is installed - on the ceiling, floor or facade.
When working, it is important to avoid the most common mistakes. Otherwise, the quality of the material may quickly deteriorate due to the appearance of frost and even ice on it.
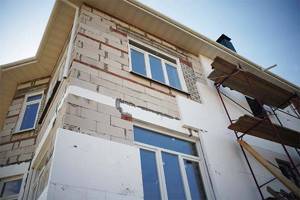
Is it necessary to waterproof walls from the inside?
The need to waterproof walls from the outside is beyond doubt: it is necessary to protect surfaces from moisture that enters from the outside. For basements and basements this is groundwater. For the first floors - rain water.
The importance of internal moisture protection is not so obvious. But the walls also need to be insulated from the inside. This is especially true for rooms with high humidity: bathrooms, kitchens. If moisture remains on the walls, over time this will lead to the appearance of mold, unpleasant odors, fungi and cracks.
Therefore, to reliably protect walls from any sources of moisture, comprehensive measures are needed:
Horizontal waterproofing of walls - to prevent moisture from penetrating the walls through the foundation
Vertical waterproofing of external walls - protection from groundwater and precipitation
Waterproofing from the inside - against moisture and condensation on the walls inside the house
Vapor barrier and its functions
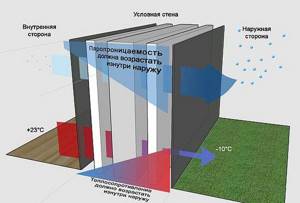
The practice of drying mineral wool with street air is found both in roof insulation and in ventilated facades. The main problem with this method is that the intense flow and evaporation of moisture contribute to its even faster penetration from inside the building. To ensure that the supply of moisture does not exceed its ability to evaporate, the saturation of the insulation with steam is limited using special materials.
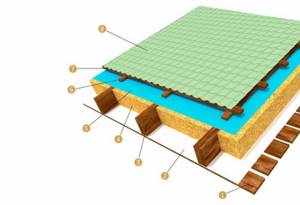
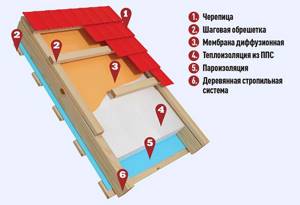
Roof insulation: 1 - sheathing; 2 - vapor barrier; 3 - rafters; 4 - insulation; 5 - windproof membrane; 6 — counter-lattice; 7 - sheathing; 8 - roofing
There are also several nuances in this matter. For example, on the reverse side of the insulation circuit there is an increased saturation of air with moisture, which must certainly be taken into account in a new recalculation of the dew point route. On the other hand, the throughput of the barrier should be selected correctly: not more than can evaporate from the insulation to the street, but not too small so that the wall continues to “breathe.”
The vapor barrier should not be placed in an area where moisture condensation is possible, otherwise the latter is likely to settle on the inside of the barrier. This behavior is sometimes used to their advantage: if the vapor barrier has air on the side of the room, critical structures will not get wet, while the vapor permeability of the membrane is regulated naturally.
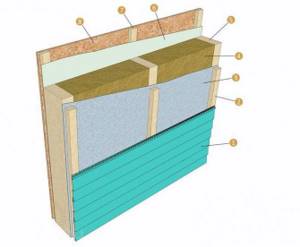
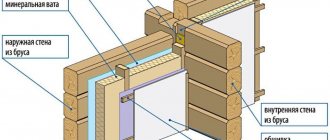
Pie of insulation of a frame wall of a house: 1 - external cladding (for example, siding); 2 - sheathing; 3 - wind protection; 4 - insulation; 5 - wall frame; 6 - vapor barrier; 7 - sheathing; 8 — interior decoration
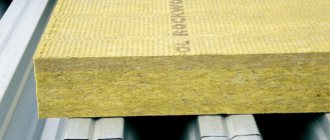
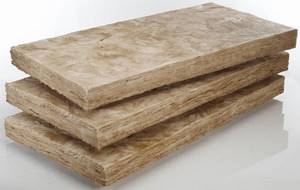
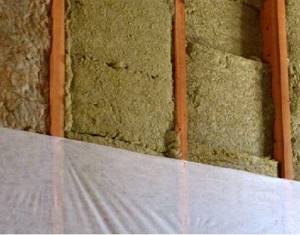
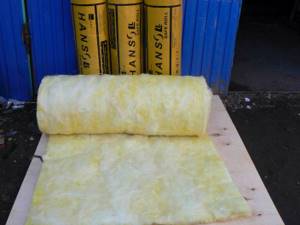
Mineral wool
This material belongs to non-flammable, fibrous insulation. It is made from basalt, which is melted, drawn into fibers, and then pressed using a binder (resin), resulting in slabs or mats (rolls) used for thermal insulation: roofs, floors, ceilings, ventilated facades. Mineral wool is also used in the production of three-layer building panels for layered masonry. Can be used in ordinary residential premises, as well as for thermal insulation of buildings with high temperature and humidity loads (saunas, baths).
The advantages of basalt or as it is called “stone” wool are:
- Non-flammability. Even at a temperature of 1000°, the fibers retain their structure and do not melt.
- Chemical resistance. Mineral wool is a passive material that does not come into contact with chemicals and does not cause metal corrosion.
- Biostability. Mold, rot, fungus, rodents are not dangerous for basalt insulation.
- Compressive strength, resistance to loads, preservation of geometry (dimensions, shape).
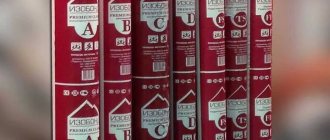
Famous cotton wools: HITROCK, IZOBEL, ROCKWOOL, PAROC, TECHNONICOL, IZOVER.
Why is vapor barrier needed?
Current building codes require protection of insulation from moisture on both sides, and in different structures this protection performs different functions, and accordingly, different materials are used.
During the construction of buildings with normal humidity conditions (housing, offices, most public and industrial buildings), the vapor barrier is located on the inside of the enclosing structures, and it can be single-layer. Horizontal surfaces - roofing and ground floors require waterproofing.
Rolled bitumen-polymer roofing materials for soft roofing based on fiberglass or polyester fabric, and special roofing films - membranes are laid on a flat roof. Waterproofing materials are used for floors.
The situation is more complicated when insulating external walls with curtain walls, pitched roofs and floors of private houses with cold, unused undergrounds. In this case, on the indoor side, the insulation must be protected with a vapor barrier, and on the outside, with a material that must perform several functions:
- Protect insulation from destruction by wind in ventilated gaps.
- Do not allow moisture to be absorbed from the air.
- Prevent dirt, debris, insects and rodents from getting into the insulation.
- Allow moisture that may come from the interior to be ventilated.
All these functions are performed by multilayer superdiffusion moisture and windproof membranes, which have different surfaces, and it is for them that the installation issue is relevant - which side to lay the vapor barrier to the insulation.
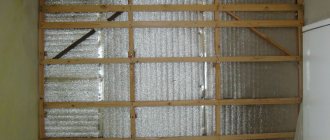
When constructing buildings and premises with humid and wet operating conditions and high temperatures - baths, laundries, swimming pools, another type of insulation is used - foil.
A layer of aluminum foil or polished stainless steel is combined with rubber, polyurethane foam or other elastic, moisture-resistant material and mounted on the wall to reflect the flow of thermal energy, which saves 10% or more on space heating.
IMPORTANT: Foil vapor barrier has almost zero vapor permeability, therefore, in the rooms where it is used, exhaust ventilation with a four-fold exchange must be installed.
Features of the method
Construction waterproofing mixtures differ in their use and composition. At the same time, they are divided into several types according to the following criteria:
- By type of material: roll (film, roofing felt), powder (construction dry mixes), liquid.
- By chemical composition: polyethylene, cement, bitumen, rubber, acrylic, PVC materials, silicone (silicon).
- By method of implementation: sealing, penetrating, coating, membrane.
As you can see, there are many types of waterproofing, each of which has its own characteristics of operation outside and inside the premises.
Outside buildings
When applying waterproofing, it is very important to take into account the air temperature and the amount of sunlight on the base. The mixtures are used at temperatures from +50C to 350C. Excessive sunlight negatively affects the applied powder or liquid waterproofing, as it causes water from the solution to evaporate very quickly. As a result of the hydration reaction, the composition will not achieve the declared characteristics and will not be able to perform its functions. Therefore, the workplace must be protected from solar radiation.
Indoors
The main indicator for internal use is environmental cleanliness and fire safety.
Therefore, materials made of PVC, bitumen, and rubber are not recommended for interior work. Sometimes they cause allergic reactions. There is also one important feature of using waterproofing in rooms, which our builders forget about. Any powder and liquid compositions perfectly protect against moisture penetration on planes, but do not work well in corners. Therefore, at the junction of vertical and horizontal surfaces treated with insulation, a special membrane tape with an elastic non-penetrating gasket in the middle should be used.
What is a vapor barrier used for?
The main function of a vapor barrier barter is to prevent the formation of water inside the room.
During life, the air in the room begins to become humidified and steam is formed that penetrates the finishing and insulation.
Accumulation and retention of water appears in the thermal insulation layers. In winter, condensation appears from the contact of warm steam, cool walls and air. The characteristics are lost when moistened.
Due to the accumulated water, the formation of fungi and mold begins. As a result, the thermal insulation deteriorates and a hydro-vapor barrier with ventilation cannot be created.
Vapor barrier
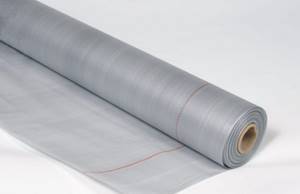
Vapor barrier materials are a protective barrier separating zones of cold and warm air. If their use is excluded, temperature changes will cause the formation of condensation, which in turn will destroy the insulation and other elements of the building structure. As a vapor barrier, special roll materials are used - films or membranes. They are pulled over the insulation, thereby eliminating the possibility of moisture formation and accumulation. Scope of application from facades to internal partitions, ceilings, roofing. Among the well-known manufacturers we can highlight the company IZOVEK.

Do not forget that hydro-, steam- and heat-insulating materials are a guarantee of the durability of your home.
Installation features
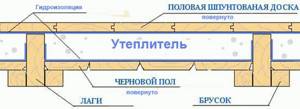
The floor pie is made of several layers, including logs, a layer of waterproofing material, a subfloor, a layer of insulation, a vapor barrier layer, a layer of soundproofing material and a finishing coating. Before installing a vapor barrier, it is necessary to prepare the surface. If the structure is being built from scratch, then there will be no problems with installing this layer. The subfloor boards are simply treated with antiseptic preparations, leveled, and a vapor barrier material is laid on top of them. It is also recommended to coat the joists with protective compounds.
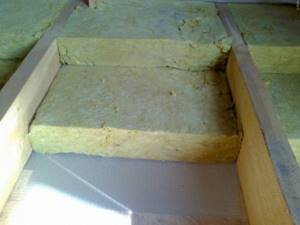
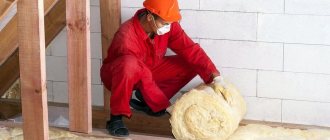
Floor insulation with mineral wool
If the house has already been built and is undergoing a major renovation, then first it is important to remove the old flooring and other previously used materials. Next, it is important to check the strength of the logs and the rough foundation - if they sag or rot, they will have to be dismantled and replaced with new ones
All debris is removed before further work, the smallest specks are removed using a vacuum cleaner.
The vapor barrier layer must be laid on a flat base without protruding nails. Otherwise it may be damaged
Immediately before installation, it is important to determine which side the vapor barrier material will be mounted. As for ordinary polyethylene film, there is no need to determine the side
If Izospan is used, then it is important to look at its color on both sides. It is laid with the light side facing the insulation. If the material has pile, then this side is mounted towards the room - the pile will absorb excess moisture.
Laying vapor barrier "Izospan"
Installing a vapor barrier does not require special knowledge. The material is rolled out over the surface of the prepared floor and secured to it using small nails and a construction stapler. However, the easiest way is to use special adhesive tape.
Places that are difficult to reach or have an unusual shape are best treated with a bitumen-based coating agent. The reason for these actions is that in such places it will be quite problematic to lay and properly fasten vapor barrier material.
The process of laying "Izospan"
The insulation itself will be laid directly on top of the vapor barrier if the material is used to protect it from moisture not only from the inside, but also from the outside. Foam plastic, mineral wool or expanded polystyrene can be used as an insulating layer. It should fit very tightly to the wooden joists so that cold bridges do not form.
Another layer of vapor barrier is mounted on top of the insulation layer. It will no longer allow moisture coming from inside the room to reach the insulation and be absorbed into it.
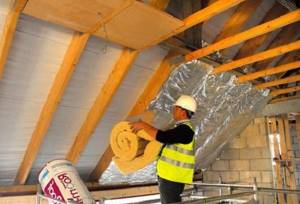
How to install anti-condensation film
To perform this work correctly, the following procedure must be followed:
- First of all, the rafters must be installed and a layer of insulation laid. After this, you can begin laying a vapor barrier film, for example, Stroybond. It is advisable to do this in dry weather.
- For rafters, it is necessary to maintain a distance between structural elements of no more than 120 cm.
- The anti-condensation film must be laid in such a way that the surface is directed with the absorbent side towards the base. You also need to pay attention to its base, which should not interact with the insulation.
- Construction staples, glue or galvanized nails with a large head are used as fasteners.
- During the installation of vapor barriers, the construction bond is advanced sequentially from the eaves to the ridge, periodically overlapping the overlapping joints with separate horizontal layers. For the created overlap layer in the horizontal plane, a width of no more than 150 mm is allowed, and for the vertical part - no less than 200 mm.
- The areas of film joints must be brought out to the rafter elements of the structure.
- To connect the joints, use a special adhesive film for vapor barrier, for example, Stroybond. It can also be replaced with waterproofing tape.
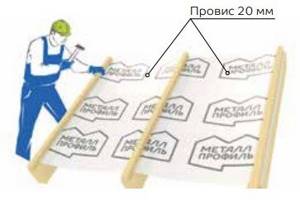
- When laying the film, you need to make sure that there are no surface irregularities. The appearance of sagging up to 20 mm in the central part of the inter-rafter space is not a violation of technology. Such an artificial defect will help remove condensate vapor from wooden elements.
- The insulation should be located at a distance of no more than 40–60 mm from the film.
When laying waterproofing material, you need to remember that the lower base of the component performs the function of draining water into the corresponding gutter.
At the end of installation of the waterproofing layer, they begin to finally fix the coating. As fasteners, take wooden slats with a cross section of 30 x 50 mm, into which galvanized hardware is hammered . The roof sheathing is installed directly on them.
Why do you need moisture protection?
Vapor barrier is a set of various methods of protecting heat-insulating materials and building structures from the penetration of steam and, as a consequence, from the loss and absorption of condensate (Footnote 1).
Why do you need a vapor barrier at all? As you might guess, its purpose is to protect surfaces from steam. Moreover, we are talking not only about visible steam, but also moisture, which is always present in the air.
Inside the home, the humidity level is almost always higher than outside, which is explained by cooking, washing and taking water procedures. Since steam moves towards the cold - out, excess moisture can significantly reduce the life of building structures and the effectiveness of insulation.
Protection is necessary in the following cases:
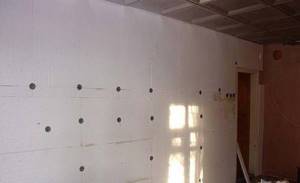
When insulating walls from the inside with mineral wool. As is known, the level of vapor permeability and moisture absorption of mineral wool is quite high. Therefore, the absence of a vapor barrier can lead to the accumulation of moisture inside the insulation. This in turn will lead to a decrease in the efficiency of the insulation, dampness of the walls, the formation of fungus, etc.;
When insulating frame structures. Vapor barrier is necessary for frame walls, wooden floors and pitched roofs not only when using mineral wool insulation, but also polymer insulation, which has zero vapor permeability. The fact is that zero vapor permeability of thermal insulation leads to the fact that all moisture rushes into the elements of the wooden frame. As a result, the tree quickly becomes unusable;
When insulating floors. In this case, vapor barrier allows you to protect the insulation from rising steam.
Materials
As we found out, the vapor barrier should not allow air to pass through, which carries moisture. Therefore, the vapor barrier film should not be confused with waterproofing, which often has the ability to allow air to pass through.
The following materials are currently used for vapor barrier:
Polyethylene
Polyethylene films are the cheapest vapor barrier option. As a rule, polyethylene film is used for waterproofing interfloor ceilings and walls.
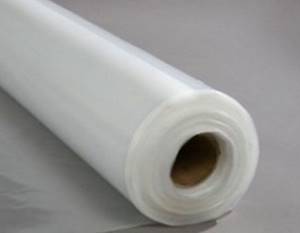
Kinds. There are several types of polyethylene films:
- Single layer. The cheapest, but not durable, and also unstable to mechanical loads;
- Reinforced. They are a three-layer material. The middle layer is made of fiberglass mesh.
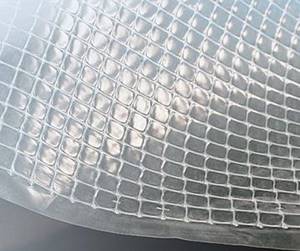
Thanks to the reinforcing layer, the film has higher strength and durability;
Below is a table from the manufacturer of roofing materials with a brief description of the main parameters of the vapor barrier reinforced film (Footnote 2)
| Material | 4-layer reinforced polyethylene film with a reflective layer of aluminum. |
| Flammability | G4 is highly flammable (GOST 30244-94) |
| Flammability | B2 moderately flammable (GOST 30402-96) |
| Breaking force | 450 N/5 cm |
| Vapor permeability | 3.1 x 10⁻⁶ mg/m*h*Pa according to GOST 25898-83 |
| Diffusion resistance Sd | More than 150 m |
| Heat resistance | from - 40 °C to + 80 °C |
| Weight | 180 g/m² |
| Roll weight | 13.5 kg |
| Roll size (area) | 50 m x 1.5 m (75 m2) |
Foil. The main feature of these films is their ability to reflect heat.
Price:
| Film type | Price per roll |
| Reinforced 4x25 m 100g/1 m2 | 2750 |
| Reinforced 2x10 m 140/1 m2 | 750 |
| Single layer 3x100 m 120 microns | 4600 |
Polypropylene
Polypropylene vapor barrier films are the most popular, as they are superior to polyethylene films in all respects. In particular, they are stronger, more durable, and resistant to UV radiation and temperature changes.
Another feature is that these films usually have a two-layer structure. As a result, one side has a rough surface.
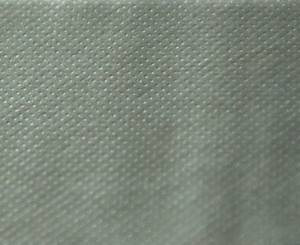
This is done so that the villi retain moisture on the surface of the coating and thereby allow it to evaporate. Beginners often ask which side to put the vapor barrier on?
The material is laid with the smooth side against the insulation, and the rough side against the cladding. True, if you mistakenly attached the canvas with the rough side to the insulation, this is not a critical mistake, since in any case the material does not allow moisture to pass through.
Therefore, a ventilation gap is required between the film and the finishing material.
Price. Below are the prices for popular vapor barrier materials that have proven themselves well:
| Brand | Price |
| Stroybond B 70 m2 | 635 |
| Izospan B 70 m2 | 1 140 |
| Nanoizol B 70 m2 | 770 |
| Metalprofile N 96 1.5x50 m | 1800 |
| Axton d 35 m2 | 615 |
Ceiling vapor barrier material
It’s not for nothing that there are so many different types of films on the market. It must be said right away that none of them allows moisture to pass through. Water surrounds us everywhere. It comes in three states: liquid, solid, gaseous. Absolute humidity is the amount of water in grams contained in 1m3 of air. But since this value is not constant, but depends on the air temperature, the concept of relative humidity was introduced, the maximum possible moisture content in the air at a certain temperature.
The thing is that moisture cannot be retained in the air; there is a saturation limit when the “dew point” occurs - the temperature at which moisture condenses on small air microparticles, forming a foggy cloud or ice crystals. A branch of physics called thermodynamics is devoted to this phenomenon; it is a whole science. Simply, the “dew point” is the temperature when the phenomenon of condensation occurs. It is different for different conditions of mass moisture content in the air.
We found out that the vapor barrier film does not allow water to pass through. There are films that do not allow air to pass through. Under certain conditions and proper ventilation, impermeable films can also be installed. By the way, the vapor barrier in the steam room is made with impenetrable aluminum foil, but provided that there is a ventilated gap between the lining and the film. When the bath is ventilated, the moisture leaves, the lining remains dry.
If you choose a specific manufacturer of vapor barrier films, then ISOSPAN is the right choice. This manufacturer has a set of films for all types of protection: wind, waterproofing, vapor barriers. The differences between wind and vapor barriers are in the size of the membrane holes. Wind ones have smaller ones.
Which side should the vapor barrier be attached to the ceiling if the insulation is installed from the inside of the room? With this type of insulation, there is only one rule: vapor barrier is a barrier against the penetration of moisture into the blocking structure. It must be secured so that neither water nor moist air gets into the insulation. In the case of ISOSPAN vapor barrier, it is always placed with the smooth side facing the insulation. This is indicated by arrows on the film or there is a laying diagram in the instructions.
Stretch ceiling as a vapor barrier - it's possible
PVC film of a stretch ceiling is the same membrane as a vapor barrier. The ceilings are suitable for wet rooms: bathroom, kitchen. To some extent they protect the ceiling above it, part of the steam passes through the openings of the lamps and is removed through the ventilation, and the main part is removed by an exhaust fan installed in the ceiling or under it.
Who will be happy are the neighbors above. The stretch ceiling absorbs some of the sounds. It is unlikely that anyone will install a suspended ceiling specifically for vapor barrier. Rather, an effective hood is better in this option.
How to choose a vapor barrier for a ceiling
The choice and types of vapor barrier for the ceiling depend on the purpose of the room:
- Basement. If the basement is dry, a vapor barrier is not needed; if the humidity in the basement cannot be eliminated with the help of ventilation, then the basement ceiling is insulated with a rigid vapor barrier film. Liquid rubber or coating bitumen-polymer materials are suitable. A foamed polyurethane coating will help.
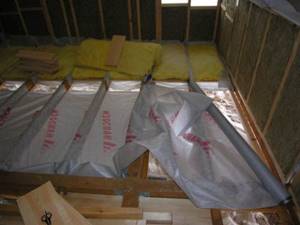
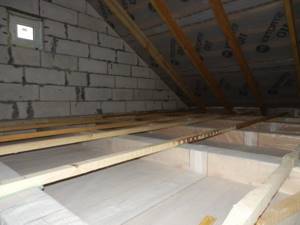
- Cold attic. Vapor barrier material for the ceiling can consist of traditional natural materials, which are mentioned above. A rigid vapor barrier film (a waterproofing film will do), thick cardboard, and coating vapor barrier materials are placed under the insulation. One condition: the attic is ventilated.
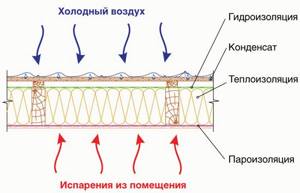
- The attic floor is the same as with a cold one, but a vapor barrier film is placed on top of the insulation, as in the image above.
- The steam room in the bathhouse is rigidly insulated with aluminum foil or other heat-resistant material.
When it comes to rigid insulation, it is actually waterproofing and can be used as a vapor barrier. It is impossible to determine which vapor barrier is better for a ceiling based on the manufacturer, because for advertising purposes they may offer expensive material that is no better than a cheap one. Here you need to rely on the experience of use - who has a vapor barrier installed in their house.
In many ways, they choose based on the price of the material and the cost of installation work. And while roll materials have already been studied, liquid and coating materials are not used so often, although liquid bitumen waterproofing has been known for decades.
To the ceiling
As for the vapor barrier of the ceiling, it is overlapped with the vapor barrier of the walls up to 20 cm. The presence of a vapor barrier on the ceiling will allow the finishing material to be preserved for a long time. As a rule, vapor barrier can be installed both from the bottom of the ceiling and from above from the attic. In this case, you will get the following pie:
- Vapor barrier.
- Thermal insulation.
- Vapor barrier.
This work must be done even with concrete ceilings. When there is a temperature difference, the accumulated condensation can, after a while, provoke the appearance of mold and mildew, which is not so easy to fight.
Ceiling vapor barrier
The installation process begins with preparatory work:
- The surface is cleaned of construction debris and old finishing material.
- All existing cracks and imperfections in the base are covered.
- The ceiling is primed and dried.
The vapor barrier process looks like this:
- As mentioned above, the vapor barrier is laid overlapping with the wall one. It is attached to the ceiling with a stapler.
- It’s good if it is possible to treat the vapor barrier joint with slats.
- The joint is first covered with waterproof tape.
- On the ceiling it is enough to overlap up to 10 cm.
- There is no need to stretch the material too much. But you should not allow sagging. Otherwise, condensation will accumulate on the film and the polyethylene may break through.
Installation of waterproofing material
Bathroom waterproofing and bathroom waterproofing is a set of measures to protect against the penetration of moisture and water. A modern frame house must be protected from the penetration of moisture and water.
The process of waterproofing a frame house consists not only of installing a protective layer of waterproofing, but also of a protective layer of thermal insulation. Glassine is often used to waterproof a frame house; it removes moisture and accumulated steam from the insulation.
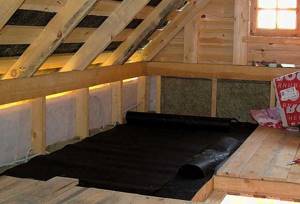
Glassine laid in the attic
Walls that will not let moisture into your home
The function of external waterproofing of the walls of a frame house is performed by a special superdiffusion membrane. There are no specific recommendations for the use of this membrane; instead, waterproofing films or polyethylene can be used. Films have significantly low vapor permeability when compared with membranes. Therefore, this material is not suitable for floor waterproofing. This film simply cannot cope with removing all the moisture from the insulation. And this is an important point, since there is a dew point in the insulation, and this is its characteristic location in this design. Both dampness and moisture must be able to ventilate well. The membrane does this very well.
The location of the superdiffusion membrane in the walls of a frame house depends on the type of rough lining and, of course, finishing: the superdiffusion membrane is nailed to the frame studs, close to the insulation, then the sheathing is applied (these are usually wooden slats) using it to create a gap. Next, the rough lining is nailed to the frame posts. A membrane is nailed on top of it without a gap. From above, further along the sheathing, siding is attached. This scheme will be applicable when facing material is attached to the rough lining. The membrane is usually secured with a construction stapler. Membrane joints are assembled and installed with an overlap of 10-15 cm.
Which side should the hydro vapor barrier be laid on?
According to all the canons of physics, when the temperature decreases, vapor from the air always condenses, turning into liquid. In construction, this rule is always taken into account when arranging structures operating at the junction of the temperature difference between the room, insulation and the street, the ground. These include the roof, walls, base, and floor. Without high-quality insulation, a large amount of moisture accumulates on surfaces and in the structure of materials. This inevitably leads to deterioration of the properties of the foundations and their gradual destruction.
To avoid the negative consequences of the condensation process, when constructing critical structures, a specialized film is used - hydro-vapor barrier. Which side to put it on correctly is an important question.
Installation of water vapor barrier: which side?
There are several types of films. According to their structure they are divided into:
- Single-layer and double-layer (multi-layer);
- Diffusion;
- Anti-condensation.
The main task of builders is not to make a mistake on which side to lay a particular type of water vapor barrier, depending on the installation location. Incorrect application will lead to the opposite process: subsequent condensation of moisture on the surface of the membrane, as evidenced by the photo of improper arrangement of water vapor barrier.
Which side to lay a single-layer hydro-vapor barrier?
Simple single-layer films are made from polyethylene. Sometimes it is additionally reinforced with a polymer mesh to add strength. This material retains water, but allows steam in, in both directions. Therefore, the choice of installation side does not play a special role here.
It is only worth noting that such products have lost their relevance due to low efficiency and the emergence of membrane films.
Which side should the diffusion hydro-vapor barrier be laid on?
Modern film water vapor barrier for roofing is produced using a woven method from pure, 100% polypropylene. Its structure, if you look closely under a microscope, is a network of thin threads. Their interweaving forms microscopic cells. Their size is not sufficient for the unimpeded passage of water molecules in a vapor state.
High-quality diffusion hydro-vapor barrier for floors or roofs is made in two layers. Its specificity lies in its operation on the principle of a valve: passing steam from the air in only one direction (from an area of high pressure to an area of low). When there is oversaturation of moisture in the air in the room and under the influence of steam pressure (diffusion), water molecules literally seep through the film and excess moisture is removed outside.
Such material is laid when organizing a system of ventilated facades, on top of mineral insulation with the obligatory arrangement of a ventilated gap. This water vapor barrier is suitable for floors and walls.
Diffusion films usually have markings for installation, which are different for each manufacturer. Before installation, you must carefully study the instructions. Often such material is made dark and rough on the back side, lighter and smoother on the outside.
Installation is carried out with the light (water-repellent) smooth side facing away from the room in the following cases:
- for insulation when arranging the under-roof space;
- under insulation when laying the floor on concrete or soil;
- external thermal insulation when installing ventilation facades.
When installing a floor under a screed, protecting walls and ceilings in wet rooms (for example, baths, saunas), the water-repellent side should face the inside of the room:
Which side should the anti-condensation hydro-vapor barrier be laid on?
To give the material improved vapor barrier properties, one side of the diffusion film is coated with a special moisture-absorbing hydrophobic coating, polyester fabric, or an aluminum reflective layer is applied. Such membranes are called anti-condensation and superdiffusion. Due to the absorption of condensate, this hydro-vapor barrier is best suited for cold roofs: pitched type with metal decking. The absorbed moisture prevents the formation of metal corrosion. The additional layer provides better thermal protection.
Antioxidant hydro-vapor barrier is installed in the same way as diffusion barrier: with the water-repellent side facing away from the material that needs to be protected from moisture. Typically, manufacturers apply markings on the outer (water-repellent) side such as: “This side up”, a logo or brand designation.
Waterproofing and vapor barrier of walls
The word waterproofing often refers to vapor barrier and waterproofing films. All of them protect the insulation of walls and structures from moisture. When installing siding, both types of films or only waterproofing films are used - it depends on the design of the walls of the house. Proper installation of siding involves the use of sheathing. It helps to level the walls if there are uneven areas and makes installation easier. In this case, there remains free space between the siding and the wall. Additional insulation is installed in this space.
Pitfalls and myths
Many people mistakenly think that if there is a good vapor barrier layer, condensation will not appear in the room at all or will quickly come out. However, this is an erroneous statement, because any moisture that rises upward in the form of steam eventually becomes condensation.
There is also such a thing as a “temperature limit”, at which all moisture turns into a drop-like state. In most cases, this happens at a temperature of +15°C and a humidity of 65%. If the latter indicator rises to 80%, then condensation can occur at +17°C.
Steam formation occurs when there is a difference in partial pressure. Any steam that appears inside the house tends to go outside, where there is a lower temperature. But on its way it encounters a barrier - a vapor barrier layer.
If the room air is heated to a certain level, all the moisture in the air will turn into condensation and precipitate. With this phenomenon, the difference between a roof structure protected by insulation and an unprotected one is clearly visible. If the vapor barrier layer is located on the insulation, then it will warm up many times faster than without it.
In the absence of a vapor barrier, water vapor will begin to make its way directly to the roofing “pie”, where it will meet the cold front. Because of this, the steam is converted into condensate, and at low temperatures - into an ice edge. But all these processes take place inside the roofing structure, which negatively affects its functionality and durability.
True, if the roof is equipped correctly, then the occurrence of condensation will be practically excluded. And in this case, even incorrect placement of vapor barrier layers will not in any way affect the security of the roofing “pie”.
Glass wool
Just like its basalt counterpart, it belongs to fiber insulation. However, it has its differences. Glass wool is softer due to the increased fiber length. The material is suitable only for non-load-bearing structures; for example, it has proven itself remarkably well in pitched roofing systems and is actively used in interior partitions.
The material is made from waste from the glass industry, which is treated at high temperatures (melted), after which it is formed into long fibers. Advantageous characteristics of glass wool: non-flammability, chemical resistance, absence of corrosive agents, immunity to biological damage.
Mineral and glass wool additionally provide effective sound insulation. They are supplied to the consumer in the form of slabs or rolls. Well-known manufacturers: IZOVER, URSA, KNAUF.
Which side to lay the waterproofing film
Proper waterproofing of a building is one of the most difficult and critical stages of construction or renovation.
If the waterproofing material is laid incorrectly, then within six months the residents of the house will be able to observe an unpleasant picture in the form of:
- high room humidity;
- getting the insulation wet, which will very soon collapse from such exposure;
- poor heat retention inside the house due to a wet insulating layer.
To avoid the above problems, it is initially important to lay the waterproofing correctly, namely on the side recommended by the manufacturer. Below we will answer the question of which side to lay waterproofing under different types of building materials and in different parts of the building
Under metal tiles
Under the layer of metal tiles, the waterproofing film is laid with the markings up, horizontally from the ridge to the eaves, with an overlap of 15 cm. The film should only be attached to the joists or rafters using a stapler
It is important to remember about the film sag, which must be under the metal tile layer (about 2 cm). It will help air circulate freely and protect the film itself from premature destruction.
Waterproofing floors in rooms such as bathrooms and kitchens requires maximum precision in laying the moisture barrier layer. In this case, the waterproofing film is attached with the unmarked side to the insulation.
The roof waterproofing stage begins with laying insulation. Then a waterproofing film is spread over it in an even layer at the joint. The film is laid with the logo facing up, with the adhesive layer directed towards the insulation. Be sure to take into account the ventilation gap for normal air circulation between materials.
To waterproof walls inside the house, the film is mounted with the logo facing up, with the unmarked surface facing the insulation.
Laying the waterproofing film on the walls outside the house is carried out on the insulation, with the markings facing up. The film is secured with a construction stapler with an overlap of 15-20 cm.
To the ceiling
Waterproofing films are laid with the unmarked side facing the insulation layer or the ceiling.
Properly laid waterproofing is a guarantee of long service life of the insulation. Keep this in mind and take into account the recommendations of the manufacturer of waterproofing films during repairs and/or construction.
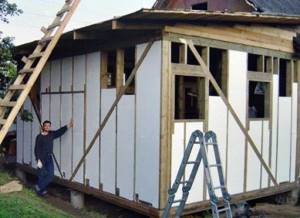
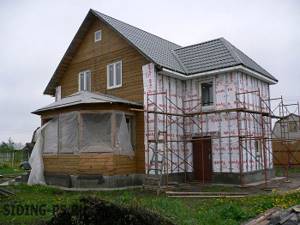
Installing waterproofing when insulating walls
Houses made from natural materials are quite beautiful, so the outer parts of the walls are usually left untouched. However, many owners are increasingly insulating their houses from the street side, decorating the walls with functional finishing materials. Modern technologies, as well as a wide selection of materials, make it possible to create a high-quality ventilation system for such facades, as well as extend the service life of houses.
To perform insulation and, in particular, waterproofing the walls of a wooden house with your own hands, you will need:
- special emulsion to protect against mold and/or mildew;
- aluminum self-adhesive tape for insulation work;
- required amount of mineral wool;
- vapor barrier film;
- construction stapler;
- hammer;
- timber for sheathing with a section of 40×100;
- scissors or construction knife;
- nails;
- jute tow;
- thin slats;
- dowels;
- construction level;
- self-tapping screws;
- waterproofing film;
- screwdriver, drill or hammer drill.
- The walls are cleaned and treated with a special emulsion or several compounds, allowing each layer to dry thoroughly. An antiseptic is applied to the bars and slats.
- Treat cracks, cracks, gaps with tow, compacting the material well.
- Using slats, a hammer and nails, install the vertical sheathing at 100 mm intervals.
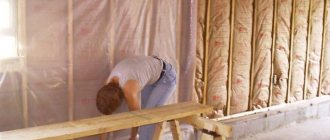
- Attach the pre-cut vapor barrier sheets to the sheathing with a stapler, laying the material with the glossy side facing you (the porous side is directed towards the wall). Pay attention to creating a gap for ventilation: leave 20 mm holes between the slats. up and down. Carefully seal all joints with special tape.
- Installation of sheathing. The beams (located with an edge to the surface of the wall) are stuffed with nails or screwed with self-tapping screws, always using a level. The pitch of the lathing depends on the width of the mineral wool slabs - so that it is convenient to lay it. It is important to use solid timber, because the facade frame will be installed on it.
- Laying thermal insulation in a “checkerboard” pattern with complete exclusion of gaps.
- Installation of waterproofing film. Mandatory condition: the overlap of the canvases is 100-150 mm. The canvases are carefully stapled to the sheathing. The joints are sealed with special tape.
- The ventilation gap is made using lath 25×50. A protective metal mesh is installed below.
- Installation of finishing material according to instructions.
When is it needed for polystyrene foam?
Now let’s look at specific moments when you can do without a vapor barrier layer, and when its absence will lead to the negative consequences described above. Professionals know exactly where it is necessary and where it is not necessary to use vapor barrier and expanded polystyrene in one set.
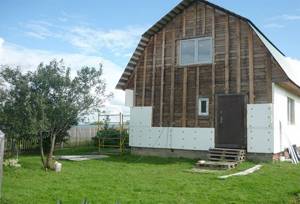
When insulating walls outside
Most often, the house is insulated from the facade. There are a number of reasons for this, and one of them is a shift in the dew point in the environment. Here, vapor barrier is not used at all, both for buildings built from materials with a high vapor permeability rate, and vice versa.
If the main structure is made of concrete, then the risk of moisture appearing on the outer wall is very low, which means glued polystyrene foam will not cause any trouble. If you decide to insulate a house using “breathable” materials, it is better to use a ventilated façade design. Then there will be a small gap where air flows will naturally remove excess moisture.
Thermal insulation of walls from the inside
This option for installing insulation is used extremely rarely, including polystyrene foam. The main reason for choosing this method is the inability to perform external insulation. In this case, high-quality vapor barrier is simply necessary. Otherwise, all the moisture will begin to condense in the thickness of the wall, which will lead to:
- Wetting of finishing materials.
- The appearance of an unpleasant odor.
- The development of mold and mildew, which can cause many complex diseases.
Roof of the house
Expanded polystyrene is a universal material, which is why it is also used for roof insulation. Here, vapor barrier is also not replaced with anything and is not ignored. Moreover, they also use waterproofing. To protect the insulation from moisture, a kind of “pie” is constructed from both precipitation and interior spaces.
The layers are placed as follows, starting from the roofing material:
- waterproofing;
- expanded polystyrene;
- vapor barrier.
This material is also used for thermal insulation of ceilings. And here it is impossible to do without vapor protection. Warm and humid air is always at the top, and therefore polystyrene foam will be exposed to it. At the same time, the vapor barrier must protect the insulation, which means it is mounted on the side of the room.
Floor of the house
When installing thermal insulation on the floor, the presence of a vapor barrier depends on several factors:
- Using a screed - in this case, waterproofing is required. This layer protects against moisture penetration. This means there is no need to use an additional barrier.
- Floor installation using wooden structures. Here you will have to spend money on a vapor barrier to protect the tree. The floor is installed like this: wooden logs, then vapor barriers, and then polystyrene foam.
In private houses, they completely abandon vapor barrier, because warm air does not linger near the floor, and therefore does not affect these structures.
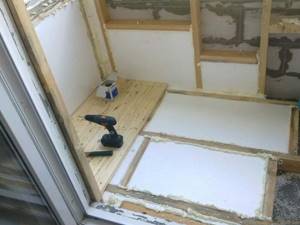
Balconies and loggias
These structures in our homes require the use of vapor barriers. Thanks to the special microclimate and conditions here, warm currents of moist air come into complete contact with cold surfaces, where condensation appears.
Therefore, when insulating a balcony or loggia with polystyrene foam, it is recommended to use difficult films and membranes. You should choose options that have foil on one side, and the base should be foamed. Only in this case will the object be completely protected.
Steam or hydro?
Vapor barrier and waterproofing are two groups of different films. Each group has its own varieties, which today are marked with letter designations.
- Waterproofing is films and membranes that are installed outside the thermal insulation, that is, outside the room. They protect the insulation from external moisture, that is, from precipitation. They are usually vapor permeable, so they also remove condensation from the insulation.
- Vapor barriers are films and membranes that are installed on the inside of the room, as if before thermal insulation. They protect the insulation from the penetration of water vapor from inside the house.
Now let’s figure out which side to lay the hydro- and vapor barrier.