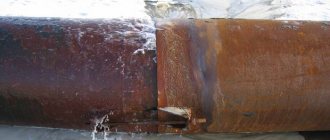
Pipeline depressurization is an extremely undesirable phenomenon that can lead to very serious consequences.
To minimize the risk of such incidents, it is necessary to ensure that the system is sufficiently reliable before putting it into operation.
A special procedure will help you do this - pressure testing of the pipeline.
Pressure testing with air and water - what is it?
The essence of pressure testing is to fill a certain system with a closed volume - a pipeline, container, machine or mechanism - or its isolated section with a medium whose pressure is 2 - 3 times higher than the working one and almost corresponds to the maximum permissible value (the value of the test pressure for each specific case is set by the appropriate norms).
If the object passes this test, it is considered suitable for use.
Otherwise, places where the system has leaked are identified and repaired.
To create the required pressure, either a special pump for pressure testing pipelines, the so-called pressure tester, or a standard one, for example, a circulation pump in a centralized heating system, is used.
Water is usually used as a working medium, but if for one reason or another its penetration outside the tested system is unacceptable, pressure testing is carried out with air. In this case, leak locations are more difficult to detect.
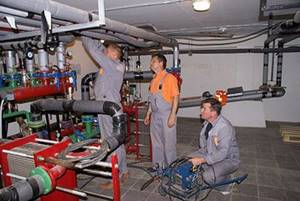
Pressure testing is a fairly serious undertaking and must be carried out by a specially trained, certified employee. For municipal and industrial enterprises this rule is mandatory.
Upon completion of the procedure, a Certificate of hydropneumatic testing of the system (pressure testing of the pipeline) is signed, indicating the date, pressure value, holding time and other information.
As for private housing, the decision here is in the hands of the homeowner. Many people undertake crimping on their own, but it is still better to entrust this work to a professional.
Heating water supply boiler room
LLC DESIGN PRESTIGE > https://resant.ru/
Telephone: 8(495)744-67-74
We provide installation services for heating and water supply systems for private country houses, dachas, and organizations. We supply equipment for work at discounts.
Our services:
Heating:
Installation, design, service repair. Heating by type: autonomous, water, private, wood, individual, gas, natural.
Water supply:
Autonomous water supply from a well and a borehole. Installation of a water supply system for both permanent and temporary residence and use of the house. We provide maintenance of water supply systems: pump replacement, replacement, repair of hydraulic accumulator, setting up automatic pump control.
Boiler room:
For private homes and industrial enterprises. We will install the boiler, distribution modules for heating circuits, and install automation elements for temperature control.
We carry out all work on a turnkey basis. LLC DESIGN PRESTIGE
LLC DESIGN PRESTIGE.
When is crimping necessary?
Pressure testing is performed in the following cases:
- Before putting the system into operation for the first time.
- After repairing the pipeline or replacing any of its components.
- After a long period of inactivity (a typical example is heating pressure testing after the summer season).
- If a scheduled check of the system status is provided. For example, sewerage from polymer pipelines is subjected to periodic pressure testing in order to check their integrity.
- Also, pressure testing should be carried out after flushing the pipeline, especially if aggressive chemicals that can weaken the walls of pipes and fittings were used. The same applies to sewer cleaning, since during this operation the joints of the pipelines may be damaged.
There is a special type of pressure testing that is applied to water wells. This check allows you to determine whether the perched water is getting into the wellbore from where water is drawn.
Heating system pressure test certificate
This document displays the following information:
- What type of crimping method was used?
- The project in accordance with which the circuit was installed;
- The date of the inspection, the address where it was carried out, as well as the names of the citizens who sign the act. This is mainly the owner of the house, representatives of the repair and maintenance organization and heating networks;
- How the identified faults were eliminated;
- Test results;
- Are there any signs of leakage or reliability of threaded and welded connections? In addition, it is indicated whether there are drops on the surface of the fittings and pipes.
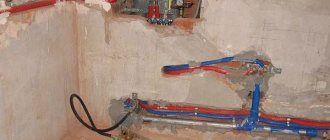
Preparatory measures for crimping
Before starting crimping work, you must perform the following steps:
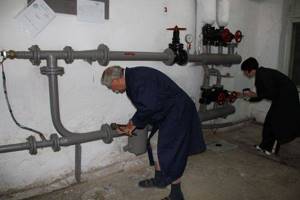
- The pipeline system under test is inspected for obvious defects (missing elements, rusted areas, etc.). Identified violations are eliminated. If the system is filled with any substance that cannot be used for testing, for example, coolant in a heating system, it must be emptied.
- Next, according to the rules, the pipeline is flushed. This operation will remove scale, rust, and organic and inorganic deposits from the pipes. Flushing can be carried out in various ways, some of which require the use of a compressor. According to the rules, upon completion of this procedure, the quality of its implementation should be checked by cutting out a section 0.5 m long in an arbitrary place of the pipeline and assessing the condition of its internal surface.
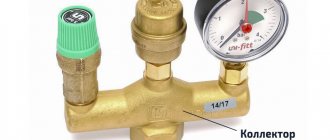
- The preparatory stage ends with the installation of a check valve and a pressure gauge, if they are not part of the injection device. A check valve is necessary to retain the working medium in the system.
When testing heating systems of apartment buildings, work on preparing the heating unit is carried out separately from the entire system and after it. This is due to the fact that this unit is tested with a higher pressure value.
Equipment washing
It is organized before the water fittings are installed. And here it is assumed that the pipeline is completely filled with water. Next, follow the following sequence of actions.
- Shut off the valve that connects the hot water supply system to external networks.
- Hoses for discharging contaminated water into the sewer system are connected to drain valves responsible for emptying the risers.
But even after such washing there is no guarantee that all debris will be removed. Therefore, specialists are developing equipment that increases the effectiveness of this process.
Video: What is pressure testing of a heating system
What is pressure testing of a heating system?
Any similar device creates a mixture of air and hot water, which is impulsively supplied into the pipeline, which requires cleaning. When the mixture passes through the equipment, it is discharged into the sewer system. The pulsation or feed force can be easily adjusted by lengthening or shortening the time intervals.
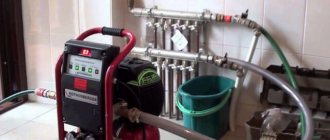
Crimping machines, pumps for crimping pipes
First of all, the pumps used for pressure testing differ in the design of the discharge mechanism.
On this basis they are divided into the following groups:
- Piston.
- Vane-rotor.
- Membrane.
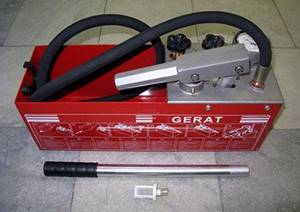
For crimping systems with a small volume, for example, heating circuits in private homes, you can purchase an inexpensive and easy-to-maintain manual crimping machine.
Using such a device, the operator will be able to pump up to 3 liters of working fluid per minute into the pipeline. For a multi-storey building, this option, of course, will be unacceptable; here you will need a crimping machine with an electric or internal combustion engine drive.
The most popular is the domestically produced manual crimping machine UGO-30, designed for a maximum pressure of 30 atm. The cylinder volume is 36 cubic meters. cm, force on the handle – 2 kg. Equipped with a 16 liter tank.
For more serious tasks, manual two-stage pumps UGO-50 (up to 50 atm) and UGI-450 (up to 450 atm) are intended.
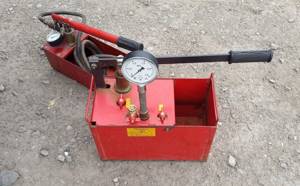
Manual hydraulic crimping machine UGO 30
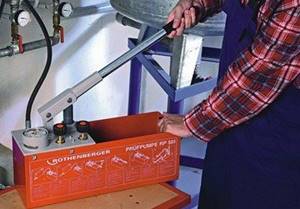
Among electric crimpers, units from the German company Rothenberger are known, for example, the self-priming model RP PRO II, which develops a pressure of 60 atm and a flow of 8 l/min. The drive power is 1.6 kW.
Ridgid products are also highly rated, for example, model 1460-E. This crimping machine develops pressure up to 40 atm.
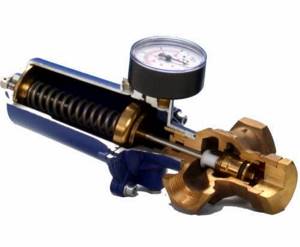
The autonomous water supply system will operate uninterruptedly only if the pressure switch for the hydraulic accumulator is correctly configured. Let's consider the principle of operation and the procedure for adjusting the relay.
Read how to make a drainage well with your own hands here.
Who doesn't dream of a swimming pool in their country house? Such a custom-made design will be expensive, but you can save money and build a pool yourself. Here https://aquacomm.ru/vodosnabzenie/zagorodnyie-doma-v/bassejn-na-dache-svoimi-rukami.html you will find instructions for building a concrete reservoir.
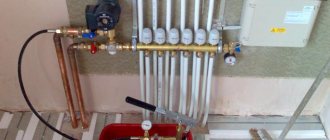
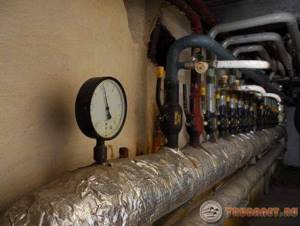
How to check the pressure in the boiler and network
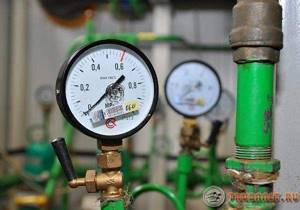
Modern thermal power equipment is equipped with indicating devices: spring and electric contact pressure gauges, as well as primary pressure sensors. Spring pressure gauges use an arrow to indicate the pressure that corresponds to the state of the medium in the circuit.
An electric contact pressure gauge and a primary sensor measure pressure; if the pressure is low, they generate a corresponding electrical signal and send it to the automation and instrumentation system to make a decision on process control while simultaneously recording the readings on the operating display of water heating boilers.
Pressure devices are located at the coolant outlet from the boiler on flexible hoses, on the safety group, after the electric pump and on the heat supply circuit. The process of pressure formation in the circuit:
- The circuit is energized and the air plug is released until the pressure equalizes to 1.2 bar.
- Start the electric pump and achieve stable operation in the heating circuit
- The unit is started and heating of the coolant begins according to the specified temperature schedule.
- Along with the rise in temperature, the pressure in the Ariston boiler increases; when it reaches the operating load, it cannot be higher than those set by the manufacturer.
- During the heat transfer process, the state of the medium in the circuit is monitored using the boiler pressure gauge and its indicator on the boiler screen.
- When the hydraulic pressure drops, the arrow on the device on the boiler unit will drop, and an error code caused by low pressure of the medium will appear on the display.
If measures are not taken and it continues to decrease, the boiler will automatically shut down.
How it's done?
The general scheme of hydropneumatic tests is as follows:
- The part of the system being tested is isolated by shutting off the shut-off or control valves (the sewer pipes are closed with rubber plugs or wooden plugs wrapped in rags).
- Next, the system is completely filled with water. In the heating system, air is released through air vents installed at the very top.
- A pressure testing pump is connected to the pipeline, which pumps a certain amount of working fluid into the system, creating the pressure required by the test regulations.
- When the required pressure is reached, the pressure tester switches off. In this case, the observer records the readings on the pressure gauge.
- The system remains under pressure for a certain period of time. The exposure time can range from 0.5 hours (for heating systems) to 6 – 8 hours.
- After the appointed time has expired, the observer takes readings from the pressure gauge again. If the pressure differs from the original value, then there is a leak in the system that should be found and repaired. After this, crimping is performed again.
Pressure testing of heating system with air
The following connection points are usually used:
- For heating systems: a special valve on one of the radiators, or a drain valve on the elevator unit (in centralized systems).
- For water supply systems: one of the connections to a cold or hot water tap.
- For the sewerage system: any of the revisions, usually installed in increments of 40 - 50 m.
If the heating system has been tested, the Hydropneumatic Test Report is signed by representatives of the heating network and the organization providing heat supply. Next, the inspector checks the coolant for hardness.
The procedure for testing water supply pipelines and its purpose
When testing water supply pipelines, experts check several indicators at once:
- Detection of defective areas.
- Tightness.
- Reliability.
Heating testing is carried out before a newly built facility is put into operation. This applies not only to the introduction of new communications, but also to its overhaul.
If defects are found, they are eliminated as soon as possible. The tests are repeated until the results are found positive.
The pipeline tests themselves are carried out in two passes.
- First come the preliminary ones.
- These are followed by the final ones.
The first stage involves pumping water into the pipeline under high pressure. The main thing is that the pressure is one and a half times greater than normal operating indicators.
At the same time, it is important to maintain access to system elements that are located both inside and outside. This must be done before plumbing fixtures are installed.
IMPORTANT! Hydraulic testing of water supply pipelines is also prescribed before finishing the interior. Specially trained people are responsible for hydraulic testing of water supply systems.
The underground sections of the pipeline are completely closed before final testing begins. At this stage, it is necessary to complete all installation work.
But the installation of plumbing fixtures has not yet begun. During these activities, the pressure is increased by 1.3 times compared to normal.
The technique allows for additional rules.
- Hydraulic checks of water supply systems should be carried out only 24 hours after installation is completed. The ambient temperature must be above zero.
- During this event, the pipes are completely filled with water. Until it reaches the top of the risers. Before this, the condition of the pipes undergoes a visual inspection to control. If noticeable deficiencies are identified, they are corrected immediately. The system is considered to have successfully passed the test if no leaks occur within 20 minutes of operating condition. And if the water maintains the previously noted level.
Watch the video
SNiP

Data on the procedure for performing pressure testing of pipelines, technological diagrams of this process and safety precautions are contained in the relevant sections of the following SNiPs:
- SNiP 3.05.01-85 (dedicated to internal sanitary systems).
- SNiP 41-01-2003 (outlines the issues of organizing heating, air conditioning and ventilation systems).
- SNiP 3.05.04-85 (applies to external drainage systems).
The method of pressure testing of pipelines of industrial enterprises is specified in industry standards.
Among other things, these documents establish the value of the test pressure. It depends on the material of the pipeline, the thickness of its walls (the minimum value is taken), the difference in height between the uppermost and lower elements of the system and other factors. Most often, the pressure during hydropneumatic tests is developed to the following values:
- in pressure pipelines (water supply): 10 – 15 atm.;
- cast iron sewerage: 1.5 atm.;
- non-pressure polymer pipes: 1.5 – 2 atm.;
- heating systems in apartment buildings (with cast iron radiators): 2 – 5 atm. (according to SNiP - at least 1.5 working pressure);
- input node (in centralized systems): 10 atm.;
When pressure testing a heating system in private homes, a pressure of up to 2 atm is sufficient. (there is no point in pumping higher: the emergency valve is usually set to this level).
Purpose of heating tests
Central heating test
The inspection should be a mandatory activity, since during this process hidden and obvious defects can be identified. But how to properly conduct a thermal or hydraulic test of a heating system? To do this, you should refer to the regulatory document SNiP3.05.01-85.
It does not provide a clear methodology for performing these procedures. However, there is a link to GOST 25136-82, which describes recommendations for drawing up a hydraulic test report for an internal heating system. These measures must be carried out both for autonomous schemes and for centralized heating. They are designed for the following:
- Preliminary check of all circuit elements before launch. Minimizing the likelihood of failure of individual components;
- Monitoring the compliance of the finished system with the design parameters - temperature, pressure and heat load;
- In some cases, it is necessary to show representatives from government agencies a test report of the thermal effect of heating systems or another document confirming the fact of the inspection.
There is a certain procedure according to which the order of tests is established. So, first, a hydraulic test report for the internal heating system is drawn up, which can be replaced by a pneumatic (bubble) test. The final report is a thermal study report on the operation of the heating system.
Price
The cost of crimping depends on several factors:
- length (internal volume) of the system;
- the age of the system and the condition of its constituent elements (amount of rust and dirt and salt deposits);
- type of equipment used.
Prices from different performers, even within the same city, may differ by 2–3 times. Private teams and craftsmen charge the cheapest for their services.
On average, for flushing and pressure testing the heating system of a building with an area of 400 sq. m (two-story) performers charge from 7 to 15 thousand rubles. As practice has shown, if you know how to bargain, you can agree to complete this amount of work for 4–5 thousand rubles. The work will be completed in 1 – 2 days.
The same work in a building of 5 thousand square meters. m (5 floors) will cost from 30 to 80 thousand rubles.
Some performers indicate prices per unit of volume (150 - 250 rubles / cubic meter) or time (500 - 1000 rubles / hour).
If you want to install the washbasin yourself, be sure to take care of connecting the water seal. Water seal for sewerage: types, purpose and installation features.
You will learn about the types of antiseptics for cesspools in this review.
The pressure in the boiler drops or increases, what are the reasons?
One of the common malfunctions is that the pressure in the heating system slowly drops and when it drops below normal, the boiler turns off.
There are two reasons
Leak in the heating system
First reason
—
in general, it’s not related to the boiler; it’s more a problem with the heating system itself.
Namely, an elementary leak of coolant from pipes or a radiator, and most often what is used as a coolant? That's right water! Believe me! Such a leak can sometimes be difficult to detect, but the fact is that you will not see a puddle on the floor, well, of course, unless it is a serious leak, but most often it is just droplets flowing, for example, from under a radiator cap, or a poor-quality connection or soldering, and You won’t see these droplets, because during the heating season they immediately evaporate from heated pipes. As a result, the pressure slowly but surely drops, you add water over and over again and this continues to kill radiators and pipes.
It is not uncommon for modern radiators, aluminum or bimetallic, to also become unusable, sometimes in inconspicuous places, between the ribs or from below, they begin to dig in due to metal corrosion. Not rust, of course, but various chemical processes also render them unusable. They must be carefully inspected when searching for a leak.
It will be easier to detect various types of leaks if you turn off the heating for a while, let the radiators cool and add pressure to about 2.5 Bar. Carefully inspect the radiators themselves, pipe connection points, and soldering points.
The second
reason
for the pressure drop in the heating system and, accordingly, in the boiler is associated with the expansion tank. The expansion tank is designed to compensate for the pressure created during the expansion of the heated coolant; it is a container divided by a membrane, one half of the tank is filled with inert gas or just air, the other is filled with coolant (read water). When heated, water expands and fills the tank; when cooled, it is again pushed into the heating system.
A) In an extremely rare case, there may be a malfunction of the tank itself. For example, the tank body has lost its tightness. Or there may be a rupture of the membrane inside the tank, but it is not so delicate, so you need to try to break it. But if this happens, then the coolant enters from the heating system into that part of the tank that should be filled with air. This is not difficult to determine; in the upper part of the tank there is a spool through which air is pumped (as in a car, bicycle), if pressing the spool the water is thrown out of the tank, the tank needs to be replaced.
B) In the second case, the reason is that the air has escaped from the part of the expansion tank in which it should be or does not have sufficient pressure.
It can manifest itself like this: FIRST STAGE
...The pressure in the boiler drops slowly, about once a week you have to top up the boiler, and there are no leaks in the heating system itself.
SECOND STAGE
...
On the boiler pressure gauge, the pressure constantly “walks” in heating mode and rises until the relief valve is activated, in hot water mode it drops to values less than 1 bar and then the boiler begins to turn off, the protection is activated. THIRD STAGE
...
If there is no air left in the tank, then the pressure on the pressure gauge drops to zero in a very short time, sometimes in a minute
.
Solution: You need to create pressure in the expansion tank of your boiler.
Reinforced pipes
Reinforcement helps to increase the service life of pipes, as well as make them more stable and wear-resistant.
Reinforced polypropylene pipes are a special type of multilayer pipes with a strong internal frame that reduces thermal expansion and increases the ability to operate at elevated operating temperatures and pressures.
There are several methods of pipe reinforcement:
- Reinforcement with aluminum foil (perforated or whole). Between two layers of PPR polypropylene, a layer of foil up to 0.7 mm thick is fixed with glue. The reinforcing layer is placed between the layers in the middle or closer to the surface.
- Fiberglass reinforcement. To reduce thermal expansion, fiberglass is placed in the middle between the inner outer layers of polypropylene.
Results of control pressure testing of the gas pipeline
The positive result of the work performed is stable pressure in the gas communication section. In this case, the repair team must remove the hoses connecting the air duct to the gas pipeline. During these actions, you need to ensure that all shut-off valves on the air supply to the gas pipeline are closed. Next, plugs are installed on the pipes supplying air to the gas pipeline.
Removing the plugs
In the event of a drop in pressure in the communication during pneumatic testing, the result will be negative, and the launch of the gas pipeline will be postponed until appropriate measures are taken. A subsequent inspection of the test area will be required to identify inconsistencies with their further elimination. Then, the gas pipeline must be re-checked.
The results of the work performed are entered into a special journal and recorded in the work crew’s orders. There must be air pressure remaining in the system before it can be started.
At enterprises with gas supply, in addition to the acceptance certificate for gas facilities, the following documents must be available:
- order appointing someone responsible for the organization's gas facilities;
- instructions for the operation of communications, equipment and equipment of the gas facilities of the organization;
- instructions for labor protection during operation and repair work on gas pipelines and gas equipment.

Results of control pressure testing of the gas pipeline
In what cases is surgery necessary?
- On the eve of the 1st launch of the infrastructure into operation;
- After fixing pipes or changing any of the components;
- After a long stop (a typical example is pressing the heating after the summer period);
- If a planned audit of the state of the structure is expected. For example, drainage from polymer pipes is subject to systematic inspection to audit their integrity;
- In addition, the procedure must be performed after flushing the pipeline, especially when hostile chemicals were used for this, which can undermine the walls of the pipeline and fittings. The same applies to drainage cleaning, since during the procedure parts of the pipe joints may be damaged;
How long does it take to pressurize a water pipe?
Who does the crimping?
- Are you testing the entire system as a whole or individual elements of the system, for example, a separate line running from the collector to the collector.
- What do you use for pressure testing - air or water?
- When performing pressure testing, do you simply check for visible leaks or make sure there is no pressure drop? If there is a pressure drop, what drop is considered acceptable and what is not, or is any drop unacceptable?
- If the absence of pressure drop is checked, over what time period is the check done?
- At what pressure are you testing the system?
Well, and other details that you consider important.
Pipeline depressurization is an extremely undesirable phenomenon that can lead to very serious consequences.
To minimize the risk of such incidents, it is necessary to ensure that the system is sufficiently reliable before putting it into operation.
A special procedure will help you do this - pressure testing of the pipeline.
How to prevent air from entering the heating system?
It is very difficult to completely avoid air getting into the system, but you can minimize the problem and learn how to easily and quickly remove traffic jams:
- It is necessary to monitor the serviceability and tightness of all joints, shut-off valves, etc.
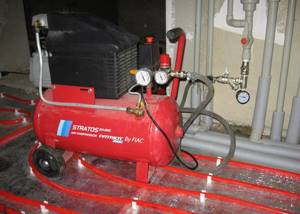
- Before starting the system, air is pumped into it using a compressor at a pressure 20% greater than the working one. Measurements from the pressure gauge are taken at the beginning of the test and after 20 minutes. If the indicator has not changed, there are no leaks, the system is sealed. A leak will be indicated by the pressure gauge needle, as well as a characteristic whistle. To finally make sure that the leak has been found, lubricate it with a thick soap solution.
- The system must be filled with cold water and smoothly. After filling, the air is released several times using air vents and Mayevsky taps. Each time after draining, water is added to the system.
- It is recommended to use stainless or bimetallic heating radiators.
- It is also advised not to change the coolant too often. A fresh portion of water always contains oxygen impurities.
- To bleed air, install air vents in all problem areas and use them regularly. Or equip radiators with automatic devices and monitor their serviceability.
The adaptation period of the system, during which it is necessary to bleed air and add water again and again, is several days.
Why does the pressure rise in the heating boiler?
Filling the heating circuit is carried out subject to the exact sequence of actions; deviation from the rules leads to malfunctions of the system. When starting the system seasonally, it is necessary to adjust the adjustable auxiliary elements and fix the position of the valves in the correct position.
Air lock in the system
Thermal imager shows a plug
If the heating system malfunctions, expressed in an arbitrary increase in pressure, the temperature of the coolant sometimes drops and the boiler blocks. As a consequence, in such situations, an imbalance occurs in the functioning of the system, leading to the failure of expensive elements.
Airing of the circuit can lead to similar consequences, and the resulting plugs are recognized as a common reason why the pressure in the boiler increases.
Air locks can occur for a number of reasons:
- equipment malfunction;
- the system was launched with violations;
- automation failure;
- formation of cracks in the heat exchanger housing.
The above consequences are the result of neglecting the established rules for operating the heating system.
The following actions can lead to these breakdowns:
- the DHW circuit is filled from the top point;
- upon startup, the system is rapidly filled with water;
- before launch, the check required for the air vents, as well as each Mayevsky valve, was not carried out;
- air was not bled from the radiators after repair;
- The vibrating impeller with which the circulation pump is equipped slowly pumps air, causing a circulation problem.
Such problems are eliminated by relieving pressure from the heating circuit. Next, the circuit is filled with water, carried out from the bottom point
It is important to consider that while filling the system, it is necessary to keep the air bleed valves open. Filling is carried out gradually without undue haste, and the end of the process is signaled by the appearance of water at the top point of the system
Expansion tank malfunctions
The expansion tank can look like a separate wall element or as part of the boiler. It is designed to collect excess coolant from the heating circuit. When water in the system is heated, its volume can increase by up to 4%, and the expansion tank is designed to compensate for this difference.
Incorrect calculation of the system volume may lead to the installation of a tank with a smaller capacity than necessary for compensation. In this case, all the excess water cannot leave the system and this becomes the explanation why the pressure increases. The dimensions of the tank are also affected by the power of the installed boiler.
A hidden breakdown is considered to be a rupture of the membrane in the expansion tank. Such damage may not be noticed immediately, but in the meantime, unfixed coolant can fill the entire internal cavity. The pressure in the circuit will decrease, but if, in this situation, the system is recharged, this will lead to an arbitrary increase in pressure.
Other causes of high blood pressure
Other malfunctions also come into view, which may explain why the pressure in the heating system increases. If you do not regularly check the pressure readings in the system, then inconspicuous problems can cause expensive repairs.
- If the fittings are blocked, then at the time of intake the pressure will increase, and the control sensors will block the equipment. To avoid consequences caused by this reason, during startup it is necessary to inspect the valves and taps to ensure that the valves are in good condition.
- Dirt and rust that gradually accumulate in the system can clog the mesh filter. Therefore, you should either clean this element regularly, and if washing the filters does not help, then you should install a washable or magnetic filter. With the correct design of such elements, the pressure does not rise above the permissible level.
- A controller or thermostat can fail, and problems with automation lead to negative consequences. The cause may be either premature wear or a manufacturing defect. In addition, a malfunction of these elements can be caused by an incorrect connection.
Such problems can be identified in a timely manner only if the readings of control devices are systematically monitored. They are not capable of dramatically disrupting the operation of the system, but are capable of gradually changing the indicators, leading to the critical point at which the boiler operates under load.
Methods for checking plastic (polypropylene) pipes for leaks
Of course, the most important result of any action will be to achieve the desired result, or to find criteria that need to be corrected in order to achieve the cherished goal. Pipeline control using air pressure testing can be considered successful if the pressure does not drop within 5-7 minutes. In this case, crimping should be carried out in two stages. Initially, we dial up the working pressure and wait 2-3 minutes. There may be a drop in pressure. Then we raise the pressure again to working and test pressure and wait our 5-7 minutes. Here the pressure drop should not exceed 2-3 percent.
If the pressure drops by a large amount, then we begin to search for leaks. Usually these are joints, gaskets, and soldering points. To do this, dilute a soap solution; you can dilute liquid soap. The main thing is that the solution lathers and foams well. Then apply it with a brush to possible leaks. Observe the appearance of bubbles in the solution. If there is, then there is a leak, but if not, then there is no leak.
Hydraulic Test: Formula
The tested pressure must be no less than the value obtained from the formula:
And no more than the value at which membrane stresses can occur in the tested pipeline, and the total or local membrane and total bending stresses in the aggregate will be equal (upper limit).
P – calculated pressure value when testing in factory conditions or operating pressure when testing after installation work and during operation;
– maximum permissible voltage at test temperature T^h;
– maximum permissible voltage at design temperature T;
K^h – coefficient, which for pipelines is equal to 1.25.
Materials and tools for crimping pipelines made of polypropylene pipes
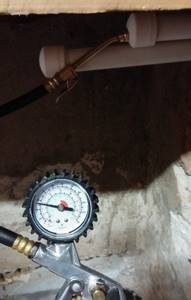
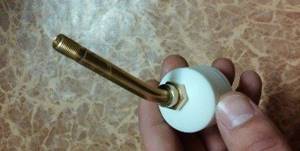
To carry out the pressure testing we need plugs, standard plugs that are used to terminate a pipeline line. We will also need a nipple for the wheel, this can be purchased at auto parts stores.

Then you need to drill a hole in one of the plugs and insert a nipple into it.
The nipple simply screws into the plug.
But to pump the medium, in our case air, you will need a compressor with a pressure gauge.
Features of hydraulic sewer tests
Testing of non-pressure sewer systems is carried out after completion of waterproofing work, but before the start of interior finishing. External lines are checked before backfilling trenches. At the preliminary stage, the system is tested without wells, and then tested together with wells.
Internal polymer communications should be checked only at ambient temperatures above zero, at least 24 hours after completion of all installation work.
To test wells, they are filled with water and kept for a certain time. When the inlet and outlet openings are closed, the liquid level should remain unchanged. This indicates that there is no leak.
In the case of pressure sewer systems, tests are carried out under pressure. The test is considered successful if the inlet and outlet pressures are the same - this means there are no leaks.
When carrying out testing activities and putting the pipeline into operation, the following acts must be drawn up:
- Visual inspection of the system and all components;
- Hidden works;
- Checks for strength indicators and communication density;
- Washing operations;
- Incoming quality control;
- Compliance of the work performed with the design documentation.