The high level of comfort of a modern person involves the use of a large number of electrical appliances. Therefore, installing sockets in the bathroom is not a whim, but an important necessity.
The selection and installation of power supply points occurs in accordance with the requirements of regulatory documents and the rules of the intra-apartment or intra-house electrical network arrangement. These provisions have been studied by us and outlined in detail in the article.
We will indicate areas acceptable for installing sockets, list the rules for laying electrical cables and give advice on choosing electrical appliances. The proposed step-by-step installation instructions will help you complete all electrical work yourself, without turning to specialists for help.
Deciding on the number of sockets
Which devices will be used constantly, and which ones only need recharging?
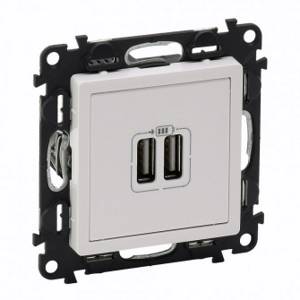
For example, to connect a washing machine or an electric heated towel rail, you need two or three special sockets with a cover and a degree of protection not lower than IP44, connected to a residual current device (RCD) in the panel. To connect such a powerful electrical appliance as a water heater, a regular outlet may not be enough. It is connected directly using a special mechanism - a cable outlet.
Choice for this interior:
Sockets for additional appliances can be placed inside the drawers of the cabinet under the sink or mirror cabinet. This way you won't be confused by dangling wires.
Additional safety measures in bathrooms
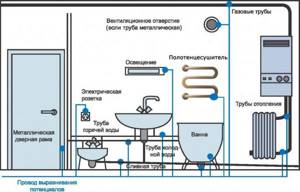
Additional electrical safety in the bathroom is ensured by creating a potential equalization system in the bathtub.
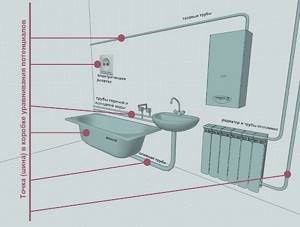
In this case, the electrical connection of the conductive parts is carried out, consisting of:
- Main protective conductor (main).
- Main ground wire (main) or special ground clamp.
- Communications consisting of steel pipes laid in and outside the building.
- Metal elements of building structures, lightning protection systems and other suitable networks.
In accordance with the Electrical Installation Rules, all stationary equipment and other conductive parts, as well as neutral protective conductors with which open contact and touching open places are possible, are connected to the potential equalization system. The same list also includes a plug socket for the bathroom.
This system must be installed in rooms with high humidity, even if there is no electrical equipment in them. All components are connected to a common wire, which is connected, in turn, to the PE bus, which is located at the input or in the distribution board.
Kinds
Often the degree of protection from moisture is already written on the product on a scale from 0 to 8. Moreover, the number eight can even be completely immersed in water to a depth of 1 meter - it will not do anything for it.

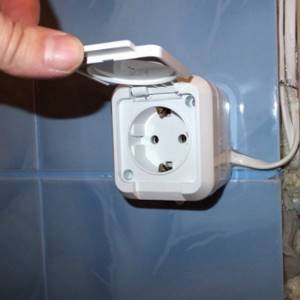
In the bathrooms you can get by with the fourth class - protection against splashes and drops. It is best to equip all sockets with a jumping cover. In this case, the holes will never get wet.
Safe connection also requires a lower class, using closed installation and under a protective casing. Then you can achieve the desired degree of tightness.
Installation location
Most often they decide how to connect an outlet in the bathroom with their own hands in cases where they need to install a washing machine in the room. It has its own characteristics.

Mounting it near a shower or washbasin is not the most acceptable solution. A short circuit can always occur. You should always divide the entire room into several squares according to the electrical safety scale.
Zero level – maximum proximity to splash sources. The third level is in the area from 3 meters to the source of moisture, and it is this that is considered the most acceptable.
The Internet is full of diagrams for connecting sockets in the bathroom. The main thing is to make sure that condensation that appears on the walls due to specific conditions of high humidity does not interfere in any way.

The wall that is adjacent to the staircase suffers the most. Moreover, there is more dampness in areas closer to the floor coverings. The height should reach about 1.5 meters if you want to place it on partitions inside.
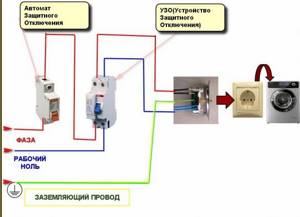
Electrical safety requirements (RCD and grounding)
A mandatory requirement is the use of RCD (residual current device) circuit breakers. They ensure that power switches operate in cases where there is a danger to humans:
- Leakage on the body;
- Short circuit;
- Touching live parts.
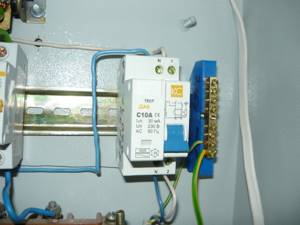
The main parameter by which an RCD is selected is the leakage current value. It is measured in µA and its value is indicated on the device body. The maximum triggering threshold of the RCD should be no more than 30 μA.
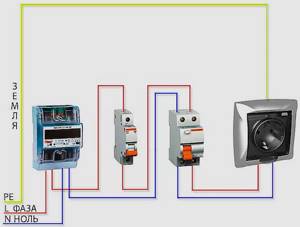
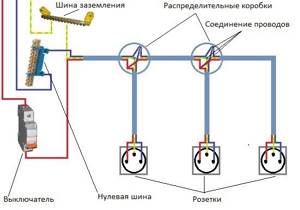
Washing machine power supply installation diagram
You can use a switch rated for 10 µA. It provides an increased level of safety, but imposes more stringent requirements on the insulation resistance of live parts. Most often, more sensitive switches are used on newly laid lines to avoid too frequent false alarms.
Connecting RCD circuit breakers to the supply line must be done outside the bathroom. Most often, the unit is installed in the entrance electrical panel of the apartment. A necessary condition for the effective functioning of the security system is the use of a cable with a separate grounding conductor. Through it, potentials are equalized to a safe level. The connection can be made to the corresponding contacts in the input panel. Grounding to metal pipelines or building fittings is not allowed.
Safety
Numerous installation options are shown in the photo of sockets in the bathroom. But you should always additionally remember all the electrical safety requirements.
It is imperative to install so-called RCDs - these are residual current devices. They quickly turn off the power if there is a risk of injury to a person. This may be in cases where the housing is leaking, a short circuit occurs, or parts where current flows are touched.

The RCD is installed outside the bathroom. Most often it works in the shield itself. They use a special cable with grounding, which is located far from metal pipes or fittings.
Ensuring safe operation
One of the elements of electrical safety is a protective grounding device - RCD. Previously, when two-wire wiring was used, a separate large-section cable was brought from the bathroom to the distribution board and connected to the grounding bus. Thus, the question of how to make grounding was resolved. Modern wires initially have three wires, one of which serves as a grounding wire. It should be connected to the ground terminal of the waterproof socket and then also goes to the distribution board.
Additional electrical safety is provided by a residual current device. These devices are required for use in electrical wiring lines leading into bathrooms. The RCD is located in the home electrical panel and cuts off the power in the event of current leaks.
A separate RCD with a rating higher than the rated current of the circuit breaker is installed on the sockets in the bathroom. If this condition is not met, then the circuit with the protective device simply will not function normally.
Simultaneously with the RCD, automatic circuit breakers are installed to protect the line from overloads and short circuits. They protect individual outlets dedicated to high-power appliances or groups of outlets. The rating of the protective equipment is selected in accordance with the expected load.
Bathroom sockets: necessity or whim
In a combined or separate bathroom, a person often has to use all kinds of electrical appliances, such as:
- washing machine;
- hair dryer;
- hair curling iron;
- electric shaver;
- mirror lighting;
- shower cabin parts;
- hydromassage system.
Considering the number of appliances powered by the mains, a block of sockets or several separate points are installed in the bathroom
. When asked how many sockets are needed in the bathroom, experts say that this directly depends on the number of electrical appliances and the total area of the room. In a spacious, clearly zoned room, it is important to take into account that the washing machine will be located in one corner, and the dressing table with a mirror, near which hair drying with a hairdryer and shaving with an electric machine will be done, will be in the other. If you put just one point, you will have to “pull” many wires to it, which is extremely inconvenient. When many connections to the electrical network are required, it is better to install double or triple sets.
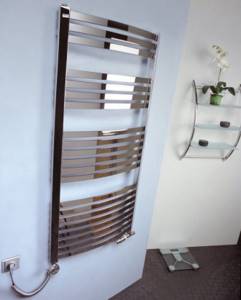
It is recommended to allocate separate sockets for connecting heated towel rails, storage boilers, instantaneous water heaters and other devices that usually operate in constant mode
Where is the best location?
The location of outlets in the bathroom is a fundamental issue that should definitely be studied before planning the room. The choice of the correct location for the hole is made based on the distance from the high-risk area and the distance from the floor.

The photo shows a model with curtains above the tabletop
Which areas are suitable for installation?
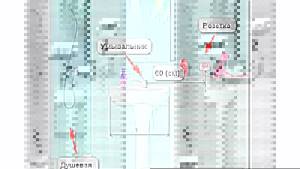
According to GOST R 50571-7-701-2013, described in the PUE (electrical installation rules), any bathroom is divided into 4 zones:
- Zone 0. Or red zone - this includes the inside of the bathtub, sink, shower stall. GOST prohibits the placement of any type of sockets for safety reasons - voltage in the zero location is life-threatening.
- Zone 1. Located under the sink or on top of the bathtub. According to the standards, it is also impossible to install 220V outputs here, but it is allowed to connect a boiler with a class of at least IPX5 through an automatic machine.
- Zone 2. 0.6 m around the washbasin, bathtub, shower. The installation of sockets is still prohibited, but the installation of devices that are plugged into an outlet located in the next zone is allowed. These could be boilers, mirrors, lamps.
- Zone 3. Remaining space of the bathroom. It is recommended to install the main sockets in the bathroom here. A mandatory requirement is a degree of moisture protection of at least IP44, preferably IP54 and higher.
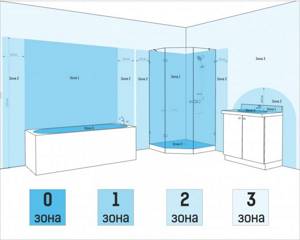
Important! The division into zones is relevant up to a partition height of 225 cm. Anything higher goes beyond the requirements and has virtually no restrictions on the installation of electrical systems.
This exception allows you to place a water heater or machine even in a small bathroom, connecting them at a height of 15-20 cm from the ceiling.
If the room is too small and there is no Zone 3 in it, it is better to abandon the sockets and place them on the wall near the door outside the room.
What distance is suitable?
The height of the sockets from the floor in the bathroom is determined individually and depends mostly on the layout of the room. For example, if a socket is needed above the countertop 80 cm, feel free to make it at a level of 90 cm. At the same time, make sure that splashes from the washbasin do not get inside: this can be easily achieved by moving the point 60 cm from its edge to the left or right.
The statement “the higher, the safer” is not entirely true. The socket in the bathroom can be raised 2 meters, but it will be extremely inconvenient to use. If you are afraid of a short circuit during flooding, it is enough to place the entrance on the wall 60 cm from the floor covering - the water will definitely not reach here.
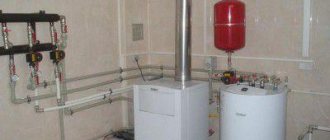
Connection diagram and installation
As mentioned, the electrical equipment in this room is connected through an RCD. Ideally, it would be good if all sockets and appliances were connected through a separate circuit breaker, but this is not always possible to do without capital investments and without gating. The connection diagram is shown below.
Depending on how you can arrange the outlets, either before or after tiling, you will need to upgrade the electrical circuit of the bathroom. You can use surface-mounted or built-in electrical installation products. The above citations of the PUE do not indicate whether there is a difference in their installation. Therefore, it is permissible to install external wiring in the bathroom as well as in all others, for example, in cable ducts.
Be sure to install built-in models in socket boxes inside the wall. There are no special differences in installation, except that you need to make a hole in the tile with extreme caution so as not to chip it.
To do this, if you don’t have a diamond bit, use special tile drill bits to make a series of holes in a circle, then chop off a round piece of tile and gouge out a hole in the base material of the wall.
To reduce the risk of electric shock, all live parts (metal) must be connected into a single circuit for potential equalization and grounded.
Location rules
Strictly speaking, the outlet must be installed in the third zone for its safe operation. In other words, it is as far away from the shower stall as possible, as well as from the water tap. If your bathroom sink is used on a countertop, then the socket can be placed above the countertop at least 15 cm in height, and also at least 30 cm away from the edge of the sink to the right or left, but far from the shower stall. It is better to make this distance 60 cm.
The socket in the bathroom should not be exposed to direct streams of water. However, the outlet itself can be chosen of good quality and with protection. Good quality implies the ability of the mechanism not to be destroyed by moisture, and the contact group to provide a good connection.
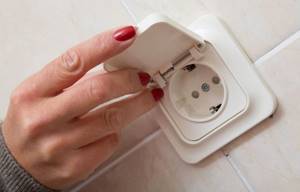
If we talk about protection, we recommend that you use sockets in the bathroom with protective curtains. Such curtains are directly used as protection against small children, in order to avoid electric shock to the baby if he suddenly decides to play with sockets.
However, such curtains will prevent the accumulation of moisture on the contacts at the moment when high humidity accumulates in this room. We also recommend using special frames with lids for protection. Such covers provide a degree of climate protection IP 44, which is enough for safe operation of the socket in the bathroom.
How to choose an outlet
Devices intended for installation in rooms with high humidity are not much different from simple ones.
When choosing a device, pay attention to the following parameters:
- Moisture protection class. This parameter is determined by deciphering the markings applied to the case or packaging. It consists of an IP symbol and a digital code. When choosing an electric point for the bathroom, both numbers are taken into account. The first reflects the degree of protection from dust and dirt, the second - from water. Both numbers must have values greater than 4. The best option is sockets with a degree of protection IP65 (+).
- Housing tightness. Devices marked with numbers 6-8 are able to withstand jets. The important part is the lid. It is equipped with a built-in spring that prevents accidental opening. To insert the plug, you need to carefully lift the cover.
- Presence of defects. The device is inspected, identifying cracks or chips. The terminals must not be offset. Pay attention to the tightness of the lid. It should not open spontaneously.
- Build quality. When purchasing a waterproof socket, you should not save money by choosing products from unknown brands. Products from the BERKER, Makel, and GIRA brands have a long service life.
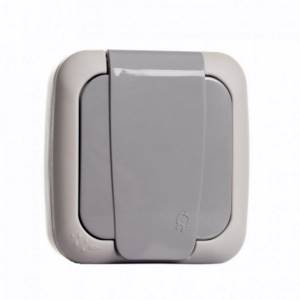
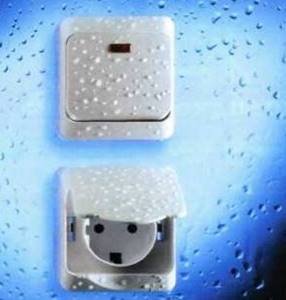
High-quality socket of IP-54 standard.
Rules for installing an outlet in the bathroom
When installing an outlet in a room with high humidity, follow the following electrical safety rules:
- The need for grounding. This factor ensures safety; it is provided even in old houses. Grounding must not be routed into a bathtub, steel pipes or reinforcement frame. It is brought to the input panel, where circuit breakers are installed. The latter stop the supply of electricity to the apartment in the event of emergency situations.
- The need to install separate machines. Occurs when connecting powerful electrical appliances, such as a washing machine or dryer. If the outlet will be used to power small devices (hair dryer or razor), it can be connected to a common network.
- Installation of protective shutdown devices. Such a device should monitor the operation of all wiring in the bathroom. The RCD is triggered when there is a current leak, stopping the supply of electricity.
- No twists or terminals in the bathroom. Connections should not be left even under the cladding layer of walls or floors. The wiring is formed outside the premises. Distribution wiring is laid on the other side of the wall.
RCD in the bathroom.
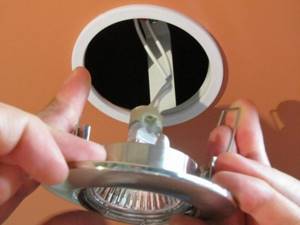
Ceiling lights
If you are planning a suspended ceiling in your bathroom, then it makes sense to install ceiling lights for a number of advantages. Technically, they are easier to connect to a network cable; this type of lighting is more efficient and at the same time, from a design point of view, the most attractive. Modern ceiling lights have an adjustable lighting angle.
When connecting through the ceiling, the cable is also routed through a corrugated sleeve, which is fixed to the ceiling with special terminals.
Step-by-step instructions for installing sockets yourself
Installation of an electric point is carried out in several stages.
Preparation of tools and materials
The amount of materials used and types of tools depend on the scope of work. If you plan to replace the wiring, you will need the following items:
- perforator;
- drill with core bits;
- indicator screwdriver for determining voltage;
- building level;
- a set of screwdrivers with different attachments;
- copper cables;
- automatic switches;
- cable cutters;
- distribution boxes;
- protective sleeves.

Cable cutters.
When replacing an outlet in a new home, all you need is a pair of wire cutters, a screwdriver, and electrical tape.
It is necessary to prepare personal protective equipment (insulated work gloves, mask, goggles).
Chasing walls for wiring
Grilling is the most difficult stage of installation work. To prevent the appearance of dust and dirt, the wall chaser is combined with a vacuum cleaner. There are combined devices that cut out 2 channels at once. They move easily and quickly absorb dust. In the absence of professional equipment, you can use the following tools:
- grinder with diamond discs;
- perforator;
- chisel and hammer.
The groove is completed by forming a hole for the socket box. To do this, the drill is replaced with a crown attachment. After this, you need to clean the room - construction debris can make it difficult to install the outlet.
Installation of a socket box
The socket box is installed before laying the tiles. When replacing a device, you need to remove the old housing and unscrew the screws. After this, remove the socket box and install a new one. If installation starts from scratch, perform the following steps:
- Trying on a new socket box. If the hole is not of sufficient size, it is widened with a chisel.
- Prepare the niche by clearing it of dust and dirt. The bottom and walls of the hole are treated with putty.
- Insert the socket box into the niche. Remove excess solution. Installation of the socket begins only after 24 hours. This will allow the solution to harden and secure the socket box.
Installation of socket boxes in a plasterboard wall.
Installation
Installation of sockets in the bathroom from scratch should be done based on the recommendations:
- Before installation, the line is equipped with a separate automatic switch for emergency shutdown;
- each socket has a separate connection with a separate wire;
- the socket is equipped with a grounding cable and a cover;
- the device should be located no closer than 60 cm from water sources;
- installation is carried out without repair, so the socket must be equipped with a separate cable, which is connected to the distribution panel via an automatic machine.
The following tools will be required for installation:
- indicator for measuring voltage;
- Phillips screwdriver;
- knife or special tool for removing insulation;
- level;
- drill;
- pliers.
Then the installation process begins. Conventionally, it is divided into 4 main stages:
- Drilling holes into which dowels are installed. They are needed to secure the device.
- Then prepare the wiring. The tips are cleaned from the insulating layer using a knife or a special cleaning tool.
- Afterwards, the bolts are installed in the prepared holes. Then they connect it to the socket and attach it in a box to the wall with dowels. Moisture-resistant devices are equipped with ready-made holes, which are equipped with rubber plugs. They are where the wiring is connected before connecting to the electrical network.
- The final step is to install the housing in the designated place and supply electricity.
Don't miss: Plastering bathroom walls under tiles. How to plaster walls under tiles
If a built-in socket is installed, then at the first stage you need to make a hole in the wall along the diameter of the box. After which it needs to be installed on a plasterboard wall using special screws and the wires connected.
Installation of an additional outlet is carried out according to a similar algorithm, but with a slight difference. There are 2 ways to connect the cable:
- laying a new electrical cable line from the panel, installing a separate circuit breaker;
- installation of a transformer, in this case grounding is carried out from the nearest electrical point.
The remaining steps are the same as for the initial installation. When installing additional equipment, it is necessary to make additional holes in the facing coating; for this purpose, specially designed drills and crowns are used.
When installing, follow safety precautions:
- installation is carried out in a de-energized apartment;
- check the wires with an indicator before connecting;
- Avoid contact with exposed wires.
If you follow simple installation rules, you can connect the outlet in the bathroom yourself without much effort.
Sockets can and should be installed in bathrooms.
The choice of outlet is made taking into account the devices connected to it and their total power. For small household appliances: curling iron, razor, you can use 8 A sockets. For powerful devices, such as a washing machine and water heaters, you will need 16 A sockets. By observing the above installation and installation requirements, any person without special knowledge and skills can independently connect the device.
Installation of sockets in the bathroom: standards
Before installing sockets, it is important to choose the right locations for their installation. It is imperative to follow the electrical safety rules:
- Grounding. It is responsible for safety and is provided in all new-style houses. Grounding cannot be routed into the bathroom or into metal pipelines; it is routed only to the input panel with circuit breakers.
- Automatic machines. They are installed in apartments where the power of the connected equipment is high - for example, when installing washing machines and water heaters.
- RCD. It is recommended to install a device with a protective shutdown in the bathroom along all the wiring. The RCD will respond to any minimal current leakage and will cut off the electricity supply completely.
It is important to note that bathrooms do not require terminal blocks with twists and other wire connectors.
Moisture-resistant electrical outlets are connected using three-core, double-insulated cables. Each of the conductors has its own marking. Using copper cables, sockets are connected, which are less susceptible to oxidation, are resistant to significant loads and have low contact resistance when connected to machines.
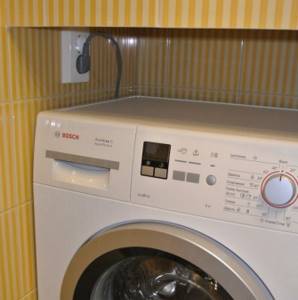
Installation height for washing machine: correct location
Mandatory conditions for connecting washing machines:
- connection is made only to working wiring via a three-core copper cable;
- Only special sockets with protection against water ingress are installed inside the bathroom.
- It is imperative to follow safety precautions;
- The socket must be grounded and have a built-in RCD.
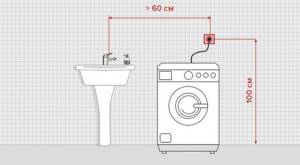
Choose the location of the outlet carefully. The device should be located at a considerable distance from water sources, next to the washing machine and in a place convenient for access.
In the bathroom, electrical sockets for washing machines are placed at a height of at least 60 cm from the floor. Typically, a distance of 100 cm is chosen with the average height of the machines being 85 cm. For ease of use, the socket is placed above the machine. They should also be placed no closer than 60 cm from objects that are sources of water.
Height above sink for wet areas
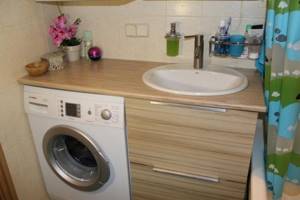
The socket in the bathroom should be located at a distance of at least 60 cm from the sink, the optimal value is 100 cm. The device should also be equipped with a protective cover to prevent splashes of water from getting inside. For additional protection, the product can be installed in niches, behind a partition or in hanging cabinets. For sinks with a countertop, you can make a device with a hidden module that will be hidden in the table.
At what height should a hair dryer socket be placed in the bathroom?
A bathroom is not just about having a shower or washbasin, it is a place where you can dry and style your hair with a hairdryer, use an electric razor, and dry towels. For low-power devices, such as a hair dryer, curling iron, the optimal location would be a height of 100 cm. The calculation should be carried out so that the wires are not stretched when used.
What rules must be followed during installation?
In conclusion, let us once again summarize what has been said and outline the basic rules that must be followed when refusing the services of masters:
- The minimum moisture protection class is IP44. The 4 at the end means there is protection against dripping water.
- The wiring must be hidden - external installation is prohibited by the PUE. Also, do not hide cables in metal channels. If you can only install it in an open way, choose insulated cables and hide them in a corrugated pipe. The optimal cross-section of the wire cores is 2.5 mm.
- In order for the socket in the bathroom to be suitable for both a hair dryer and a washing machine, a three-core cable with grounding is required.

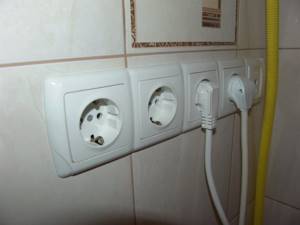
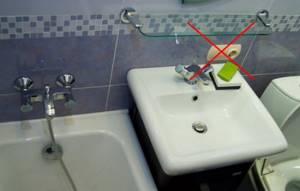
The photo shows the wrong location of the electrical points.
- To protect yourself and your loved ones from electric shocks, connect serious technical devices (boiler, washing machine) through an RCD. For the greatest safety, it is recommended to install isolation transformers in bathrooms - they prevent electric shocks even in contact with a conductor. But in ordinary apartments they are used extremely rarely.
- The layout of electrical outlets should be based on zoning so that during the repair process the sockets do not end up next to a water source. Think over the layout and placement of all elements in advance.
Laying an electric highway is a complex and responsible process on which the lives of you and your loved ones depend. If you doubt your knowledge and abilities, entrust the work to trusted specialists. Professionals will do the wiring according to PUE standards and the sockets can be used without fear.
Photo of installing sockets in the bathroom
Distances when installing sockets
As for the minimum distances that will need to be maintained when installing sockets, they are as follows:
- height of sockets from the floor – 1.3 m
- the safe distance of the socket from the washbasin, bathtub or shower is 0.6 m
If the bathroom is too small and you cannot maintain the minimum distances according to the specified zones, then you will have to move the outlet to another wall, or, unfortunately, abandon it altogether.
This is why experienced electricians tell some owners that installing sockets in their bathroom is prohibited.
How to draw up a layout of sockets
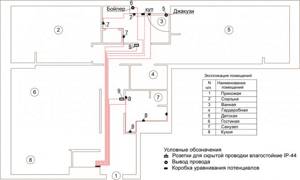
If you are planning to do a major renovation in the bathroom with the installation of an electrical network and installation of power supply points for household appliances, then you should start by drawing up a diagram. When drawing up a diagram for installing sockets, you need to adhere to the rules and restrictions that we described above.
One of the important points in installing sockets for a bathroom is to remove them from direct contact with water. The best option in this case would be to mark the humidity zones on the diagram, and then plan the installation of power points.

Installing sockets
Before installing sockets in the bathroom, you should decide how many there will be. It is necessary to provide each consumer with a power source. It is possible to install double or triple sockets. This is more convenient than installing several single ones. Next you need to move on to installation, which can be done in several ways.
- Overhead installation type. Involves the installation of external-type moisture-proof sockets with a protruding plastic casing. Often used when laying cables in plastic boxes. It is performed using self-tapping screws that fix the device to a partition or concrete (brick) wall.
- Hidden installation type. It is used when laying cables in drywall or fines. If you intend to mount it in drywall, you should make a hole in it the same size as the box for the socket. Then you need to press it to the drywall using special screws, and then connect the wires. Next you need to attach the socket to the box. When installing the device in the wall, you first need to make a ring groove corresponding in size to the socket box. After this, a hole is cut out with a hammer drill or chisel and the box is secured in it. Further installation does not differ from the previous option.
- Mounting inside a protective casing. According to safety requirements, sockets with a moisture protection class of at least IP4 should be installed in the bathroom. But if necessary, this requirement can be circumvented. The location of the device inside the electrical panel housing with water protection class IP4 will help with this. This design should be used in two cases:
- it is not possible to purchase waterproof sockets;
- there is a need to install a built-in lighting switch or a heated floor control unit inside the panel.
- First you need to fasten the shield to the wall using dowels and nails, then insert the end of the cable inside and connect it to the terminal block using the appropriate terminals. Mounting brackets will help secure the socket in the panel body.
Waterproof sockets are devices that are difficult to live without in modern life. They allow you to easily use a washing machine, heat water using a boiler, or dry your hair with a hairdryer. Such sockets are very diverse and require certain placement conditions. If you follow the necessary safety measures, using moisture-proof sockets will be a pleasure.
Selection of cable cross-section for its installation
Regulatory documentation requires that the cable be laid in a closed way in the bathroom. Under the cable, grooves-channels are made in the walls. When the wiring is laid in the channels, plaster and facing material are applied on top.
Running a cable over the wall is an open installation. This option will require less effort and time. In this case, the cable must be protected with corrugation or a cable channel.
Whatever laying method is chosen, passage in the “0” zone is not permissible.
The data sheet for each household appliance indicates its power. Depending on this, the cable cross-section is selected. It is calculated how many equipment are powered at the same time. The cable cross-section is selected based on the expected load on it (table).

For example, to power a washing machine, a copper cable with a cross-section of at least 2.5 mm is selected. If this wire will power a couple more household appliances (boiler, underfloor heating system), then without a cross-section doubled, the wiring will not be able to cope with the load. Otherwise, the cable will heat up and the insulation will melt.